
K42ST04 - Wristwatch Georg Jensen - Free user manual and instructions
Find the device manual for free K42ST04 Georg Jensen in PDF.
| Product type | Quartz watch for men/women |
| Movement | Swiss quartz (battery) |
| Display | Analog: 4 hands (hours, minutes, seconds, GMT), date window at 3 o'clock |
| Functions | Hours, minutes, seconds, GMT (second time zone), date |
| Crown | 3 positions: 1 (neutral), 2 (date/GMT adjustment), 3 (time setting) |
| Water resistance | 10 ATM (100 meters) – estimate based on watch category |
| Crystal | Sapphire (estimate, not explicitly specified) |
| Case | Stainless steel (estimate, not specified) |
| Strap | Leather or metal (depending on version, not specified) |
| Dimensions | Diameter approx. 40-42 mm (estimate, not specified) |
| Weight | Approx. 80-100 g (estimate) |
| Power supply | Button cell battery (type SR621SW or equivalent, not specified) |
| Battery life | Approximately 2 years (maintenance recommendation) |
| Care | Clean with soft cloth, avoid chemicals, annual water resistance check in humid climates |
| Warranty | 2 years international (per conditions) |
| Origin | Made in Switzerland (Swiss Made) |
| Serviceability | Service by Georg Jensen authorized center (battery: 2 years, maintenance: 3 years, overhaul: 6 years) |
| Package contents | Watch, warranty certificate, user manual (not specified but standard) |
| Brand | Georg Jensen |
| Model | K42ST04 |
Frequently Asked Questions - K42ST04 Georg Jensen
User questions about K42ST04 Georg Jensen
0 question about this device. Answer the ones you know or ask your own.
Ask a new question about this device
Download the instructions for your Wristwatch in PDF format for free! Find your manual K42ST04 - Georg Jensen and take your electronic device back in hand. On this page are published all the documents necessary for the use of your device. K42ST04 by Georg Jensen.
USER MANUAL K42ST04 Georg Jensen
The Georg Jensen Story 02
Product quality 03
Cnng for your wotch 03
Socing E Maintence 26
-Georg Jensen International Warranty 95
Environmental protection 06
-2-hand/3-hand,no date Models: C30-ST01, C39-ST01, D428ST01,V55ST01,V5M-RGT01,282SRT01,V55FST01, V5M-RG01,V5M-RG01
-3-hand, date
Models: K32-ST02, K32-RC02, C8857022, K4455025, 33660702, 38880202, 4867024, 6885702
-4-hord, GMT, date
Model: 41304, 528104, 538104
Chnreograph
Models: D42-STD3, D44-STD3, #21-STD3, S42-STD3, S44-STD3 11
General instructions 13
-3-hand, no date, manual winding
Models: K38-ST51, K38-ST52, K38-R052 14
- 3-hand, date, automatic winding
Models: D42-ST70, D46-ST70, H111ST70, 3268ST20, 5948ST20, 6248ST20, 648ST70
-4-hond, GMT, date, automatic winding
M 16
-3-hand, GMT, Power Reserve, automatic winding
1
Annual Calender, automatic winding
model: KAI-3174, KAI-RG74, S428174, S168874 18
-Chronograph, automatic winding
Vodels: D42-171, D48-171, 100877, 584237, 768677
1. Introduction
The Georg Jensen story
Georg Jensen's time defying elegance rests on a unique aesthetic heritage. Georg Jensen himself trained as a sculptor but soon turned his skill to silversmithing, conjuring creations out of the metal that defied the thinking and constraints of the time. His approach was innovative, his ideas revolutionary. Yet his skill was firmly grounded in Danish design tradition - clean, minimalist - and the highest levels of meticulous, hand crafted quality.
110 years later and the singular creative vision of one man is now a globally renowned design phenomenon. Organic and sculptural, intellectual yet straightforward, always original, a Georg Jensen piece is distinctive for its complex simplicity, for its ability to transcend form and function, and its capacity to change our perceptions. Since 1969, Georg Jensen has collaborated with some of the 20th century's most influential designers to create some of the world's most compelling watches.
Defined by their design, pared down, stripped of all but the bare essentials, each collection reflects the personal ideals of the designer. Yet each tells the Georg Jensen story with clarity and purpose - a story of hand crafted quality, timeliness, elegance. It is this purity of focus that delivers timepieces of exceptional originality and watches that are unexpectedly, undistated, bold, iconic.
We are proud to introduce our watch collections that combine the Georg Jensen spirit with cutting edge horology. These are watches that not only tell the time, but define the times.
Introduction
Product quality - Swiss Made
All Georg Jensen watches carry the famous 'Swiss Made' marking that embodies a concept of quality. This originates from Swiss watchmaking craftsmanship that has been forged over many years and enjoys a solid reputation throughout the world.
Swiss Made is a reliable indication of the technical quality of watches (accuracy, reliability, water-resistance, and shock-resistance), as well as their aesthetic quality (elegance and originality of design).
All Georg Jensen watches are supplied with genuine Swiss movements that ensure high levels of accuracy and superior reliability.
Caring for your watch
Advice on steps you can take to ensure your watch remains in peak condition
Water:
3 and 5 ATM rated watches: although water resistant, they should not be
submerged unnecessarily. If your watch does get wet, pot dry with a soft cloth.
10 9 20 ATM rated watches: these can be submerged provided the crowns are
Before submerging your watch always ensure the crown is firmly pushed or screwed
into place.
After being submerged in salt or chlorinated water, your watch should be rinsed
with warm fresh water and then patted dry. Crowns and chronograph pushers should never be operated underwater.
Magnetism:
- Avoid close contact with objects that emit strong magnetic fields, such as x-ray machines, smartphones, refrigerators, hi-fi speaker etc...
Temperatures:
Avoid exposing your watch to extremes of temperature (grea ter than 6 0 C/14 0 F and less the n0 C/3 2 F). Also try
Shocks
- Avoid extreme impacts or shocks to the watch as these may damage the movement, crystal or cose.
- Your watch should not be dropped and you should consider removing it before playing cartoon sports like golf and tennis.
Cleaning:
- Keep your watch clean and free from dust, grime etc.
- Watch cases can be cleaned with a soft cloth dipped in soopy water, while braceletls can be cleaned with a soft brush. Your watch should be patted dry with a soft cloth and finally polished with a lint-free polishing cloth to work up a shine.
- Leather straps can be wiped clean with a damp cloth, or brushed with a soft brush.
Chemicals
- Avoid contact with chemical substances such as perfumes, solvents, detergents, chlorinated pool water and cosmetics as they can damage gaskets and erode the metals.
Leather Straps
- Avoiding contact with greasy substances such as cosmetics, solvents and detergents as they may be absorbed by the leather.
- Avoid contact with water or high humidity environments as this may discolour and prematurely age the strap.
- Avoid high heat sources, as well prolonged exposure to sunlight.
Servicing & Maintenance:
Your watch is a complex, delicate instrument that requires special and regular servicing if it is to continue working properly. Servicing should be performed by an approved Goorg Jansen Service Centre.
Service intervals depend on how the watch has been used and on the climate in which it exists.
Recommended service intervals are as follows:
Battery service 2 years
Moipntenane Serviceen3 years
Complete service 6 year
If the watch is used in hot, humid environments an annual water resistance check is recommended.
Georg Jensen International Warranty
A Georg Jensen watch purchased from an authorised dealer or reseller is covered by a two year international warranty starting from the date of purchase. The warranty is the assurance that the watch has been supplied in perfect condition and will remain free of material and manufacturing defects (“defects”) during this two year period. The warranty comes into force when the warranty card accompanying the watch is correctly completed, including purchase date, case number, serial number and authorized dealer's name and contact details (“valid warrant card”). All details must be clearly legible and the corresponding serial number must be clearly visible on the watch.
During the warranty period and provided the watch is accompanied a valid warranty card and original purchase receipt form the authorised Georg Jensen dealer or reseller, Georg Jensen will replace or repair any defective component resulting from a material or manufacturing defect as noted by our technical team. In the event that repairs are unable to restore the normal conditions of use of your Georg Jensen watch, Georg Jensen guarantees its replacement by a Georg Jensen watch of identical or similar characteristics.
Should a watch require repair, please bring the watch (together with valid warranty card and purchase receipt) to an authorised Georg Jensen dealer (see www.georgjensen.com for the nearest store).
It is to be noted that the International warranty does not cover:
- Straps, bracelets, sapphire crystal glass or batteries
Surface treatments or coatings (such as PVD or gold plating)
- External parts (such as screws or diamonds)
- Normal wear and tear and aging (such as scratches on glass, or color fading and material alterations)
- Damage resulting from a lack of care, negligence, or misuse of the watch by the user
- Moisture damage resulting from improper use of the crown and/or pushers in or under water
- Defacts resulting from any modifications or alterations performed by persons unauthorized by Georg Jensen
§ 6
Any further claim against Georg Jensen for damages, beyond those specified in this warranty, is totally excluded, except mandatory statutory rights the purchaser may have against the manufacturer.
Goorg Jensen's obligation is strictly limited to repair or replacement as expressly stated in this limited warranty. The above manufacturer's warranty is independent of any warranty that may be provided by an independent retailer, for which the retailer carries the sole responsibility.
Georg Jensen customer service ensures your watch will be maintained to the highest standard. If your watch needs maintenance, please rely on of official Georg Jensen outlets or official Georg Jensen authorised dealers: they can guarantee service to the Georg Jensen standards.
Georg Jensen A/S
Spendre Fasconvej 7
2000 Frederiksberg
2014QAll rights reserved.
Environmental protection
Collection and treatment of expired quartz watch batteries* Batteries should not be disposed of with ordinary household waste, represented by this symbol which indicates they should be returned to a local authorised collection system. By following this procedure, you will help conserve natural resources and contribute to the protection of the environment.

*Valid in EU member states and any country with corresponding legislation.
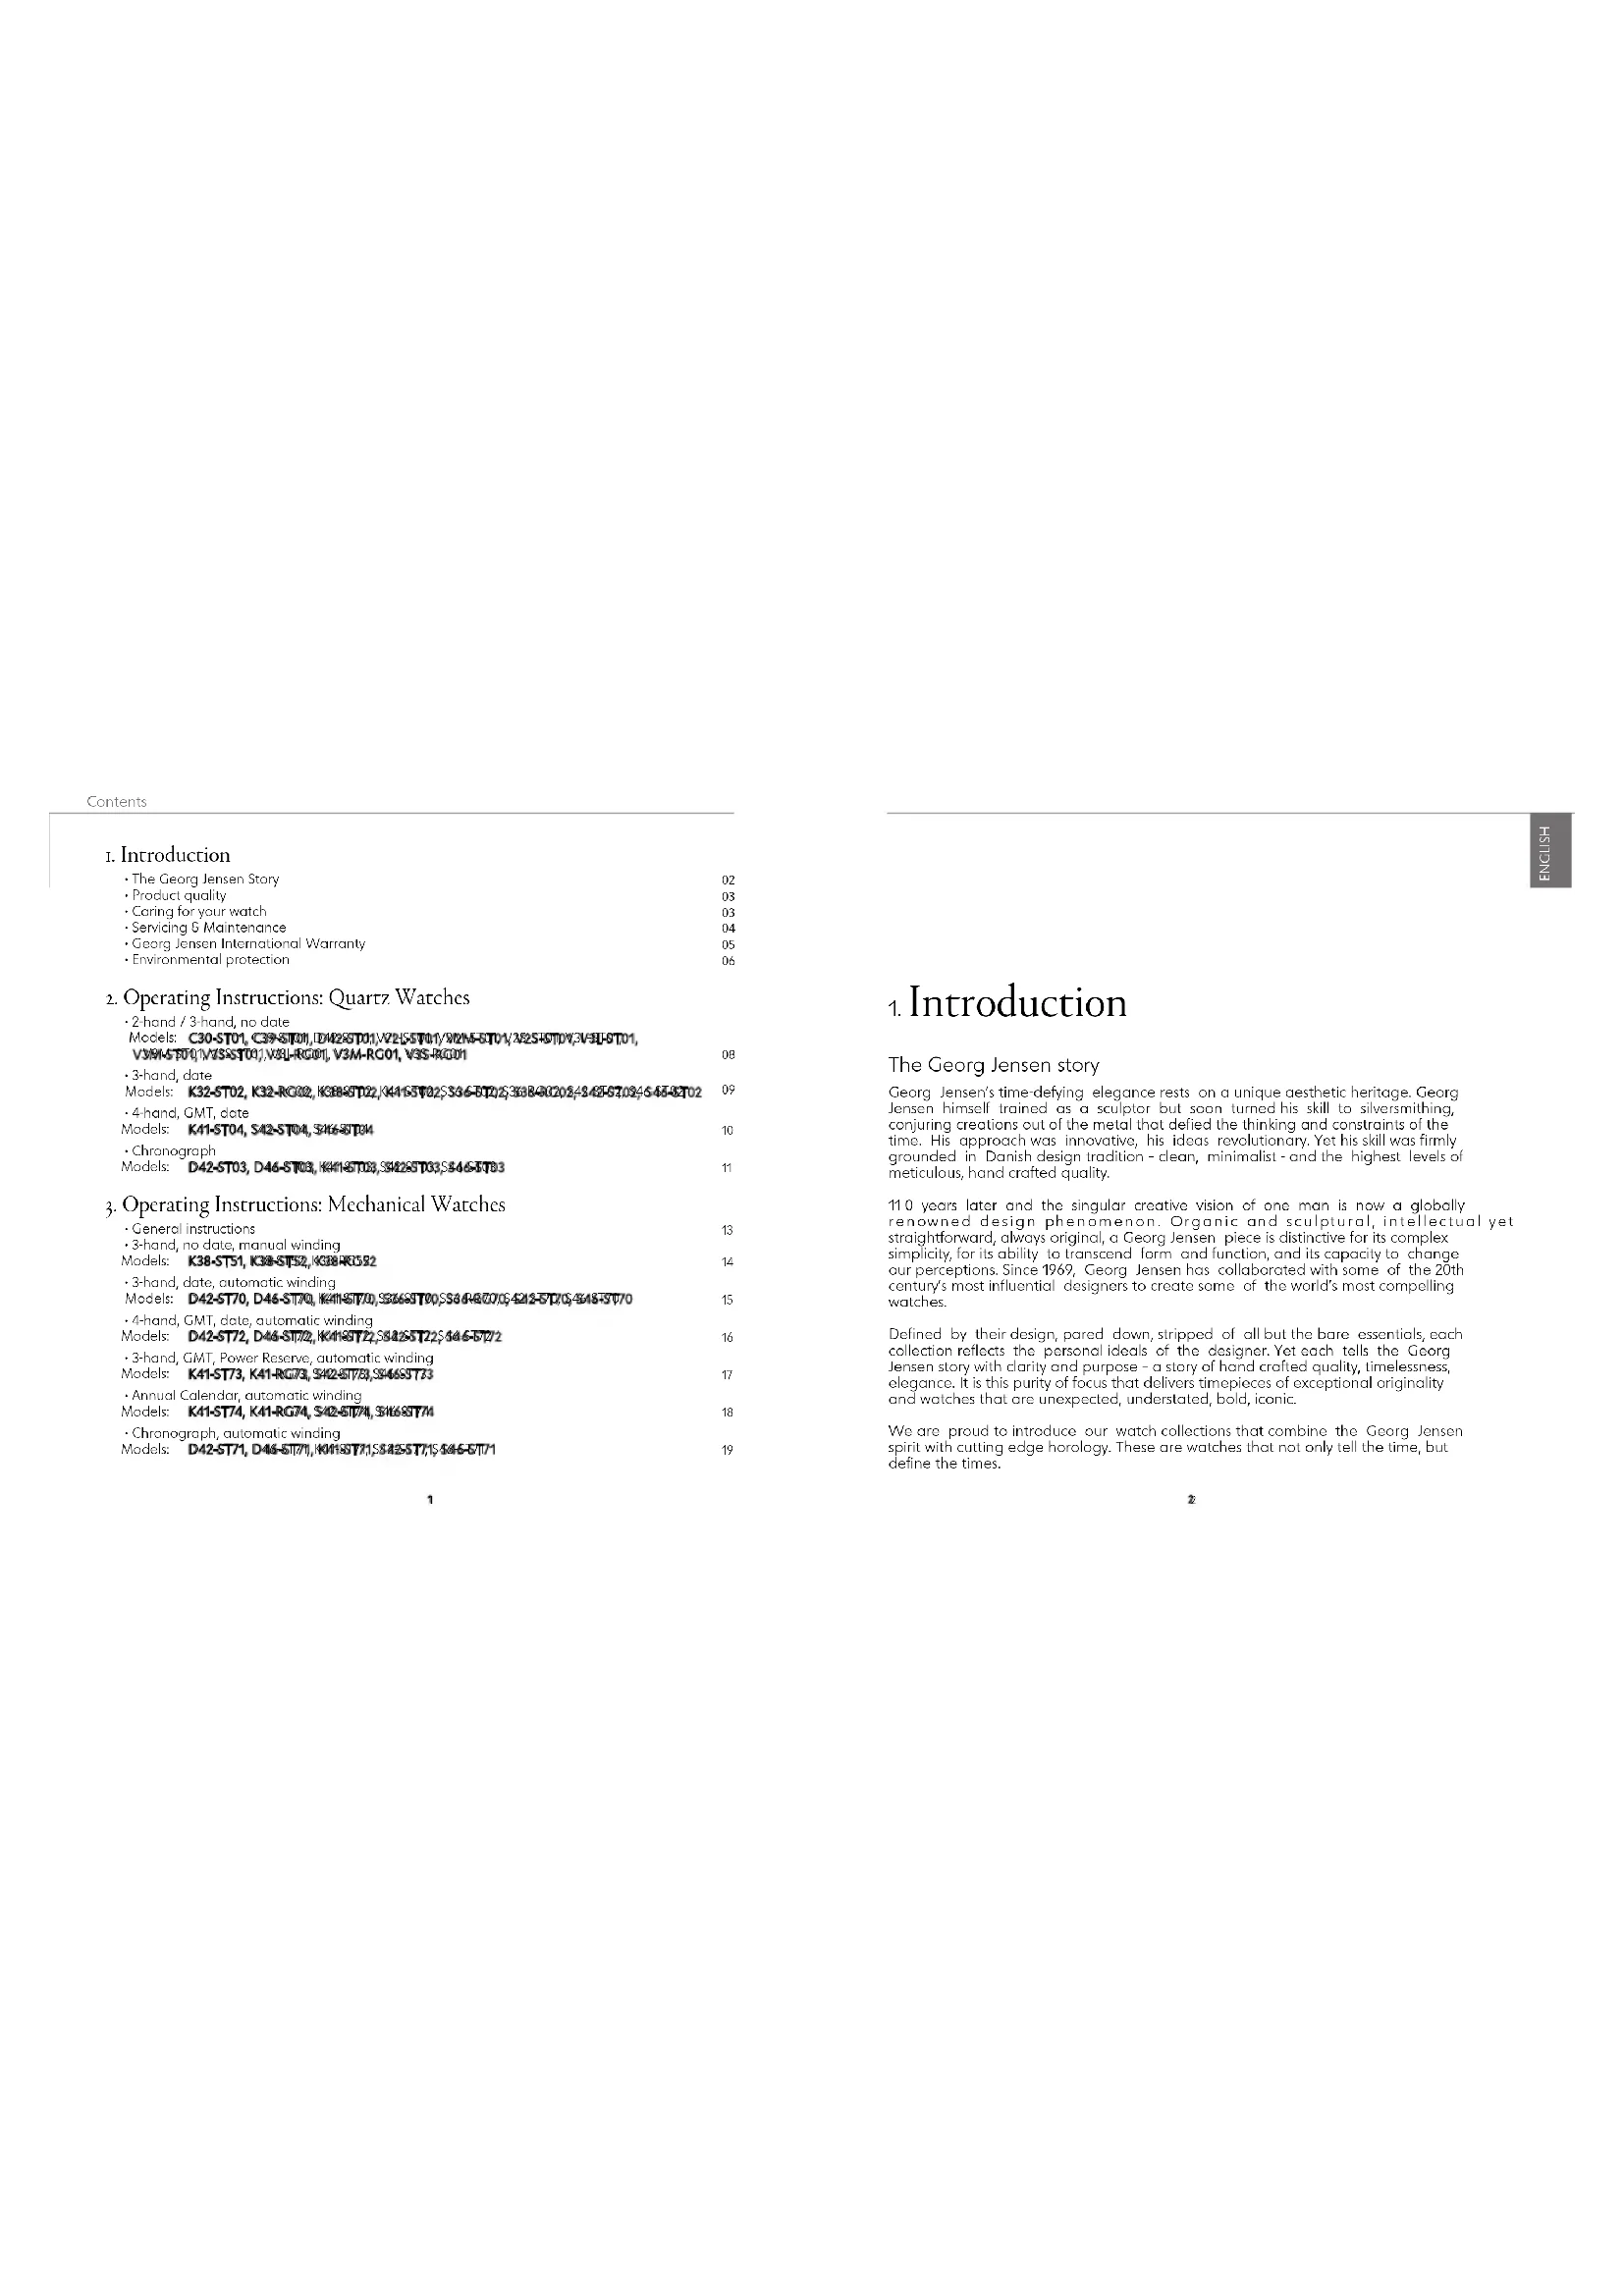
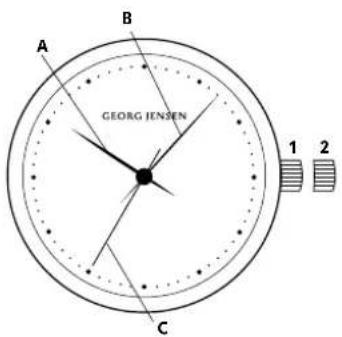
2-hand/3-hand, no date
Models:C30-ST01,C995ST01,P2425ST01,N2285ST01,V7A85ST01,V255ST01,V8B5ST01,V7A85ST01, V35-ST01,V8L-A6001,V7A85001,V8B5001

2. Operating Instructions Quartz Watches
A quartz watch contains a battery powered electronic movement that drives the watch hands. Quartz movements are highly accurate and efficient, requiring minimal maintenance aside from occasional battery replacements.
Setting the time:
- Pull the crown to position 2.
- Turn the crown either clockwise or anti-clockwise until the watch hounds (A and B) are positioned at the desired time.
- When the desired time is reached push the crown back to position 1.
Operating Instructions: Quartz Watches
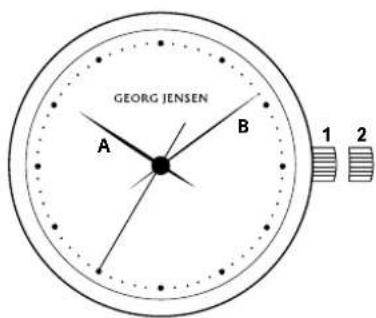
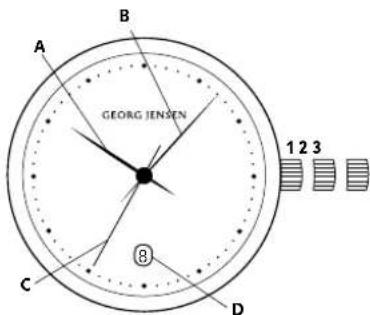
3-hand, slate
Models: K32-ST02, K32-R0002/888-5902, K444-3002, 3638701023-58G061S4728, T02, S4638-T02
Setting the time:
-
Pull the crown out to position 3, its maximum extension. The second hand (C) will stop moving.
-
Turn the crown either clockwise or anti-clockwise until the watch honos (A and B) are positioned on the desired time.
-
When the desired time is reached push the crown back to position 1 and screw down if applicable. NOTE: When the hour hond passes 12 a' clock and the date changes, the watch is set at midnight. If the date does not change, it is set at noon.
Setting the date:
-
Pull the crown out to position 2.
-
Turn the crown clockwise or anti-clockwise until the desired date is shown in the date window (D). 3. When the desired date is reached push the crown back to position 1 and screw down if applicable. NOTE: Do not change the date between 10pm and 2pm as this may damage the movement.
10
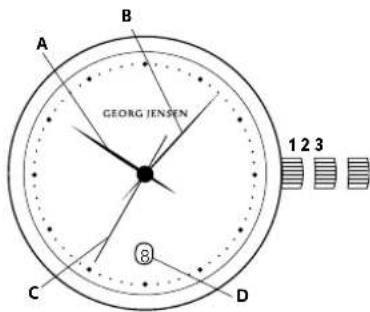
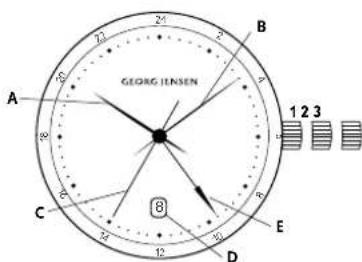
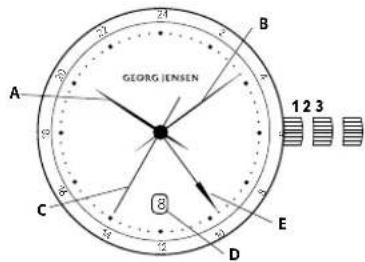
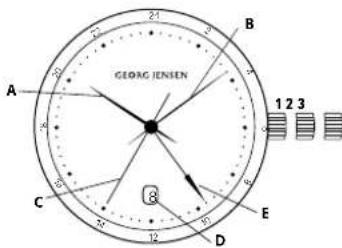
4-hand.GMT.dgtte
Models:K41-STM,542-STM,546-STM
Setting the time:
-
Pull the crown out to position 3, its maximum extension. The second hand (C) will stop moving.
-
Tum the crown eher clockwise or anti-clockwise until the watch hons (A and B) are positioned at the desired time.
-
When the desired time is reached push the crown back to position 1 and screw down if applicable. NOTE: When the hour hand passes 12 o'clock, the watch is set at midnight if the date changes. If the date does not change, it is set at noon.
Setting the date:
-
Pull the crown out to position 2.
-
Turn the crown clockwise until the desired date appears in the date window (D).
-
When the desired date is reached, push the crown back to position 1 and screw down if applicable. NOTE: Do not change the date between 10pm and 2am as this may damage the movement.
Setting the GMT / 2nd time zone hand(E):
1.Pull the cwn out to position 2.
-
Turn the crown anti-clockwise to set the GMT/second time zone band (E) to the desired time.
-
When the desired time is reached push the crown back to position 1 and screw down if applicable. NOTE: The GMHT hand (E) operates on a 24-hour scale. In other words, half the speed of the hour hand Please note that only even hours are marked.
10
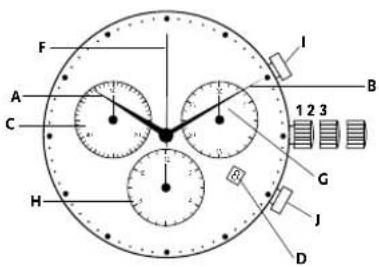
Chronograph
Models:D42-503,D46-5103,K44-5103,S42-503,S46-5103
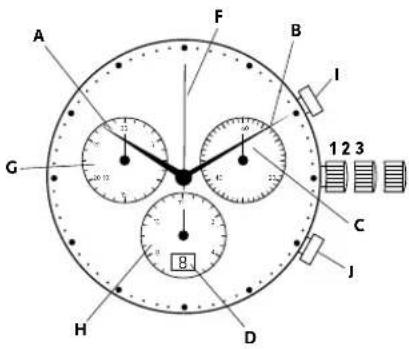
Display & control buttons
A:Hourhand
B:Minute Hand
C:SecondHond
D:Date window
F Centre stop second
G:30-minute counter
H:12 hour counter
1: Start / stop pusher
1:Re set pusher
Setting the time:
- Pull the crown out to position 3, its maximum extension. The second hand (C) will stop moving.
-
Turn the crown either clockwise or anti-clockwise until the watch hands (A and B) are positioned at the desired time.
-
When the desired time is reached push the crown back to position 1 and screw down if applicable. NOTE: When the hour hond passes 12 a'clock, the watch is set at midnight if the date changes. If the date does not change, it is set at noon.
Setting the date:
-
Pull the crown out to position 2.
-
Turn the crown clockwise until the desired date appears in the data window (D). 3. When the desired date is reached push the crown back to position 1 and screw down if applicable. NOTE: Do not change the date between 10pm and 2pm as this may damage the movement.
Chronograph: Basic Functions (Start, Stop & Reset)
- To start timing, press the star
- To stop timing, press the start / stop pusher (I) again
- Eloped time can be read as follows: hours: 12 hour counter (H) minutes: 30-minute counter (G)
seconds:second stop hand (F)
4.To reset,press the reset pusher (I)
Chronograph: Basic Functions (Start, Stop & Reset)
- To start timing, press the start stop pusher (I)
- To stop timing, press the start/stop pusher (
3.To resume timing, press the start/stop pusher (
4To stop timing,press the start/stop pusher (I) gocin - Elapsed time can be recd as follows:
hours; 12 hour counter (H) minutes; 30-minute counier (G) seconds; second sign bond (F) - To reset press the reset pusher (1)
NOTE: accumulated timing sessions can be continued by repeating steps 2 and 3 above.
Chronograph:Interval Timing
- To start timing, press the start stop pusher (I)
- To show timing interval, press the reset pusher (I) interval timing will be displayed. Timing continues in the background.
- To show measured time, press the reset pusher (j) again, the chronograph hands will advance quickly to the measured time.
4To stop timing, press the start / stop pusher (I) - Final time can be read as follows:
hours; 12 hours counter (h) minutes; 30-minute counter (C) seconds; second step band (F)
6.To rees, prss the rees pushar (1)
NOTE: further intervals can be displayed by repeating steps 2 and 3 above.
Chronograph: Adjusting the chronograph hands
Occasionally you may find that the chronograph counters do not return to zero. Follow these steps to
correct them.
1 Pull out the crown to position 3
2. Simultaneously input the start/stop (i) and reset numbers (j) and hold for two seconds. The centre stop
Second (5) will make a fast revolution to indicate that adjustment mode has been activated.
3. Press the statistics button (1) to adjust the status step second hand (2) to the driver position
4 Press the reset pusher (R) force to activate the 12 hour counter (H).
5. Press the start/stop button (H) to advance 12 hour counter (H) to the desired position.
6. Press the reset push (I) once to activate the 30-minute counter (C).
7. Press the stop/stop pusher (f) to advance 30-minute counter (G) to the desired position.
8.Once complete return grown to position 1
3. Operating Instructions: Mechanical Watches
Mechanical watches are driven by the power stored in a spring. In order to keep time, they need to be regularly wound, either by hand (as with manual wound models) or automatically through the inclusion of a special mechanism that uses the movements of the wearer to wind the spring (as in automatic models). All mechanical movements are composed of many minute springs, plates, screws and gears - somewhere between 50 and 300 - working in perfect synchronicity to power the watch. The sheer number and intricacy of the components makes mechanical watches highly sensitive, more so than quartz movements. However, if properly maintained, their longevity is given.
Besides their longevity, mechanical movements are highly coveted because of their engineering-the wearer will usually have an appreciation of the high level of skill, precision and craftsmanship involved in creating each individual timepiece.
General Instructions for Mechanical Watches
- When manually winding a watch always turn the crown in a clockwise direction
-
Do not force the crown when you feel the spring become tense toward the end of the winding process.
-
When fully wound most mechanical watches with have a power reserve of around 40 hours. Daily winding is recommended.
If your watch is equipped with an automatic winding mechanism, ensure that the strap or bracelet of the watch is correctly fitted to your wrist. If the watch is too loose the automatic winding function may be compromised.
Automatic watches can also be manually wound by turning the crown clockwise in position! It is recommended that if your watch has completely run out of power you manually wind it (with about 30 turns) before wearing.
Try to avoid exposing your watch to strong magnetic sources (for example smartphones, loudspeakers, airport metal detectors, etc.) as these may have an adverse effect on the movement. In extreme cases, this can cause your watch to stop. If this is the case, or you notice the watch losing time, take your watch to a Georg Jensen outlet or authorised Georg Jensen dealer.
3-hand/3-hand, small second, manual wound Models:K38-ST51,K09-5752/K08R-6532
Winding the watch:
- With the crown in position 4, turn clockwise until you feel resistance. The watch is wound. 2. When fully wound the watch will have a power reserve of around 40 hours. Daily winding is recommended.
IMPORTANT: When manually winding a watch, always turn the crown in a clockwise direction. Do not force the crown when you feel the spring/reconnection toward the end of the winding process.
Setting the time:
- Pull the crown out to position 2. its maximum extension. The second hand (C) will stop moving. 2. Turn the crown either clockwise or anti-clockwise until the watch hands (A and B) are positioned at the desired time. 3. When the desired time is reached push the crown back to position 1.
Operating Instructions: Mechanical Watches
3-hand, date, date, automatic winding
Models:D42-ST70,D46ST70,X445700,38857070,636R07015827ST20548ST70
Setting the time:
-
Pull the crown out to position 3, its maximum extension. The second hand (C) will stop moving.
-
Turn the crown either clockwise or anti-clockwise until the watch hounds (A and B) are positioned at the desired time.
-
When the desired time is reached push the crown back to position 1 and screw down if applicable. NOTE: When the hour hond passes 12 a' clock and the date changes, the watch is set at midnight. If the date does not change, it is set at noon.
Setting the date:
-
Pull the crown out to position 2.
-
Turn the crown clockwise or anti-clockwise until the desired date is shown in the date window (D).
-
When the desired dot is reached push the crown back to position 1 and screw down if applicable. NOTE: Do not change the dot between 40pm and 20pm as this may damage the movement.
4-hand, GMT, date, automatic winding
Models: D42-ST72, D46-ST72, D44-ST72, S42-ST72, S46-ST72
Setting the time:
-
Pull the crown out to position 3, its maximum extension. The second hand (C) will stop moving. 2. Turn the crown either clockwise or anti-clockwise until the watch hands (A and B) are positioned at the desired time.
-
When the desired time is reached push the crown book to position 1 and screw down if applicable. NOTE: When the hour hand passes 12 a' clock, the watch is set at midnight if the date changes. If the date does not change, it is set at noon.
Setting the date:
- Pull the crown out to position 2. Turn the crown clockwise or anti clockwise until the desired date is shown in the dore window (D). 3.When the desired date is reached push the crown back to position 1 and screw down if applicable NOTE: Do not change the date between 10pm and 2pm as this may damage the movement.
Setting the GMT/2nd time zone hand(E):
1Pull the grown pui position 2
2. Turn the crown clockwise or anti-clockwise to set the GMT / second time zone hard (H) to the desired time. The hondo will advance in hour increments.
3. When the desired time is reached push the crown back to position 1 and screw down if applicable. NOTE: The GMAT hand (E) operates on a 24-hour scale. In other words, half the speed of the hour hand Please note that only even hours are marked.
Operating Instructions: Mechanical Watches
3-hand, GMT, Power Reserve, automatic winding Models: K41-ST79, K41R4073S42575, S485773
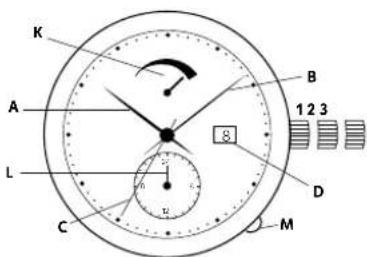
Display 8 control buttons
A:Hour hand
B:MinuH Hand
C:Second Hand
D:Date window
K:Power reserve indicator
L:GMT/second time zoneindicator
M:GMTpusher button
Setting the time:
- Pull the crown cut to position 3, its maximum extension. The second hand (C) will stop moving.
-
Turn the crown either clockwise or anticlockwise until the watch hands (A and B) are positioned at the desired time.
-
When the desired time is reached push the crown back to position 1 and screw down if applicable. NOTE: When the hour hond passes 12 a' clock, the watch is set at midnight if the date changes. If the date does not change, it is set at noon.
Setting the date:
1.Pull the crown out to position 2.
-
Turn the crown anti-clockwise until the desired date appears in the date window (D).
-
When the desired date is reached push the crown back to position 1 and screw down if applicable. NOTE: Do not change the date between 4pm and 2pm as this may damage the movement.
Setting the GMT/2nd time zone band:
IMPORTANT: Do not operate the GMT/2nd time zone pusher (M) immediately after setting the time in an anti-clockwise direction. This may damage the movement. It is important to let the watch run for approximately 30 minutes before setting the GMT / second time zone hand.
It is recommended that you always set the time in a clockwise direction - the GMT / second time zone can then be set immediately after setting the time.
- Express the GMT pusher button (M) several times to move the GMT / second time zone indicator (L) forward to the desired time.
NOTE: The GM1 hand (L) operates on a 24-hour scale. Please note that only even hours are marked.
1715
Annual calendar, automatic winding Models: K41-ST74, K41-R0774, S425T3745 446-5774
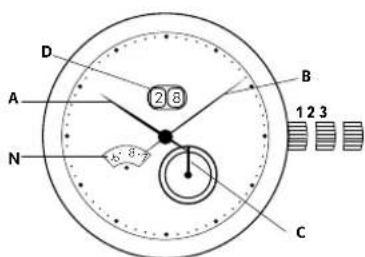
Display
A:Hour hand
B:Minute Hard
C:Second Hand
D:Date window
N:Month window
IMPORTANT: To adjust your watch successfully, please follow the steps below in consecutive order: Setting the time:
- Pull the crown out, to position 3, its maximum extension. The second hand (C) will stop moving.
- Turn the crown clockwise until the watch hands (A and B) are positioned at the desired time.
- When the desired time is reached push the crown back to position 1 and screw down if applicable. NOTE: When the hour hand passes 42 a' block, the watch is set at midnight if the date changes. If the date does not change, it is set at noon.
Setting the date:
IMPORTANT NOTE: It is essential that the date is not adjusted between the hours of 8pm and 2am. Setting the date within these hours may permanently damage the movement.
1.Pull the crown out to position 2.
2. Turn the crown anti-clockwise to advance the date (D) and month (N) in sequence until the desired date is displayed.
3. When the desired date is reached push the crown back to position 1 and screw down it applicable. The Annual calendar automatically adjusts the date for each month, accounting for the cycle of 30 and 31 day months. Once set, the watch will require no date adjustment until the end of February, provided it is kept wound.
18
Operating Instructions: Mechanical Watches
Chronograph, automatic winding
Models: D42-ST71, D465T71, K445T71, S425T71, S465T71
Display 6 control buttons
A:Hour band
3. M
C:Second Hand
D:Date window
F:Centre stop second
G:30-minute counter
H:12 hour counter
: sion / stop pusher
Jre-setpusher
Setting the time:
- Pull the crown out to position 3, its maximum extension. The second hand (C) will stop moving.
- Turn the crown either clockwise or anti-clockwise until the watch hounds (A and B) are positioned at the desired time.
- When the desired time is reached push the crown back to position 1 and screw down if applicable. NOTE: When the hour hand passes 12 o'clock, the watch is set at midnight if the date changes. If the date does not change, it is set at noon.
1920
Setting the date:
- Pull the crown out to position.
- Turn the crown clockwise until the desired date appears in the date window (D).
- When the desired data is reached push the crown back to position 1 and screw down if applicable.
NOTE: Do not change the date between 10pm and 2am as this may damage the movement.
Chronograph: Basic Functions (Start, Stop & Reset):
- To start timing, press the start stop push
2.18 stop timing,press the start/stop pusher (j) again - Elapsed time can be read as follows: hours: 12 hour counter (H)/minutes: 30-minute counter
C)Secrond second stn6 hand (-)
Chronograph:Accumulated Timing
- To start uming, press the start stop pusher (I).
- To stop timing, press the start / stop pusher (I) again
- To resume timing, press the start/stop pusher (I) again
- To stop timing, press the start / stop pusher (I) again
- Elapsed time can be read as follows: hours: 12 hour counter (H)/minutes: 30-minute counter
G/soconies:second sloop hand [1]
NOTE: accumulated timing sessions can be continued by repeating steps 2 and 3 above.
20
In dh old
1. Introduction
The Georg Jensen Story 22
Produktkvalitet 23
Pieje ot dit ur 23
Socicn ondldhaldte 54
Service of Vending holoide 24
Coagulon International Corpanti 65
- Berg Jensen International Groupe 25
Miliabastemt besitzvulse 26
2. Brugervejledning: Quartzure
2.Visere / 3visere, ingen dofo
Modeller C30-STD1,C39-STD1,D42-STD1,V52-STD1/V78-STD1/V88-STD1/V95-STD1, V88-STD1/V95-STD1, V53-STD1, V53-STD1
3+visere, dato.
Modell: K32-ST02,K32-R082,K32RST02,K445ST02,S36ST02,S38R0205,4545ST02,S45ST02 29
4visere,GMT.dato
Modeler K41-ST04, S42-ST04, S468T84 30
Kranograf
Medellner D42-ST03, D45-ST03, H016ST03, S942ST03, S846-ST03 31
Indstilling of date:
-
Tregk kropen ud til position 2
-
Prei kronen indtil den gnskede dato vises i dotoruden (D).
-
När den zinskäde datavise, skå kromer trykkes ilboga iil positin 1 og skués iil enam nadvendigt Bemerkf Fretogäke itag hurd korektion af datoen nr dret viser tidstrummet mellem kl 22:00 og kl 02:00, do det kon skade unverket.
4visore.GMT.dcto
Modeler: K415STD4, S428STD4, S468STD4
Indstilling of tid:
Indstilling of date:
Indstilling of date:
K: Power reserve indicator
L:GMT-/cnden tidszoneindikator
M:GMT-knqp
Indstilling of tid:
All rights reserved.
Mijoskydd
Modeler:K41-STD,542-STD,S48SSTD
Stollg in tiden :
- Dru konran till position 3, sin maxima undraginspunt. Sekundans (C) kummer do att stnna.
- Vid konran antingem medsois eier motos issi tinn oia (A och B) or placereo pa onsked ta.
- Nn du hervik sncak od ineyk il bokk konran til position 1 and skru garno at om det ar migtj.
OBESEVA: Nor vinravens passer 12 och dotumer findas, so stills klockan in pia midart. Om dotumer inte andras sa stals klockan in p42 daigen.
StalIg In datum :
1.Drc at kronan till position 2.
OBSERVATION: Now, this cannot be done in any way.
Stalla in datum:
minute 30-minute systolic (G)
sekundere:segundostponyscienr (E)
- For att nollstg,tryk p6 atensta ninesssnppen (1)
Kronograf: Lopande tigtagnig
-
For ctt borga t tie, rtyp a ststloppkrappn (
-
Fecu staeag tldopopinaen, rck psg sgrt / soppogpaaen () jgen
-
For gtt bae to tid, fyck od start stopknapaen (1)
-
For att stoppa fiddtagningen,tryck p8 start-7 stopknappen (1)igen
I: Start/Stopp-Drucker
J:Reset Drucker
Uhrzeit einstellen:
JUNENONNANONNNANNNNNNNNNNNNNNNNNNNNNNNNNNNNNNNNNNNNNNNNNNNNNNNNNNNNNNNNNNNNNNNNNNNNNNNNNNNNNNNNNNNNNNNNNNNNNNNNNNNNNNNNNNNNNNNNNNNNNNNNNNNNNNNNNNNNNNNNNNNNNNNNNNNNNNNNNNNNNNNNNNNNNNNNNNNNNNNNNNNNNNNNNNNNNNNNNNNNNNNNNNANNNE
製品の品質・スイス製
修理:必要者场合合,有、勿保证书及收取书,添源文、JJJJJJJJJJJJJJJJJJJJJJJJJJJJJJJJJJJJJJJJJJJJJJJJJ
4.105237968700000000000000000000000000000000000000000
27:算时


- Introduction
- The Georg Jensen story
- Product quality - Swiss Made
- Caring for your watch
- Water:
- Magnetism:
- Temperatures:
- Shocks
- Cleaning:
- Chemicals
- Leather Straps
- Servicing & Maintenance:
- Georg Jensen International Warranty
- Environmental protection
- Operating Instructions Quartz Watches
- Setting the time:
- Setting the date:
- Chronograph: Basic Functions (Start, Stop & Reset)
- Chronograph:Interval Timing
- Chronograph: Adjusting the chronograph hands
- Operating Instructions: Mechanical Watches
- General Instructions for Mechanical Watches
- Winding the watch:
- Setting the GMT/2nd time zone hand(E):
- Display 8 control buttons
- Display
- Display 6 control buttons
- Chronograph: Basic Functions (Start, Stop & Reset):
- Chronograph:Accumulated Timing
- Brugervejledning: Quartzure
- Indstilling of date:
- Indstilling of tid:
- Mijoskydd
- Stollg in tiden :
- StalIg In datum :
- Stalla in datum:
- Kronograf: Lopande tigtagnig
- Uhrzeit einstellen:
- 製品の品質・スイス製
Brand : Georg Jensen
Model : K42ST04
Category : Wristwatch