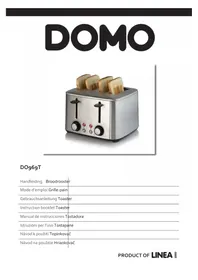
DO961T - Toaster DOMO - Free user manual and instructions
Find the device manual for free DO961T DOMO in PDF.
| Product type | Toaster |
| Brand | DOMO |
| Model | DO961T |
| Number of slots | 2 |
| Functions | Toasting, defrosting, reheating, manual stop |
| Control buttons | Start lever, toasting button (adjustment), stop button (STOP), defrost button (DEFROST), reheat button (REHEAT) |
| Crumb tray | Removable, cleanable with a damp cloth |
| Power supply | 220-240 V ~ 50 Hz (typical) |
| Power consumption | 800-1000 W (estimated) |
| Cord length | Short (about 70 cm, estimated) |
| Exterior material | Heat-resistant plastic |
| Safety | Automatic shut-off at end of cycle, automatic ejection, overheat protection, do not use with external timer |
| Use | Household, indoor only |
| Minimum age of use | 8 years under supervision |
| Maintenance | Clean the exterior with a soft, slightly damp cloth, empty the crumb tray regularly |
| Spare parts | Domo accessories and parts available online |
| Warranty | 2 years from date of purchase |
| Recycling | Compliant with WEEE directive, do not dispose with household waste |
Frequently Asked Questions - DO961T DOMO
User questions about DO961T DOMO
0 question about this device. Answer the ones you know or ask your own.
Ask a new question about this device
Download the instructions for your Toaster in PDF format for free! Find your manual DO961T - DOMO and take your electronic device back in hand. On this page are published all the documents necessary for the use of your device. DO961T by DOMO.
USER MANUAL DO961T DOMO
CONDITIONS DE GARANTIE
This appliance has a two year warranty period. During this period the manufacturer is responsible for any failures that are the direct result of construction failure. When these failures occur the appliance will be repaired or replaced if necessary. The warranty will not be valid when the damage to the appliance is caused by wrong use, not following the instructions or repairs executed by a third party. The guarantee is issued with the original till receipt. All parts, which are subject to wear, are excluded from the warranty.
If your device breaks down within the 2-year warranty period, you can return the device together with your receipt to the shop where you purchased it.
CONDICIONES DE GARANTÍA
RECYCLAGE-INFORMATIE
RECYCLING INFORMATIONEN
RECYCLING INFORMATION
This symbol on the product or on its packaging indicates that this product may not
be treated as household waste. Instead it must be brought to the applicable collection point for recycling of electrical and electronic equipment. By ensuring this product is disposed of correctly, you will help prevent potential negative consequences for the environment and human health, which could otherwise be caused by inappropriate waste handling of this product. For more detailed information about recycling of this product, please contact your local city office, your household waste disposal service or the shop where you purchased the product.
The packaging is recyclable. Please treat package ecologically.

If the supply cord is damaged, it must be replaced by the manufacturer, its service agent or a similarly qualified person in order to avoid a hazard.
This appliance may be used by children from the age of 8 and up, and also by persons with a physical or sensorly limitation, as well as mentally limited persons or persons with a lack of experience and knowledge. But only on the condition that these persons have received the necessary instructions on how to use this appliance in a safe way and know the dangers that can occur by using this appliance.
Children cannot be allowed to play with the appliance. Maintenance and cleaning of the appliance may not be done by children, unless they are older than 8 years old and are under supervision. Keep the appliance out of reach of children younger than 8 years old.
This appliance is suitable to be used in a household environment and in similar surroundings such as:
- Kitchen for personnel of shops, offices or other similar professional surroundings
Farms - Hotel or motel rooms and other surroundings with a residential character
Guest rooms or similar
Attention: This appliance cannot be used with an external timer or a separate remote control.
The appliance can become hot during use. Keep the power cord away from hot parts and don't cover the appliance.
- Read the complete instruction booklet.
- Do not touch hot surfaces. Use the knobs and handles.
- Do not immerse the appliance, the power cord or the plug in water or any other liquid.
- When children are around, make sure that the toaster is used under close supervision.
- Remove the plug from the socket when you don't use the appliance and when cleaning the appliance.
- Do not use the appliance when the power cord or the plug is damaged or when the appliance has fallen or is damaged in anyway.
- Only use the appliance indoor.
- Do not place the appliance near a burning gas or electrical stove or in a hot oven.
- The breadlift must be elevated before you plug in the appliance or remove the plug from the socket.
- Make sure that the air around the toaster can circulate freely. Do not place anything on top of the toaster. Do not place the toaster near flammable objects such as curtains, table cloth,...
-
Do not try to remove any bread when the plug is still in the socket.
-
This appliance is for household use only. It can only be used for toasting bread.
- The cord is short to prevent accidents (like tripping over the cord). Be careful when using an extension cord.
- Don't ever use a fork or any other sharp, metal object to clean the toaster or to remove bread from the toaster, as long as the plug is still in the socket.
- First check if the voltage stated on the rating label on the appliance corresponds with the voltage of the power supply at your house, before using the appliance.
- If the appliance were to drop into water or another liquid, do not touch the appliance, but immediately unplug the appliance and have it checked by a service center.
- Do not take this appliance into the bathroom and do not use it near water.
- Do not leave the appliance turned on when it is not in use.
- Do not use any accessories that are not included in the packaging of the appliance.
- Do not try to repair or adjust the appliance, or to replace any parts. Have the appliance checked and repaired by a service center.
- Keep the cord away from sharp edges and hot surfaces.
-
Do not pull or twist the cord and do not wind the cord around the appliance.
-
Do not move the appliance before it has cooled down completely.
- Do not put any bread slices into the slots that are too thick or that are wrapped in tin foil. This can cause electric shock or fire.
- Caution: toasting for too long can cause fire.
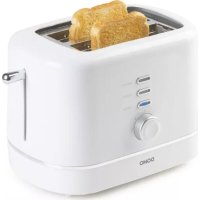
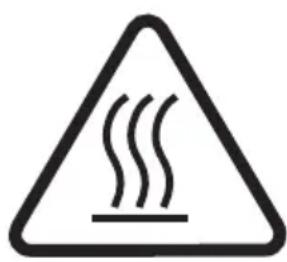
PARTS
- 2 slots
- Breadlift
- Browning control
- Stop button
- Reheat button
- Defrost button
- Crumb tray
USE
- Before you use the appliance for the first time, remove all packaging materials and clean the outside of the toaster with a damp cloth.
- Use the toaster for the first time without any bread in it. Press down the breadlift and put the browning control to the maximum position. This way you will burn existing dust that has fallen into the toaster during production or transport. During this first use small smoke and odor development is possible.
- For toasting bread, plug in the toaster. Choose the desired browning degree en put the bread in the slot. Press down the breadlift until it clicks. The heating element is now activated. The bread will be centered automatically for even toasting. Precise browning positions are hard to recommend, since this depends a lot on a persons taste.
- The toasted bread will pop up automatically when the toasting time has passed.
- The stop button can be used to cancel the toasting at any time.
- Your toaster also has a defrost button. When you want to toast frozen bread, press the defrost button. The defrost button will light up. When the bread is toasted, it will again pop up automatically and the light next to the defrost button will go out.
- When you want to reheat bread that has already been toasted, you can use the
reheat button. Place the bread that you want to reheat into the slot. Press down the breadlift and then press the reheat button. The button will light up. The reheat button will light up. The bread will again pop up automatically. Changes in the browning control will not alter the reheating time.
CLEANING OF THE TOASTER AND THE CRUMB TRAY
Remove the plug from the outlet before cleaning the appliance.
- Whipe the outside of the toaster with a damp cloth and dry thoroughly. Do not use any abrasive cleaners.
- Do not use a fork or any sharp, metal objects to clean the inside of the toaster. This may damage the heating elements.
- Before cleaning the crumb tray, remove the plug from the socket and wait for the toaster to cool down. Then open the crumb tray by pressing the tray and pulling it out of the toaster. Clean the crumb tray with a damp cloth. Always dry the tray thoroughly before replacing it into the toaster. When replacing the crumb tray, make sure that you push it far enough into the toaster, so that it clicks into place when you release it.