SDH 10036 MCNHKI - Air Conditioning SAUNIER DUVAL - Free user manual and instructions
Find the device manual for free SDH 10036 MCNHKI SAUNIER DUVAL in PDF.
| Product type | Air conditioning (multi-inverter split system) |
| Brand | Saunier Duval |
| Model | SDH 10036 MCNHKI |
| Cooling capacity | 3.6 kW (estimated from model) |
| Heating capacity | 3.6 kW (estimated from model) |
| Refrigerant | R-410A |
| Remote control | Yes, with digital display and programming |
| Operating modes | Auto, Cool, Heat, Fan only, Dry |
| Fan speed | Auto, Low, Med, High |
| Special functions | Timer (programmable start/stop), Turbo, Sleep (energy saving), Lock |
| Filter cleaning | Recommended regularly, washable with cold water |
| Maintenance | Clean indoor/outdoor units with a dry cloth |
| Safety | Grounding mandatory, circuit breaker, do not use with wet hands |
| Power supply | 220-240 V, 50 Hz (estimated) |
| Repairability | Contact Saunier Duval technical service |
Frequently Asked Questions - SDH 10036 MCNHKI SAUNIER DUVAL
User questions about SDH 10036 MCNHKI SAUNIER DUVAL
0 question about this device. Answer the ones you know or ask your own.
Ask a new question about this device
Download the instructions for your Air Conditioning in PDF format for free! Find your manual SDH 10036 MCNHKI - SAUNIER DUVAL and take your electronic device back in hand. On this page are published all the documents necessary for the use of your device. SDH 10036 MCNHKI by SAUNIER DUVAL.
USER MANUAL SDH 10036 MCNHKI SAUNIER DUVAL
8- Quick Start ....17
"Le technipole" 8, avenue Pablo Picasso
94132 Fontenay-sous-Bois - Cedex - France
Tel: +33 1 49 74 11 11
Fax: +33 1 48 76 89 32
www.saunierduval.com
info-group@saunierduval.fr
Portugal:
Saunier Duval Adratérmica, Lda.
Rua das Lages, 515
Zona Industrial S. Caetano
4405-231 Canelas VNG
Tel: +227129477/78
Fax: +227116674
Portugal
www.saunierduval-adratermica.pt
7.5-Timer operation....13
7.6-Example for setting the timer 14
7.7-Combined timer settings 15
8- Quick Start 17
8.1- Inserting the remote control batteries....17
8.2- Removing the remote control batteries....17
Sliding lid of remote control is open in this illustration.
Readjusting the clock
CLOCK
Use this feature if you want to start the air conditioner operation automatically at a fixed time, for example, before you come home again.
NOTA
"Le technipole" 8, avenue Pablo Picasso
94132 Fontenay-sous-Bois - Cedex - France
Tel: +33 1 49 74 11 11
Fax: +33 1 48 76 89 32
www.saunierduval.com
info-group@saunierduval.fr
Portogallo:
Saunier Duval Adratérmica, Lda.
Rua das Lages, 515
Zona Industrial S. Caetano
4405-231 Canelas VNG
Tel: +227129477/78
Fax: +227116674
Portugal
www.saunierduval-adratermica.pt
4- Recommendations....5
8.1- Inserting the remote control batteries.... 17
8.2- Removing the remote control batteries....17
9- Entretien ....18
flowchart
graph TD
    A["MODE"] --> C["Power Supply"]
    B["FAN"] --> C["Power Supply"]
START
Ensure the unit is plugged and electric power is available. The operation indicator on the display panel of the indoor unit starts flashing.
- Press MODE button until DRY mode is selected.
- Use TEMP/TIME button to select the desired temperature.
- If the ON/OFF indicator on the display is switched OFF, press the ON/OFF button to start the air conditioner.
ARRÊT
"Le technipole" 8, avenue Pablo Picasso
94132 Fontenay-sous-Bois - Cedex - France
Tel: +33 1 49 74 11 11
Fax: +33 1 48 76 89 32
www.saunierduval.com
info-group@saunierduval.fr
Le Portugal:
Saunier Duval Adratérmica, Lda.
Rua das Lages, 515
Zona Industrial S. Caetano
4405-231 Canelas VNG
Tel: +227129477/78
Fax: +227116674
Portugal
www.saunierduval-adratermica.pt
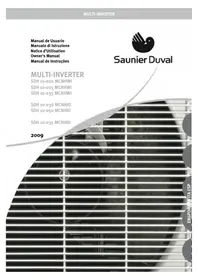
Owner's Manual

Saunier Duval
MULTI-INVERTER
SDH 10-020 MCNHWI
SDH 10-025 MCNHWI
SDH 10-035 MCNHWI
SDH 10-036 MCNHKI
SDH 10-050 MCNHKI
SDH 10-035 MCNHDI
2009
1- CONTENTS
1- Contents ...... 2
2-Warnings....3
3- Operating limitations....4
4- Recommendations....5
4.1- For proper use .... 5
5- Characteristics.... 5
6- Remote control.... 6
6.1- Remote control A....6
6.2- Remote control B ....7
7- Indicators on the display of the remote control....8
7.1- Indicators on the display of remote control 8
7.2- Automatic operation.... 11
7.3- Cooling / heating / "fan only" operation....12
7.4- Drying operation....12
7.5-Timer operation....13
7.6-Example for setting the timer ....14
7.7-Combined timer settings 15
8- Quick Start 17
8.1- Inserting the remote control batteries.... 17
8.2- Removing the remote control batteries....17
9- Maintenance....18
9.1- Cleaning the air filters ....18
9.2-Cleaning the indoor unit....18
9.3- Cleaning the outdoor unit....18
9.4- General care instructions ....18
10- Troubleshooting....19
2- WARNINGS
Carefully read the following information in order to properly handle the air conditioner. Several types of safety warnings and advice are listed below:
These units should be installed and used in accordance with the Regulations and Standards for refrigerator, electrical and mechanical equipment prevailing in relation to the location of such installations.
As part of its policy for ongoing improvements of its products, Saunier Duval reserves the right to modify these specifications without prior notice.
Saunier Duval cannot foresee all the possible circumstances that could pose a potential risk.
These units have been designed and manufactured for the purposes of acclimatisation by means of air conditioning; the use thereof for other domestic or industrial purposes shall be the exclusive responsibility of the persons projecting, installing or using them in that way.
Prior to the performing any work on the unit, its installation, commissioning, use or maintenance, the personnel in charge of these operations must be familiar with all the instructions and recommendations contained in the unit's installation manual.
In the event that any irregularity is detected (e.g. smell of smoke), unplug the unit from the power supply immediately and contact the distributor in order to proceed appropriately.
If the air conditioner continues to be used in these irregular conditions, it could be damaged and cause a short circuit or a fire.
Do not insert fingers or other objects in the air inlets and outlets or in the slats whilst the air conditioner is in operation since the high speed of the fan could cause injury.
Call the technical specialist in order to take the appropriate preventative measures in the event of a refrigerant gas leak. Refrigerant leakages in certain quantities can cause loss of oxygen.
If the air conditioner is allied in a small room, ensure that the necessary measures are taken to prevent any symptoms of lack of oxygen in the event of a refrigerant leak.
In the event that the air conditioner is removed and subsequently realised, its proper allation must be adequately verified. Otherwise, water or refrigerant leakage could occur, as well as short-circuiting or even fire.
Do not dismantle the outdoor unit's air vent. Exposing the fan is very dangerous.
It is convenient to regularly check the base of the outdoor unit to detect possible wear and tear. If a damaged base is not repaired, it could come away and cause an accident.
Do not place any items on top of the outdoor unit.
Do not handle the unit with wet or damp hands as this would cause a risk of electrocution.
Only use the right fuses for each model. Do not use wire or any other material to substitute the fuse. This could cause faults or fire.
Do not place any heat source with a flame in the airflow of the unit. Do not use sprays or other inflammable gases close to the air conditioner since this could cause a fire.
Air conditioner must not be allied close to a heat source, flammable or corrosive materials or near an air vent of a neighbouring building.
Disconnect the power source when cleaning the unit. This will avoid the risk of short-circuiting or injury.
Do not use water to clean the unit.
Connect the earth wire to the right line (never to the gas pipes, water pipes, neutral line or telephone line). Direct earthing can cause electrical risk.
Connect the condensed water pipe correctly to ensure efficient drainage. Incorrectly connecting the pipe could cause a water leakage.
Install differentials in order to prevent short-circuiting.
Do not connect the equipment whilst insecticides or pesticides are in use. Toxic chemicals could be deposited in the air conditioner and affect persons with allergies to the chemical substances.
2- WARNINGS
Avoid prolonged exposure to refrigerated air and to an extreme temperature in a room. This can be a health hazard.
Do not expose animals or plants directly to the airflow as this could cause damage or injury.
The personnel in charge of receiving the unit should check for any damage to the unit during transport.
So that its products sustain optimum operating parameters, Saunier Duval recommends that units undergo regular maintenance reviews, always performed by qualified staff. This service can be covered by Saunier Duval's official Customer Services Department which, based on your specific needs, will offer you a customised contract.
Installation of refrigeration material should be done using specific pipes for refrigeration (Warning! Never plumbing materials).
This equipment contains R-410A refrigerant. Do not vent R-410A into atmosphere: R-410A, is a fluorinated greenhouse gas, covered by Kyoto Protocol, with a Global Warming Potential (GWP) = 1975
The refrigerant fluid contained in this equipment must be properly recovered for recycling, reclamation or destruction before the final disposal of the equipment.
The relevant personnel performing the maintenance operations related with the handling of the refrigerant fluid must have the necessary certification issued by local authorities.
Your product is marked with this symbol. This means that at the end of its useful life it should not be mixed with the rest of your unclassified domestic waste and its disposal should be undertaken in accordance with the local and national regulations applicable, in a correct and environmentally-friendly manner. This means that the user is obliged, at the end of the useful life of the unit, to submit it to an appropriate waste management company authorised by the local authorities, for transportation to a plant where it will receive proper treatment. In the event that the unit is being removed to be replaced with a new similar product, the old product can be submitted to the distributor of the new unit for waste management.
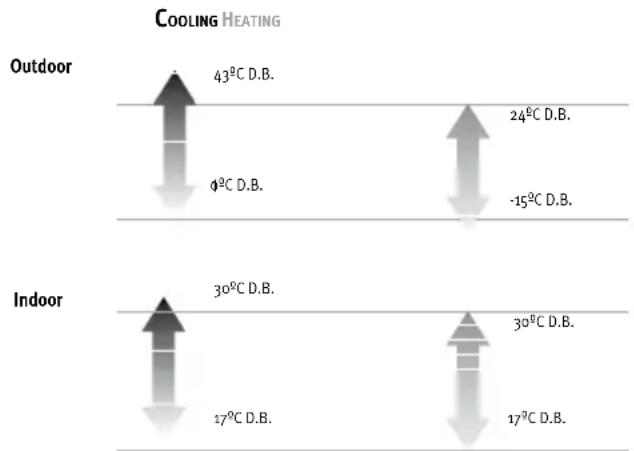
3- OPERATING LIMITATIONS
This air conditioner has been designed for the following temperatures. Operate it within these parameters.
bar
COOLING HEATING | Location | Temperature Change (°C D.B.) | | :--- | :--- | | Outdoor | 43°C | | Outdoor | 24°C | | Outdoor | -15°C | | Indoor | 30°C | | Indoor | 30°C | | Indoor | 17°C | | Indoor | 17°C |4- RECOMMENDATIONS
4.1- FOR PROPER USE
Configure the indoor temperature properly.
Neither excessive heat nor excessive cold are good for the health. Select the temperature in which you feel most comfortable.
Do not expose yourself to the direct airflow for prolonged periods of time.
Keep all doors and windows firmly shut.
This will save electricity and improve comfort.
Ventilation should comply with prevailing regulations.
To ensure this use a specific ventilation system.
Indoor design conditions
| Season | Operating temperature °C | Average air speed m/s | Relative humidity % | |
| Summer | 23 to 25 | 0,18 to 0,24 | 40 to 60 | |
| Winter | 20 to 23 | 0,15 to 0,20 | 40 to 60 |
Adjust the airflow correctly.
Set the airflow directed upwards in cooling mode and downwards in heating mode in order to obtain a regular room temperature.
Clean the air filters regularly.
Dirty filters decrease the air conditioner's efficiency, causes irritating noises and wastes electricity.
Do not block or cover the air vents.
5- CHARACTERISTICS
- Saunier Duval thanks you for purchasing this unit. This product contains, amongst others, the following characteristics:
Low noise emission from both the indoor and outdoor units.
Easy access to inside and electronics.
Programmable remote control with digital screen.
Modulating control of condensation and evaporation of the fan in the outdoor unit.
Scroll compressor.
90° directionalable air inlets and outlets.
Air inlet in the outdoor units.
Dismountable switchboard in outdoor units.
6- REMOTE CONTROL
6.1- REMOTE CONTROL A
Sliding lid of remote control is closed in this illustration.
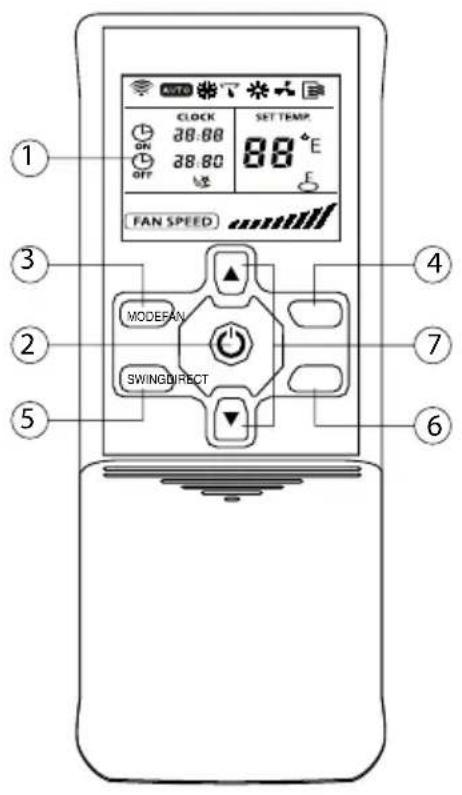
When batteries are removed from the remote control, they should be deposited in recycling bins.
| 1 DISPLAY | Indicates the settings, timers and functions selected. |
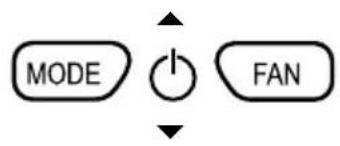
| 2 ⏻ | ON/OFF button. Use to switch the unit ON and OFF. |
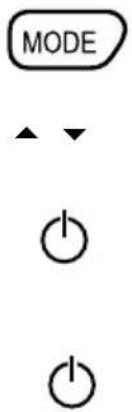
| 3 MODE | Use to select the operating mode.Following options can be selected in the shown sequence:AUTO -> COOL -> DRY -> HEAT -> FAN <- |
| 4 FAN | Use to set the fan speed. Following four options can be selected in the shown sequence:AUTO -> LOW -> MED -> HIGH <- |
| 5 SWING | Activates nd de-activates the oscillating movement of the swing unit. |
| 6 DIRECT | DIRECTION button. Use to change the angle of the swing unit. Each time the button is pushed, the angle of the swing unit changes by 6°. If the swing unit stops at any position in which it would affect the cooling and heating effect of the air conditioner, it would automatically change the angle. As long as this button is pushed down no symbol is shown on the display. |
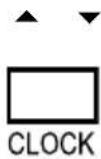
| 7 ▲ ▼ | TEMP/TIME buttons. Use the ▲ button to increase the indoor temperature setting or to adjust the TIMER in clockwise direction. Use the ▼ button to decrease the indoor temperature setting or to adjust the TIMER in counterclockwise direction |
6- REMOTE CONTROL
6.2- REMOTE CONTROL B
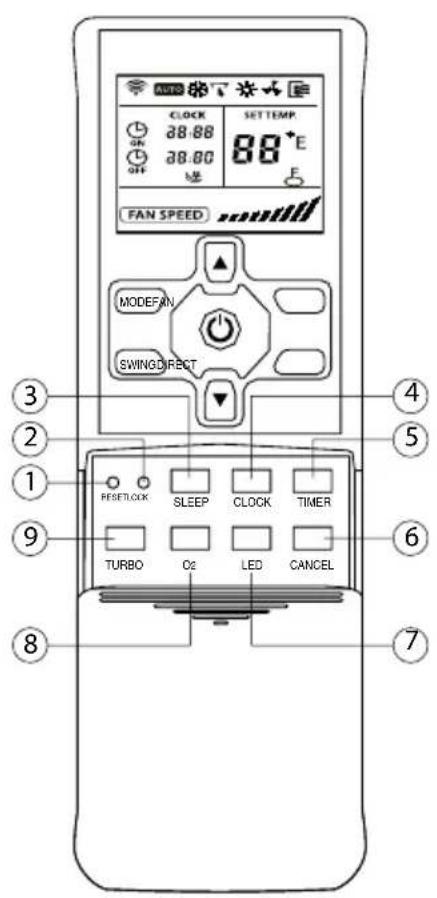
Sliding lid of remote control is open in this illustration.
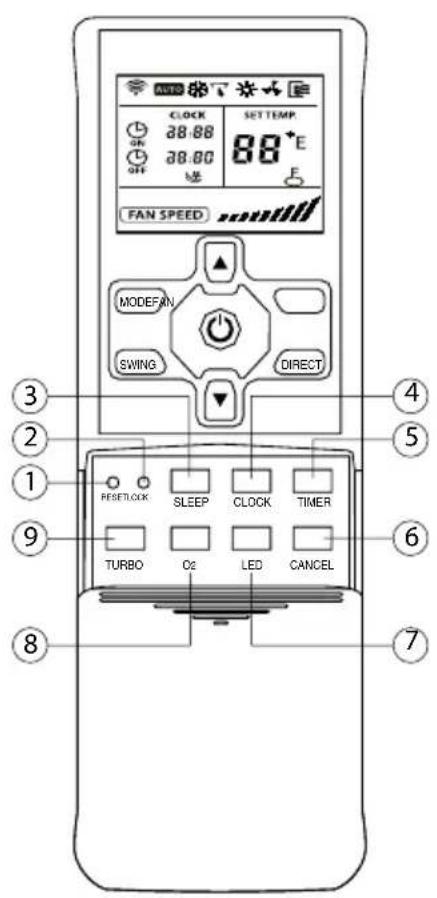
| 1 RESET | Use to cancel all current settings and to return to the initial settings. |
| 2 LOCK | Use to lock all current settings. During LOCK mode the remote control does not accept the operation of any button except the LOCK button. To cancel the LOCK mode press this button again. |
| 3 SLEEP | Use to change to the energy-saving operation mode. To cancel the SLEEP mode press this button again. This function can only be selected in COOL, HEAT and AUTO mode and it automatically adapts the most comfortable temperature for you. |
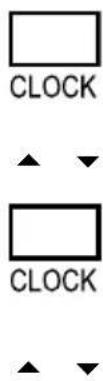
| 4 CLOCK | CLOCK button. Use to set the current time. |
| 5 TIMER | Use to set the start-up time (turn ON operation) and to set the shut-off time (turn OFF operation) for TIMER mode. |
| 6 CANCEL | Use to cancel the TIMER ON/OFF settings. |
| 7 LED | Use to clear all information on the display. To activate the display press this button again |
| 8 O2 | Function not available |
| 9 TURBO | Use this button in COOL mode to increase the cooling operation. To cancel the TURBO mode press this button again. |
7- INDICATORS ON THE DISPLAY OF REMOTE CONTROL
7.1- INDICATORS ON THE DISPLAY OF REMOTE CONTROL
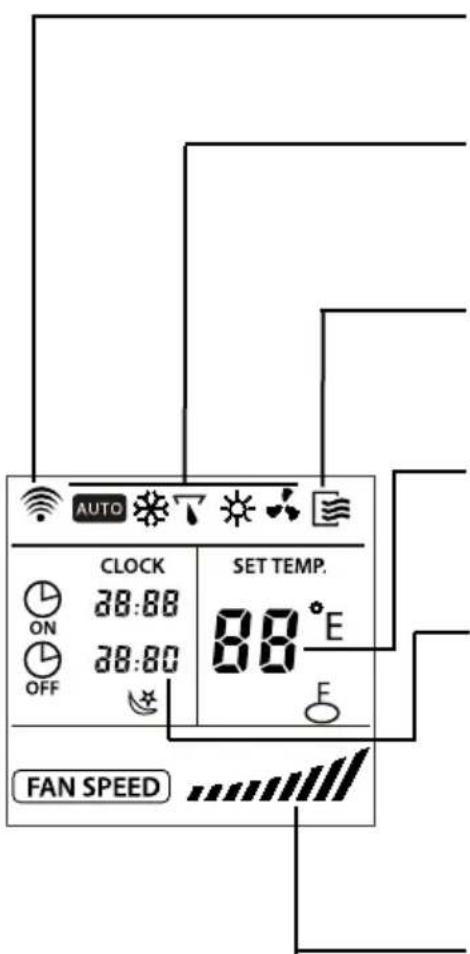
Transmission indicator
This indicator appears when the remote controller transmits signals to the indoor unit.
Mode indicators
According to the selected operation following mode indicators appear on the display: AUTO 0, COOL 0, DRY 0, HEAT 0, FAN ONLY 0.
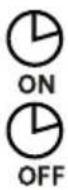
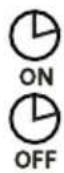
ON/OFF indicator
This indicator appears on the display as long as the air conditioner is switched ON. When the unit is switched OFF the indicator is cleared from the display.
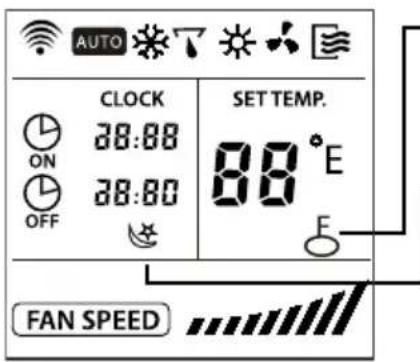
Temperature indicator
Displays the temperature setting (17°C - 30°C). If the FAN ONLY mode is selected, the temperature indicator is not displayed.
Time indicator
Displays the timer AUTO-ON/OFF time (0 - 23:50 hours) or the clock.
The clock is only displayed if no timer AUTO-ON/OFF settings are selected. As long as the AUTO-TIMER function is operating the AUTO-ON/OFF time is displayed. To display the current time press the CLOCK button in the lower control panel of the remote control.
Fan speed indicator
Displays the selected fan speed in the AUTO mode and in the three fan speed levels "" (LOW), "" (MED), and "" (HIGH). As long as the modes AUTO or DRY are selected, AUTO is displayed.
LOCK indicator
This indicator is displayed as long as the LOCK function is selected. After LOCK function is cancelled by pressing LOCK button again, this indicator is cleared from the display.
SLEEP indicator
This indicator is displayed as long as the SLEEP function is selected. After SLEEP function is cancelled by pressing SLEEP button again, this indicator is cleared from the display.
NOTE
The above illustration which displays all indicators at the same time is shown for informational purposes only.
7- INDICATORS ON THE DISPLAY OF REMOTE CONTROL
Setting the clock
Before starting the air conditioner operation, set the clock to the current time at the remote control according to the following instructions. The time indicator on the display of the remote control will show the time either the air conditioner is in operation or not.
Initial setting of the clock
After inserting the batteries into the remote control, the time indicator will display "12:00". Press CLOCK button and it will begin to flash.
Then, use the bottoms TEMP/TIME ▲ ▼ to set the current time
▲ Increase
Decrease
Each time one of these buttons is pressed and released again after a moment, the time indicator increases or decreases by one minute, depending which button is pressed.
The time indicator changes as fast as the button is repeatedly pressed.
As long as one of these buttons is pressed and kept down pressed, the time indicator increases or decreases in steps of 10 minutes, depending which button is pressed.
7- INDICATORS ON THE DISPLAY OF REMOTE CONTROL
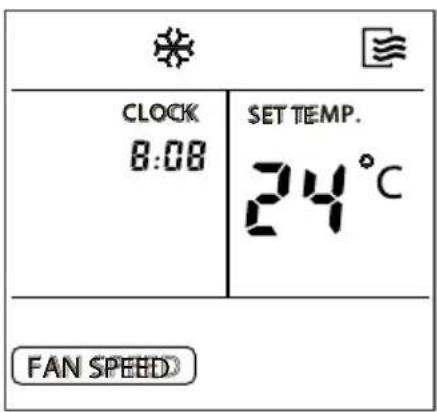
CLOCK button
CLOCK
CLOCK
8:08
After the time indicator reached the desired time, press the CLOCK button or release button ▲ or ▼ and wait for 5 seconds.
The time indicator stops flashing and the clock starts to operate.
Readjusting the clock

CLOCK
- Press the CLOCK button on the remote control for approx. 3 seconds. The colon in the time indicator starts flashing.
To change the current time, follow the above instructions in section "Initial setting of the clock" and "CLOCK button".
NOTE
Setting of the clock must be completed before the AUTO-TIMER function is started. If the time is adjusted, after a setting of the AUTO-ON/OFF timer has been performed, the remote control will send the adjusted timer settings to the indoor unit.
The clock accuracy is 15 seconds per day.
WARNING
Static electricity or other events which cause extremely high voltage may result in the initialization of the clock in the remote control (flashing "o:oo"). If it happens that the clock is initialized, adjust the clock time before you start to operate the unit.
7- INDICATORS ON THE DISPLAY OF REMOTE CONTROL
In the AUTO mode the system will automatically select cooling, heating (if equipped), or "fan only" operation, depending on temperature setting on the remote control and current indoor temperature.
Once the AUTO mode is selected, the operating conditions are saved in a memory inside the unit's microcomputer.
If the air conditioner is switched ON again by simply pushing the ON/OFF button at the remote control, the unit will operate under the same conditions as before.
Ensure the unit is plugged and electric power is available. The operation indicator on the display panel of the indoor unit starts flashing.
- Press MODE button until AUTO mode is selected.
- Use TEMP/TIME button to select the desired temperature. In general the selected temperature is 21^ C - 28^ C.
- If the unit is switched OFF, press the ON/OFF button to start the air conditioner.
Stop
- Press the ON/OFF button again to stop the air conditioner operation.
If the AUTO mode is uncomfortable, the desired conditions can be selected manually.
In the AUTO mode it is not necessary to set any fan speed. The fan speed is controlled automatically.
7- INDICATORS ON THE DISPLAY OF REMOTE CONTROL
7.3- COOLING / HEATING / "FAN ONLY" OPERATION
flowchart
graph TD
    A["MODE"] --> B["Power"]
    C["FAN"] --> B["Power"]
Start
Ensure the unit is plugged and electric power is available. The operation indicator on the display panel of the indoor unit starts flashing.
- Press MODE button until COOL, HEAT, or FAN ONLY mode is selected.
- Use TEMP/TIME button to select the desired temperature. The most comfortable temperature is 21^ C - 28^ C.
- Press the FAN SPEED button to select AUTO, LOW, MED, or HIGH mode for the fan speed.
- If the ON/OFF indicator on the display is switched OFF, press the ON/OFF button to start the air conditioner.

Stop
- Press the ON/OFF button again to stop the air conditioner operation.
During FAN ONLY mode the temperature is not controlled. Therefore only perform the above steps 1, 3, and 4 if you want to select the FAN ONLY mode.
Ensure the unit is plugged and electric power is available. The operation indicator on the display panel of the indoor unit starts flashing.
- Press MODE button until DRY mode is selected.
- Use TEMP/TIME button to select the desired temperature.
- If the ON/OFF indicator on the display is switched OFF, press the ON/OFF button to start the air conditioner.
Stop
- Press the ON/OFF button again to stop the air conditioner operation.
NOTE
During AUTO and DRY mode the fan speed can not be adjusted.
7- INDICATORS ON THE DISPLAY OF REMOTE CONTROL
- Press the TIMER button as required.
The current timer settings are displayed and they start flashing. On the left the indicator for TIMER ON or TIMER OFF is displayed.
TEMP/TIME buttons
- Use to set the desired time.
▲ Increase
▼ Decrease
Each time one of these buttons is pressed and released again, the time indicator increases or decreases by 10 minutes, depending which button is pressed. The time indicator changes as fast as the button is pressed.
- After completion of the timer settings TIMER ON and TIMER OFF, ensure the timer indicator on the display panel of the indoor unit is activated.
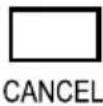
Cancel
To cancel the timer settings, press the CANCEL button.
Change
To change the timer settings, perform above steps 1 - 3.
WARNING
During timer operation the remote control automatically transmits timer signals to the indoor unit at the fixed time settings.
Therefore keep the remote control at any place from where its signals are able to reach the receiver in the indoor unit properly.
With the remote control you can preset a max. timer operation period of 24 hours.
7- INDICATORS ON THE DISPLAY OF REMOTE CONTROL
7.6- EXAMPLE FOR SETTING THE TIMER

ON
6:00
TIMER ON
Use this feature if you want to start the air conditioner operation automatically at a fixed time, for example, before you come home again.
NOTE
After pressing one of the TEMP/TIME buttons ▲▼, the time is registered within 0.5 second. Therefore it is necessary to continue pressing the button(s) until the desired time has been reached. Otherwise previous steps for setting the timer need repeating.
To start the air conditioner operation at 6:00 a.m.
- Press the TIMER button. The TIMER ON indicator and the time setting are displayed and they start flashing. If the start time setting is 6:00, the TIMER ON function is activated automatically after 3 seconds.
- Use the TEMP/TIME button(s) at the remote control to adjust the time setting for TIMER ON on the display to 6:00.
- 0.5 second after releasing the TEMP/TIME button the TIMER ON indicator stops flashing and this timer function is activated.

OFF
23:00
CLOCK

TIMER OFF
Use this feature if you want to stop the air conditioner automatically at a fixed time, for example, after you went to sleep.
To stop the air conditioner operation at 23:00 p.m.
- Press the TIMER button. The TIMER OFF indicator and the time setting are displayed and they start flashing. If the time setting is 23:00, the TIMER OFF function is activated automatically after 3 seconds.
- Use the TEMP/TIME button(s) at the remote control to adjust the time setting for TIMER OFF on the display to 23:00.
- 0.5 second after releasing the TEMP/TIME button the TIMER OFF indicator stops flashing and this timer function is activated.
7- INDICATORS ON THE DISPLAY OF REMOTE CONTROL
7.7- COMBINED TIMER SETTINGS

TIMER OFF TIMER ON
(ON stop operation start operation)
Use this feature if you want to stop and re-start the air conditioner operation automatically at fixed clock times. For example stop operation after you went to sleep and re-start operation in the early morning.
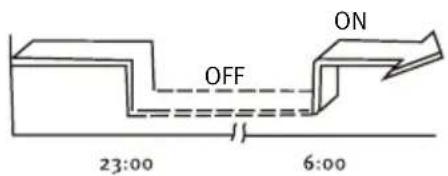
EXAMPLE
Assumed it is 20:00 in the evening and you want to stop the air conditioner operation at 23:00 and re-start it next morning at 6:00.
- Press the TIMER button and activate the flashing TIMER OFF indicator and the time setting on the display.
- Use the TEMP/TIME button(s) at the remote control to adjust the time setting for TIMER OFF to 23:00.
- Press the TIMER button again to display the TIMER ON indicator.
- Use the TEMP/TIME button(s) at the remote control to adjust the time setting for TIMER ON to 6:00.
- 0.5 second after releasing the TEMP/TIME button the TIMER OFF indicator stops flashing and this timer function is activated.
7- INDICATORS ON THE DISPLAY OF REMOTE CONTROL
TIMER ON TIMER OFF
(OFF start operation stop operation)
Use this feature if you want to start and stop the air conditioner operation automatically at fixed times. For example start air conditioner operation in the early morning and stop operation after you left the house.
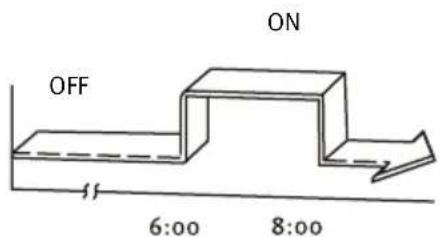
EXAMPLE
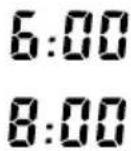
Assumed you want to start the air conditioner operation at 6:00 and stop it at 8:00.

- Press the TIMER button and activate the flashing TIMER ON indicator and the time setting on the display.
- Use the TEMP/TIME button(s) at the remote control to adjust the time setting for TIMER ON to 6:00.
- Press the TIMER button again to display the TIMER OFF indicator.
- Use the TEMP/TIME button(s) at the remote control to adjust the time setting for TIMER OFF to 8:00.
- 0.5 second after releasing the TEMP/TIME button the TIMER OFF indicator stops flashing and this timer function is activated.
NOTE
That timer setting (TIMER ON or TIMER OFF) which appears first in the sequence after the current time will be activated first.
8- QUICK START
8.1- INSERTING THE REMOTE CONTROL BATTERIES
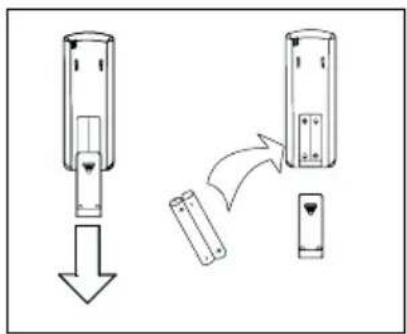
- Two alkaline dry batteries (Ro3/LR03 x 2) are required for the remote control.
Press on the arrow mark of the battery cover on the rear of the remote control and slide open the cover in the direction of the arrow. - Insert two batteries and ensure the + and - contacts are in the correct positions.
Replace the cover by sliding upwards until it clicks into place.
NOTE
- Ensure only new batteries are used. If the unit is not being used for a long period of time, remove the batteries.
8.2- REPLACING THE REMOTE CONTROL BATTERIES
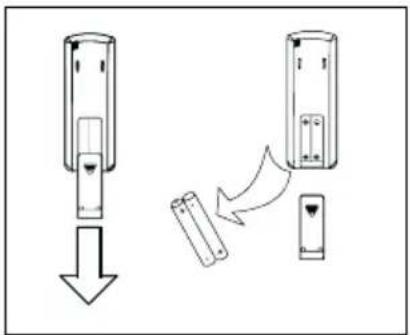
If the display of the remote control is not working, the remote control batteries require replacing.
- Two alkaline dry batteries (Ro3/LRo3 x 2) are required for the remote control.
- Slide open the battery cover on the rear of the remote control according to the arrow direction.
Insert two batteries and ensure the + and - contacts are in the correct positions.
Replace the cover by sliding upwards until it clicks into place.
After replacing the batteries, set the clock to the current time at the remote control.
NOTE
- Ensure only new batteries are used.
If batteries are removed from the remote control they must be segregated from the household waste and disposed according to the local requirements.
9- MAINTENANCE
Before proceeding to clean the unit, ensure that the entire unit and the magnetothermal switch are unplugged.
9.1- CLEANING THE AIR FILTERS
The air filter eliminates the dust absorbed from the room into the indoor unit. If the filter becomes obstructed, the air conditioner's efficiency will be reduced, the indoor unit's battery could freeze up and the compressor could be damaged. It is recommended that the air filter be cleaned regularly to prevent this from happening.
Remove the air filters and use a vacuum cleaner to remove any dust or dirt that may be in the filters, or clean them with cold water.
After cleaning, ensure that the filters are dried completely before putting them back into the unit.
Do not attach perfume or anti-odour systems, etc. to the filters or the indoor air reflux as this could damage
or soil the evaporator battery. If necessary, all these systems at the unit's exit point and only ensure they only run when the fan is on.
9.2- CLEANING THE INDOOR UNIT
Wipe the outer part of the unit with a dry cloth. Regularly remove dust from the inlet surface. Do not clean any of the electrical parts using water. Do not use petrol, solvents or polishes when cleaning.
9.3- CLEANING THE OUTDOOR UNIT
Wipe the outer part of the unit with a dry cloth. Regularly remove dust from the inlet surface. Do not clean any of the electrical parts using water. Check and clean the condenser battery regularly with a soft brush if the unit is located in a dusty atmosphere (Remember that this should always be done with the unit switched OFF).
9.4- GENERAL CARE INSTRUCTIONS
If you are not intending to use the unit for a few days: Put the fan into operation for three or four hours in order to dry the inside of the unit; stop the unit and disconnect the magnetothermal switch; clean the air filters; and remove the batteries from the remote control.
Before turning the unit back on, check the following: that the air filters are allied, that the air inlet and outlet are not blocked up, that the remote control is fitted with batteries and that the differential switch is connected.
Occasionally check the base of the outdoor unit. If the base is damaged or deteriorated, the unit could fall down and cause physical or material damage.
We advise you to contact a reliable air conditioner specialist or the Saunier Duval Official Technical Services
to contract a preventative maintenance service. This will help to prolong the life of your air conditioner and improve its performance.
10- TROUBLESHOOTING
We set forth below a series of problems and their possible causes. If the solutions shown do not solve your problem, contact your air conditioner specialist or call your nearest Saunier Duval Official Technical Service centre.
| SYMPTOMS POSSIBLE CAUSES POSSIBLE SOLUTION | ||
| The system is not working at all (The fan won't start up) | Cut off the power supply.Cut off from the circuit breaker or fuse. Very low line pressure.The selector is set to “o” (off).The thermostat is set too high (cooling) or too low (heating).The fuse may have blown.The batteries in the remote control may be wasted.The operating time does not coincide with the timer setting. | Restore the power supply.Consult after-sales services.Consult your electrician.Set the selector “I” (on).Turn the temperature up or down.Replace the fuse.Replace the batteries.Wait or cancel the timer settings. |
| Insufficient cooling or heating | Dirty or obstructed air filter.Heat source nearby or too many people in the room.Doors and windows open.Obstacle in front of the air inlet or outlet.The thermostat is set too high (cooling) or too low (heating).The cold water or hot water generator in the unit is malfunctioning or not functioning at all.The air inlet or outlet on the indoor unit is obstructed.The room temperature may not have reached the specified level as yet. | Clean the air filter.If possible, remove the heat source.Close them to prevent air entering from outside.Remove the obstacle to allow the air to circulate properly.Turn the temperature up or down.Check the generator's functioning (consult the after-sales services).Remove the objects causing the obstruction.Wait a few moments. |
| Excessive or inexistent cooling or heating (for units that operate in cooling mode) | The operating mode (Hot or Cold) of the thermostat is not set).The cold water or hot water generator in the unit is malfunctioning. | Check the operating mode selected.Check the generator's functioning (consult the after-sales services). |
10- TROUBLESHOOTING
| SYMPTOMS POSSIBLE CAUSES POSSIBLE SOLUTION | ||
| Excessive or inexistent cooling or heating (for units that operate in cooling mode) | The air inlet or outlet on the indoor or outdoor unit is obstructed.The three-minute compressor is activated for protection.When running in DRY mode there is no air flow.When running in HEAT mode there is no air flow. | Remove the objects causing the obstruction.Wait and it will operate again.At times, when in DRY mode, the airflow stops to avoid excessive cooling.In HEAT mode the air does not flow until it is hot enough, thereby avoiding a jet of cold air. For the same reason, the air stream may not be variable. |
NOTES
NOTES
NOTES
Spain:
Saunier Duval Clima S.A.
Polígono Ugaldeguren 3 · Parcela 22
48170 Zamudio (Bizkaia)
Tel: +34 94 489 62 00
Fax: +34 94 489 62 53
www.saunierduval.es
info@saunierduval.es
Italy:
Vaillant Saunier Duval Italia S.p.A.
Via Benigno Crespi 70 20159 Milano
Tel. 02.60.74.901
Fax 02.69.71.25.59
www.saunierduval.it
webmaster@saunierduval.it
Belgium:
BULEX
Chaussée de Mons 1425 Bergensesteenweg
Bruxelles 1070 Brussel
Belgique - België
T: +003225551313
F: +003325551314
www.bulex.com
info@bulex.com
France:
Saunier Duval Eau Chaude Chauffage
"Le technipole" 8, avenue Pablo Picasso
94132 Fontenay-sous-Bois - Cedex - France
Tel: +33 1 49 74 11 11
Fax: +33 1 48 76 89 32
www.saunierduval.com
info-group@saunierduval.fr
Portugal:
Saunier Duval Adratérmica, Lda.
Rua das Lages, 515
Zona Industrial S. Caetano
4405-231 Canelas VNG
Tel: +227129477/78
Fax: +227116674
Portugal
www.saunierduval-adratermica.pt
Saunier Duval
8.1- Inserting the remote control batteries.... 17
8.2- Removing the remote control batteries....17
"Le technipole" 8, avenue Pablo Picasso
94132 Fontenay-sous-Bois - Cedex - France
Tel: +33 1 49 74 11 11
Fax: +33 1 48 76 89 32
www.saunierduval.com
info-group@saunierduval.fr
Portugal:
Saunier Duval Adratérmica, Lda.
Rua das Lages, 515
Zona Industrial S. Caetano
4405-231 Canelas VNG
Tel: +227129477/78
Fax: +227116674
Portugal
www.saunierduval-adratermica.pt