BO650JEE - Cooker BOMPANI - Free user manual and instructions
Find the device manual for free BO650JEE BOMPANI in PDF.

Frequently Asked Questions - BO650JEE BOMPANI
User questions about BO650JEE BOMPANI
0 question about this device. Answer the ones you know or ask your own.
Ask a new question about this device
Download the instructions for your Cooker in PDF format for free! Find your manual BO650JEE - BOMPANI and take your electronic device back in hand. On this page are published all the documents necessary for the use of your device. BO650JEE by BOMPANI.
USER MANUAL BO650JEE BOMPANI
Technical data and specifications 13
Installation 14-15
Ventilation 14
Positioning 14
Gas connection 14
Adapting to different types of gas 14
Replacing the injectors 14
Minimum setting 14
Electrical connection 14
Electric ignition 15
Safety device 15
For the user 15-20
Ventilation 15
Igniting the burners 15
Igniting the gas oven 15
Igniting the gas grill 15
Safety device 15
Electrical switch-on 15
Using the gas hob 16
Using the electric hot-plates 16
Using the gas oven 16
Using the gas or electric grill 16
Using the multi-function electric oven 4 16
Using the static electric oven" 4 New " 16
Using the fan electric oven" 4 programs "............15
Using the multi-function electric oven 6 programs 17
Using the multi-function electric oven 17
Using the rotisserie 17
Using the minute minder 17
Using the single-control cooking timer 17
Using the electronic timer 17
Using the "analogue" timer 18
Removing the oven door 18
Using the self-cleaning oven 18
Using the ceramic hob 18
Cleaning of the ceramic hob 19
Advice and precautions 19
European Directive 2002/96/EC (WEEE) 20
European Regulation 1935/2004 20
Figures 61-63
- Thank you for choosing one of our quality products, capable of giving you the very best service. To make full use of its performance features, read the parts of this manual which refer to your appliance carefully. The Manufacturer declines all responsibility for injury or damage caused by poor installation or improper use of the appliance.
- To ensure its appliances are always at the state of the art, and/or to allow constant improvement in quality, the manufacturer reserves the right to make modifications without notice, although without creating difficulties for users.
-
When ordering spare parts, inform your dealer of the model number and serial number punched on your appliance's nameplate, visible inside the warming compartment (if present) or on the back of the cooker.
-
APPLIANCE COMPLYING WITH THE FOLLOWING DIRECTIVES:
-
EEC 2009/142/CE (ex 90/396)
- 2006/95/EC Low Voltage (replaces 73/23/EEC and subsequent amendments)
- EEC 2004/108 (radio-frequency interference)
- European Regulation 1935/2004 (materials in contact with food)
- European Regulation 1275/2008
- EEC 40/2002
- EEC 92/75
-2002/96/EC (WEEE) - 2005/32/CE (Energy-using Products)
FOREWORD
- Refer only to the headings and sections covering accessories actually installed on your cooker.
Technical data and specifications
| Nominal external dimensions Cookers | 60x60 |
| Height at hob | cm. 86,5 |
| Height with lid raised | cm. 143 |
| Depth with door closed | cm. 60 |
| Depth with door open | cm. 104 |
| Width | cm. 60 |
| Usable dimensions | 60x60 static oven | 60x60 fan oven |
| Width | cm. 45 | cm. 41 |
| Depth | cm. 47 | cm. 38 |
| Height | cm. 34 | cm. 31 |
| Volume | l. 72 | l. 50 |
GAS BURNERS (injectors and flow-rates)
| Gas Burner | Injector low | flow-rate (kW) | nominal flow-rate (kW) | |
| G20 | auxiliary | 77 | 0,40 | 1,00 |
| 20 | semi-rapid | 97 | 0,58 | 1,65 |
| mbar | rapid | 123 | 0,80 | 2,80 |
| oven | 130 | 1,00 | 3,00 | |
| grill | 99 | - | 1,85 | |
| ultra-rapid ec. | 145 | 1,70 | 4,00 | |
| G30 | auxiliary | 50 | 0,40 | 1,00 |
| 28-30 | semi-rapid | 65 | 0,58 | 1,65 |
| mbar | rapid | 83 | 0,80 | 2,80 |
| G31 | oven | 86 | 1,00 | 3,00 |
| 37 | grill | 68 | - | 1,85 |
| mbar | ultra-rapid ec. | 98 | 1,70 | 4,00 |
| G110 | auxiliary | 150 | 0,40 | 1,00 |
| 8 | semi-rapid | 185 | 0,58 | 1,65 |
| mbar | rapid | 265 | 0,80 | 2,80 |
| oven | 300 | 1,00 | 3,00 | |
| grill | 200 | - | 1,85 | |
| ultra-rapid ec. | 350 | 1,70 | 4,00 | |
Cat.: seename plate on cover; Class 1 or 2.1
Type "X" cookers
ELECTRIC HOTPLATES
| ø 145 | 1,2 kW - High-Light hotplate |
| ø 180 | 1,5 kW - Normal hotplate |
| 1,8 kW - High-Light hotplate | |
| 2,0 kW - Rapid hotplate | |
| ø 210 -120 | 2,1 - 0,7 kW - High-Light hotplate |
| ø 265 -170 | 2,2 - 1,4 kW - High-Light hotplate |
ELECTRIC OVEN POWER
| bottom | top | total | |
| static oven | 1,5 kW | 0,7 kW | 2,2 kW |
| multi-function oven | 1,5 kW | 0,7 kW | 2,2 kW |
| circular element | 2,0 kW | ||
| grill | 2,0 kW |
EQUIPMENT
All models are equipped with safety device for oven and grill burners.
Depending on the models, cooker may also have:
- Safety device for one or more hob burners
- Electric ignition on top burners
- Electric ignition on oven and grill burners
- Self-cleaning enamelled liners
- Oven thermostat (or tap)
- Electric oven lighting
- Rotisserie
- Grill burner
- Mechanical timer
- Pan retainers
- One or more electric plates
- Single-control end of cooking timer
Electronic timer
For the LAYOUT OF HOB BURNERS see the models illustrated in figure 1 at the back of this manual.
For the ELECTRIC WIRING DIAGRAM see figure 2 at the back of this manual.
The electrical power is stated on the nameplate visible inside the warming compartment (if present) or on the back of the cooker. A copy of the nameplate is glued to the cover of this manual (for gas or gas-electric products only).
Useful information concerning the energy consumption of electric ovens.
This information completes and expands on the figures provided on the technical data sticker supplied with the instruction manual.
| Oven 66 N static | Oven 66N fan | Oven 66 N multifunctions | |
| EU environmental quality mark No No | No | ||
| Time required to cook a normal load in conventional mode in minutes. | 43,2 ... 43,8 | ||
| Time required to cook a normal load in fan mode in minutes. | ... 44,9 ... 44,9 | ||
| Power consumption in stand-by setting in Watts | ...... | ||
| Usable area of the dripping pan in cm2 | 1300 1143 | 1143 |
GB
Installation
INSTALLATION
The appliance must be installed by qualified staff working in accordance with the regulations in force.
Before installing, ensure that the appliance is correctly preset for the local distribution conditions (gas type and pressure).
The presettings of this appliance are indicated on the nameplate shown on the cover. This appliance is not connected to a flue gas extractor device. It must be installed and connected in accordance with the regulations in force.
This appliance may only be installed and may only operate in rooms permanently ventilated in accordance with national regulations in force.
VENTILATION
The rooms in which gas appliances are installed must be well ventilated in order to allow correct gas combustion and ventilation.
The air flow necessary for combustion is at least 2m^3 /h for each kW of rated power.
POSITIONING
Remove the packaging accessories, including the films covering the chrome plated and stainless steel parts, from the cooker.
Position the cooker in a dry, convenient and draft free place. Keep at an appropriate distance from walls which may be damaged by heat (wood, linoleum, paper, etc.).
The cooker may be installed alone or between two kitchen units; in this case, the sides of the units must withstand a temperature of 100 degrees C and they must not be higher than the cooker hob.
CONNECTING TO THE GAS SUPPLY
Before connecting the cooker, check that it is preset for the gas to be used. Otherwise, make the conversion as described in the section headed "Adapting to different gas types". The connection is on the right; if the pipe has to pass behind the cooker, it must be kept low down where the temperature is about 50 degrees C.
- Rigid connection (see Figure 3, diagram D):
The connection to the mains gas supply may be made using a rigid metal pipe (D). Remove the hose connector and screw the rigid union onto the threaded connection of the gas train. The union for rigid connection is amongst the cooker accessories.
- Connection using a rubber hose (see Figure 3, diagrams B and C):
Connect a rubber hose carrying the conformity mark currently in force to the hose connector. The hose must be replaced at the date indicated, and must be secured at both ends using standard hose clamps. It must be absolutely accessible to allow its condition to be checked along its entire length. - Connection using a metal hose (see Figure 3, diagram D): Make the connection using a hose which complies with national standards, screwing it onto the connector with a ring seal, which is delivered amongst the cooker accessories.
- After installation, check that all connections are airtight.
- For operation with butane/propane, check that the gas pressure is as indicated on the nameplate.
IMPORTANT:
- Use only standard rubber hoses. For LPG, use a hose which complies with the national regulations in force.
- Avoid sharp bends in the pipe and keep it well away from hot surfaces.
References to the regulations covering the gas connection to the appliance: ISO 7-1.
ADAPTING TO DIFFERENT TYPES OF GAS
If the cooker is not already preset to operate with the type of gas available, it must be converted. Proceed as follows:
- Replace the injectors (see table on page 12);
- regulate the primary air flow;
-regulate the minimum settings.
N.B.: every time you change the type of gas, indicate the new type of gas on the serial number label.
REPLACING THE HOB BURNER INJECTORS (Fig. 4)
- Remove the grid, the burner caps (A), and the burners (B);
- Unscrew and remove the injector in the bottom of each injector holder (C);
- replace the injector in accordance with the table in page 12, using a 7mm socket wrench, tighten and screw right down;
- check that the system is gas-tight;
- replace the burners, the burner caps and the grid.
IMPORTANT:
- Never over-tighten the injectors;
- after replacing, check that all the injectors are airtight.
REPLACING THE OVEN BURNER INJECTOR (Fig. 5a)
- Loose the screw securing the oven bottom;
- remove the oven bottom (push back and raise);
- remove the oven burner, after taking out its fixing screw;
- replace the injector, using a 7 mm socket wrench.
REPLACING THE GRILL BURNER INJECTOR (Fig. 5b)
- Remove the burner after taking out the two screws which secure it;
- replace the injector using a 7 mm socket wrench.
IMPORTANT:
- Never over tighten the injectors;
- after replacing, check that all the injectors are airtight.
SETTING HOB BURNER MINIMUM LEVELS
If the cooker is to work on bottled gas (butane/propane), the tap by-pass must be screwed right down.
The cooker may be equipped with type A taps, with by-pass inside (accessed by inserting a small screwdriver into the rod) or type B taps, with by-pass on the outside on the right (accessed directly). See figure 6.
If the cooker is to work on natural gas, proceed as follows for both types of tap:
- Ignite the burner at maximum flame;
- pull off the knob, without using a lever against the control panel, which might be damaged;
- access the by-pass with a small screwdriver and back off by about 3 turns (turning the screwdriver anti-clockwise);
- turn the tap rod anti-clockwise again until it stops: the burner will be at maximum flame;
- screw the by-pass slowly back in, without pushing the screwdriver, until the flame has apparently shrunk to 1/4 of the maximum size, checking that it is sufficiently stable even in quite strong draughts.
SETTING OVEN BURNER MINIMUM LEVELS
If the cooker is to work on bottled gas (butane/propane), the thermostat by-pass must be screwed right down.
If the cooker is to work on natural gas, proceed as follows:
-
Remove the oven bottom (push towards the back and raise);
-
ignite the oven burner, turning the knob pointer to the maximum setting;
-
shut the oven door;
- access the thermostat or tap by-pass (see fig. 7);
- back off the thermostat by-pass by about 3 turns;
- after 5 or 6 minutes, turn the knob pointer to the minimum setting;
- slowly retighten the by-pass, watching the flame decrease in size through the window in the closed oven door until the tongue of the flame is about 4mm long. Never keep the flame too low. It must be stable even when the oven door is opened or closed quickly;
- turn off the burner and replace the oven bottom.
CONNECTING TO THE ELECTRICAL MAINS
Before making the connection, check that:
- the mains voltage is as indicated on the nameplate;
- the earth connection is in good working order.
GB
Installation
For the user
For direct connection to a power mains, a device that ensures disconnection from the mains must be installed, with a opening distance for the contacts that allows for a complete disconnection under conditions of category III electrical overload, in conformity with the installation instructions.
If the appliance power lead is not fitted with a plug, use an approved standard type, remembering that:
- the green-yellow wire must be used for the earth connection;
- the blue wire is the neutral;
- the brown wire is live;
- the lead must never touch hot surfaces over about 75 degrees C;
- replacement leads must be of type H05RR-F or H05V2V2-F of suitable size (see diagrams in fig. 2).
- if the appliance is supplied without lead, using type H05RR-F or H05V2V2-F cable of suitable size (see diagrams in fig. 2).
IMPORTANT:
The manufacturer declines all liability for damage due to failure to comply with the regulations and standards in force. Check that the appliance is correctly connected to the earth (see diagrams in fig. 2 at the back of the manual).
FOR COOKERS WITH ELECTRIC IGNITION
The correct gaps between the electrode and the burner are shown in figures 5a,5b.
If no spark is generated, do not keep on trying as this might damage the generator.
Possible causes of malfunctions:
- spark plug damp, dirty or broken;
- electrode-burner gap not correct;
- spark plug wire broken or without sheathing;
- spark discharging to earth (to other parts of the cooker);
- generator or microswitch damaged;
- air has built up in the pipes (particularly if the cooker has been out of use for a long time);
- air-gas mixture incorrect (poor fuel setting).
THE SAFETY DEVICE
The correct gap between the end of the thermocouple sensor and the burner is shown in figures 5a,5b.
To check that the valve is working properly, proceed as follows:
- ignite the burner and leave it to work for about 3 minutes;
- turn off the burner by returning the knob to off position ( ;
- after 90 seconds for hob burners, 60 seconds for oven and grill burners, turn the knob pointer to the "on" position;
- release the knob in this position and move a burning match towards the burner; IT MUST NOT IGNITE.
Time needed to excite the magnet during ignition: 10 seconds approx.
Automatic tripping time, after flame has been turned off: not more than 90 seconds for hob burners; not more than 60 seconds for oven and grill burners.
IMPORTANT:
- Before doing any work inside the cooker, disconnect the mains plug and shut the gas tap.
- Never use matches to check the gas circuit for leaks. If a specific control device is not available, foam or very soapy water can be used.
- When re-closing the hob, check that the electrical wires of the spark plugs (if present) are not close to the injectors, so that they cannot run across them.
HOW TO USE THE COOKER
VENTILATION
All gas cooking appliances produce heat and moisture in the rooms where they are installed. Take care to ensure that the kitchen is well ventilated; keep the ventilation openings unobstructed or install an extractor hood with fan. In case of intensive or prolonged use, additional ventilation may be required; open a window, or increase the extractor fan power.
IGNITING THE HOB BURNERS
- Press the knob and turn it anti-clockwise until it reaches the symbol on the control panel (maximum flame position);

- at the same time, move a burning match towards the burner head;
- to reduce the flame, turn the knob further in the same direction until its pointer is against the symbol (minimum flame position).
FOR HOB BURNERS EQUIPPED WITH SAFETY DEVICE

- Press the knob and turn it anti-clockwise until it reaches the symbol on the control panel (maximum flame position);
- move a burning match towards the burner, keeping the knob pressed right down for about 10 seconds;
- then release the knob and check that the burner remains on. Otherwise, repeat the operation.
IGNITING THE OVEN BURNER
- Open the oven door;
- press the knob and turn it anti-clockwise to the maximum flame position;
- move a burning match towards the hole in the centre of the oven bottom and press the knob right down (see fig. 8);
- look through the two holes in the sides of the bottom to check that the burner has ignited, keeping the knob pressed down;
- after about 10 seconds, release the knob and check that the burner remains on. Otherwise, repeat the operation.
IGNITING THE GRILL BURNER (GAS GRILL)
- Fit the control knob guard as shown in fig. 11;
- press the oven knob and turn it to the right until it reaches the stop;
- move a burning match towards the perforated burner pipe and press the knob right down (see fig. 9);
- check that the burner has ignited, keeping the knob pressed down;
- after about 10 seconds, release the knob and check that the burner remains on. Otherwise, repeat the operation.
SAFETY DEVICE
Burners equipped with this device have the advantage that they are protected if they accidentally go out. If this occurs, the supply of gas to the burner concerned is automatically cut off, preventing the hazards deriving from a leak of unburnt gas. The gas supply must be cut off within no more than 60 seconds for the oven and grill burners or 90 seconds for the hob burners.
FOR COOKERS WITH ELECTRIC IGNITION
All the above applies, except that the match is no longer required; a spark is obtained by pressing the button on the control panel once or more, or by pressing the knob of the burner to be ignited. If electronic ignition is difficult with some types of gas, set the knob on the low (small flame) setting.
- For cookers with electric ignition of the oven and grill burners, ensure the oven door is completely open when these burners are ignited;
- Do not operate the ignition device for more than 10 seconds when igniting the oven and grill burners. If the burner has not lit after these 10 seconds, stop using the device, leave the door open and wait one minute before trying again to ignite the burner. If the
GB
For the user
ignition device malfunctions again, light the burner with a match and call the after-sales service.
IMPORTANT:
- Difficulty in igniting burners is normal if the cooker has been out of use for some time. The air accumulated in the pipes will be expelled in a few seconds;
- Never allow too much unburnt gas to flow from the burners. If ignition is not achieved within a relatively short time, repeat the procedure after returning the knob to the off position (
- when the oven and grill are lit for the first time, a smell may be noticed and smoke may come out of the oven. This is because of the surface treatment and oily residues on the burners.
HOW TO USE THE HOB BURNERS
Use pans of diameter suitable for the burner type. The flames must not project beyond the base of the pan. Recommended sizes:
- for auxiliary burners = pans of at least 8 cm using the adjusting grid supplied with the cooker
- for semi-rapid burners = pans of at least 14 cm
- for rapid and triple flame burners = pan of at least 22 cm.
N.B.: Never keep the knob at settings between the maximum flame symbol and the off position () .
FOR COOKERS EQUIPPED WITH ELECTRIC HOTPLATES
The different heat settings are obtained as follows:
- 1 = minimum setting for all hotplates;
- 6 = maximum setting for normal and rapid hotplates (with red disc);
-0=off.
Pans must never be smaller in diameter than the hotplates and their bottoms must be as flat as possible (see fig. 10).
IMPORTANT:
- Never leave hotplates on without pans, except when first used; leave for about 10 minutes to dry oil or moisture residues;
- if the hotplate is to be out of use for a long time, apply a little grease to its painted surface;
- do not allow spills to burn onto the hotplate, requiring the use of abrasive cleaners.
- After igniting the burner, leave the oven to heat up for about 10 minutes;
- place the food for cooking in an ordinary oven dish and place it on the chrome-plated shelf;
- place in the oven on the highest possible runners, and turn the knob pointer to the setting required;
- cooking can be observed through the window in the door with the oven light on. This will avoid opening and closing the door frequently, unless oil or fat has to be added to the dish.
N.B.: For cookers without thermostat:
- with the knob on the maximum setting = 280 degrees C
- with the knob on the minimum setting = 150 degrees C
- All other temperatures between 150 and 280 degrees C are obtained approximately by positioning the knob between the maximum and minimum settings.
Never leave the knob in positions between the maximum symbol and the off setting (●.
- fit the knob guard (see fig. 11);
- light the burner and wait a few minutes to give the burner time to warm up;
- place the foods on the chrome-plated shelf;
- insert on the highest runner;
- insert the drip tray on the bottom runner;
- gently close the oven door, resting it against the knob guard;
- after a few minutes, turn the food to expose the other side to the infrared radiation (the cooking time depends on the type of food and personal taste).
The table below "Food to be grilled" will serve as a guide.
N.B.: the first time the grill is used smoke will come out of the oven. Before inserting foods for cooking, wait until any oil residues on the burner have completely burnt away. The grill must only be used at its full rated heat.
The appliance becomes very hot during use. Care should be taken not to touch the heating elements inside the oven.
ATTENTION: Accessible parts may be hot when the heating element is in use. Keep children well away.
| Food to be grilled Time minutes | ||
| 1st side | 2nd side | |
| Thin pieces of meat | 6 | 4 |
| Fairly thick pieces of meat | 8 | 5 |
| Thin fish or fish without scale | 10 | 8 |
| Fairly thick fish | 15 | 12 |
| Sausages | 12 | 10 |
| Toasted sandwiches | 5 | 2 |
| Small poultry | 20 | 15 |
HOW TO USE THE ELECTRIC GRILL WITH GAS OVEN
- ignite the grill heating element;
- place the foods on the chrome-plated shelf;
- insert on the highest runner;
- insert the drip tray on the bottom runner;
- gently close the oven door;
- after a few minutes, turn the food to expose the other side to the infrared radiation (the cooking time depends on the type of food and personal taste). To see table " Food to be grilled"
The grill element in the top of the oven is switched on by turning the thermostat knob clockwise to the grill symbol on the control panel. The red light will come on to show the element in operation.
MULTIFUNCTIONS ELECTRIC OVEN 4 POSITIONS
With different heating elements controlled using a selector switch and regulated by a thermostat, starting from the 0 (off) position, the knob can be turned clockwise to the following settings:
- symbol : oven lamp on (it will remain on even if the knob pointer is turned to the other settings).
- symbol conventional "static" oven cooking, the oven temperature is controlled using the thermostat knob.
- symbol 30oking with fan oven, on one or two levels, the oven temperature is controlled using the thermostat knob.
symbol I -grill on;
N.B. - The yellow light switches on and off as the thermostat is tripped. Before placing food inside, allow the oven to heat up for at least 10 minutes.
STATIC ELECTRIC OVEN " 4 New "
With different heating elements controlled using a selector switch and regulated by a thermostat, starting from the 0 (off) position, the knob can be turned clockwise to the following settings:
- symbol :oven lamp on (it will remain on even if the knob pointer is turned to the other settings).
- symbol -slow cooking using the bottom element; the oven
temperature is regulated using the thermostat knob. - symbol :conventional "static" oven cooking, the oven temperature is controlled using the thermostat knob.
symbol on.
N.B. - The yellow light switches on and off as the thermostat is tripped.
Before placing food inside, allow the oven to heat up for at least 10 minutes.
ELECTRIC FAN OVEN WITH 4 COOKING PROGRAMS
With different heating elements controlled using a selector switch and regulated by a thermostat, starting from the 0 (off) position, the knob can be turned clockwise to the following settings:
GB
For the user
- symbol theven lamp on (it will remain on even if the knob pointer is turned to the other settings).
symbol : operation of fan. - symbol cooking with fan oven, on one or two levels, the oven temperature is controlled using the thermostat knob.
symbol : grill on.
N.B. - The yellow light switches on and off as the thermostat is tripped. Before placing food inside, allow the oven to heat up for at least 10 minutes.
MULTIFUNCTION ELECTRIC OVEN WITH 6 COOKING PROGRAMS
With different heating elements controlled using a selector switch and regulated by a thermostat (from 50 to 250^ ), starting from the position 0 (off) the selector knob can be turned clockwise to the following positions:
- symbol oven light and red warning light on
- symbol 光 光 oven light and red warning light on, operation of fan.
- symbol □:conventional "static" oven cooking, the oven temperature is controlled using the thermostat knob.
- symbol + cooking with fan oven, on one or two levels, the oven temperature is controlled using the thermostat knob.
- symbol :grill on (on oven top element), the thermostat knob must be set at maximum temperature.
- symbol quick cooking using the fan oven, the oven temperature is controlled using the thermostat knob.
In all positions except zero (0) the red warning light and the oven light are on.
NOTE: The yellow warning light comes on according to thermostat variations. Before putting food in to be cooked, the oven should be pre-heated for at least 10 minutes.
MULTI-FUNCTION ELECTRIC OVEN
With different heating elements controlled using a selector switch and regulated by a thermostat, this oven offers various cooking methods. There are three principle sources of heat:
a) Forced heat diffusion (fan oven).
b) Spontaneous heat diffusion (static oven).
c)Infra-red rays (grill).
Starting from the 0 (off) position and turning the selector knob clockwise, the following settings are obtained:
- symbol 煮oven light and red warning light on, operation of fan.
- symbol :conventional "static" oven cooking, the oven temperature is controlled using the thermostat knob.
- symbol :cooking with fan oven, on one or two levels, the oven temperature is controlled using the thermostat knob.
- symbol on (on oven top element), the thermostat knob must be set at the maximum temperature.
- symbol :infra-red cooking with fast grill, advised for long grilling: the thermostat knob must be set at the maximum temperature.
- symbol quick cooking using the fan oven, the oven temperature is controlled using the thermostat knob.
- symbol + slow cooking using fan oven, the oven temperature is controlled using the thermostat knob.
In all positions except zero (0) the red warning light and the oven light are on.
NOTE: The yellow warning light comes on according to thermostat variations. Before putting food in to be cooked, the oven should be pre-heated for at least 10 minutes.
HOW TO USE THE ELECTRIC GRILL WITH ELECTRIC OVEN
- For models with "Electric Oven" only, controlled by two knobs separately (selector-thermostat), grilling is permitted with the door closed, without using the front side. Temperatures above 180^ must not be used when grilling with the door closed.
HOW TO USE THE ROTISSERIE
a)Grilling with the door open.
- fit the control knob guard as shown in figure 12.
- ignite the grill burner, or switch on the grill element;
- impale the meat for cooking on the spit and fix it in the centre of the two forks;
- insert the end of the spit into the motor drive socket;
- remove the handle from the spit;
- place the drip tray on the bottom runner of the oven;
- gently close the oven door, resting it against the knob guard;
- start the rotisserie motor by pressing the switch on the symbol.
- baste the meat from time to time. When cooked, screw the handle onto the spit and remove from the motor drive socket.
b)Grilling with the door closed.
- as above without using the knob protection as shown in fig.12
CAUTION: The spit forks may have sharp points. Handle with care.
HOW TO USE THE MINUTE MINDER (Fig. 13)
Set the cooking time considered necessary by turning the timer knob clockwise. An alarm will sound at the end of the preset time.
USE OF SINGLE-CONTROL END OF COOKING TIMER (WITHOUT CLOCK) (Fig. 14)
This allows the cooking time to be programmed. Operation:
- Move the knob to the desired cooking time (120 mins max. for the electric oven; 100 mins max. for the gas oven).
- Choose the temperature using the thermostat knob and move the selector knob to the required cooking method.
- When the programming knob is at the 0 position the oven will switch itself off. This is automatic.
- Move the thermostat knob back to symbol
- Move the selector knob to symbol 0.
N.B. If the timer is not used, the oven programming knob is to be set to the manual position .
USE OF THE ELECTRONIC TIMER (Fig. 15)
This allows the start time and cooking duration time to be programmed. If food does not need to be watched, this timer can be selected even when the user is absent. Soon after installation and at any electrical supply cut-outs the display flashes; the clock must then be synchronized again to allow programming.
SETTING THE TIMER TO THE CURRENT TIME
- The current time is set by pressing the 2 buttons (COOKING TIME and STOP) and the "+" or "-" button at the same time. Any previous programmes are cancelled and the AUTO symbol flashes.
NOTE: when the AUTO symbol is flashing the oven cannot be used manually.
^ + ^ AND ^ - ^ BUTTONS
- Pressing the "+" or "-" buttons makes time go up or down at variable speed according to how long the button is pressed for.
MANUAL USE
- Press the MANUAL button: the AUTO symbol goes out (if flashing or permanently on) the SAUCEPAN symbol lights up and the oven can be used by adjusting the thermostat knob and the selector switch according to the instructions given in the manual.
AUTOMATIC OPERATION WITH END OF COOKING AND DURATION TIMERS
- Let's use an example: it is 9:25 am; you want the oven to switch on at 11 am and switch off at 12 pm (cooking time 1 hour).
- Press the COOKING DURATION button and within 5 seconds press "+" button until it shows 01.00, adjust using "-" button if necessary. The AUTO and PAN symbols come on permanently.
GB
- Press the END OF COOKING button and within 5 seconds press "+" button until it shows 12.00. The PAN symbol goes out but the AUTO symbol remains permanently on.
- Move the oven thermostat knob to the desired temperature, and the selector switch to the required cooking method; the red warning light comes on the oven light comes on and the timer is ready to start: at 11am the oven will come on automatically and the PAN symbol will light up.
- When cooking is over (12 am) the AUTO symbol flashes, the PAN symbol goes out and a buzzer sounds; to turn off the buzzer press any button.
- Move the thermostat and selector knob to the OFF position.
SEMI-AUTOMATIC OPERATION WITH COOKING DURATION SELECTION - Let's take an example: it is 11:35 am and you want the oven to stay on for 25 minutes from now on.
- Press the COOKING DURATION button and within 5 seconds press the "+" button until it shows 00.25, adjusting the time with the "-" button if necessary. The AUTO and PAN symbols light up permanently.
- Turn the oven thermostat knob to the desired temperature and the selector switch to the required cooking method; the red warning light comes on, the oven light comes on and the oven starts to operate.
- After 25 minutes the oven and the PAN symbol go out. The AUTO symbol flashes and the buzzer tells you that cooking is over: to turn off the buzzer press any button.
- Then move the oven thermostat knob and the selector switch to the OFF position.
MINUTE MINDER
- Press the MINUTE MINDER button and choose the desired time using the "+" or "-" button.
- The BELL symbol lights up when the minute minder is in use.
- When the pre-set time is over, the buzzer sounds and the BELL symbol goes out.
BUZZER
- The buzzer sounds at the end of a programme and lasts for a maximum of 7 minutes.
- To turn it off, press any button.
- Pressing the "-" button without having previously selected a function the frequency of the signal changes. A selection from 3 possibilities can be made. The selected signal is audible as long as the "-" button is pressed.
STARTING AND CHECKING A PROGRAMME
- The programme starts after about 4 seconds of it being set.
- The set programme can be checked at any point by pushing the corresponding buttons.
PROGRAMMING ERRORS
- Example: at 12:15 pm a COOKING DURATION time of 30 minutes is set and a END OF COOKING is programmed in at 12:30 pm.
- The programme error can be rectified by changing the duration or the end of cooking time, or by pressing the MANUAL button and programming again.
- If there is a programming error the oven will not come on. ANNULLING A PROGRAMME
- A programme can be cancelled by pressing theOOKING DURATION button and then the "-" button until the display shows 0.00.
IMPORTANT:
AT THE END OF EVERY PROGRAMMED COOKING OPERATION YOU ARE ADVISED TO PRESS THE BUTTON, OTHERWISE THE OVEN CANNOT BE OPERATED MANUALLY.
USING THE "ANALOGUE" CLOCK / USING THE CLOCK WITH MINUTE-MINDER AND AUTOMATIC SWITCH -OFF (Fig. 17)
PROGRAMMING THE CLOCK
Press the knob(A) and turn it to the left until it is on the right time. If the knob is turned to the right by mistake, a safety mechanism protects the clock's components.
PROGRAMMING THE COOKING TIME
Turn the knob(A) anti-clockwise, without pressing, until the hand (or dial pointer) is on the cooking time required. At the end of the set time, the oven switches off and the buzzer sounds continuously. To stop the buzzer, turn the knob(A) to the left, without pressing, until the hand is on the symbol of a bell with a line through it (or position the pointer in line with the bell). MANUAL MODE COOKING (contact closed).
Turn the knob(A) to the left, without pressing, until the hand is on the "I" symbol (or position the pointer in line with the hand symbol).
Move the hand (or dial pointer) to the symbol of a bell with a line through it, by turning the knob(A) to the right.
N.B. This clock is also available with minute-minder function only.
REMOVING THE OVEN DOOR
The door can be removed for easier oven cleaning, proceeding as follows:
- fully open the door.
- insert two small coins (e.g. 10 Euros) into the two slots in the hinges.
- close the door until the coins start to prevent it closing further (fig. 16).
- close the door some more and lift it off, holding it at the sides and moving it slightly forward; this is the point at which the door can be removed easily.
- to put the door back in place, return the hinges to their positions, checking that they have fitted into their seats.
- lower the door completely and remove the coins inserted earlier.
- fully close the door.
- always inspect the oven door gasket and if worn have it replaced at once by the after-sales service.
FOR COOKERS WITH SELF-CLEANING OVEN
The two side walls and the back are coated with a catalytic self-cleaning enamel.
Every 10-15 times it is used, leave the oven empty at full heat. The time required for cleaning depends on the condition of the oven.
Some splashes tend to set hard and may clog the pores of the special coating, preventing oxidation and eliminating its self-cleaning properties. In this case, as soon as the oven has completely cooled apply very hot water to soften the deposits and use a soft brush, without detergent, to remove them. Then switch the oven back on at maximum heat for a few minutes.
(Important: never use metal brushes or abrasive substances).
HOW TO USE OVEN ACCESSORIES
- The oven shelf is designed to take normal oven dishes for cooking sweets or roasts, or is used without a pan for cooking foods under the grill.
- The drip pan under the grill is used to collect juices, which drip from the food that is cooked directly on the grill. The drip pan can also be used for cooking.
- Remember that cooking times may vary if food is cooked on two shelves at the same time.
HOW TO USE THE CERAMIC HOB
The hotplate power has a sequential control device which ensures excellent control of the cooking temperature.
The heat settings are from 1 to 6. The knob can be set in the required position by turning it to right or left.
On dual circuit plates, the knob only turns clockwise and the heat settings are from 1 to 6, for the central zones of the plates only. If the knob is turned forward another notch after the last heat setting, the other zones of the plates will switch on.
When one of the cooking zones is hot, the warning light E (see fig. 1) comes on; it will not go off until the temperature of all the hotplates has dropped below about 60 degrees C).
GB
For the user
The four cooking zones are indicated by the outlines screen-printed on the hob. For good efficiency and appropriate energy consumption, only use saucepans and utensils with thick, perfectly flat bottoms (see fig.10). The diameter of the base of the pan must be at least as large as the outline marked on the hob. If the bottom of the pan does not cover the heating area, energy will be wasted. Preferably, it should be slightly larger in diameter.
Pan bottoms and the cooking surface must be clean and dry. Otherwise heat, and thus energy, will be wasted.
Note:
- Never cook directly on the hotplates.
- To save time, cooking with the hotplates may be started at full heat (knob on 6), turning down to the ideal temperature once the contents of the pan have heated up.
- All the hotplates are equipped with a temperature limiter which prevents them from overheating, even if a hotplate is operated at the highest setting with no pan, or if pans with uneven bottoms are used.
The table below will serve as a guide, bearing in mind that cooking times and temperatures may vary depending on the type and amount of foods cooked and personal taste.
| Knob setting | Cooking process |
| 1 - 2 Keeping foods warm, bechamel sauce, custard | |
| 2 - 3 Reheating foods | |
| 3 - 4 Pasta, vegetable soups, ragout | |
| 4 - 5 Boiling, roasting | |
| 5 - 6 Steamed vegetables, steaks, fish | |
| 6 Grilling, omelettes, lamb chops | |
CAUTION
- Do not look directly at the halogen hotplates while they are on, as the light emitted from the hotplates may be harmful to your eyes.
- The ceramic glass surface is very tough but it is not shatterproof and it may not be used to place objects upon it.
- It may be damaged if struck violently by sharp or very hard objects.
- If breakages, crazing or cracks appear on its surface, stop using it and contact the after-sales service immediately.
- Do not place aluminium foil or plastic film wrappings on the hob while it is still hot.
- Soon after installation, the hob may give off a burnt smell; this will disappear after the first few times it is used.
IMPORTANT:
Because of their height, children may fail to see the residual heat warning light. Take care that they do not touch the hob, even if the heating elements are switched off.
CLEANING OF THE CERAMIC HOB
The ceramic hob is much easier to clean than a hob with conventional hotplates. Light dirt can be removed with a sheet of damp kitchen paper. To remove tougher dirt, use the same cleaning methods as for glass, with specific detergents. If a pan boils over onto the hob, use a spatula to remove the deposit formed. Sugar or syrup must be removed immediately before it forms caramel on the glass. Any residues of aluminium foil or plastic film wrappings accidentally placed on the hob while it is still hot must also be removed at once. Water marks and traces of scale can be removed with white wine vinegar. Always remember to rinse and dry the surface with kitchen paper after use. Never use abrasive or corrosive detergents, such as oven sprays, degreasers, rust-removers, powder polishing detergents or abrasive sponges. Do not allow grains of sand to be left on the hob when cleaning vegetables, for example, as they may scratch the surface. Do not slide pans with rough bottoms over the hob; they may mark or even scratch the glass.
GENERAL PRECAUTIONS
- This appliance must not be used by those with reduced mental or motor capacities (including children), or by those who are not experienced or know how to work it, unless supervised or instructed on its use by safety personnel. Children must be supervised to ensure that they do not play with the appliance.
- Always disconnect the power supply before any work inside the oven or where live parts may be accessed.
- Never use the warming compartment for storing inflammable liquids or items which do not withstand heat, such as wood, paper, aerosol cans, matches, etc.
- Make frequent checks on the rubber connection hose, ensuring that it is well away from hot surfaces, that there are no sharp bends or kinks, and that it is in good condition. The hose must be replaced at the latest at the indicated date and must be secured at both ends using a standard hose clamp.
- If taps become stiff to operate over time, contact the After-Sales service.
- Wash enamelled or chrome-plated parts with soapy lukewarm water or non-abrasive detergents. A metal brush may be used to remove deposits from hob burners and flame caps. Dry thoroughly.
- Never use abrasives to clean enamelled or chrome-plated parts.
- Do not use too much water when washing the hob. Take care that no water or other substances enter the burner housing holes, as this may be dangerous.
- The spark plugs for electric ignition must be kept clean and dry; always check after use, particularly if there have been drips or overflows from pans.
- Never move the cooker by means of the handle.
- Do not clean the glass doors of the oven with rough, abrasive materials or sharp metal scrapers, since they may scratch the surface and cause the glass to shatter.
- Do not use vapor jets to clean the appliance.
- The cooker does not have an installation stand.
- Never close glass lids until the hob burners or hotplates have cooled completely; it might shatter or crack.
- Never knock enamelled parts or ignition spark plugs (where present).
- The main or wall gas tap should be turned off when the cooker is not in use.
CAUTION: The use of a gas cooking appliance results in the production of heat, moisture and products of combustion in the room in which it is installed. Ensure that the kitchen is well ventilated especially when the appliance is in use: keep natural ventilation holes open or install a mechanical ventilation device (mechanical extractor hood).
CAUTION: This appliance is for cooking purposes only. It must not be used for other purposes, for example room heating.
A number of fundamental precautions must be complied with when using household electrical appliances. In particular:
- The ceramic-glass hob has good mechanical strength and thus withstands small accidental knocks. If the knob is broken or cracked by a knock, do not use the appliance, disconnect the power supply and contact your dealer.
Advice in case of malfunctions
Before contacting your After-Sales Service, check that:
- the plug is fitted properly into the mains socket;
- the master pilot is on.
If the problem persists, consult a qualified, authorised technician capable of repairing the fault. If the oven light does not work, proceed as follows:
- Disconnect the power supply. Remove the protective glass on the back of the oven and replace the bulb.
No liability is accepted for injury or damage caused by poor installation or improper use of the cooker.
GB
In case of malfunctions, particularly gas leaks or short-circuits, contact your engineer without delay.
EUROPEAN DIRECTIVE 2002/96/EC (WEEE): INFORMATION FOR THE CONSUMER
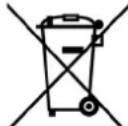
Fig. A
This information is strictly addressed to those who have a product showing the symbol below (Fig.A). This symbol is indicated on the technical data sticker (rating label) placed on the product itself.
This symbol indicates that the appliance is considered as Waste Electrical and Electronic Equipment and complies with the European directive 2002/96/EC (WEEE).
Therefore this product is not to be treated as household waste. Instead it shall be handed over to the applicable collection point for the recycling of electrical and electronic equipment or it can be handed back to the retailer when you want to purchase a new equivalent product.
The consumer is responsible for a correct disposal of the product towards an appropriate collection point.
Otherwise the consumer can be exposed to a penalty sanction by laws in force for waste disposal.
Appropriate separate waste collection followed by recycling the product, the treatment and compatible environmental disposal contributes to avoid negative effects towards the environment and health and helps to recycle material which the product is composed of. For more detailed information regarding the available waste collection systems of this product please contact your local city office or contact the retailer where the product was purchased.
The manufacturers and importers will obey to their responsibility for recycling, treatment and compatible environmental disposal by participating directly and through a joint cooperative system.
EUROPEAN REGULATION NO 1935/2004 - MATERIALS IN CONTACT WITH FOOD. NOTICE TO USERS.

The symbol shown here, which appears on the packaging, indicates that the materials in this product which may come into contact with food are compliant with the requirements of European Regulation No 1935/2004.
Inside the oven chamber, food might come into contact with oven shelves, dripping pans, pastry trays, oven door glazing, rubber gaskets, rotisserie spits, and the sides of the oven itself.
On the hob, contact is possible with pan stands, burners and the hob skin.
In the food-warmer, contact may occur with the sides of the compartment.
RU
Copexahne
BcTynJIeHne
TexHHueckne daHHbIe
HxapakTepehCTKn 21
YcTaHOBka 22-24
Bentnlaunnoeenn 22
Pa3melleHHe 22
IopKIOUOCHNE Kra3OpacnpdeJIHTeJIbHOcETn 22
IacTpoKaHa pa3JHhBte Tnblra3a 23
3aMeHa KHepeOB 23
PeryJHPOBka MHHMaJIbHOrO IIaMeHN 23
IodKIOHHeH K 3JekTpocetH 23
3JIeKtpnueckoe 3axnraHne 23
IpeoxpaHnteJIbHOe ra30KoHTpoJIbHOe ycTPOIcTBO 24
Hhopmaunna JnnoTpeBnteJen 24-30
BentnIyIyIyIyIyIyIyIyIyIyIyIyIyIyIyIyIyIyIyIyIyIyIyIyIyIyIyIyIyIyIyIyIyIyIyIyIyIyIyIyIyIyIy
3axnraHne ropeJok 24
BkIIOueHHe ra3oBOH dyXOBKn 24
BkIouHnnc ra3oBOrO rpnJra 24
PpeoxpaHHTeJIbHOoe yctpoIcTBO r3OKoHTpOJI 24
3JIeKtpnueckoc 3axnraHnnc 24
HcnoJb3OBAHnE raoobix ropeJIOK pa6ooyen nobepxHOCTn IINTbI 25
HcnoB3OBaHHe 3eKtpuecknx KOHphiopok 25
HcnoJIb3OBAHnCe Ra3OBOn AyxOBKn 25
HcnoJb3OBAHHe r3OBOrnH 3JIeKTPueckoro rpn.. 25
HcnoJb3OBAHHe KOHBekUHOHHo 3JeKTPueeCKo DyXOBKn 25
3JIeKTPnueckoI dyXOBKn "4 New" 26
3JEKTPNUECKA DYXOBKA C CHCTEMON BEHTHJIaHH "4" 26
HcnoJb3OBaHHe KOMHHHPOBaHHoH
HcnoJb3OBAHHe NOJINyHKUHOHa.JbHOI
JIeKTPnueckoI dyXOBKn 26
HcnoJb3OBaHHe BepTeJa 26
JyXOBKn C TepMOperyJrTOpOM 26
HcnoJb3OBaHne TaMepa 26
HcnoJb3ObaHne nporpaMMpyioeRo
ycTPOHCTBa C IuΦpOBbIMn YacAMn 27
HcnoJb3OBAHHe nporpaMMpyioero yctpOCTBa 6e3 yacob 27
KAKIIOJIb3OBATbcra“AHAIOROBbIM” 28
HcnoJb3OBAHHe 3JIeKTPoHHOrO
PpOpaMMpyoero ycTpoHCTBa 28
HcnoJIb3OBAHHnc cAmooounlaKIOIeCnryXOBKn 28
HcnoJb3OBAHHe 3aIHTHOrO orpaXdEHH
paoboucnoBepxHIOCTnIHTbI 28
MCINb3OBAHNECTEKIOKEPAMUHECKOINOBEPXHOCTNJIHTbl. 28
CHCTKA CTEKJIOKEPAMUHECKOI NOBEPXHOCTNI JNTbl. 29
PekomeHauuH IO TexHKe 6e3oHaCHOCTH 29
EBPONENCKN PEGIAMEHT No 1935-2004 30
DnpeKtnBa 2002/96/EC (WEEE) 30
PncyHKn 61-63
Дя onpejenenJaTbI BBynucka npnbopa npOBepBe 9-3HaHbI cepHHbI HOpE, yKa3aHHbI Ha cepe6pncToI 3TNKeTke, Ha pyKOBOdCTBE NO 3KcNpyaTaunu Ha cAmOM npnbope:
AABBCDDD
AA=ΓΟД BыΙΝΥΚΑ (нанример: 99=1999, 00=2000, nT.Д.)
BB=HEDEJBAbIyCKA(hanpImep:03TpeTbJe HeJe rOda AA)
C=DEHbBbIyCKA(HanpImep:1=noheJeBnK HeJeBB,
2=BTOPHNIK,
3=cpea,4=YeTBepr,5=πa,6=cy66oTa)
DDDD: npraKOBbH Omep BbIycka (HanpImep: 0004: HeTbeptar nIHTa, BbIyueHHa B DeH C HeJeN BB roa AA).
Haama 6laorapnBac3a Bb6op H NOkynky Ondoro H3 Haixn BbCOKOKaueCTBCHhIx H3dclnn. MblrpoH HoAeCCMc, yTO B Baunx pykax Haan PnHTb6dyT FyHKUHOHPoBaTc MaKChMaJbHoOn Tdaen H HAnlyuHmpe3yIbTaTaMn, OnPabDbBaBc Bce Baun OKnDaHHN.C ToH CEbIO ppeLaTaem Bam BHMaTeNbHO npounTaTb HAcToaHae pykoBOCTBO HnPnDEpKHBaTcBcTexeroYka3aHH, rPeYbHETOpnbopax HcCTEmax, KOTopbIMn OchHaeha Baan PnHTa. Fa6pHa-K HAROBtE h CHHMAeT C c68nBCKYO TBETCTBEHHOCTb 3a IOBpeKDeHH, HEHCIIpaBHOCTH H HeCuaCTHbc C LyH, Bb3BaHHHe Hec6JIIODeHHem peKOMHdaun No yCTAHOBKe H KcJIpyataun nnHtB.
-ДЯТOrO,TObI BbInyCKaTb NHTbB COOTBeTCTBnC COBpe
MeHHbIMN TEXHOLOTNCKHMpeHcHnM H/HINI NOCTOH HOrOIOBBHHeHHKaueCTBaHaHINX N3DeJIn,pa6pHKo OCTABJIeT 3a C0BOn PpABOBHeCHnKakNX-JIb6o N3MeHeHH DaKe 6e3 IIpeBaHPteJIbHOrO IIpeyIpyEckHeHH, YTO, OJHaKO, He Bb3bBAeT IpoBjem HIN 3aTpPydHeHH pN3KcNlNyatauHN.
EcHn BO3HHKHeT Heo6xOJHMOCTb 3aKa3a 3aIyAcTeH, HAdo CdeJaTB 3aIpoc Bauemy npOdaBuy, rIe cJeIyET yKa3aTb HOMep MOeHN HOMep ccpHN PHTb, «PPOHTAMNOBaHHbc Ha fapPhHOH OIO3HaBATEJIbHO TabJNUKe. 3Ta TaJNUka MoKet 6bITb paCIOJIOKeHa BHyTpH OTJeJIeHnPa3OrpeBa TaPeJok (ecJH ecTb) HJH Ha 3aDHHe CTOpOHe IJNTbl.
-ПИNTa COOTBeTcTByET HOPMaTHBaM:
-
CEE 2009/142/ (ex - 90/396)
-
2006/95/CE NO HN3KOMy HnprjKeHNO (aMeHReT 73/23/EEC i nocneJyoune nonpankBu)
-
CEE 2004/108 (po urovn[ radiopomex)
-
EBPONEENCKNI PEGIAMEHT No 1935/2004 (kontaktirovanie s pijevymi produkti)
-EBPONEENCKIPEJAMENT No 1275/2008
-CEE 40/2002
-CEE92/75
-2002/96/EC (WEEE)
- 2005/32/CE (Energy-using Products)
IORCHEHH
-B HacToaHem pyKOBOcTBe npdeCTabJIaOT HHTepec ToJbKO Te npaparpaBn nn pa3JeBn, TDe rOBOPHTbcra O npbOpax, KOTOpBMN ochaHeHa BaIIa PNTa.
KaT. cmOTPHa6pHHyTO TabJnKy Ha oJokke
KJaacc 1 HJH Jx e 2-1
CTCINCHb TcNJIH3OJIaHH X
3JEKTPHUECKHE KOHΦOPKH
145 1.2 KBT - High-Light KOHΦopKa
0 180 1,5 KBT - O6bHuHa KOHΦopKa
1,8 KBT High-Light konΦopka
2.0 KBT - Bictpa KOnΦopKa
210-120 2,1-0,7 KBT-High-Light KOHOPKa
265-170 2,2-1,4 KBT-High-Light KOHΦopKa
MOUHOCTb 3JIEKTPNUECKOHN DYXOBKN 60x60
IOA CBOI IOJHa
KOBBCUHOHHa
AyxOBKa 1.5 KBT 0.7 KBT 2.2 KBT
KOMBHHHPOBAHHa
1.5 KBT 0.7 KBT 2.2 KBT
KpyroBa cnpaJIb dyXOBKn 2,0 KBT
ΓpHb 2.0 kBτ
T30BbIE TOPEJIKN (KHKcpbH MOIOIOCTN)
| Тип raза | Тип торелкий | Бжектор умe | Ньшения MOДИССТБ (КВТ) | HOMN HOMIIHOCSTb (КВТ) |
| G20 | MaJIЯ | 77 | 0,40 | 1,00 |
| 20 | сpeДнЯ | 97 | 0,58 | 1,65 |
| мбap | БоЛьшя | 123 | 0,80 | 2,80 |
| Духовka | 130 | 1,00 | 3,00 | |
| ГрIHь | 99 | - | 1,85 | |
| ТрОйнay | 145 | 1,70 | 4,00 | |
| G30 | MaJIЯ | 50 | 0,40 | 1,00 |
| 28-30 | сpeДня | 65 | 0,58 | 1,65 |
| mбap | БоЛьшя | 83 | 0,80 | 2,80 |
| G31 | Духовka | 86 | 1,00 | 3,00 |
| 37 | ГрIHь | 68 | - | 1,85 |
| mбap | ТрОйнay | 98 | 1,70 | 4,00 |
| G110 | MaJIЯ | 150 | 0,40 | 1,00 |
| 8 | сpeДня | 185 | 0,58 | 1,65 |
| mбap | БоЛьшя | 265 | 0,80 | 2,80 |
| Духовka | 300 | 1,00 | 3,00 | |
| ГрIHь | 200 | - | 1,85 | |
| ТрОйнay | 350 | 1,70 | 4,00 |
Iopne3hie CBeDnB O6nactn 3Heprnonotpe6JeHnna 3NeKtpnuecknx dYxOBOK.
3Tu CBeHn 3aBepaIOT nDOnJIHrIOT INHΦOpMaIIO, npNBeDEHHyIO Ha HAKLeIKe C TexHHeCKIMN DaHHbIM B pyKOBoDCTBE NO 3KcPnyatauIN
CoeHHHcHc Pc3HHOBbIM HJAHROM (pHc. 3 Bn 3 C)
CoeHHHe HbIIOJIHReTc npH NOMOIN pe3HHOBORO IIIaHa, Mapka KaTOPOr COOTBCTCTByCT DCNCTBYUHM HaUNHOJbHBm CTaHdap TaM.Oba KOHuaIIaHTra JOXHb 6bTB 3aKpeJIeHb CTaHdapTHBM 3axHMAMn. B yCTaHOBJeHHbI cPOK HeoBXoHMo pOn3BOIDtB 3aMeHy IlaHaHn IOCTyN K HeMy DOJxH 6bTB 0JIerueH JI KHTPOJI ercoCTOHHN NO BceI DInHe.
IocnnoKIOCHHnIANTbKra3opacpcdJIHTcBHOH cTHeo6xOIMO npOBepHTb Ra3OHnpOHuaEMOCt bHTyuePOB nCOeHHCHH.
JyHKINHOHPOBAHHIHTbHa BytaHe/IpponaHe NOeXoDHMO y6eHTbc8,TO DAJIeHHe rata cetH COOTBeTcByET daJIeHNU. YkaAHHomYHa BApHUNOIO3HABATcBHO.TabHHKc
BHIMAHHE:
RU
YCTAHOBKA
HcnoB3OBaTb TObKO cTaHapTHbIe H6KHe McTaJIHueCKHe TpybI HJIN pe3HHOBBe IIIaHTN.
-PeryJrTop daBJeHHaNoJxH COOTBeTcTBoBaTb HOpMaTHBaM.
-CoeHHHeHHe paMnbl COOTBeTCTByeT HOpMaI ISO 228-1
- H36eRaTb CHIbHbIX H3rHbOB H nepeKaTH TpybI HIN IIIaHaTcTaPbCHe IPhcIOHArbE rO K pa3OrpTeBm CTeHKam IIHTbI.
HACTPOKA HA PA3INHbIE TINbI FA3A
B cIyue,ecINHIOJIb3yeMbI JIJIyHKUHOHNPOBaHHNIIHTbIra3 OTJHuaeTcOYka3aHHoro,HeoXoIMMO HAcTpOHTb PINTy,Den
CTBy CcIeYIOuHM OObpa3OM:
3aMeHHb XHKJIepbB (BCOOTBeTCTBHN C TaBnueH Ha pnc 20).
BbnoJHHTb peryJnpoBky nOdaun BO3dyxa.
- BbIOJHHbpeRyJIHPOBky MHHMaJIbHOrO IIaMeHH BcEx TOpEJOK.
PnmuHHe: Pn KaJOn CMeHe Ra3a HAcJIeHBaTb Ha (pa6pHuHyTOBnKy Ha3BaHHe HOBOr TnHa ra3a, Ha KOTpbHacTpOeHa nIHTa.
3AMEHA KIKJIIEPOB FOPEIOK PAOUEH IOBEPXHOCTH IJHTbI (pnc.4)
-CHrTBpeWtKy,paccKaTeHnPiMaEHN(A)HropeJKN(B);
OTBHTTb H CHrTB KJep, paNIOJKeHHb Ha DHe KaKdOrO DePkaTeJra KJepa (C);
3aMCHHTb HIXCKTOpB b COOTBCTCTBHN C Ta6JHnC, nPHBCdHHoHa cTp. 20, 3aBHHTb H 3aTnHyTb Hx Do ynpa.
PpOBcPHTb rcpMCTHnHOCTb Ra3a
- yCTaHOBHTb Ha InpexHee MecTO TpeJKN, pacceKaTeJIN NJaMeHN H peWETKY.
BAKHBIEPEKOMEHDAUHH
- HN B KOEM cIyuae He 3aTARHBaTB H3JIHWHE HHKeKTopbl.
IPOH3BCD3aMCHy.IPOKOHPTPOJNPOBA Tb TcPMCTNUHOCb Ra3a.BCCX HJKeKTopoB.
3 AMEHAJKJIEPOB IOPEJIKN DYXOBKN (pHc.5a)
OTKpyTHC BnHT KPCNJIChHna Da DyXOBKn
CHHMTe DHO DYXOBKN (CDBHrae ero Ha3aN NOHNMa)
- CHHMMTE RopeJky DxyOBKN, PpeBapHTeJIbHO OTKpyTHB KpeNnue ee BHT
-3aMeHHTe XHKJIep, HcnoJb3yra TOpueBOr TpyuAtbI KIOU Ha 7 MM.
3AMEHA KHKIEPOB FOPEJKN TPNIA (pnc 56)
- CHHMMTe ropeKy, npeBapHTeJbHo OTkpyTHB Dba KpePnIe ee BnHTa
-3aMeHHTe XHKJIep, HcnoJIb3yra TOpueBOI TpyuAByI KJIou Ha 7 MM.
PEKOMEHДALINH
Ipn ycTaHOBKe XHKJIePOB HNKoTaN3JINHHe He 3aTARBaITeHX KJIIOYOM
- IocJIe 3aMeHb BceX XHKJIepOB PpOBepbTe Hx Ra3OHenpoHHuaeMOCTb
PEYJHPOBKA MHHHMAJIbHOI IOIAMEHN FOPEIOK PABOENIOBEPXHOCTN IINTbl
B cnyuac, ccn n nnta fynknoHnpyet Ha cckKcHOM ra3c (7/1) peryIHHPOUHb BHT DoJIKeH 6bTB 3akpyeuH Do yIopAp. IInHa moKet 6bTB oChAHeHa KpaHAM TnA «A», C yCTaHOBJeHHBM BHyTpH peryIHHPOOuHb BMHTOM (peryIHPoBaTb KOtOpBI MOxHO IIHNOMOIIM MaJIeHbKOI OTBepTKH Upe3 cTePKeHb) HIN TnA «B» C hapyXbHM peryIHPoBOUHbM BHTOM C npaBOI CTopoHbI (cro MoKHO peryIHIPOBaTb HeIOcpeIDCTBEHNO), CMOTPH PNC.6.Cnn dIy fynKIOHPOBaHHI NHTbl HCIOJB3ycTcRA HAtypaJIbHbI rA3, TO HC3aBHCHMO OT TnII KaHa DeHCTBOBaTb CJJeDyIOIHUM O6pa3OM
-3axrHTe ropeKny H ycTaHOBHTe MaKcHMaJIbHoe PIAm.
CHHMHc pykky peryIaTopa,NOTAHyB cHa Cc6n, Hc HaKHMaHa npeDHHIO naHeJIb PNTb BO H36eKaHHe ee NOBpeKDeHN.
Pn NOMOUI MaJIChbKOI OTBCPTKNI KTKpyTNTe pCryJINHPOBOUHBI BHT npH6JIH3HTeJIbHO Ha TPN O6Opota (BpaIIaA ONBepTKy IpOTNB acOBONCTpcJIKN).
IIOBepHHTe eue pa3 ctepKepbKaPbI pOtnb YacOBn CTpeJKNdoero6JOKHPOBKn. B 3OM cTyuae 6ydet MAKCHMaJIbHOe PAm.
OueHb MeIeHHO 3aKpyTHe peRyIHpOBouHbBHT, He HaxHMaHa OTBePTKy, Do Tex NOp, Ioka IIaMaHe yMeHbHTcH a 3/4. PnIOTOM oBaPHTe ocOObE BHMaHHe Ha To, YTo6blPiMa6blIo DOCTaTOH OYCToHNBbIM DaKe IpN yMepeHHOM NtOKe BO3dyxa.
PeyJINPOBKA MHHMMAJIbHOFO IJIAMEHN FOPEJIKN DYXOBKN BcIyueae,ecIINIaIyHKUHOHNPyET Ha cKHXeHHOM r3e (5/II), perYInpouHb BNHT DOJIxKeH 6bITb 3aKpyueH Do ynpa. Ecln IJIpeyHKUHOHPOBaHNA INITb HcIOJIb3yeTc HATypaJIbHbI Ra3, To He3aBHNCMO OT TINa KpaHa peYJINPOBKA MHHMaJIbHOrO IJIaMeHN BblIOJIHHCTCn CLEdyUoHM Obpa3OM:
-CHHMMTEIHOIyXOBKN(CBHTAeeroK3aDHeiCTEHKe HNOHNMaJ).
-3aKHTeTopeJky dyXOBKn H yctaHOBHTe yka3aTeJIb peRyJInpOBOUHOpyKN B NOJOKeHHe MaKCHMaIbHO rO IJaMeHN. 3akponTc DBCPuy dyXOBKn.
-HaHnHTe peryJInpOBOuHbB BnHT TepMoperyJrTopa HnN KpaHa (pHc.7)
- OTKpyTHTe peRyJIHPOBOUHb BnHT npH6JIH3HTeJIbHO Ha TpN o6o-pota.
-Yepe3 5-6 MHHyT yCtAHOBHTe yka3aTeJb pyKn B NOJIOKeHHe MHHMaJIbHOrO IJaMeHH.
-MeJIeHHo 3aKpyTHe peTyIHPOBOuHb BHT,Ha6IIOda yMeHbIeHHe IaMeHn Upe3 CTekIOB DBePue DYXOBKn (Dbepua 3aKpIta)do TcX NOp,IOKA KOHyC IIaMCHH HC yMcHbIHTcN DO 4MM.IPi6JIN3HTeJIbHO.He peKOMHdyETcR CIIHIIKOM yMeHbIIaTb IlaMaOHO OIOJIKHO 6bITbCTaHbHbIM DaKc PnH bICTPOM OTKpbBaHHn 3aKpbBaHHn DBepiBu DYXOBKn.
- BbIKIOUHTe RopeKy H yCtAHOBHTe DHO DYXOBKN Ha MecTO.
IIOJKJIOUHNEKJIIEKTPOCETN
IpeKJde cem IIOKIOUaTb IIHTy K 3JIeKTPocetn. Heo6xOdHMO y6eINTBcra, YTO:
HaepKHe BHeHHe cTH COOTBeTCTByeT npaMeTpam, yka3AHbIM Ha a6pHOn ONo3HaBATEbHO TaJIuKe
-po3eTka 3a3emJehnH yHKUHOHHpye
ДЯ Bынонненя npramorno NOKJIIOUeHnK cTeN Heo6xOIMO NOIroTOBnTB yCtpoNCTBO, KOToPoe 6yDet OBeceNeuBaTb OTKIIIOUeHne OT cTeN, pacCTOJHnE OTKpbITnA KOHTaKTOB B KOTOpOM DoJIIXHO IO3BOJrTb NOIHOe OTKJIIOUeHnE B yCJNOBnX npeHApRjaKeHn KeTEROpn III N B COOTBeTCTBnB I npaBUNamN yCTaHOBKn.
ECJINIJIHTaYKOMIIeKTOBaHa CeTeBbIM IHHyPOM 6e3 BNIJK,TO JIAI NOIKJIIOUeHn MOJHO HcNOJIb3OBaTb CTAHApTHyO BHJky.IpH 3TOM HeoXoDnMo yuHTtBA Tb CJJeIyouee:
-KeJTO-3eJIeHbI IPOBOIDIOJXeH HcNOJB3OBaTBcA DJIa 3a3EmHeHH
- rojbo npoBo dJHnTpaJH
KOPHHeBbI npOBoD IJIa HAnpJxKeHHcETN
- Hyp He doJKeH cOpHKacTaBcR co CTeHKaMn NHTbI, HapReBaIOUIMMC6 60Jee 75^
B C Lyue 3aMeHbI CeTeBOrO uHypa NcIOJb3OBaTb HHyp TnHa HO5RR-F HnH HO5V2V2-F IOxOJaEro CCHeHn (CMOTPH CXEmbHa pnc.2).
-ecJHnIHTaNocTabHeHa63ceTeBOrO IHypa, npHIOKIOueHHN HcIOJIb3OBaTbIHHypTHIIaHO5RR-FHINHO5V2V2-FIOxOJIIEero CEeHHN (CMOTPH CXEmbl Ha pnc. 2).
BHIMAHHE:
PpOH3BOHHTeJIbHe HecET OTBcTCTBEHHOCTH 3aIOBpeKJdeHH, Bb3BaH
HbIe HecO6HOJeHHEm BbIeYKa3aHHbIX Tpe6OBaHH N DeHCTBYIOHN
IPaBnI NO TxHHKe 6c3OnaCHOCT nPi NIOKJIouCHHH IJIHTbl.
08a3TeJbHo IpoBepbTe, YTO IPOBOd 3a3emJehHH PJIHTbl IpaBnJIbHO
CocDHHc C cctbO 3a3cMlChHH (CMOTPH CXcMbHa pHC.2).
IHTbIOCHAHEHbIE CNTTEMOH 3JEKTP03AKINAHN
Touhhe pacctoHHa Mekdy 3JIeKTPoDM I ropeJIKOH yka3aHbHa pnc.5a,56..
EcnH NcKpa Hc BbIbBacTcHc YIOpCTByTe.T.K.MoXHO NOBpeDHTb ReHePApOp.CnCTema 3aXHHaHHaMOKe T He cpa6aTBBaTaNoCnCdyuHMM pHnHHAM:
-BJaxHnHa, HEnCnpaBHa NJI 3apr3HeHHa CBeha.
-He npaBnIbHO yCTaHOBJeHO paccToHHe MeKdy 3KeKtpoDom H ropeJIKOH.
- TOKOIIPOBOIDHINIPOBOIDOK CBeHNIOBpeKDeH NIN OToJIeH.
RU
YCTAHOBKA
HHΦOPMAUHДЛ NOTPENEJIEN
HCKPOBOI pa3pnd yXODHT B 3cMJIIO (B dpyrNX qactx IANTbI).
-IOBpeKdEHeHepaTOp HJIMMKNPOBbIKIIOHaTeJIb
-ckonJIeHHe BO3dyxa B Tpy6oNpOBoJax (OCo6eHHo NocJe DINTcIbHOrnpHOHa HcHcNoIb3OBAHHaIIHTbI).
- HenpaBbHbHO COCTaBJIeHa Ra3OBo3dYuHna Cmecb (HenpaBbHbHOE rOpEHc)
PPEOXPAHNTIELbHOE YCTPONCTB0I3OKHTPOJI
PpABHbHOe pacCToHHHe MeKdy KOHAMN YyBCTBHTeJbHOrO 3JeMeHTa TepMonapbI H ropeIKoN IokaHaHO Ha pnc.5a,56.
KoHTPOJIyHKUHOHPOBaHHI KlaHaHa Ra3OKOHPOJIaEN CTBOBAtb CJIeIyIOHM O6pa3OM
3aKHTc ROpcIKy H OCTaBBTE CC BKNIOCHHOI npHOH3NTcJIbHO Ha 3 MHHyTbl.
- BbIKIOHTe ropeKy H NOBepHHTe pyky peryIaTopa B noJIOKeHHe 3aKpbITo, Oo3HaueHHoe CHMBOJOM (●).
-Yepe3 90 cekyH B cnyuae KOHTpOJa rOpEIOK paBouen NOBepx-HocTH N Ucpc3 60 cckyH B CAYuac TOpCIOK dYXOBKn H rPHJN IOBepHyb pyky B NoIOJKeHne OTOKpbITo.
OCTaBBTCpykyB3TOMIOJOKCHHHI npHbH3HTb 3aKcHHyOCnHcy K ropeJIke. IOPEJIKA HE JOJKHHA 3AKEHBCr.
Bo Bpem3aXnHaHH Tpe6yOTc npHbHTeJbHO 10 cekyHd nIa BO36yKDeHHMaHTHTa.
KlaanrataOKOHpoJIcpaabTbIbAEaBtOMaTHueeCKnIOcJIe BbIKUOCHHIIaMCHNHC6oJIccYCMupeC390CCkyHdJIArTOPOK paOoeHIOBepxHOCTNIHTbIupe360ceyHdJIArTOpeJOK dXOBKNrPnJI
IPDEyYPKEKDEHNE
IpeaononepaueHnnoHCTKe HINTEXO6cLyKHBHIO OTKIOHTC NHTyOT 3AKPbBaHTC KpaH NOaH ra3a.
-IPN NOIKJIOUCHHH NINTbK HCTOuHky IODaun Ra3a He IpOBepaTe RepeMeTHNUoCTb CTbIKOB pN NOMOIN NJaMaEH. EcJIN BBaIeM pacnopjKeHH Het CneuaJIbHbIX PnHbOpOB dJIa KOTPOJIra3OHpOHNoHuaemocTH,MOxHO HCIOJIb3OBA Tb NeHy INI KOnHeHTpHpOBaHHyMbIbHyO BODY.
- YcTaHaBJIHbA Ha MeCTo pa6OuYIO IOBepxHOCTb IIINITbI y6cIIH-TeCb, YTO 3JIeKtpHueckHe npOBoDNK CBeueH (ecJIN HMeIoTc) He cOpnKaCAIOTCa KHKJIepaMn H He NcPcKpbIAOTnx.
KAK NcnoJb3OBaTbIHTY
BEHTIJIaIINIOMELIEHHI
3KcnNyataunra3OBOHnIHTbCOnpOBXdaTcBbldeCHHEm TnIOBTBnBIAJHOCTNBIOOMEHNN,Γe OHA yCTaHOBJEHa.103OMY, HCOXBODMO 06CCNCHTB BOHTNJIUHNO NMOUIH N IOADCPKHBATbOTKpbITBMIECTBEHHBIE BENTHJINHOHBEOPCTHINHYCtAHOBHTB BHTJHKOH 3OH.B CUYae DINTeJbHORO INHTEHCHBHOROHCIOJB3OBAHNRn IITb BO3HNkAcT HCOBXOHNMOCTb DOONIHHTCBHOBEHTNJUN, KAK, HAHPMEp, OTKpbITb OKHO INYBEJNUHTBMOHOCCTB BByHXDCHHO BHTNJUNH BBITXHORO 3OHTA.
BKIOUOHEHIEPOEIOKPAOOUENIOBEPXHOCTIINITBI
-HaMMHTe H NOBepHHTe peryHnPOBOHyIO pyky npOTHB YacOBOH CTpeKN H yCTaHOBHb OTMeTKy HAIpOTHB CHMBOJIA, O6O3HaYeHHO Ha IpcDcHn PAnCJIH NIIHTbI (NOLOKCHNC MaKCMJaIbHOI PIaMeHH).
3aTcM NOHCCHTC 3aKCHHyO CnHky K ROpck
-ДЯУMeHbIeHnIIaMeHHIOBpaAHBaHTe pyKy B TOM JKe HApaBCHHN.YcTaHaBJIHBAOTMCTKY HAnPOTHB CHMBOJIa(NOJIOXCHHCMHHMajbHOro IIaMeHH).
BKJIOUeyHNE TOPEJOK PAOCHEN IOBEPXHOCTN, OCHAIIEHHbIX KJIAHOM FA3OKOHPOJI
HaMKHTc H NOBcPHHc pcryHnPOBOHyO pyky npOTNB acoBOI CTpeKN H yCTaHOBHTE OTMeTKy HAIpOTNB CHMBOJAO, 0603aueH-HORo Ha IncpCdHc Hn HcHn IIHTbI (IOLOXCHNC MaKcHMaJIbHOrO IIJaMeHN).
-3aTeM NOHeCHTe 3axKeHHyO cHnUky K TopeJke H HaKMnTe Ha pyKy Do ynpa H DePKeHTe ee npxKaToB TeueHHnPn6JIuN3HTeJbHO 10 cekyHd.
OTNYCTHTCpykUy6cHNTCCb,HTO rOpckA3aKrAacB.BnpoTH BHOM CUYae NOBTOPHTe BCE CHaJa.
BKIOUHEHNETOPEJIKN DYXOBKN
-OTKpoTe DBepu DyXOBKN
HaKMHTc Ha pyky HIOBcPHNT CC IpOTHB qacOBH CTpcJKN DO NOJOXEHNAKCHMaJIbHOrO IaMeHN.
3aTcM NOHCCHTc 3aKxKCHHyO CINHky K cHTpaJIbHOMy OTBCpCTHO Ha dHe dyXOBKn H aKMITE Ha pyKy Do yNopa (PnC.8).
He OTnysckar pyuKn y6eHTecb B TOM, qTO ropeJa 3aKrJAcB, Ha6IIOaIaIpaIyApe3 DBA 6OKOBbIX OTBepCTHn Ha dHe dyxoBKN
IpiHbH3NTcJIbHOuepe3 10 ckyHOnOTnycHTc pyuKy H npOBcpbTe, He nOryXJa IIn ropeJka. B npOTHBOM clyyae NOBTOPHTb BCE CHaHaJa.
BKJIOUHNE TOPEJIKN TPNJIA(A3OBbIN TPNJIB)
- YcTaHOBHTe PAnHky DAn3aHNTbpeYnHPOBOuHbXpyekOT NO-TOKa Ropyero Bo3dyxa, KaYkA3aHO Ha pnc.11.
HaKMMTe Ha pepyIaPBOOHyIO pyuKy dYXOBKn I NOBcPHnte cBnpaBO Do KOHua.
-3aTeM NOIHeCHTe 3aKKeHHyIO CINHky K IepfOpHPOBaHHoN Tpy6e RopeJKN HAnKMHTe Ha pyKU DO yNopa (CMOTpn PHc.9).
-Heotnyckaypyuky6eHntecb.HTORopejka3aKrIacb
-Пиблн3HTeJIbHo uepe3 10 cekyHД OTNcTHe pyky H y6eHNTecB, YTO rOpEJa He nOTyXJa. B IpoTHBOM cIyHae NOBtOPhTe BCE CHaHaJa.
PPEOXPAHNTBHOE YCTPOHCTBO FA3OKOHPTOJIA
IpeHMyIeCTBO OcHaaHHeBHX 3THM yCTPOINCTBOM rOpeJOK COCTOHT B TOM, ITO B Cnyae HENPON3BOJbHOrO rAaHEHn NaMeHH nAmEHn cpaBaTaIBaet CHCTema 3aIIHTbI. DeHCTBHTeJIbHO, B 3TOM Cnyae aBTOMaTHueckn npckpaaactcna OdaHa Ra3a K NotyXuHr FOpEKe, No3BOJra TaKM o6pa3oH36BeKaTb OAnachOCHTH yTeUKNrA3. NocJe HENPON3BOJbHOrO raIeHn PJIaMeHH KJIaHaH rAOKOHTpoJr CpaBaTaIBaET aBTOMaTHueckn He BoJee Yem Upe9 90 cekyHd JIA rOpeJok paBooye NOBepxHOCTHn IIHTbI Hpe960 cekyHd JIA rOpeJok dYxOBKn H rPHJ.
IJIHTbIOCHAUHbIECNCTEMOJ3AXNIGAHNOTJIEKTPUECKOHCKPbI
PpHHH3axKHaHH TaKOH Ke KaONHcHo BBHIE, 3a HCKJIOueHHEM TORO, YTO BmecTO CnHUK HCNOJb3yeTcHckpa, NOyuaMaM npH
HaxaTHN, DaXe MHOROKpaTHOM, pacnoLOXeHHo Ha nepeDHei NaHei KHOIIKN, HIN Ke HaxHMaj HA pyKoRTy RopeJIKN, KOtopaJIOJXHa 6bTTB BKIOUeHa. B Clyuae, ecn ropejka He 3axHraetc, NonpoBoBaTB eue pa3,yCTaHOBB peryIHPOBOHyO pyUKy B no JOxKeHHe MHHMaJIbHOrO IIJaMeHN (2).
EcHnPiHTaOCHaHeHa ChTeMoN 3eKTPo3axHraHHr OpeLOK DxyOBKn HrpNIA, npH Nx BkIIOueHHN OB3aTeJbHO DePkaTb DBepyDxyOBKn NOJIHOCTbO OTKpBtOH.
-BoBpEMBAKIOUeHHRAOPEJOKDxyOBKnHrpNJIA,OCHaHEHHbIX CnCTeMOJ3JIeKTPo3aXHrAHH,HeHaXHMHTeHa KHOKNy 3aXHrAHH 60JIeueHMe HA10cekyH.EcJIN uepe310cekyHrOpeJIka He 3axRETC,OTNycTHTE KONKY,OTKPOHTe DBepuy DxyOBKn H NOOXHTe NkpaHHe MpeMHHyTpypeXJe QmNOBTOpHTb BKIOUeHHE. EcJIn JIeOpeJKA He BKIOHaTeCnIO pPHNHHe HEnCIIpaBHOCTHnCTeMbl 3JIeKTPo3aXHrAHH,TO 3aXHTc OpeJky BpyHyO pN NOMOHN CINHKn,A 3aTEM BB3OBHTe CneuaHCTa No TeXObcJyXHBAHIO.IPDEyIPPEK.DEHIE
06bHNO NOCIE DHTCJbHOrO HcHcNOb3OBaHnI IHTb cpa3y He ydaTe 3aKeueb ropeJIKN. IpeE 3axHraHNem DOCTaTOUHO NOOXDaTb HcCKoJIbKO CCKyHd. NOKA Hc BblcT CKONHBHHNCB TpyoONPOBOJAX BO3dyx.
CTapaNTccb, YTO6bI BMCCTe C BbIyNcKacMbIM H3 ROPcIOK BO3dy XOM He BbHIIO MHoro Ra3a. FcJIH RopeJIka He 3aKRTcB TteEHHN HeCKoJIbKHX cekYH, NOBtOpHTe 3aJrAHHne, NpeBaPHTeJIbHO IOBepHyB peryIHPoBOuHyO pykY B NoIOxKeHHe 3aKpbIBaHHn ( ), a 3aTcM BHOBb OTKpbIB CC.
Korda dyxOBKa HnH rHb HcNOJb3yOTcBnCpBbc, H3 OTBCpTHa DYXOBKn MOKeT IOBHTCBdBM HHePnTHb3aIax, Bb3BaHHb pa3ORPCBaHHCM MaHnPOBaHHOIOKpbTHcTCHOK dyxOBKn HocTaTKOB MacJIHnCTOH CMA3KN TOpEJOK.
HcnoJb3OBAHNE KOHΦOPK ΓA3OBONIHTB
HcnoIb3yIteKaTpIOJIcDHaMeTpOMdHA,POXoJreroKdaH HOMy pa3Mcpy KOHΦOpKN.IIaMn He DoJxHO BblpBtbcn H3 IOJ KAcTpOJIH.PekomeHdyetC
-ДЯ MaJOn IopeJIKN HcNoJIb3OBAbT KaCTpIOH dHaMeTpOM 8 CM, yCtHaBaBJIbBa NocTaBJIReMyIO BmEcTe C PJIHToI CeTKy DJIa YMeHbIeHHN dHaMeTpA ropeJIKN. -ДЯ cPcIHCn IopeJIKN HcNoJIb3OBAbT KaCTpIOH dHaMeTpOM 14
-ДЯбСТРОПROPEЛКHЛНТрОнТROPEЛКH = EMKOCbCДИМETPOM HC MCHC 22 CM.
TpoHnra ropEnka npiroDHa Iy nCnoB3OBAHnK aKTPOB Wok.
IIPMEUAHHE: HN B KOEM cnyae He ocTaBJIb pyky B npoMekyTOUYHx NOJIOKeHHx MEKdy CHMBOJOM MaKcHMaJIbHOrO nJaMeHH HNOJOKeHHem "3akpbTo"
IINITbIC 3JEKTPNUECKHM KOHΦOPKAMH
KOHOpKn HMeIOT pa3JHHyIO HHTeHCNBHOCTb HaPcBaHHB 3aBNCHMOCTN OT NOJOKeHHpeyJrTopa.
-NOLOXKeHHe 1 = MHHHMaJIbHOe HaRpeBaHHe BCEx KOHΦOpOK
- NOJOKeHHe 6 = MaKCHMaJIbHOe HaPeBaHHe ObUHbIX N ObICTpBX KOHΦOpOK (C KpaChbIM DnCKOM)
-IOJOXCHNE0-BbIKJIOUChHNCBcEX KOHOPOK
He HcnoJb3yHrKe KAcTpOJn C DHaMeTpOM Ha MeHbIe DHaMeTpPa KOHOpKn. DHO KAcTpOJN DOJIJKHO 6bITb KaK MOXHO 6oJIee IIIOCKHM. UTo6bl JyUWe npHJIerAtb K NOBepXHOCTH KOHOpKn (pHc.10). IPEyIIPEKDEHIE
He octabJHrTe KOHOpky BKIOUeHHoB 63 KAcTPOJIN. EJIN JKe BbI HcNOJb3yeTe KOHOpky BnepBBe, TO peKOMeHNyETcOCTaBHtbe BKIOUeHHo IIpN6JIIN3HTeJIbHO Ha 10 MHyT dIa TOrO, YTO6bl npocyuHTb BJary IOCtaTK CMA3KN Ha ee NOBepxHOCTH.
EcH KOnΦopKa He HcNoJb3yEcTcB TeeHH dIHTeJbHO rnpHOa BpeMeHH, peKOMeHdyeTc CJIerKa cMa3aTb XnPOBOc Ma3KOJ ee 3MaJIHpOBaHHyIO NobepxHOCTb.
- H36eAaTe npMmHeHHa 6pa3HBbIX cpeCTB nPH OCHTE NOBepxHOCTN KOHOpKn.
HcnoJIb3OBAHNE FA3OBON DYXOBKN
- NocJIe BKJIOueHHI ROpeJIKN 3aKpOHTe KpbHkN H OCTaBBTe DyXOBky B TeUeHHN 10 MmHyT dIra pa3OrPeBaHH.
YIOXHTC nPiHrOToBnAeMyo IINuHa ObHuHyO cKOBOpOdy 6c3 pyuHNIOCTaBBTe ee Ha XpOMHPOBaHHyO pellEly.
HOMCCTHTc PCHTKY BMCCTCo CKOBOPoDIOB D LyXOBky KaK MoXHO IPhrTOBJraEmoe Ha rPHJe 6IIO
BbIe H yCTaHOBHTc yKa3aTeJIb pyuKN peRyJrTOpa B XeJaACMOe NO JIOXEHHe.
-3a npHrTOBJIeHHM NIIH M0KHO HAbIOaTb YpeE 3acTeKJIeHHYIO DBepuy DxyOBKn Pn BKKIOueHHOM 3JEKTPuYecKOM OCBeueHH. TaKM O6pa3OM MOxHO H36ExKaTb NocToHHORO OTKpbBaHH JDBepU, ecJN B 3TOM HcT ONpeDEeHHo HaIObHOCT, KaK, HApHMcP, NOJITb ROTOBHIEECB 6IIO JO KHPOM
IIPMHUEAHHE:ДЯ ПИТ Бe3 TepMOperyJITopa
pyuka pepyJrTopa B IOJIOXeHH MaKCHMaJIbHO rHaIpeBa 280°C
-pyuka peryjIaTOPa B NOJIOKeHH MHHMaJIbHOrO HArpeBa 150°C
-Bce IppomEkytoHbIe TempepaTybI MeKdy 150°C n 280CyCTaHaBaJIHbAIOcTcII pNIOJIN3HTeJIbHO MeKdy HOJOKeHHEMMHHMaJIbHOrO H MaKCHMaJIbHOrHOHArPCBa.
HnKoIa He yctaHaBJIbAaTe pyky peTyIaTopa B IpomExKyTOUHOe IOJIOKeHHc Mckdy CHMBOJIaMn MaKCHMaJIbHOrO HaPepHnOTKIOueHHyXOBKn
HcIOJIb3OBAHNEI3OBOFO TPHJIA
- YcTaHOBHTe PAnHKy 3aHNTbpeRyIHPoBOuHbIXpyeKOTnToKa rOpAero BO3dyxa, Ka k yka3aHo Ha pnc.11.
-3aXHTe TOpEJKy HIOOJHTE HeCKOJIbKO MHHYT, IOKa HArpeETcA IVXOBKa. - Pa3MecTHTe Ha peIeTe NpHrTOBJIReMoE Ha rPnIe KyIIaHBe.
- YcTaHOBHTpepeKBy B LyXOBky BCAMoe BepxHee NOLOKeHHe. UyTb HNKe peCCTKN NOCTaBBte IPOTHBCHB.
-3akpoHTeDBepuydyxOBKN,PPNCLOHnEEeK3aunTHOHIIJAAKe. Ucpc3 HcckOJIbKO MHHyT IpeBCpHNTc KApHBWUOCHa TPhIe HNHTy TaKHM Obpa3OM, YTObbl Obe CTOPHOI NDoBepJIHCb OHNHaKOBOMy DeHCTBNO HHPaPaKpaCHORo H3JyHeHH H3aKaPNIHCpbABHOMepHO.(BPEM PnHrTOBJIeHHN 3aBHCHT OT TnTa IIPOdYkTa H NHDINBDAjALbHOrO BKyCa).IPnHrTOBJIeEMoe Ha rPHJe 6JIOdo.
- KaK yka3aHO BbIe, 6e3 IcNoJIb3OBAHnIaIITbI pyuKn, KaK noka3aHO Ha pnc.12
NPOOxH: OI akpc Tc ooubaac 0a mnpouov va eiva upec. Na tic niaveTne npooektikca.
HIOJIb3OBAHME MEXAHHECKOFO TAHMEPA (pnc.13)
yCTaHOBHTe BpEm, Heo6xOHNMe IJI npHrTOBJIeHHN NIIIN, NO-BOPaUHBApyKu TaHMePa No yAcBOH CTpeJIke. NcTeueHHYcTaHOBJIeHHORo BpEmHI Bb YcJIbHHTe 3BOHOK, H3BeHaIOHH O6 OKOHHaHHn pHrTOBJIcHHI.
HIOBJ3OBAHNE IPOPTPAMMHPYIOIEFO YCTPOHCTBA E3 YACOB (pnc.14)
3To nporpaMMpyIOoee ycTpoCTBO NO3BOJraTe nporpaMMPOBaHHe BpeMeHH OKOHuaHH PnIroTOBJIeHH NIIH.
ФункцИОнHрOBaHHe:
YcTaHOBHTe KcJaACMOE BPCMЯ npHrTOOBJIChHЯ (MaKCHMym 120 MmHyT dIaIeKtpnueckoI dyXOBKn I MaKCHMym 100 MmHyT dIra Ra3OBON dyXOBKN).
- Pn NMOUpyK TepMOperyJrTopa Bb6epuTe TempePty H yCTaHOBHTe NepeKJIouaTeJb Ha XeJaemOM CnOCo6 EpnroTOBJIeHHra.
-Korda pyka nporpammatopa DOniet Do HyeBoro noJIOxehn (0),Piua ByctrotobaHdyXOBKa ABToMaTHCCKN OTKIOHTC -
Nocle 3Toro nepeBdnte pyky TepMoperyJrTopa B noLoKeHne
-
YcTaHOBHTe NepeKIOUaTeJIb B HHyIeBOe IIOJOKeHHe 0.
IPIMEuaHHe: Be3 HcNoJIb3OBAHHn IporpAMMpyoIero ycTpoIcTBa dYxOBka FyHKuOHnHPcyt ToJIbKO B TOM ClyAc, KOrJa pyKa npOrpAmMaTopa yCTaHOBJeHa B NoIOJKeHHe pyuHorO peXHMa, o6o3HaueHHoe CHMBoJOM
HIOJb3OBAHNE 3JEKTPOHHO IPOPGAMMHPYIOIEFO YCTPOHCT BA (pnc.15)
IIO3BOJIACT IPOrpaMMNPOBAHHC BpMCHH HaaylaI npHrTOBJIeHN H II IPOJOJIHTeJIbHOCTb IPIHrTOBOTJIeHNIIIN. EcJH Het HeoBXOJHMOCTH HaJIIOdaTb 3a IPOUeCCOM IPIHrTOBJIeHN, TO DOCTaTOUHO YcTAHOBT BpEMn, NO HCteueHHKOTOPORO DYXOBKa ABTomATHueCKN OTKIOHTCn. IIOCE MoHTaKa HIN NOCLe BpeMeHHORO OTKIOUeHHN OT JICKTPOCCTN 3JCKTPOHbHd INCIIICmMTRAcB TaKOM Clyuac, JIpy PAIBJIbHOTo IPOrpaMMNPOBAHNN HeoBXOJHMO BbICTaBHt ToHQOC BpCMn.
HACTPOKA YACOB
-HaKHMaOJHOBpeMeHHoHa 2 KHOKN (IPODOJIIXHEJIbHOCTb IPHTOBIEHIN, OKOHAIHN IPHOTOBIIHHN H HA KHOKNY +nHIM MOKHO yCTaHOBHt BpEMr. IIpn 3TOM aBTOMaTHueckn CTHpAOTcR
paHee ycTaHOBJIeHbIe npOrpamMbI H MmraEt HaINncb AUTO, 0603HaayauoIIaH aYHKUHOHNPoBaHHe B aBTOMaTHueCKOM Peknme. IPIMUEAHHE: cCnn HaINncb AUTO mHaTc, FyHKUHOHPOBaHHe dXOBKN BpyHOM peKHMc HcBO3MOxHO.
KHONK H
HaKHMa KHOKN H MOxHO yBCJHnHBaTb HmYMCbWAtb
yCTaHOBJIeHHoe BpEM. CkopoCTb H3MeHeHHaABHCHT OT
JInTeJIbHoCTH HaKaTHa KHOKN.
ФУHKIIOHNOHPOBAHNE B PUYHOMPEKHM
-HaKaTaHa KhoNkpyuHOrPEKHM:HaDnHcB AUTO norachET (ecJH OHa do 3TOrO MHRaJa HIN TROPaI NOCToRHHbIM CBCTOM) H3aropaaTcHMMBOJI KACIOJI. Tepeb MoXHO BKIOHTb dyXOBKY, IOBOPaUHBA B COOTBCTCTBHN C yka3aHnMn pyKOBoOCTBa pyky TepMopeyJITopA n pyKny NepeKIOuaTeJI dJI BBOpa cNoocob npHrTOBJeHHra
ФУHKUHOHPOBAHNE B ABTOMATNUECKOM PEXKHEMC IIPOPTPMMPOBAHEM BPEMEH IPOJOJKNIEJBHOCIN N OKOHUAHINIPHIOTOBJIENIA
-PaccmOTpHn pHMepe. cHuaC 9 u25 MHH. Bb JxelaTe, yTO6b dyXOBKa BKIOUHJAcB 11 q. H OTKIOUHJAcB 12 q. (dHTeJIbHOCTb npHrTOBJIeHHa 1 qac).
-HaKaTb KHOIky IPOJOJTKHTEJIbHOCTb IPNFOTOBJEHH3aTEM B TeueHH 5 cCKyHd HauKaTb KHOIky +' NOKa Ha DCNLIcc HC NOBHTcB PcMg 01.00.B Cnyae HaIObHOCTn HCNOJb3ObaTb KHOIky -'.HaDNHB AUTO HCMBOJI KACTIOJ3aROPrTC NOCTOHNBM CBETOM.
-HaKaTb KONKY OKOHNAHNE IINTOOTOBIEHH,3aTeM B TeueHHN 5cekyH HauKaTb KONKY +' DO TcX IOP,IOKA Ha DCNCLCC HC IOBHTCBAPEM12.00.CHMBOJ KACTPHOI NoracHeT,aHaDINCB AUTO ocTa- HetcROpeTB NOCTOARHHBM CBEtom.
YcTaHOBHTC pyKy TcPmOpcrJrTOpa Ha KcJaCMOM 3HauchHH TeMnepaTpybH nPn NMOuH nepeKJIouaTeJI Bb6epHTe CnocOB npHroTOBJeHH nHH. PnH OTOM 3aRopAcTc KpaCHa JAMNoUka, BKJIooaETc3JEKTPHueCKoe OCBHeIe Hne DYXOBKN H BXOHT B JeHCTBHe nPorpamMHpyoWe yCTPOHCTBO C 3aDaHHoN pOrppaMMoH. B11 Yacob DyXOBKa aBTOMaTHueckn BKJIooaETc H 3aRopaeTc CHMBOL KACTPJOJ.
- IIO HCTeEHHN BpEmH N pNfROTOBJIeHHA 12 YacOB)HaIINHCb AUTO 3AMHraET H CMMBOJ KACTPLOJINOTACHE.3BOHOK H3BcTHT Bac O6 OKOHaHHY cTaHOBJIEHHO INoPpAMMbI. JIA BBKJIIOUeHHI 3BOHKa JOCTaTOUHO HAKaTB JIObYIO KHONKY.
IIOBepHHTe B HylEBoe NOJIOKeHne peryJrTOp TEMpeATpyb dyXOBKn HnpeKJIHOaTeIb cnoCoBa npHrTOBJIeHH.
ФУHKUHNOPOBAHNE B IIOJYABTOMATNUECKOM PEXKHM C IIPOTPAMMPOBAHEM BPEMEHH IPOJOJTKHTJIbHOCTH IPIHOTOBJIEHIN
PACCMTPMIINMep:ceHAc11435MH,BbJKeJaTe,yTO6blDxyOBKaBKIOUHJAacbHa25MHHT,HAHHaC3TOTO MOMHTA.HaKaTBKONKYIPODOJIKNHTEHLHOCTbPHFOBOTHEHHHBA TcEHN5cekyHdHaKaTBKONKY“+”,NOKaHaHNCJIeHe NOBHTCBpEM00.25.BcIyAcHaIObHOCTHcNOJIb3ObaTbKONKy“-”.HaNNCbAUTO HCMBOJ KACTIOJ3aTOPTCR NOCTOHHBM CBTOM.
- YcTaHOBHTe pyKy TepMOperyTJrTopa Ha JxJaemOM 3HaueHHN TemHepatpyb H pH NOMOIN IIpeKJIIOuATEJI BbIbePHTe CIOOCB npHrTOBJIeHHN IIN. PpH 30m 3aRopaetc KpaHae KOHTPOJBHAR JaAMNoHka, BKIOHAcTcN 3LCKTpHuCckOc OBcUeHHe DyXOBKn H dYXOBKa HAUNHaET yHKUHOHNPOBaTb.
Upe3 25 MNHyT dYXOBKa BbIKIOHTcR. CHMBOJI KACTPLOI IORa cHET, a HADINCb AUTO MHRaeT. 3BOHOK H3BecHTt Bac o6 OKOHuaHHN yCTaHOBJeHHoI pOrpamMbI. JIA BbIKIOueHHra BOHK JoCTaTOuHO HaKaTb IIOyIO KHONKy.
IIOBEPHHTBE HHyIeBOE NOJIOKeHHpepyrIaTOpTeMnepaTypbIyXOBKNH NcpcKJIouaTeNb CNOOCoA npHrTOBJIChNIA.
TAHMEP
-HaKMnTe KHOKNy TAHMEPIH NPOHOMOINKHOHOK + HJN - BBCTaBHTe KeJaEMOE BpeM.
-Bo Bpem ΦyHKUHHPoBaHH TaHMepa 3aTOpaeTcR cHMBOJ 3BO HOK.
- IIO HCTeueHHN yCTaHOBJIeHHORo BpeMeHH NOJaetcra 3ByKOBoH cHTHaJI N CHMBOJI 3BOIOK IORaCHCT.3BOHOK
- IIO OKOHuaHHI pOrpaMMbI HaHHaet 3BeHeTb 3BOHOK B TeueHHI 7 MHHT.
-ДЯ BBKIOUeHHA 3BOHKA HAXMHTe IIOyIO KHOIky.
-HaKHMaj KONky -,63 BeBbIbopa peKHMa FyHKUHNOHPOBaHH, MoKHO H3MeHHTb YACTOTy 3ByKOBOTo CnTHAJa. MoKHO BblpaTb OINH H3 TpEx TnIOB CnTHAJa. BblpaHHn 3ByKOBoH CnTHAJI 6yDet 3BOHHTb DO TEX NOp, NOKa Hc OTNcyTHTe KONky
HAJIOIPOPGAMMbIKOHHTPOJIb
IporpmaMa BXoHrB DCHeCTBHe npH6JIH3HTeJbHO Ucpe3 4 cKyHdbI nocJe ee yctaHOKn.
-BIOBOMeHT, HaxHMaCOOTBeCTBYIOI KHOKNy,MOKHO IPOBepHTb yCTaHOBJEHHyIO IPOPGpAMMy.
OUIHKI IIPN IPOPGAMMPOBAHNN
Haipmep,B12q.15MH.ByYcTaHOBHINIPOJIOJIKHTELbIOCTb IIPITOTOBJEHH30MHHT,aBPemOKOHAAHHIIPIIOTOBIEHHB12q. 30MHH.
-Oh6ky nporpaMMPOBaHH MoKHO HcnpaHTb H3MeHn IpOdoJKTteBbOCtB HIN BpEMa OKOHuaHH pNHTOBoHeHH, HIN Ke HaKaTb KONKY PYHIOPEKM. IocJIe 3TOrO IOBTOPHTe nporpaM MnpoBAHHe.
PnHaHnHH OINbKn nporpaMMHPOBaHH dyXOBKa Hc BKJIOyaeTc.
CPOC IIPOPAMMBI
- YcTaHOBJIeHHyIO IPOrpaMMy MOJHO CTepeTb, HaxHMa Ha KONKy IPOJOIKHTEJIbHOCTb PPHOTOBJIeHnA, a 3aTeM KONKy **- Do Tex NOp, NOKA Ha dHcIIcc HC BbcBCTIaTcR cHpbl 0.00. BHIMAHHE:
IO OKOHAHHH KAKDOI IPOPGAMMBI PEKOMEHJYETC HAKATB KOIKU , HAUe FYNKUNHOPOBAHNE DYXOBKN BYCHOM PEXHME HEBO3MOXHO.
KAK NOJb3OBATbcra "AHAJIOGBbIM"
PAMMIVIOUIM YCTPOINCTBOM / KAK NOLb3OBATcR PROMAMMIVIOUIM YCTPOINCTBOM OKOHUHNAI FOTOBKU (pnc.17)
ПОНТРAMMЮВАНИЕ YACOB
Haxmnte pyky(A) n nobepnite ee HaneBO, BnIObTo Do BbIbopa Tekyuero BpeMeHN. PedeoxpahnteJbHbM MexaHn3M 3aunTtKOMTOHEHTbYacOB Cnyae HnpabINbHO BoBINOHNHeHn OepaUN, T.e.BpaueHHanpabo.
ПОГРAMMИPOBAHп ПОДOLЖИТьнгocTи ГOTOBКN
IIOBepHnTe pyKy(A) npOTnb YacOBoC TpeJIKN, He HaKIMaHa HHe, BnNOTb DO COBMeUeHnA CTEpIKN (uIN yKa3aTeJr DaCKa) C Heo6XoDmOri npDOJIKnTeJbHOCTbIO rTOBKn. IIO nCTeueHn 3aDaHHo NPOdoJXKeTbeHocTn DyXOBKa BbIKIOHTcR, IN NOdaETcR HepepbIBhbl 3ByKOBo CnHap.IIra OTKJIQUeHnCnHana IOBepHnTe pyKy(A) HaneBO, He HaKIMa Ha Hee, BnNOTb DO COBMeUeHn CTpeKNc CnMBOJOM NepeUePKHyTORO 3BOHKA (uIN Xe nepeBeJnte Yka3aTeJb B COOTBeTCTBne C 3BOHKOM).
PYHARI FOTOBKA (3aMKHyTbIK KOHTaKT)
IobepHnTe pyKy(A) HaneBO, He haxmHa Hee, BnIOb Do COBMeueHna CTpeJIcN C CIMBOJOM "I" (IIN Xe nepeBeJNTe yka3aTeB B COOTBeTCTBnE C CIMBOJOM pyKn U).
BbIKIOUeyHNE DyXOBKIN
IobepHnTe cTpeKy(A) (myn yka3aTeJb DnCKa) B COOTBETCTBne C CMBONOM nepeuepKHyTORO 3BOHka, NOBOPaUNBa pyky (A)HaNPaBO. PpIM. DaHHbIe Yacbl MOrT NocTabNtBcR TaKke C OdHO JINb FyHKUe CteTHKOB MNHT.
DEMOHTAK DBEPUbI DYXOBKN
DBePcA MoKet CHMaTbCra DnI BoJee yOo6Ho OuHCTKn DyXOBKn, BbINOJIHRA CNeDyUOuNE HNCTpyKuIN:
-NotHocTbOOTKpoTeDbepuy.
- BCTaBbTe DBe MoHETbI NO 10 CEHTOB B DBe ZeJI N TeJIb.
-3akpoTe DBepu DY DO TORO, KaK Bbl NOuyBCTByeTE COIpOTnBHeHne MOHeT (pnc. 16).
- npoJOnjXaIe 3akpbBaTb DBePcy, Nocne Yero NOHIMNITE ee, B3RbUcMb 3a 6oka, n cnerka CmecHTte Bneped. Nocne 3toro DBePcy MoKHO 6ydet JERKO CHrTB.
-ДЯ yctaHOBKn DBePcbl Ha MeCTO BCTaBbTe NETIN B INN 3HaayabHOE NOJKeHHe, Y6eINBUNCB, YTO OHN NIOHOCbBO WOnB IN BTHe3da.
- 3aTeM NOJIHOCTbIO ONyCTNTe IN BBePuy IN BbiHbTe paHee BCTaBneHHble MOHeTbl.
-3akpoTe DBepy Do NONOKeHn NOJHOrO 3akpbTn.
- Bcerda npOBepaTe COxpaHnOCTb yNIOHTHeHna DBePcbl dXOBKn; B cIyae ee N3HOca HMeEaHNo 3aMeHnTe ee B cepBnCHOM ceHTpe.
IANTbIC CAMOHNIAIOENCR DYXOBKON
3aJHHe H60KOBbIe CTeHK DxyOBKn IOKpbITb CaMOUHaIOJIeICr 3MaJIbIO KaTaNHTNueCKORO DeCTBn.
Yepe3KaKdbie 10 15 npHrTOBILCHN HINHN BbIOJHReTCYHCTKa DxyOBKn. JIJI 3TOI HAIO BKIIIOHTb NcTyO dYxOBKy Ha IOJHyO MOHOCTB. BcPMg OHHCTKN 3aBNCNT OT COCTOHN 3aRpy3HCnH NdyOBKn. FcIN bblJeMbe IIN pPiHrTOBJIeHN NIIIN COKN H Kp 3aTBePdEBAOT HA cTeHKAX, 3TO 3aTpYdHeET DeNCTBNE MAn, TaK KaT BcPdbic OCTaTK NIIIN 3a6HBaOT NOpbl NOKpblON CnCnHaJBHO 3MaJIbIO NOBepXHoCTN, TpTYdHN OKnCeHEN. B TaKOM CUYae, KaT TOJIbKO dYxOBKa POJHOCTbIO OCTbHCT, Pa3MgHTc 3acoXyIO KOPKy PnH NOMOIIGTOPyue BOI IN MRAHIO IIeTOQK IIePIMHeHHN MOIIXxCpcDCTB. 3ATCM CHOBA BKIOHTe dYxOBKy Ha HcCKoJIbKO MMHYT, YcTAHOBB MAKCHMaJIbHyIO TeMnpeaTpy.
(BHHMaHHe: HNKOrda He HcNoJb3yIe a6pa3HBbIe YHCTaIIHe cpeCTBa H MCTaJIHueCCKHe WcTKH).
IPINHAJLEJEXKHOCTN DYXOBKN
- Ha peiHTky IyXOBKN yCTaHaBJIHBAeTcK cKBOpOJa, B KOTOPo MoxHO rTOBNTb CJaIKHe 6JIIOda, XapKoe. IpH npIrTOrOBJIeHHn HnIHn Ha rPiJe, Mco PackJIAdbIbAEtC HeNOCpeDcTBeHHo Ha peiTeKe.
IpoTnBeHb pa3meaetaCnopeWetKo n Cnyknt dna c6opa CTekaiuero coka npiroTaBnBaembix npOdyKTob Ha peWeTke. IpoTnBeHb MoxHO nCNOB3OBaTb N Dnra rTOBKn 6nIO.
-BcIyuee npnroTOBJIeHn HINH BdyXOBKe C Bo3dyXoYbKOIOxHO HCIOJb3OBA Tb OJHOBpeMeHHO DBe peWeTK. B JIOOM cIyueae,ecII npnroTOBJIeMHe 6JIOda pa3JNuaiOTcma Kx dy co0n NO COCTaBY H KOJIHueCTBy, BpEmHX FOROBHOCT TaKke Bydet pa3JNUHbIM.
NCSIOJIb3OBAHNE CTEKJIOKEPAMMUECKOINIOBEPXHOCTINIITbI
MoHocb 3nK Tp nuecknx KO hOpok perynpyetcnaocneIOBATEHBHM yCTPOIcTBOM, oBeceuBaHOUM OTJNUHYopeRyNPOBky TemnepaTybl npriOTOBHeHrPaJIuHbYe yPoBnHaTtna rpaDmpoBaHbO101do6.Pyka moKET bItb yCTaHOBHeHa JKeJaEMyIO OTMeTKy, NOBopauHBa eBnpaBO HIN BNeBO.
Дякофорokсдбиньим котypompykaВрацаetсЯЛшьТолько no yacoboi CTpeJIke;ИNTeHcNBIHOCt bTenla rpaDynpoBaHa ot 1do6 ЛшьТOLьКДЯЦHTpaIbHbIX30H KOHфорok.
Pn nocneyuohemuehke Bnepe nocne noce hero dehen H BknoaTcOCTaHbIe 30Hb KOHopok.
Ioka oHa n3 3neKtpnuecknx KOHOpok ropraa, CnHaNbHaJ lamna E (cmotpn pnc.1) BKNIOHTcN He OTKJIIOHTcN Do Tex npo, Ioka temepaTpa Bce 30H npiroTOBHeH He ONyCTNTc Hnke 60^
YeIbe 30Hb npiroTOBHeHn O6OHaueHb HaHeceHHbIMn Ha nobepxHOCTn OTMeTkAMn.ДЯ HauBBicWe O Tau n CbaaHcnpoBaHHOrp pacXoJa 3JIeKTPo3Heprn Heo6xoDmO HCNoIb3OBaTB ToIbKO KAcTPOJn IN pInHaJNeKHOCTn CToTcBIMn COBepHEnHO POBbIM dHniEEM (CMOTPN PNC.10).dNAmETp DnHua eMKoCTn DOJXeH 6bITb He MeHee HaHeceHHbIX Ha NOBepxHOCTn OTMeTOK.Ecn DNHIe EMKOCTn HE NOKpbIbAet HarpeBaIOyUO 3OHy,TO 3Heprn paCXoYTeC BnyCTyo.JyUe BCero,ecn DnHsJe HEMHOrO 60JIbWe HArpeBaIOSe 30HbI.
Hnue emkocte npabooa NOBepxHOCTb DOXhbl 6bIT YNCTbIMn cyxmm. HecobJeHne 3ToI peKoMeHaauu BHeET 3a CO6O nOTepH TEnJa N, CJIeOBaTeNbHO, 3Heprnn.
Примechanical:
-HnB KOem Cnyuae He roTOBnTb 6NHOa HEnocpeDCTBeHNO Ha 3NeKtpnuecknx KOHOpkax.
- YTO6bI COKpaTnTB BpEMr PnPIROTOBJeHnHa N3JyauOuNX KOHDPokkx MOKHO HaHaTb PnPIROTOBJeHnHa MaKcImaJIbHOI OTMeTke 6, NOcne Yero CHoBA yCTaHOBnTB pyKv B bbl6paHHoe dnn PnPIROTOBJeHnNoIOKeHne.
-Bce 3nEeKtpuueckne KOHOpKn OobpyoBaHbI orpaHnHTeIem TempePaTybl, npeOToBpaaIoUIM IN nepepeB daKe B cnyae paobtby KOHOpKn Ha MaKcImaJIbHOI OTMeTke 6e3 KAcTpIOJIb IIN B cnyae npmHeHHr EMKOCTe C HEPOBHbIM dHIeM.
Hnke npBedeHa opneHTnpoBOuHra TabncapeXmApnproTOBNEHnpa3nHbIX 6NIO. He 3a6BaIte, YTO napaMeTpbl Moryt13MeHrTbcR B 3aBNCIMOCTn OT KOJIueCTBa N TnPa npiroTOBnEMO
nHmHnHbNyaJbHOrO BKyCa.
CHCTKA CTEKLOKEPAMUeCKOIOBEPXHOCTIJIITbI
ПлOCKая Форма стеклорампеског рабочи NOBEPXHOCTN pIITbI 3HaHTeNBHO O6JIerHaeT ee YnCTKу NO cpaBHeHIO C pa6OUMN NOBEPXHOCTMn C TpaINUONHBIMN KOHΦOPkAMN. JERKA, eue He OTLOXKBWaaCra rpr3b ydaJIeTCR CMOUeHHo 6ymarO.IIyUCTPAHEHNA CTOKKr rpr3m MOxHO NcNOJb3OBaTb TAKNE Xe MeTOMbI YnCTKN, KOTOpBE O6bIyHO NcNOJb3YOTcR DJIa CTEKNa, I, CJIeDObAteLBHO, MOxHO NcNOJb3OBaTb CNEuNAlbHBie MOUOuNe cpeDCTBa DnRA CTeKNa. Ecnu CoDEpXUMoe KAcTPOJIN BbITEKNo HA NOBEPXHOCTb, ydaJInte O6pa3OBaBWHceCR OTLOXeHn npn nOMOUs WnATEL. Ecnn BbITEKn Caxap nIN CNPON, TO HeoBXODIMO HEmeDJIeHNO ydaJIntb IN, DO IN OTBePdBaHn Ha CTeKne. AnlOrTHNO 3TOMY, HEOxODIMO HEmeDJIeHNO ydaJIntb TAKKE I IIOBle OCTATKn aIiOMHNIEBOF QoJIbRn IINI PIACTMaCCbl, ECIn nPeDMtBu 6blIN CnyauH NoLOXeHbHa eSe TROPuy 3OnHy nprirotOBHeHn. BoJHbIe PnTHa n CneDbI BODHOR KAMHR MOrYT 6blTb YdaJIeHbI 6JIbIM BUNHbIM YKCycOM. IocNE NcNOJb3OBaHn IOBepXHOCTN HeoBXODIMO BcerDa nPoMbITb N bICyUnTB ee BInITbBAIOSe B1ary 6yMarO.Hn B Koem Cnyae He NCNOJb3YIte abPa3NBHbIe IINI KoppOzHIbIe MOUOuNe cpeCTBa, TaKne KaK cnpeI dIyXOBok, ObezKnpIBaIOUne cpeCTBa, cpeCTBa IDAyDALEHn PPKABuHbI, nopoUKObIe NOIpYIOUne cpeCTBa I abPa3NBHbIe MoaANKn. He DOnyckaIte HakONJIeHne necka, HanpIMep, npn YnCTKe OBOseI, TAK KaK NECOK MOKet NOUAPAanTa b NOBepXHOCTb. He DBIrATb KAcTPIOn I CopeBaBIM DnHiMe, TAK KaK OHN MOrYT OCTaBNT b CJeDbI Ha cTeKLe IIN daXe NOUAPAanTa bero.
OUIHE PEKOMEHDAUHN I PPEyPPEKDEHNA NO TEXHKE E30NA-CHOCTN YXOdy 3A IIHTOJ
-ДаньnpbOp He npedHa3HaueH nIg NcNoIb3OBAHnIIOBmC orpaHneHHbIMNΦn3HueCKHMn IIN DBVaTeHBiIMN CnocO6HOCTMa (BKIOUaer DeTe), IN60 HeONbITbIMN INI H3HakOMbIMN CyTpoICTBOM, 3a NckIIOUeHNEm CnyuaeB PpImeHeHnI np6oPa IOd Ha3OpOM INI CNeDy INHCTpyKUJRM INuIa, OTBeTCTBeHHORO 3a 6e3OnacHOCTb. CneITb, YTObIe Tn He IRpaJIc nPp6Opom.
- Ipeo onepaunno TeXOBcJyKHaHHIO, uHCTKe Hn peMOHTy BHTPN dyXOBKn Be3e, fde cyuieCTByET OAnchoCTb COpHKOCHOBeHHN C HxOJaIMMHC NOD HApPjKeHHem DeTaJIaMH, OTKIOHae nHTy OT 3IckTPOCCTH.
-He HcnoIb3yHrTe OTdeJeHHe pa3oRpeBa TaPeJOK H OTdeJeHHe pa3McOChnra3OBOrO bAJIHOHa IJIa XpaHCnBOCnIaMCHNIOUHXc KHNKOCTeH NII HeYcTOuHBIX K DeICTBNO TEMpePATpyb MaTePNaIOB, TAKNX KaK JepeBO, 6ymara, a3pO3OJIH, XHNKOCTH H Ra3b IOI daBJIeHHem, cINHcH N T. J. - YacTo npOBepnIte coCtOaHHe, CoeHNHIOIero PINTy C HCTOHKOM IOaunr Ra3a. ObpaTHc BHMHaHne Ha To, T06bI OH 6blIOCTaTOUHO ydaJeH OT HApeBaONHXc rTeHOK, T06bI He 6blIO CNbHBx H3rHOB, NpcKaTHn HIN NOBpCKdHm HlaHra. PnOsbHApUKeHHN NOBpeJdeHHn HADoHEMeJleHHo pOn3BecTH 3aMeHy IHaHaR. B JIObOM cJyueae erO HeoBXoHMo 3aMeHbTB B yCTaHOBJIChHbI cPOK. Oba KOHua WLaHra DoJKNbI b6blT 3akpcnnJeHbPi nnooH cTaHapTHbIX rapaHTnpuXh 6eOtonachocTb 3aKHMOB.
-BcIyue,ecnHcoBpeMeHemKpaHnoaunra3a6yETOKpbBaTbC Tpydom,pckomchdyctc Bb3BaTb CncuHaJIHCTa TxHHUCCKOn Clyx6bl.
-ДЯ OYHCTKN 3MaJINHOPOBAHHbIX INH XPOMHPOBAHHbIX YAcTeN PJIHTBIPIMCHHITC TcIyIOMbIbHyIO BODY INH HCaOpa3HBHbIC MOUHcCpeCDTa.ДЯ OYHCTKN IopeJOK pa6OeH NOBepXHOCTN pACCekaTCAIINIIaMCHN MOKHO HcIOJB3OBaTb MCTaJIINUCCKyIO IcTOUYДЯ yJaJIeHNHaKHN. AKKypaTHo BBcyuHBaHTe OUnHHeHbIe IOBCpxHOCTH.
-He npHMeHnIte abpa3HNbIbe MOIOIIe cpeCTBa IJIa YHCTKN 3MaJNHOBAHHbIX HIN XpOMHPOBAHHbIX Uacten.
PnHcKcTapaNTCBHe3aINBaTBBOOpaOuyIOOBcpxHOCTb PHTb. H36eAHTe nonaHaHHB OdbI HIN MOIOero cpeCTBA B OTBepCTHROPEJOK
-Bcerda noDdepeKHBaHTe B uHcTote CBeu IJRA 3JIeKTPo3aKHa Hnra (ecHN HMeOTc) H npocyuHBaHTe HX nOcJe KaJdoRO HCIOb3OBaHHI PJIHTb,OCObEHHO ecINB pOncepePpHrTOBJIeHHI NHN H3 KAcTpOJIb BbITeKaJa XHKnOCTb.
Ecln nIHTa yKOMIIeKTOBaHa CTckJIHHHON KpbIIKOHNHKORda Hc 3akpblaiTe KpbIKy Do Tex nop, NOKa He ocTbHyt RopeJKN HIN 3IEKtpOKOHOpKn paOouen NOBepxHOCTN. KpbIIKa MoKET TpeChyTb HIN pa36Htbcra.
He noDBepraIte ynapam 3MaJIHPOBAHHbIe qactn IJIHTbI H CBeHN 3JIeKtpo3aXHRaHH (ecJIN ecTb).
IocJIeKaKdORoHCNOJb3OBAHHNIIHTbpeKOMeHdyETc3aKpbIBaHb ceHTpaJbHb(HnHaCTeHHb)ra3OBbKnPah,nepeKpbBaIOuHn IOnauyra3a.
-He6epntecb3a pykyIJIpeHocApNTbl.
-ДячNTКСТКЛЯHHbIXДБЕUEДУXOBKNHeCNEJYEITNCIOJIb3OBA Tb rpy6bIe abpa3nBhIe MaTePnaJIbI NNOCTpBiE MeTaJIINueCKNe CKpe6Kn, TAK KAK OHN MOrYT NOcapanaTb NOBepxHocTb N pa3bntb CTKNo.
- He nCnOJb3OBA Tb napOBIe IOnIpOBUKN dIy NcCTKn yCTpoiCTBa. -Ipy YcTaHOBKn PInTbI pOnuM He npDeYcMoTpeH.
-CTEKNOKepaMnuecka pa6o7a NOBepxHOCTb IMeET XopoOwee MexAHnueckoe cnpOTNBneHne, INo3TOMy BbldepxkBaet cnabIe ciUaHbIe ydapbl. EcnI nocIe ydapa Ha noBepxHOCTu 0bHApXKBaHOCTc N3lONMbI INI TpeunHbI, To peKomeHdyETc H NOJb3OBaTBcR pINTOn, OTKnIOHTb eE O T JNeKTpNUeCKOcTeN O6paNTbcr K npOdaBuCy.
BHIMAHHE: NcnoJb3OBAHHe ra3OB0I pNTbl dIra roTOBKn npBOIDNT K obpa3OBAHIO n36blTOHOro TEIIa, BnAAKHOCTn IpoDyKTOB rOpEHnB B NOMeUeHN, rDe OHa yCTaHOBJIeHa. Y6eINTEcb, yTO kXoHHoe NOMeUeHne XopoIo npOBETpNBaeTc, OC6eHNO pN IN BKNIOUeHHO IINTe: He 3AkpbBaIte eCTeCTBeHHbIE BEHTINLAIOHHe OTBepCTNa, OTKPOITe NN yCTaHOBtE YCTPOICTBO MEXAHUECKO BEHTINLAIZ (BbITAKKa).
BHIMAHHE: 3Ty pIHTy moKHO nCNoJIb3OBAt bTOnbKO dIpynroTOBHeHn Iu. He nCNoJIb3yIe ee dIy INhIx ceJeN, HAnpIMep, dIra o6OrpeBa nomEeHn.
RU
HHΦOPMAUJIYДЛЯ NOTPEENTJEI
PnO6HApXeHm HEnCnpaBHOCTe peKOMeHdyETcBbINOJIHNt bJeUoee:
PpeD BbIOBOM Cnyx6bl TexHuecko NMOU pekomeHdyetc npOBepntb,HTO:
-BNIIKA BCTaBHeHa HAdnEkaUm 06pa3OM Bpo3eTky
-CINHahbHaJ lamnoOka pa60tI pntI rOpNT.
Ecnn npo6nema He yctpaHareTc, Bbl30Bnte KBaJInpUnpoBaHHoro n yNoHOMOHeHHORO CneuaJIncTa, KOtOpbIMoXeT yCTpaHHTb HEnCnpaBHOCTb.
Ecni OCBeueHne DyXOBKn He BkJIIOuHaETcra, HEO6xOIMOBbIINHHTcNeDyUouee:
-OTKJIIOUHTb PINTy OT 3JNEKTPocetTu. CHrTb 3aIHTHOe CTeKJIO, paCNoIooXeHHoe B 3aIHeN Yactn BHYTpEHHe NIOOCTu DxyOBKn, n 3aMeHHTb IamNOyKy.
fa6pka - H3r0TOBHTeJIb He Hecet OTBeTCTBeHHOCTH 3a NOBpeJdeHn, HeHCnPpABHOCTH HeCuaCTHbe ClyuH, Bbl3BaHHbeHecobJIODeHHem peKomeHdaun No ycTaHOBKe n EKcnIyataunPiHTbl.
B clyuae HeHcnpabHocTH nIITb, oHapyKeHH yTeKn r3a HIN IOBpeKJHeHH 3JIeKTponpOBOdKN HeMeJLeHHo ObpaHTecb B IeHTP TexO6CJyKJBAHN H BbIOBHTE CneHaJInCTa.
Директва 2002/96/EC (WEEE): Инфорmaцnia дяплььзовател徳
(pnc. A)
DaHHbIe CBeDeHnI npEHa3NaueHbI NmMb TOnbKO nJa O6NaIaTeJIe IpN6OpOB, IMeIoUx CNMBON (PNC. A) Ha cAMOKJIeAeJc8 3TNKeTKe CTexHnueCKIMM DaHHbIMn, HAKJIeEHHO HA N3dJIu (NaCnOPTHaR Ta6LIuKc).
3TOT CnMBOI O6O3NaUaET, YTO NPOdyKUIN KJIaCCNΦuINpOBaHAno DeIcTByUOIM HOpMaB KaHeCTBe 3NeKTPNueCKOrO ININ 3NeKTPOHORO O6OpYOBAHIN, INTO OHA COOTBeTCTByET DInpeKTHBE 2002/96/EC (WEEE).CneObATEJBHO,B KOHc CBOero Cpoka 3KcNpyataun OHa DOJXHa NEpepaBaTbBaTbcra OTDeNbHOOT 6bITOBbIX OTxODOB, NYTEM 6ecPiATHOIN CdaUN B NYKCT C6Opa 3NeKTPNueCKORIO 3NeKTPOHORO O6OpYOBAHIN, ININ Xe CdaBaAee DInCTPNbIOTopy B MOMENT NOKyIKN HOBOR, 3KBVBaJIeHTHOrO 6OpYOBAHIN. POJB3ObATEJB HeCET OTBETCTBEHHOCt 3a CDAUYnp6Oba B KOHc ERO 3KcNpyataun B NyHKtBi C6Opa BTOPCbIPbY, B pOTNBOM CNYaE K Hemy 6yDyt PnIMHeHb CaHKUIN, npEDyCMOTpeHHbIe 3AKOHDoTeJIbCTBOM B OBlaCTNIOTXODOB.
DnΦepeHnnpoBaHHb C6Op OTXODB DnI IN NocJeYUoSei nepepa6OTKn, 6pa6OTKn u yTnIN3aCInN, COBMeCTmblx C OKpykaIOse CpeOOn, NO3BOJraTe I36ExKaTb OTpuCaTeNbHO BO3dEChTBna Ha npipOdy n 3doPObBe, a TAKKe CNOCo6CTByET NOBTOPHOMy NCNOb3OBAHNIO MaTePnaIOB, IN3 KOToPbIX IN3rOToBNeHa npOkyu. DnI NOyehnia Bolee DetanbHO INHfOpMaunn O IMeIOUxsc CnCTemax C6opA OTXODB CneDyET o6pauaTbcB MecTHHy cnyk6y IO nepepa6OTKe OTXODB, INI Jx B MaraIN, B KOTOPOM 6bl KNpIIEN pN6Op.Ppon3BOIDTeEN INMnOpTepbI HecyT OTBetCTBeHHOCTb 3a Nepepa6OTKy, 6pa6OTKu y TnIN3aCInU, He 3aPr3HIOUIne OKpykaIOU cyPeDy, KaK HenocpeDCTBeHHO, TaK IN yUCA7BBy B KONNEKTNUHOB CnCTeMe.
EBPONEENCKN PEGLAMEHT No 1935/2004 - MaTePnAJIbI, npeHa3NaeHHbIe IJRA KOHTaKTA C NIIeBbIMN IpOdyKTAMN. HOpmaun NOJb3OBaTeJAM.

PnBHeHbI Ha pncyHke cMBOJ, KOtOpB I MmEeTcHa yNaKOBKe, Yka3bIbAeT Ha To, YTO MaTePnaJIbI 3TOrO N3DeJIa, BO3MOxHO BCTyNaIOUe B KOHTaKT C NIIuEeBbIMN IpOdyKTAMn, COOTBeTCTBYOT Tpe6oBaHnM Ebponeckoro perJaMeNTa Ng 1935/2004.
BHytpn NOIOCTN DxyOBKn NIIeBbIe IpOdykTbI MOrY T BcTyNaTb B KOHTaKT C: peWETKAMN DxyOBKn, IPOTNBHJMN, INITAMN DJI BblneKn KOHNTepCKNX N3dJIIN, CTEKJOM DBepCuI DxyOBKn, pe3HOBbIMN yNJIOTHEHNMAH, BEPTJIOM, CTEHKM N DxyOBKn.
Ha nIte - c peWetkamn, KOHΦopKamn m MetaJInecko nOBepxHOCTbIO nIITbl.
Brauike dnpaorpeba niu-cero cTeHKamn.
2,0 kW - Eotia Taxeliae
210-120 2,1 - 0,7 kW - Eotia High-Light
265-170 2,2-1,4 kW-Eoia High-Light
IXXYHAEKTPIKOY FOYPNOY
Kατω πανω Σύνολo
σaikoc φoúpvoc: 1,5 kW 0,7 kW 2,2 kW
φύρνος πολλαπλών
1,5kW 0,7kW 2,2kW
kuklki navtiotaan: 2,0 kW
grill: 2,0 kW
EONAIIMO
Ola ta movTeLa eivai epoiaoueva e diataa aopaaia c yia kaotnpes, poupvo kal grill.
Avaloya ta oikouivec npopoov enionc va exouv:
- Diatae n aopaaia c yia eva n nepioootepuoc kauotnpes
-HAektpiakavapAeEgntouc avw KAoTnpeC
- Hλεκτρική ανάφλεξη στους καύστήρες τοῦ φουρνους τοῦ grill
-Toxwata tou foovou ano autokaepiOevo oaAto
- Θερμοστάπ (η ρουμινέτο) γι φρύρνο
-Hλεκτρικό φωτισό του φούρνου
-Σouβλa
Kauotnpa tou grill
-Mxavikos xovodiakontns
- PpOToaia oKeuWv
-Mia n npioootepee nEekpike eoties
- Ppoypaumatntc me nektpovko pool yia to teawau Tou
- Anos npoypaumotn yia to tealeomega tou noiato
-HAektpovikoc npoypaumatotns
Tn DIATAEH TQN KAYSTHPN, Bane Ta movtla nou anekoviovtal otnv ekova 1 oTo TEoCtou Eyexipidiou.
Tia To HAEKTPIKO DIAPMA AENE EIOVA 2 OTO TEOC TOU EYXeipoiou.
PPOPTPAMMATIEMOPOAOIOY
Pnote kai yupite apiope (A)to koupi mexpi va oupteneoi otny wapopovacoc tki kal o xpvol a eival diapopetikoi.
TnS nepac. Ze Tepinwn Aavthetaevou Xeiipouou, Tepioppond Egeia, Evac mnxaviooc aoaaleia Tpoataeue Ta Eaaptna Tou poayiou. NPOPGPAMMATMOX XPONOY PHSIMATO
Tupiote to koumu Tbeioopaa(A),xwic va miezt, mexvi aoumteia apiotn puoiion tnc thepokpaiaac ayepaotoc. n beova (no feikntc tou biakou), eTOV EINUUMTO XPOVO ynoiuaoc.OI diaopoptkec Evtaoeic thepOHTAC ivai diaBaogvec ano to 2To TELOc Tou TPokaopiaevou xpovou, atoouvdeetai o oupvoc ka1 ec TO. O diaokontnc mnpoei va tonotheeit otnv enuuntn eveytoioietai n ouvexns nytiké iDoutoinan. Ia va tauaete To xho, cen nepiotpeovtac To npoc Ta dEla n npoc ta apotepa.
yupiote apiotepa (A)to koupti, xwpi va TiieoTE, xepvi aoumtoei nBélova μe to oumbolotou diaypaumevou koudou (TOTTOETE iTo deiktn oaviptoiau e to koudouvi).
XEIPOKINHTO IMO (KAEIOI IaI
Tupiote to koupi apiotepa(A),xwpi va tneTe,mu xvi aountoe i n belaov e to uubolo "I" (n totoeiete to deiktn oavntoixia e to uubolo tou xepioj).
ANOZYNADEsH TOY FOYPNOY
TToTOteIeTe Tn 3eOVA (n To D6IKTN Tou DIOKOU) O e AVITIOxia μ E To diaypaumévo KouOUVI, OtpEPOVtac (A)TO KOUPTI TPOCS Ta δεjá.
EHMEIOH:To poAoI auto mtopei va xopnynthei kai movo e Tn Aetoupyia etpnonc aeTTwv.
TIA NA AΦAIPESETE THN ΠOPTA TOY ΦOYPNOY
H npTa mTpei va aapaie3ei yia va mTropoeTe va kaapiaeTe to foUpvO e TIO Eukolo rpOTo aKoAouWvTac Tc TApakatw oonyies:
ανοξτε τελειως την πόρτα.
- TOTTOEETNEO E KEPaTa TWV 10 AETTuw V E Oa OTIC DU O XIAUEc TWV EVTSEODWV.
- gavakkeiote TIV TIOpta mexpi va aio8avtheta TNV avtioan twv duo kepuatwv (EK.16).
- KJIeIOTE TEPiOAOTePO TIV TIOPTa KAI OTN OUVEXIA ONKOWTE NV KpatwTAC TIV ATIO TA TIAIVA KAI TOITOTNE TIV ELAappa EUMPoc, ME TOTO auto n TIOPTa BYaive I EUKoia.
- yia va gavatoTTOEtnaTe TnV TIOpTa GavaBalaTe Touc MeVTeOeEs OToN Toeon Touc KAI BbaIWte OTI Exouv MTEI OTNV Epa Touc.
- KATEβAOTε EVTEλως Νγν ΠΟΥΑΤΑ KAI ΜΑλΕτα τα ΚΕρμΑΤΑ ΣΟΥΑΤΑ ΣΤρούγουμενως.
- əvakkeiote TIV TIOPTa MEXPI Tn Θ EoN oIAKou KEAioIaTOc.
-va eIeYxETe nVAtaTnV kataoTaon aeitoupyikotntac Tns φλavTcag TnTIOPTAC Tou oOpvou, OE TEPITTTOW gn Othetaq, mN DIOTAeTe VA TnV AVTKATAOHTNaTe OTNV UITNPeia UTOOTnPiNG.
TIA KOYZINE ME AYTOKAOAPIZOMENO FOYPNO
Ta du nlaiva toixwma ta kal to npooTivo evai enevduveva e autokaagipzoevo ouaToe katautikn spao.
KaTe 10-15 ynaiata apote va aeitoupyoei, eTo fooupvo adeio kal ot nyeiot noxU. O xpoVoc nou anaiteital ia autnt tn diadiikaia eapatai ano tnv kataotaon tou poqvou. Mepikec ouoic oknpaivouv kal npovuv va emnooiouv tn aeitoupyia TNC enevduong. Tny npayatikoteta paocuv tous npouc Tou elikou maaltou kal n oeiiodowdav aubavei xupa.TOTE npentie, oolic o poupoc Kpuwoe Evtalew, va kaalwoete Tnv Kpouota e nou zetot vepo kal e naakbouptoa, xwpic va xpnoiotoinoe anoppunaviko kal va avawete EaVa to qoupvo oTo maipouyia epika eaTt.
XPHEH TON KEPAMIKQN EETION
H IOxucTwv EOTIWpuOJIcEaI ano maia diataEn nou EeaoqaiZeu aapotn puOJion ts Oepokpaiaac yapeipaeatoc.
Oi diaopopeTkec evtaceic themuotntac ivai diaaBuaoece ano to 1 ecw to 6. O diaokontnc mnoepia va tonotheeThei otyn eniuumtn
,beon nepiatpepovtacs to npoc ta deEia n npoc ta apiotepa.
Tia TIC EOTIEc ME DIIALo KUKwua, O dIakottns yupva mvo DEgiooppa, o diapoeC EVTAOEIG eepoNTaKupaivovtai aTO 1 EwG 6 MVO YIA TIC KEVTPIKE CWEVC TWV EOTIWv.
To EIOevo KAIK MPTPOOta, MTea aTTO TNY TEAEUTaia OKAa, 0a avapei TIG UTOAOITTEC WVEc TWV EOTIw
Otav ma ano tic oiec eiva zootn, n vEvekntknauxvia E (Bene 1) avaai kal dve th a ohei av n thepokpaia oawv twv eotiw 2. dve katetbei katw ano toc 60^ nepinou.
Ol teoepic zwec maepiepaotoc kaobipovtai ano ta
tnepiypama tno eiva oxedioumeva oTo nlaT. Tia va exete
mu Kaan ano0oon kai xaunn katavalawon evepyiaac, eiva
anapaittova xnpaonoiite anteokleiotika oekun twv onoiw
O natoC v eiva npuckai evtalewc enineboc.H diaeptoc
tou natou tou okeuouc npenei va eiva toulambdaotov ion me Ta
tnepiypama tno eiva oxedioumeva oTo nlaT. Av o natoC Tou
okeuocdelta kaluntte th epaivovmynovn, exoue anowla
evepyiaac. O havakutepo va eiva eaappoc yeaalutepoc.
O natoC twv okeuw kai oEtiEc maeyipemaTO npenla v eivai Kahepckai otEyvec.H mtnponan autwTwv ououauw unpoei va enipepel anwlae 0epoTnTac kai eonovw c evpyiaac.
ZHMEIΩSH
-Mn maeyepueuTe note aenueoiaac navw otic eotiec.
-Me TIC EOTIEC ZOTEC, YIA VA KEPOIOE TE AIO XPOVO MIOPEITE VA apxioTe TO MAYEIPeMa ME TO DIAKONITN OTO 6, KAI VA Tov EavayupioTe OTN ΘeON NOU ExTe EINAEELY IA TNY IPOETOJAOSIA.
- OLeC oI eTieC Eiva epoiaouvec me evav nepiopiotn Thepokpaiaac nou dev enitpei Tnv unepepavon, akouk aoe nepintwn aeitoupyiac tnc miac estiaocto myio To xwpic OKeUoc n Tn xpnon oKeuwv Xwpic enine do npto.
EvkeiKa mopeite va ououeute tevnapakawivaevuicovtac otmuopeiv unapGVdeltaopocn opeilovta OTNVIOIOTa kal OTNV NOOTa TWpayntwounvtekota youoTa Tou kaEvoc.
1,5 kW - Plaque Normale 1,8 kW - Plaque High-Light 2,0 kW - Plaque Rapide
210-120 2,1-0,7 kW - Plaque High-Light
265-170 2,2-1,4 kW - Plaque High-Light
RECOMMANDATIONS IMPORTANTES:
FUNCTIONNEMENT MANUEL
ANNULATION D'UN PROGRAMME
- 2005/32/CE (Energy-using Products)
VOOROPSTELLING
=SEMI-RAPID
=CPEDH
= nuiTAXUC
= SEMIRAPIDE
=HALFSNELLEBR.
TC = TRIPLA CORONA
ULTRA-RAPID
=CKPOOCHAA
= uneptaxu
=TRIPLECOURONNE
=KBOONBBANDER
P1 = PIASTRA
= HOTPLATE 180
=0NEKTKPOOCHPOO 180
=8ctTig a180
= PLAQUE 180
= PLAATJE 0180
0180
0180
g 180
180
180
0180
A1 = PIASTR
= HOTPLATE 180
=3TETPPOKOPK0A 180
=ctqia 180
= PLAQUE 180
= PLAATJE 0180
B2 = PIASTR
= HOTPLATE 0145
=9EETKPOKOH04A 145
= 0σiα 0145
=PLAQUE 0145
= PLAATJE 0145
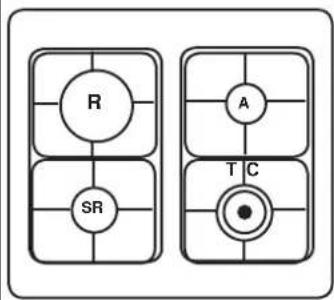
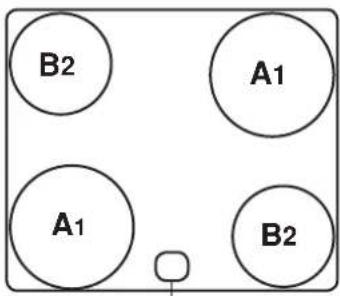
E
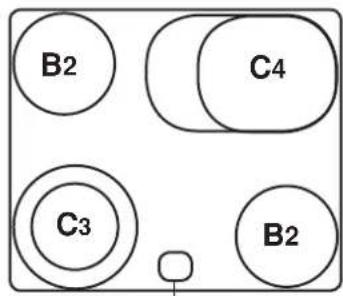
E
E = SPIA CALORE RESIDUO
= RESIDUAL HEAT WARNING LIGHT
=HILHKATOPHIAJAMNOUKA
OCTATOHHO TELTA
=EVδεικικηλuxviaθεροτητας
= VOYANT CHALEUR RESIDUELLE
= CONTROLELAMPJE RESTWARMTE
C3=PIASTRA 210-120
= HOTPLATE 210-120
=3JHTFESKPPKSA 210-120
=80ia 210-120
= PLAQUE 210-120
= PLAATJE 210-120
C4=PIASTRA
= HOTPLATE 265-170
=265-170
= 801a 265-170
= PLAQUE 265-170
= PLAATJE 265-170