
EI67322AX - Cooker GORENJE - Free user manual and instructions
Find the device manual for free EI67322AX GORENJE in PDF.



| Product type | Electric stove |
| Brand | Gorenje |
| Model | EI67322AX |
| Dimensions (W x D x H) | 60 cm x 60 cm x 85 cm |
| Weight | 50 kg |
| Electrical supply | 230 V / 50 Hz |
| Control type | Touch controls |
| Display | Digital with icons |
| Timer function | Yes, up to 10 hours |
| Cooking duration programming | Yes, up to 10 hours |
| End of cooking programming | Yes, up to 10 hours from the current time |
| Delayed cooking | Yes (duration + end of cooking) |
| Audible alarm | Yes, adjustable volume |
| Child safety | Yes, key lock |
| Automatic shut-off | Yes, at end of programmed cooking |
| Display brightness variation | Yes, dims after 1 minute of inactivity |
| Care and cleaning | Soft cloth, avoid abrasive products |
| Spare parts | Available, refer to after-sales service |
| Manual available | Multiple languages, free download |
Frequently Asked Questions - EI67322AX GORENJE
User questions about EI67322AX GORENJE
0 question about this device. Answer the ones you know or ask your own.
Ask a new question about this device
Download the instructions for your Cooker in PDF format for free! Find your manual EI67322AX - GORENJE and take your electronic device back in hand. On this page are published all the documents necessary for the use of your device. EI67322AX by GORENJE.
USER MANUAL EI67322AX GORENJE
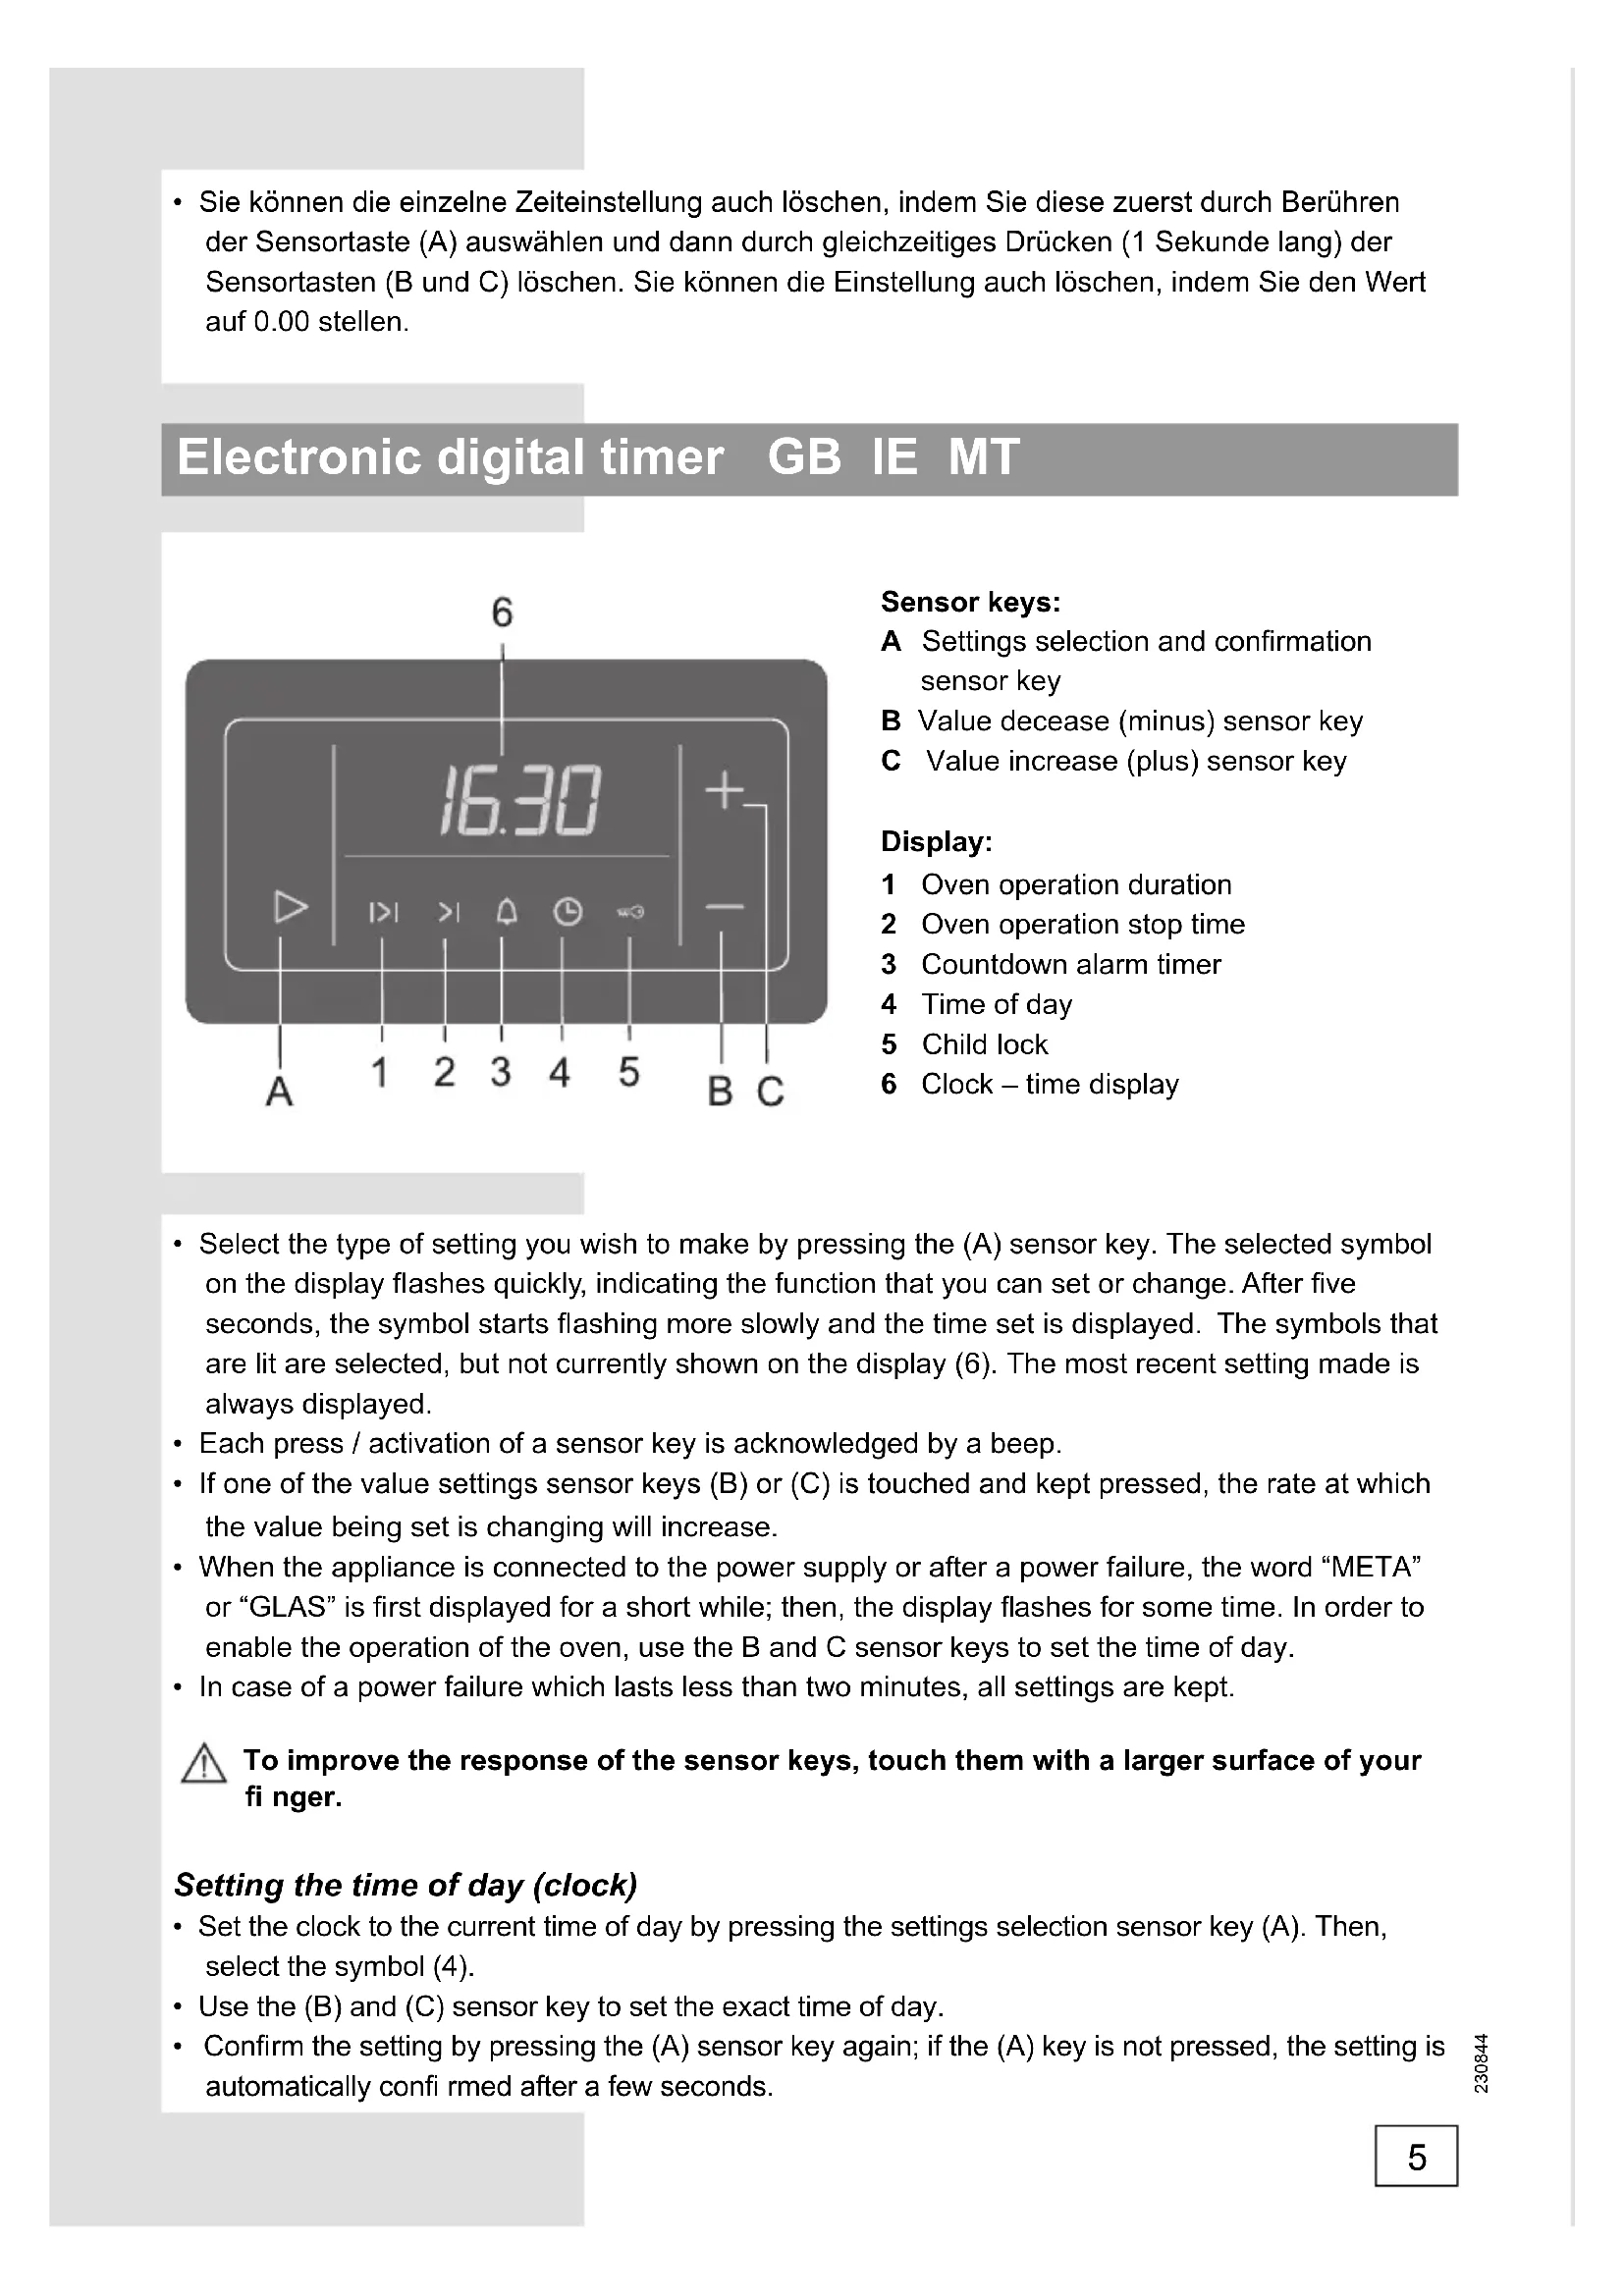
A Settings selection and confirmation sensor key B Value decrease (minus) sensor key C Value increase (plus) sensor key
Display:
1 Oven operation duration 2 Oven operation stop time 3 Countdown alarm timer 4 Time of day 5 Child lock 6 Clock-time display
- Select the type of setting you wish to make by pressing the (A) sensor key. The selected symbol on the display flashes quickly, indicating the function that you can set or change. After five seconds, the symbol starts flashing more slowly and the time set is displayed. The symbols that are lit are selected, but not currently shown on the display (6). The most recent setting made is always displayed. Each press / activation of a sensor key is acknowledged by a beep.
- If one of the value settings sensor keys (B) or (C) is touched and kept pressed, the rate at which the value being set is changing will increase.
- When the appliance is connected to the power supply or after a power failure, the word "META" or "GLAS" is first displayed for a short while; then, the display flashes for some time. In order to enable the operation of the oven, use the B and C sensor keys to set the time of day.
- In case of a power failure which lasts less than two minutes, all settings are kept.

To improve the response of the sensor keys, touch them with a larger surface of your finger.
Setting the time of day (clock)
- Set the clock to the current time of day by pressing the settings selection sensor key (A). Then, select the symbol (4).
- Use the (B) and (C) sensor key to set the exact time of day.
- Confirm the setting by pressing the (A) sensor key again; if the (A) key is not pressed, the setting is automatically confirmed after a few seconds.
The program timer can be used to program the oven operation in three ways:
- Cooking time setting - immediate start of oven operation; after a set period of time, the oven is turned off automatically.
- Cooking end time setting - the time at which oven operation is to end is set.
- Delayed start setting - automatic start and end of oven operation at a selected time.
Setting the cooking time
With this program mode, the duration of oven operation is set (cooking time). Maximum setting allowed is 10 hours.
- Press the (A) sensor key to select the symbol (1). Use the (B) and (C) sensor keys to set the duration / cooking time.
- Turn on the oven (use the corresponding oven knobs to set the operation mode and temperature). After the expiration of the set time, the oven will automatically stop operating (end of cooking time). An intermittent beep will sound, which can be stopped by pressing any key; if no key is pressed, the beep stops after one minute.
- The symbol (1) and the sign (_ _ _) will flash. If you wish to resume cooking, press the (A) sensor key and set a new duration if necessary.
Setting the cooking end time
This mode allows you to set the time at which the oven should stop operating. Maximum setting allowed is 10 hours relative to the current time of day.
- Make sure the current time of day is set correctly.
- Use the (A) sensor key and select the symbol (2). The current time of day is indicated on the display. Press the (B) and (C) sensor keys to set the cooking end time.
- Turn on the oven (use the corresponding oven knobs to set the operation mode and temperature). The oven starts to operate immediately and stops operation at the set time. An intermittent beep will sound, which can be stopped by pressing any key; if no key is pressed, the beep stops after one minute.
- The symbol (1) and the sign (_ :_ _ will flash. If you wish to resume cooking, press the (A) sensor key and set a new duration if necessary.
Setting the oven delayed start
With this operation mode, two settings have to be made: cooking time (duration of oven operation) and cooking end time (tie at which the operation should stop).
Cooking end time can be delayed by a maximum of 24 hours relative to the current time of day.
- Make sure the current time of day is set correctly.
- First, set the cooking time: Press the (A) sensor key to select the symbol (1). Use the (B) and (C) sensor keys to set the duration / cooking time.
- Then, set the cooking end time: Use the (A) sensor key and select the symbol (2). (A sum of the current time of day and the oven operation time is automatically shown on the display). Press the (B) and (C) sensor keys to set the cooking end time.
- The timer will wait for the start of the cooking - both symbols (1 and 2) are lit.
- Turn on the oven (use the corresponding oven knobs to set the operation mode and temperature). At the corresponding time, the oven starts operating automatically (the symbol (2) goes off upon the start of operation), and switches off when the set cooking time has elapsed. An intermittent beep will sound, which can be stopped by pressing any key; if no key is pressed, the beep stops after one minute.
- The symbol (1) and the sign (_ _ _) will flash. If you wish to resume cooking, press the (A) sensor key and set a new duration if necessary.
Setting the alarm timer
The clock can also be used independently of the oven operation, as an alarm timer that sounds an alarm after the expiration of a preset time.
- Use the (A) sensor key to select the symbol (3). Then, use the (B) and (C) sensor keys to set the time before the alarm sounds. Maximum setting allowed is 10 hours.
- When the set time has elapsed, an intermittent beep will sound, which can be stopped by pressing any key; if no key is pressed, the beep stops after one minute. The symbol (3) will go off.

The last minute of the timer countdown is displayed in second intervals.
Setting the beep volume (loudness)
The alarm volume can be set when no timer function is activated (only current time of day is displayed).
- Press the (B) sensor key and hold it for approximately three seconds; a volume indicator will appear, and the corresponding sample sound will sound. "ooo" indicates maximum volume, and "o" indicates minimum volume. Use the (B) sensor key to select among the four loudness levels.
- Confirm the selected volume level by pressing the (A) sensor key; if the (A) sensor key is not pressed, the setting will be confirmed and stored automatically after a few seconds.
Setting the child lock
The clock may be locked only after one of the time functions had been previously set (period of operation, end of operation, or alarm). The oven will function normally, but you will not be able to change settings.
Activation: Press the (A) sensor key to select the symbol (5). Use the (B) and (C) sensor keys to activate the child lock; the display will read "ON". Confirm the setting by pressing the (A) sensor key.
Deactivation: Press the (B) or (C) sensor to deactivate the child lock; "OFF" is displayed.
The setting must be confirmed by pressing the (A) sensor key.
Display dimmer
One minute after the appliance is turned off, the display will be dimmed.
Deleting the timer settings
- All timer settings can be deleted at any time by pressing the (B) and (C) sensor keys simultaneously and holding them for three seconds. The set programs are automatically interrupted and the timer switches to display of the current time of day.
- Any timer setting can also be deleted in the following way: selecting it using the (A) sensor key, then press the (B) and (C) sensor keys simultaneously. Another way to delete a setting is by setting the timer value to "0.00".
Sensors:
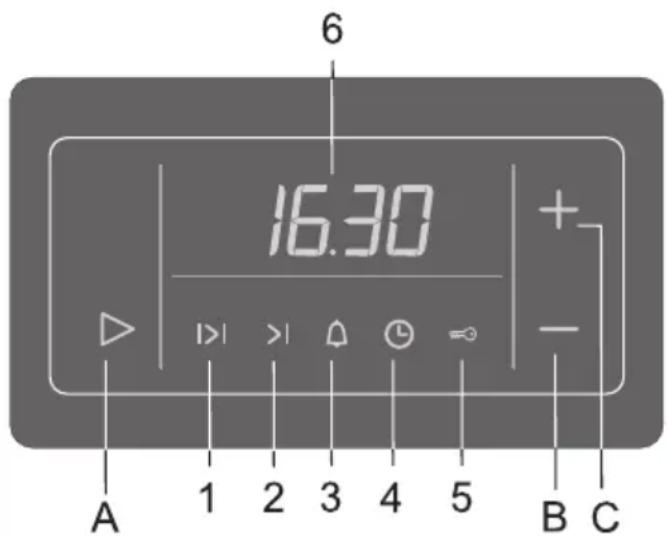
A Sensor key for selection and confirmation of settings B Sensor key for decreasing values (minus) C Sensor key for increasing values (plus)
Display:
1 Daily operation 2 Operating time 3 Time interval setting μ Etpno 4 End time 5 Child safety lock 6 Clock - time setting
Set delayed start
Symbol (1) and symbol ( ) to confirm the setting. If you need to repeat the cooking process, press the sensor (A) and set a new time interval.
Setting the timer
The timer can also be used independently of the oven, as a timer that emits an audible signal after the set time has elapsed.
- Press the sensor (A) and select the symbol (3). Then use the sensors (B) and (C) to set the timer time. The maximum setting is 10 hours. When the set time has elapsed, an audible signal sounds, which can be stopped by pressing the timer button. If the button is not pressed, the audible signal will sound again after one minute. Symbol (3) flashes.

The last minute of the countdown is displayed with an interval of one second.
Setting the volume of the audible signal
The volume of the audible signal can be set when the timer function is not activated (only the time is displayed).
Setting the child lock
The timer can be locked only after a previous setting of one of the timer functions (operating time, end of operation, or timer function).
The knob operates normally, but you cannot change the setting.
Activation: Press the sensor (A) and select the symbol (5). Using the sensors (B) and (C), activate the child lock; after that, "ON" appears. To confirm the setting, press the sensor (A).
Deactivation: To deactivate the child lock, press the sensor (B) or (C); after that, "OFF" appears.
The setting must be confirmed by pressing the sensor (A).
After a few minutes, the appliance will switch off automatically.
Cancelling the set timer
- All settings will be cancelled at any time if you press sensors (B) and (C) simultaneously and hold them for about three seconds. The set program is automatically checked and the timer displays only the current time.
- Any timer setting can also be cancelled in the following way: select it with sensor (A), then press sensors (B) and (C) simultaneously. To cancel a setting, set the timer to "0.00".
Electronic programmer
After the first connection of the appliance to the power supply and in the event of a power failure, it is necessary to set the current time.

Without setting the current time, the use of the oven is impossible.
The heating elements can operate with the oven door open, if the appliance is not equipped with a built-in oven switch. Danger of burns!
Sensors:
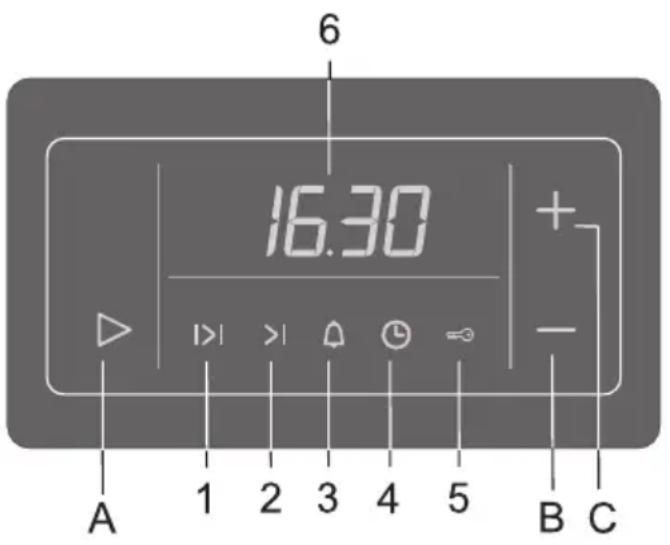
A Sensor for selecting and confirming functions, Sensor "-", Sensor "+"
Indicators:
1 Cooking duration 2 End of cooking 3 Timer (minute minder) 4 Clock 5 Child lock 6 Digital display
To select the desired function, press sensor A. The symbol of the selected function on the display will start flashing quickly; now you can set or change the function parameter. After 5 seconds, the symbol will flash more slowly, and the set time of the function will be displayed. - The flashing of the symbols indicates that the function is selected, but its time is not displayed on the display. The last function you set is displayed. Each press on the sensor is confirmed by a short sound signal. - If sensor "-" or "+" is held down, the value will change faster (increase or decrease respectively). - After connecting the oven to the power supply or in the event of a power failure, the display shows the message META or GLAS for a few seconds, then the display flashes for some time. To operate the oven, it is necessary to set the current time with sensors B and C. - If the power is interrupted for less than 2 minutes, all programmer settings are retained, and the oven automatically continues the operation (if it was on).

The end of cooking can be programmed no later than 24 hours from the moment of setting the function!
- Set the exact time of day.
- Set the cooking duration. Using sensor A, select symbol 1. Using sensors B «—» and C «+», set the cooking duration.
- Set the cooking end time. Using sensor A, select symbol 2. The display will show the sum of the current time of day and the cooking duration. Using sensors B «—» and C «+», set the cooking end time.
- The programmer will start cooking. The display will show symbols 1 and 2. Turn on the oven (select the heating mode and temperature). The oven will turn on automatically at the set time (symbol 2 flashes) and turn off at the set time. An intermittent sound signal will sound, which can be turned off by pressing any sensor, or after 1 minute the signal will turn off automatically. The display will show symbol 1 and the indicator «_:». If cooking needs to be extended, press sensor A and, if necessary, set a new cooking duration.
Manual mode
You can use the oven without setting the functions that program the oven operating time. To do this, place the products in the oven, close the door, set the heating mode and temperature, and the oven will start operating.
To exit manual mode after one of the functions that program the oven operating time has finished, press sensor A.

In this mode, the oven does not turn off automatically. Watch the cooking!
Timer
The programmer is equipped with a timer function that signals when the set time has elapsed and does not turn off the oven. The timer can be used independently of the oven operation.
The maximum time for the function is 10 hours!
- Using sensor A, select symbol 3. Using sensors B «—» and C «+», set the timer time.
- When the set time has elapsed, an intermittent sound signal will sound, which can be turned off by pressing any sensor, or after 1 minute the signal will turn off automatically. Symbol 3 flashes.

During the last minute, seconds are displayed on the display.
Setting the volume of the sound signal
To adjust the volume of the oven, the functions that program the cooking time must be activated. Only the current time is displayed on the display.
- Press and hold the sensor for 3 seconds with "-", until the symbols "0000" (maximum volume) or "0" (minimum volume) appear on the display and a sound signal sounds. Press the sensor with "-" to adjust the volume level.
- Confirm the set volume level by pressing sensor A, or after a few seconds the setting will be saved automatically.
Child lock
The child lock can be activated only if one of the functions that program the cooking time (cooking duration, cooking end, or timer) is enabled. The oven will operate, but it will be impossible to change the settings.
Activation
Select symbol 5 with sensor A. With sensor B "-" or C "+", activate the child lock. The display will show ON. Confirm the activation of the lock by pressing sensor A.
Deactivation
With sensor B "-" or C "+", deactivate the child lock. The display will show OFF. Confirm the deactivation of the lock by pressing sensor A.
Display brightness reduction
One minute after switching off the appliance, the display brightness will decrease.
Cancelling functions
To cancel all programmer functions, simultaneously press and hold the sensors "-" and "+" for 3 seconds. The execution of the set programs and cooking will stop automatically. The current time will be displayed. To cancel an individual function, select that function with sensor A and then simultaneously press and hold the sensors "-" and "+". The function can also be cancelled by setting the value to "0.00".
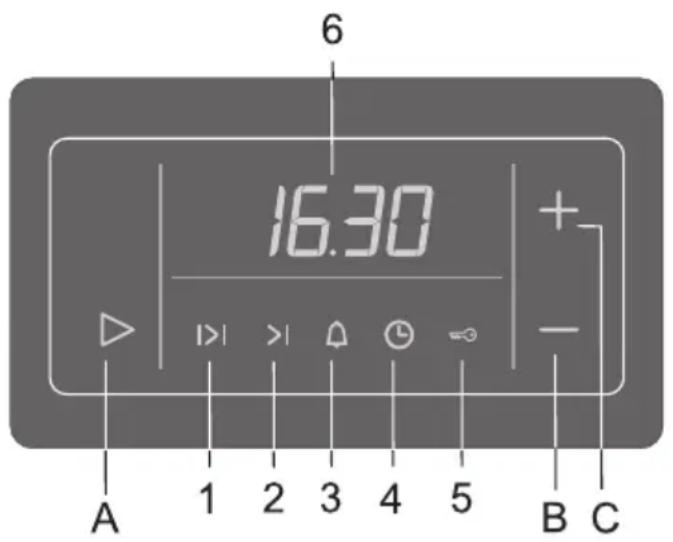
Sensors:
A Sensor for selection and confirmation B Sensor for decrease (minus) C Sensor for increase (plus)
1. Programming the oven for operation 2. Time for setting the working temperature 3. Timer with countdown 4. Current time 5. Shutdown 6. Clock - current time display
- Select the function you want to set by touching the sensor (A). The selected symbol will flash quickly, indicating which function you have selected for adjustment. Then the symbol will light up continuously and will be displayed during this time. The selected symbols will light up, but the current display will be shown (B). After the set adjustment is made, it will be displayed. Each touch of the sensor is confirmed with a sound.
- If you touch and hold the sensors (B) and (C), the speed at which the value changes will accelerate. When you turn on the device in the network or during a temporary power outage, the display initially shows the word "META" or "GLAS", after which the clock starts at 12:00. To operate the oven, you must set the current time. Use the sensors (B) and (C) to adjust the hour. If the power outage lasts no more than a few minutes, all settings are preserved.

For the sensors to work normally, touch them with a larger surface of the finger, etc.
Setting the current time (clock)
- Set the current time by touching the sensor (A), then select the symbol (4).
- Use the sensors (B) and (C) to set the hour.
- Confirm the setting by touching the sensor (A) again. If you do not touch the sensor (A), the setting is confirmed automatically after a few seconds.
The timer can be used in three ways:
- Setting the working time - the oven switches off automatically after a set period of time.
- Setting the end of the working time - setting the hour at which the oven will stop working.
- Delayed start of the oven - automatic start of the oven at a certain hour.
Setting the cooking time (first)
With this setting you set the duration of the oven operation (cooking time). The maximum value is 10 hours.
- Touch sensor (A) and select symbol (1). Use sensors (B) and (C) to set the cooking time duration. Turn on the oven (use the corresponding knobs to select mode and temperature). After the set time has elapsed, the oven will stop automatically (end of cooking). An audible signal will remind you that the oven has finished; the sound can be turned off by touching the sensor; if you do not touch the sensor, the signal will stop after one minute. - Symbols (1) and (:) will light up. If you want to extend the cooking time, touch sensor (A) and set a new duration, if necessary.
Setting the end of cooking time and the oven
With this option you can set the time at which the oven will stop working. The maximum selectable time is 10 hours from the current time.
- Make sure the clock is set to the correct current time.
- Use sensor (A) and select symbol (2). The current time is displayed on the display. Touch sensors (B) and (C) to set the time at which the oven should stop working. Turn on the oven (use the corresponding knobs to select mode and temperature). The oven starts working immediately and will stop at the set time. This is announced with an audible signal, which can be turned off by touching the sensor; if not turned off, it stops automatically after one minute. Symbols (1) and (:) will light up. If you want to extend the cooking time, touch sensor (A) and set a new duration, if necessary.
Setting the delayed start
To use this option, two settings must be made: the cooking time setting and the end of cooking time setting.
The start of the oven operation can be delayed by up to 24 hours from the corresponding time at the moment of setting.
- Make sure the clock is set to the correct current time.
- First, set the cooking time: Touch sensor (A) and select symbol (1). Use (B) and (C) to select the duration - cooking time. After this, set the end of cooking time. Use sensor (A) and select symbol (2). The current time is displayed on the display. Touch sensors (B) and (C) to set the time at which the oven should stop working. The timer will then count down to the oven start - both symbols (1 and 2) light up. Turn on the oven (use the corresponding knobs to select mode and temperature). At the set time (the timer calculates the time at which the oven should turn on), the oven turns on automatically (symbol (2) turns off at the moment of
The timer can be used in a pre-set time interval. This is announced with a sound signal, which can be turned off by touching the sensor, and it can also be silenced if not needed. The symbols (1) and (:) will light up. If you want to change the setting, touch the sensor (A) and set a new setting, if necessary.
Setting the alarm
The timer can be used independently of the clock, as a timer that emits a sound signal after a certain period of time.
- Use the sensor (A) and select the symbol (3). Then, use the sensors (B) and (C) to select the time period before the alarm is activated. The maximum time is 10 hours. When the set time has elapsed, a sound signal is emitted, which can be turned off by touching the sensor, and it can also be silenced if not needed. The alarm stops automatically after one minute. The symbol (3) disappears from the display.

The last minute of the time interval is visualized in the interval display.
Setting the volume of the sound signal
The volume of the sound signal can be adjusted only when another timer function is active (only the current time is displayed).
- Touch the sensor (B) and hold for about three seconds; the indicator for the sound volume will appear and you will hear a sample sound signal. "OOOO" indicates maximum sound volume, and "O" indicates minimum sound volume. Use the sensor (B) to select between the levels of sound volume. - Confirm the selected sound volume level by touching the sensor (A); if you do not confirm it, the setting will be confirmed automatically after a few seconds.
Setting the lock
The timer can be locked only after one of the time functions has been set (cooking duration, end of cooking, or alarm). The function will operate normally, but you will not have the possibility to change the settings.
Activate: Touch the sensor (A) and select the symbol (5). Use the sensors (B) and (C) to activate the lock, on the display it will show "ON". Confirm the setting by touching the sensor (A).
Deactivate: Touch the sensors (B) and (C) to deactivate the lock; the display will show "OFF". Confirm by touching the sensor (A).
Adjusting the brightness of the indicator lights
One minute after the device is switched off, the display will turn off.
Resetting the timer settings
Any setting on the appliance can be changed at any time by pressing the (B) and (C) sensors simultaneously for three seconds. Any set program will automatically stop and the current time will be displayed. - Any timer setting can be changed in the following way: select the setting with sensor (A), then press sensors (B) and (C) simultaneously. Another way to change a timer setting is to program the timer with the value "0.00".
The oven functions and the delayed start function can be set (delayed start).
The delayed start function can be set for up to 10 hours.
Delayed start!
- Set the delayed start time. - Press sensor 2 to select. The display will show the delayed start time. Use the "-" and "+" sensors to set the delayed start time. - Set the delayed start function. Press sensor 2 to select. The display will show the delayed start time with the oven function. Use the "-" and "+" sensors to set the delayed start time. - The programmer will start the delayed start. The display will show 1 and 2. - Set the oven (cooking mode and temperature). The oven will start automatically at the set time (2 beeps) and turn off at the set time. If the signal is not confirmed, it will beep again or turn off automatically after 1 minute. - Press 1 and "0.00" to cancel. If you need to cancel the delayed start, press sensor A and then press the delayed start time to set it to zero.
Starting the oven
This oven function allows you to set a delayed start time (delayed start) and a delayed stop time (delayed stop).
The delayed start function can be set for up to 24 hours.
Set the oven time. - Set the delayed start time. Press sensor 1 to select. Use the "-" and "+" sensors to set the delayed start time. - Set the delayed stop time. Press sensor 2 to select. The display will show the delayed stop time with the oven function. Use the "-" and "+" sensors to set the delayed stop time. - The programmer will start the delayed stop. The display will show 1 and 2. - Set the oven (cooking mode and temperature). The oven will start automatically at the set time (2 beeps) and turn off at the set time. If the signal is not confirmed, it will beep again or turn off automatically after 1 minute. - Press 1 and "0.00" to cancel. If you need to cancel the delayed stop, press sensor A and then press the delayed stop time to set it to zero.
Cooking mode
You can use the oven functions to set the cooking time. To do this, set the oven function and temperature, then set the cooking time.
One of the oven functions is to set the cooking time. After the set time has elapsed, the oven will switch to standby mode. Press sensor A to confirm.

The oven will operate automatically in this mode. Do not leave it unattended!
Off
The pressure switch is activated by the air pressure, and the function of the switch is to signal the air pressure. The switch is designed to be connected to the air circuit.
The function time is at least 10 seconds!
Test with 3 sensors. Turn on the switch with the «-» and «+» sensors. - When the switch is turned on, if the signal is weak, you can press the sensor that appears, and after 1 minute the switch will turn off automatically. 3 signals.

The final minutes are displayed on the display.
Signal strength setting
To set the signal strength, the switch must be in the function setting mode. The display shows the setting value.
- If the display shows Oooo (maximum signal) or Oo (minimum signal), press the «-» sensor for 3 seconds to set the signal. Press the «-» sensor to set the signal strength.
- To set the signal strength, press the A sensor and hold, or after a few seconds the switch will turn off automatically.
Course setting
The course setting can be done by using the switch function (setting value, setting action or off) to set the course. The switch is set, and the setting values are displayed.
Setting
Test with 5 sensors. Set the course with the «-» or «+» sensors. The display shows the value. Press the A sensor to confirm the setting.
Setting
B «-» and C «+» sensors set the operating time. The OFF dispatcher is on. The sensor is off, the operating time is set.
Dispelzhar is activated
If the functions of the spiritual office are required at a certain time, set the time between 0.00 and 6.00, and the dispenser will automatically turn off.
Reset functions
- To reset all functions of the programmer, press B «-» and C «+» sensors together for 3 seconds. The set parameters will be reset and the automatic shutdown will stop. The dispatcher will return to the previous time. To reset a specific function, select it with the sensor and then press B «-» and C «+» sensors together. The function can be reset to «0.00».
- DISPLAY
- TO IMPROVE THE RESPONSE OF THE SENSOR KEYS, TOUCH THEM WITH A LARGER SURFACE OF YOUR FINGER
- SETTING THE TIME OF DAY (CLOCK)
- SETTING THE COOKING TIME
- SETTING THE COOKING END TIME
- SETTING THE OVEN DELAYED START
- SETTING THE ALARM TIMER
- THE LAST MINUTE OF THE TIMER COUNTDOWN IS DISPLAYED IN SECOND INTERVALS
- SETTING THE BEEP VOLUME (LOUDNESS)
- SETTING THE CHILD LOCK
- DISPLAY DIMMER
- DELETING THE TIMER SETTINGS
- SENSORS
- SET DELAYED START
- SETTING THE TIMER
- THE LAST MINUTE OF THE COUNTDOWN IS DISPLAYED WITH AN INTERVAL OF ONE SECOND
- SETTING THE VOLUME OF THE AUDIBLE SIGNAL
- CANCELLING THE SET TIMER
- ELECTRONIC PROGRAMMER
- WITHOUT SETTING THE CURRENT TIME, THE USE OF THE OVEN IS IMPOSSIBLE
- INDICATORS
- MANUAL MODE
- IN THIS MODE, THE OVEN DOES NOT TURN OFF AUTOMATICALLY. WATCH THE COOKING
- TIMER
- DURING THE LAST MINUTE, SECONDS ARE DISPLAYED ON THE DISPLAY
- SETTING THE VOLUME OF THE SOUND SIGNAL
- CHILD LOCK
- ACTIVATION
- DEACTIVATION
- DISPLAY BRIGHTNESS REDUCTION
- CANCELLING FUNCTIONS
- FOR THE SENSORS TO WORK NORMALLY, TOUCH THEM WITH A LARGER SURFACE OF THE FINGER, ETC
- SETTING THE CURRENT TIME (CLOCK)
- SETTING THE COOKING TIME (FIRST)
- SETTING THE END OF COOKING TIME AND THE OVEN
- SETTING THE DELAYED START
- SETTING THE ALARM
- THE LAST MINUTE OF THE TIME INTERVAL IS VISUALIZED IN THE INTERVAL DISPLAY
- SETTING THE LOCK
- ADJUSTING THE BRIGHTNESS OF THE INDICATOR LIGHTS
- RESETTING THE TIMER SETTINGS
- STARTING THE OVEN
- COOKING MODE
- THE OVEN WILL OPERATE AUTOMATICALLY IN THIS MODE. DO NOT LEAVE IT UNATTENDED
- OFF
- THE FINAL MINUTES ARE DISPLAYED ON THE DISPLAY
- SIGNAL STRENGTH SETTING
- COURSE SETTING
- SETTING
- DISPELZHAR IS ACTIVATED
- RESET FUNCTIONS
Brand : GORENJE
Model : EI67322AX
Category : Cooker