
587.14669 - Dishwasher KENMORE - Free user manual and instructions
Find the device manual for free 587.14669 KENMORE in PDF.
| Product Type | Built-in or portable dishwasher |
| Brand | Kenmore |
| Model | 587.14669 |
| Power Supply | 120 V, 60 Hz |
| Circuit Rating | 15 A (20 A with garbage disposal) |
| Water Pressure Required | 103,5 - 837 kPa (15 - 120 psi) |
| Minimum Water Temperature | 49 °C (120 °F) |
| Wash Cycles | Pots & Pans, Normal Wash, Light Wash, China Gentle, Eco, Quick Rinse |
| Wash Options | High Temperature Wash (Hi-Temp Wash) |
| Drying Options | Heated Dry (default) or Air Dry |
| Delay Start | Yes, 2 to 4 hours |
| Detergent Dispenser | Dual Cup (one open, one closed) |
| Rinse Aid Dispenser | Yes, adjustable (capacity for 35 to 140 washes) |
| Filtration System | Filter assembly with main filter, cup, and fine filter |
| Wash Arms | Lower and middle rotating spray arms |
| Safety | Grounding required, lockable door |
| Maintenance | Regular cleaning of filter and wash arm |
| Warranty | One-year limited warranty |
Frequently Asked Questions - 587.14669 KENMORE
User questions about 587.14669 KENMORE
0 question about this device. Answer the ones you know or ask your own.
Ask a new question about this device
Download the instructions for your Dishwasher in PDF format for free! Find your manual 587.14669 - KENMORE and take your electronic device back in hand. On this page are published all the documents necessary for the use of your device. 587.14669 by KENMORE.
USER MANUAL 587.14669 KENMORE
Sears Brands Management Corporation,
Hoffman Estates,
IL 60179 U.S.A.
www.kenmore.com
www.sears.com

Table of Contents
Kenmore Limited Warranty 2
IMPORTANT SAFETY INSTRUCTIONS 3
Before Using Your Dishwasher 4
Dishwasher Features 5
Operating Instructions 6-7
Preparing and Loading Dishes 8-9
Dishwasher Dispenser and Detergents 10-11
Care & Cleaning 12
Before You Call - Solutions to common problems 13-14
Protection Agreements 15
Sears Service. Back Cover
Kenmore Limited Warranty
When installed, operated and maintained according to all instructions supplied with the product, if this appliances fails due to a defect in material or workmanship within one year from the date of purchase, Call 1-800-4-MY-HOME® to arrange for free repair. If this appliance is used for other than private family purposes, this warranty applies for only 90 days from the date of purchase.
This warranty covers only defects in material and workmanship. Sears will NOT pay for:
- Expendable items that can wear out from normal use, including but not limited to filters, belts, light bulbs, and bags.
- A service technician to instruct the user in correct product installation, operation or maintenance.
- A service technician to clean or maintain this product.
- Damage to or failure of this product if it is not installed, operated or maintained according to all instructions supplied with the product.
- Damage to or failure of this product resulting from accident, abuse, misuse or use for other than its intended purpose.
- Damage to or failure of this product caused by the use of detergents, cleaners, chemicals or utensils other than those recommended in all instructions supplied with the product.
- Damage to or failure of parts or systems resulting from unauthorized modifications made to this product.
Disclaimer of implied warranties; limitation of remedies
Customer's sole and exclusive remedy under this limited warranty shall be product repair as provided herein. Implied warranties, including warranties of merchantability or fitness for a particular purpose, are limited to one year or the shortest period allowed by law. Sears shall not be liable for incidental or consequential damages. Some states and provinces do not allow the exclusion or limitation of incidental or consequential damages, or limitation on the duration of implied warranties of merchantability or fitness, so these exclusions or limitations may not apply to you.
This warranty applies only while this appliance is used in the United States or Canada.
This warranty gives you specific legal rights, and you may also have other rights which vary from state to state.
Sears Brand Management Corporation, Hoffman Estates, IL 60179 USA
Sears Canada Inc., Toronto, Ontario, Canada M5B 2B8
Product Record
In this space below, record the date of purchase, model and serial number of your product. You will find the model and serial number printed on an identification plate. See page 5 Dishwasher Features for serial label location.
Model No. 587.
Serial No.
Date of Purchase
Save sales receipt for future reference.
Read all instructions before using this appliance.
This manual contains important safety symbols and instructions. Please pay attention to these symbols and follow all instructions given.
Definitions
This is the safety alert symbol. It is used to alert you to potential personal injury hazards. Obey all safety messages that follow this symbol to avoid possible injury or death.
Do not attempt to install or operate your appliance until you have read the safety precautions in this manual.
Safety items throughout this manual are labeled with a WARNING or CAUTION statement based on the risk type.
WARNING -indicates a potentially hazardous situation which, if not avoided, may result in death or serious injury.
CAUTION - indicates a potentially hazardous situation which, if not avoided, may result in minor or moderate injury.
All rights reserved. Printed in the USA.
Important Safety Instructions
WARNING
When using the dishwasher, follow basic precautions, including the following:
- Read all instructions before using the dishwasher.
- Use your dishwasher only as instructed in this Use and Care Guide.
- Use only detergents or rinse agents recommended for use in a dishwasher, and keep them out of reach of children.
-
When loading items to be washed:
-
Locate sharp items and knives so that they are not likely to damage the door seal or tub.
-
Load sharp items and knives with the handles up to reduce the risk of cut-type injuries.
-
Do not wash plastic items unless marked "dishwasher safe" or the equivalent. Check with manufacturer for recommendations, if not marked. Items that are not dishwasher safe may melt and create a potential fire hazard.
- Do not touch the heating element during or immediately after use.
- Do not operate your dishwasher unless all enclosure panels are properly in place.
- If the dishwasher drains into a food dispenser, make sure dispenser is completely empty before running dishwasher.
- Disconnect electrical power to dishwasher before servicing.
- Do no tamper with controls.
- Do not let children abuse, sit, stand or play on door or racks of a dishwasher.
- Keep young children and infants away from dishwasher when it is operating.
- Under certain conditions, hydrogen has may be produced in a hot water system that has not been used for two weeks or more. HYDROGEN GAS IS EXPLOSIVE. If the hot water system has not been used for such a period, before using the dishwasher turn on all hot water faucets and let the water flow from each for serveral minutes. This will release any accumulated hydrogen gas. As the gas is flammable, do not smoke or use an open flame during this time.
- Remove the door to the washing compartment when removing an old dishwasher from service or discarding it.
Before Using Your Dishwasher
AWARNING

Tip Over HazardTip Over Do not use dishwasher untilDo not use completely installed.completely installed
Do not push down on open door.Do not put Doing so can result in serious injury orD cuts.cuts.
Hazard Iahwasher until
ush down on openbing so can result
AWARNING

Electrical Shock HazardElect Electrically ground dishwasher.Electrical Connect ground wire to green groundCon nut in terminal box.nut in terminal box.
Do not use an extension cord. Do not use Failure to do so can result in death, Failur fire, or electrical shock/fire, or electrca
ical Shock Ha y ground dlahwa nect ground wire
an extension cor e to do so can re shook.
GROUNDINGINSTRUCTIONS
- For a grounded, cord-connected dishwasher:
The dishwasher must be grounded. In the event of a malfunction or breakdown, grounding will reduce the risk of electric shock by providing a path of least resistance for electric current. The dishwasher is equipped with a cord having an plug. The plug must be plugged into an appropriate outlet that is installed and grounded in accordance with all local codes and ordinances.
AWARNING: Improper connection of the equipment-grounding conductor can result in a risk of electric shock. Check with a qualified electrician or service representative if you are in doubt whether the dishwasher is properly grounded. Do not modify the plug provided with the dishwasher. If it will not fit the outlet, have a proper outlet installed by a qualified electrician.
- For a permanently connected dishwasher:
The dishwasher must be connected to a grounded metal, permanent wiring system, or a equipment-grounding conductor must be run with the circuit conductors and connected to the equipment-grounding terminal or lead on the dishwasher.
Dishwasher Features
How Your Dishwasher Cleans
Your dishwasher illustrated below, cleans by spraying a mixture of hot, clean water, and detergent against the soiled surfaces of your dishes and tableware.
Each cycle starts with a pre-drain. Next, the dishwasher fills with water to a level even with the heating element. This water is constantly pumped through the rotating spray arm and sprayed on the dishes. Soiled water is pumped out and replaced with clean water during a cycle. The number of water fills depends upon the cycle being used.
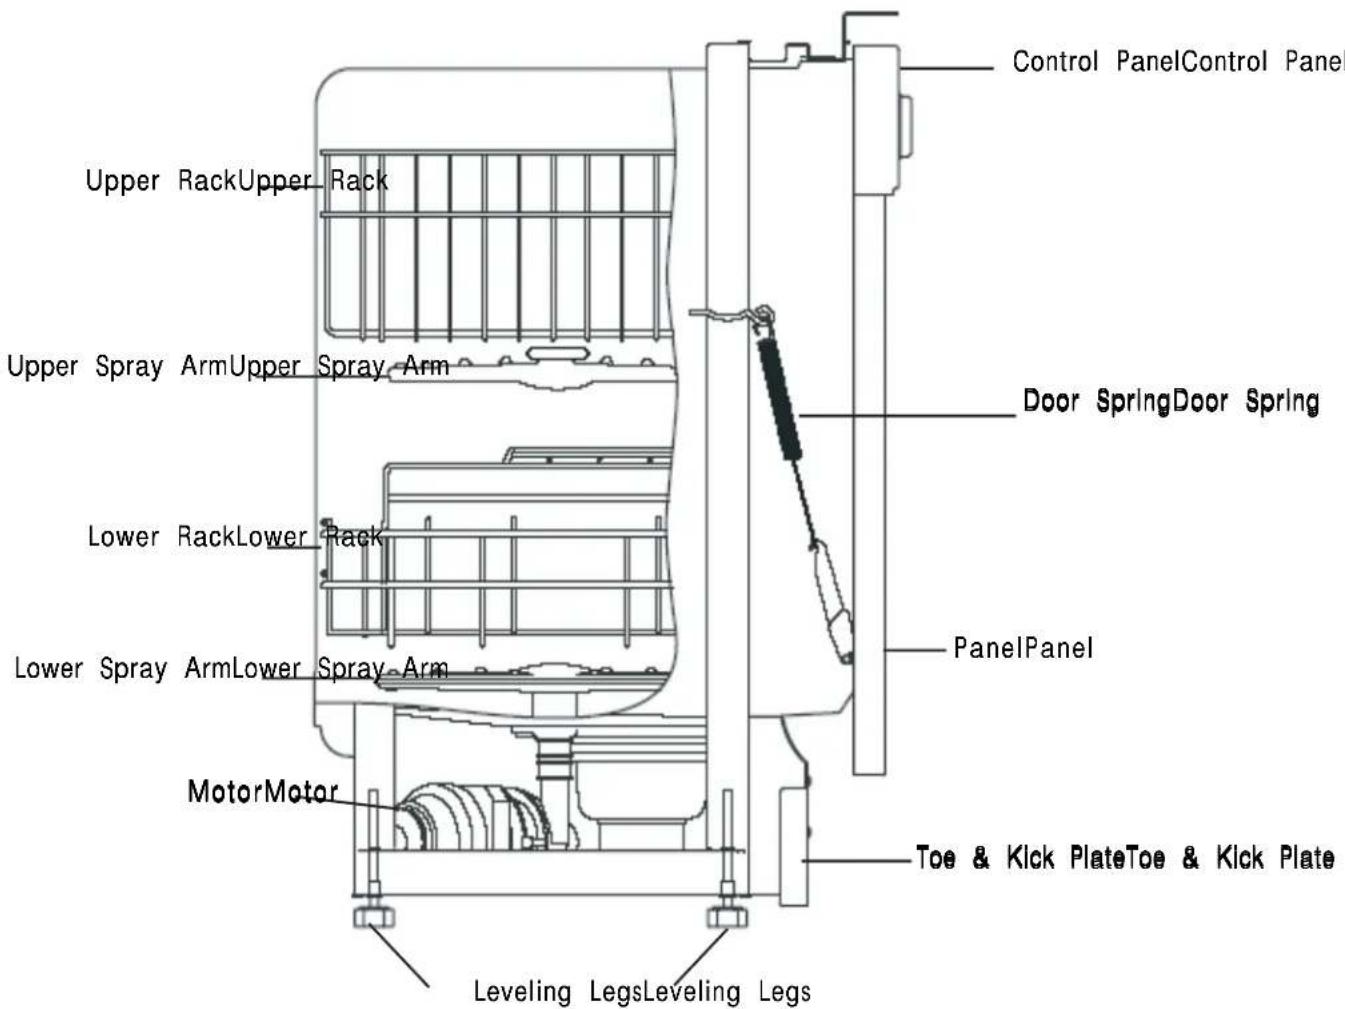
Appearance may vary from your model.
Operating Instructions

Appearance may vary from your model.
| Cycle Chartcycle Chart * Includes dry time. | |||||
| Cycle | Description Description | To Select Cycle | Water (approx.) (approx prox) | Time* Time approx. (approx prox) | Washes/ W approx. |
| Pots & PansPan and silverware. | For & heavily soiled dishes and silverware. | • Select POTS & PANS. • Select desired OPTIONS. | 4.41 gal. 16.7 liters | 125 mins. | 2 washes 5 rinses |
| Normal Wash | For regularly soiled dishes and silverware. | • Select NORMAL WASH. • Select desired options. | 3.5 gal. 13.4 liters | 95 mins. | 2 washes 4 rinses |
| Light Wash | For lightly soiled and pre-rinsed dishes and silverware. | • Select LIGHT WASH. • Select desired options. | 2.7 gal. 10.2 liters | 65 mins. | 2 washes 2 rinses |
| China Gentle | For lightly soiled China and Crystal. | • Select CHINA GENTLE. • Select desired options. | 2.7 gal. 10.2 liters | 80 mins. | 1 rinse |
| Eco | For lightly soiled or pre-rinsed dishes and silverware. | • Select ECO. • Select desired options. | 3.5 gal. 12.0 liters | 85 mins. | 2 washes 3 rinses |
| Quick Rinse | For rinsing dishes that will be washed later. | • Select QUICK RINSE. DO NOT USE detergent. | 1.8 gal. 6.8 liters | 25 mins. | 1 rinse |
Note: No cycles are approximate and will vary with options selected. Not all cycles available on all models.
Getting Started
- Check Filter (See Cleaning Filter).
- Load dishwasher (See Preparing and Loading Dishes).
- Add detergent (See Dishwasher Dispenser & Detergents).
- Add rinse aid, if needed (See Rinse Aid).
-
Select wash cycle (See Cycle Chart).
-
Select desired OPTIONS.
- See Page 12 for instructions on connecting the protable dishwasher.
- Run hot water faucet nearest dishwasher until water is hot. Turn water off.
- To Start, close door to latch.
Operating Instructions
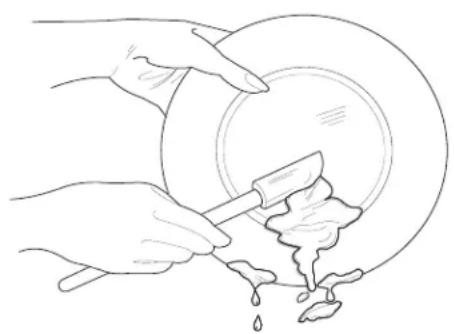
Dish Preparation
It is not necessary to rinse dishes before putting them into the dishwasher. Just remove large pieces and quantities of food, bones, pits, etc. Empty glasses and cups. It may be necessary to presoak or lightly scour firmly cooked-on or baked-on foods.
Food such as mustard, mayonnaise, vinegar, lemon juice and tomato-based products may cause discoloration of stainless steel and plastics if allowed to sit for a long period of time. Unless the dishwasher is to be operated at once, it is best to rinse off these food soils.
- Load dishes facing the center of the rack so that the water spray from the rotating spray arm can reach soiled surfaces.
- Be sure large items do not block the detergent dispenser, preventing it from opening during the wash cycle.
- To be sure an item is dishwasher safe, read the manufacturer's care instructions.
- If the dishwasher drains into a food dispenser, be surebe sure the heating element. This will reduce energy consumptions.
disposer is completely empty before dishwasher/disposer is completely empty before dishwasher is started.is started. - To save energy, wash full loads.
- For best washing results, load correctly and avoid overloading.
The unit defaults to heated dry when it is started with any cycle selected. This drying uses a combination of the heated dry with rinse aid that achieves enhanced drying performance. If you prefer to only have AIR DRY for dishes, you will select AIR DRY and the uit will not energize the heating element. This will reduce energy consumption,
But reduce drying performance.
Delay StartDelay Start
The DELAY START option allows you to automatically delay starting your dishwasher from 2 - 4 hours.
Hi-Temp Wash OptionHi-Temp Wash Option When HI-TEMP WASH ON option is selected, the dishwasher heats the water in the main wash to approximately 140^ (60^)
This increase in water temperature helps dishwasher detergent remove food grease and soil from dishes more effectively and aids in drying. HI-TEMP WASH option can be used with all cycles except LIGHT WASH and QUICK RINSE. HI-TEMP WASH is automatically provided when HEAVY WASH cycle is selected.
To turn off the HI-TEMP WASH option, press the pad a second time.
Air Dry OptionAir Dry Option
Make cycle selections, press the DELAY START key until the desired delay LED is it, then close the door and the delay time will start.
To cancel the delay and start the cycle before the delay period is over, open the door and press the START/CANCEL key. Close the door and the cycle will start.
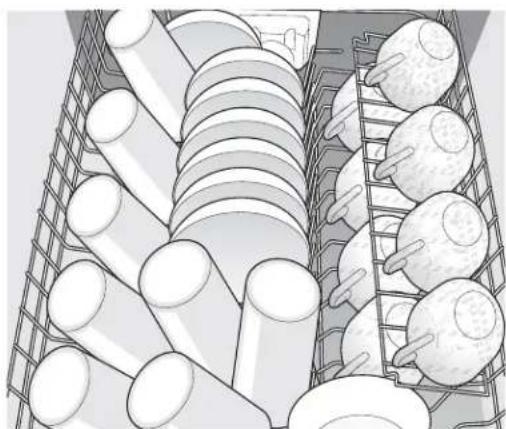
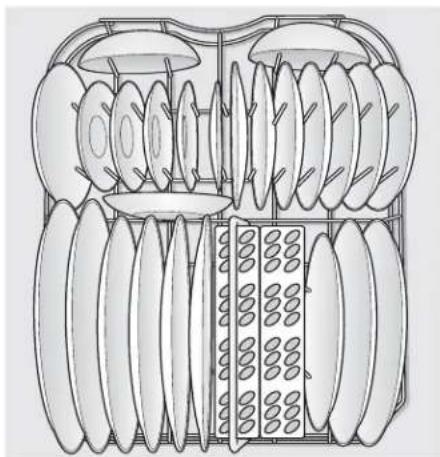
Preparing and Loading Dishes
Loading the Top Rack
Glasses and cupsGlueee ghebsespand cups against outside pins at an angle. Cups with a concave bottom will collect water.
Small plates and saucers.
Plasticware Plastic plasticware in the top rack to avoid melting.
BowlsBeRlace bowls between the middle 2 rows of pins facing down.
Miscellaneous items: Mibtaclarogshetbed knives and utensils in top rack.
Cup Shelf Cup Shelf shelf can be folded down over short items (juice glasses, cups, etc.) for more loading space. When using cup shelf, alternate items with layer below so that water can reach all inside surfaces.
Loading the Bottom Rack
Large plates and plattersLaPcplatedtpeport pins with soiled sides facing inward.
Bowls, casseroles and sauce pans—Boads, up batteroles and sauce pans—down or at an angle facing inward. Slightly tilting items will provide better drainage.
Pots and pans placed aside down and at an angle. Do not allow handles to protrude through bottom of rack, blocking wash arm rotation. Load large items at the sides and not across the front so they do not block the detergent dispenser preventing it from opening.
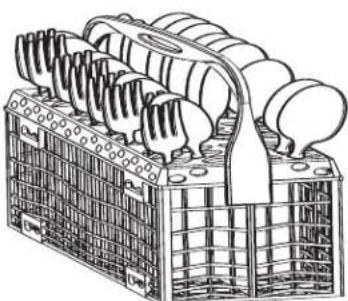
Loading the Silverware Basket
Load sharp items with handles up. Load sharp item slowly with hand not protrude through the holes in the basket and stop the rotation of the spray arm.
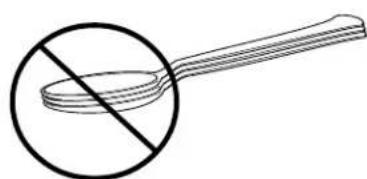
Load silverware so items are mixed in each section to prevent nesting. Water spray cannot effectively reach nested items.
ADDING A DISH
- Make sure there is a full wash cycle yet to be completed so that any added items are thoroughly washed and rinsed.
- Unlatch door and wait for water action to stop.
- Open door and add dish.
- Firmly close door to latch and resume cycle.
Dishwasher Dispenser & Detergents
Filling the Detergent Dispenser
The detergent dispenser has one main wash cup and one prewash cup. The covered cup opens automatically to release detergent.
- Use only fresh automatic dishwashing detergent. Other detergents will cause oversudsing.
- When using automatic dishwashing detergent tabs, place one tab in main wash cup and close.
- Add detergent just before starting cycle.
- Store detergent in a cool, dry location. Moist or caked detergent will not dissolve properly.
CAUTION
The use of industrial grade detergent can damage the heating coil and other parts of the dishwasher leading to damage to the unit and surrounding property. Use only household grade automatic dishwasher detergents.
How much Detergent to use
The amount of detergent to use depends on the water hardness. Water hardness is measured in grains per gallon. Using too little detergent can result in poor cleaning and hard water filming or spotting. Using too much detergent in soft water can cause a permanent film called etching. Your local water company, water softener company or county extension agent can tell you the water hardness in your area.
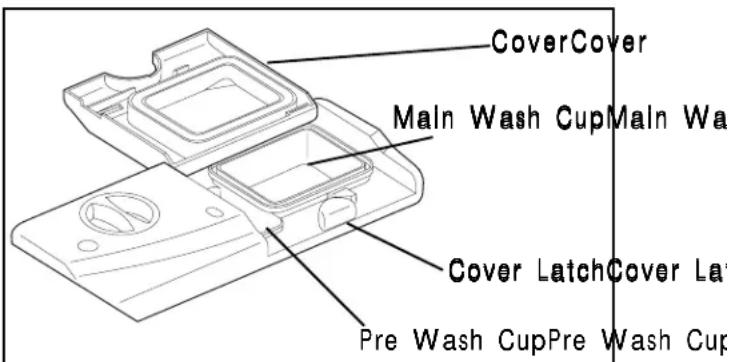
Note: Mutter cover is closed on the Main Wash Cup, open by pressing the cover latch.
| Detergent Usage Guide | ||||
| Cycle | Soft Water (0-3 grains) | Medium Hard Water (4-8 grains) | Hard Water (9-12 grains) | Very Hard Water* (over 12 grains) |
| Pots & Pans or Normal Wash | 1.5 teaspoons (each cup-1/4 full) | 4 teaspoons (each cup-fill to line above "Regular") | 6 teaspoons (each cup-completely full) | Each Cup - Completely Full (water softener recommended) |
| Light Wash | 1.5 teaspoons (Main Wash cup-1/4 full) | 4 teaspoons (Main Wash cup-fill to line above "Regular") | 6 teaspoons (Main Wash cup-completely full) | Main Wash Cup - Completely Full (water softener recommended) |
| Quick Rinse | No Detergent No | Detergent No Detergent | No Detergent (water softener recommended) | |
*Note: For very hard water, detergent alone may not be enough. A water softener is recommended to improve water quality and dishwashing performance. Try adding more detergent at the beginning of the main wash portion of the cycle. As a rule, use 1 teaspoon for each grain above 12. Unlatch the door, open slowly and add detergent to the bottom of the tub. Close the door to latch and the dishwasher will continue through the cycle.
Dishwasher Dispenser & Detergents
Rinse Aid
Rinse ald greatly improves drying and reduces Rinse water spots and filming. wate spsteed affimishes rather than forming water droplets that cling and leave spots.
A dispenser, located next to the detergent cup, automatically releases a measured amount of rinse aid during the last rinse. If spotting and poor drying are problems, increase the amount of rinse aid dispensed by rotating the dial to a higher number. The dial is located under the dispenser cap. The indicator will be dark when full and will show clear when it is time to refill.
To add liquid rinse aid, turn dispenser cap 1/4 turn counterclockwise and lift out. Pour in rinse aid until liquid touches the indicated fill level. Replace cap.
Do not overfill since this can cause oversudsing. Do not Wipe up any spills with a damp cloth. Wipe up any spill
The dispenser holds enough for 35 to 140 washes, The depending on settingdepending on setting.
Factors Affecting Performance
ald greatly improves drying and reduces Water Pressure
Water pressure should be between 20 and 120 pounds per square inch. Low water pressure occurs most often during periods of high water consumption, such as when laundry or showers are being done. To determine if you have enough water pressure, put a 2 quart container under fully opened hot water faucet nearest the dishwasher. It should fill in less than 14 seconds. Be sure all other faucets are turned off during test.
Water Temperature
Hot water is needed for best dishwashing and drying results. Water entering dishwasher should be 120^ (49^) to give satisfactory results.
ot overfill since this can cause oversudsing. To check water temperature entering dishwasher
Turn on hot water faucet nearest dishwasher for several minutes to clear cool water from pipes. Washes,
- Hold a candy or meat thermometer in stream of water to check the temperature.
- If temperature is below 120^ (49^) , have a qualified person raise the hot water heater thermostat setting.
Dispenser OpeningDispenser OpeningindicatorIndicatolImportant: Before starting a cycle, run hot water to clean cool water from pipes.
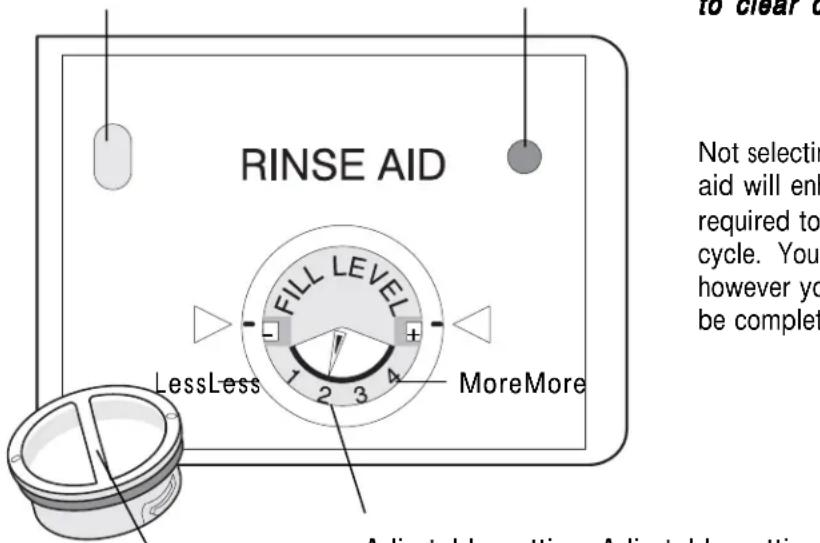
Dispenser CapDispenser Cap Adjustable setting Adjustable setting
Not selecting the AIR DRY option in combination with rinse aid will enhance drying performance. The energy required to use the AIR DRY option costs pennies per cycle. You may choose to select the AIR DRY option; however you will have items in your dish load that will not be completely dry at the end of the cycle.
Care & Cleaning
CAUTION
Property Damage Hazard
Freezing temperatures may cause water lines to rupture. Be sure all supply lines to and circulating lines within dishwasher are protected.
Failure to do so could result in property damage.
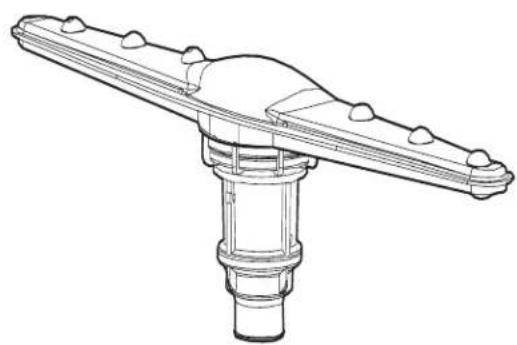
Cleaning the Spray Arm
The spray arm may need to be cleaned to insure that there are no clogs to the spray arm jets and bearings due to hard water chemicals.
To remove spray arm simply hold the spray arm in place and turn the retaining nut clockwise and pull up on the spray arm lifting off the shaft.
To clean the spray arm use warm soapy water using a soft brush to clean the jets and bearings.
To replace the spray arm simply set the spray arm on the shaft, take the retaining nut and turn it counter clockwise till it has locked into place.
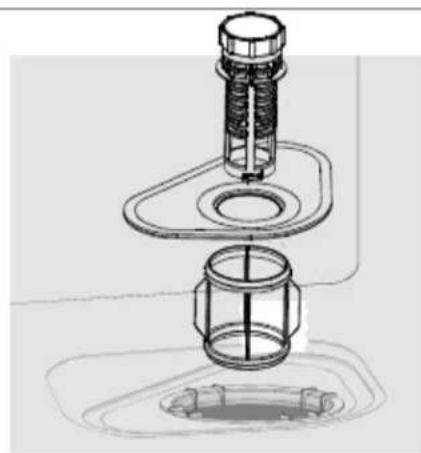
Cleaning the Filter
For optimum performance, your dishwasher is equipped with a filter assembly featuring a main filter, cup and fine filter as shown in the drawing above. All food fragments are removed from the dishwasher as water passes through the filter assembly.
Each part of the assembly should be cleaned often to ensure that all food fragments are removed from the dishes. To remove food fragments from the filter assembly, the filters must be removed from the dishwasher. To remove the filters, pull up on the edge of the main filter. Next, rinse the main filter and fine filter under running water. Cleaning with a brush may also be necessary to remove any fragments trapped in the filters. Once cleaning has been completed, simply reassemble the filter as shown in the drawing above. To ensure that the filter is fully seated, please press down on the top of the main filter. Using the dishwasher, using the dishwasher recommended as it will reduce the cleaningrecommende efficiency and may damage dishware.efficiency and m
Care & Cleaning
WARNING

Burn Hazard
Allow heating element to cool before cleaning the interior.
Failure to do so can result in burns.
Outside—Occasionally wipe with a mild nonabrasive detergent and water. Rinse and dry.
Inside—The inside of the dishwasher is self-cleaning with normal use.
To clean Stainless Steel wipe with the grain.
NEVER use the products that contain Chlorine Bleach or Citric Acid.
Important: The dishwasher motor is permanently lubricated at the factory and does not need to be oiled.
Care of Drain Air Gap
If a drain air gap was installed for your built-in dishwasher, check to make sure it is clean so the dishwasher will drain properly. A drain air gap is usually mounted on countertop and can be inspected by removing the cover. This is not part of your dishwasher and is not covered by warranty.
Winterizing
A dishwasher left in an unheated place should be protected from freezing. Have a qualified person do the following:
To Disconnect Sergicdoenect Ser
- Turn off electrical power to the dishwasher at the supply source by removing fuses or tripping circuit breaker.
- Shut off water supply.
- Place a pan under the inlet valve. Disconnect water line from inlet valve and drain into pan.
- Disconnect drain line from pump and drain water into pan.
Note: Note installation Instructions for more details on disconnecting and restoring service to your dishwasher.
To Restore Servicerequest Ser
- Reconnect the water, drain, and electrical power supply.
- Turn on water and electrical power supply.
- Fill both detergent cups and run dishwasher through a NORMAL WASH Cycle.
- Check connections to make sure they do not leak.
Note: Nester installation Instructions for more details on disconnecting and restoring service to your dishwasher.
Connecting and Disconnecting Portable Dishwasher
The portable dishwasher must be connected to a faucet and electrical outlet each time it is used. Follow directions on this page to properly connect dishwasher.
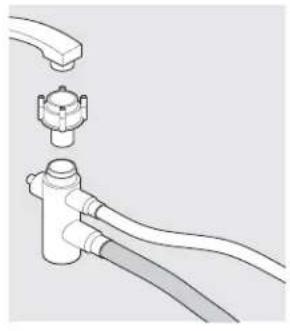
Faucet Adapter Assembly (Figure A)
Connecting the Portable Facet Adapter Assembly (Figure B)
IMPORTANT: Make sure door is latched before moving dishwasher.
The power cord and faucet coupler with hoses are located in a compartment in back of dishwasher. A special adapter must be installed on faucet before you can connect dishwasher (Figure A).
-
Remove faucet adapter assembly from literature package.
-
Unscrew existing sink faucet aerator.
-
Check faucet spout to see if threads are inside or outside.
-
If threads are on inside of faucet spout, use both rubber washers.
- If threads are on outside of faucet spout, use one rubber washer only.
-
If faucet has no threads, an adapter kit with instructions for attachment to a non-threaded spout is available at most hardware stores.
-
Assemble faucet spout as shown in Figure A.
Connecting the Portable DishwasherConnecting the Portable Dishwasher
- Run water at faucet until it is hot. Turn off faucet.
2.Pull hoses out of compartment.
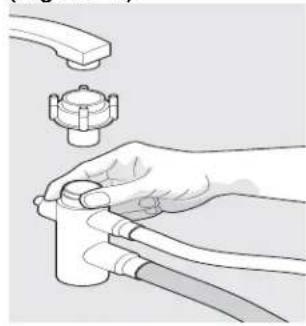
3.Push collar down and slip faucet connector onto faucet adapter (Figure B).
4.When connector snaps into place, release collar. - Slowly turn on hot water all the way.
6.Plug power cord into grounded outlet.
Disconnecting the Portable DishwasherDisconnecting the Portable Dishwasher
- When cycle has finished, unplug power cord and return it to compartment.
- Turn off hot water.
- Press red button on coupler to release water pressure.
- Press down on collar to release coupler.
- Empty remaining water from coupler and return it to compartment.
IMPORTANT: IMPORRANT spray hose can burst due to constant waterA sink spray hose (pressure while in use. If your spray hose is Installed on same water line as the dishwasher, it is your responsibility to disconnect sink's spray hose and to plug hole.
Electrical Connection for a Portable Dishwasher
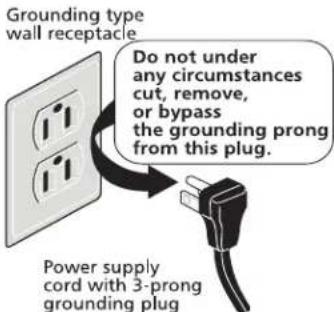
An electrical supply of 120 volts, 60Hz , AC only, 15 amps is required. For your safety, the dishwasher must be grounded. If there is a malfunction or breakdown, grounding will reduce risk of electrical shock. This dishwasher has a power cord with a 3-prong grounding plug. It must be plugged into a mating 3-prong grounding type receptacle, installed and grounded in accordance with the National Electrical Code and any local codes and ordinances.
CAUTION

Electric Shock Hazard
Avoid fire hazard or electrical shock. Do not use an adapter plug, extension cord or remove grounding prong from electrical power cord. Failure to follow this warning can cause serious injury, fire or death.
Solutions to Common Dishwashing Problems
Before calling for service, review this list. It may save you both time and expense. This list includes common experiences that are not the result of defective workmanship or material in your dishwasher.
Dishes not clean Diachoppagean4 to 8 for information on correct wash cycle, proper loading, water temperature, water pressure, hard water, amount of detergent, old and ineffective detergent, and dish placement. To maximize wash performance clean the filter of all large food particles after each wash. To ensure that you clean the filter correctly refer to page 10.
Dishes not drying Dishes are greatly improved by using a rinse aid and hot water. Hot water raises temperature of dishes to speed up drying. When loading, invert cups and bowls so that water can run off. Avoid nesting of articles. If dishes are not completely dry at end of cycle (which may occur when COOL DRY setting is used), open door, roll out racks, and allow dishes to air dry.
Spotting Spotting form when hard water droplets evaporate leaving a deposit. Low phosphate detergents increase the problem in hard water. To prevent, use hot water and a detergent with a higher level of phosphates (preferably 8.7% or higher), or use more of a low phosphate detergent. Be sure to use a rinse aid. If water is very hard, it may be necessary to install a water softener. Load glasses and plates so they have minimum contact with racks and pins. Avoid overloading. Spotting will occur where dishes and glasses touch.
Cloudy films and streaking atoudusquilyncscaedcstoyaing combination of hard water and an insufficient amount of detergent. Low phosphate detergents are also a factor. To correct, increase amount of detergent, check water temperature and always use a rinse aid. If water is very hard, it may be necessary to install a water softener.
Etched film on glassware Etchadistidbynugstaarenuch detergent in soft or softened water. This film cannot be removed. It is more likely to occur on soft leaded glass or expensive crystal. An early warning of this condition is a cloudy iridescent appearance on glasses. To prevent, be sure dishwasher is getting a full fill of water. Water should reach base of heating element. If water level is low, have water pressure checked by a plumber. Use less detergent and make sure water temperature is not higher than 150^ (66^) . Underload to assure thorough rinsing. Use the COOL DRY Option.
Chipped dishes and glassesChipped dishes,Chipped glasses handling and improper loading. Do not put glasses in direct contact with other items. Place glasses securely against pins.
Crazing of older chlna and potteryCrazgnsowoder chl items are subjected to very hot water. Once crazing (fine cracks in the glaze) appears, it cannot be removed. Do not machine wash again or condition may worsen.
Gray-black stains on dishes (Caay daaed stbysn on dishes manganese in water supply. To correct, install a manganese filtering system into house water supply.
Coffee and tea stains Coffeecandwba states contains traces of iron. To avoid stains, rinse cups out immediately after use. Increase amount of detergent and use a rinse aid. Water temperature should be approximately 140^ (60^) . If problem persists, install a water softener with an iron removal unit. To remove stains, hand wash cups in solution of 1/2 cup (120 ml) bleach and a quart (1 L) of warm water. Rinse thoroughly.
Reddish-brown stains on dishes, glasses and Reddish-brown interior are caused by iron in water. To avoid iron stain, increase detergent, use water heated to approximately 140^ (60^) and a rinse aid. It may be necessary to install a water softener with an iron removal unit. To improve appearance, use a commercial rust and lime scale remover.
Plastic items can lose their shape due to high temperatures of automatic dishwashing. Read labels before washing. Place washable items in top rack away from heating element.
Discoloration of plasticware by some foods, such as tomato sauce, can stain plasticware. If stained, soak item in solution of 1 tablespoon dishwasher detergent and a quart of hot water or in a solution of 12 cup (120 ml) bleach and a quart (1 L) of hot water.
Fading of patterns and metallic trim is due to many washings, detergent and hot water. Most of today's china is dishwasher safe. Antique, handpainted china, and handpainted pottery should be washed by hand.
Do not place silver next to or touching stainless steel utensils in dishwasher silverware basket. This can cause pitting of stainless steel blades. (Most silver knives have stainless steel blades. Do not let blades touch other stainless steel utensils during wash cycle.)
Tarnish on silver plate occurs when worn down to the base metal and turns a bronze color when exposed to hot water and detergent. Remove bronzing by soaking item in vinegar for 10 minutes or use a silver polish. For permanent protection, have silver replated.
Silver tarnish can be caused by prolonged contact with air or with foods containing sulphur like eggs, mayonnaise, or seafood. Contact with undissolved detergent can also cause tarnish. To prevent this, rinse silver soon after use. Remove tarnish with a silver polish.
Discoloration of stainless steel—Food soil can create a film or discoloration. To avoid, rinse stainless items promptly. Food soil films can be removed with a stainless steel cleanser or mild cleanser. Rinse thoroughly.
Solutions to Common Dishwashing Problems
Pitting of stainless steel Pisticuaedstainbsotgeb contact with detergent granules and foods like salt, mayonnaise, fruits, butter or milk. To prevent, rinse soon after use. Do not allow detergent to fall directly onto stainless steel items.
Discoloration of aluminum Discoloration color aluminum aluminum cannot withstand machine washing. Resulting loss of color is permanent. Other aluminum may darken when machine washed. To decrease chance of discoloration, do not place aluminum directly beneath detergent dispenser. To brighten darkened items, scour with soap filled steel wool pads. For severely darkened pans, simmer an acidic food or a solution of 2 teaspoons (10 ml) cream of tartar per quart (1 L) of water for 1/2 hour. Scour with soap filled steel wool pad, rinse and dry.
Knife handles become loose. Kniften htee taeoe loose exposed to very hot water. Test wash a single knife for several weeks. Damaged knives should be professionally re-cemented.
Troubleshooting
Before calling for service, review this list. It may save you both time and expense. This list includes common experiences that are not the result of defective workmanship or material.
Noise problems? Noise problems?
It is normal to hear swishing and pulsating sounds.
These sounds mean that water is circulating through the dishwasher. It is normal to hear motor sounds before water enters tub. Loud ticking usually means something is hitting wash arm.
See Preparing and Loading DishesPreparing and Loading Dishes Vibrating or rattling sounds can mean dishes are touching each other. See Preparing and Loading Dishes.Preparing and Loading Dishes.
Operating problems?Operating problems?
Be sure door is firmly closed. It is normal for dishwasher to pause between cycles.
Leaking?Leaking?
Check for items sticking out of dishwasher that could prevent door from closing and sealing properly. Use only fresh dishwashing detergent to avoid oversudsing. Water coming through door vents? When a dish is added after starting dishwasher, wait a few seconds before latching door. This permits entering cold air to expand slowly inside dishwasher.
Water in tub? Water in tub?
A small amount of water in bottom of tub is normal. It keeps water seal lubricated.
Detergent left in cup? Detergent left in cup?
Detergent may be too old. Discard old detergent.Use fresh detergent.Dishes may not be loaded properly.Be sure items do not protrude from front of bottom rack preventing detergent cup from opening.
Dishes not dry? Dishes not dry?
Check to see if rinse aid dispenser needs refilling. Hot water temperature may be too low (min. 120^49^) If COOL DRY option is being used, additional drying time may be required with door open.
Master Protection Agreements
Congratulations on making a smart purchase. Your new Kenmore® product is designed and manufactured for years of dependable operation. But like all products, it may require preventive maintenance or repair from time to time. That's when having a Master Protection Agreement can save you money and aggravation.
The Master Protection Agreement also helps extend the life of your new appliance. Here's what the Agreement* includes:
Some limitations and exclusions apply. For prices and additional information call 1-800-827-6655.
*Coverage in Canada varies on some items. For full details call Sears Canada at 1-800-361-6665.
Sears Installation Service
For Sears professional installation of home appliances, garage door openers, water heaters, and major home items, in the U.S.A. call 1-800-4-MY-HOME®.
Parts and labor need parts and products operating properly under normal use under normal use defects. Our coverages goes well beyond the well beyond the product warranty: product qualities, no functional failure excluded from coverage - real protection. protection.
Expert service hyperservice more than 10,000 10,000 authorized Sears service technicians, authorized Sears service technicians, means someone you can trust will be working on your product.
Unlimited service Unbinned service and nationwide service often as you want us, whenever you want us.
l "No- lemon" guarantee"Noelphaoehnngatainye. covered product if Four or more product failures occur within twelve months
Product replacementProduct replacement product can't be fixed
Annual Preventive Maintenance Check at your request - no extra charge
Fast help by phone - we call it Rapid Resolution - phone support from a Sears representative on all products. Think of us as a "talking owner's manual"
Power surge protection against electrical damage due to power fluctuations
$250 Food Loss Protection annually for any food spoilage that is the result of mechanical failure of any covered refrigerator or freezer.
Rental reimbursement if repair of your covered product takes longer than promised
10% discount off the regular price of any non-covered repair service and related installed parts.
Once you purchase the Agreement, a simple phone call is all that it takes for you to schedule service. You can call anytime day or night, or schedule a service appointment online.
The Master Protection Agreement is a risk free purchase. If you cancel for any reason during the product warranty period, we will provide a full refund. Or, a prorated refund anytime after the product warranty period expires. Purchase your Master Protection Agreement today!
Table des matieres
Sears Canada Inc., Toronto, Ontario, Canada M5B 2B8
All rights reserved. Printed in the USA.
Get it fixed, at your home or ours!
Your Home
For troubleshooting, product manuals and expert advice:

managemylife
www.managementlife.com
For repair - in your home - of all major brand appliances, lawn and garden equipment, or heating and cooling systems, no matter who made it, no matter who sold it!
For the replacement parts, accessories and owner's manuals that you need to do-it-yourself.
For Sears professional installation of home appliances and items like garage door openers and water heaters.
1-800-4-MY-HOME® (1-800-469-4663)
Call anytime, day or night (U.S.A. and Canada)
www.sears.com www.sears.ca
Our Home
For repair of carry-in items like vacuums, lawn equipment, and electronics, call anytime for the location of your nearest
Sears Parts & Repair Service Center
1-800-488-1222 (U.S.A.)
www.sears.com
1-800-469-4663 (Canada)
www.sears.ca
To purchase a protection agreement on a product serviced by Sears:
1-800-827-6655 (U.S.A.)
1-800-361-6665 (Canada)