MAG555ONY - Microwave Oven Pelgrim - Free user manual and instructions
Find the device manual for free MAG555ONY Pelgrim in PDF.

| Brand | Pelgrim |
| Model | MAG555ONY |
| Product type | Combined microwave oven (microwave, grill, convection) |
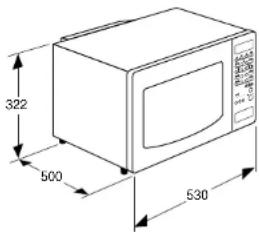
| Dimensions (H x W x D) | 322 x 500 x 530 mm |
| Weight | Approximately 15 kg |
| Power supply | 230 V, 50 Hz |
| Main functions | Microwave (5 power levels), Quartz grill, Convection, Combined cooking |
| Automatic programs | 4 auto cooking programs, 4 auto defrost programs, 1 auto grill program |
| Interior capacity | 25 liters (estimated) |
| Included accessories | Glass turntable, high rack, low rack, metal oven tray, conductor ring |
| Microwave power | 900 W (estimated) |
| Grill power | 1000 W (estimated) |
| Convection power | 1500 W (estimated) |
| Display | Interactive display with symbols |
| Clock | 12h or 24h display |
| Safety | Child lock, automatic stop when door opens |
| Care and cleaning | Clean with a damp cloth; do not use abrasive cleaners |
| Spare parts | Turntable, conductor ring, racks, oven tray |
| Repairability | Contact a Pelgrim authorized installer |
| Warranty | 5 years parts (labor 1 year) subject to authorized installation |
Frequently Asked Questions - MAG555ONY Pelgrim
User questions about MAG555ONY Pelgrim
0 question about this device. Answer the ones you know or ask your own.
Ask a new question about this device
Download the instructions for your Microwave Oven in PDF format for free! Find your manual MAG555ONY - Pelgrim and take your electronic device back in hand. On this page are published all the documents necessary for the use of your device. MAG555ONY by Pelgrim.
USER MANUAL MAG555ONY Pelgrim
natural_image
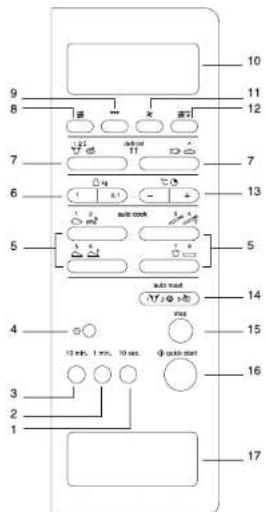
Simple diagram of a gray rectangle with a small grid of numbers on the right side (no text or symbols)Bedieningspaneel / Control panel / Tableau de commande / Bedienungsblende
text_image
10 11 12 9 8 7 6 5 4 3 2 1 13 14 15 16 17Toebehoren / Accessories / Les accessoires / Zubehör
natural_image
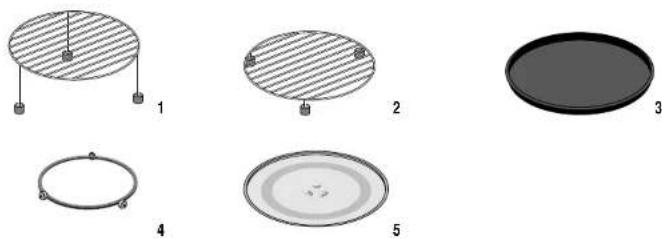
Five circular components with different surface patterns and mounting points, labeled 1 to 5 (no text or symbols on the objects themselves)Toestelbeschrijving
Bedieningspaneel
Hoog (100%) 850 W 1x
Midden-hoog (60%) 660 W 2x
Ontdoolen (40%) 340 W 4x
Ontdoaien gevoelig (20%) 170 W 5x
Hoog (100%) 850 W 6x
三
(240 ml = 1 kopje water)
- time setting (10 sec)
- time setting (1 min.)
- time setting (10 min.)
- clock
- automatic cooking program with weight setting
- weight setting
- automatic defrost by entering the weight
- microwave function
- grill function
- display
- hot-air function
- combination function
- -/+ buttons for temperature setting / time added/subtracted
- automatic grilling program with weight setting
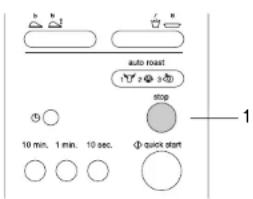
- stop / clear
- start / quick start
- door release
Accessories and use
- high grid: for combination setting and for grilling flat dishes.
- low grid: for combination setting, grill and hot-air function.
- metal baking tray: drip-tray during grilling; baking tray on the low grid with hot-air function.
- roller stay: always use underneath the glass turntable.
- glass turntable: for microwave setting; for placing the grids and baking tray on.
Preface
You will find information about the installation, safety, operation and maintenance of your appliance in this instruction booklet.
By reading this information, you will quickly learn all about the facilities the appliance offers.
Keep this booklet safely. Anyone using the appliance after you will find it very useful.
We wish you much pleasure using your microwave oven.
Interactive display
This appliance is equipped with an interactive display. Once you have chosen a function, the display tells you what action you should then carry out.
The button symbols corresponding to these actions light up.
You can then press the buttons whose symbols are visible in the display.
The other buttons do not respond if you press them. Only the stop button (will still respond.
All of the settings selected can be cancelled using the stop button.
Introduction
Cooking with your new microwave oven is safe and relaxing. You can have the tastiest dishes on the table in no time at all.
The appliance is extremely easy to use, partly thanks to the automatic cooking and defrost programs.
The microwave oven is also very easy to clean.
Table of contents
■ Safety 2
Points for your attention 2
■ Positioning ....2
Positioning ....2
■ Connection .... 3
Electrical connection .... 3
■ General ....3
How the microwave works ....3
Before use 4 - 5
Before first use 4
Points for your attention 4
Operation - general 6
Clock 6
Operation - microwave 7 - 14
Cooking 7
Quick start....8
Cooking in 2 stages....9
Automatic cooking .... 10
Automatic defrost .... 12
"-" and "+" buttons 14
Operation - grill 15
Grill setting 15
Operation - hot air 16 - 17
Baking 16
Baking with preheating 17
Operation - combined cooking ..... 18 - 21
Microwave oven and grill 18
Microwave and grill automatic ..... 19
Microwave and hot air function .....21
Operation - lock 22
Childproof lock 22
- Maintenance ....23
Keep your appliance looking good ....23
■ Faults 23
Faults 23
Packaging 24
Disposal of packaging and appliance 24
■ Technical information ....24
Technical information ....24
Points for your attention
■ Turn the power supply off before cleaning or repairing the appliance, preferably by removing the plug from the socket.
- This appliance may only be used for the purpose for which it was designed, namely cooking food.
All other uses should be considered improper and dangerous. We do not accept responsibility in the event of damage due to improper, incorrect or irrational use of the appliance.
Children are not aware of the dangers that can arise when operating electrical equipment. For this reason do not allow children to use the microwave oven.
- Your microwave oven is only safe if the door closes properly! Never place an object in the door opening of the oven and make sure that the seal is always clean.
- Do not use the microwave oven if there is any damage to the door (bent), the hinges and catch (defective or loose) or the seal.
■ Only use the microwave oven for defrosting and cooking food and not, for example, for drying clothes or paper. These can catch fire.
- Switch the microwave oven off and remove the plug from the socket if something in the oven catches fire. Keep the oven door closed.
Positioning
■ Place the microwave oven on a firm, flat surface.
■ Make sure that there is sufficient ventilation around the microwave oven. Keep a 30 cm space free at the top. At the rear and sides keep at least 10 cm free.
■ Do not cover the air vents.
■ The adjustable feet should not be removed.
- Do not place the microwave oven near a heat source.
■ Transmitting and receiving equipment such as radios and televisions can affect the operation of the microwave oven.
■ The appliance can also be built in.
text_image
322 500 530Electrical connection
This appliance requires a mains power supply of 230 V, 50 Hz alternating current.
The appliance must be grounded and under no circumstances should it be connected to a direct current supply.
Place the appliance near to a grounded wall socket.
How the microwave works
A microwave oven is a cooking appliance that uses microwaves to heat food. Microwaves are electromagnetic waves, just like radio and television waves. A radio converts these waves into sound, whereas a microwave oven converts them into heat.
The heat arises because the microwaves cause water and fat molecules, which are always present in food, to move quickly. The molecules slide past each other quickly and friction occurs. And friction causes heat (just try rubbing your hands together quickly).
The microwave oven heats food very intensively, because the waves penetrate the food directly. The waves do not just heat the outside of the food, as in traditional methods of cooking, but get right inside the food. Compared to conventional methods of cooking, with small quantities cooking time is much shorter.
Before first use
- Open the door and remove the packaging material.
- Clean the inside of the oven and the accessories with a damp cloth. Do not use an abrasive cleaner or any strongly-smelling detergents.
■ Place the roller stay in the middle of the oven. Place the turntable on top of the roller stay.
■ The microwave oven may not be used without the roller stay or turntable. - Do not operate the oven when empty.
- Check that the microwave oven is working correctly. Put a glass of water inside it. Switch the microwave oven on for one minute on its highest setting (see page 7, cooking). At the end of this time, the water should be hot.
NB:
If you want to boil a liquid (e.g. water), put a plastic spoon in the cup. It is possible that the liquid will boil without you seeing any bubbles. When you remove the cup from the oven, the liquid may start to boil violently and splash out of the cup, with the risk of scalding.
If you heat small amounts of powdery products in the microwave oven (for example, when drying herbs), there is a chance that
they will spontaneously combust. Should a fire start in the microwave oven, keep the door closed, switch the microwave oven off and disconnect the appliance from the power supply.
Points for your attention
- The microwave oven is not suitable for: - Making preserves.
- Cooking eggs in their shells, because these burst due to the increase in pressure.
- Heating oil for deep-frying.
■ Remove metal closures from plastic bags and use dishes and plates which are suitable for the microwave oven.
- You may only heat liquids in airtight packaging if you first prick the packaging. This is because of the increase in pressure which occurs during heating.
- Never heat things for longer than is necessary; take the "standing time" into account.
■ Use as little water as possible when cooking food and be sparing with salt.
■ Stir or turn dishes halfway through the cooking time.
- Prick the packaging of meat, chicken and fish with a fork or any other pointed object. This prevents these foods bursting.
■ A useful rule when using the microwave oven is: doubling the quantity of food means doubling the cooking time.
- Covering the food prevents it spattering, shortens the cooking time and helps to retain moisture.
- The door may be opened if the microwave oven is switched on: the microwave oven then switches itself off automatically and the cooking time is stopped.
- Not all materials are suitable for use in the combi-microwave oven. The table below shows which materials you can use and which you cannot.
Material Microwave Hot-air function Combination Grill
| paper yes no no no aluminium foil to cover* yes to cover* yes cling film yes no no no aluminium trays no yes no yes freezer / microwave dishes | yes no no no | ||
| heat-resistant plastic | yes no no no | ||
| unglazed earthenware | no yes no yes | ||
| metal cooking utensils | no yes no yes | ||
| normal glass | yes no no no | ||
| Pyrex, other ovenproof glass and ceramics | yes yes yes | yes | |
| dishes with metallic decoration | no ** no ** | ||
| metallic twists | no yes no n/a | ||
| mercury thermometer | no yes no yes | ||
| sealed pots | no n/a | n/a | n/a |
| bottle with narrow neck | no n/a | n/a | n/a |
| roasting bags | yes yes yes | no |
* By covering thinner pieces of food (such as chicken legs) you prevent them cooking too quickly.
** If in doubt, consult the manufacturer's instructions on the packaging of the cooking utensil.
Clock
The clock will work as long as the oven is connected to the mains. If the time has not been set, the display will show '0'. You can choose a 12-hour or 24-hour display for the clock.
While the clock is being set, a colon flashes. The colon stops flashing when the clock has been set.
For example:
You want to set the clock to 13:25.
text_image
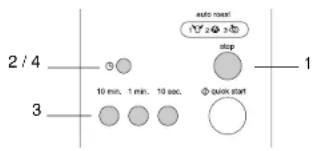
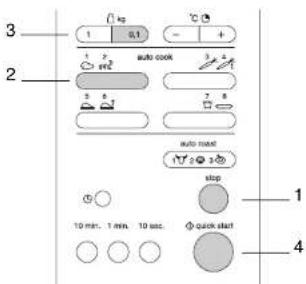
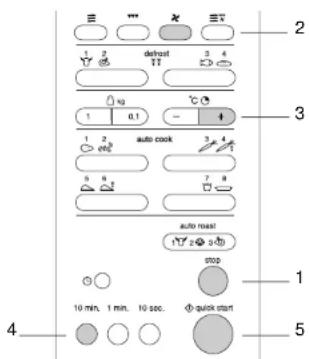
2 / 4 3 10 min. 1 min. 10 sec. auto start! stop quick start 1Setting the clock
-
Press
-
Press Ⓤ.
The display shows "24 H".
Press again if you want to set the clock to the 12-hour setting.
- Set the hour using the button. Press the button 13 times or keep the 10 min. button depressed until "13" appears in the display.
Set the minutes using the and.
10 sec. buttons.
Press the button 2 times or keep the
1 min. button depressed until "2" appears in the display.
Press the button 5 times or keep the 10 sec. button depressed until "5" appears in the display.
Note
Pull the plug out of the wall socket if any strange signs appear in the display.
Once you have set the clock, if you want to switch from the 12-hour clock to the 24-hour clock you must first disconnect the appliance from the power supply. Then reconnect the appliance and set the time.
- Pres again
The clock begins working.
Cooking
Power level Press
High (100%) 850 W 1x
Medium-high (80%) 680 W 2x
Defrost (40%) 340 W 4x
Defrost delicate (20%) 170 W 5x
High (100%) 850 W 6x
三
You can choose from five power levels. You activate the power function by pressing ≈. This automatically sets the power level to maximum. You can then select the power level you require by pressing several times.
For example:
You want to cook fish on the medium power level (60%) for 5 minutes 30 seconds.
-
Pressp
-
Press to select the microwave function.
-
Press twice to set the power level to medium (60%).
-
Press 5 times and 3 times to set the cooking time to 5 minutes 30 seconds.
5.
The microwave oven is switched on.
Quick start
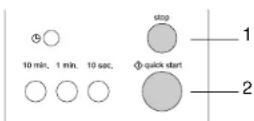
With just one press on the start button you can cook for 30 seconds on maximum power. By pressing the button repeatedly you can increase the cooking time in steps of 30 seconds. You can set the cooking time to a maximum of 10 minutes.
For example:
You want to cook a dish for 2 minutes on high power.
-
Press
-
Press 4 times to set the cooking time to 2 minutes on high power.
-
You can increase the cooking time in the interim by pressing onestart more time.
The microwave oven is switched on.
Cooking in 2 stages
text_image
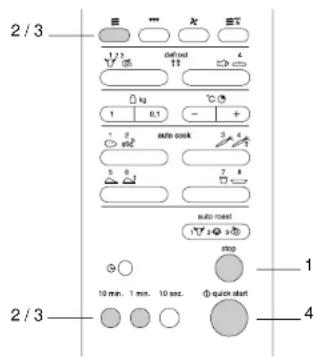
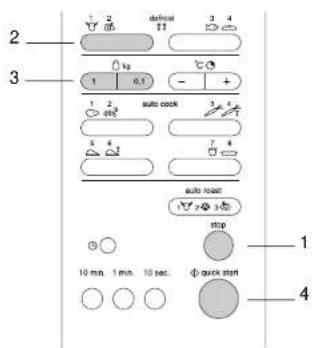
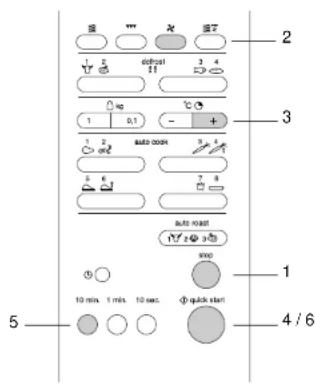
2/3 1234
0 kg 1 0.1 - + 1 2auto lock
5 6 7 8 auto reset 10 min. 1 min. 10 sec. 1 quick start 2/3 1 4The oven door may be opened during the 2 stage cooking program to check the food. After you have closed the door again and pressed start, the appliance will continue with the cooking program.
For example:
You want to cook on high power for 5 minutes (1st stage) and then on medium-low power (40%) for 13 minutes (2nd stage).
1st stage
-
Pressp
-
Press once to select the microwave function.
Press 5 times to set the cooking time to 5 minutes.
2nd stage
- Press 4 times to set the microwave power level to 40%.
Press once and 3 times to set the cooking time to 13 minutes.
4.
quilleg
The microwave is switched on.
The settings for stage 1 are shown in the display until program 2 starts.
The appliance beeps twice between the two stages.
Notes
You can interrupt the cooking program by pressing stop once.
Close the door and press ①quick start continue.
Press twice to cancel the program.
Automatic cooking
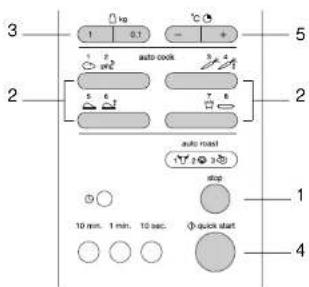
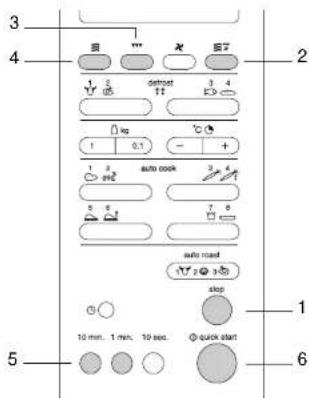
text_image
3 2 1 kg 1 0.1 - + 1 2 auto cook 2 3 3 4 2 5 auto meal stop 10 min. 1 min. 10 sec. ① quick start 4Automatic cooking (auto cook) enables you to cook your favourite foods easily. You can choose from 4 cooking programs. You only have to select the type of food and the weight. The microwave does the rest.
For example:
You want to cook 0.6 kg of jacket potatoes.
- Press stop
- Press once to select the cooking program for jacket potatoes.
- Enter the weight using kg .
Press ☐ 6 times to enter a weight of 600 grams.
4. Press ◆ quick start
The program time appears in the display. The microwave is switched on.
In the table on the following page you can see which cooking programs you can select. You can also read how to select the programs and for which dishes.
Cooking table – automatic cooking
| Program Utensils Preparation No. of times Min./max. to press button weight | ||||
| 1. | jacket potatoes (20 °C) | glass Wash and dry the potatoes. 1x(oven) dish+kitchen roll | 0.2 / 1.0 kgPut them in the oven dish. Prick the potatoes a few times with a fork.When the program has finished, wrap the potatoes in aluminium foil and allow them to stand for 5 minutes. | |
| 2. | rice/pasta (20 °C) | deep glass(oven) dish | Pour rice or pasta* into a deep oven dish.Add water** and 1/4 to 1 teaspoonful of salt.Put a lid on the oven dish or cover it with microwave cling film. | 2x0.1 / 0.3 kg |
| 3. | fresh vegetables/peeledpotatoes(20 °C) | glass(oven) dish dish. Add 30 cc water per 0.2 kg. Cover thedish with microwave cling film or a lid.When the program has finished, drain thevegetables and allow them to stand for 2 to 3 minutes covered. | 1x | 0.2 / 0.6 kg |
| 4. | frozen vegetables (oven) dish(-10 °C) | glassdish with microwave cling film or a lid. Whenthe program has finished, allow the vegetabesto stand for 2 to 3 minutes covered. | 2x | 0.2 / 0.6 kg |
| 5. | cold pizza(5 °C) | glassturntable+ metalbaking tray+ high grid | Place the cold pizza on the high grid.Place the metal baking tray, with the gridon it, on the glass turntable Remove from oven.immediately after heating up and allow tostand for 2 to 3 minutes. | 1x0.2 / 0.4 kg |
| 6. | frozen pizza(-10 °C) | glassturntable+ metalbaking tray+ high grid | Remove the packaging. Place the pizza on thehigh grid. Place the metal baking tray, with thegrid on it, on the glass turntable. When theprogram has finished, allow the pizza to standfor 2 to 3 minutes. | 2x0.1 / 0.5 kg |
| 7. | chips(-10 °C) | glassturntable+ metalbaking tray+ hoge rooster | Spread the chips on the metal baking traywhich is placed on the high grid. Turn the chipsafter the sound signal. Make sure that the chipsare not on top of each other. When the programhas finished, allow the chips the stand for 1 to 2 minutes. | 1x0.2 / 0.4 kg |
| 8. | au gratin(20 °C) | glassturntable+ low grid the dish to stand uncovered for 1 to 3 minutes. | Use this setting for home-made "au gratin" dishes. When the program has finished, allow | 2x0.5 / 1.2 kg |
* Stir the rice well when the program has finished and allow it to stand for 5 to 10 minutes covered. Rinse the pasta with cold water when the program has finished.
**Proportions of rice/pasta and water:
| quantity water water (rice/pasta) rice pasta |
| 1/2 cup (100 g / 50 g) 240 ml 360 ml |
| 1 cup (200 g / 100 g) 480 ml 600 ml |
| 1 1/2 cups (300 g / 150 g) 720 ml 840 ml |
(240 ml = 1 cup of water)
Note
If you keep 1 or 20 depressed, the display runs through the weights quickly.
Automatic defrost
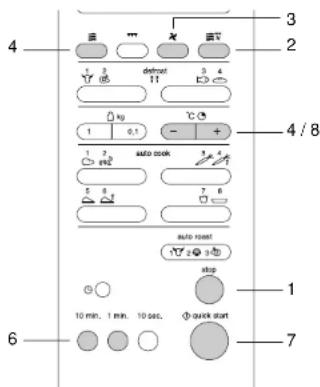
text_image
2 3 default 1 0.1 - + 1 2 auto cook 5 6 7 8 auto roset stop 10 min. 1 min. 10 sec. ④ quick start 4There are 4 defrost programs (auto defrost) you can use to defrost frozen food; all you have to do is enter the weight of the food to be defrosted.
For example:
You want to defrost 1.4 kg of chicken.
- Press stop.
- Press twice to select the defrost program for poultry.
- Enter the weight using k_g .
Press once and 4 times to enter a weight of 1400 grams.
- Press ◆ quick start
The microwave is now switched on.
In the table on the following page you can see which defrost programs you can select. You can also read how to select the programs and for which dishes.
Defrost table
| Program Type of food No. of times to Min./max. | ||||
| press button weight | ||||
| 1. | meat | beef: mince, cubes of meat, steaks, rolled meat | 1x | 0.1 / 4.0 kg |
| pork: mince, cubes of meat, escalopes, rolled meat | ||||
| veat: mince, cubes of meat, escalopes, rolled meat | ||||
| 2. | poultry | chicken: whole chicken (< 2 kg), chicken breast, chicken legs | 2x | 0.1 / 4.0 kg |
| turkey: turkey breast (< 2 kg), turkey legs | ||||
| 3. | fish | fish: fillets, steaks, whole fish | 1x | 0.1 / 4.0 kg |
| shellfish: crabmeat, lobster, prawns, mussels | ||||
| 4. | bread | cut brown/white, rolls, French stick, croissants | 2x | 0.1 / 0.5 kg |
Tips
For best results, first remove the packaging from meat and fish. Packaging can have an adverse effect on the defrosting process. The presence of liquid from the fish or meat can lead to the formation of steam, which then cooks the outside of the food.
The centre of the food should still feel slightly frozen when you take it out of the microwave oven.
Place slices of bread between sheets of kitchen paper. Cut rolls in half first.
If the packaging is difficult to remove, it is best to defrost the food for one quarter of the defrosting time, which is shown in the display at the start of the defrosting program. Then take the food out of the microwave oven, remove the packaging and put the food back.
Put the food in a shallow glass oven dish to catch any liquid that comes out of it.
Note
Halfway through the defrosting time, a signal
can be heard. The dish can now be turned.
Remove any parts already defrosted.
Press ◆ quick start to continue.
"-" and "+" buttons
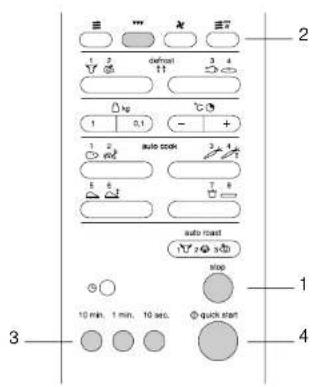
text_image
3 1 0.1 - + 5 2 1 2 auto cock 3 4 2 5 6 7 8 auto mask stop 1 10 min. 1 min. 10 sec. ① quick start 4The automatic cooking programs and grilling programs (auto roast) work with a fixed set time. You can shorten or increase this time during the program using the "-" or "+" buttons. You can use these buttons to adjust the cooking time for manually operated cooking as well (see page 7).
A shorter cooking time:
- Pressp
- Select an automatic cooking program
using _^3^1 , _1^3 , _1^5 , _2^6 , _r^7 -
Enter the weight using kg
-
♦ quresst
-
Press
Each time the button is pressed, the cooking time is decreased by 10 seconds.
A longer cooking time:
-
Presop
-
Select an automatic cooking program using
1 2 3 4 5 6 7 or
-
Enter the weight using kg
-
♦ quresst
-
Press
Each time the button is pressed, the cooking time is increased by 10 seconds.
Note
If the dish needs to be in the oven for a longer or shorter time in combined cooking or when using the automatic cooking programs, adjust the cooking and buttons.
Grill setting
text_image
3 10 min, 1 min, 10 sec. stop quick start 1 2 3 4 5 6 7 8 9 10 default 1 2 3 4 1 0.1 - + auto cook auto roast stopThis appliance is fitted with a quartz grill, and so you do not need to preheat it and food quickly becomes brown and crispy.
For example:
You want to grill for 12 minutes and 30 seconds.
-
Pressp
-
Press once to select the grill function.
-
Set the grilling time.
Press 10 min, once, 1 min, twice and 10 sec, 3 times to set the grilling time to 12 minutes and 30 seconds.
- ♦ quFress
The grill is switched on.
Notes
It is not necessary to preheat the oven.
Use the (high) grid for the best results.
Place the grid on the glass turntable (see also
'description and use of accessories').
Baking
With the hot-air function, you can select temperatures between 100 °C and 250 °C. You can also select a temperature of 40 °C for letting dough prove.
When you select the hot-air function, the oven automatically switches on at 180^ C.
For example:
You want to bake a dish for 50 minutes at a temperature of 200 °C.
text_image
2 3 4 1 2 detrost 3 4 1 0.1 - + 1 2 auto cook 3 4 6 7 8 auto roast 10 min. 1 min. 10 sec. quick start stop 1 5- Pressp
- Press once to select the hot-air function.
- Press twice to set the temperature to 200 °C.
- Press five times to set the baking time to 50 minutes.
- quPress
The oven is ready for use.
Note
Use the low grid (see also "description and use of accessories").
Baking with preheating
text_image
接 2 3 4 5 10 min. 1 min. 10 sec. ① ② ③ ④/6You can automatically preheat the hot-air oven and then bake in it.
For example:
You first preheat the oven and then bake a dish for 50 minutes at a temperature of 200 °C.
Preheating
-
Pressp
-
Press once to select the hot-air function.
-
Press twice to set the temperature to 200 °C.
4.
quipress
The oven begins to preheat and the message *Pr-H* appears in the display.
After the preheating you will hear a beep. The oven is now at the temperature set.
Baking
Put the dish in the oven.
- Press 10 min. five times to set the baking time to 50 minutes.
6.
quRiesgt
The hot-air oven is switched on.
Notes
When the oven reaches the temperature set, you will hear a short beep.
Use the low grid (see also 'description and use of accessories').
Microwave oven and grill
text_image
3 4 5 1 2 3 4 instout inst 1 2 3 4 instout 1 0.1 - + 1 2 auto cook 2 6 5 6 7 8 5 6 7 8 auto read stop 10 min. 1 min. 10 sec. quick start 6Notes
Combination settings shorten the cooking time.
Take care when taking the dish out of the oven. The oven utensils are hot!
microwave functions. The microwave can be set to three power levels: 20%, 40% and 60%.
For example:
You want to grill for 25 minutes using the grill and the microwave function at a power level of 40%.
- Press
- Press ☐ to select the combination setting.
You can now select the combination you want. - Press once to select the grill function.
- Press twice to set the microwave function to a power level of 40%.
- Press twice and 5 times to set the grilling time to 25 minutes.
6.
The microwave and grill functions are switched on.
- During cooking, you can increase or decrease the cooking time of the program. This does not interrupt the cooking process. Press - to decrease the cooking time and press
+ to increase it (see page 14 for more information).
Microwave and grill automatic This combination function is a care prepared your
favourite grilled foods very easily. You can choose from 3 combined grill/microwave programs (auto roast).
The appliance selects the microwave power level required itself. You only have to select the type of food and the weight.
For example:
You want to grill chicken weighing 1.4 kg.
- Pressp
- Press 3 times to select the automatic grill/microwave program for chicken.
- Enter the weight using .Ω kg
Press once and 4 times to enter a weight of 1400 grams.
4.
In the table on the following page, you can see which grill/microwave programs you can select. You can also read how to select the programs and for which foods.
Grilling table
| Program Cooking Preparation No. of times to Min./max.utensils press button weight | |||||
| 1. | beef | glass turntable + metal baking tray+ low grid or spit | Rub the meat with melted margarine, butter, oil or seasoning. Place the metal baking tray on the glass turntable in the oven.Put the meat on the low grid and place this grid on the metal baking tray. When the program has finished, allow the food to stand for 10 minutes, covered with microwave cling film. | 1x | 0.5 / 1.5 kg |
| 2. | pork | glass turntable + metal baking tray tray+ low grid or spit | Rub the meat with melted margarine, butter, oil or seasoning. Place the metal baking on the glass turntable in the oven.Put the meat on the low grid and place this grid on the metal baking tray. When the program has finished, allow the food to stand for 10 minutes, covered with microwave cling film. | 2x | 0.5 / 1.5 kg |
| 3. | whole chicken | glass turntable + metal baking tray baking or spit | Rub the meat with melted margarine, butter, oil or seasoning. Put the chicken on the metal place this baking tray on the glass turntable in the oven.When you hear the audio signal, tum the chicken over and baste it with its own fat. When the program has finished, allow the food to stand for 10 minutes, covered with microwave cling film. | 3x | 0.8 / 1.5 kg |
Microwave and hot-air function
text_image
4 3 2 4 / 8 1 0.1 - + 1 2 auto lock 3 6 5 6 7 6 auto reset stop 10 min, 1 min, 10 sec. ① quick start 6 7Notes
If the oven first has to be preheated, you should do this as described on page 17. Then switch the microwave/hot-air combination on.
Combination settings shorten the cooking time.
Take care when you take the food out of the oven. The oven utensil is hot!
This combination makes use of the hot-air and microwave functions. The microwave can be set to 3 power levels: 20%, 40% and 60%.
For example:
You want to bake at a microwave power level of 40% and an oven temperature of 200 °C for 25 minutes.
1. Pressp
- Press on to select the combination setting.
You can now select the combination required.
-
Press once to select the hot-air function.
-
Press twice to set the oven temperature to 200 °C.
-
Press twice to set the microwave power level to 40%.
-
Press twice and 5 times to set the cooking time to 25 minutes.
7.

The microwave and hot-air functions are switched on.
- During cooking, you can increase or decrease the cooking time of the program. This does not interrupt the cooking process. Press to decrease the cooking time and to increase it (see page 14 for more information).
Childproof lock
text_image
auto roast stop 10 min. 1 min. 10 sec. Φ quick startYou can "lock" your microwave oven, so that it is no longer possible to start it.
Activating the childproof lock
- Press and keep it depressed until L appears in the left of the display and two short beeps are heard. When L appears in the display, the time disappears for a few seconds.
All of the controls have been made inoperative.
Press any button and L appears in the display.
Turning the childproof lock off
- Press and keep it depressed until L disappears from the display and two short beeps are heard.
The microwave can be used normally again.
Keep your appliance looking good
Before starting to clean the microwave oven, remove the plug from the socket or turn the switch in the meter cupboard to zero.
Clean the inside immediately after use. Use a damp cloth to remove any condensation, liquid that has boiled over and food remains. Crumbs and liquid that remain behind absorb microwave energy and lengthen cooking times.
Clean the inside and outside of the oven regularly using soapy water and dry it thoroughly with a dry cloth.
Make sure that the microwave distributor cover (inside the oven on the right) is clean. A cover which is not clean may cause sparking.
Clean the accessories regularly; use soapy water and a brush and dry the accessories thoroughly with a dry cloth. The accessories may also be washed in a dishwasher.
Odours will disappear if you put a glass of vinegar or water - with lemon juice added - in the oven space. Switch the microwave on for two minutes on full power. Then wipe with a damp cloth.
Check the door closure and the door seal regularly for damage.
Do not use the oven if the door or the door closure is damaged.
Faults
If the microwave oven does not cook as well as it should do, if there is sparking inside it, or if it does not start, etc., first try to find the reason for the problem yourself before phoning the service department. You can do this by referring to the points listed below.
- Is the plug in the socket?
– Is the door closed properly? - Have the power level and the cooking time been set properly?
- Are there any objects in the microwave oven which shouldn't be there?
- Are you using the correct cooking utensils?
- Are both the roller stay and the turntable in the microwave oven?
– Are the ventilation openings blocked? - Has the food been defrosted sufficiently?
– Did you stir or turn the food during cooking?
– Is the childproof lock turned on?
Disposal of packaging and appliance
Render discarded appliances unusable immediately by removing the plug from the socket and cutting the cable.
The packaging materials used for your new microwave oven should also be disposed of in a responsible way.
It is important that an old microwave oven is disposed of in a responsible manner and in accordance with the regulations.
You can obtain information about the responsible disposal of discarded household appliances from the relevant authorities.
Technical information
Power supply 230 V - 50 Hz
Connected load 2650 W
Frequency of microwaves 2450 MHz
Microwave output (IEC 705) 850 W
Dimensions (wxhxd) 530 x 322 x 500 mm
Forte (100%) 850 W 1x
Moyennement forte (80%) 680 W 2x
Moyenne (60%) 510 W 3x
Forte (100%) 850 W 6x