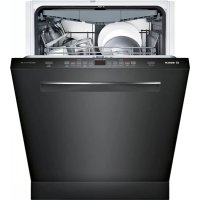
USER MANUAL SHP65T56UC BOSCH
en-us Operating instructions
Safety Definitions. 5

IMPORTANT SAFETY INSTRUCTIONS .6

Causes of Damage. 9

Getting Started 10

Rinse Aid. 12

Loading the Dishwasher . . .13

Detergent 24

Dishwasher Cycles 26

Dishwasher Cycle Options . .27

Operating the Dishwasher. .30

Care and Maintenance. .34

Troubleshooting 38

Customer Service. 42

Statement of Limited Product Warranty. 43
en-us
Dear Valued Customer,
Thank you for selecting a Bosch® dishwasher. You have joined the many consumers who demand quiet and superior performance from their dishwashers.
This manual was written with your safety and convenience in mind, and the information contained herein is very important. We highly recommend that you read this manual before using your dishwasher for the first time.
To learn more about your dishwasher and available accessories, as well as many other top quality Bosch appliances, visit our web site at:
www.bosch-home.com/us (USA)
or
www.bosch-home.ca (Canada)
While there, don't forget to register your new dishwasher by clicking on the "Support" tab or filling out the product registration card enclosed with your new unit.
If you have any questions or comments, please contact us by phone at:
1-800-944-2904
or write us at:
BSH Home Appliances Corporation
1901 Main Street, Suite 600
Irvine, CA 92614

Safety Definitions

WARNING
This indicates that death or serious injuries may occur as a result of non-observation of this warning.

CAUTION
This indicates that minor or moderate injuries may occur as a result of non-observation of this warning.
NOTICE
This indicates that damage to the appliance or property may occur as a result of non-compliance with this advisory.
Note: This alerts you to important information and/or tips.
This dishwasher is provided with Installation Instructions and this Use and Care Manual. Read and understand all instructions before using the dishwasher.
This dishwasher is intended for use up to a maximum altitude of 13,000 ft (4,000 meters) above sea level.
To reduce the risk of fire, electrical shock, or serious injury, observe the following:

WARNING
RISK OF INJURY OR DEATH! Misuse of the dishwasher can result in serious injury or death. Do not use the dishwasher in any way not covered in this manual or for any purpose other than those explained in the following pages.

WARNING
RISK OF INJURY! Severe injury and/or product damage could result from the use of unauthorized service technicians or non-original replacement parts. All repairs must be performed by an authorized service technician using only original equipment factory replacement parts.

WARNING
RISK OF ELECTRICAL SHOCK OR FIRE! Electrical shock or fire could result if the electrical supply for the dishwasher covered in this manual is incorrectly installed or if the dishwasher has been improperly grounded. Do not use the dishwasher covered in this manual unless you are certain the electrical supply has been correctly installed and the dishwasher has been properly grounded.

WARNING
HEALTH HAZARD! Never use harsh chemicals to clean your dishwasher. Some chloride-containing products can damage your dishwasher and may present health hazards!
GROUNDING INSTRUCTIONS
This appliance must be grounded to a metal, permanent wiring system or an equipment grounding conductor must be run with the circuit conductors and connected to the equipment grounding terminal or lead on the dishwasher. See the Installation Instructions included with this dishwasher for more information on electrical requirements.

WARNING
RISK OF ELECTRIC SHOCK! This appliance must be grounded. In the event of a malfunction or breakdown, grounding will reduce the risk of electric shock by providing a path of least resistance for electric current. This appliance is equipped with a cord having an equipment-grounding conductor. Improper connection of the equipment-grounding conductor can result in risk of electric shock. Check with a qualified electrician if you are in doubt whether the appliance is properly grounded.
Safe Operation
Use this dishwasher only for its intended function, which is the washing of household dishware and kitchenware rated as dishwasher safe.
Use only detergents or rinsing agents recommended for use in a dishwasher, and keep them out of the reach of children.

CAUTION
When loading items to be washed:
- Locate sharp items so they are not likely to damage the door seal.
- Load knives and other sharp utensils with their HANDLES UP to reduce the risk of cut-type injuries.
- Do not wash plastic items unless they are marked "dishwasher safe" or the equivalent. For plastic items not so marked, check the manufacturer's recommendations.
- Do not operate your dishwasher unless all enclosure panels are in place.
- Do not tamper with or override controls and interlocks.
Do not abuse, sit or stand on the door or dish racks of the dishwasher.

WARNING
RISK OF INJURY! To avoid risk of injury, always use caution when opening the door during or following a wash cycle as hot water or steam may escape. Do not fully open the door until water noises have stopped and steam has subsided.
NSF/ANSI 184 Certified residential dishwashers are not intended for licensed food establishments.
Child Safety
To reduce risk of injury, do not allow children to play in or on the dishwasher.
When children become old enough to operate the appliance, it is the responsibility of the parents/legal guardians to ensure the children are instructed in safe practices by qualified persons.
Proper Care and Maintenance

WARNING
RISK OF EXPLOSION! Under certain conditions, hydrogen gas may be produced in a hot water system that has not been used for two weeks or more. Hydrogen gas is explosive. Before using a dishwasher that is connected to a hot water system that has been unused for two weeks or longer, turn on all hot water faucets and let the water flow from each for several minutes. This will release any accumulated hydrogen gas. As the gas is explosive, do not smoke or use an open flame during this time.
Remove the dishwasher door to the washing compartment when removing an old dishwasher for service or discarding.
To avoid floor damage and possible mold growth, do not allow wet areas to remain around or under the dishwasher.
To avoid dishwasher damage, do not allow water to remain in your dishwasher systems through extended periods of freezing
temperatures. Freezing temperatures can damage the water fill valve and potentially other components of your dishwasher.
NOTICE
It is highly recommended for the end user to become familiar with the procedure to shut off the incoming water supply and the procedure to shut off the incoming power supply. See the Installation Instructions or contact your installer for more information.

WARNING
STATE OF CALIFORNIA PROPOSITION 65 WARNINGS! This product contains one or more chemicals known to the State of California to cause cancer, birth defects, or other reproductive harm.

Causes of Damage
NOTICES
- Never use steam cleaning products to clean your dishwasher. The manufacturer will not be liable for the possible damages or consequences.
- Bleach-based wipes can cause stainless-steel doors and tubs to rust.
Using harsh chemicals (e.g. bleach), abrasive cleaners, scouring pads (metal or plastic), or abrasive cloths/paper towels can damage your dishwasher's exterior door panel, fascia panel and buttons.
To avoid dishwasher damage, do not load the dishwasher with paper products, plastic bags, packing materials or anything other than normal, dishwasher safe dishware and kitchenware.

Getting Started
Appliance overview
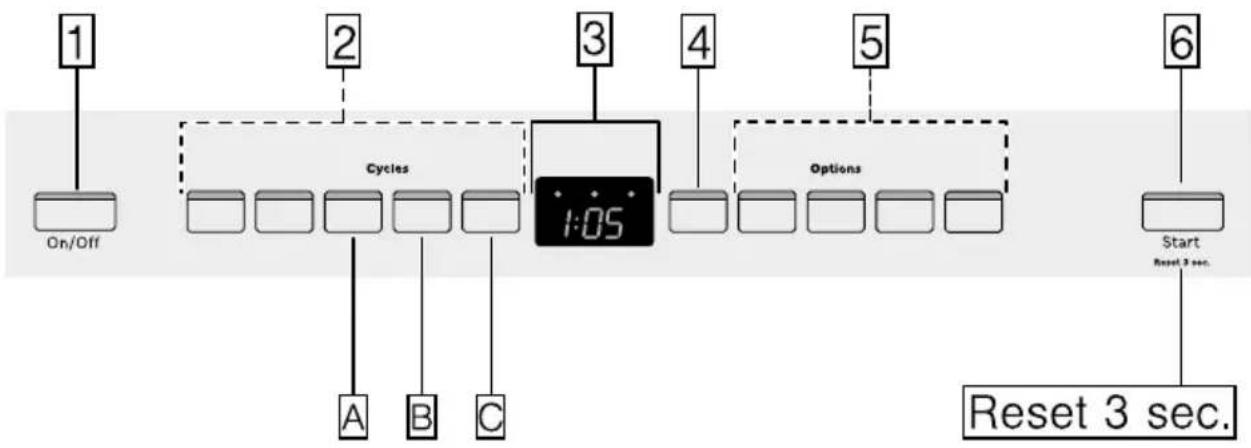

The dotted lines show optional features which may or may not be included with your dishwasher.
The numbers stated below refer to the overview images on the previous page of this manual.
Operating panel
1On/Off button
2 Wash cycles**
3 Digital display
Time preselection
5 Wash cycle options**
6 Start button
**number of wash cycles and options varies on specific model number
Dishwasher interior components
20 Interior light *
21Third rack*
22Upper rack
23Upper spray arm
Detergent tab tray
25 Vent hole
26Lower spray arm
Dispenser for special salt*
28Filters
29 Silverware basket
30Lower rack
31Rinse aid dispenser
32 Detergent dispenser
33 Lock for detergent dispenser
34Rating plate
- optional feature which may or may not be included with your dishwasher.
Display indicators
| 0:00 | Cycle time remaining |
| Add Rinse Aid | Lights up when rinse aid is low |
| Sanitize | Lights up when sanitation requirements are met |
| Clean | Lights up when dishes are clean |
The dishwasher has been preset with certain settings for your convenience. You can change these factory settings.
Use the function keys A, B and C to change the settings.
| Setting Factory setting Description |
| Rinse aid | r:05 | Amount of rinse aid affects drying. When using Multitabs, select setting 0. |
| r:00-r:06 | | |
| d Intensive drying* | d:00 / Off | Improved drying for glasses and plasticware. |
| d:00-d:01 | | |
| b Cycle completion signal* | b:02 | Signal sounds when wash cycle is complete. |
| b:00-b:03 | | |
| l Info light* | l:01/On | Light is projected to signal an active wash cycle. |
| l:00-l:01 | | |
| P Auto power off | P:01 | Dishwasher switches off automatically after wash cycle is complete. |
| P:00-P:02 | | |
- depending on the features of your dishwasher

Rinse Aid
To achieve proper drying, always use a liquid rinse aid, even if your detergent contains a rinse aid or drying additive.
Note: The dishwasher indicates low rinse aid by turning on the Rinse Aid indicator on the display 3. If this indicator lights up, you need to refill the rinse aid dispenser 31 by following the directions below.
Adding rinse aid
NOTICE
To avoid oversudsing or clogging, do not overfill the rinse aid dispenser [31]. Wipe up any spills with a damp cloth.
- Open the rinse aid dispenser 31 by pressing on the latch of the lid and pull it open.
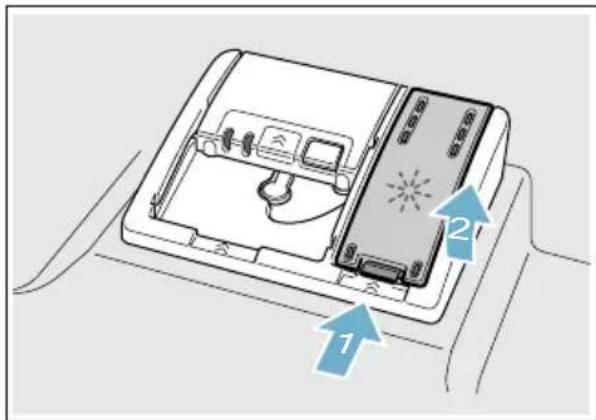
- Add liquid rinse aid to the dispenser 31 until it is full. Do not overfill.

- Close the lid. Lid must be fully closed until it clicks in order to seal.
- Wipe up any excess rinse aid that may have puddled when the dispenser reservoir is full.
The indicator light will go out a few moments after the dishwasher door is shut.
NOTICE
Do not fill the rinse aid dispenser 31 with detergent. Doing so will damage the dishwasher.
Setting the amount of rinse aid used
The amount of rinse aid dispensed can be set from r:00 to r:05 . The factory setting is r:05 .
You should only change the setting if streaks remain on the dishes (lower the amount), or if dishes are not getting dry enough (increase the amount).
| Setting Amount |
| r:00 | dispenser is OFF |
| r:01 | lowest setting |
| r:02 | low setting |
Setting Amount
r:03 medium setting
r:04 medium/high setting
r:05 high setting
r:06 highest setting
- Open the door.
- Press the On/Off button 1.
- Hold down the function key A and press the Start button 6 until the display 3 indicates d:0x (x can be any number). Release both buttons.
- Press the function key A until the display 3 shows r:05.
- Press the function key C to select the desired setting.
- Press the Start button 6 to save the setting.
Turning off rinse aid indicator
Proceed as described in the section "Setting the amount of rinse aid used" and set value to r:00 . The rinse aid indicator is now turned off.
NOTICE
Using no rinse aid or setting the dispenser to r:00 may result in longer cycle times consuming more energy and water. The higher temperatures and longer cycle times can damage fine china or glassware.

Loading the Dishwasher
Dishware material
Note: Before using your dishwasher for the first time, check the information in this section. Some items are not dishwasher-safe and should be hand washed; others require special loading.
Recommended
| Aluminum Colored anodized aluminum may fade over time. Minerals in your water may cause the aluminum to darken or spot. This can usually be removed with a soap-filled steel wool pad. |
| China, Crystal, Stoneware | Some hand-painted utensils may discolor, fade or spot. Hand wash these utensils. Position fragile glassware so that it will not topple over or come in contact with other utensils during the wash cycle. |
| Glass Milk glass may discolor or become yellow. |
| Non-stick Coatings | Apply a light coating of vegetable oil to non-stick surfaces after drying. |
| Plastics Make sure the plasticware is dishwasher-safe. |
| Stainless Steel, Sterling Silver and Silver Plates | Load these so they do not come in contact with other metals, stainless steel dishwasher tub walls or the inner door. |
| Not Recommended |
| Acrylic Crazing or small cracks throughout the acrylic, may occur. |
| Adhesive-Joined Pieces | Adhesives that join materials such as plastic, wood, bone, steel, copper, tin, etc. may loosen. |
| Bone-Handled Utensils | Handles may separate. |
| Iron Iron will rust. Hand wash and dry immediately. |
| Non-Dishware Items | Your dishwasher is intended for use in cleaning ONLY standard household dishware and kitchenware. |
| Pewter, Brass, Bronze | These items will tarnish. Hand wash and dry immediately. |
| Tin Tin will stain. Hand wash and dry immediately. |
| Wood Wooden bowls, wooden utensils and utensils with wooden handles can crack, warp and lose their finish. |
Loading the racks
For best dishwashing results, observe the following when loading the dishwasher:
- Do not pre-wash items with loosely attached food soil.
- Remove all food particles, bones, toothpicks and excessive grease.
Pre-treat items having burned-on, baked-on or starchy soils.
- Load dishes in the dishwasher racks so the insides of bowls, pots and pans are facing the spray arms.
- Avoid nesting and contact points between dishes.
-
Separate items of dissimilar metals. Use care to not block movement of the spray arms.
-
Only wash household dishware and kitchenware rated as dishwasher-safe. Refer to the Dishware Materials section for more information about dishware suitability.
NOTICE
To avoid dishwasher damage, do not load the dishwasher with paper products, plastic bags, packing materials or anything other than normal, dishwasher safe dishware and kitchenware.
Loading the upper rack
Ensure items do not protrude through the bottom of the racks and block the spray arms.
Note: When pushing the upper rack [22] into the dishwasher, push it until it stops against the back of the tub so the upper rack spray arm [23] connects to the water supply at the back of the tub. Do not push racks in using the door.
Loading the lower rack
Place large items in the lower rack 30. Load pots, pans and bowls upside down. Do not block the vent hole 25 with tall baking sheets. Load these items on the right side of the dishwasher.
Recommended loading pattern
12 place setting
Lower rack 30

Upper rack 22

Note: Folding the cup shelves down will allow the cups to sit at an increased angle and reduce water pooling on cup bottoms.
Third rack 21

10 place setting
Lower rack 30

Upper rack 22
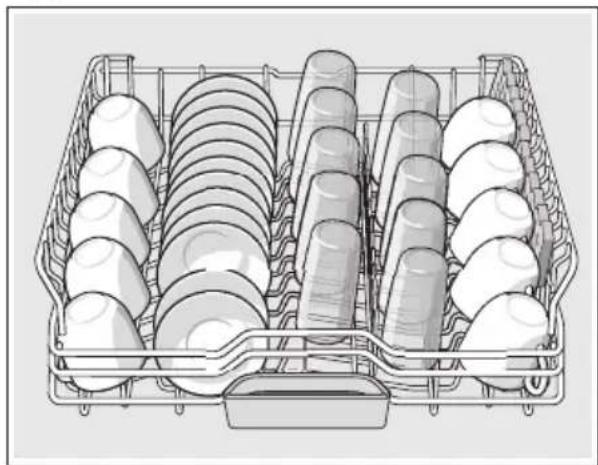
Note: Folding the cup shelves down will allow the cups to sit at an increased angle and reduce water pooling on cup bottoms.
Third rack 21

Loading the silverware basket
Place knives and sharp utensils with their handles up and forks and spoons with their handles down. If large or oddly-shaped items are loaded in the silverware basket, be sure they do not nest together.

WARNING
RISK OF INJURY!
The sharp points and edges of knives and other sharp utensils can cause serious injury. Load knives and other sharp utensils with edges down. Do not allow children to handle or play near knives and sharp utensils.
Long silverware basket*

Note: The silverware basket lid may also be folded downward in order to leave the basket open.
- optional feature which may or may not be included with your dishwasher.
The Double Flex silverware basket *
This basket splits along its length, resulting in two halves that may be placed in a variety of positions in the lower rack 30, greatly increasing the lower rack's loading versatility. The basket snaps together either side by side or back to back.
To split the Double Flex silverware basket:
Grasp the basket and slide the two halves in opposite directions and then pull the two halves apart.
Side by side
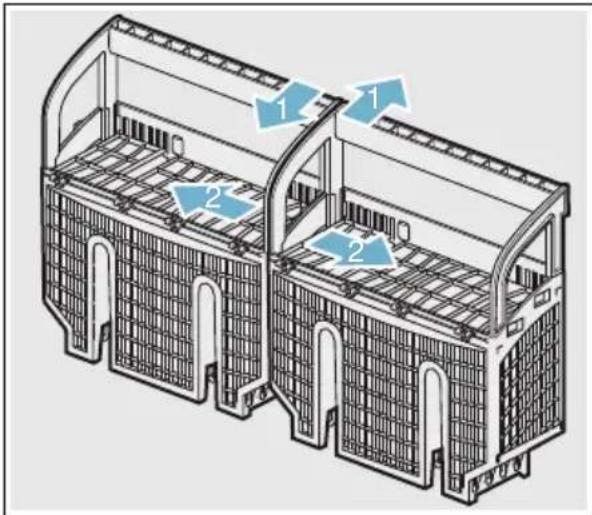
Back to back

To assemble the Double Flex silverware basket:
Hold the two halves side by side or back to back, so that the tab on one basket can slip into the notch on the other basket. Push the two halves in opposite directions until they click.
Note: The silverware basket lid may also be folded downward in order to leave the basket open.

- optional feature which may or may not be included with your dishwasher.
Suggested loading patterns

1 Salad fork
2 Teaspoon
3 Dinner fork
4 Knife
5 Tablespoon
6 Serving spoon
7 Serving fork
Long silverware basket
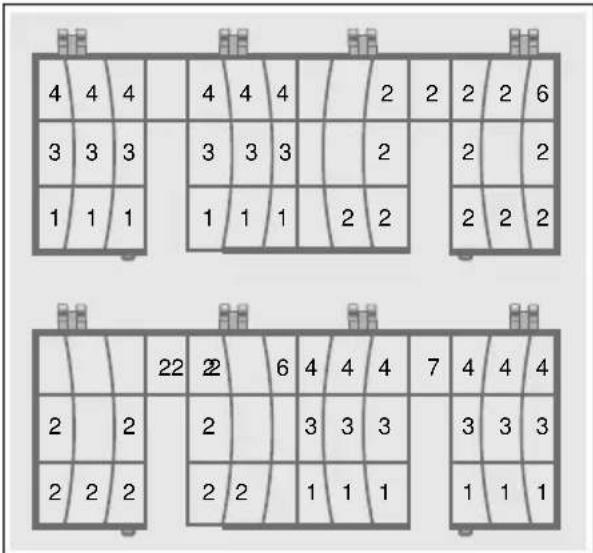
Double Flex silverware basket

Unloading the dishwasher
When unloading the dishwasher, to prevent water from dripping onto dry dishes, unload the lower rack 30 first. Next, unload the silverware basket 29 followed by the upper rack 22, and then the third rack (if equipped).
Note: Dishes are more likely to chip when unloading before cooling.
Adjusting the height of the rack *
If required, the height of the upper rack [22] can be adjusted to create more space for taller utensils either in the upper or lower rack.
| With silverware basket | Upper rack | Lower rack |
| Setting 1 | 9.4 in | 13.4 in |
| max.ø | (24 cm) | (34 cm) |
| Setting 2 | 10.4 in | 12 in |
| max.ø | (26.5 cm) | (30.5 cm) |
| Setting 3 | 11.4 in | 11 in (28 cm) |
| max.ø | (29 cm) | |
| With third rack | Upper rack | Lower rack |
| Setting 1 max.ø | 7 in (18 cm) | 13.4 in
(34 cm) |
| Setting 2 max.ø | 8 in
(20.5 cm) | 12 in
(30.5 cm) |
| Setting 3 max.ø | 9 in
(23 cm) | 11 in (28 cm) |
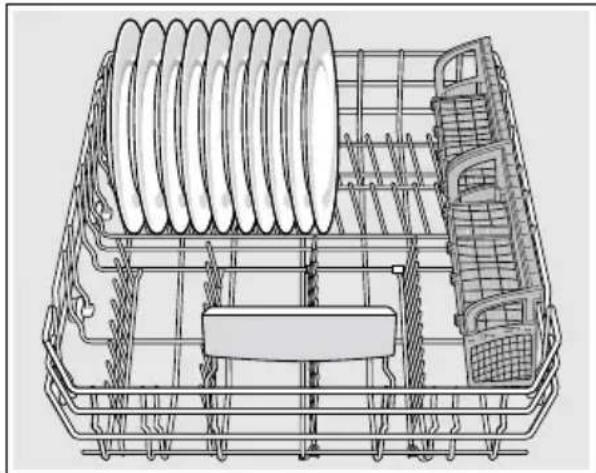
Arrange large plates up to a diameter of 13.4 in (34 cm) in the lower basket [30] as illustrated.
- optional feature which may or may not be included with your dishwasher.
RackMatic®
The height of the upper rack [22] can be adjusted in 3 steps to create more space.
- Pull the upper rack out of the dishwasher until it stops.
-
To lower the rack, push the RackMatic lever inward.
-
To raise the rack, hold the basket on the sides of the upper rack and lift it up.

Note: Check spray arm for clearance after adjustment.
- optional feature which may or may not be included with your dishwasher.
Manually adjustable upper rack*
- Remove the empty upper rack 22 by pulling it out of the dishwasher until it can be lifted upward as shown in left image.
- Pull the rack up and out until the rollers are completely free of the roller guides.
- Reinsert the upper rack with the other set of rollers on the roller guides as shown in right image.
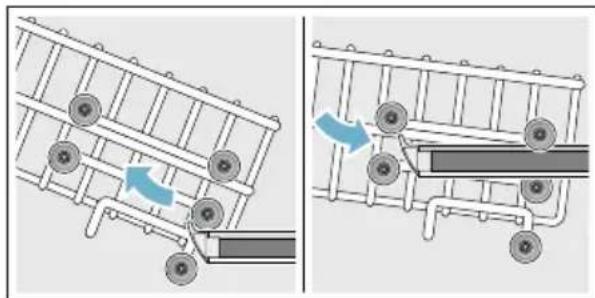
Note: This feature is available for racks with 5 wheels per side, not racks with 3 wheels per side.
- optional feature which may or may not be included with your dishwasher
Rack accessories
Flip tines*
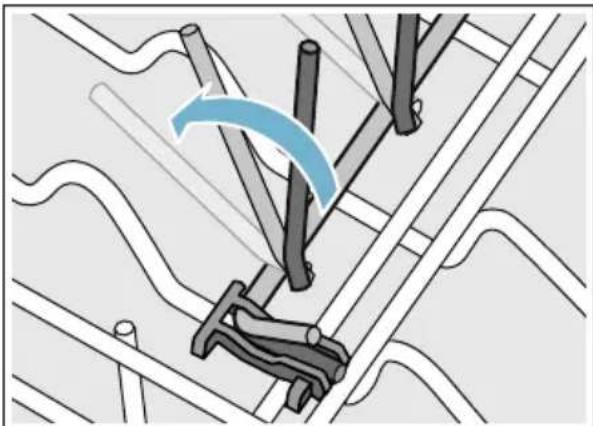
The upper and lower rack are fitted with flip tines that can be folded down depending on what you may need to load in the rack.
Lower rack flip tines: To fold down, pull flip tine gently forward and release it from the notch. Push the flip tine downward. To fold up, push flip tines into an upright position until the holder engages in the notch.
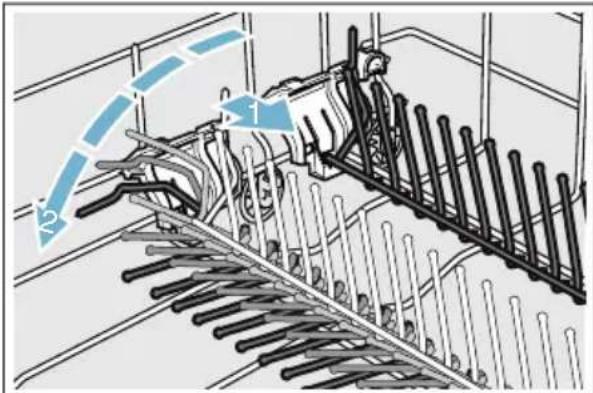
Upper rack flip tines: To fold down, push flip tines downward with gentle pressure. To fold up, push flip tines into an upright position until the holder engages in the notch.
- optional feature which may or may not be included with your dishwasher.
Third rack*
The third rack horizontally positions knives, spatulas and other oversized tools for improved cleaning and easier loading and unloading. Arrange cutlery in third rack as illustrated.

- optional feature which may or may not be included with your dishwasher.
Plastic item clips*
Light-weight plastic accessories (cups, lids, etc.) can be held securely by the plastic item clips.
Press the plastic item clip against the upper rack [22] as shown until it clicks.

- optional feature which may or may not be included with your dishwasher.
Vase holder*
The vase holder can be placed anywhere in the lower rack to hold and thoroughly clean vases, bottles, and other containers.

* optional feature which may or may not be included with your dishwasher.
Cup shelves*
The cup shelves and the space underneath them can be used for small cups or for larger serving utensils.

* optional feature which may or may not be included with your dishwasher.
Knife shelf*
Long knives and other utensils can be placed in the knife shelf.

* optional feature which may or may not be included with your dishwasher.
If an item is too tall to be placed in the lower rack [30] even with the upper rack [22] in the raised position, remove the empty upper rack [22] by pulling it out of the dishwasher until it stops. Pull the front of the rack upward and outward until the rack will not slide out anymore. Then lift it up and away from the dishwasher, until the rollers are completely free of the roller guides (A).
Set the upper rack 22 aside and push the roller guides (A) back into the dishwasher. Insert the extra tall item sprinkler (B) into the upper rack spray outlet (C) and turn the sprinkler clockwise to lock into position.


Note: Keep the vent hole [25] on the tub's left side clear by placing tall items such as plastic cutting boards and tall baking sheets on the lower rack's right side or center.
NOTICE
To avoid dishwasher damage, do not reinstall the upper rack [22] without removing the extra tall item sprinkler (B).
- optional feature which may or may not be included with your dishwasher.
Removing/Installing third rack

Removing third rack 21
- Pull out third rack all the way (1).
- Lift upper rollers over the stopper hooks of both rails (2).
- Pull third rack out forward and upward so the the holding hooks and the lower rollers of the rack slide over the stopper hooks of both rails (3).

Installing third rack 21
- Pull out third rack rails all the way (1).
- Insert third rack at an angle. Make sure that the stopper hooks of both rails slide in between the holding hooks and the lower rollers of the third rack (2).
- Slide third rack in and lift the upper rollers over the front stopper hooks of both rails (3).
- Push in third rack (4).

Removing/Installing upper rack with Rackmatic®*

Removing upper rack 22
- Pull out upper rack all the way (1).
- Lift front rollers over the stopper hook of the rail (2).
- Pull out upper rack forwards and upwards so that the upper and lower rollers of the rack slide over the stopper hooks of both rails (3).

Installing upper rack 22
- Pull out upper rack rails all the way (1).
- Insert upper rack at an angle. Make sure that the stopper hooks of both rails slide in between the upper and lower rollers on the rear side of the rack (2).
- Slide upper rack in and lift the upper rollers over the front stopper hooks of both rails (3).
- Push in upper rack (4).

- optional feature which may or may not be included with your dishwasher.

Detergent
Use only detergent specifically designed for dishwashers. For best results, use fresh powdered dishwashing detergent or detergent tabs.
NOTICE
To avoid dishwasher damage:
- Do not use hand dishwashing products in your dishwasher.
- Do not use too much detergent if your water is soft. Using too much detergent with soft water may cause etching in glassware and fine china.
This dishwasher uses less water than most, therefore, less detergent is required. With soft water, 1 tablespoon (15 ml) of detergent will clean most loads. The detergent dispenser cup has lines that measure detergent to 1 tablespoon (15 ml) and 1.75 tablespoons (25 ml). 3 tablespoons (45 ml) of detergent will completely fill the detergent dispenser.
Note: If you do not know the hardness of your water supply, use 15 ml of detergent. Increase the amount if necessary to the least amount required to get your kitchenware clean.
Use the measuring lines in the detergent dispenser cup as a guide to measure the amount of detergent recommended in the following table.
| Wash Cycle Hard Water/ Heavy Soil | Medium Water/ Medium Soil | Soft Water/ Little Soil |
| Heavy 3 tbsp | (45 ml) | 3 tbsp (45 ml) | 1.75 - 3 tbsp (25 - 45 ml) |
| Auto 1.75 - 3 tbsp | (25 - 45 ml) | 1.75 tbsp (25 ml) | 1 - 1.75 tbsp (15 - 25 ml) |
| Eco 1.75 - 3 tbsp | (25 - 45 ml) | 1 - 1.75 tbsp (15 - 25 ml) | 1 tbsp (15 ml) |
| Normal 1.75 - 3 tbsp | (25 - 45 ml) | 1.75 tbsp (25 ml) | 1 - 1.75 tbsp (15 - 25 ml) |
| Express 1.75 tbsp | (25 ml) | 1 - 1.75 tbsp (15 - 25 ml) | 1 tbsp (15 ml) |
| Rinse none none none | | | |
Adding detergent
- If the detergent dispenser [32] is still closed, actuate the locking bar [33] to open it.
Note: Make sure the detergent dispenser is dry and clear of detergent residue.
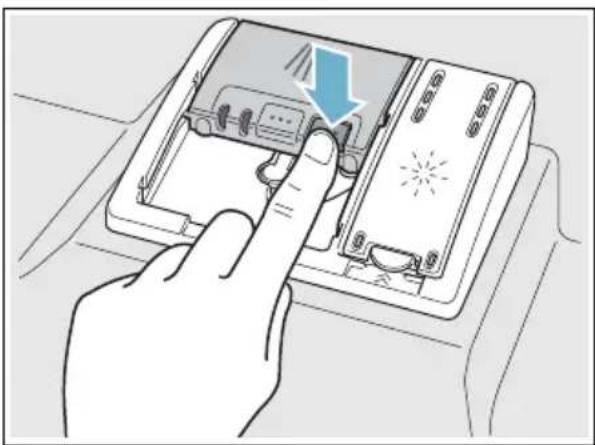
- Pour detergent into the dry detergent dispenser [32] only. Add detergent. Do not overfill the detergent dispenser.
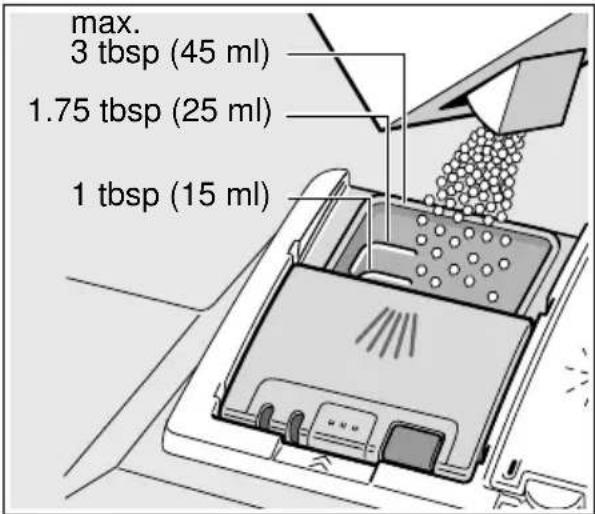
When using detergent tabs, lay them such that they do not come in contact with the cover, insert a detergent tab flat, not on its side.
Note: Do not place detergent tabs or utensils in the detergent tab tray [24]. Place tabs or other detergent forms directly in the detergent dispenser [32].
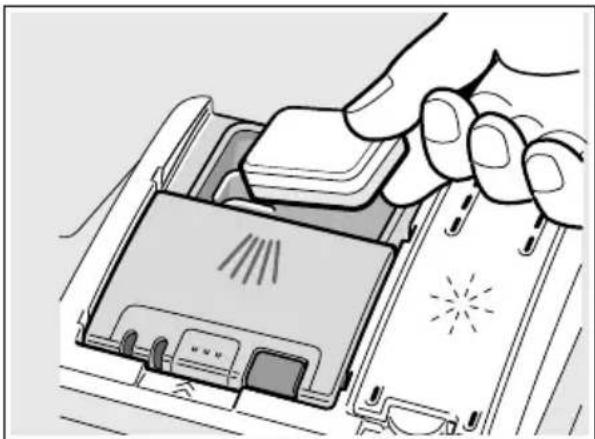
Dosage: see manufacturer's instructions on the packaging.
- Close the lid by placing the finger on the lid as shown. Slide the lid closed and press down firmly until it clicks.
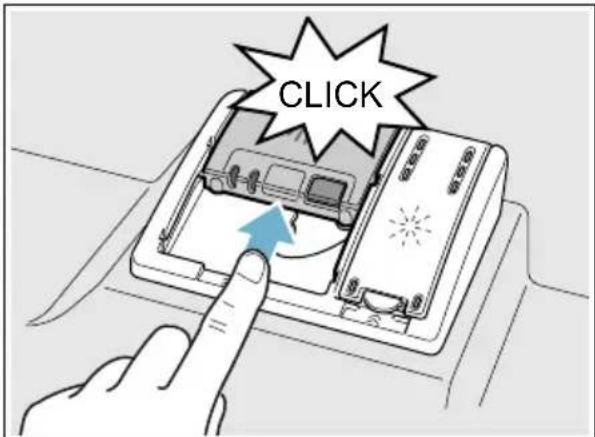
The detergent dispenser will open automatically at the ideal time for the set cycle. The powder or liquid detergent is distributed in the appliance and is dissolved, detergent tabs will fall into the detergent tab tray 24 where it dissolves during the cycle.
Tip: If the utensils are only lightly soiled, slightly less than the indicated amount of detergent is usually adequate.

Dishwasher Cycles
| Wash cycle Recommended use Possible wash cycle option |
| Heavy Best for cleaning items with baked-on food or grease. These dishes would normally require soaking or hand scouring. | all | |
| Auto Smartest cycle, with most flexible soil sensing, which is ideal for mixed dishware and food soils. | all | |
| Eco* Best for delicate dishes and glasses, the Eco cycle lowers temperature and cycle length to decrease energy usage. | Delay SpeedPerfect™ Half Load Extra Shine® | |
| Normal (see note at bottom of table) | Recommended for daily, regular or typical use to completely wash a full load of normally soiled dishes. | all Note: In order to obtain optimal performance with minimum energy consumption, it is recommended to disable all available options and settings, except Auto Power Off-set to P:0 1→ "Auto power off" on page 31 |
| Express Cleans lightly soiled dishes and reduces overall wash time. Use this cycle to clean glasses and dessert dishware that may need to be reused at the same event. | Delay Extra Shine® | |
| Rinse Use this cycle if you need to pre-rinse dishes to avoid odors. Place unrinsed dishes inside the dishwasher and select the Rinse cycle. Uses less water than hand rinsing and very low energy. | Delay | |
| *the number of wash cycles depends on the features of your dishwasher |
Note: The Energy Guide label was based on the Normal soil sensing cycle as follows: The unit was tested without any rinse aid (liquid) in the rinse aid dispenser [31]. A single dose of detergent was inserted into the detergent dispenser [32], with no detergent being used in the prewash. The unit was not subjected to truncated testing per the definitions in the test procedure. We recommend that dish loads such as the one in the energy certification test have the rack position set in the highest position.
+ Dishwasher Cycle Options
- Depending on the features of your dishwasher you can select various wash cycle options 5.
Delay
Allows you to delay the start time of your dishwasher up to 24 hours.
SpeedPerfect™*
SpeedPerfectTM is an option that allows saving time without sacrificing wash and dry performance. Selecting this option ensures the same final temperatures as the underlying cycle by starting the heat period at an earlier phase in the program. Selecting this option also increases energy consumption while reducing cycle time.
Half Load*
Can reduce water consumption when washing small, lightly soiled loads that fill approximately half of the dishwasher's capacity.
Delicate
This option's reduced time and temperature are best for lightly soiled items with easy to remove food soils. The option also reduces the likelihood of cloudy glasses. Rinse aid is recommended for the high gloss drying function (even when using combination detergents).
Sanitize
This function increases the temperatures and retains them for an extra long time to obtain a defined disinfecting performance. Continuous use of this function increases the hygiene status. This additional option is ideal for cleaning items such as chopping boards and baby bottles.
The sanitize LED will light when sanitation requirements are met. Using the Sanitize option may also improve drying.
Used in combination with a wash cycle (except Rinse), the Extra Shine® option raises the temperature and extends the drying time to further enhance drying results and provide a brilliant shine.
To save energy, this dishwasher has EcoSense where the sensors in the dishwasher automatically adjust the cycle length, temperature and water changes based on the amount of food soil and the incoming water temperature. The "Smart Control"
makes decisions that can cause the cycle time and water usage to adjust intermittently. Wash cycle times are based on 120^ (49^) water supply. If your household water supply is different than 120^ (49^) , your dishwasher's cycle times may be impacted.
| Heavy Auto Eco Normal Express Rinse |
| Cycle time min. | 110-135 105-129 80-85 130-135 30 9 |
| Water usage gal/L | 4.9-6.4/18.6-24.2 | 3.5-6.5/13.1-24.5 | 2.5-3.8/9.3-14.5 | 2.4-5.5/8.8-20.8 | 2.8/10.53 | 1.1/4.1 |
| Wash temp. °F/°C | 150-160/66-71 | 127-150/53-66 | 113-122/45-50 | 113-131/45-55 | 113/45 | in-coming |
| Rinse temp. °F/°C | 162/72 | 153/67 | 144/62 | 140-156/62-69 | 122/50 | in-coming |
| Speed PerfectTM |
| Cycle time min. | 95-110 75-90 | 60-70 95-105 | N/A N/A | | | |
| Water usage gal/L | 4.3-5.5/16.3-20.5 | 4.3-5.3/16.1-20.0 | 2.4-3.3/9.2-12.5 | 4.4-5.6/16.6-21.1 | N/A N/A | |
| Rinse temp. °F/°C | 162/72 | 162/72 | 145/63 | 162/72 | N/A N/A | |
| Half Load |
| Cycle time min. | 115 95-105 | 75-80 90-99 N/A N/A | | | | |
| Water usage gal/L | 4.8/17.9 | 2.7-4.4/10.2-16.5 | 2.5-3.3/9.3-12.5 | 2.8-3.7/10.8-13.9 | N/A N/A | |
| Rinse temp. °F/°C | 162/72 | 158/70 | 144/62 | 162/72 | N/A N/A | |
Heavy Auto Eco Normal Express Rinse
| Delicate |
| Cycle time min. | 105-110 90-105 N/A 100-120 N/A N/A |
| Water usage gal/L | 4.9-6.4/18.6-24.2 | 3.5-6.5/13.1-24.5 | N/A 2.4-5.5/8.8-20.8 | N/A N/A | | |
| Rinse temp.°F/°C | 140/60 | 140/60 | N/A 140/60 | N/A N/A | | |
| Sanitize |
| Cycle time min. | 130-150 125-150 N/A 135-155 N/A N/A |
| Water usage gal/L | 4.9-6.4/18.6-24.2 | 3.5-6.5/13.1-24.5 | N/A 2.4-5.5/8.8-20.8 | N/A N/A | | |
| Rinse temp.°F/°C | 162/72 | 162/72 | N/A 162/72 | N/A N/A | | |
| Extra Shine® |
| Cycle time min. | 130-150 125-150 115-125 135-155 60 N/A |
| Water usage gal/L | 4.9-6.4/18.6-24.2 | 3.5-6.5/13.1-24.5 | 2.5-3.8/9.3-14.5 | 2.4-5.5/8.8-20.8 | 2.8/10.5 | N/A |
| Rinse temp.°F/°C | 162/72 | 162/72 | 162/72 | 162/72 | 162/72 | N/A |
Note: Only sanitizing cycles have been designed to meet the requirements of Section 6 of the NSF/ANSI Standard for Residential Equipment for soil removal and sanitization efficacy. There is no intention, either directly or indirectly, to imply that all cycles have passed sanitization performance tests.

Operating the Dishwasher
Note: With hidden controls, the door must be opened before changing settings and closed after changing settings.

WARNING
RISK OF INJURY!
To avoid risk of injury, always use caution when opening the door during or following a wash cycle as hot water or steam may escape. Do not fully open the door until water noises have stopped and steam has subsided.
Protection against unintentional operation
Your dishwasher is equipped with a function that helps to prevent unintentional operation (e.g. by children).
After setting the dishwasher, the dishwasher door has to be closed within 4 seconds, otherwise the operation will be paused. There will be a signal on the control panel advising you to press the Start button again and close the door.
This function will be activated when:
■ pressing Start to begin a wash cycle
setting Delay time and pressing Start
- opening the door while Delay time is active
- opening the door during a wash cycle.
Note: This function cannot be deactivated.
AquaSensor
The AquaSensor is an optical measuring device which measures the cleanliness of the rinse water.
The AquaSensor is used according to the wash cycle. If the AquaSensor is active, "clean" rinse water can be transferred to the next rinse and water consumption can be reduced by 0.8-1-5 gal (3-6 liters). If the rinse water is not yet clear, the water is drained and is replaced with fresh water. In the automatic wash cycles the temperature and running time can also be adjusted to the degree of soiling.
Switching the appliance on
- Turn the water supply on fully.
- Open the door.
-
Press the On/Off button 1. The display of the last selected wash cycle flashes. This wash cycle remains selected if no other wash cycle button 2 is pressed. The expected wash cycle duration flashes on the display 3. Select any desired option.
-
Press Start button 6
Wash cycle sequence starts.
Note: Your dishwasher is protected against unintentional operation. If the appliance door remains open for more than 4 seconds after pressing the Start button, the operation will be paused. Press the Start button again and close the appliance door.
Time display
When a wash cycle is selected the remaining wash cycle time is shown on the display 3.
The wash cycle time is determined during the wash cycle by the water temperature, the amount of dishes, as well as the degree of soiling and may vary (depending on the selected wash cycle).
Delay Start
You can delay the start of the cycle in one hour increments up to 24 hours.
h:01 hour delay h:24 24 hours delay
To set Delay start:
- Open the door and press the On/Off button 1. Select a cycle.
- Press the Delay button from the wash cycle options 5 until the displayed time corresponds with your requirements.
- Press the Start button 6 to activate Delay start.
To cancel Delay start:
- Open the door and press the Delay button until h:00 is indicated on the digital display 3.
- Press the Start button 6 to save setting.
Note: Your dishwasher is protected against unintentional operation. If the appliance door remains open for more than 4 seconds after pressing the Start button, the operation will be paused. Press the Start button again and close the appliance door.
Wash cycle end
The wash cycle has ended when the display 3 reads 00:00.
If the signal tone has been set, the wash cyIce end is also indicated by a buzzer.
b:00 Off b:01 low b:02 medium b:03 loud
To change the signal volume:
- Open the door.
- Press the On/Off button 1.
- Hold down function key A and press Start button 6 until the display 3 indicates 品 _ 品 x (x can be any number). Release both buttons.
- Press function key A until the display shows 02.
- Press function key C. Each time the button is pressed the set value increases by one level; when it reaches the value b:03, the display jumps back to b:00 (off).
- Press Start button 6 to save the setting.
Auto power off
To save energy, the dishwasher is turned off 1 minute after the wash cycle ends.
This setting can be adjusted from P:00 to P:02.
P:00 dishwasher does not turn off automatically
P:01 dishwasher turns off automatically after 1 minute
P:02 dishwasher turns off automatically after 120 minutes (2 hours)
To change the setting:
- Press the On/Off button 1.
- Hold down the function key A and press the Start button 6 until the display 3 indicates d:0x (x can be any number).
- Release both buttons.
- Press the function key A until the display 3 indicates P:0x.
- Press the function key C until the display corresponds with your requirements.
- Press the Start button 6
Switching off the appliance
Short time after the end of the wash cycle:
- Open the door.
- Switch off On/Off button 1.
- Turn off water supply.
- Remove the utensils when they have cooled down.

WARNING
RISK OF INJURY!
To avoid risk of injury, always use caution when opening the door during or following a wash cycle as hot water or steam may escape. Do not fully open the door until water noises have stopped and steam has subsided.
Interrupting the wash cycle

CAUTION
Expansion (overpressure) may cause the appliance door to open and/or water to escape! If the door was opened on an appliance which has a hot water connection or is heated, always leave the door ajar for several minutes and then close.
- Open the door.
- Switch off On/Off switch 1. The LED's go out. The wash cycle is saved.
- To continue the wash cycle, switch on the On/Off switch 1 again.
- Close the door.
Note: Your dishwasher is protected against unintentional operation. If the appliance door remains open for more than 4 seconds after pressing the Start button, the operation will be paused. Press the Start button again and close the appliance door.
Terminating the wash cycle (Reset)
- Press and hold Start button 6 for approximately 3 seconds until the display reads 0:01.
- Wait about 1 minute while the dishwasher drains.
- Press On/Off button 1. You may now power the dishwasher back on and begin a new cycle if desired.
Changing the wash cycle
When the Start button 1 has been pressed, the wash cycle cannot be changed. The only way a wash cycle can be changed is by terminating the wash cycle (Reset).
InfoLight\*
While the wash cycle is running, a light spot shines on the floor under the appliance door.
Do not open the appliance door until the light point is no longer visible on the floor.
If the appliance door is not completely closed, the light spot flashes*.
If the appliance is installed at eye-level, with flush furniture front, the light point is not visible.
In darkened rooms, some light scattering may be visible. This is normal and cannot be changed.
You can switch the Infolight on or off.
:00 Off
1:01 low
To change the setting:
- Open the door.
- Press the On/Off button 1.
- Hold down function key A and press Start button 6 until the display 3 indicates d:0x (x can be any number). Release both buttons.
- Press function key A until the display shows 101.
- Press the function key C to switch the InfoLight feature on 1:01 or off 1:00.
-
Press Start button 6 to save the setting.
-
optional feature which may or may not be included with your dishwasher.
Intensive drying*
The final rinse uses a higher temperature which improves the drying result. The cycle time may increase slightly. (Caution if utensils are delicate!)
This feature has two settings:
d:00 Off
d:01 On
- Open the door.
- Press the On/Off button 1.
- Hold down function key A and press Start button 6 until the display 3 indicates ^ :x (x can be any number).
- Release both buttons.
- Press function key A until the display 3 indicates the factory set value d:00
- Press function key C to switch the Extra dry feature on d:01 or off d:00.
-
Press Start button 6 to save setting.
-
optional feature which may or may not be included with your dishwasher.

Care and Maintenance
A regular inspection and maintenance of your machine will help to prevent faults. This saves time and prevents future problems.
Overall condition of the dishwasher
NOTICE
- Never use a steam cleaner to clean your dishwasher. The manufacturer is not liable for any resulting damage.
Regularly wipe the front of the appliance with a damp cloth - water and a small amount of liquid soap is adequate. Do not use sponges as they could scratch the surfaces.
- Do not use bleach-based wipes as they could damage the surface or printing.
Stainless steel appliances: To prevent corrosion, do not use sponges or chlorine based cleaners. Use a stainless steel polish to seal and protect the surface. Do not use chlorine based cleaners or wipes.
Clean the outer edges of the inside door panel regularly to remove debris that may collect from normal loading. If spots begin to appear on the stainless steel, make sure the rinse agent is full and functioning properly.
Clean the door seal regularly with a damp cloth to remove food particles that may collect from normal loading and cause odor. A soiled door seal may not seal properly.

WARNING
Use caution when removing parts for cleaning as some debris may be sharp.
Filters
The Bosch® filter system [28] is designed to prevent the need to pre-rinse normally attached food soils from your dishes. Simply scrape leftover food soils off of dishware before loading. This process will conserve time, water and the energy require to heat your household water supply.
Your dishwasher filter system is designed to filter 100% of the water entering the spray arms to provide a continuous supply of clean water to remove food soils from your dishware.
Filter components
The filter system 28 consists of three parts.

A Large Object Trap
Prevents objects that should not be placed in your dishwasher from damaging the dishwasher pump system or clogging your household drain.
B Flat Fine Filter
Prevents food particles from entering the wash chamber and directs particles toward the micro filter.
C Micro Filter
Directs the smallest of particles to the household plumbing drain.
Cleaning intervals
The filter system [28] is designed to minimize maintenance while providing premium cleaning performance and minimum energy consumption.
Depending on use habits and water hardness, the filter system will require some maintenance to sustain premium cleaning performance.
Your filter system may need to be cleaned when:
You notice food soils remaining on the filter system or objects trapped in the Large Object Trap.
A drop in cleaning performance or a gritty film forms on the dishware.
When washing normally attached food soils that have been scraped before loading, in a household that runs the dishwasher every other day, your filter should be cleaned:
| Cleaning
interval | Use this setting, |
| 3 times a year if you rinse before loading |
| 4 times a year if you only scrape before loading |
| 6 times a year if you do not rinse or scrape before loading |
| 12 times a year if you have hard water |
Note: Clean the filter after washing loads with large amounts of food soils or loads with a heavy starch content, like potatoes and pasta, to maintain optimal performance.
To check or clean the filter system:
- Unscrew the Large Object Trap as illustrated and remove the entire filter system.
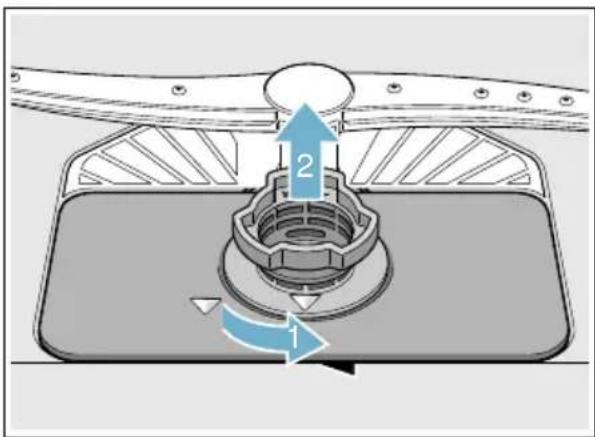

- Remove any residue and clean filters by rinsing under running water. Note: do not use abrasive brushes or steel wool, etc., as they may damage the filter.
- Reinstall the filter system in reverse sequence and lock into place by screwing the Large Object Trap until the marking arrows align.
Spray arms
Check spray arms [23], [26] for grease and limescale deposits. If you find such deposits:
- Fill detergent dispenser 32 with detergent and start the appliance without utensils in the cycle with the highest rinsing temperature. "Wash Cycle Information" on page 28
Clean the appliance with detergents/appliance cleaners which are particularly suitable for use with dishwashers.
- Unscrew the upper spray arm [23] and pull off the lower spray [26] arm as shown. Inspect for deposits.

Drain pump
Large food remnants in the rinsing water not retained by the filters may block the waste water pump. In this case:
- Disconnect the appliance from the power supply.
Remove the filters. "Filters" on page 34
- Scoop out standing water - use a sponge if necessary.
Using a spoon, pry off the pump cover until it clicks, then grip the cover and pull upward until it resists and then pull forward.


Check inner compartment and remove any foreign objects.
WARNING
Use caution when removing parts for cleaning as some debris may be sharp.
Place cover in the original position, press down and engage.
Reinstall filters.
Note: The drain pump will not work properly if the drain pump cover is not snapped in completely until it clicks.
Preparing your unit for vacation
NOTICE
Before leaving for vacation during warmer weather, besides turning off the main valve, also turn off water supply at the nearest point to the dishwasher. During colder weather, please follow the instructions for winterizing your unit below.
Winterizing your unit
NOTICE
If your dishwasher will be unused for a period of time in a location that experiences freezing temperatures (holiday home or through a vacation period), have your dishwasher winterized by a professional service.

Troubleshooting
Dishwashers may occasionally exhibit problems that are unrelated to
a malfunction of the dishwasher itself. The following information may help you with a dishwasher problem without involving a repair professional.
| Problem Cause Action |
| Dishwasher does not start | Door may not be properly latched. Shut the door completely until you hear a click. |
| Dishwasher may not be turned on. Press the main power switch 1 to turn dishwasher on. |
| Dishwasher not reset or previous cycle not completed. | Reset the dishwasher. |
| Delay start engaged. | Reset Delay start. → "Delay Start" on page 31 |
| Interruption of electrical power supply to dishwasher or blown fuse. | Check circuit breaker. |
| The door may have been closed without first selecting a cycle. | Select a cycle and close the door. |
| Water supply may not be turned on. Check and turn on water supply. |
| Cycle does not resume after door is opened and closed during cycle. | Door is opened longer than 4 seconds after a cycle has started. | Press Start button again to resume cycle. |
| Display does not illuminate | A fuse may have been blown or circuit breaker tripped. | Check the fuse or circuit breaker box and replace the fuse or reset the breaker if necessary. |
| Door not closed or latched. Note: For models with controls on top of the door, the display only illuminates when the door is opened and controls are visible. | Ensure door is properly latched and completely closed. |
| Dishwasher seems to run a long time | Incoming water is not warm enough. | Before starting a cycle, run hot water faucet at the sink closest to the dishwasher. |
| Cycle time can vary due to soil and water conditions. | Sensors in the dishwasher automatically increase the cycle time to ensure a good wash when heavy soil is detected. |
| Rinse aid dispenser [31] is empty, or rinse aid setting has been set to "0". | Add rinse aid, or change rinse aid setting. |
| Dishwasher connected to cold water supply.
Note: Check the typical wash cycle length. → "Wash Cycle Information" on page 28 | Verify dishwasher is connected to hot water supply plumbing. |
| Dishes are not getting clean enough | Spray arm movement obstructed. Ensure that spray arm movement is not blocked by hand rotating spray arms [23], [26] before starting cycle. |
| Spray arm nozzles clogged. | Remove spray arms [23], [26] and clean them. → "Spray arms" on page 36 |
| Improper use of detergents. Increase or decrease detergent depending on the water hardness. |
| Filters [28] could be clogged. | Clean the filters [28]. → "Filter components" on page 34 |
| Dishes are nested or loaded too closely together. | Rearrange load such that water spray can reach all items in the dishwasher.
→ "Loading the Dishwasher" on page 13 |
| Selected wash cycle is not suitable for food soil conditions. | Refer to Wash Cycle Information.
→ "Wash Cycle Information" on page 28 |
| Streaks on glassware or residue on the dishes | Incorrect rinse aid setting. Depending on the hardness of water, adjust the rinse agent dispenser [31]. → "Rinse Aid" on page 12 |
| Dishes are not getting dry enough | Rinse aid dispenser [31] is empty or incorrect rinse aid amount is set. | Add rinse aid or adjust setting - the use of rinse agent improves drying, use the Auto cycle, use the Sanitize option. |
| Note: Plastic or Teflon do not typically dry as well as other items due to their inherent properties. | Improper loading of dishes. Rearrange load to ensure items are not nesting. → "Loading the Dishwasher" on page 13
Note: Select models offer an extra heating option to improve drying performance. |
| Odor
Note: Water testing is done in the factory. Occasionally water may still appear in dishwasher at purchase which may create an odor. | Food debris is present at the bottom of the dishwasher. | Remove the filters and clean them. → "Care and Maintenance" on page 34 |
| Food particles are present near the door seal. | → "Care and Maintenance" on page 34 |
| Residual water is present at the bottom of the dishwasher. | Ensure the dishwasher has completely drained from the last cycle. |
| Drain hose is obstructed. Remove any obstructions from the drain hose by calling qualified personnel.
Note: If odor still persists, run the Normal/Regular cycle until it flushes and interrupt the cycle and place an 8 oz. cup of distilled white vinegar solution on the upper rack and then finish the cycle. |
| Dishwasher not filling with water or "Check water supply" display lights up | Restriction in the water supply system. | Ensure that the water supply valve (typically located under kitchen sink) is open and check that the water supply line has no kinks or clogs. |
| Previous wash cycle was not completed. | → "Operating the Dishwasher" on page 30 |
| Delay start is active. Cancel the delay start or wait until delay start time completes. |
| Household water supply turned off. Turn on water supply. |
| Fascia panel discolored or marked | Abrasive cleaner used. Use mild detergents with soft damp cloth. |
| Noise during wash cycle | Dishes may not be arranged properly. | Water circulation sound is normal, but if you suspect items are banging into each other or into the spray arms, check optimal arrangement of dishes. → "Loading the Dishwasher" on page 13 |
| Water leaks Suds. Using wrong type of detergent or overfilling the rinse aid dispenser results in suds and leaks - use only dishwasher detergents. If suds still persist, add one tablespoon of vegetable oil at the bottom of the dishwasher and run the desired cycle. |
| Door seal could be pulled away from track. | Ensure the door seal is in the track. |
| Condensation vent is blocked. Ensure that condensation vent is not blocked. |
| Improper installation. Have proper installation verified by qualified personnel (water supply, drain system, leveling, plumbing). |
| Tub stains Stains on the dishwasher interior are due to water hardness. | Concentrated lemon juice can reduce the build-up of hard water stains. Run Normal/Regular cycle until it flushes and interrupt the cycle and then place an 8 oz. cup of the concentrated lemon solution on the upper rack and finish the cycle. This can be done periodically to avoid build-up. |
| Silverware in contact with tub. Ensure that silverware does not make contact with the tub while running a cycle. |
| Detergent dispenser cover will not shut | Improper operation of detergent cover. | For instructions on opening and closing the dispenser → "Detergent" on page 24 |
| Previous cycle was not finished or interrupted. | → "Operating the Dishwasher" on page 30 |
| Unable to select desired cycle | Previous cycle not finished. | → "Operating the Dishwasher" on page 30 |
| Touch sensitive keys not activating easily or activating without being touched* optional feature which may or may not be included with your dishwasher. | Water or other liquid on the surface. | Wiping the fascia with a wet cloth may cause unwanted activation. wipe the fascia with a soft, dry cloth when possible. If you must use a damp cloth to clean, dry immediately. Never pour water on the controls. |
| Touch keys not being activated properly. | Press the center of the touch key with the flat area of your fingertip. A beep will sound to indicate that the selection has been made. Touching the keys lightly should work.Note: There is a built-in delay to prevent someone from launching several actions at once by accidentally wiping their hand (or a cleaning cloth) across the control panel. |

Customer Service
Your Bosch® dishwasher requires no special care other than that described in the Care and Maintenance section of this manual. If you are having a problem with your dishwasher, before calling for service please refer to the Troubleshooting Guide section of the manual. If service is necessary, contact your dealer or installer or an authorized service center. Do not attempt to repair the appliance yourself. Any work performed by unauthorized personnel may void the warranty.
If you are having a problem with your Bosch® dishwasher and are not pleased with the service you have received, please take the following steps until the problem is corrected to your satisfaction:
- Call us at 1-800-944-2904
- Contact Customer Service from our web site: www.bosch-home.com/us or www.bosch-home.ca
- Contact your installer or the Bosch Authorized Service Contractor in your area.
- Write us:
BSH Home Appliances Corporation
1901 Main Street
Irvine, CA 92614
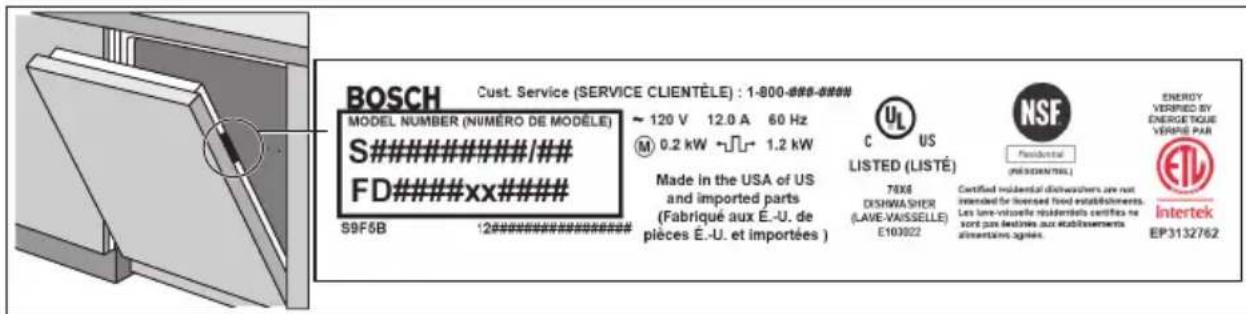
Please be sure to include your model information as well as an explanation of the problem and the date it started. You will find the model and serial number information on the label located on the edge of the dishwasher door. Please make a copy of your invoice and keep it with this manual. The customer may be required to show proof of purchase to validate warranty coverage.

Statement of Limited Product Warranty
What this Warranty Covers & Who it Applies to:
The limited warranty provided by BSH Home Appliances Corporation (BSH) in this Statement of Limited Product Warranty applies only to Bosch® dishwashers ("Product") sold to you, the first using purchaser, provided that the Product was purchased:
for your normal, household (non-commercial) use, and has in fact at all times only been used for normal household purposes;
- new at retail (not a display, "as is", or previously returned model), and not for resale, or commercial use; and
within the United States or Canada, and has at all times remained within the country of original purchase. The warranties stated herein apply only to the first purchaser of the Product and are not transferable.
Please make sure to return your registration card; while not necessary to effectuate warranty coverage, it is the best way for BSH to notify you in the unlikely event of a safety notice or product recall.
How Long the Warranty Lasts
BSH warrants that the Product is free from defects in materials and workmanship for a period of three hundred sixty five (365) days from the date of purchase. The foregoing timeline begins to run upon the date of purchase, and shall not be stalled, tolled, extended, or suspended, for any reason whatsoever.
This Product is also warranted to be free from cosmetic defects in material and workmanship (such as scratches of stainless steel, paint/porcelain blemishes, chip, dents, or other damage to the finish of the Product), for a period of thirty (30) days from the date of purchase or closing date for new construction. This cosmetic warranty excludes slight color variations due to inherent differences in painted and porcelain parts, as well as differences caused by kitchen lighting, product location, or other similar factors. This cosmetic warranty specifically excludes any display, floor, "As Is", or "B" stock appliances.
Extended Limited Warranty
BSH also provides these additional limited warranties:
5 year limited warranty on electronics: BSH will repair or replace any BSH microprocessor or printed circuit board if it proves to be defective in materials or workmanship (excludes labor charges).
5 year limited warranty on dish racks: BSH will replace the upper or lower dish rack (excluding rack components), if the rack proves defective in materials or workmanship (excludes labor charges).
Lifetime warranty against stainless steel rust through: BSH will repair or replace your dishwasher with the same model or a current model that is substantially equivalent or better in functionality, if the inner liner should rust through (excludes labor charges).
BSH will repair or replace the stainless steel door if the door should rust through (excludes labor charges).
Repair/Replace as Your Exclusive Remedy
During this warranty period, BSH or one of its authorized service providers will repair your Product without charge to you (subject to certain limitations stated herein) if your Product proves to have been manufactured with a defect in materials or workmanship. If reasonable attempts to repair the Product have been made without success, then BSH will replace your Product (upgraded models may be available to you, in the sole discretion of BSH, for an additional charge). All removed parts and components shall become the property of BSH at its sole option. All replaced and/or repaired parts shall assume the identity of the original part for purposes of this warranty and this warranty shall not be extended with respect to such parts. BSH's sole liability and responsibility hereunder is to repair manufacturer-defective Product only, using a BSH-authorized service provider during normal business hours. For safety and property damage concerns, BSH highly recommends that you do not attempt to repair the Product yourself, or use an unauthorized servicer; BSH will have no responsibility or liability for repairs or work performed by a non-authorized servicer. If you choose to have someone other than an authorized service provider work on your Product, THIS WARRANTY WILL AUTOMATICALLY BECOME NULL AND Void. Authorized service providers are those persons or companies that have been specially trained on BSH products, and who possess, in the opinion of BSH, a superior reputation for customer service and technical ability (note that they are independent entities and are not agents, partners,
affiliates or representatives of BSH). Notwithstanding the foregoing, BSH will not incur any liability, or have responsibility, for the Product if it is located in a remote area (more than 100 miles from an authorized service provider) or is reasonably inaccessible, hazardous, threatening, or treacherous locale, surroundings, or environment; in any such event, if you request, BSH would still pay for labor and parts and ship the parts to the nearest authorized service provider, but you would still be fully liable and responsible for any travel time or other special charges by the service company, assuming they agree to make the service call.
Out of Warranty Product
BSH is under no obligation, at law or otherwise, to provide you with any concessions, including repairs, pro-rates, or Product replacement, once this warranty has expired.
Warranty Exclusions
The warranty coverage described herein excludes all defects or damage that are not the direct fault of BSH, including without limitation, one or more of the following:
Use of the Product in anything other than its normal, customary and intended manner (including without limitation, any form of commercial use, use or storage of an indoor product outdoors, use of the Product in conjunction with air or water-going vessels);
Any party's willful misconduct, negligence, misuse, abuse, accidents, neglect, improper operation, failure to maintain, improper or negligent installation, tampering, failure to follow operating instructions, mishandling, unauthorized service (including self-performed "fixing" or exploration of the appliance's internal workings);
Adjustment, alteration or modification of any kind;
A failure to comply with any applicable state, local, city, or county electrical, plumbing and/or building codes, regulations, or laws, including failure to install the product in strict conformity with local fire and building codes and regulations;
Ordinary wear and tear, spills of food, liquid, grease accumulations, or other substances that accumulate on, in, or around the Product;
- Any external, elemental and/or environmental forces and factors, including without limitation, rain, wind, sand, floods, fires, mud slides, freezing temperatures, excessive moisture or extended exposure to humidity, lightning, power surges, structural failures surrounding the appliance, and acts of God.
In no event shall BSH have any liability or responsibility whatsoever for damage to surrounding property, including cabinetry, floors, ceilings, and other structures or objects around the Product. Also excluded from this warranty are Products on which the serial numbers have been altered, defaced, or removed; service visits to teach you how to use the Product, or visits where there is nothing wrong with the Product; correction of installation problems (you are solely responsible for any structure and setting for the Product,
including all electrical, plumbing or other connecting facilities, for proper foundation/flooding, and for any alterations including without limitation cabinetry, walls, floors, shelving, etc.); and resetting of breakers or fuses.
TO THE EXTENT ALLOWED BY LAW, THIS WARRANTY SETS OUT YOUR EXCLUSIVE REMEDIES WITH RESPECT TO PRODUCT, WHETHER THE CLAIM ARISES IN CONTRACT OR TORT (INCLUDING STRICT LIABILITY, OR NEGLIGENCE) OR OTHERWISE. THIS WARRANTY IS IN LIEU OF ALL OTHER WARRANTYES, WHETHER EXPRESS OR IMPLIED. ANY WARRANTY IMPLIED BY LAW, WHETHER FOR MERCHANTABILITY OR FITNESS FOR A PARTICULAR PURPOSE, OR OTHERWISE, SHALL BE EFFECTIVE ONLY FOR THE PERIOD THAT THIS EXPRESS LIMITED WARRANTY IS EFFECTIVE. IN NO EVENT WILL THE MANUFACTURER BE LIABLE FOR CONSEQUENTIAL, SPECIAL, INCIDENTAL, INDIRECT, "BUSINESS LOSS", AND/OR PUNITIVE DAMAGES, LOSSES, OR EXPENSES, INCLUDING WITHOUT LIMITATION TIME AWAY FROM WORK, HOTELS AND/OR RESTAURANT MEALS, REMODELLING EXPENSES IN EXCESS OF DIRECT DAMAGES WHICH ARE DEFINITIELY CAUSED EXCLUSIVELY BY BSH, OR OTHERWISE. SOME STATES DO NOT ALLOW THE EXCLUSION OR LIMITATION OF INCIDENTAL OR CONSEQUENTIAL DAMAGES, AND SOME STATES DO NOT ALLOW LIMITATIONS ON HOW LONG AN IMPLIED WARRANTY LASTS, SO THE ABOVE LIMITATIONS MAY NOT APPLY TO YOU. THIS WARRANTY GIVES YOU SPECIFIC LEGAL RIGHTS, AND YOU MAY ALSO HAVE OTHER RIGHTS WHICH VARY FROM STATE TO STATE. No attempt to alter, modify or amend this warranty
en-us Statement of Limited Product Warranty
shall be effective unless authorized in writing by an officer of BSH Home Appliances Corporation.
How to Obtain Warranty Service
TO OBTAIN WARRANTY SERVICE
FOR YOUR PRODUCT, YOU
SHOULD CONTACT THE NEAREST
BSH AUTHORIZED SERVICE
CENTER, OR CALL 1-800-944-2904
Table des matieres

1901 Main Street, Suite 600
Irvine, CA 92614

Sanitize (Assainissement)
BSH Home Appliances Corporation
1901 Main Street
Irvine, CA 92614
BSH reserves the right to change specifications or design without notice. Some models are certified for use in Canada. BSH is not responsible for products which are transported from the United States for use in Canada. Check with your local Canadian distributor or dealer.
1901 Main Street, Suite 600
Irvine, CA 92614
1-800-944-2904