TIG539W - Air Conditioning ZIBRO - Free user manual and instructions
Find the device manual for free TIG539W ZIBRO in PDF.
User questions about TIG539W ZIBRO
0 question about this device. Answer the ones you know or ask your own.
Ask a new question about this device
Download the instructions for your Air Conditioning in PDF format for free! Find your manual TIG539W - ZIBRO and take your electronic device back in hand. On this page are published all the documents necessary for the use of your device. TIG539W by ZIBRO.
USER MANUAL TIG539W ZIBRO
SPLIT UNIT AIR CONDITIONER
TIN/TIG-327W
TIN/TIG-539W
D GEBRAUCHSANWEISUNG 2
DK BRUGSANVISNING 16
F MANUEL D'UTILISATION 30
GB OPERATING MANUAL 44
NL GEBRUIKSAANWIJZING 58
TIPS TIL AT OPNA EN OPTIMAL YDELSE
Nedbring temperature
Tryk pā▼ tasten: 1 x tryk nedbringer den indstillede temperatur med 1 °C.
0g temperature
Bouton minuterie ARRET (OFF)
M CONDITIONS DE GARANTIE
Congratulations on the purchase of your Zibro Clima. You have acquired a high quality product that, if used responsibly, will give you many years of pleasure. Please read these instructions for use first in order to ensure the maximum life span of your airconditioner.
On behalf of the manufacturer, we provide a 24-month guarantee on all material and production defects. Please enjoy your Zibro Clima.
Yours sincerely,
PVG International b.v.
Customer service department
- READ THE DIRECTIONS FOR USE FIRST.
- IN CASE OF ANY DOUBT, CONTACT YOUR DEALER.
GB
44
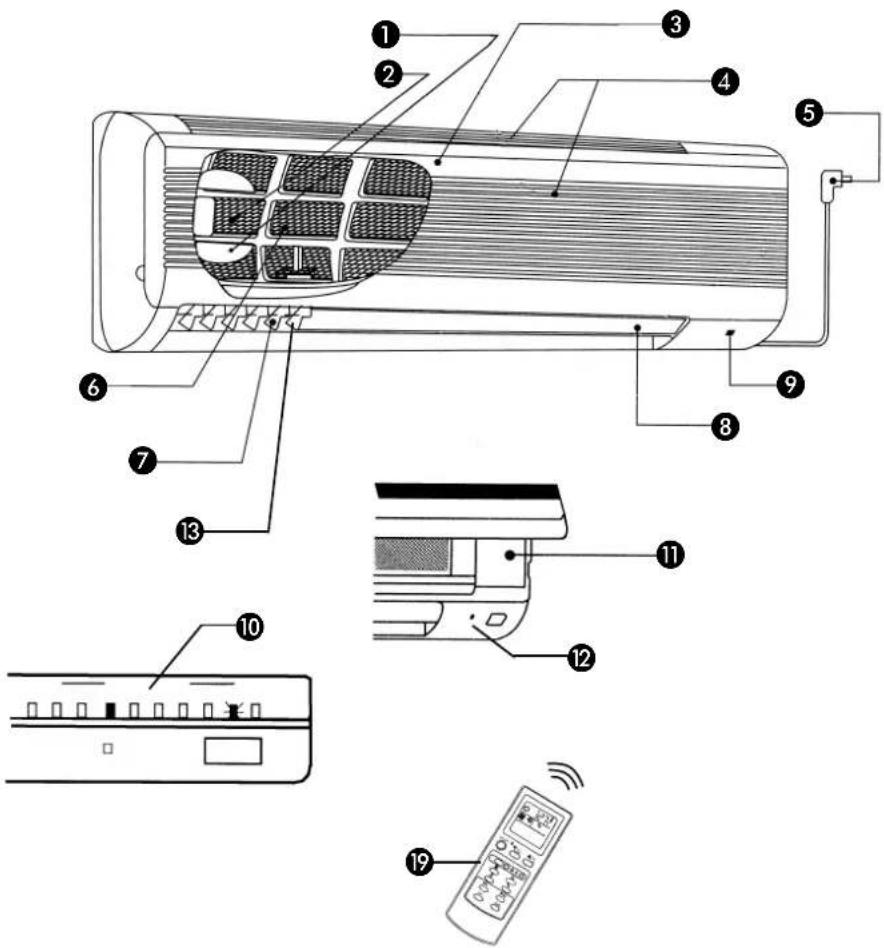
INDOOR UNIT
OUTDOOR UNIT
IMPORTANT COMPONENTS
Deodorising filter (applies to TIN 539)
Air purification filter (applies to TIN 539)
3 Front panel
Air inlet
Mains power plug
6 Air filter
Vertical blades
Horizontal blade
9 Reception section of the remote control
10 Temperature indication light (applies to TIN 539)
Manual operation button (behind the front panel)
12 ON/OFF light
Air outlet indoor unit
Air inlet (rear and side)
15 Pipes / cables
Water drainage hose
Air outlet
18 Water outlet
Remote control
LET OP!
- The airconditioner needs to be installed according to the local valid regulations
-
Please read the safety instructions and instructions for use carefully before using the air conditioner.
-
Never point the direct air flow at people, animals or plants.
- Ensure that the interior and exterior units are installed out of reach of children.
- Do not use an extension cord and do not plug more than one device into the same socket.
- Incorrect connection, poor insulation, overloads, etc., may cause fires or electric shocks.
- If you notice anything unusual (strange smell, smoke, etc.) switch the air conditioner off and pull the plug out of the socket or terminate the power supply.
- If the unit is used in abnormal conditions, this may cause problems, fire, etc.
- Do not damage the power cable, clean it with an abrasive substance, subject it to heat or place heavy objects on it. This may damage the cable, thereby causing a fire or electric shock.
- Never pull the plug out of the socket by the cable. Only recognised installers may replace damaged electricity cables.
- Switch off the device and pull the plug out of the socket before cleaning the air conditioner. The ventilator runs at high speed and can cause physical injury.
- Never operate the air conditioner with wet hands. This can cause an electric shock.
- Do not spray any insecticide or flammable spray in the direction of the device. This may cause fire or damage.
- Pull the plug out of the socket during thunderstorms are predicted.
- Do not use the air conditioner for long periods of time in an extremely humid environment or if windows and/or doors are opened. Use (of the cooling function) for long periods in extremely humid rooms may cause the water that has condensed in the air conditioner to leak onto furniture, thereby causing damage.
- Do not stand or sit on the units and do not place any objects on them.
- The air conditioner must always have an earthed connection. Incorrect earthing can cause an electric shock. An earth leakage switch may have to fitted, depending on the location of the installation. Ask your dealer.
- Never use the air conditioner without an air filter.
-
Do not use petroleum, benzene, abrasives, cleaning agents or hot water (30^ or hotter) to clean the air conditioner. If necessary, the units may be cleaned with a slightly damp cloth. Never use large quantities of water!
-
Pull the plug out of the socket if the air conditioner is to be out of use for an extended period of time.
- If the power supply has been disrupted, switch the air conditioner on again with the ON/OFF button after 3 minutes.
- Ensure that condensed water drains away efficiently and completely.
B REMOTE CONTROL
- Signal transmission section
- Information display
- ON/OFF - button
- Function selection button
- Ventilator speed adjustment button
- 'SLEEP' function adjustment button
- Time + temperature adjustment buttons
- Timer ON switch
- Timer OFF switch
- Button for:
Horizontal blade adjustment
- 'SWING' function adjustment
On the rear of the remote control
- 'CLOCK' adjustment button
- 'RESET' button

CBEFORE USING THE AIRCONDITIONER
ATTENTION
Please read the safety instructions and instructions for use carefully before using the air conditioner.
UNIT INTERIOR
1 Check that all packaging material has been removed.
2 Insert the plug into the wall socket.
REMOTE CONTROL
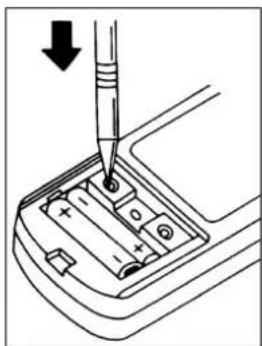
1 Remove the covering panel from the back and insert the batteries. Ensure that the + and - poles correspond.
Press the 'CLOCK' adjustment button.
3 Set the correct hours with the and buttons.
4 Press the 'CLOCK' adjustment button.
5 Set the correct minutes with the and buttons.
6 Press the 'CLOCK' adjustment button again and close the covering panel.
The display will now show the correct time.
REMARKS
- If the remote control will not be used for an extended period of time, remove the batteries and store them in a dry location.
- The distance for signal reception is approximately 6 metres. One or two beeps will be heard when the unit has received the signal.
- To ensure that the signal transmission section of the remote control functions optimally, point it at the signal reception section of the unit.
- Do not use rechargeable batteries
- Careless use and moisture can damage the remote control.
D OPERATING THE AIRCONDITIONER
AUTOMATIC CONTROL FUNCTION
Press the ON/OFF button.
When activated, the airconditioner will first measure the room temperature, which will be the basis for the automatic selection of either 'COOLING', 'DEHUMIDIFY' or 'HEAT'.
Room temperature on activation Automatic function selection
approx. 25^ or higher COOLING
approx. 20 -25 ° C DEHUMIDIFY
approx. 20^ or lower HEAT
The last function used will be selected automatically if the airconditioner is switched on after being switched off for less than 2 hours.
If you are not satisfied with the function selected automatically, switch to manual control with the aid of the remote control.
MANUAL CONTROL FUNCTION
Press the ON/OFF button.
2 Select the desired function by pressing the function selection button. The function selected will change each time the button is pressed: AUTO > COOLING > DEHUMIDIFY > HEAT > VENTILATE.
3 Select the ventilator speed (see chapter F).
4 Adjust the direction of air flow (see chapter F).
5 You can set the desired temperature if you are using the cooling or heat functions (see chapter E).
If the remote control does not work, the air conditioner can be operated manually. In this case, you can select either the cooling or heating functions or switch the air conditioner off. Each press of the button 'manual operation' changes the function.
Details: Cooling Heating
Set temperature 24^ 24^
Ventilator speed medium medium
TIPS!
- The cooling function works optimally when the room to be cooled is exposed to sunlight as little as possible.
- Protect the exterior unit against direct sunlight. This saves energy.
- We recommend keeping the difference between the exterior and interior temperatures as small as possible. A temperature setting between 20^ and 24^ is most suitable. This will create a comfortable temperature.
- Excessive humidity causes discomfort. A relative humidity of approximately 55% is experienced as most comfortable.
E SETTING THE TEMPERATURE (WHEN COOLING OR HEATING)
Adjust the temperature after activating the airconditioner.
To lower the temperature
Press the button - 1× lowers the temperature setting by 1^
To raise the temperature
1 Press the button - 1 x raises the temperature setting by 1^ .
REMARKS
- The temperature can be set when using the automatic control function (except when dehumidifying), but this is not shown in the display.
- If the ambient temperature is too high, it may occur that the set room temperature is not reached.
Indication green signal on the unit interior display (applies to type TIN 539):
- This shows the current and set temperatures.
- The room temperature indicated may vary somewhat from the current room temperature. Use it as a reference.
Room temperature indication range 21 - 30^ C. The temperature to be set varies between 16 - 31^ C.
Room temperature within indication range:
The set temperature (permanently illuminated light) and the room temperature (flashing light) are displayed.
Room temperature or set temperature outside the indication range:
-
If the room temperature or set temperature is 31^ or higher, 30^ will appear on the display.
-
If the room temperature or set temperature is 21^ C or lower, 21^ C appears on the display.
Room temperature and set temperature are identical:
- The corresponding light is activated.
Comments relating to the use of the "HEAT" FUNCTION
- The effective operation of the airconditioner depends on the outside temperature.
- Defrost setting; If the outside temperature is extremely low, the unit automatically switches to the defrost setting for 2 to 10 minutes. The operation of the airconditioner is suspended during this period.
- Pre-heating function; When the timer is ON, the airconditioner measures the air temperature 1 hour before the set time and activates the unit in advance if necessary.
Room temperature: Unit starts operating:
< 0^ C 50 min. Before set time
0 - 5 °C 40 min. Before set time
5 - 10°C 30 min. Before set time
>10^ 20 min.Before set time
Comments relating to the use of the 'DEHUMIDIFY' function
- The ventilator speed can not be adjusted when using this function.
- In this setting, the ventilators in the interior and exterior sections do not operate continuously.
- This function can not be used at a room temperature of 13^ or lower.
F ADJUSTING VENTILATOR SPEED AND AIRFLOW DIRECTION
The ventilator speed adjusts automatically according to the room temperature.
Adjusting the ventilator speed
Ventilator setting: Power air flow:
LOW Gentle air flow
MEDIUM Medium air flow
HIGH Powerful air flow
You can change the air flow by pressing the 'Ventilator speed' button - the speed will change each time you press the button (see above).
Setting the direction of the air flow
- Only adjust the air flow up or down with the remote control.
- Adjust the air flow to the left or right manually before activating the device.
ATTENTION!
The remote control can be used to adjust the vertical air flow for the following functions:
- COOLING and DEHUMIDIFYING, when the air conditioner has been in operation for 1 hour with the air flow directed downwards, the air flow will automatically be adjusted to a position that ensures that no condensation can drip out.
- During heating or defrosting, the horizontal blades are set to direct the air flow upwards in order to ensure that you are not annoyed by cold air.
- Select the maximum ventilator speed to ensure that the entire room reaches the desired temperature with the minimum of delay.
G SWING SETTING
When using the SWING setting, the direction of the horizontal blade is varied constantly. This promotes even distribution of the air in the room.
- The direction of the air flow can not be changed when the ventilator speed is set to AUTO.
- The SWING setting is automatically deactivated when a function is changed.
- The SWING setting can not be used when the Timer is set.
H USING THE TIMER FUNCTION
Use the Timer to switch the air conditioner on and off automatically at pre-set times. Setting the Timer requires the correct time to be set and the air conditioner to be switched on. Follow these steps:
1 Check that the correct time has been set.
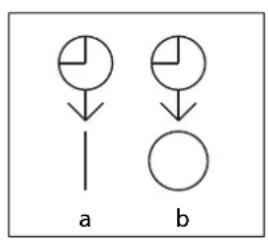
Press the timer ON or OFF button to select the Timer function. The set time is displayed.
3 Set the correct time with the and buttons and the symbol a or b will be displayed. After approximately 1 minute, these symbols will disappear and it will no longer be possible to reset the time.
This pre-programmed activation and deactivation can be used in combination.
The and symbols indicate the sequence.
The time must be reset if the power supply is disrupted during the setting procedure.
OFF timer button
The air conditioner switches off automatically at the set time.
ON timer button
The air conditioner switches on automatically at the set time.
MAINTENANCE DURING USE
The air conditioner must be cleaned regularly. Follow these steps:
Switch the air conditioner off and pull the plug out of the socket.
2 Clean the interior unit and the remote control with a soft, dry cloth. You can use a slightly damp cloth if the unit is extremely dirty.
3 Clean the air filter regularly.
4 If the interior unit is placed on the roof, the immediate vicinity of the unit must be cleaned regularly in order to prevent dirt from blocking the heat exchanger.
If you are not using the air conditioner for an extended period of time:
1 Run the ventilator for 3 to 4 hours to dry the inside of the air conditioner. Mould will grow if moisture remains in the air conditioner when it is switched off for an extended period of time.
2 Remove the batteries from the remote control.
3 Pull the plug out of the socket
4 Clean the air filter and then replace it.
When you want to use the air conditioner again:
1 Clean the air filter and replace it.
2 Check that the air inlet and outlet of both the interior and exterior units are not blocked.
3 Check that the frame of the interior unit is not rusty or damaged.
4 Check that the drainage pipe is not blocked.
5 Check that the exterior unit is ready to operate.
6 Insert the plug in the socket.
J CLEANING AND REPLACING THE FILTERS
Cleaning the air filter
Clean the air filter at least once every two weeks.
1 Open the front panel and remove the air filter (do not move the front panel completely to the horizontal position, otherwise it will fall off).
2 Clean the filter with a vacuum cleaner or with water. Remove stubborn dirt with a mild, neutral cleaning agent, diluted in lukewarm water (max. 30^ C). Rinse the filter thoroughly with clean water to remove all soap remnants.
3 Dry the filter in the shade. Do not expose it to direct sunlight or dry it by an open fire.
4 Replace the filter and close the front panel.
Cleaning the deodorising filter
Clean the deodorising filter at least once every two weeks.
1 First remove the air filter, followed by the deodorising filter. Hold the deodorising filter by the holder. Do not touch the surface of the filter.
Soak the filter and holder in lukewarm water (max. 30^ C) for approximately 15 minutes. Add a mild cleaning agent to remove stubborn dirt. Rinse the filter thoroughly with clean water in order to remove all soap remnants. Never scrub or use bleach.
3 Dry the filter in the shade.
4 Replace the deodorising filter, and then the air filter.
Replacing the deodorising filter
The deodorising filter must be replaced after approximately 1 year. This must be done when the colour of the filter has faded significantly and it does not return to its original state after cleaning.
Replacing the air purification filter
The air purification filter must be replaced every 4 months. This must be done when the filter is dark in colour.
K PROBLEMS, CAUSES AND SOLUTIONS
If you are unable to solve a problem with the tips listed below, switch the air conditioner off and contact your dealer or service department.
THE AIR CONDITIONER DOES NOT WORK
- Check that the plug is inserted firmly into the socket and the power supply has not been disrupted.
Switch the air conditioner back on when the power supply has been re-established.
The timer has been set to a later time.
THE AIR CONDITIONER COOLS OR HEATS INSUFFICIENTLY.
The temperature has not been set correctly. Check:
Cooling: the set temperature must be lower than the room temperature. Heating: the set temperature must be higher than the room temperature.
The air filter is dirty. Check.
The inlet and/or outlet of the exterior unit is/are blocked. Check.
Environmental factors hinder the effective operation of the air conditioner (e.g. open door, large number of people in the room). Check.
THE REMOTE CONTROL DOES NOT WORK.
The batteries have not been placed in the holder correctly. Check (pay attention to the + and - poles).
The batteries are flat. Replace.
BEFORE CONSULTING AN EXPERT
The following situations do not indicate a defect:
The air conditioner does not restart immediately.
After it has been switched off, the air conditioner can only be restarted after approximately 3 minutes in order to protect the compressor.
- Slow air flow when the heating function is activated.
The air conditioner requires a preparation period before blowing out warm air.
- The heating function does not work for 2 to 10 minutes while the control light is lit.
The defrost function has activated - a low exterior temperature and high level of humidity causes ice to form on the exterior unit.
- The interior unit makes a creaking sound.
This sound is caused by shrinkage or expansion of the interior unit as a consequence of temperature fluctuations.
- The ventilator stops during dehumidification.
Condensation on the heat exchanger re-evaporates, and this increases the relative humidity level. To prevent this, the ventilator of the interior unit stops when the room temperature has dropped sufficiently.
Sound of flowing water.
This sound is caused by the coolant flowing through the pipes.
- The direction of the air flow changes.
During cooling/dehumidification the air conditioner automatically changes the direction of the air flow in order to prevent condensation from dripping onto the floor.
During heating, the horizontal blade moves automatically to the horizontal setting if the temperature of the expelled air is too low or the defrost function has activated.
- The interior unit makes a rattling sound.
This sound is caused by the ventilator or compressor starting.
- The interior unit leaks water.
This is caused by condensation on the pipes and heat exchanger of the exterior unit.
- The signal from the remote control is not received.
The signal is obstructed by sunlight or bright light on the receiver section of the interior unit.
- Formation of ice on the vertical blades.
When the air conditioner is used in an environment with a high humidity level for an extended period of time, condensation may form on the vertical blades. This will turn into ice.
M THE GUARANTEE CONDITIONS
There is a 24-month guarantee on the air conditioner from the purchase date. Within this period, all material and manufacturing defects will be repaired free of charge. The following rules will apply:

- We expressly reject all further claims to damage compensation, including claims relating to secondary damage.
- Repairing or replacing components within the guarantee period will not extend the guarantee.
- The guarantee is invalidated if any modifications have been made to the machine, non original parts have been fitted or repairs have been carried out by third parties.
- Components subject to normal wear, such as the filter, are not covered by the guarantee.
- The guarantee is valid exclusively when you present the original, dated and unaltered purchase invoice.
- The guarantee does not cover damage caused by actions that deviate from the instructions for use or neglect.
- Shipment costs and the risks associated with shipping the air conditioner or parts thereof will always be borne by the buyer.
To prevent unnecessary expense, we recommend that you first always consult the instructions for use carefully. If this does not provide a solution, ask your dealer to repair the air conditioner.
N TECHNICAL SPECIFICATIONS
| Model TIN 327W TIN 539W | |||
| Dehumidification capacity * L/h 1.7 2.8 | |||
| Cooling capacity kW (BTU/h) 3.2 (11,000) 5.3 (18,000) | |||
| Warming capacity kW (BTU/h) 3.5 (12,000) 5.6 (19,000) | |||
| Power consumption kW 1.3 1.9 | |||
| Power consumption warming | kW 1.3 1.9 | ||
| Dimensions indoor unit (HxWxD) | mm | 277 x 810 x 187 | 320 x 1010 x 187 |
| Dimensions outdoor unit (HxWxD) | mm | 541 x 672 x 246 | 650 x 800 x 330 |
| Mains | V/Hz | 220-240/50 | 220-240/50 |
| Room size | m³ | 90 | 150 |
| Weight indoorunit | kg | 10 | 13 |
| Weight outdoorunit kg | 33 | 48 | |
| Refrigerant | gr | R22/900 | R407C/1800 |
| Noise level indoorunit (max) | dB | 40 | 43 |
| Noise level indoorunit (nom) | dB | 51 | 53 |
| Maximum airflow | m³/min. | 9.8 | 12.2 |
- at 32°C / 80% RH
Holloway Bank, Wednesbury
West Midlands WS10 OAW
Tel.: +44 121 506 1818
Fax: +44 121 505 1744
email: gases@lister.co.uk
ITALIA
PVG Italy SRL
Via Niccolò Copernico 5
50051 CASTELFIORENTINO (FI)
tel: +39 571 628500
fax: +39 571 628504
email: pvgitaly@zibro.com
N NORGE
Sunwind - Gylling A/S
Rudsetta 71-75 / P.O. Box 64
N-1309 RUD
tel: +47 67 17 13 70
fax: +47 67 17 13 80
email: pvgint@zibro.com
NEDERLAND
PVG International b.v.
P.O.Box 96
5340 AB OSS
tel: +31 412 694694
fax: +31 412 622893
email: pvgnl@zibro.com
PORTUGAL
Gardena, Lda