
C151 - Mobile Phone TELME - Free user manual and instructions
Find the device manual for free C151 TELME in PDF.

| Product type | Mobile phone |
| Brand | TELME |
| Model | C151 |
| Dimensions | 104 x 52 x 12 mm |
| Weight | 70 g |
| Battery | Li-Ion 3.7 V / 800 mAh (replaceable) |
| Standby time | 200 h |
| Talk time | 250 min |
| Network | Dual-band GSM 900/1800 MHz |
| SAR (head) | 0.69 W/kg |
| Display | LCD display |
| Bluetooth | Yes |
| FM Radio | Yes |
| Main functions | Calls, SMS, Phonebook, FM Radio, Calculator, Calendar, Alarm, Flashlight, SOS emergency call |
| User profiles | General, Silent, Meeting, Outdoor |
| Auto keypad lock | Yes (15 s / 30 s / 1 min) |
| Phone warranty | 12 months |
| Battery warranty | 6 months |
| Support | Industriezeile 36, 4020 Linz, Austria, www.telme.eu |
| Care and cleaning | Protect from moisture, shocks and direct sunlight |
| Safety | Turn off in hospitals, airplanes, gas stations; keep 20 cm from pacemakers |
| Disposal | Device and battery must not be disposed of with household waste; mandatory recycling |
Frequently Asked Questions - C151 TELME
User questions about C151 TELME
0 question about this device. Answer the ones you know or ask your own.
Ask a new question about this device
Download the instructions for your Mobile Phone in PDF format for free! Find your manual C151 - TELME and take your electronic device back in hand. On this page are published all the documents necessary for the use of your device. C151 by TELME.
USER MANUAL C151 TELME
Deutsch | English | Italiano | Francais | Nederlands

Thank you for purchasing a product TELME! Please read through the instruction manual before using the phone in operation. The English description see page 22.
natural_image
Illustration of a mobile phone with a USB flash drive and a gray arrow indicating left (no text or symbols on the device itself)
natural_image
Illustration of a USB flash drive with an arrow icon (no text or symbols)natural_image
Illustration of a computer monitor with an open screen showing a download arrow (no text or symbols present)
natural_image
Illustration of a mobile phone with an arrow indicating upward movement (no text or symbols)
6.4 Anrufbeantworter (Voicemail)
13. DECLARATION OF CONFORMITY (DOC)
- Press this to select the option displayed in the bottom left-hand corner of the screen.
4 Right option key
- Press this to select the option displayed in the bottom right-hand corner of the screen.
5 Arrow keys
- Use these to flick through your Contacts and the menu
- When the phone is on standby, press to call up the menu.
- When the phone is on standby, press ✅ to access Contacts.
6 Green key
- Start or accept a call
- When the phone is on standby: Access All calls
7 Red key
- When in a call: End
- When you are in the menu: Back to standby
- When entering digits or letters: Delete
- Power button
8 M1 M2 M3 Quick dial keys (see page 29)
9 1 key (voicemail) (see page 32)
10 Star key (see page 26)
11 Hash key (see page 26)
12 Torch
13 Wrist strap holder
14 Loudspeaker
15 Emergency button
16 Volume button
17 Torch button
18 Battery cover
19 Port for USB charging cable
Symbols on the screen
Networksignal strength
Roaming(abroad)
Batteryindicator
Callforwarding
Missedcall
Alarmon
Newmessage
Bluetooth
Profile: Silent (mute) Profile: General and Outdoor
Keypadlock
Profile:Meeting
1. GETTING STARTED
> Inserting a SIM card
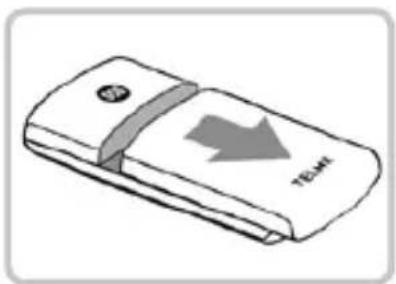
natural_image
Illustration of a mobile phone with a gray arrow pointing to the right side (no text or symbols)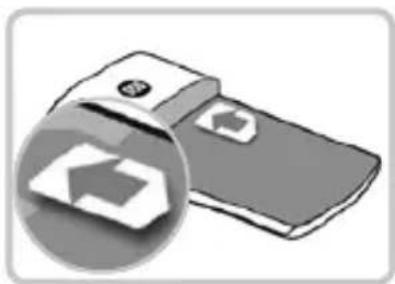
natural_image
Illustration of a smartphone with an open button and download icon (no text or symbols)- Remove the battery cover.
- Slide the SIM card into the SIM card holder with the gold contacts facing down.
> Inserting and charging the battery
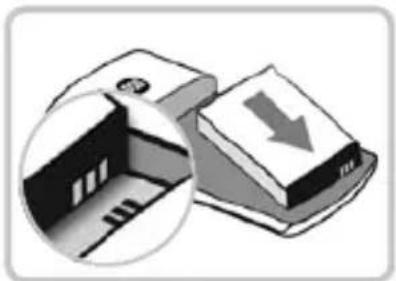
natural_image
Illustration of a computer monitor with an open screen and a download arrow, showing internal components (no text or symbols)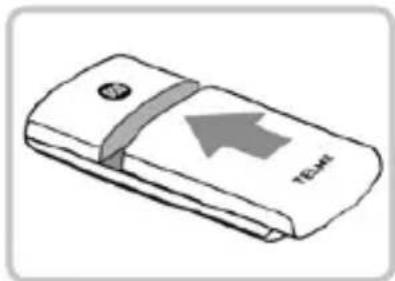
natural_image
Illustration of a USB flash drive with an arrow indicating leftward motion (no text or symbols)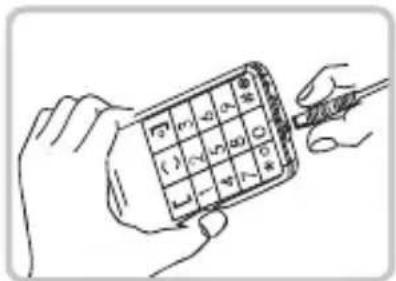
- Insert the battery, making sure that the battery contacts touch the phone's gold contacts.
- Slide the battery cover into its position over the battery. You will know it is in the correct position when you hear it click into place.
- Plug the charging cable into the USB port on the bottom of the phone.
Attention: Charge the battery for at least four hours before the first time you use it. Only use batteries and chargers that are permitted for use with this specific model.
> Turning on the phone
- Pressing the 🔓 key for at least two seconds switches the phone on.
- To turn the phone off, press the 🔓 key for two seconds again.
> Using a new SIM card for the first time:
Enter the four-digit PIN code (personal identification number)
⇒ Press the left option key ☐ for OK to confirm the code.
You have a maximum of three attempts to enter the correct number. If you enter the wrong number three times in a row, you will only be able to unblock the SIM card with the PUK code. You will find the PIN code and PUK code in the documents supplied by your network operator.
⇒ Use ▲ and □ to select a language.
→ Confirm your selection by pressing the left option key 📄 for OK.
→ Set time
⇒ Press √ to continue.
→ Set date
→ Save your settings by pressing 📄.
> Saving energy
If a few seconds pass without the phone receiving any input from you, the screen will go blank to save energy. In the event of an incoming call or you pressing any key, the screen will automatically light up again. If the keypad is set to lock automatically, the phone will only respond if the green, red or 🔒 key is pressed.
2. USING THE PHONE
In standby mode the phone is on, but is not running any applications (calls, SMS messages, etc.).
> Using the menu
- Opening the menu: When the phone is on standby, press
- Navigating the menu: Use ▲ and □ to flick through the menu and select Contacts, Messages, Settings, FM radio, Calculator, Calendar, Alarm, or Calls.
- Selecting a menu item: Press the left option key ☐ to select the function displayed on the screen (Option, OK, Select, etc.)
- Closing the menu: Press the right option key 📞 to go one step back in the menu or the red key 📞 to return to standby mode.
> Dual-function keys
Some keys have additional functions if they are pressed and held down for a few seconds:
1 key: Listen to your voicemail
* key: Turn the keypad lock on or off in standby mode.
# key: Turn silent mode on or off.
3. CALLS
> Incoming call
- To answer: Press the green key 📋.
- To reject: Press the red key 📞.
- To mute the ringtone temporarily: Press the bottom part of the volume button. (The phone will ring again next time it receives a call.)
> Ending a call
Press the red key 🔒.
> Dialling a number
Enter the number (incl. the area code) you want to dial using the keypad. Start the call by pressing 📋 + for a country code, e.g. +49 for Germany, press the ✪ key twice.
> Redialling
When the phone is on standby, press 📄 to view your call history.
⇒ Press ▲ and □ to select a number.
→ Start the call by pressing ↗.
> Hands-free mode
During a conversation, press the right option key 📄 to turn the speaker on or off.
4. CONTACTS
> Opening Contacts:
- When the phone is on standby, press ✅.
- Or press to open the menu
→ Confirm you want to open Contacts by pressing 📞.
> Saving a new contact (name and number):
Select New contact by pressing ↗ and then confirm your selection with 🔒.
→ Select To SIM or To phone to choose the storage location for the number by pressing √ or ▲ and then confirm your selection with 📞 for OK.
→ Enter the name using the keypad (see the section
»Writing a text message« to find out how to enter text).
→ Press √ to continue.
→ Enter the contact's phone number.
→ Press 📋 to open Option.
→ Save the number by pressing
> Searching for a contact (name and number):
- Use √ or to flick through your contacts.
- Or enter the first few letters of the name you're looking for using the keypad.
→ Flick through the selection of entries
that appear by pressing √ or ▲
⇒ Press 📂 to start a call.
> Settings for Contacts:
In Contacts: Option → Storing of contacts
Menu items: Voicemail, Quick dial keys, Extra number, Memory status, Preferred storage, Copy all contacts, Move contacts and Delete all contacts.
> Quick dial keysM1 M2 M3
You can assign quick dial keys to numbers you call often.
- Saving a quick dial key:
Press and hold a quick dial key that has not yet had a number assigned to it for three seconds.
→ Select Enter number or Add from contacts.
- Making a quick dial call:
Press and hold a quick dial key for three seconds.
- Changing a quick dial key:
In the Contacts menu Option Storing of contacts Quick dial keys
5. TEXT MESSAGES
Menu items: Write message, Received, Unsent, Outgoing, Sent, Settings
Writing a message
→ Messages → Write message
Enter text using the keypad.
Each key has several characters assigned to it, which can be selected by pressing the respective key several times.
(E.g. 2x 4, 1x 2x, 3x 5 and 5 for Hall 6)
The symbols available vary according to which language you are using. Press # to change the input method.
abc Lower case only Abc Upper and lower case
ABC Upper case only 123 Digits
Sending a message
Options Send to Select Enter number or Add from contacts. Add an entry or a selection of entries to the list of recipients by pressing 📋. Open Option by pressing 📋 Press 📋 select Send.
Receiving a message
Received messages are indicated by an audio signal and the ☑ symbol.
- To open the message immediately, press the left option key ☐ for View.
- To view your message list, select Messages Received.
6. SETTINGS
6.1 Sound and alerts
In the Settings menu Phone settings Audio profiles.
Select a profile with predefined settings:
- General profile: Tones and the vibration function turned on, visual indicators on the screen
- Silent profile: Only visual indicators on the screen, no ringtone, no vibration function
- Meeting profile: Visual indicators on the screen, device vibrates, no ringtone
- Outdoor profile: Key tones, text message tone and vibration function turned on, ringtone volume is set on maximum
You can personalise the settings for tones, signals and vibration in Audio profiles. For example, open the following in the General profile: Option Adjust
Menu items: Ring and vibrate, Ring type, Ringtone, Ringtone volume, Message, Message signal volume, Key tone volume, System alert
Press ☐ for Option to change settings and then again to save your changes.
6.2 Screen or keypad light
In the Settings menu Phone settings Light Backlight Use the arrow keys to switch between brightness and duration, and the # key and * key to change the values here.
6.3 Automatic keypad lock
In the Settings menu Phone settings Light Auto keylock
- Off: No automatic keypad lock activated
- 15 seconds, 30 seconds or 1 min: If the phone receives no input from you within the selected period when it is on standby, the keypad will lock automatically.
6.4 Voicemail
Enter the number for your voicemail. You will find this number in the documents supplied by your network provider.
- Saving your voicemail number: Press 1 if a number has not been assigned to your voicemail yet.
→ Enter the name and number → Option → Save - Calling your voicemail: Press 1 for three seconds.
- Editing your voicemail number: Select the following in the menu: Contacts Option Storing of contacts Voicemail
6.5 Bluetooth
In the Settings menu → Bluetooth
- Bluetooth: On/off
- Visibility: On/off
- Connect: Search for and manage Bluetooth devices.
- Device name: C151 (predefined at the factory)
6.6 PIN and phone codes
In the Settings menu Security settings
• SIM codes: Use PIN on/off, Change PIN
- Phone code: Use phone code on/off,
Change phone code (factory preset code 1234)
6.7 Reset phone
In the Settings menu → Master reset
All the data stored on the phone and all your personal settings will be deleted.
7. FM RADIO
In the menu FM radio Option
Menu items: Channel list, Manual input and Auto search
Station search
- Manual station search: If you know the frequency of your desired station, set the station using √ and □ or enter the frequency using the number keys after selecting Option → Manual input (use the # key for decimal points).
• Automatic station search:
Select the following: Option Auto search
→ All the stations found will be saved in the Channel list.
- You can flick through saved stations using the * key and # key.
Adjusting the volume:
Use the volume button on the side of the phone. Pressing the top half will increase the volume, while the bottom half will decrease it. This will not work in the Option menu.
Turning the radio on and off:
Press 0.
8. CALCULATOR
Use the arrow keys to select the different calculator functions.
9. CALENDAR
Use the arrow keys to navigate up and down, and the 4 and 6 keys to move to the left and to the right.
10. ALARM
> Setting the alarm time
You can set a maximum of five alarm times. Use ▲ and □ to select an entry, press Edit and select the following settings:
- Status: Use the * key and # key to switch between On and Off. ⇒ Press √ to continue.
- Time: Enter your desired alarm time using the keypad. → Press ☑ to continue.
- Repeat: Open Option and select Once only, Daily, or Days. → Press ☑ to continue.
- Alarm tone: Open Option and select Ringtone. → Press ☑ to continue.
- Ring and vibrate: Use the * key and # key to select Ring only, Vibrate only or Ring and vibrate → Confirm your selection by pressing 🔒.
> Ringing alarm
- Turning off the ringing alarm: Press 📄 for Stop.
- Muting the alarm: Press 📄 for Snooze.
The alarm will ring again after five minutes. The snooze function can be used up to six times.
11. TELME EMERGENCY CALL FUNCTION
You can save up to five emergency numbers (family members and friends).
> Using the emergency call function:
In an emergency, press and hold the emergency button.
This will work even if the keypad is locked.
⇒ A warning tone (pre alarm) will sound for
five seconds, drawing the attention of anyone nearby.
→ The five preset numbers will be dialled automatically
in the order you have saved them in.
At the same time, an emergency call text message will be sent.
This process will be repeated three times.
The phone will not detect whether the emergency call has been answered by a person or a contact's voicemail and will class it as a successful call regardless if the call is answered!
- To cancel the emergency call, press and hold 📞.
- If you do not have any emergency numbers saved, have no credit on your prepaid phone card or are connected to a foreign network without permission (e.g. roaming is not activated), 112 will be dialled when you press the emergency button.
Saving/editing emergency numbers
In the Settings menu SOS settings
→ Emergency numbers
⇒ Select an entry (1-5) you would like to edit.
→ Select Edit.
⇒ Enter the number of your choice
(Enter number or Add from Phonebook.
⇒ Confirm the entry by pressing ☐ for OK.
If you want to add the number of an official institution such as the police or fire brigade as an emergency number, you must check that this is okay with the respective institution beforehand. We do not assume liability for any costs incurred through you calling such an institution by mistake.
Activating the emergency button:
In the Settings menu → SOS settings
→ Status → On or Off
> Safety information
- Turn off the phone in hospitals and whenever you are near medical equipment. There should always be a distance of at least 20cm between pacemakers and the phone when it is on.
- Never try to control a vehicle while holding the phone in your hand. Always comply with relevant national laws and traffic regulations.
- Turn off the phone whenever you are travelling in an aeroplane.
- The phone must be switched off whenever it is near a petrol station or other places with explosive substances.
- Never shine the LED torch in the eyes of people or animals! (Protection class 3)
- To prevent hearing impairments, do not use the phone on a high speaker volume for extended periods of time. Do not hold the phone to your ear when the hands-free mode is activated or the emergency button has been pressed.
- Using a headset on a high volume can cause hearing impairments. Check the volume of the headset you are using.
- The phone and the accessories may contain small parts. Keep the phone out of the reach of young children.
- As a precaution, we recommend disconnecting the phone from the charger during thunderstorms.
- The mains adapter serves as a separator between the product and your mains supply. The mains supply must be close to the device and easily accessible.

> Guarantee
- This guarantee is only valid if the original batteries supplied by TELME have been used.
• Mobile phone: 12 months - Battery: 6 months
> Support
• TELME Service Centre
Industriezeile 36 · 4020 Linz · Austria · www.telme.eu · office@telme.at
• Germany: 0049 (0)180 · 59 13 181
• Austria: 0043 (0)732 · 77 77 17 · 446
• Switzerland: 0041 (0)8484 · 50004
> Intended use
- This phone is robust and designed for mobile use.
However, it still needs to be protected from moisture (rain, bathroom water, etc.) and heavy impacts. - Do not leave it where it will be directly exposed to the sun.
- Using the phone for any purpose other than that described above will result in damage to the product. Doing this also entails hazards such as fire, electric shocks, etc. This product must not be changed or modified, and the casing must not be opened.
- The adapter is only suitable for use in conjunction with a standard household mains socket that is connected to your electrical grid and uses 100-240 volts/50/60Hz (10/16A) of alternating voltage.
> Scope of delivery
- Mobile phone
• Battery: Li-ion 3.7V / 800mAh
• USB cable with USB AC adapter - Charging unit
> Technical data
• Dual-band GSM 900/1800 MHz
• Dimensions: 104mm x 52mm x 12mm
- Weight: 70g
- Battery: Li-ion 3.7V / 800mAh (replaceable)
- Internal antenna: SAR 0.69 W/kg
- Standby time: 200 hrs*
- Talk time: 250 min * (* Depending on network coverage and activated applications the battery life can be reduced.)
> Disposal
- Disposing of the packaging
The packaging and packaging aids are recyclable and should be made available for reuse. - Disposing of the battery
Batteries should never be disposed of as domestic refuse!
As a consumer you are legally required to return used batteries.
They can be handed in at one of your community's local collection points or at specialised stores. - Disposing of the device
If this product ever wears out, please don't dispose of it as domestic refuse. To ensure you don't cause damage to the environment, take it to a collection station or recycling centre where used devices are processed for recycling in an environmentally friendly manner.

13. DECLARATION OF CONFORMITY (DOC)
We, Emporia Telecom GmbH & Co.KG., Industriezeile 36, 4020 Linz, Austria, hereby declare that the construction of the device described in the following complies with the relevant EC directives stated below.
Item description: Dual-band mobile phone
Item number: C151
Relevant EC directives
Low voltage directive 2006/95/EC, taxation directive 2004/106/EC and radio and telecommunication terminal equipment directive 1999/5/EC
Harmonised EN basic and engineering standards
• Health: EN 50332-1:2000; EN 50332-12:2003; EN 50360:2001 +A1:2012; EN 50566:2013; EN 62209-1:2006; EN 62209-2:2010; EN 62479:2010
• Safety: EN60950-1:2006+A11:2009 +A1:2010 +A12:2011 +A2:2013
• EMC: EN 301 489-1 V1.9.2; EN 301 489-7 V1.3.1; EN 301 489-17 V2.2.1) EN 55013:2013; EN 55022:2010; EN 55020:2007+A11:2011; EN 55024:2010
• Radio spectrum: EN 300 328 V1.8.1; EN 301 511 V9.0.2
Eveline Pupeter 18.05.2015, Linz, Austria emporia Telecom
> PANORAMICA DEL CELLULARE
1 Altoparlante
2 Display (schermo)
3 Tasto opzione sinistro
natural_image
Illustration of a mobile phone with a USB flash drive and a gray arrow symbol (no text or labels)
natural_image
Illustration of a mobile phone with an arrow icon, no text or symbols presentnatural_image
Illustration of a computer monitor with an open screen showing a download icon, no text or symbols present
natural_image
Illustration of a mobile phone with an upward arrow and 'NEW' label (no other text or symbols)
natural_image
Illustration of a mobile phone with a USB flash drive and a gray arrow symbol (no text or labels)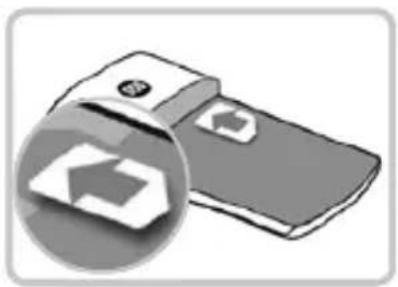
natural_image
Illustration of a mobile phone with an open button and download icon (no text or symbols)natural_image
Illustration of a computer monitor with an open screen showing a download icon (no text or symbols)
natural_image
Illustration of a mobile phone with an upward arrow and 'NEW' label (no other text or symbols)
natural_image
Illustration of a mobile phone with a gray arrow pointing to the right side (no text or symbols)
natural_image
Illustration of a smartphone with an open button and download icon (no text or symbols)natural_image
Illustration of a computer monitor with an open screen showing a download arrow (no text or symbols present)
natural_image
Illustration of a USB flash drive with an arrow indicating leftward motion (no text or symbols)