HS5051DVD - Hi-fi system SALORA - Free user manual and instructions
Find the device manual for free HS5051DVD SALORA in PDF.


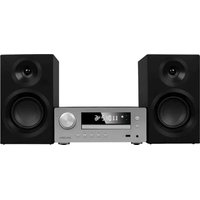
| Product Type | Micro DVD system with DVD player, FM/AM radio, and USB functions |
| Brand | Salora |
| Model | HS5051DVD |
| Power Supply | 100-240 V ~ 50/60 Hz, power consumption 80 W |
| Output Power | 30 W + 30 W (8 ohms) |
| Compatible Disc Formats | DVD, CD, MP3, JPEG, MPEG4, CD-R, CD-RW |
| Connectivity | USB, SCART, S-Video, Composite Video, Component Video (Y/Pb/Pr), Coaxial Audio Output, AUX Input, Speaker Terminals |
| Radio | FM 87.5-108 MHz, AM 522-1620 kHz, 50 presets |
| Remote Control | Infrared, range approx. 5 m, batteries 2×AAA |
| Dimensions (approx.) | Approx. 300 × 250 × 300 mm (W × H × D) |
| Weight (approx.) | Approx. 4 kg |
| Playback Functions | Program play, repeat, random play, zoom, angle, subtitles, language selection |
| Video Resolution | More than 500 lines |
| D/A Converter | 192 kHz / 24 bits |
| CD Ripping | Convert CD tracks to MP3 on USB key |
| Safety | Double insulation, laser class 1, parental lock |
| Maintenance | Clean with a soft dry cloth; do not use liquids or aerosols |
| Spare Parts and Repairability | Contact a qualified technician; identical replacement parts recommended |
Frequently Asked Questions - HS5051DVD SALORA
User questions about HS5051DVD SALORA
0 question about this device. Answer the ones you know or ask your own.
Ask a new question about this device
Download the instructions for your Hi-fi system in PDF format for free! Find your manual HS5051DVD - SALORA and take your electronic device back in hand. On this page are published all the documents necessary for the use of your device. HS5051DVD by SALORA.
USER MANUAL HS5051DVD SALORA
TV Aspect Ratio modi

DVD video

Oudervergrendeling


1. KLANK
2. VOLUME
AM buitenantenne

FM buitenantenne
natural_image
Technical line drawing of a CD-ROM front panel with buttons and ports (no text or symbols)1. PHONE (EMETTEUR)
2. Volume
23 OPEN/CLOSE (OUVRIR/FERMER)
24 DVD
26 FM MODE (MODE FM)
27 SCROLL LEFT (DEFILEMENT VERS LA GAUCHE)
28 ENTER (ENTREE)
29 SCROLL DOWN (DEFILEMENT VERS LE BAS)
30 MEMO (MEMOIRE)
31 PAUSE/STEP (PAUSE/REPRISE)
32 VOL- VOL+
33 PREV BUTTON (BOUTON PRECEDENT)
34 NEXT BUTTON (BOUTON SUIVANT)
35 ZOOM
36 PROG
37 GOTO (ALLER A)
38 TITLE (TITRE)
39 SUBTITLE (SOUS-TITRES)
40 N/P
41 RESUME (REPRISE)
42 REPEAT (REPETER)
43 RETURN (RETOUR)
natural_image
Technical line drawing of a CD-ROM front panel with buttons and ports (no text or symbols)natural_image
Line drawing of a CD-ROM front panel with two speakers and a central display unit (no text or symbols)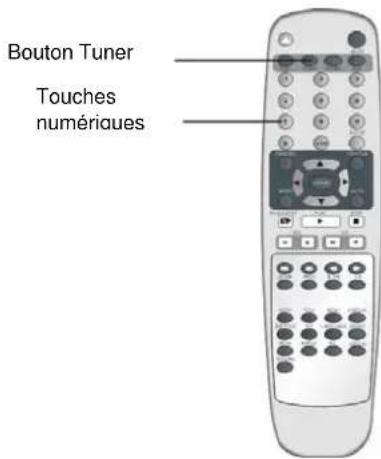
1. Read Instructions
All the safety and operating instructions should be read before the product is operated.
2. Retain Instructions
The safety and operating instructions should be retained for future reference.
3. Water and Moisture
Do not use this product near water for example, near a bathtub, wash bowl, kitchen sink, or laundry tub; in a wet basement; or near a swimming pool; and the like.
4. Ventilation
Slots and openings in the cabinet are provided for ventilation and to ensure reliable operation of the product and to protect it from overheating, and these openings must not be blocked or covered. The openings should never be blocked by placing the product on a bed, sofa, rug, or other similar surface. This product should not be placed in a built-in installation such as a bookcase or rack unless proper ventilation is provided or the manufacturer's instructions have been adhered to.
5. Power Sources
This product should be operated only from the type of power source indicated on the marking label. If you are not sure of the type of power supply to your home, consult your product dealer or local power company. For products intended to operate from battery power or other sources, refer to the operating instructions.
6. Power Cord Protection
Power supply cords should be routed so that they are not likely to be walked on or pinched by items placed upon or against them, paying particular attention to cords at plugs, convenience receptacles, and the point where they exit from the product.
7. Overloading
Do not overload wall outlets, extension cords, or integral convenience receptacles, as this can result in a risk of fire or electric shock.
8. Object and Liquid Entry
Never push objects of any kind into this product through openings as they may touch dangerous voltage points or short-out parts that could result in a fire or electric shock. Never spill liquid of any kind on the product.
9. Servicing
Do not attempt to service this product yourself as opening or removing covers may expose you to dangerous voltage or other hazards. Refer all servicing to qualified service personnel.
10. Damage Requiring Service
Unplug this product from the wall outlet and refer servicing to qualified service personnel under the following conditions:
A) When the power-supply cord or plug is damaged,
B) If liquid has been spilled, or objects have fallen into the product,
C) If the product has been exposed to rain or water,
D) If the product does not operate normally by following the operating instructions. Adjust only those controls that are covered by the operating instructions as an improper adjustment of other controls may result in damage and will often require extensive work by a qualified technician to restore the product to its normal operation.
E) If the product has been dropped or damaged in any way,
F) When the product exhibits a distinct change in performance this indicates a need for service.
11. Wall or Ceiling Mounting
The product should be mounted to a wall or ceiling only as recommended by the manufacture.
12. Heat
The product should be situated away from heat sources such as radiators, heat registers, stoves, or other products (including amplifiers) that produce heat.


THE LIGHTNING FLASH WITH ARROWHEAD SYMBOL WITHIN AN EQUILATERAL TRIANGLE IS INTENDED TO ALERT THE USER TO THE PRESENCE OF UNINSULATED "DANGEROUS VOLTAGE" WITHIN THE UNIT'S CABINET THAT MAY BE OF SUFFICIENT MAGNITUDE TO CONSTITUTE A RISK OF ELECTRIC SHOCK TO PERSONS.

THE EXCLAMATION POINT WITHIN AN EQUILATERAL TRIANGLE IS INTENDED TO ALERT THE USER TO THE PRESENCE OF IMPORTANT OPERATING AND MAINTENANCE (SERVICING) INSTRUCTIONS IN THE MANUAL ACCOMPANYING THE UNIT.

THE MAINS PLUG USED AS THE DISCONNECT DEVICE, THE DISCONNECT DEVICE SHALL REMAIN READILY OPERABLE.

THE APPARATUS SHALL NOT BE EXPOSED TO DRIPPING OR SPLASHING AND THAT NO OBJECTS FILLED WITH LIQUIDS, SUCH AS VASES, SHALL BE PLACED THE APPARATUS.

THE APPLIANCE COUPLER IS USED AS THE DISCONNECT DEVICE, THE DISCONNECT DEVICE SHALL REMAIN READILY OPERABLE.

ALWAYS REMEMBER TO REMOVE THE PLUG FROM THE MAINS SOCKET BEFORE DISCONNECTING THE POWER LEAD FROM THE BACK OF THE UNIT.
WARNING:
TO PREVENT FIRE OR ELECTRIC SHOCK, DO NOT EXPOSE THE UNIT TO RAIN OR MOISTURE. NEVER ATTEMPT TO OPEN THE CABINET, DANGEROUS HIGH VOLTAGES ARE PRESENTED IN THE UNIT. REFER SERVICING TO QUALIFIED SERVICE PERSONNEL.
CAUTION:
TO PREVENT ELECTRIC SHOCK, MATCH WIDE - BLADE PLUG WITH WIDE SLOT AND FULLY INSERT. THE APPARATUS SHALL NOT BE EXPOSED TO WATER AND NO OBJECTS FILLED WITH LIQUID SUCH AS VASES SHALL BE PLACED ON THE APPARATUS.
CAUTION:
THE UNIT EMPLOYS A LASER SYSTEM. TO ENSURE THE PROPER USE OF THE UNIT, READ THIS MANUAL CAREFULLY AND KEEP IT FOR FUTURE REFERENCE. IF THE UNIT REQUIRES SERVICING, CONTACT THE SELLER OR SEE "TROUBLESHOOTING". TO PREVENT DIRECT EXPOSURE TO THE LASER RADIATION, DO NOT OPEN THE CABINET. VISIBLE LASER MAY RADIATE WHEN THE CABINET IS OPENED OR THE INTERLOCKS ARE DEFEATED. DO NOT STARE INTO THE LASER BEAMS.
CAUTION:
THE DVD VIDEO PLAYER IS A CLASS 1 LASER PRODUCT. USE OF CONTROLS OR ADJUSTMENTS OR PERFORMANCE OF PROCEDURES OTHER THAN THOSE SPECIFIED HEREIN MAY RESULT IN HAZARDOUS RADIATION EXPOSURE. AS THE LASER BEAM USED IN THIS DVD VIDEO PLAYER IS HARMFUL TO THE EYES, DO NOT ATTEMPT TO DISASSEMBLE THE CABINET. REFER SERVICING TO QUALIFIED PERSONNEL ONLY.
WARNING:
FCC REGULATIONS STATE THAT ANY CHANGE OR MODIFICATION TO THE EQUIPMENT, NOT EXPRESSLY APPROVED BY MAKER OR ITS AUTHORIZED PARTIES, COULD VOID USER'S AUTHORITY TO OPERATE THIS EQUIPMENT.

This symbol indicates that this product incorporates double insulation between hazardous mains voltage and user accessible parts. When servicing use only identical replacement parts.
WARNING: To reduce the risk of fire ore electric shock, do not expose this apparatus to rain or cords.
TABLE OF CONTENTS
Safety Precautions .... 1
Table of Contents ...... 2
About Your DVD Player 3
Front and Back panels 4
Front Panel....4
Back Panel.... 5
Remote Control 6
Operating the remote control.... 7
Connections.... 8 9 10 11
Connecting power supply 12
Basic DVD operation 13 14 15
Playing the radio.... 16
MPEG4/ MP3 PLAYBACK.... 17
FUNCTION OF USB.... 18
CD RIPPING FUNCTION 18
SYSTEM Setup....18 19 20 21 22 23
LANGUAGE Setup 24 25
AUDIO SETUP.... 26
VIDEO SETUP 27 28
SPEAKER Setup 29
DIGITAL Setup 30
Trouble shooting.... 31
Technical specifications 32
Disc formats supported by this player:

MPEG4 files on discs

Multi-angle

Dolby Digital

Subtitle choices

KODAK picture CD

Audio choices

MP3 files on CD-R/CD-RW

TV Aspect Ratio modes

DVD video
Parental Lock


You can help protect the environment!
Please remember to respect the local regulations: hand in the non-working electrical equipments to an appropriate waste disposal center.
This product incorporates copyright protection technology that is protected by method claims of certain U.S. patents and other intellectual property rights owned by Macrovision Corporation and other rights owners. Use of this copyright protection technology must be authorized by Macrovision Corporation, and is intended for home and other limited viewing uses only unless otherwise authorized by Macrovision Corporation. Reverse engineering or disassembly is prohibited.
The product complies with the KODAK Picture CD format and will display KODAK Picture CDs. The "KODAK Picture CD Compatible" logo is a trademark of Eastman Kodak Company and is used with permission.
Manufactured under license from Dolby Laboratories. "Dolby" and the double-D symbol are trademarks of Dolby Laboratories. Confidential Unpublished Works. C 1992-1997 Dolby Laboratories, Inc. All rights reserved.
Front Panel Functions

1. PHONE
2. VOLUME
Use this button to control the unit's volume. It controls 2 channels simultaneously.
3.▲ OPEN/CLOSE
Use this button to open and close the disc tray while in DVD mode.
4.▶II PLAY/PAUSE
Use this button to begin play function while in DVD mode. Use this button to pause play function while in DVD mode.
5. PREV
While in the DVD status, you may press this button for previous track.
6.▶ NEXT
While in the DVD status, you may press this button for next track.
7. ➞ INPUT SIGNAL SOURCE
Use this button to select the proper input signal source. (Note: The selected input will correspond to the selected input terminal on the rear panel.)
8. POWER
9. USB CONNECT
Use only USB Memory Device
Back Panel Functions

1. FRONT/MAIN
Use to connect the four terminals of the left and right front or main speakers.
2. AUX INPUT
Use to connect input for auxiliary music source.
3. LINE OUT
4. COAXIAL DIGITAL AUDIO OUTPUT
5. COMPONENT VIDEOS OUTPUT (Y, Cr/Pr, Cb/Pb)
6. VIDEO OUTPUT
7. S-VIDEO OUTPUT
8. SCART IN/OUT
9. ANTENNA
Use to connect the provided indoor FM and AM loop antennas.
10. 100 - 240 \~ 50/60Hz
This unit comes with an AC power cord. Be sure its prongs are dry before plugging it into an electrical outlet. Take caution not to overextend the cord or walk on it.

1 MUTE
2 AUX
3 SCART
4 0-9 NUMBER KEYS
5 SETUP
6 PRE/TUN
7 SCROLL UP
8 SCROLL RIGHT
9 AUTO
10 STOP
11 PLAY
12 CH-CH+
13 FWD
14 REV BUTTON
15 A-B
16 SLOW
17 DISPLAY
18 MENU (PBC)
19 ANGLE
20 LANGUAGE
21 VIDEO
22 R/L
23 OPEN/CLOSE
24 DVD
25 TUNER
26 FM MODE
27 SCROLL LEFT
28 ENTER
29 SCROLL DOWN
30 MEMO
31 PAUSE/STEP
32 VOL- VOL+
33 PREV BUTTON
34 NEXT BUTTON
35 ZOOM
36 PROG
37 GOTO
38 TITLE
39 SUBTITLE
40 N/P
41 RESUME
42 REPEAT
43 RETURN
Battery Installation
- Push down and out on the battery Compartment cover to remove it.
- Insert the two "AAA" batteries into the battery compartment of the remote control, making sure the + and - signs on the batteries and inside the batteries compartment match up.
- Replace the battery compartment cover.
Notes:
- Do not mix batteries from different manufacturers, nor old ones with new.
- If the remote control will not be used for an extended period of time, remove the batteries to prevent damage-causing corrosion.
- Remove dead batteries immediately to prevent damage-causing corrosion.
- If battery leakage occurs, wipe the battery liquid from the battery compartment, then replace both batteries.
● Always replace both batteries at the same time, using new, fully charged batteries.
● Life expectancy of batteries may vary depending on amount of use.
Using the Remote Control
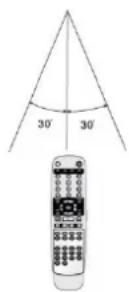
Point the remote control at the remote sensor. (The pictures below are for reference only.)
Notes:
- Point the remote control directly at the player's remote sensor.
- Do not leave the remote control in an extremely hot or humid place.
- Do not spill water or put anything wet on the remote control.
- Battery life is \~1 year under normal conditions.
Notes:
- Do not direct the remote sensor toward any light source, such as direct sunlight or a strong fluorescent light, as it may cause the unit to not operate correctly.
- When other remote controls are used nearby or when the remote is used near equipment using infrared rays, interference may occur.
- Placing an object on the remote control may cause it to inadvertently depress a button, changing a function and shortening battery life.
- Do not glaze the front of the DVD receiver with colored glass, as it may cause interference with normal operation of the controller.
- Make sure there is no barrier between the remote control and remote sensor, as it could prevent the unit from receiving the signal.
- Do not spill water or put wet items on the remote control.
- Never disassemble remote control.
Connections
Connecting the System
It is recommended that you turn off all components (or unplug AC power) while you are connecting the system.
1 - Connect TV
Composite Video
Connect the video cable from the Video Out jack on the back panel of the DVD system to your television's Video In jack.
S-Video
For better video quality, you can connect the system to your TV with a S-Video cable (not included).
Connect the S-Video cable from the S-Video Out jack on the back panel of the system to your television's S-Video In jack.
SCART Video
You can connect the system to your TV with a scart cable. Set the [Video Type] to [TV-RGB].
Y/Pb/Pr
Use the COMPONENT Cable (not supplied) to connect DVD system to your TV. Set the [Video Type] to [YUV]. If the TV set supports P-Scan function, you can set [Video Type] to [Y, Pb, Pr].
2 – Place Speakers
For the best result, arrange the 2 speakers as shown in your listening area:
Front Speakers (L, R)
Align the front speakers at ear level and at a horizontal angle of 45 degrees to the primary listening area.

-
TV set or screen
-
Front or main right speaker
-
Front or main left speaker
-
Viewer's location
3 – Connect Speakers
1) Make sure the power is turned off to prevent possible damage to the system.
2) Connect the speakers' wires to the connectors on the back panel of the DVD system.
3) To insert a speaker wire, press down the thumb levers, fully insert each tip of the wire into its connector, and then release the thumb levers to lock the wire in place.
CAUTION – To prevent damage to circuits, do not short-circuit the positive and negative speaker output jacks. Make sure the exposed tips of each speaker wire are separated to the distance that they cannot touch each other after they are inserted into the connectors.
- Do not connect any other speakers or devices that are not included with this system.

4 - Connect AM Loop Antenna
1) Assemble the supplied AM loop antenna by rotating the base and snapping it into place.
2) Connect the two wires from the AM loop antenna to the AM antenna connector on the back panel.
Press down the thumb levers to insert each wire, and then release the thumb levers to lock the wires in place.
- To prevent noise pickup, keep the AM loop antenna away from the system and other components.
5 - Connect FM Wire Antenna
1) Connect the supplied FM wire antenna to the FM antenna connector on the back panel.
2) Be sure to fully extend the FM wire antenna. Make use of the small loop at the free end of the antenna to maintain its position.
3) If noise or interference occurs, use an external antenna with a 75 ohm coaxial cable (not included).

Outdoor AM antenna

Outdoor FM antenna
6 – Connect External Audio
The back panel of the DVD system provides.
1 AUX IN
Connect to an external stereo audio input.
2 Line Out
Connect to the inputs of external Audio System.
3 COAXIAL Out
Connect to an external audio decoder.

Before plugging the power cord into the AC outlet, check to make sure all of the connections have been properly completed. When they have been, carefully plug power cord into outlet.
Press the POWER button on the front panel to power the unit. The display panel will light.
When the unit is initially powered, a brief surge of electricity may cause interference with other electronic equipment on the same circuit. If this occurs, connect the unit to an outlet on a different circuit.
Chapter 1 Basic Operation
1. Turn On the TV and Your DVD Receiver
Press the Power button on the player or the remote controller, and "Read" appears on the TV screen. If there hasn't a disc in the DVD player, "No disc" will be displayed on both the screen and the VFD.
2. Place A Disc
Press the Open/Close button on the remote controller or the front of the DVD player, and "Open" appears on the screen. Then place a disc gently into the tray with the disc's label facing up (double-sided discs have content on both sides, so you can place either side up), and press the Open/Close button again to close the disc tray. "Close" appears and the player stars to read. Then the disc starts playing automatically.
(Note: Of some certain type discs, after reading out the type, the Play or Enter button should be pressed to start playing.)
3. Play
The contents of each disc menu vary according to how the disc was authored and what features are included. The disc menu will be turned on for you to select, when Menu button pressed. Also play and pause can be switched with the Pause button on the remote. Moreover, such as menu play, title play, sequence play etc., these different play modes are offered.
a) Menu Play (compatible with DVD, SVCD, VCD2.0 discs)
I. Press Menu button
- TV screen displays the DVD Rood Menu when a DVD disc is loaded.
- PBC is initialized on when a SVCD or VCD2.0 disc is loaded.
II. When a DVD disc is loaded, you can press Arrow buttons to highlight the menu item you want to choose;
III. Press Enter or Play button, you can begin play with the highlighted.
IV. Return when playing: When a DVD disc is playing, press Menu (PBC) button, and you can return to Rood Menu; As SVCD, VCD2.0, and PBC is on, press Return button, you can return to the menu.
V. Stop
1) Press STOP once during playback to stop and hold playback.
2) Press PLAY to resume playback from the point you pressed STOP.
3) Press STOP twice to stop playback completely.
For the disc protection, before you press Open/Close button to eject the disc tray when playing, please press Stop button at first. After taking out the disc,
- Press Open/Close again to close the tray.
- If you're going to use the DVD player for a long time, be sure to remove the electronic plug.
b) Title Play (compatible DVD discs only)
I. During DVD playback, press Title button to display the DVD title content.
II. Press the Arrow buttons to highlight the title you want to choose, and press Enter; Also you can press numeric buttons to choose.
III. The DVD player begins with the chapter 1 of the chosen title.
c) Sequence Play
I. When a SVCD or VCD disc is loaded and MENU(PBC) is on, once MENU(PBC) button pressed, MENU(PBC) button switches off. Then the player can play in sequence playback mode; when MENU(PBC) button pressed twice, MENU(PBC) switches on.
II. Except for SVCD or VCD discs, in the stop state, when press Play button, the player then enters sequence playback mode. This feature is effective to all the compatible discs.
d) Program Play
The Program Playback option allows you to enter the order in which you want chapters or tracks to play, maximum to 16.
- Program Menu
DVD, MP3, JPEG discs:
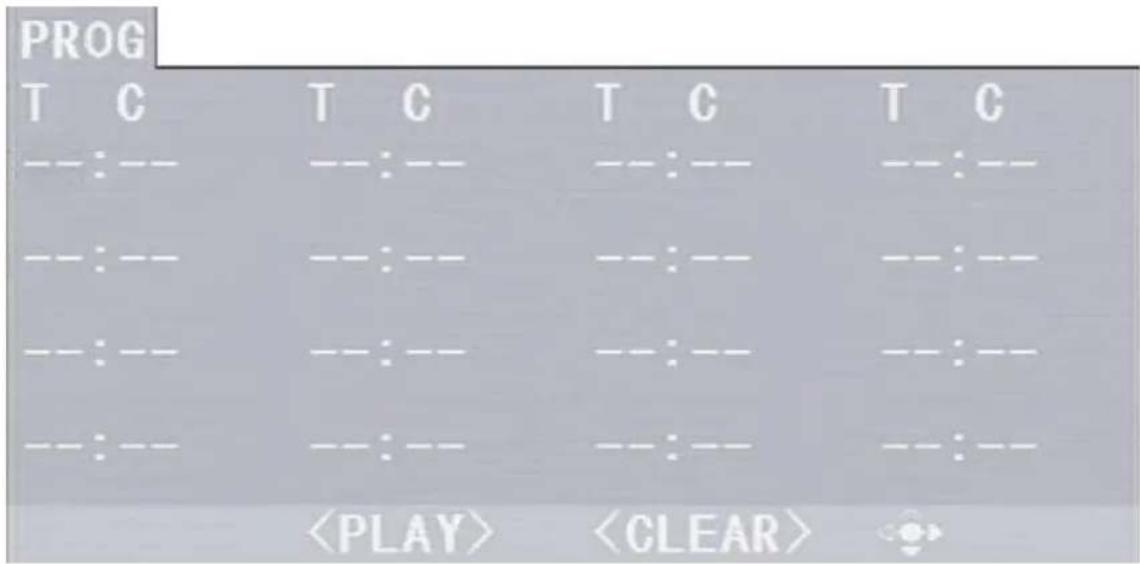
* If PBC is on, this operation will turn PBC off while the chapters / tracks plays in programmed order.
- According to the highlight, use the Numeric buttons to enter the chapters / tracks in the order you want them to play. Then press Play or use Arrow buttons to highlight the "PLAY" item and press Enter. The chapters / tracks will play in the programmed order.
* You can program maximum 16 titles / chapters / tracks. - According to the Direction Indicator on the menu, you can press Arrow buttons to highlight where you want to enter.
- During Program Playback, if Program button pressed, the programmed order and the contents will be displayed on the screen, and the Program Playback will be stopped; Also you can press Stop and Play to resume normal playback.
Notes:
* To clear the programmed order, use Arrow buttons to highlight the "CLEAR" item, then press Enter.
* To modify the programmed order, use Arrow buttons to highlight the modifying item and enter the new chapter / track you want to program directly.
Selecting Sound Source Volume Control
- Press any function button (Tuner Scart, AUX) to select the desired sound source.
The appropriate symbol will appear in the display.
- When the AM/FM tuner button is pressed, the last station listened to will play.
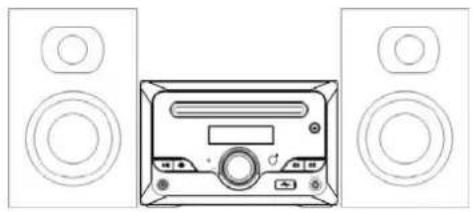
The volume may be adjusted by either turning the large volume knob on the front panel or using the appropriate volume button on the remote control.
Mute
Pressing the MUTE button temporarily mutes every speaker. To resume audio, press MUTE button again.
natural_image
Line drawing of a CD-ROM device with two speakers and a front panel (no text or symbols)Basic Operations
- Press TUNER button to select desired wave band (AM or FM).
- Press CH+ or CH- button to find a station. The frequency will change with each press. When a station's signal is received, it will appear in the display.
- To lock onto a station quickly, hold the CH+ or CH-button for two seconds. The unit will start automatic tuning. When a station is found, automatic tuning stops.
- To listen a frequency-known station, you can input the station frequency directly by pressing the number keys one by one in tune state.
- To add a station to memory, press the MEMO button. The memory storage number will blink for four seconds in the display. Press MEMO again to store the station.

Wave band Station frequency
- To reduce noise when an FM-stereo program has been received, press the FM mode button. The word STEREO will disappear from the display. The program is now heard in monographic form, reducing the noise. To resume stereo play, press the FM mode button again.

Automatic Tuning
This unit will store up to total 50 AM or FM radio stations in its memory.
- Press the AUTO/SCAN button. The automatic tuning mode is activated.
- Stations will be stored in ascending order until 50 stations of that particular wave band have been saved. When a station is stored, the memory storage number, as well as the station's frequency, will flash for four seconds in the display.
- When the total number of stations reaches 50, in a particular wave's (AM or FM) memory, no further station in that wave band will be saved.
Press the TUNER button to select the desired wave band
- To play preset stations
- Press the PRESET/TUN button.
- Press any of the numbered buttons to select the desired station's memory number. For example, to play the station at memory #5, simply press the 5 button; for memory #17, press the 1 button followed by the 7 button.
- Stations in the memory function may also be accessed by pressing the CH- or CH+ button.
RDS Function
If there is "RDS" radio station in your area, when you tune on that radio, you can choose different kind of "RDS" information by pressing "RDS" key on the Remote Control.
When a MPEG4 and a Mp3 disc is loaded, the screen will display as follows:
![[EN]I BelieveE.MP3 Current directory name 01.- 02.CH 03.EN The playing file is a MP3 audio file. Current directory name [ - ]D01_DIVX1_.AVI The playing file is a MP3 audio file. Current MP3/JPEG file name. If a JPEG file is playing, the name should have a JPEG extension. File Switch Region: Displays the file type of the playing and the switching. The playing file is a JPEG picture file. Current MP4 file name. If a JPEG file is playing, the name should have a JPEG extension. File Switch Region: Displays the file type of the playing and the switching. The playing file is a JPEG picture file.](/content/2026/02/396205/images/8302c719d5607028b65ed779ae2242708e53bf67337a0250892cd1273a763b28.jpg)
Press △□ to select the file when the cursor appears in the file window.
Press enter to play the current file selected by the cursor.
Press ◇◇ to switch between the directory window and the file window.
Note: The player will not function correctly under the following condition:
- The disc is badly scratched, damaged or dirty.
- The disc is not finalized.
- The recording format is not supported by the player.
USB Interface
This unit have a USB jack, when no disc in the player, you can insert a USB DISC or a Mp3 Player with USB Interface to play the Mp3 music or and JPEG files. All the function is the same to play a disc. When the disc is in the player, user can enjoy USB by selecting USB in the SYSTEM SETUP - SOURCE. Not all USB Device can be supported by this system.
NOTE:
When using USB function, please do not insert in the wrong direction, or it will be corrupted.
CD RIPPING FUNCTION
During CD playback, you can encode music file from CD to MP3 file and record it in USB MEMORY.
- Insert CD disc and connect USB Memory Device to USB Port of DVD player. The USB Memory Device may need to be formatted in advance.
- Select and playback desired CD track you want to encode, and then, press "SUBTITLE" button in remote controller to start CD RIPPING function. Information will be shown in TV accordingly and selected track song is recorded as MP3 FILE in USB Memory Device.
- Everytime you press "SUBTITLE" button, only current track file is recorded as MP3 FILE in USB Memory Device. To record other music file, select and play desired CD track again, and press "SUBTITLE" button.
SYSTEM SETUP
1. General Steps of Setup Menu
a) Press the setup button. The main setup menu appears.

b) Press the Left and Right arrow buttons to highlight the icon of the desired page, then press the Down or Right arrow button to activate that page; For example, if you want to setup the video page, press Right to highlight the video icon, the video page will be displayed on the screen.

c) Press the Down arrow button to highlight the desired option. Press Enter or press Right to select, the choices of that option appear on the right; For example, press the Down arrow button to highlight the BRIGHTNESS option, then press Enter to select, the brightness choices appear on the right.

d) Press the Arrow buttons to highlight the Exit setup option, then press Enter or Setup again to exit Setup Menu.
2. Setup Items Introduction
1) SYSTEM SETUP
The system setup options are illustrated below:
SOURCE
There are 2 kinds of sources illustrated below.
USB can be selectable when the USB device is connected.

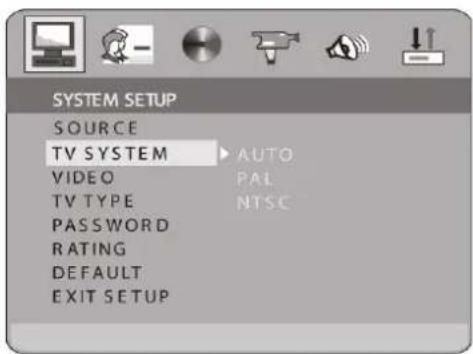
TV SYSTEM
According to the Color System of the TV, you can choose the TV system.
VIDEO
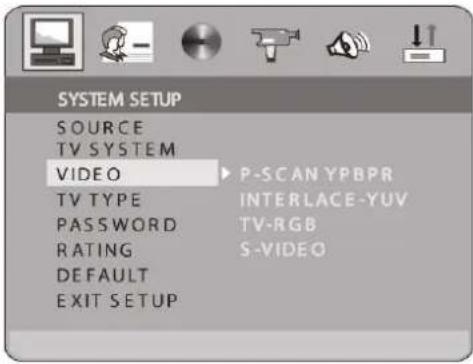
According to the output jack of TV set, you can choose S-VIDEO, YUV, RGB, P-SCAN YPbPr.
Notes: Only choose P-SCAN if your DVD player is connected to a Progressive Scan TV with Y, Cb, Cr cables.
TV TYPE
According to the TV type, you can choose 16:9, 4:3LB or 4:3PS.

◆ PASSWORD
The password option is initialized locked, and you cannot set the ratings limit or change the password. In order for the Ratings feature work, the password mode must be turned on. If you want to set the ratings limit, you will need to enter the default password, which is 6666, then press Enter to confirm. To change the password, you will be prompted for the old password, then be prompted for a new. Enter a 4-digit number (this is your password).
Note: When you select "Restore the Default" password is also reset to default 6666.

RATING
The rating feature is a rating limit system, like movie ratings. It works with DVD discs that have been assigned a rating. This helps you control the types of DVDs that your family watches.

◆ DEFAULT
Choose this option to resume all the setup options to default settings.

2) LANGUAGE SETUP
The language setup options are illustrated below:
◆ OSD LANGUAGE
Highlight the OSD LANGUAGE option, and press the Arrow buttons to choose the OSD language you prefer. Press Enter to confirm, and it will display OSD in that language;

AUDIO LANGUAGE
Highlight the AUDIO LANG option, and press the Arrow buttons to choose the audio language you prefer. Press Enter to confirm. If the disc you are playing has that language available, it will output audio in that language;

◆ SUBTITLE LANGUAGE
Highlight the SUBTITLE LANG option, and press the Arrow buttons to choose the subtitle language you prefer. Press Enter to confirm. If the disc you are playing has that language available, it will display subtitles in that language;
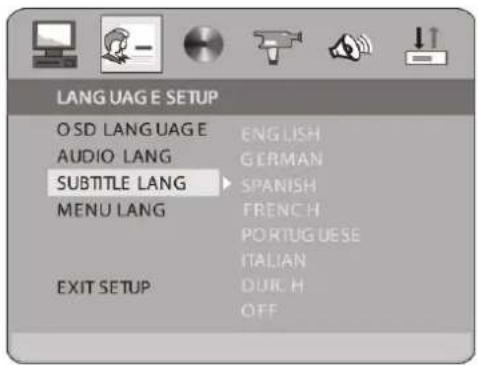
◆ MENU LANGUAGE
Highlight the MENU LANG option, and press the Arrow buttons to choose the menu language you prefer. Press Enter to confirm. If the disc you are playing has that language available, it will display menu in that language;
Notes;
If your preferred language isn't available, the disc's default language will be played.

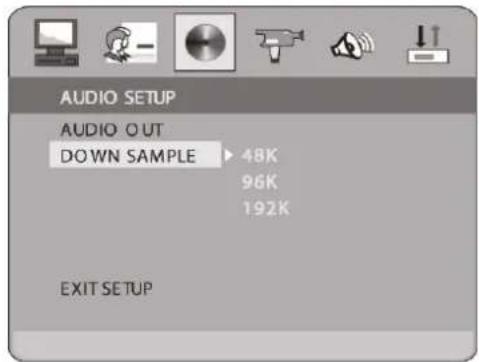
3) AUDIO SETUP
The audio setup options are illustrated below:
◆ AUDIO OUT
Highlight the AUDIO OUT option, and press the Arrow buttons to choose the audio output mode you prefer. Press Enter to confirm; There are 3 optional audio output modes: SPDIP/OFF, SPDIF/RAW and SPDIF/PCM.
- SPDIF/RAW: Choose this setting if your DVD player is connected to a power amplifier with a coaxial cable or an optical cable;
- SPDIF/PCM: Choose this setting if your DVD player is connected to a 2-channel digital stereo amplifier;

♦ DOWN SAMPLE
When playing LPCM format file and connecting the DVD to the Power Magnify System through Coaxial connector, you have to adjust the audio frequency sampling rate to output the best audio effect.
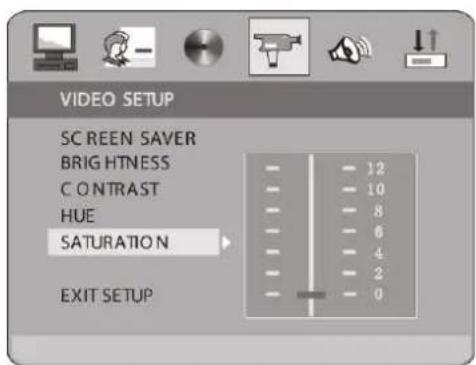
4) VIDEO SETUP
◆ SCREEN SAVER
If the screen saver is on, when your DVD player is I Stop, Open or No Disc state, or there is a frame frozen for more than 60 sec, the screen aver will be displayed. This feature can protect the screen from damage.
- ON: Choose this setting to activate the screen saver.
- OFF: Choose this setting to cancel the screen saver.
The default setting is ON.

◆ BRIGHTNESS
Use the Up and Down arrow button to move the scroll and adjust the brightness.

CONTRAST
Use the Up and Down arrow button to move the scroll and adjust the contrast.

◆ HUE
Use the Up and Down arrow button to move the scroll and adjust the hue.

SATURATION
Use the Up and Down arrow button to move the scroll and adjust the saturation.
5) SPEAKER SETUP
The speaker setup options are illustrated below:
♦ DOWN MIX
- LT / RT: Choose this setting, it will sound like in a movie theatre if the original movie the disc was recorded from was encoded in the Pro Logic Dolby Digital format.
- STEREO: Choose this setting, when 5.1-channel sound playing, two channels of signals will be output from the left and right soundtrack; when 2-channel sound playing, stereo signal will be output.

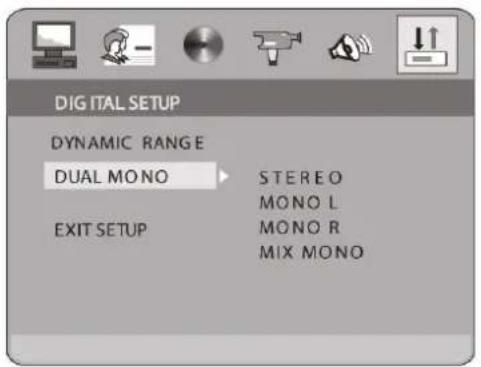
6) DIGITAL SETUP
◆ DYNAMIC RANGE
When the LINE OUT is selected, choose this setting to adjust the line out ratio for different effects.

◆ DUAL MONO (LEFT + RIGHT)
Choose this option to set up the L and R mono output mode; There are four modes in this option: STEREO, MONO L, MONO R and MIX MONO.
REFERENCE:
- To protect your DVD player, the interval between two consecutive Power button operations must be above 30 seconds.
- If not using a period of time, please pull out the plug from the electronic outlet.
- The player should be operated only on condition that the type of power supply corresponds to the making label. Otherwise, it doesn't work or even be damaged.
● The player may not be compatible with some encrypted discs.
This handy trouble-shooting guide is provided to save your time in case you experience any inconvenience with this DVD player.
Problem / Possible Solution
No power
- Check to ensure that the power plug is securely in the wall outlet.
No sound
- Check the connection between the DVD player and the TV set, amplifier, or any other unit it is connected to.
- Check to ensure the TV and amplifier are in the correct mode.
No picture
- Check the connection between the DVD player and the TV set or any other unit it is connected to.
- Check to make sure TV is turned on.
Disc does not play
- Check to make sure the disc is loaded correctly label side facing up on disc tray.
- Check that disc is clean from dirt, dust, fingerprints, and smudges.
- Check to ensure disc is with in the guides on the tray.
- Check if parental lock function is on.
- Make sure disc is for use in region.
Remote does not work
- Check batteries; possibly replace.
- Check to ensure there isn't any obstacles between the remote sensor on the unit's front panel and the remote control.
- Be sure the remote is aimed at the remote sensor.
Divided picture
- Check that disc is clean and has no scratches.
- The unit is controlled by a micro computer, which may need to be reset. Turn off the unit's power, wait several seconds, then turn back on.
No color picture
- Check to see if the connector is damaged (bent pin).
DVD Player
| TV System | NTSC/PAL | Tuning Range | 522-1620KHz |
| Compatible Discs | MPEG4, DVD, CD, MP3,CD-R, CD-RW | S/N Ratio | 35dB |
| THD | 3% | ||
| Resolution Ratio | Greater Than 500 lines | ||
| Video S/N Ratio | 65dB | Amplifier | |
| Frequency Response | fs (96KHz/24bit) | Output Power: | 30W+30W (8 ohm) |
| 4 Hz - 4 4 KHz: +/- 2 dB | Frequency Response: | 200Hz-20kHz +/- 3dB | |
| Audio S/N Ratio | 95dB | ||
| Degree of Distortion | <0.01% | S/N Ratio | >76dB |
| D/A Converter | 192KHz/24bit | Input Sensitivity | 350mv, 47k |
| Video Out | 1Vp-p | Channel Resolution | >30dB (Normal) |
| S-Video Out | Y: 1Vp-p(75 ohm) | ||
| C: 0.3Vp-p(75 ohm); | Remote Control | ||
| Audio Out | 2.0 V + 0/- 1 V | Transmitter | Infrared Ra |
| Signal Range | Approximately 5m | ||
| Digital Audio Output | CoPower I Source | 2 "AAA" Batteries | |
| Connections | Scart, USB, CVBS | ||
| S-Video, 2 Channel Output | General | ||
| Power Supply | 100-240V ~ 50/60HZ | ||
| FM Tuner | Consumed Power | 80 W | |
| Tuning Range | 87.5-108 MHz | ||
| S/N Ratio | >46 dB | ||
| Monophonic | >46dB | ||
| Stereo | >50dB (DIN) | ||
| Selectance | 50dB | ||
| THD | |||
| Monophonic | 2% | ||
| Stereo | 3% | ||
| Frequency Response | 30Hz-10kHz +/- 1dB | ||
| Stereo Resolution | 35dB (1kHz) | ||
| 30dB (100Hz-10kHz) | |||
Designs and Specifications are subject to change without notice.
SALORA
DVD Mini Combo System+UKW Radio+USB+MPEG-4
HS5051DVD
Bedienungsanleitung

natural_image
Black audio recording device with speaker, digital display, and speaker tower (no visible text or symbols)L/R (Linker/rechter Audio-Kanal)....22
KODE (PASSWORD) – Password....31
KLASSIFIKATION (RATING) Kindersicherung (Rating)......31
MENÜ VERLASSEN (EXIT SETUP)....32
Spracheinstellungen (LANGUAGE SETUP) 32
natural_image
Two gray electronic components with internal wiring, shown from top and bottom views (no text or symbols visible)Anmerkungen:
natural_image
Pure electrical circuit lines without any symbolsL/R (Linker/rechter Audio-Kanal)
natural_image
Front view of a remote control with keypad and scroll (no visible text or symbols)
natural_image
Line drawing of a two-tiered audio amplifier with speaker units and control panel (no text or symbols)KODE (PASSWORD) – Password

Anschlüsse: USB, CVBS, S-Video, Output
UKW Tuner
Abstimmbereich:
87.5-108MHz
S/N Verhältnis
46dB
Mono:
46dB
Stereo:
50dB (DIN)
Selectance:
50dB
THD:
Mono:
2%
Stereo:
3%
natural_image
Simple line drawing of a classic telephone handset and keypad (no text or symbols)Herstellergarantie:
- KLANK
- VOLUME
- PHONE (EMETTEUR)
- Read Instructions
- Retain Instructions
- Water and Moisture
- Ventilation
- Power Sources
- Power Cord Protection
- Overloading
- Object and Liquid Entry
- Servicing
- Damage Requiring Service
- Wall or Ceiling Mounting
- Heat
- WARNING:
- CAUTION:
- TABLE OF CONTENTS
- Front Panel Functions
- PHONE
- 3.▲ OPEN/CLOSE
- 4.▶II PLAY/PAUSE
- PREV
- 6.▶ NEXT
- ➞ INPUT SIGNAL SOURCE
- POWER
- USB CONNECT
- Back Panel Functions
- FRONT/MAIN
- AUX INPUT
- LINE OUT
- COAXIAL DIGITAL AUDIO OUTPUT
- COMPONENT VIDEOS OUTPUT (Y, Cr/Pr, Cb/Pb)
- VIDEO OUTPUT
- S-VIDEO OUTPUT
- SCART IN/OUT
- ANTENNA
- 100 - 240 \~ 50/60Hz
- Battery Installation
- Notes:
- Using the Remote Control
- Connections
- - Connect TV
- Composite Video
- S-Video
- SCART Video
- Y/Pb/Pr
- – Place Speakers
- Front Speakers (L, R)
- – Connect Speakers
- - Connect AM Loop Antenna
- - Connect FM Wire Antenna
- – Connect External Audio
- Chapter 1 Basic Operation
- Turn On the TV and Your DVD Receiver
- Place A Disc
- Play
- a) Menu Play (compatible with DVD, SVCD, VCD2.0 discs)
- b) Title Play (compatible DVD discs only)
- c) Sequence Play
- d) Program Play
- Selecting Sound Source Volume Control
- Mute
- Basic Operations
- Automatic Tuning
- Press the TUNER button to select the desired wave band
- RDS Function
- USB Interface
- NOTE:
- CD RIPPING FUNCTION
- SYSTEM SETUP
- General Steps of Setup Menu
- Setup Items Introduction
- 1) SYSTEM SETUP
- SOURCE
- TV SYSTEM
- VIDEO
- TV TYPE
- ◆ PASSWORD
- RATING
- ◆ DEFAULT
- 2) LANGUAGE SETUP
- ◆ OSD LANGUAGE
- AUDIO LANGUAGE
- ◆ SUBTITLE LANGUAGE
- ◆ MENU LANGUAGE
- 3) AUDIO SETUP
- ◆ AUDIO OUT
- ♦ DOWN SAMPLE
- 4) VIDEO SETUP
- ◆ SCREEN SAVER
- ◆ BRIGHTNESS
- CONTRAST
- ◆ HUE
- SATURATION
- 5) SPEAKER SETUP
- ♦ DOWN MIX
- 6) DIGITAL SETUP
- ◆ DYNAMIC RANGE
- ◆ DUAL MONO (LEFT + RIGHT)
- REFERENCE:
- Problem / Possible Solution
- No power
- No sound
- No picture
- Disc does not play
- Remote does not work
- Divided picture
- No color picture
- SALORA
- Anmerkungen:
- L/R (Linker/rechter Audio-Kanal)
- KODE (PASSWORD) – Password
- UKW Tuner
- Herstellergarantie:
Brand : SALORA
Model : HS5051DVD
Category : Hi-fi system