BO247 - Oven BOMPANI - Free user manual and instructions
Find the device manual for free BO247 BOMPANI in PDF.
User questions about BO247 BOMPANI
0 question about this device. Answer the ones you know or ask your own.
Ask a new question about this device
Download the instructions for your Oven in PDF format for free! Find your manual BO247 - BOMPANI and take your electronic device back in hand. On this page are published all the documents necessary for the use of your device. BO247 by BOMPANI.
USER MANUAL BO247 BOMPANI
FUNCTIONNEMENT MANUEL
ANNULATION D'UN PROGRAMME
REEMPLACEMENT DE L'AMPOULE DU FOUR
Building the oven into the unit 15
Electrical connection 15
For the user....16 - 19
Using the static electric oven 16
Using the static electric oven Bicomando 16
Using the static electric oven "4 New" 16
Using the electric fan oven.... 16
Using the multifunction electric
oven with 6 cooking programs .... 16
Using the multi-function
electric oven 16
Using the grill 17
Using the rotisserie 17
Using the minute minder 17
Using the digital end-of-cooking
timer 17
Using the single-control
cooking timer.... 17
Using the electronic timer.... 17
Using the "rustic oven" timer / 18
Cleaning and
maintenance.... 18
Cleaning the oven 18
Using the self-cleaning oven 18
Changing the oven light bulb.... 18
Removing the oven door 18
Advice and precautions.... 18
Figures 26 - 28
Introduction
- Thank you for choosing one of our quality products, capable of giving you the very best service. To make full use of its performance features, read the parts of this manual which refer to your appliance carefully. The Manufacturer declines all responsibility for injury or damage caused by poor installation or improper use of the appliance.
- To ensure its appliances are always at the state of the art, and/or to allow constant improvement in quality, the manufacturer reserves the right to make modifications without notice, although without creating difficulties for users.
- When ordering spare parts, inform your dealer of the model number and serial number punched on your appliance's nameplate. The nameplate can be seen when the oven door is opened.
- APPLIANCE COMPLYING WITH THE FOLLOWING DIRECTIVES:
- EEC 73/23 and 93/88
- EEC 89/336 (radio-frequency inter-ference)
- EEC 89/109 (contact with foods)
FOREWORD
- Refer only to the headings and sections covering accessories actually installed on your appliance.
GB Installation technical data
| Usable dimensions | oven |
| Width | cm. 41,0 |
| Depth | cm. 39,4 |
| Height | cm. 31,0 |
| Volume | l. 50 |
HEATING ELEMENT POWERS
bottom element 1.5 kW
top element 0.7 kW
oven circular element 2.0 kW
grill 2.0 kW
fan 25 W
oven light 15 W
Depending on the models, cooker may have:
- Self-cleaning enamelled liners
- Rotisserie
- Mechanical timer
- Digital-clock end of cooking timer
- Single-control end of cooking timer
- Electronic timer
For the ELECTRIC WIRING DIAGRAM see figure 2 at the back of this manual.
The electrical power is stated on the nameplate. The nameplate can be seen when the oven door is opened.
INSTALLATION
The appliance must be installed by qualified staff working in accordance with the regulations in force.
The appliance is produced to EN 60 335-1, EN 60 335-2 and is of built-in type, meaning that it must be installed in accordance with the producer's instructions.
The oven must be installed in a unit having materials (varnishes, finishes, glues, etc.) resistant to a temperature of at least 100^ C. The dimensions of the compartment for built-in installation are shown in Fig. 1.
Pre-fit the 4 screws (see fig. 3) using the tapered holes provided in the front side visible with the oven door open, on the 4 square black spacers, taking care that the tips of the screws just project from the spacer.
Fit the oven into the unit and screw in the screws until completely tight.
If the oven is to be installed close to other household appliances, check that there will be no mutual interference during operation. Their respective electrical connections must be separate.
Suitable ventilation should be assured by means of an opening in the top of the column unit, or an opening of 10 mm above the oven surround. See fig. 1.
CONNECTING TO THE ELECTRICAL MAINS
Before making the connection, check that:
- the mains voltage is as indicated on the nameplate;
- the earth connection is in good working order.
If the socket is not easily accessible, the installation engineer must provide a switch with a contact breaking gap of 3 mm or more.
If the appliance power lead is not fitted with a plug, use an approved standard type, remembering that:
- the green-yellow wire must be used for the earth connection;
- the blue wire is the neutral;
- the brown wire is live;
- the lead must never touch hot surfaces over about 75 degrees C;
- replacement leads must be of type H05RR-F or H05V2V2-F of suitable size (see diagrams in fig. 2).
- if the appliance is supplied without lead, using type H05RR-F or H05V2V2-F cable of suitable size (see diagrams in fig. 2).
IMPORTANT: the manufacturer declines all liability for damage due to failure to comply with the regulations and standards in force. Check that the appliance is correctly connected to the earth (see diagrams in fig. 2 at the back of the manual).
HOW TO USE THE OVEN
STATIC ELECTRIC OVEN
- The oven shelf is designed to take normal oven dishes for cooking sweets or roasts, or is used without a pan for cooking foods under the grill.
- The drip tray is only there to collect any juice from foods and must never be used as a cooking surface.
There is a single control knob for the oven or grill.
Starting from the 0 (off) position, the knob can be turned clockwise to the following settings:
- Symbol: oven lamp on (it will remain on even if the knob pointer is turned to the other settings).
- Setting from 60 to 250 degrees C : oven heat settings, with thermostat control.
- = , or symbol: grill on (in roof of oven)
- symbol: rotisserie start with grill on.
Turn the knob anti-clockwise to return to the 0 (off) position.
N.B. - The yellow light switches on and off as the thermostat is tripped.
Before placing food inside, allow the oven to heat up for at least 10 minutes.
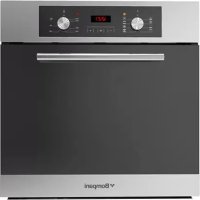
DUAL CONTROL CONVENTIONAL ELECTRIC OVEN
The grid is designed to support commercially-available oven trays for cakes, roasts or meat directly on it for cooking.
The drip pan is provided solely to collect the juices which drip from foods. It must never be used as a cooking dish.
To turn on the oven or grill, use the knob of the □ selector.
Starting from the 0 (off) position, as the knob is turned clockwise the settings available are:
- symbol 🙏: the oven light is switched on (it will always remain on even when the knob pointer is turned to the other settings).
- symbol ☐ or ☐: grill (in top of oven) is switched on.
- symbol 📄, 🌐 roaster switches on with grill on.
- symbol □: oven top and bottom elements switch on (conventional cooking function). To regulate the temperature, use the knob of the thermostat ⚙: oven heat settings rising from 60° to 250°C.
N.B. - The yellow light switches on and off as the thermostat is tripped.
Before placing food for cooking inside, allow the oven to heat up for at least 10 minutes.
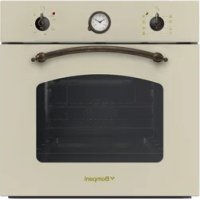
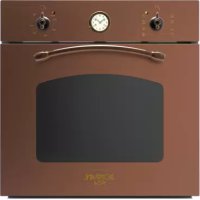
STATIC ELECTRIC OVEN "4 New "
Starting from the 0 (off) position, the knob can be turned clockwise to the following settings:
- symbol 📋: oven lamp on (it will remain on even if the knob pointer is turned to the other settings).
- symbol slow cooking using the bottom element; the oven temperature is regulated using the thermostat knob.
- symbol : conventional "static" oven cooking, the oven temperature is controlled using the thermostat knob.
- symbol : grill on.
ELECTRIC FAN OVEN
- The oven shelf is designed to take normal oven dishes for cooking sweets or roasts, or is used without a pan for cooking foods under the grill.
- The drip tray is only there to collect any juice from foods and must never be used as a cooking surface.
There is a single control knob for the oven or grill.
Starting from the 0 (off) position, the knob can be turned clockwise to the following settings:
- Symbol: oven lamp on (it will remain on even if the knob pointer is turned to the other settings) and operation of the fan.
- Setting from 60 to 220 degrees C : oven heat settings, with thermostat control.
- or symbol: grill on (in roof of oven).
Turn the knob anti-clockwise to return to the 0 (off) position.
N.B. - The yellow light switches on and off as the thermostat is tripped.
Before placing food inside, allow the oven to heat up for at least 10 minutes.
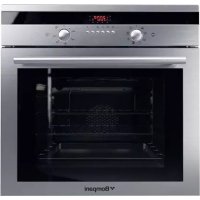
MULTIFUNCTION ELECTRIC OVEN WITH 6 COOKING PROGRAMS
With different heating elements controlled using a selector switch and regulated by a thermostat (from 50 to 250°C), this oven offers various cooking programs. There are three principle sources of heat:
a) Forced heat diffusion (fan oven)
b) Spontaneous heat diffusion (static oven)
c) Infra-red rays (grill)
Starting from the position 0 (off) the selector knob can be turned clockwise to the following positions:
- symbol 📋: oven light and red warning light on
- symbol ☐: oven light and red warning light on, operation of fan.
-symbol = or ○: conventional "static" oven cooking, the oven temperature is controlled using the thermostat knob. - symbol ☒ or ⚙: cooking with fan oven, on one or two levels, the oven temperature is controlled using the thermostat knob.
- symbol ☐ or ☐: grill on (on oven top element), the thermostat knob must be set at maximum temperature.
- symbol ☒ or ⚫: quick cooking using the fan oven, the oven temperature is controlled using the thermostat knob.
In all positions except zero (0) the red warning light and the oven light are on.
NOTE: The yellow warning light comes on according to thermostat variations. Before putting food in to be cooked, the oven should be pre-heated for at least 10 minutes.
- The oven shelf is designed to take normal oven dishes for cooking sweets or roasts, or is used without a pan for cooking foods under the grill.
- The drip tray is only there to collect any juice from foods and must never be used as a cooking surface.
- Remember that cooking times may vary if food is cooked on two shelves at the same time.
MULTI-FUNCTION ELECTRIC OVEN
With different heating elements controlled using a selector switch and regulated by a thermostat (from 60 to 250°C), this oven offers various cooking methods. There are three principle sources of heat:
a) Forced heat diffusion (fan oven)
b) Spontaneous heat diffusion (static oven)
c) Infra-red rays (grill)
Starting from the position 0 (off) the selector knob can be turned clockwise to the following positions:
- symbol ≡, ☐ or ⚙: oven light and red warning light on, operation of fan.
- symbol ☐, ☐ or ☐: conventional "static" oven cooking, the oven temperature is controlled using the thermostat knob.
- symbol ☐, ☐ or ⚫: cooking with fan oven, on one or two levels, the oven temperature is controlled using the thermostat knob.
- symbol 📄, 📋 or 🌐 : traditional oven cooking with fan assistance for cooking on one or more levels; the oven temperature is regulated using the thermostat knob.
- symbol ☐ or ☐ grill on (on oven top element), the thermostat knob must be set at the maximum temperature.
-
symbol = , or : slow cooking using the bottom element; the oven temperature is regulated using the thermostat knob.
-
symbol ☑ or ☒: quick cooking using the fan oven, the oven temperature is controlled using the thermostat knob.
- symbol 📋 or 🌐: slow cooking using fan oven, the oven temperature is controlled using the thermostat knob.
In all positions except zero (0) the red warning light and the oven light are on.
NOTE: The yellow warning light comes on according to thermostat variations. Before putting food in to be cooked, the oven should be pre-heated for at least 10 minutes.
- The oven shelf is designed to take normal oven dishes for cooking sweets or roasts, or is used without a pan for cooking foods under the grill.
- The drip tray is only there to collect any juice from foods and must never be used as a cooking surface.
- Remember that cooking times may vary if food is cooked on two shelves at the same time.
The table below will serve as a guide, bearing in mind that cooking times and temperatures may vary depending on the type and amount of foods cooked and personal taste.
HOW TO USE THE GRILL
- open the oven door;
- place the food on the shelf;
- place the dripping pan underneath the shelf;
- place the dripping pan and shelf on the uppermost level in the oven
- close the door;
- switch on the grill element;
- after a few minutes, turn the food to expose the other side to the infrared radiation (the cooking time depends on the type of food and personal taste).
IMPORTANT: accessible parts may be hot when the grill is in use! Keep children well away.
All cookings must be performed with the door closed.
The table below will serve as a guide; bearing in mind that cooking times and temperatures may vary depending on the type and amount of foods cooked and personal taste.
| Food to be Time (minutes) grilled 1st side 2nd side | ||
| Thin pieces of meat 6 4Fairly thick pieces of meat 8 5Thin fish or fish without scale 10 8Fairly thick fish Sausages Toasted sandwiches Small poultry 20 15 | 15 1212 105 2 | |
HOW TO USE THE ROTISSERIE (Fig. 4)
The rotisserie, which is combined with operation of the grill, is only available for static oven models.
Operation:
- switch on the grill element;
- impale the meat for cooking on the spit and fix it in the centre of the two forks;
- place the small frame for the spit on the oven's ordinary shelf runners, or insert the larger spit support frame in the runners incorporated in the sides of the oven;
- insert the end of the spit into the motor drive socket;
- remove the handle from the spit;
- place the drip tray on the bottom runner of the oven;
- close the oven door;
- start the motor by turning the knob to the spit setting;
- baste the meat from time to time. When cooked, screw the handle onto the spit and remove from the motor drive socket.
CAUTION: The spit forks may have sharp points. Handle with care.
HOW TO USE THE TIMER
Set the cooking time considered necessary by turning the timer knob clockwise. An alarm will sound at the end of the preset time.
USE OF DIGITAL-CLOCK END OF COOKING TIMER (fig. 5)
The timer allows the cooking time in the oven to be set. If food does not need to bewatched, the timer can be used even when the user is absent.
Operation:
- Synchronize the digital clock (in case it is not already set due to temporary power-cuts or other reasons) pressing and turning knob A in a clock-wise direction.
- Put food in the oven.
- Programme in the cooking time on dial D turning without pressing knob A towards the right (max. time - 210 mins).
- Turn the thermostat knob to the desired temperature and the selector switch to the chosen cooking method.
- When cooking is finished the buzzer will sound and the oven will automatically go off; turn off the buzzer by moving the symbol ✗ to the middle of the dial D using the knob A (turning without pressing towards the right).
- Move the thermostat and selector switch to zero.
N.B.: For manual oven use (without the aid of the timer), set the symbol
to the dial D, otherwise the oven will not be operated manually.
USE OF SINGLE-CONTROL END OF COOKING TIMER (WITHOUT CLOCK) (fig. 6)
This allows the cooking time to be programmed.
Operation:
- Move the knob to the desired cooking time (120 mins max.).
- Choose the temperature using the thermostat knob and move the selector knob to the required cooking method.
- When the programming knob is at the 0 position the oven will switch itself off. This is automatic.
- Move the thermostat knob back to symbol ●.
- Move the selector knob to symbol 0.
N.B. If the timer is not used, the oven programming knob is to be set to the manual position 🎨.
USE OF THE ELECTRONIC TIMER (fig. 7)
This allows the start time and cooking duration time to be programmed. If food does not need to be watched, this timer can be selected even when the user is absent. Soon after installation and at any electrical supply cut-outs the display flashes; the clock must then be synchronized again to allow programming.
SETTING THE TIMER TO THE CURRENT TIME
- The current time is set by pressing the 2 buttons (COOKING TIME and STOP) and the "+" or "-" button at the same time. Any previous programmes are cancelled and the AUTO symbol flashes.
NOTE: when the AUTO symbol is flashing the oven cannot be used manually.
"+" AND "-" BUTTONS
- Pressing the "+" or "-" buttons makes time go up or down at variable speed according to how long the button is pressed for.
MANUAL USE
- Press the MANUAL button: the AUTO symbol goes out (if flashing or permanently on) the SAUCEPAN symbol lights up and the oven can be used by adjusting the thermostat knob and the selector switch according to the instructions given in the manual.
AUTOMATIC OPERATION WITH END OF COOKING AND DURATION TIMERS
- Let's use an example: it is 9:25 am; you want the oven to switch on at 11 am and switch off at 12 pm (cooking time 1 hour).
- Press the COOKING DURATION button and within 5 seconds press "+" button until it shows 01.00, adjust using "-" button if necessary. The AUTO and PAN symbols come on permanently.
-
Press the END OF COOKING button and within 5 seconds press "+" button until it shows 12.00. The PAN symbol goes out but the AUTO symbol remains permanently on.
-
Move the oven thermostat knob to the desired temperature, and the selector switch to the required cooking method; the red warning light comes on the oven light comes on and the timer is ready to start: at 11am the oven will come on automatically and the PAN symbol will light up.
- When cooking is over (12 am) the AUTO symbol flashes, the PAN symbol goes out and a buzzer sounds; to turn off the buzzer press any button.
- Move the thermostat and selector knob to the OFF position.
SEMI-AUTOMATIC OPERATION WITH COOKING DURATION SELECTION - Let's take an example: it is 11:35 am and you want the oven to stay on for 25 minutes from now on.
- Press the COOKING DURATION button and within 5 seconds press the "+" button until it shows 00.25, adjusting the time with the "-" button if necessary. The AUTO and PAN symbols light up permanently.
- Turn the oven thermostat knob to the desired temperature and the selector switch to the required cooking method; the red warning light comes on, the oven light comes on and the oven starts to operate.
- After 25 minutes the oven and the PAN symbol go out. The AUTO symbol flashes and the buzzer tells you that cooking is over: to turn off the buzzer press any button.
- Then move the oven thermostat knob and the selector switch to the OFF position.
MINUTE MINDER
- Press the MINUTE MINDER button and choose the desired time using the "+" or "-" button.
- The BELL symbol lights up when the minute minder is in use.
- When the pre-set time is over, the buzzer sounds and the BELL symbol goes out.
BUZZER
- The buzzer sounds at the end of a programme and lasts for a maximum of 7 minutes.
- To turn it off, press any button.
- Pressing the "-" button without having previously selected a function the frequency of the signal changes. A selection from 3 possibilities can be made. The selected signal is audible as long as the "-" button is pressed.
STARTING AND CHECKING A PROGRAMME
- The programme starts after about 4 seconds of it being set.
- The set programme can be checked at any point by pushing the corresponding buttons.
PROGRAMMING ERRORS
- Example: at 12:15 pm a COOKING DURATION time of 30 minutes is set and a END OF COOKING is programmed in at 12:30 pm.
- The programme error can be rectified by changing the duration or the end of cooking time, or by pressing the MANUAL button and programming again.
- If there is a programming error the oven will not come on.
ANNULLING A PROGRAMME - A programme can be cancelled by pressing the COOKING DURATION button and then the "-" button until the display shows 0.00.
IMPORTANT:
AT THE END OF EVERY PROGRAMMED COOKING OPERATION YOU ARE ADVISED TO PRESS THE BUTTON, OTHERWISE THE OVEN CANNOT BE OPERATED MANUALLY.
USE OF "RUSTIC OVEN" TIMER / USE OF END OF COOKING TIMER(fig. 8)
This allows the user to set the cooking duration.
SETTING THE CLOCK
Press the knob (A) and turn it anti-clockwise until the correct time is reached.
SETTING THE COOKING END TIME
Turn the knob (A) anti-clockwise, without pushing, until the pointer is on the desired cooking time (max. 90 min). At the end of the preset time, the oven switches off and a buzzer sounds. To stop the buzzer,
turn the knob (A) anti-clockwise until the pointer is in line with the symbol.
N.B. To use the oven in manual mode (without the aid of the timer) it is essential to turn the pointer to the symbol.
CLEANING THE OVEN
- The oven should be cleaned after each use, when it is still lukewarm but not hot. This allows fats to be removed before they have time to dry.
- If stubborn stains remain place a cloth soaked in ammonia on the bottom of the oven, close the door and leave for a few hours. Then wash the oven with hot water and liquid detergent and dry completely.
- For the outside of the oven, use a soft cloth and soapy water.
NEVER USE POWDER DETERGENTS OR OTHER ABRASIVE PRODUCTS.
FOR COOKERS WITH SELF-CLEANING OVEN
The two side walls and the back are coated with a catalytic self-cleaning enamel.
Every 10-15 times it is used, leave the oven empty at full heat. The time required for cleaning depends on the condition of the oven. Some splashes tend to set hard and may clog the pores of the special coating, preventing oxidation and eliminating its self-cleaning properties. In this case, as soon as the oven has completely cooled apply very hot water to soften the deposits and use a soft brush, without detergent, to remove them. Then switch the oven back on at maximum heat for a few minutes.
(Important: never use metal brushes or abrasive substances).
CHANGING THE OVEN LIGHT BULB
- Switch the oven off and disconnect it from the mains electrical supply;
- the light bulb is in the top right-hand corner of the back of the oven;
- make sure that the oven is cold and unscrew the glass lamp-holder;
- replace the light bulb with another of the same type and screw the lamp-holder back firmly into place.
REMOVING THE OVEN DOOR
The door can be removed for easier oven cleaning by proceeding as follows:
1) Open the door completely;
2) press down the hook "B" and gently lift arm "A" (fig. 9);
3) lift the door, holding it at both sides and pull it forward (fig. 10);
4) to replace the door, return the hinges to their places making sure they are fitted into their seats; it suffices instead to lower the door completely;
5) release the door carefully until it reaches its closed position.
GENERAL PRECAUTIONS
- Always disconnect the power supply before any work inside the oven or where live parts may be accessed.
- Any overheating of the outside walls of the oven will trip the safety device, which will cut off the power supply. The power supply will be restored automatically once the outside temperature of the oven has dropped back within acceptable limits. However, remember that if this device is tripped repeatedly, there is a malfunction (e.g. breakage of the thermostat which regulates the temperature inside the oven). Call in your service engineer.
- Never touch the door hinges accidentally; this may cause injury.
- When the oven and grill are switched on for the first time there may be a typical smell and smoke may come out of the oven. This is because of the treatment applied to the surfaces. Operate the oven empty before placing foods inside.
- Some modes are fitted an automatic cooling motor.
-The appliance is not intended for use by young children or infirm persons without supervision.
-Young children should be supervised to ensure that they do not play with the appliance.
-If the supply cord is damaged, it must be replaced by the
manufacturer or its service agent or a similarly qualified person in order to avoid a hazard.
-During use the appliance becomes hot. Care should be taken to avoid touching heating elements inside the oven.
-Warning: Ensure the appliance is switched off before replacing the lamp to avoid the possibility of electric shock.
No responsibility is accepted for injury or damage due to poor installation or improper use of the oven.
In case of malfunctions, contact your service engineer without delay.
natural_image
Simple line drawing of a mechanical setup with a wooden block and a piston, no text or symbols present.
natural_image
Technical line drawing of a door frame with internal components (no text or symbols)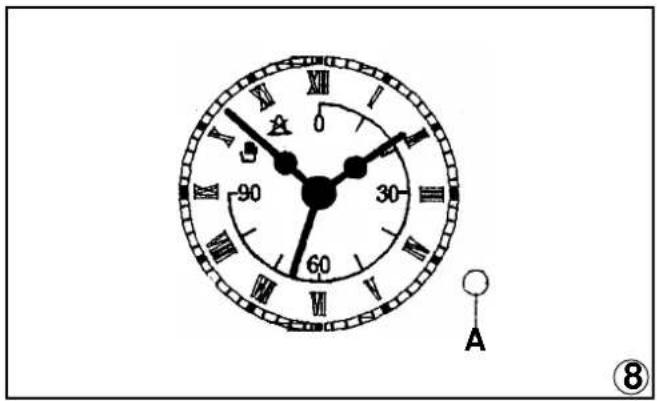
text_image
0 90 60 A ⑧
text_image
D 12.00 A ⑤
text_image
A B ⑨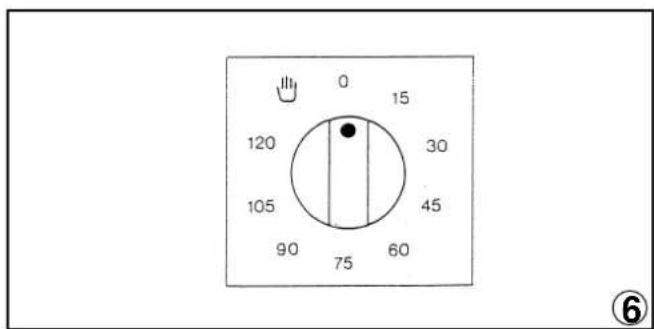
text_image
0 15 120 30 105 45 90 75 60 ⑥
natural_image
Diagram of a lever mechanism with an upward arrow indicating motion, no text or symbols present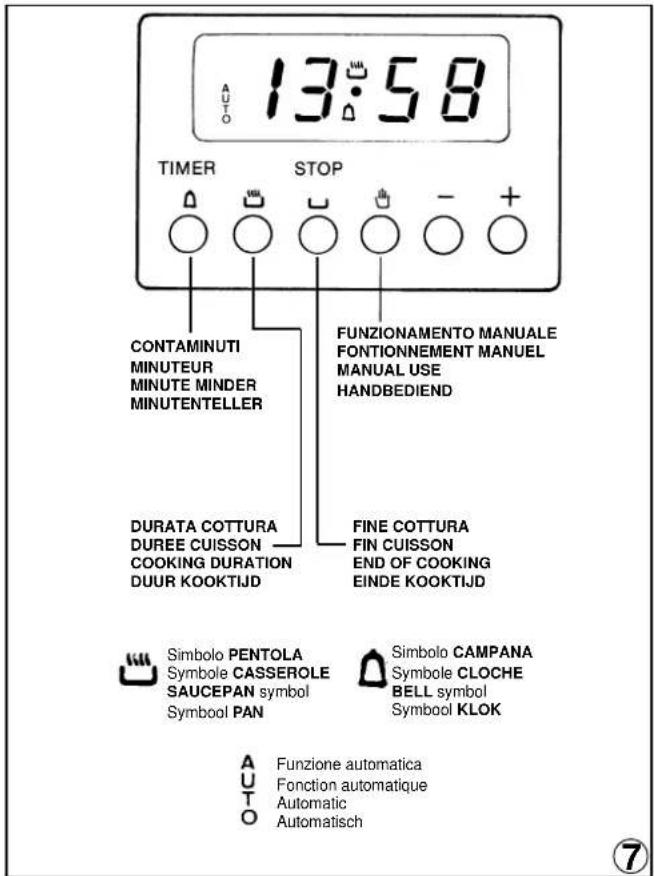
text_image
AUTO 13:58 TIMER STOP CONTAMINUTI MINUTEUR MINUTE MINDER MINUTENTELLER FUNZIONAMENTO MANUALE FONTIONNEMENT MANUEL MANUAL USE HANDBEDIEND DURATA COTTURA DUREE CUISSON COOKING DURATION DUUR KOOKTIJD FINE COTTURA FIN CUISSON END OF COOKING EINDE KOOKTIJD Simbolo PENTOLA Symbole CASSEROLE SAUCEPAN symbol Symbool PAN Simbolo CAMPANA Symbole CLOCHE BELL symbol Symbool KLOK A Funzione automatica A U Fonction automatique A U T Automatic A O AutomatischED. 04/02/2003
334879/02