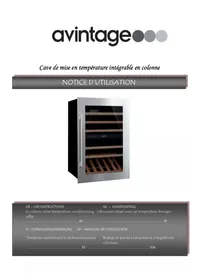
AV46CDZI1 - Fridge AVINTAGE - Free user manual and instructions
Find the device manual for free AV46CDZI1 AVINTAGE in PDF.
| Brand | Avintage |
| Model | AV46CDZI1 |
| Product type | Wine cabinet (integrated temperature-controlled wine cellar) |
| Category | Refrigerator (wine cellar) |
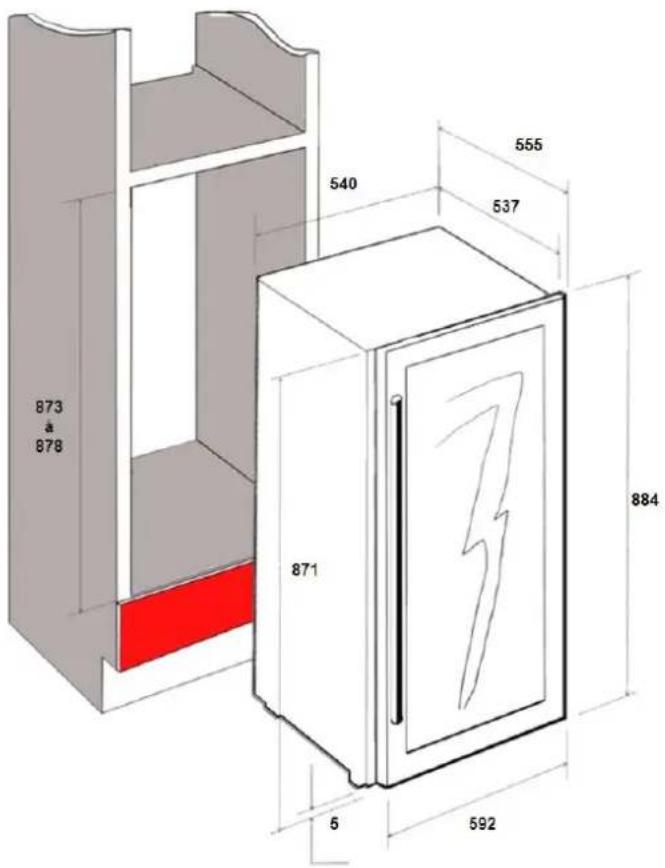
| Dimensions (H x W x D) | 873-878 x 540 x 555 mm |
| Weight | Approximately 55 kg (estimated) |
| Power supply | 220-240 V, 50 Hz, 10 A |
| Temperature range | Upper compartment: 5-12 °C, lower compartment: 12-18 °C |
| Capacity | Up to 46 bottles (estimated) |
| Number of shelves | 5 sliding shelves |
| Door type | Full glass door with handle, reversible opening |
| Lighting | Interior LED (on/off) |
| Control panel | Digital touch with °C/°F display |
| Functions | Independent temperature adjustment for two zones, stop function, lighting, unit selector |
| Defrost | Automatic (with evaporation tray) |
| Refrigerant | R600a (isobutane), CFC and HFC free |
| Noise level | Not specified (estimated: 40 dB) |
| Energy class | Not specified (estimated: F) |
| Installation | Built-in column installation, must be secured to prevent tipping |
| Maintenance and cleaning | Clean interior and exterior with warm water and mild detergent, wash shelves, do not use solvents |
| Safety | Automatic shut-off, thermal protection (10 A), grounded plug, child safety instructions |
| Spare parts and repairability | Repairs by authorized technician, do not repair yourself, power cord replaceable by professional |
| General information | User manual available in PDF, brand Avintage (Climadiff group), domestic use for temperature conditioning of wine |
Frequently Asked Questions - AV46CDZI1 AVINTAGE
User questions about AV46CDZI1 AVINTAGE
0 question about this device. Answer the ones you know or ask your own.
Ask a new question about this device
Download the instructions for your Fridge in PDF format for free! Find your manual AV46CDZI1 - AVINTAGE and take your electronic device back in hand. On this page are published all the documents necessary for the use of your device. AV46CDZI1 by AVINTAGE.
USER MANUAL AV46CDZI1 AVINTAGE
natural_image
Interior view of a wine refrigerator with shelves stocked with bottles and a digital display (no visible text or symbols)GB - USE INSTRUCTIONS NL - HANDLEIDING
text_image
Technical diagram of a mechanical assembly with numbered components and directional arrows indicating motion or assembly.natural_image
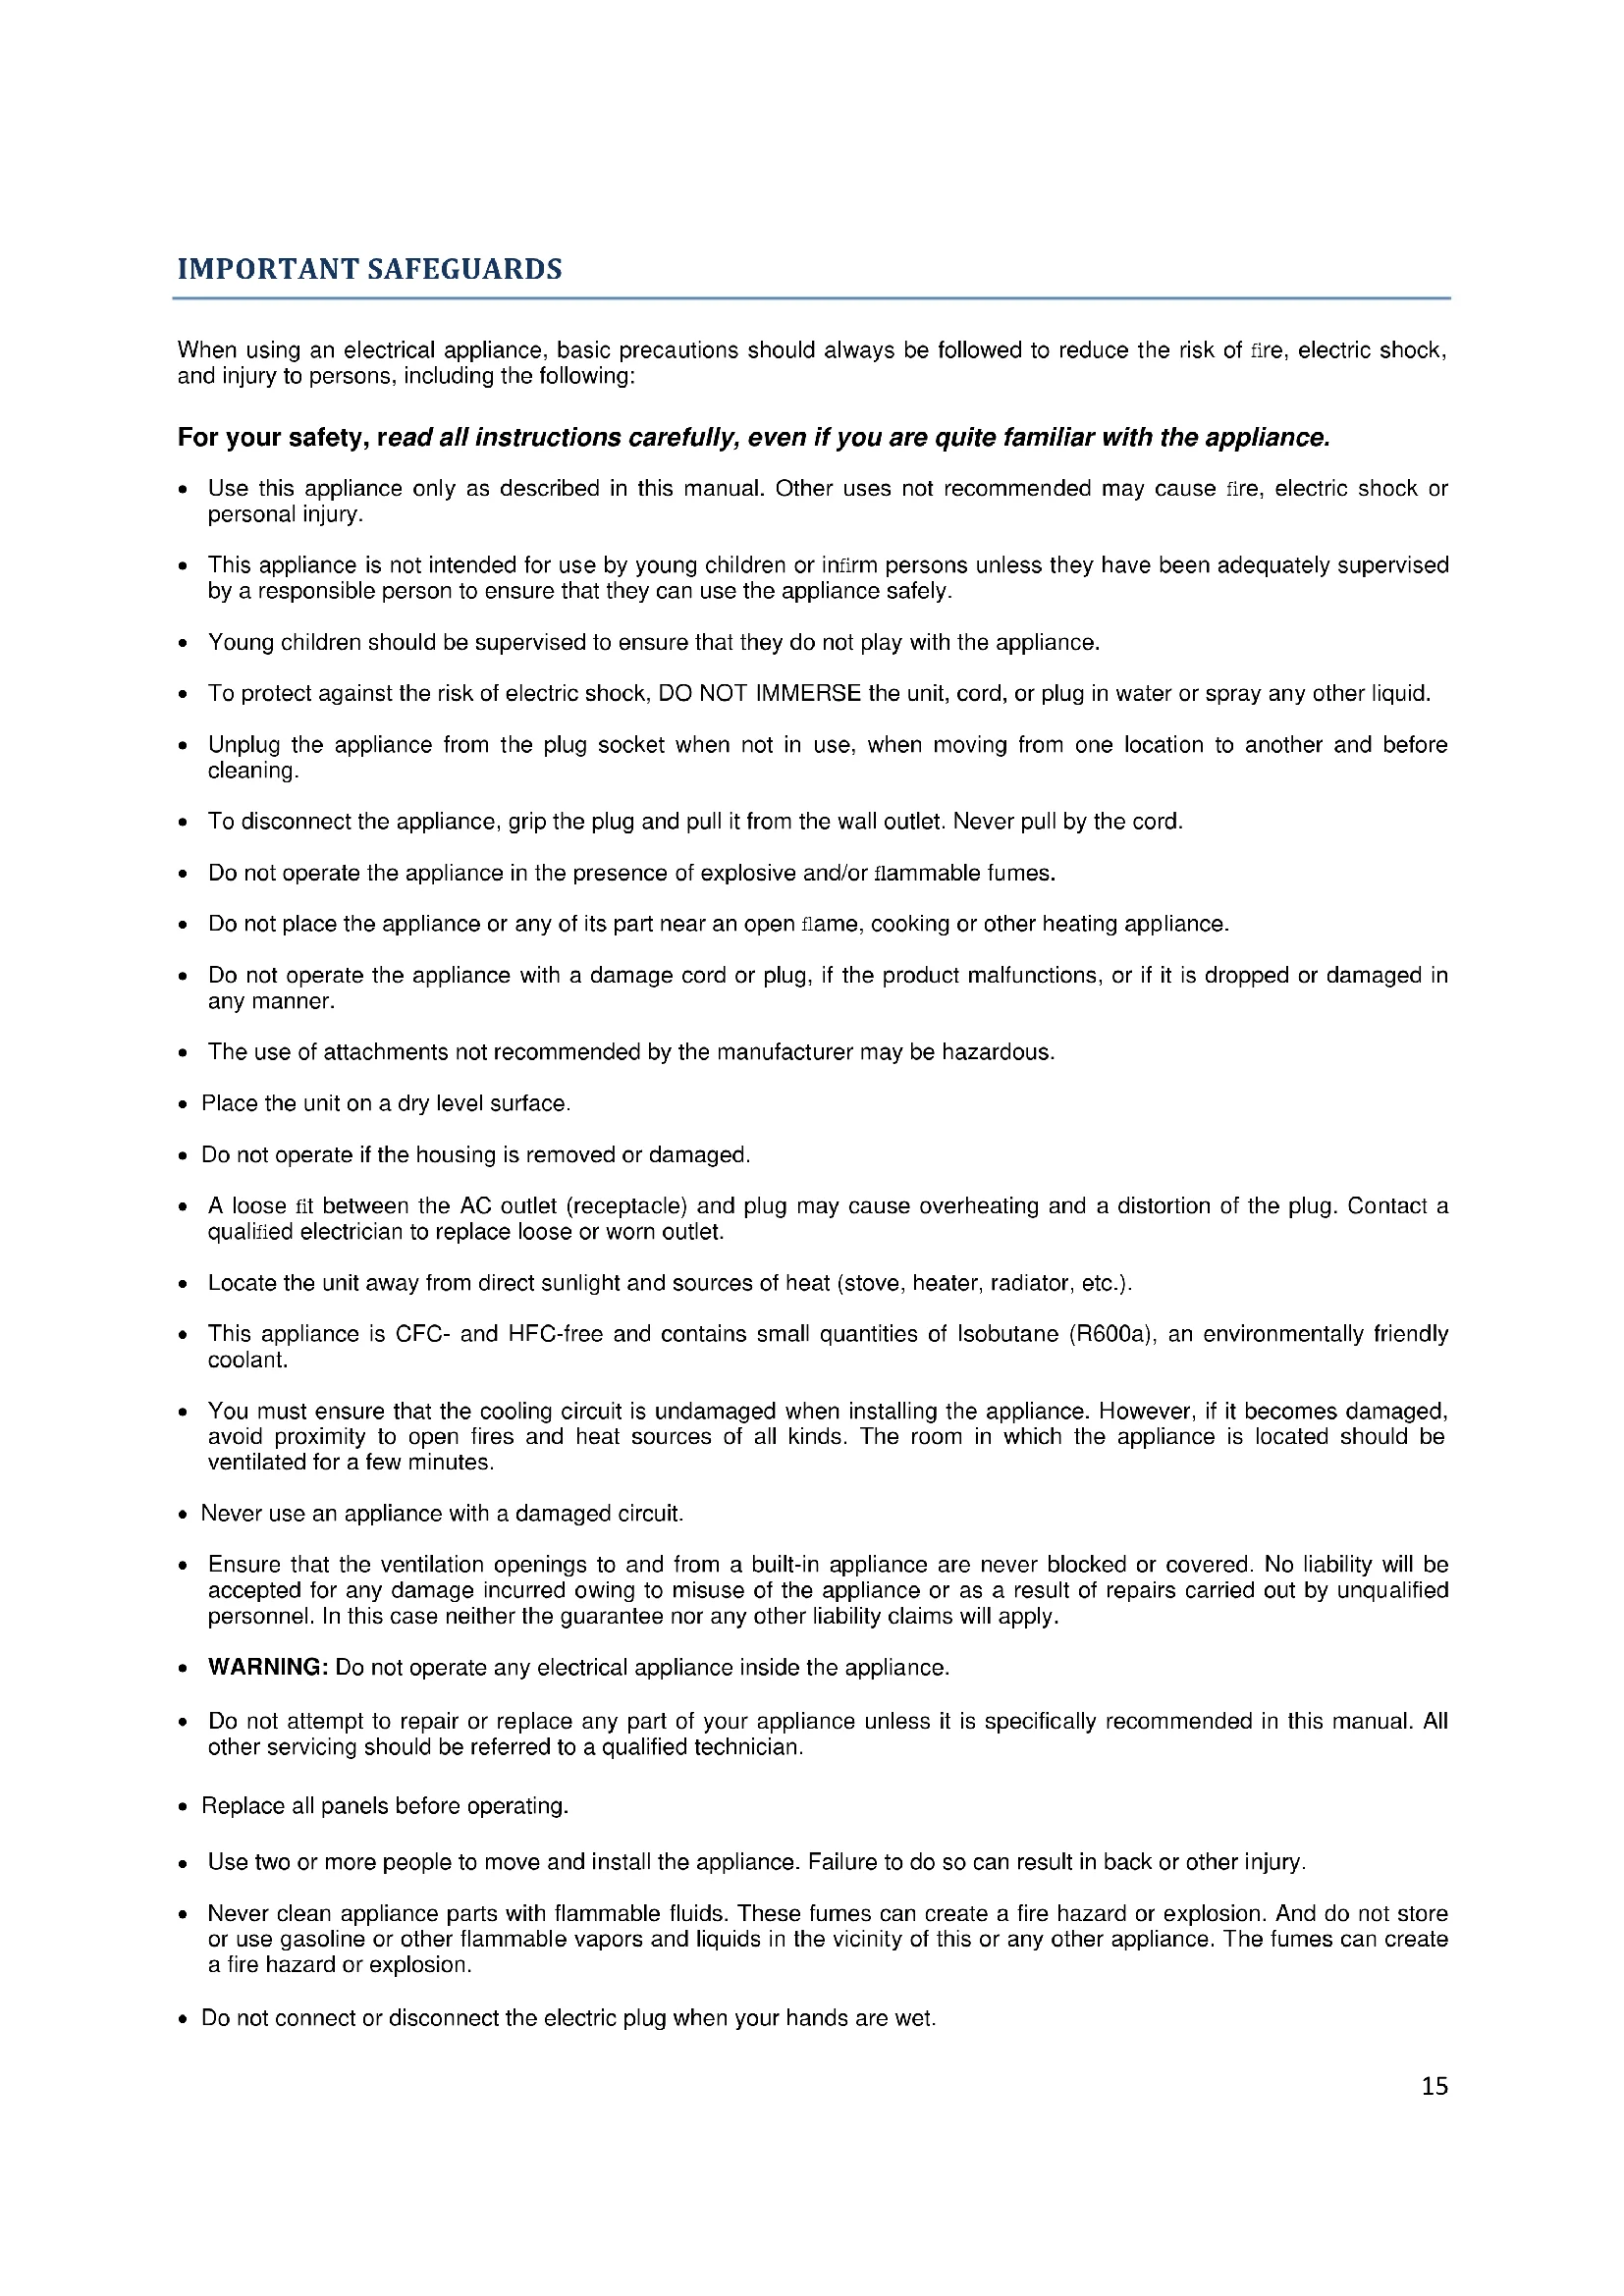
Technical line drawing of two L-shaped metal beams with mounting holes (no text or symbols)When using an electrical appliance, basic precautions should always be followed to reduce the risk of fire, electric shock, and injury to persons, including the following:
For your safety, read all instructions carefully, even if you are quite familiar with the appliance.
- Use this appliance only as described in this manual. Other uses not recommended may cause fire, electric shock or personal injury.
- This appliance is not intended for use by young children or infirm persons unless they have been adequately supervised by a responsible person to ensure that they can use the appliance safely.
- Young children should be supervised to ensure that they do not play with the appliance.
- To protect against the risk of electric shock, DO NOT IMMERSE the unit, cord, or plug in water or spray any other liquid.
- Unplug the appliance from the plug socket when not in use, when moving from one location to another and before cleaning.
- To disconnect the appliance, grip the plug and pull it from the wall outlet. Never pull by the cord.
- Do not operate the appliance in the presence of explosive and/or flammable fumes.
- Do not place the appliance or any of its part near an open flame, cooking or other heating appliance.
- Do not operate the appliance with a damage cord or plug, if the product malfunctions, or if it is dropped or damaged in any manner.
- The use of attachments not recommended by the manufacturer may be hazardous.
- Place the unit on a dry level surface.
- Do not operate if the housing is removed or damaged.
- A loose fit between the AC outlet (receptacle) and plug may cause overheating and a distortion of the plug. Contact a qualified electrician to replace loose or worn outlet.
- Locate the unit away from direct sunlight and sources of heat (stove, heater, radiator, etc.).
- This appliance is CFC- and HFC-free and contains small quantities of Isobutane (R600a), an environmentally friendly coolant.
- You must ensure that the cooling circuit is undamaged when installing the appliance. However, if it becomes damaged, avoid proximity to open fires and heat sources of all kinds. The room in which the appliance is located should be ventilated for a few minutes.
- Never use an appliance with a damaged circuit.
- Ensure that the ventilation openings to and from a built-in appliance are never blocked or covered. No liability will be accepted for any damage incurred owing to misuse of the appliance or as a result of repairs carried out by unqualified personnel. In this case neither the guarantee nor any other liability claims will apply.
- WARNING: Do not operate any electrical appliance inside the appliance.
- Do not attempt to repair or replace any part of your appliance unless it is specifically recommended in this manual. All other servicing should be referred to a qualified technician.
- Replace all panels before operating.
- Use two or more people to move and install the appliance. Failure to do so can result in back or other injury.
- Never clean appliance parts with flammable fluids. These fumes can create a fire hazard or explosion. And do not store or use gasoline or other flammable vapors and liquids in the vicinity of this or any other appliance. The fumes can create a fire hazard or explosion.
-
Do not connect or disconnect the electric plug when your hands are wet.
-
It is recommended that a separate circuit, serving only your appliance be provided. Use receptacles that cannot be turned off by a switch or pull chain.
- This appliance must not be used by person with affected mental capacities (including children), lack of experience or knowledge, excepting under the supervision of an experimented and responsible person.
- Make sure children do not play with the appliance.
WARNING: To reduce the risk of fire, electric shock or personal injury, unplug or disconnect the appliance from the power supply before servicing.
- Check that the voltage marked on the product corresponds with your supply voltage.
WARNING: Improper use of the grounded plug can result in the risk of electrical shock.
To avoid any danger, if the power cord is damaged, have it replaced by a qualified electrician or an authorized service center.
- This appliance should be properly grounded for your safety. The power cord of this appliance is equipped with a three pins plug which mates with standard three pins wall outlets to minimize the possibility of electrical shock.
- Do not under any circumstances cut or remove the third ground prong from the power cord supplied. For personal safety, this appliance must be properly grounded.
- This appliance requires a standard 220-240 Volt AC \~50Hz electrical ground outlet with three pins. Have the wall outlet and circuit checked by a qualified electrician to make sure the outlet is properly grounded. When a standard 2 pins wall outlet is encountered, it is your responsibility and obligation to have it replaced with a properly grounded 3 pins wall outlet.
- The cord should be secured behind the appliance and not left exposed or dangling to prevent accidental injury.
- The appliance should always be plugged into its own individual electrical outlet which has a voltage rating that matches the rating label on the appliance. This provides the best performance and also prevent overloading house wiring circuits that could cause a fire hazard from overheated.
- Never unplug the appliance by pulling the power cord. Always grip the plug firmly and pull straight out from the receptacle.
- Repair or replace immediately all power cords that have become frayed or otherwise damaged. Do not use a cord that shows cracks or abrasion damage along its length or at either end. When moving the appliance, be careful not to damage the power cord.
- Electrical fuse protection of at least 10 amperes must be provided. If the socket is no longer accessible once the appliance has been built-in, suitable measures must be taken during electrical installation to ensure that the appliance can be disconnected from the mains.
- Do not use your appliance with an extension cord unless this cord has been checked and tested by a qualified technician or service person. The extension cord must be a VED-Listed, 3-wire grounding extension cord that has a grounding plug and outlet and that the electrical rating of the cord is 220-240 volts and at least 10 amperes.
SAVE THESE INSTRUCTIONS: If you are experiencing problems, check the Troubleshooting Guide at the back of this manual. It lists causes of minor operating problems that you can correct yourself.
text_image
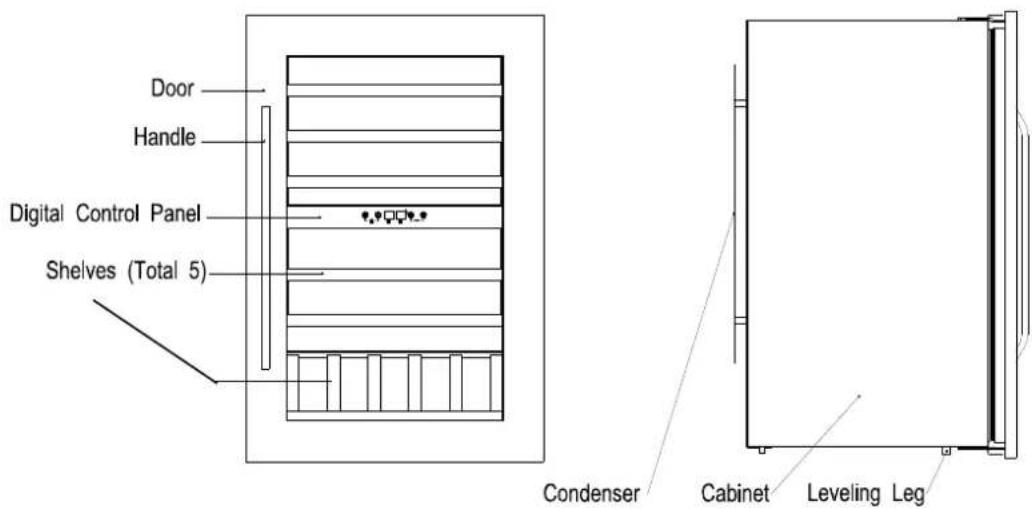
Door Handle Digital Control Panel Shelves (Total 5) Condenser Cabinet Leveling LegINSTALLATION INSTRUCTIONS
Before Using Your Wine Cooler
- Remove all exterior and interior packing.
- Before connecting the Wine Cooler to the power source, let it stand upright for approximately 2 hours.
- This will reduce the possibility of a malfunction in the cooling system caused by handling during transportation.
- Clean the interior surface with lukewarm water using a soft cloth.
- The door on this appliance can be opened from either the left or the right side. The unit is delivered with the door opening on the left side (The maximum angle of opening of the door is 100°"). Should you wish to open the door from the right, follow the instructions 'Reversing the door swing of your appliance'.
INSTALLATION OF YOUR WINE COOLER
• This device is designed to be incorporated into fitted kitchen units
- The appliance should be positioned in a well-ventilated, dry room.
- Place your Wine Cooler on a position that is strong enough to support it when it is fully loaded. To level your Wine Cooler, adjust the front leveling leg at the bottom of the Wine Cooler.
- This appliance must be fixed at the top and the bottom using the rail provided for the purpose in order to avoid any risk of tipping when the shelves are slid out
- Locate the Wine Cooler away from direct sunlight and sources of heat (stove, heater, radiator, etc.). Direct sunlight may affect the acrylic coating and heat sources may increase electrical consumption. Extreme cold ambient temperatures may also cause the unit not to perform properly.
- Plug the Wine Cooler into an exclusive, easily accessible plug socket. Any questions concerning power and/or earthing should be directed towards a qualified electrician or an authorized products service centre.
- To prevent the appliance from heating up, ensure that an adequate ventilation gap is retained and install a suitable thermal insulation panel. An adequate flow of air to and from the cooling system must be ensured.
- The appliance must be installed to all electrical, plumbing, water and drain connections in accordance with state and local codes.
NOTE: Make sure that the socket and ON/OFF switch are easily accessible after the appliance has been installed.
BUILT-IN CABINET INSTRUCTIONS
The wine cooler door seals the installed unit almost completely, so an air vent must be provided in the base of the housing. Warmed air must be conducted via the ventilation shaft to the rear wall of the housing and then expelled upwards. The ventilation channels should measure at least 200 square centimeters in cross-section.
WARNING: To ensure the proper functioning of the appliance, air vents should never be blocked or covered.
text_image
873 à 878 540 555 537 871 592 884 5Model 85 cm
text_image
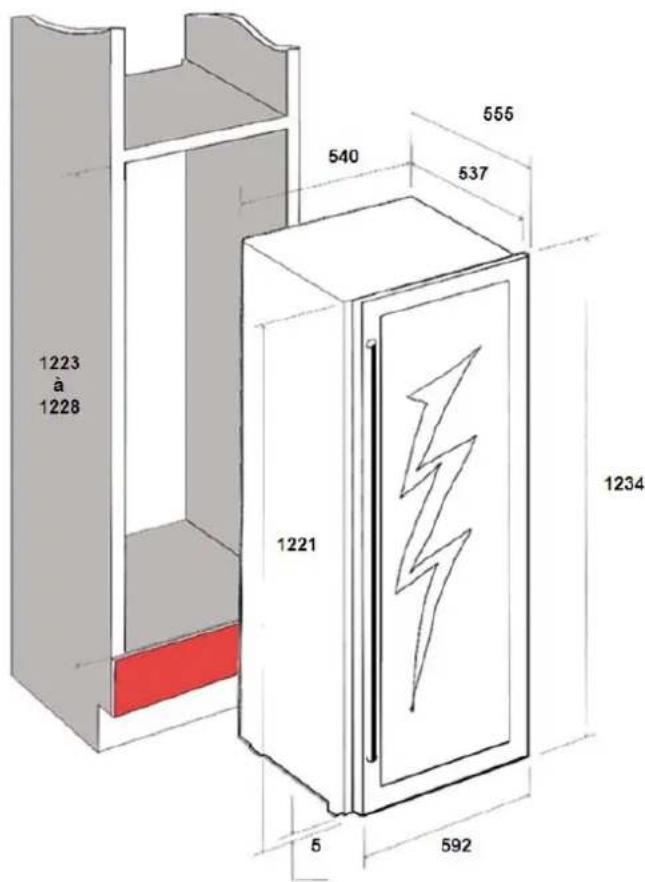
1223 à 1228 540 555 537 1221 5 592 1234Model 122 cm
Attention
- Store wine in sealed bottles.
- Do not overload the cabinet.
- Do not open the door unless necessary.
- Do not cover shelves with aluminum foil or any other shelf material which may prevent air circulation.
Should the wine cooler be left empty for long periods it is suggested that the appliance is unplugged, and after careful cleaning, leave the door ajar to allow air to circulate inside the cabinet in order to avoid possible condensation, mold or odors forming.
text_image
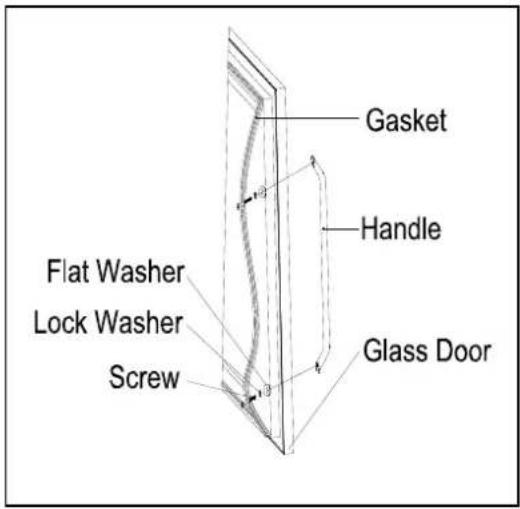
Gasket Handle Flat Washer Lock Washer Screw Glass Door-
Remove the door gasket on the side you wish to install the handle - you can see two designated holes for handle installation.
-
Install the handle tightly as shown above with two screws, lock washers and flat washers provided.
-
Replace the door gasket.
REVERSING THE DOOR SWING OF YOUR APPLIANCE
Should you desire to reverse the opening direction, please follow the instructions below.
text_image
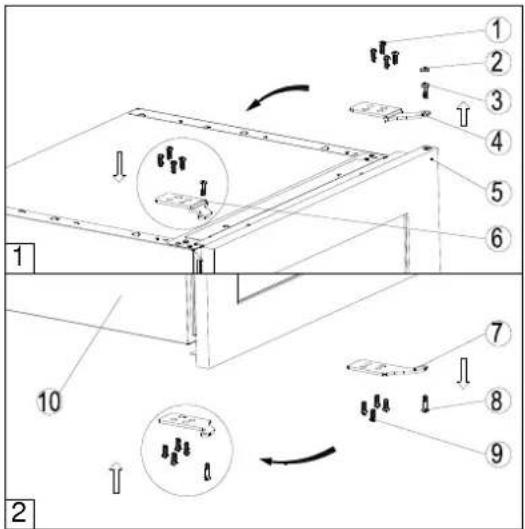
Technical diagram of a mechanical assembly with numbered components and directional arrows indicating motion or assembly.① Screw
② Decoration Plug
③ Top Hinge Pin
④ Right Top Hinge Plate
⑤ Glass Door
⑥ Left Top Hinge Plate
⑦ Lower Hinge Plate
⑧ Lower Hinge Pin
⑨ Screws
⑩ Cabinet
Note: All parts removed must be saved to do the reinstallation of door.
-
Close the glass door, and remove the decoration plug ②. Unscrew the top hinge pin ③ and lower hinge pin ⑧. Be careful to support the glass door with hands to prevent it from dropping after removing the pins. (Figure 1&2)
-
Pull down to remove the glass door and place it on a padded surface to prevent scratching it.
-
Remove the right top hinge plate ④ by unscrewing the four screws ① and get the left top hinge plate ⑥ from the plastic bag that includes the instruction manual then install it at the designated position on the opposite side. (Figure 1)
-
Remove the lower hinge plate ⑦ by unscrewing the four screws ⑨. Then turn it around and refit it on the opposite side.(Figure 2)
-
Turn around the glass door 180° and refit the hinge pin ③&⑧ through the top hinge plate ⑥ and lower hinge plate ⑦ into the door. Make sure that the spacers which the hinge pins sit on are correctly positioned.
- Leveling the door by adjusting the screws that are used to fix the top hinge plate and lower hinge plate.
The Wine Cooler should be placed in a position where the ambient temperature is between 16-32°C/60\~95°F. If the ambient temperature is above or below this range, the performance of the unit may be affected. For example, placing your unit in extreme cold or hot conditions may cause interior temperatures to fluctuate. The range of 5-18°C/40-72°F may not be reached.
Note:
When you use the Wine Cooler for the first time or restart the Wine Cooler after having been shut off for a long time, there could be a few degrees variance between the temperature you select and the one indicated on the LED readout. This is normal and it is due to the length of the activation time. Once the Wine Cooler is running for a few hours everything will be back to normal.
If the unit is unplugged, power lost, or turned off, you must wait 3 to 5 minutes before restarting the unit. If you attempt to restart before this time delay, the Wine Cooler will not start.
THE CONTROLS OF YOUR WINE CELLAR
text_image
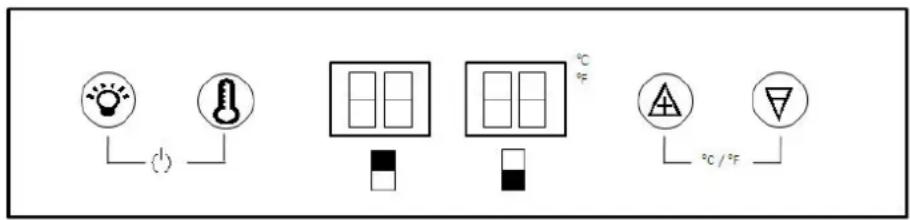
Diagram showing five labeled symbols with corresponding electrical or thermal indicators and temperature/°C labelsPOWER
To control this appliance turn on/off. To turn OFF the appliance, touch the ⚙ and ⚪ marks at the same time for 5 seconds.
SET
To set or view the internal temperature setting for each zone.
LIGHT
To control the inner light turn on/off.
UP
Used to raise (warm) the set temperature by 1°C or 1°F.
DOWN ▽
Used to lower (cool) the set temperature by 1°C or 1°F.
^o F/ ^o C Selector
Select the temperature display setting in Fahrenheit or Celsius degree. To change the temperature from Fahrenheit to Celsius or from Celsius to Fahrenheit, touch the ⚠ and ∇marks at the same time for 5 seconds.
The wine cooler has two temperature zones. The temperature settings of LOWER ZONE and UPPER ZONE are adjustable with the range 5^-22^/40^-72^ . It is recommended to set the LOWER ZONE to 13-22^/55-72^ which is ideal for storing white and red wines and the UPPER ZONE to 5-13^/40-55^ which is ideal for storing sparkling and white wines.
NOTE: The temperature set for the LOWER ZONE must always be the same or higher than that in the UPPER ZONE.
- You can touch SET mark to set the internal temperature for each zone. The degrees indicators will appear in the display window marked □ for UPPER ZONE and □ for LOWER ZONE.
- When you touch the SET mark for the first time, the LED readouts will show the original temperature sets previously (the preset temperature at the factory for UPPER ZONE is 10^ / 50^ and for LOWER ZONE is 16^ / 60^ ).
- Touch the SET mark once. The left LED indicator for UPPER ZONE will flash. Then touch the UP or DOWN marks to set the desired temperature.
- When you touch the SET mark again, the right LED indicator for LOWER ZONE will flash. Then proceed to touch the UP or DOWN marks to set the desired temperature for the LOWER ZONE.
- The temperature will increase 1^ or 1^ if you touch the UP mark once, or the temperature will decrease 1^ or 1^ if you touch the DOWN mark once.
- To view the "set" temperature in either zone at any time, touch the UP or DOWN mark, the "set" temperature will temporarily "flash" in the LED display for 5 seconds. You can touch the SET mark to view the temperature setting from one zone to the second zone.
TEMPERATURE DISPLAY
During normal operation, the temperature display on the control panel shows the temperature inside the appliance. The temperature display will flash if:
- A different temperature is being set,
- The temperature in the zone deviates by more than 5^ C from the set temperature. The temperature display flashing ensures that the temperature can not rise or fall un-noticed and impair the wine.
SHELVES
- To prevent damaging the door gasket, make sure the door is fully open when pulling shelves out of the rail compartment.
- For easy access to the bottles stored, pull the shelves out approximately 1/3. The shelves are designed with an emergency stop to prevent them being removed too far when loaded.
CARE AND MAINTENANCE
Removing Shelves
- To remove any of the shelves from the rail compartment, move the shelf to the position where the notch of wooden shelf is exactly under the plastic post and lift the wooden shelf. Please ensure these are replaced when the shelf is put back.
natural_image
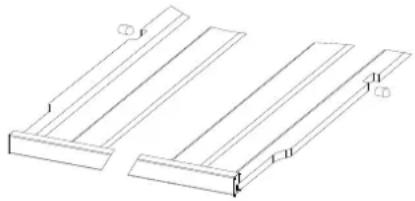
Technical line drawing of two L-shaped metal profiles with labeled points (I, II, III, IV, F) and no readable text or symbols.Your wine cellar is equipped with a manually system for maintaining a correct level of humidity. If humidity is too low, snap the small plastic reservoir on to top rack of wine cellar. Fill reservoir to 34 full. Check water level occasionally to refill.
Designed by specialists in oenology as written above, the wine cellar is allowed for a storage period of 2 months maximum. CLIMADIFF has taken care of the cork's sensibility to the humidity rate. That's why the plastic reservoir has to be put on the top shelf to ensure a minimum humidity. Be careful to control the water level if you store your wine cellar for a long period.
Make sure the water tank is well positioned to avoid any liquid falling.
LOADING
The maximum amount of bottles able to be stored which is given, is only given as an indication and is not contractual. This indication (as with the capacity in liters of a refrigerator) is to give a quick estimation of the size of the product. This indication corresponds to tests done with a standard bottle: the bottle type “Bordeaux light 75 cl” (the standardized classification contains for each bottle a geographic origin (Bordeaux, Bourgogne, Provence,...), and a type (traditional, heavy, light, flute,...) each with its own specific height and diameter.
In fact, one could store more bottles by stacking a single type of bottle and without shelves. But a “varied” cabinet is made up of a large variety of bottles and the “practical” side of the daily use of a cabinet limits the number of bottles stored. Most probably, a few less bottles will be stored than the indicated amount.
For example, if the cellar is filled only with bottles of burgundy, there will be approximately 30% fewer bottles than the initial quantity calculated for Bordeaux
EXAMPLES OF SERVING TEMPERATURES (TO BE COMPLIED WITH WHEN TASTING YOUR WINES!)
Opinions vary as does the ambient temperature but the general consensus is as follows:
| Vintage Bordeaux - Reds | 16 – 17°C | |||||
| Vintage Burgundy - Reds | 15 – 16°C | |||||
| Vintage dry white wines | 14 | - | 16°C | |||
| Light, fruity, young reds | 11 – 12°C | |||||
| Rosés de Provence, early wines | 10 – 12°C | |||||
| Dry whites and regional red wines | 10 – 12°C | |||||
| Regional white wines | 8 | - | 10°C | |||
| Champagnes | 7 | - | 8°C | |||
| Sweet wines | 6°C |
DEFROST - CONDENSATION
The cabinet is equipped with an automatic defrost cycle. When the cooling cycle is finished, the refrigerated parts of the cabinet are defrosted automatically. The water from the defrost is channelled into an evaporation tray which is located in the back of the cabinet close to the compressor. The heat from the compressor then evaporates the water from the tray.
UPKEEP
Before cleaning the cabinet (this must be done regularly), disconnect it either by unplugging it or by removing the fuse.
It is suggested that before first use and then regularly, the cabinet be cleaned both inside and out (front, sides and on top) with a mixture of warm water and gentle cleaning fluid. Rinse with water and let dry completely before reconnecting. Do not use solvents or abrasive products.
Clean the shelves with a gentle detergent then dry with a soft dry cloth.
At the moment of the first use, some odours can persist. In this case, make functioning the appliance at the coldest temperatures, empty, during a few hours. The cold will cancel all these possible odours.
WHAT TO DO IN CASE OF A POWER OUTAGE
Most power outages are resolved in a short time. An outage of 1 or 2 hours will not affect the temperatures in your cabinet. In order to protect the wines during the outage, open the door as little as possible. For outages that are very long, take necessary steps to protect the wine.
STORING THE CABINET
If the cabinet is going to be unused for a short period of time. Leave the control panel with the normal settings.
In case of prolonged un-use
- Remove the bottles from the cabinet
- Unplug the cabinet
- Clean both the inside and the outside of the cabinet
- Leave the door open to avoid condensation, odors and mold.
IF THE CABINET MUST BE MOVED
Remove all the bottles in the cabinet and securely fasten all moveable parts..To avoid damaging the levelling screws on the feet, screw them completely into their base.
- Tape the door shut.
- Be sure the appliance stays secure in the upright position during transportation. Also protect outside of appliance with a blanket, or similar item.
ENERGY SAVING TIPS
- The Wine Cooler should be located in the coolest area of the room, away from heat producing appliances, and out of the direct sunlight.
- Ensure that the unit is adequately ventilated. Never cover air vents.
- Only open the door for as long as necessary.
IN CASE OF BREAKDOWN
Despite the care we bring to our production, a breakdown can never be totally excluded. Before contacting the After-Sales department of your store, please check:
- the cabinet is properly plugged in
- there is not a power outage
- the fault does not have as an origin one of those described in the following table
WARNING ! Unplug the cabinet before cleaning or repairing the cabinet !
This product is in conformity with the EU Directive 2002/96/CEE.
The symbol of the crossed out trash container on the cabinet indicates that this product should be, at the end of its useful life, treated separately from general domestic waste..
It should therefore be taken to an appropriate collection center for electrical and/or electronic appliances or, if you have purchased an equivalent product to the store where the new appliance has been bought. The user is responsible for making sure that the appliance is given to the appropriate structure. A selective collection with the aim to recycle, treat or eliminate the appliance in an environmentally friendly fashion contributes to avoid the possible negative effects on the environment, on health and contributes to the recycling of materials of which the appliance is made.
For more detailed information, on the recycling opportunities, please contact your local office of the environment or the store in which the appliance was bought.
WARNING
As we wish to continually improve our products, we reserve the right to modify certain technical characteristics without prior notice.
The warranties for CLIMADIFF AVINTAGE products are exclusively given by the distributors whom we have chosen. No part of the information herein can be interpreted as an additional guarantee.
CLIMADIF cannot be held responsible for any technical errors or omissions or errors or omissions in this text.
PROBLEMS WITH YOUR WINE COOLER
You can solve many common Wine Cooler problems easily, saving you the cost of a possible service call.
Try the suggestions below to see if you can solve the problem before calling customer service.
| PROBLEM | POSSIBLE |
| Wine Cooler does not operate. | Not plugged in.The appliance is turned off.The circuit breaker tripped or a blown fuse. |
| Wine Cooler is not cold enough. | Check the temperature control setting.External environment may require a higher setting.The door is opened too often.The door is not closed completely.The door gasket does not seal properly. |
| Turns on and off frequently. | The room temperature is hotter than normal.A large amount of contents has been added to the Wine Cooler.The door is open too often.The door is not closed completely.The temperature control is not set correctly.The door gasket does not seal properly. |
| The light does not work. | Not plugged in.The circuit breaker tripped or a blown fuse.The light switch is “OFF”. |
| Vibrations. Check to assure that the Wine cooler is level. | |
| The Wine Cooler seems to make too much noise. | The rattling noise may come from the flow of the refrigerant, which is normal. As each cycle ends, you may hear gurgling sounds caused by the flow of refrigerant in your Wine Cooler.Contraction and expansion of the inside walls may cause popping and crackling noises.The Wine Cooler is not level. |
| The door will not close properly. | The Wine Cooler is not level.The door was reversed and not properly installed.The gasket is dirty.The shelves are out of position. |
| Display “EL” or “EH”. The air temperature sensor is failed. | |
CAUSE
text_image
Technical diagram of a mechanical assembly with numbered components and directional arrows indicating motion or assembly steps.text_image
Diagram showing five labeled symbols with corresponding temperature and force indicators, including lightbulb, thermometer, grid, warning sign, and triangle.EIN AUS

natural_image
Technical line drawing of two L-shaped metal beams with mounting holes (no text or symbols)text_image
Technical diagram showing assembly steps with numbered components and directional arrows indicating motion or movement.text_image
Diagram showing five labeled symbols with corresponding electrical or mechanical icons, including lightbulb, thermometer, grid, warning sign, and triangle.START STOP