
FX810B - Earphones freeVoice - Free user manual and instructions
Find the device manual for free FX810B freeVoice in PDF.
Download the instructions for your Earphones in PDF format for free! Find your manual FX810B - freeVoice and take your electronic device back in hand. On this page are published all the documents necessary for the use of your device. FX810B by freeVoice.
USER MANUAL FX810B freeVoice
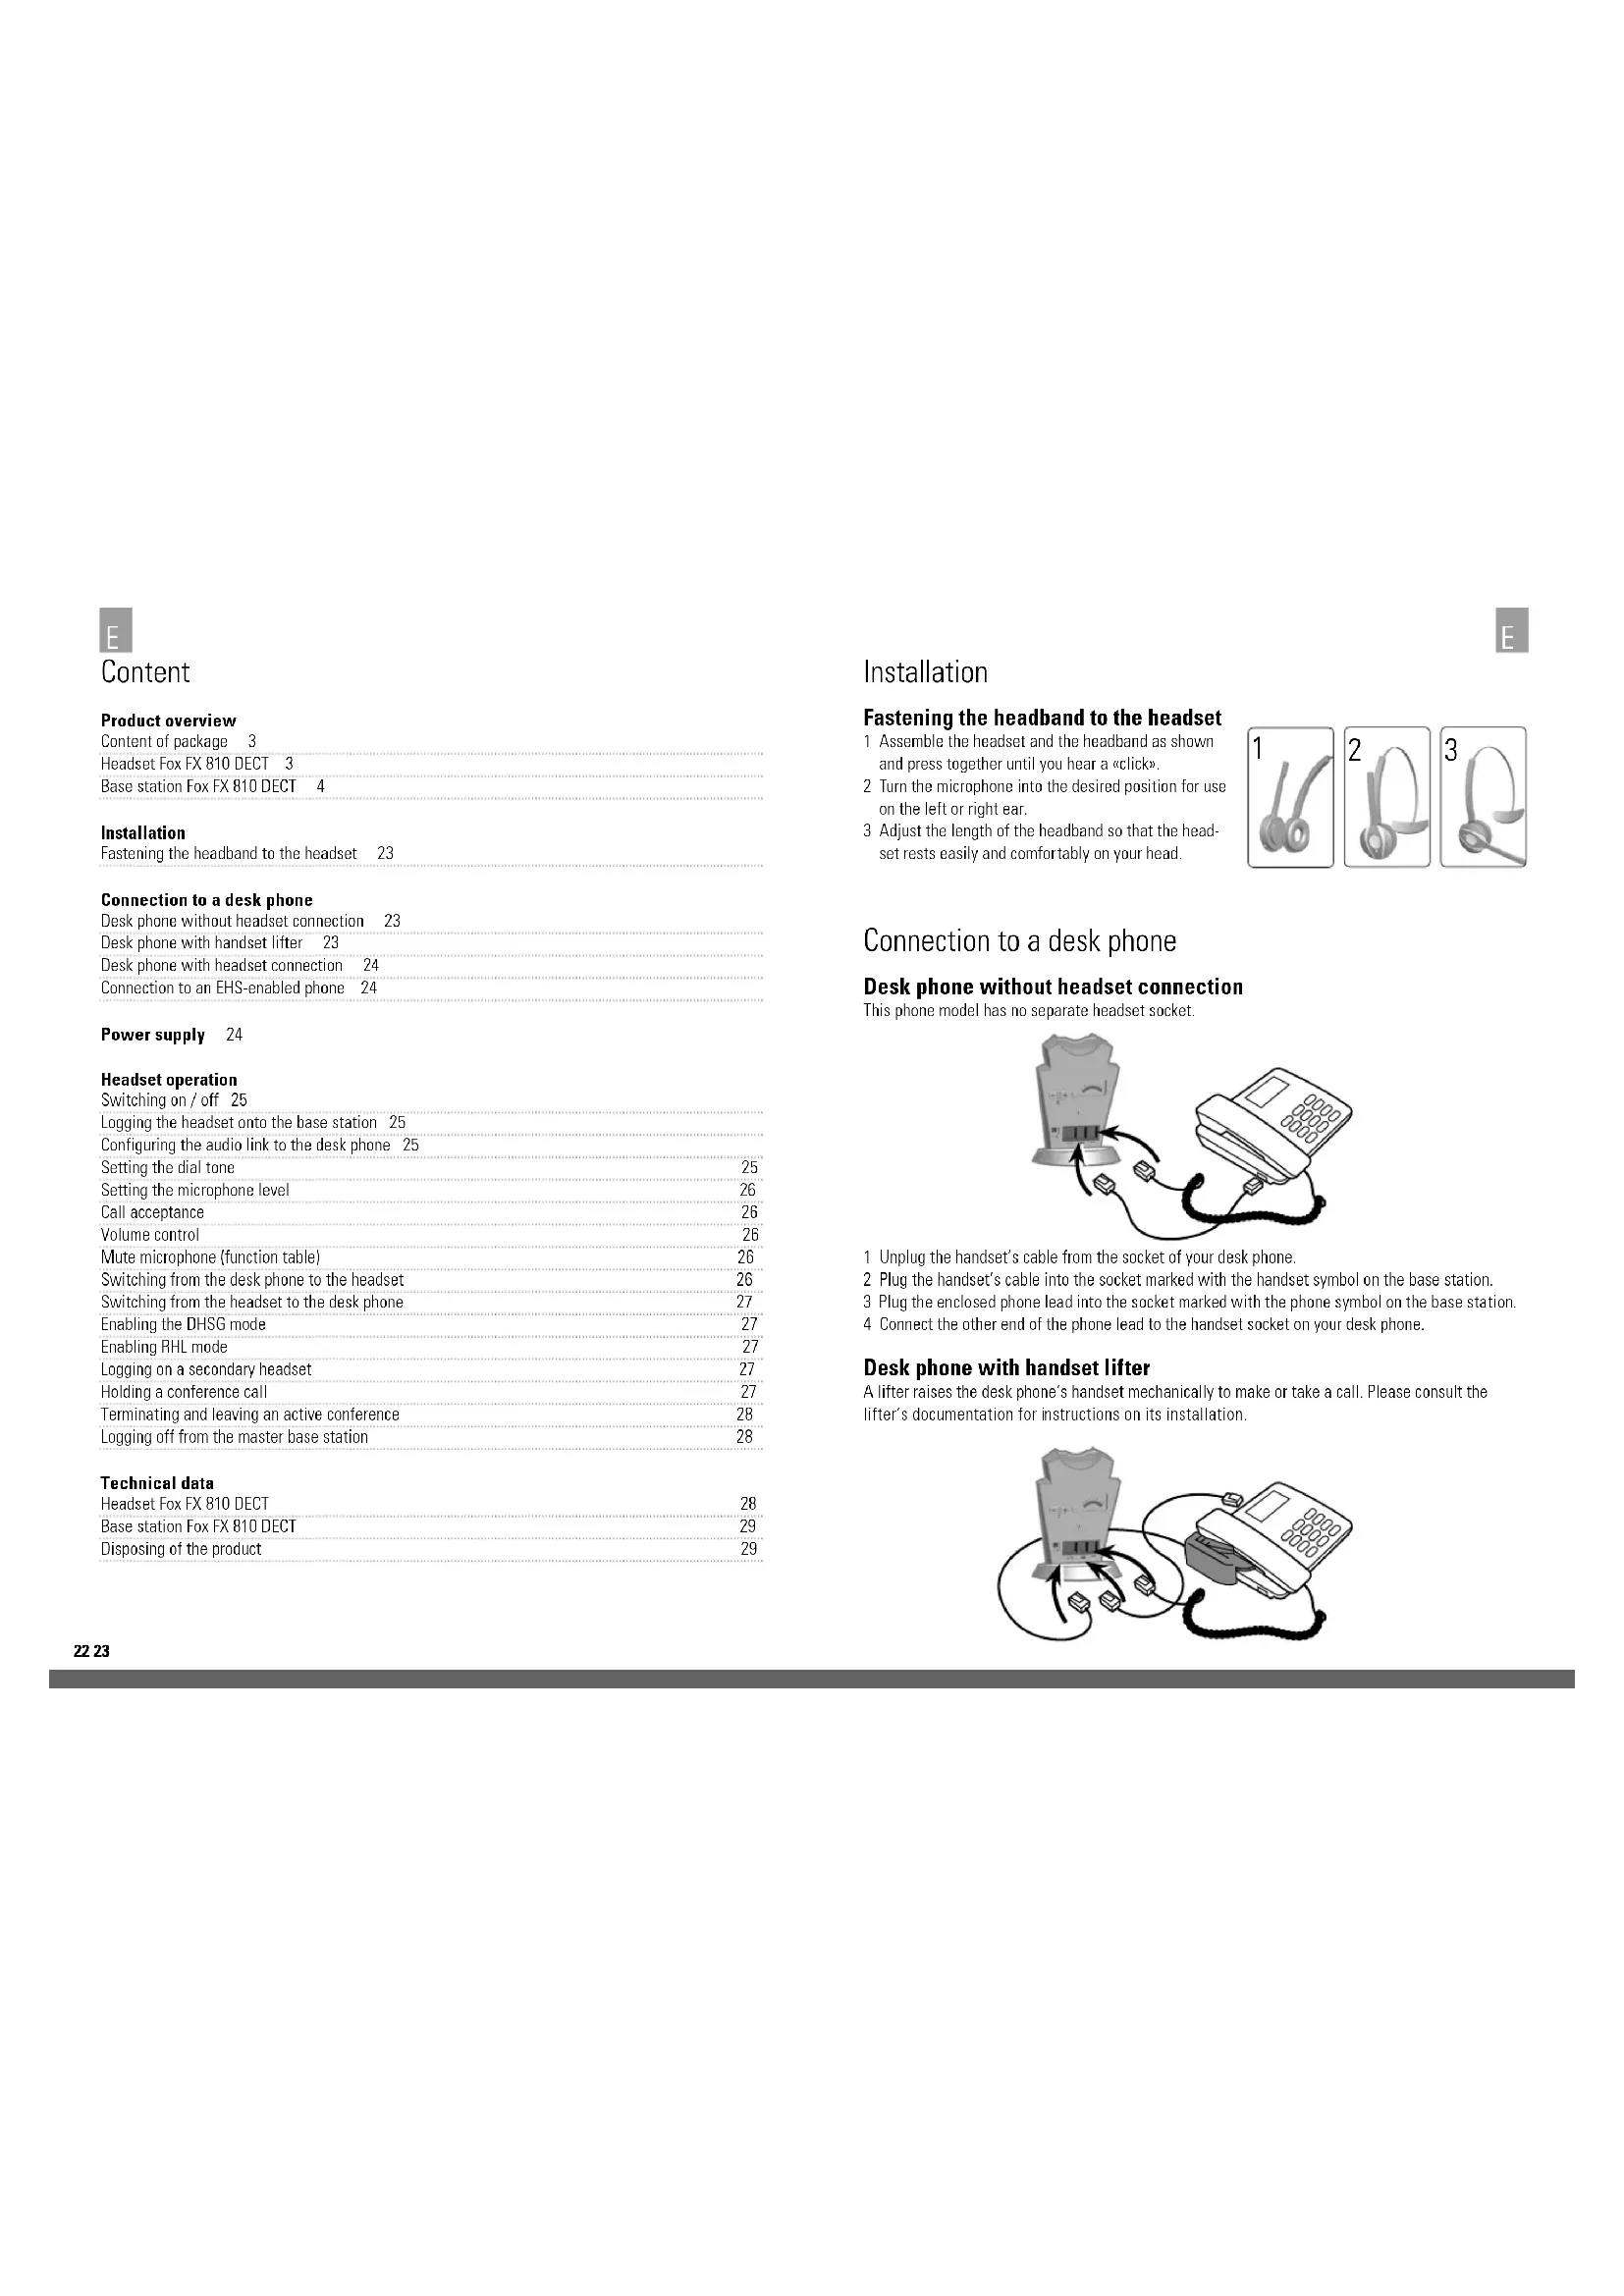
Installation Fastening the headband to the headset 1 Assemble the headset and the headband as shown and press together until you hear a «click». 2 Turn the microphone into the desired position for use on the left or right ear. 3 Adjust the length of the headband so that the head- set rests easily and comfortably on your head. Connection to a desk phone Desk phone without headset connection This phone model has no separate headset socket. 1 Unplug the handset’s cable from the socket of your desk phone. 2 Plug the handset’s cable into the socket marked with the handset symbol on the base station. 3 Plug the enclosed phone lead into the socket marked with the phone symbol on the base station. 4 Connect the other end of the phone lead to the handset socket on your desk phone. Desk phone with handset lifter A lifter raises the desk phone’s handset mechanically to make or take a call. Please consult the lifter’s documentation for instructions on its installation.
1 Unplug the handset’s cable from the socket of your desk phone. 2 Plug the handset’s cable into the socket marked with the handset symbol on the base station.
Plug the enclosed phone lead into the socket marked with the phone symbol on the base station. 4 Connect the other end of the phone lead to the handset socket on your desk phone. 5 Plug the lifter’s cable into the socket marked «AUX» on the base station. Desk phone with headset connection This desk phone model has a separate socket for a headset (usually on the rear of the device). These phones normally have a key on the front too that allows you to switch between the headset and handset. 1 Plug the enclosed phone lead into the socket marked with the phone symbol on the base station. 2 Connect the other end of the phone lead to the headset socket on your desk phone. Connection to an EHS-enabled phone Incoming calls can be accepted or terminated with the «Call acceptance» key on the headset with the aid of an EHS adapter. Please ask your dealer about a suitable EHS adapter for your desk phone. Connect the EHS adapter as explained in the corresponding documentation. The phone lead also has to be connected with certain telephones. Power supply Plug the mains lead into the marked socket on the base of the headset. Plug the mains adapter into a 220-volt socket. The battery symbol will start flashing (white).
Headset operation Switching the headset on Press the «Call acceptance» key briefly on the headset, the blue LED on the headset comes on for 2 sec. Switching the headset off Press and hold down the «Call acceptance» key on the headset until the blue LED starts to flash rapidly. Then release the key; the headset switches off. Logging the headset on the base station While the headset is offline, press the pairing button on the back of the base for 5 sec. After 5 sec, release the button and the online icon will flash blue. The registered headset is deleted and the base is in the pairing mode. Press the Mute button on the headset until the blue status light flashes rapidly. If both LEDs go out, the headset is registered. Configuring the audio link to the desk phone Since there are a wide variety of different desk phones on the market you have to get a dial tone be- fore using the freeVoice Fox for the first time. Configure the base station for correct communication with your desk phone. You should also adjust the microphone level for the best quality sound. Setting the dial tone 1 Put the headset on. 2 Press the «Headset» key on the desk phone or lift the desk phone’s handset. 3 Move the phone configuration switch on the rear of the freeVoice Fox base station in steps from the «A» position to the «G» position (see illustration) and check the sound of the dial tone in the headset. 4 Determine the best position for the switch. The dial tone should be strong, clear and undistorted.
G26 27 Setting the microphone level 1 Put the headset on. 2 Establish a connection on the desk phone 3 Make a test call. Call a friend or colleague to test the volume. Ask the person you are calling not to adjust the volume on their own phone during the test. 4 If your voice is too loud or too quiet for the person you are calling, adjust the microphone level using the «Volume» keys (+/-) for the microphone as shown. 5 Terminate the call once the microphone level has been set correctly. Call acceptance key The «Call acceptance» key can be used to accept and terminate calls and to switch the headset on and off. Volume control Use the «+» and «–» keys on the headset to adjust the earpiece volume of your headset. Mute microphone key You can use the «Mute microphone» key to mute your headset›s microphone and to deactivate the mute mode again. Function Tab Press and hold (long click) Activate microphone muting x Deactivate muting x Activate pairing mode x Quit pairing mode x Switching from the desk phone to the headset (during a call) 1 Lift the headset from the base station. 2 Do not hang up the desk phone’s handset; this would terminate the call. Function Tab Press and hold (long click) Accept call x Terminate call x Switch the headset on x Switch the headset off x (5 sec.)
Switching from the headset to the desk phone (during a call) (phone without a headset socket) 1 Lift the desk phone’s handset. 2 Place the headset in the charging cradle or tap the «Multifunction» key. Switching from the headset to the desk phone (during a call) (phone with headset and/or EHS socket) 1 Lift the desk phone’s handset. 2 Please consult your desk phone’s instruction manual for the further procedure. In some cases you have to press a key on your desk phone to switch over; in other cases this takes place automatically. Conference call with several headsets Up to four headsets can be connected to the freeVoice Fox for conference calls: one primary and three secondary headsets. Enabling the DHSG mode Your freeVoice Fox FX 810 DECT is delivered in the RHL Mode per default. Connect the headset to your phone according the description of the EHS adapter. Place the headset on the base station. Press the headset button to get a dial tone on the phone. Remove the headset from the base station. Now you hear a dial tone in the headset. Press the call acceptance Key on the headset, the headset goes offline and the phone call is also finished. Enabling RHL mode To return the freeVoice Fox FX 810 DECT to the RHL mode you need to disconnect the power cord from the base station for 10 sec. Logging on a secondary headset 1 Note that the primary headset registered to the base station is online. This is indicated by the fact that the blue online symbol is lit. Press the pairing button for 5 sec. The mute icon on the base station will flash red. Press the microphone mute button on the headset for 3 seconds until the blue LED on the headset flashes. When the LEDs on the base station and on the headset go out, the secondary headset is registered to the base station. 2 Repeat this procedure to log up to a total of three additional headsets. Holding a conference call Switch the primary headset online with the «Multifunction» key so that the headset symbol on the base station comes on (blue). Now press the «Call acceptance» key on the secondary headset;
acoustic signal will be heard in the primary headset. Press the «Call acceptance» key on the primary headset too so as to authorise the secondary headset. The conference link has now been established between these two headsets. Repeat this procedure for any further secondary headsets. E28 29 Technical data Headset Fox FX 810 DECT Operating conditions: 0˚C to +40˚C; max. 95% relative humidity (non-condensing) Call control: Multifunction key for: accept, end and reject call; docking operations can also accept and end calls Volume control and mute microphone: Control on the headset Display signal: LED shows call status, pairing status and other events. Audio signals: Audio signals indicate incoming calls, low battery charge, volume, muting and other events. Sound quality: DSP noise cancelling, echo cancellation, tone control, narrow-band audio Charging: When docked onto the Fox FX 810 DECT base station. Standard for wireless communication: (CAT-iq) EU DECT and US DECT DECT range: EU DECT: up to 100 m from the Fox FX 810 DECT base station to the headset. US DECT: up to 100 m from the Fox FX 810 DECT base station to the headset. DECT frequencies: US DECT: 1.92 – 1.93 GHz. EU DECT: 1.88 – 1.90 GHz Wearing styles: Headband and ear clip Microphone arm design: medium-length microphone with ambient noise suppression Loudspeaker: broadband loudspeaker Microphone: Microphone with noise cancelling Headset battery Battery type: lithium-ion polymer Battery capacity: 300 mA/h, typical Talk time: Up to 8 hours Battery service life: At least 1000 charging cycles Standby time: At least 50 hours Operating temperature: -20˚C to +60˚C. Charging time: 20% charge in less than 20 minutes, 50% in less than 45 minutes, full charge in less than 3 hours Shelf life of the battery: The headset battery retains its charge for at least 6 months when it is switched off before the battery has to be recharged.
Terminating and leaving an active conference If the primary headset terminates the call, the active conference is also terminated on all of the other headsets. However, the secondary headsets remain logged onto the base station of the primary headset. Repeat the section «Holding a conference call» for a new conference. Participants can also leave an active conference. All they have to do is press the «Call acceptance» key on their headset briefly. The other participants remain in the conference. Logging off from the master base station To log off completely from the conference mode and from the master base station, reconnect the headset to its original base station. Base Station Fox FX 810 DECT Operating conditions: 0˚C to +40˚C; max. 95% relative humidity (non-condensing) Charging dock: Suitable for the Fox FX 810 DECT series of headsets Desk phone sockets: RJ-11 for handset, RJ-11 for telephone (or headset socket), RJ-45 for AUX (for EHS adapter or lifter) Disposing of the product Please dispose of the headset in accordance with local regulations and use the available recycling facilities. Do not dispose of the headset together with domestic waste. Keep the headset away from fire since the battery could other- wise explode. The battery can also explode if damaged.