PerfectCare Elite Plus GC9685 - Iron PHILIPS - Free user manual and instructions
Find the device manual for free PerfectCare Elite Plus GC9685 PHILIPS in PDF.
Download the instructions for your Iron in PDF format for free! Find your manual PerfectCare Elite Plus GC9685 - PHILIPS and take your electronic device back in hand. On this page are published all the documents necessary for the use of your device. PerfectCare Elite Plus GC9685 by PHILIPS.
USER MANUAL PerfectCare Elite Plus GC9685 PHILIPS
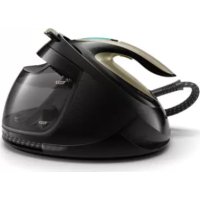
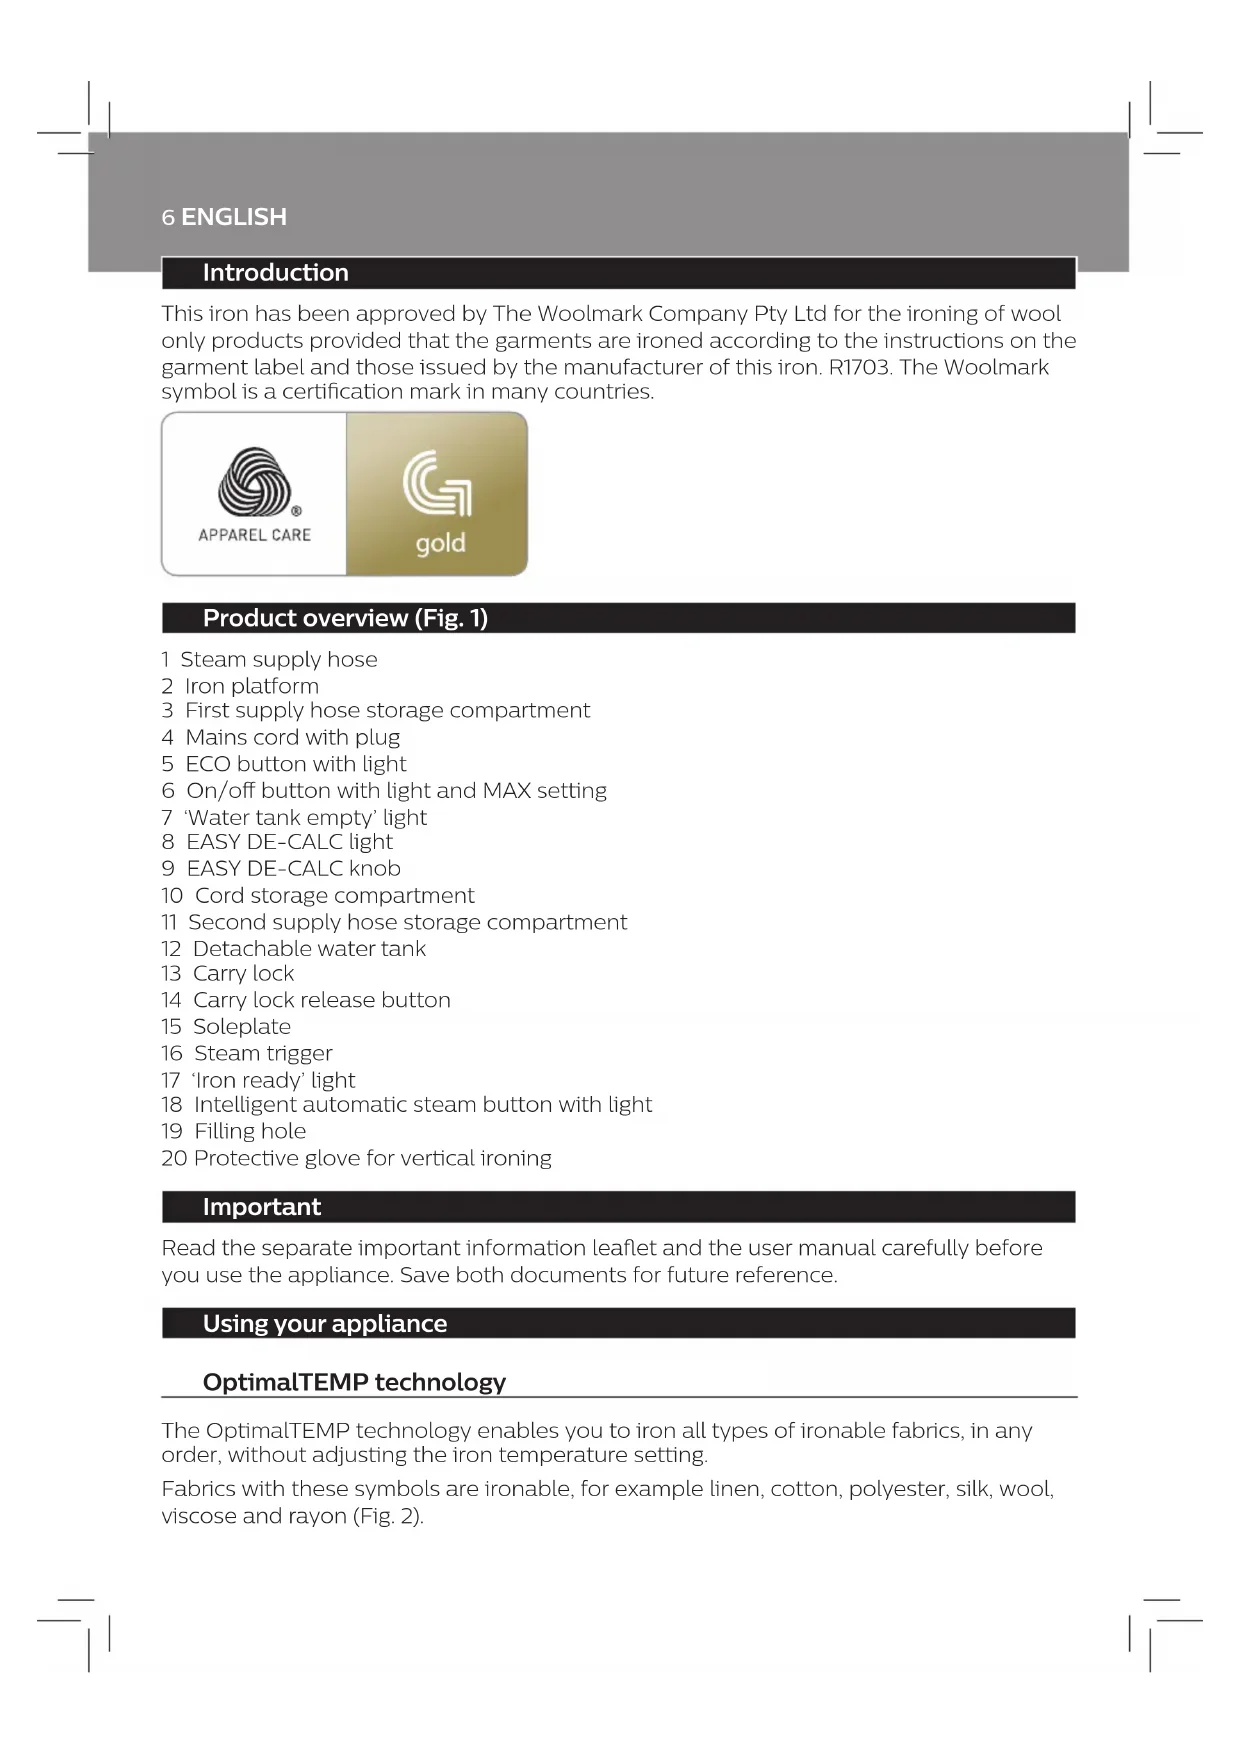
71 6 ENGLISH Introduction This iron has been approved by The Woolmark Company Pty Ltd for the ironing of wool only products provided that the garments are ironed according to the instructions on the garment label and those issued by the manufacturer of this iron. R1703. The Woolmark symbol is a certication mark in many countries. Product overview (Fig. 1) 1 Steam supply hose 2 Iron platform 3 First supply hose storage compartment 4 Mains cord with plug 5 ECO button with light 6 On/o button with light and MAX setting 7 ‘Water tank empty’ light 8 EASY DE-CALC light 9 EASY DE-CALC knob 10 Cord storage compartment 11 Second supply hose storage compartment 12 Detachable water tank 13 Carry lock 14 Carry lock release button 15 Soleplate 16 Steam trigger 17 ‘Iron ready’ light 18 Intelligent automatic steam button with light 19 Filling hole 20 Protective glove for vertical ironing Important Read the separate important information leaet and the user manual carefully before you use the appliance. Save both documents for future reference. Using your appliance OptimalTEMP technology The OptimalTEMP technology enables you to iron all types of ironable fabrics, in any order, without adjusting the iron temperature setting. Fabrics with these symbols are ironable, for example linen, cotton, polyester, silk, wool, viscose and rayon (Fig. 2).7 ENGLISH Fabrics with this symbol are not ironable. These fabrics include synthetic fabrics such as Spandex or elastane, Spandex-mixed fabrics and polyolens (e.g. polypropylene), but also prints on garments (Fig. 3). During ironing, you can place the iron either on the iron platform or horizontally on the ironing board. Thanks to the OptimalTEMP technology, the soleplate will not damage the ironing board cover (Fig. 4). Ironing Read this user manual, the important information leaet, and the quick start guide carefully before you use the appliance. Save them for future reference. 1 Press and hold the steam trigger to start ironing (Fig. 5). Never direct steam at people. Note: For best result on tough fabrics such as cotton, linen and jeans, keep the steam trigger pressed continuously when you move the iron over the fabric. Then move the iron over the same area a few more times without steam to dry the fabric. Note: For the best results on silk and shiny synthetic fabrics, it is recommended to keep the steam trigger pressed continuously while ironing. sensor and intelligent automatic steam mode The intelligent sensor inside your iron knows exactly when and how your iron is moving. When you activate intelligent automatic steam mode, the sensor will start recognizing the movements of your iron and will enable your iron to release the right amount of steam automatically without you having to press the steam trigger. This will help you to get great results faster and easier. - To activate the intelligent automatic steam mode, press the intelligent automatic steam button on top of the iron handle. The intelligent automatic steam light turns on (Fig. 6). - The ‘iron ready’ light moves back and forth when the iron is moving. Note: in intelligent automatic steam mode, steam comes out automatically when you move the iron and stops when you stop moving the iron (Fig. 7). You can still press the steam trigger in this mode to activate the steam when the iron is not moving. - You can use the intelligent automatic steam mode in all steam settings, including ECO and MAX. Note: for your safety, in intelligent automatic steam mode, the steam stops when the soleplate is tilted. - To exit the intelligent automatic steam mode, press the intelligent automatic steam button. The intelligent automatic steam light turns o. You need to press the steam trigger to continue your ironing.8 ENGLISH Steam boost function The steam boost function is designed to help tackle dicult creases. - Press the steam trigger twice quickly to activate the steam boost function. The appliance releases powerful shots of steam continuously (Fig. 8). - To stop the steam boost function, press the steam trigger once. Vertical ironing Hot steam is emitted from the iron. Never attempt to remove creases from a garment that someone is wearing. Do not apply steam near your or someone else’s hand. You can use the iron in vertical position to remove wrinkles from hanging fabrics. 1 Put on the glove. 2 Hold the iron in vertical position, press the steam trigger and touch the garment slightly with the soleplate (Fig. 9). Note: for your safety, the intelligent automatic steam mode is not available for vertical ironing. ECO setting By using the ECO setting (reduced amount of steam), you can save energy without compromising on the ironing result. - Press the ECO button. The green ECO light turns on (Fig. 10). - To deactivate ECO setting, press then ECO button again. The green ECO light goes o. MAX setting For faster ironing and a higher amount of steam, you can use MAX setting. 1 Press and hold the on/o button for 2 seconds until the light turns white (Fig. 11). 2 To deactivate MAX setting, press and hold the on/o button again for 2 seconds until the white light turns blue. Auto shut-o - The appliances enters the standby mode if it has not been used for 10 minutes. The light in the on/ o button starts to ash (Fig. 12). - To activate the appliance again, press the on/o button. The appliance starts to heat up again. - The appliance switches o automatically if it has not been used for another 10 minutes after it enters the standby mode. The light in the on/o button goes o.9 ENGLISH
IMPORTANT - EASY DE-CALC
It is very important to use the EASY DE-CALC function as soon as the EASY DE-CALC light starts to ash and the appliance beeps continuously. The EASY DE-CALC light ashes and the appliance beeps continuously after about a month or 10 ironing sessions to indicate that the appliance needs to be descaled. Perform the following EASY DE-CALC procedure before you continue ironing. To avoid the risk of burns, unplug the appliance and let it cool down for at least two hours before you perform the EASY DE-CALC procedure. 1 Remove the plug from the wall socket (Fig. 13). 2 Place the appliance on the edge of the tabletop. 3 Hold a cup (with a capacity of at least 350ml) under the EASY DE-CALC knob and turn the knob anticlockwise (Fig. 14). 4 Remove the EASY DE-CALC knob and let the water with scale particles ow into the cup (Fig. 15). 5 When no more water comes out of the appliance, reinsert the EASY DE-CALC knob and turn it clockwise to fasten it (Fig. 16). 6 You can continue using your iron immediately after completing the EASY DE-CALC procedure. IMPORTANT – Descaling the soleplate If you do not use the EASY DE-CALC function regularly, scale particles may build up in the soleplate and brown stains may come out of the soleplate during ironing. In this situation, you need to descale the soleplate by following the procedure below. We advice you to repeat the procedure twice to better clean the soleplate. To avoid the risk of burns, unplug the appliance and let it cool down for at least two hours before you descale the soleplate. 1 Remove the plug from the wall socket (Fig. 13). 2 Place the appliance on the edge of the tabletop. 3 Make sure that the water tank is empty. 4 Hold a cup (with a capacity of at least 350ml) under the EASY DE-CALC knob and turn the knob anticlockwise (Fig. 14). 5 Remove the EASY DE-CALC knob and let the water with scale particles ow into the cup (Fig. 15). 6 Hold the appliance in the position that EASY DE-CALC opening is facing up and pour 500ml distilled water into the opening (Fig. 17). Note: Be mindful on the heavy weight of the appliance when you tilt it. 7 Keep the EASY DE-CALC opening facing up, reinsert the EASY DE-CALC knob and turn it clockwise to fasten it (Fig. 18).10 ENGLISH 8 Put the appliance back on a stable and even surface. Plug in the appliance and switch it on (Fig. 19). 9 Wait for 5 minutes for the appliance to heat up. 10 Keep the steam trigger pressed continuously while you move the iron on a piece of thick cloth for 3 minutes (Fig. 20).
Warning: hot, dirty water comes out of the soleplate.
11 Stop moving the iron when no more water comes out or when steam starts coming out. 12 You can continue to use the appliance immediately. Otherwise unplug the appliance after the descaling is completed. Troubleshooting This chapter summarises the most common problems you could encounter with the appliance. If you are unable to solve the problem with the information below, visit www.philips.com/support for a list of frequently asked questions or contact the Consumer Care Centre in your country. Problem Possible cause Solution The ironing board cover becomes wet or there are water droplets on the garment during ironing. Steam has condensed on the ironing board cover after a long ironing session. Replace the ironing board cover if the foam material has worn out. You can also add an extra layer of felt material under the ironing board cover to prevent condensation on the ironing board. You can buy felt in a fabric shop. You have an ironing board cover that is not designed to cope with the high steam rate of the appliance. Put an extra layer of felt material under the ironing board cover to prevent condensation on the ironing board. You can buy felt in a fabric shop. Water droplets come out of the soleplate. The steam that was still present in the hose has cooled down and condensed into water. This causes water droplets to come out of the soleplate. Steam away from the garment for a few seconds. Steam and/or water come out from under the EASY DE-CALC knob. The EASY DE-CALC knob is not tightened properly. Switch o the appliance and let the appliance cool down for 2 hours. Unscrew the EASY DE-CALC knob and screw it back onto the appliance properly. Note: Some water may escape when you remove the knob. The rubber sealing ring of the EASY DE-CALC knob is worn. Contact an authorised Philips service centre for a new EASY DE-CALC knob.11 ENGLISH Problem Possible cause Solution Dirty water and impurities come out of the soleplate or the soleplate is dirty. Impurities or chemicals present in the water have deposited in the steam vents and/or on the soleplate. Clean the soleplate with a damp cloth. Too much scale and minerals have accumulated inside the appliance. Descale the appliance regularly (see chapter ‘Important - DESCALING’). The iron leaves a shine or an imprint on the garment. The surface to be ironed was uneven, for instance because you were ironing over a seam or a fold in the garment. PerfectCare is safe on all garments. The shine or imprint is not permanent and will come o if you wash the garment. Avoid ironing over seams or folds or you can place a cotton cloth over the area to be ironed to avoid imprints at seams and folds. The appliance does not produce any steam. There is not enough water in the water tank (the ‘water tank empty’ light ashes). Fill the water tank (see chapter ‘Using your appliance’, section ‘Filling the water tank’). The appliance is not hot enough to produce steam. Wait until the ‘iron ready’ light on the iron lights up continuously. You did not press the steam trigger. Press the steam trigger and keep it pressed while you iron. The water tank is not placed in the appliance properly. Slide the water tank back into the appliance rmly (‘click’). The appliance is not switched on. Insert the plug in the wall socket and press the on/o button to switch on the appliance. The appliance has switched o. The light in the on/o button ashes. The auto-o function is activated automatically when the appliance has not been used for more than 10 minutes. Press the power on/o button to switch on the appliance again. The appliance produces a pumping sound. Water is pumped into the boiler inside the appliance. This is normal. If the pumping sound continues nonstop, switch o the appliance and remove the plug from the wall socket. Contact an authorised Philips service centre.12 FRANÇAIS Introduction Ce fer a été approuvé par The Woolmark Company Pty Ltd pour le repassage de vêtements en laine à condition que ceux-ci soient repassés selon les instructions indiquées sur l'étiquette du vêtement et celles fournies par le fabricant du fer. R1703. Le symbole Woolmark est une marque de certication dans de nombreux pays. Présentation du produit (Fig. 1) 1 Cordon d'arrivée de la vapeur 2 Support du fer à repasser 3 Premier compartiment de rangement du cordon vapeur 4 Cordon d'alimentation avec che secteur 5 Bouton ECO avec voyant 6 Bouton marche/arrêt avec voyant et réglage « MAX » 7 Voyant « Réservoir d'eau vide » 8 Voyant EASY DE-CALC 9 Bouton EASY DE-CALC 10 Compartiment de rangement du cordon 11 Second compartiment de rangement du cordon vapeur 12 Réservoir d'eau amovible 13 Système de verrouillage 14 Bouton de déverrouillage du fer 15 Semelle 16 Gâchette vapeur 17 Voyant « Fer prêt » 18 Bouton vapeur automatique intelligente avec voyant 19 Orice de remplissage 20 Gant de protection pour repassage vertical Important Avant d'utiliser l'appareil, lisez attentivement la brochure distincte contenant les informations importantes et le mode d'emploi. Conservez les deux documents an de pouvoir vous y reporter. Utilisation de l'appareil Technologie OptimalTEMP La technologie OptimalTemp vous permet de repasser tous les types de tissus repassables, dans l'ordre de votre choix, sans avoir à régler la température du fer.13 FRANÇAIS Les tissus avec les symboles suivants sont repassables. Par exemple, le lin, le coton, le polyester, la soie, la laine, la viscose et la rayonne (Fig. 2). Les tissus comportant les symboles suivants ne sont pas repassables. Ces tissus incluent les bres synthétiques comme le Spandex ou l'élasthanne, les tissus mélangés à base de Spandex et les polyolénes (le polypropylène, par exemple), mais également les vêtements imprimés (Fig. 3). Lors du repassage, vous pouvez placer le fer sur sa base ou à l'horizontale sur la planche à repasser. La technologie OptimalTEMP permet d'éviter que la semelle endommage la housse de la planche à repasser (Fig. 4). Repassage Lisez attentivement ce mode d’emploi, la brochure « Informations importantes » et le guide de démarrage rapide avant d’utiliser l’appareil. Conservez ces documents pour toute consultation ultérieure. 1 Appuyez sur la gâchette vapeur pour commencer le repassage (Fig. 5). Ne dirigez en aucun cas le jet de vapeur vers des personnes. Remarque : pour un résultat optimal sur les tissus diciles, comme le coton, le lin et les jeans, maintenez la gâchette vapeur enfoncée lorsque vous déplacez le fer sur le tissu. Repassez ensuite le fer plusieurs fois sur la même zone sans vapeur pour sécher le tissu. Remarque : pour des résultats optimaux sur la soie et les tissus synthétiques brillants, il est recommandé de maintenir la gâchette vapeur enfoncée en continu lors du repassage. Capteur et mode Vapeur automatique intelligente Le capteur intelligent à l'intérieur de votre fer sait exactement quand et comment votre fer est en mouvement. Lorsque vous activez le mode Vapeur automatique intelligente, le capteur commence à reconnaître les mouvements du fer, ce qui permet à votre fer de produire automatiquement la quantité de vapeur appropriée sans que vous ayez à appuyer sur la gâchette vapeur. Cela vous aidera à obtenir plus rapidement et plus facilement des résultats optimaux. - Pour activer le mode Vapeur automatique intelligente, appuyez sur le bouton vapeur automatique intelligente situé sur la poignée du fer. Le voyant « Vapeur automatique intelligente » s'allume (Fig. 6). - Le voyant « Fer prêt » se déplace d'avant en arrière lorsque le fer est en mouvement. Remarque : en mode Vapeur automatique intelligente, la vapeur sort automatiquement de l'appareil lorsque vous déplacez le fer et s'arrête lorsque vous ne déplacez pas le fer (Fig. 7). Vous pouvez toujours appuyer sur la gâchette vapeur dans ce mode pour activer la vapeur lorsque le fer n'est pas en mouvement. - Vous pouvez utiliser le mode Vapeur automatique intelligente dans tous les réglages de vapeur, y compris les réglages ECO et MAX.14 FRANÇAIS Remarque : pour votre sécurité, en mode Vapeur automatique intelligente, la vapeur s'arrête lorsque la semelle est inclinée. - Pour quitter le mode Vapeur automatique intelligente, appuyez sur le bouton vapeur automatique intelligente. Le voyant « Vapeur automatique intelligente » s'éteint. Vous devez appuyer sur la gâchette vapeur pour poursuivre le repassage. Fonction Eet pressing La fonction Eet pressing est conçue pour vous aider à éliminer les faux plis les plus tenaces. - Appuyez deux fois rapidement sur la gâchette vapeur pour activer la fonction Eet pressing. L'appareil produit des jets de vapeur puissants en continu (Fig. 8). - Pour arrêter la fonction Eet pressing, appuyez de nouveau sur la gâchette vapeur. Repassage vertical Le fer émet de la vapeur chaude. N'essayez jamais d'enlever les plis d'un vêtement porté par quelqu'un. N'appliquez pas de vapeur près de vos mains ou de celles de quelqu'un d'autre. Vous pouvez utiliser le fer en position verticale pour enlever les plis sur des vêtements sur cintre. 1 Mettez le gant. 2 Maintenez le fer en position verticale, appuyez sur la gâchette vapeur et eeurez le vêtement avec la semelle (Fig. 9). Remarque : pour votre sécurité, le mode Vapeur automatique intelligente n'est pas disponible pour le repassage vertical. Réglage ECO Avec le réglage ECO (quantité réduite de vapeur), vous pouvez économiser de l'énergie sans compromettre le résultat du repassage. - Appuyez sur le bouton ECO. Le voyant ECO vert s'allume (Fig. 10). - Pour désactiver le réglage ECO, appuyez de nouveau sur le bouton ECO. Le voyant vert ECO s'éteint. Réglage MAX Pour un repassage plus rapide et une plus grande quantité de vapeur, vous pouvez utiliser le réglage MAX. 1 Maintenez le bouton marche/arrêt enfoncé pendant 2 secondes jusqu'à ce que le voyant soit blanc (Fig. 11). 2 Pour désactiver le réglage MAX, maintenez de nouveau le bouton marche/arrêt enfoncé pendant 2 secondes jusqu'à ce que le voyant soit bleu.15 FRANÇAIS Arrêt automatique - L'appareil passe en mode Veille s'il n'a pas été utilisé pendant 10 minutes. Le voyant du bouton marche/arrêt commence à clignoter (Fig. 12). - Pour activer de nouveau l'appareil, appuyez sur le bouton marche/arrêt. L'appareil recommence à chauer. - L'appareil s'éteint automatiquement s'il n'a pas été utilisé pendant 10 minutes après avoir basculé en mode Veille. Le voyant du bouton marche/arrêt s'éteint.
IMPORTANT – EASY DE-CALC
PENTING - EASY DE-CALC
PENTING - EASY DE-CALC
Woolmark Company Pty Ltd
R1703. Woolmark Symbol ( 1)
5 ECO 6 / MAX 7 ‘’ 8 EASY DE-CALC 9 EASY DE-CALC
OptimalTEMP OptimalTEMP
EASY DE-CALC EASY DE-CALC
EASY DE-CALC 10 EASY DE-CALC
7 EASY DE-CALC EASY DE-CALC
EASY DE-CALC EASY DE-CALC
EASY DE-CALC Philips EASY DE-CALC