
GC6820 - Iron PHILIPS - Free user manual and instructions
Find the device manual for free GC6820 PHILIPS in PDF.
Download the instructions for your Iron in PDF format for free! Find your manual GC6820 - PHILIPS and take your electronic device back in hand. On this page are published all the documents necessary for the use of your device. GC6820 by PHILIPS.
USER MANUAL GC6820 PHILIPS
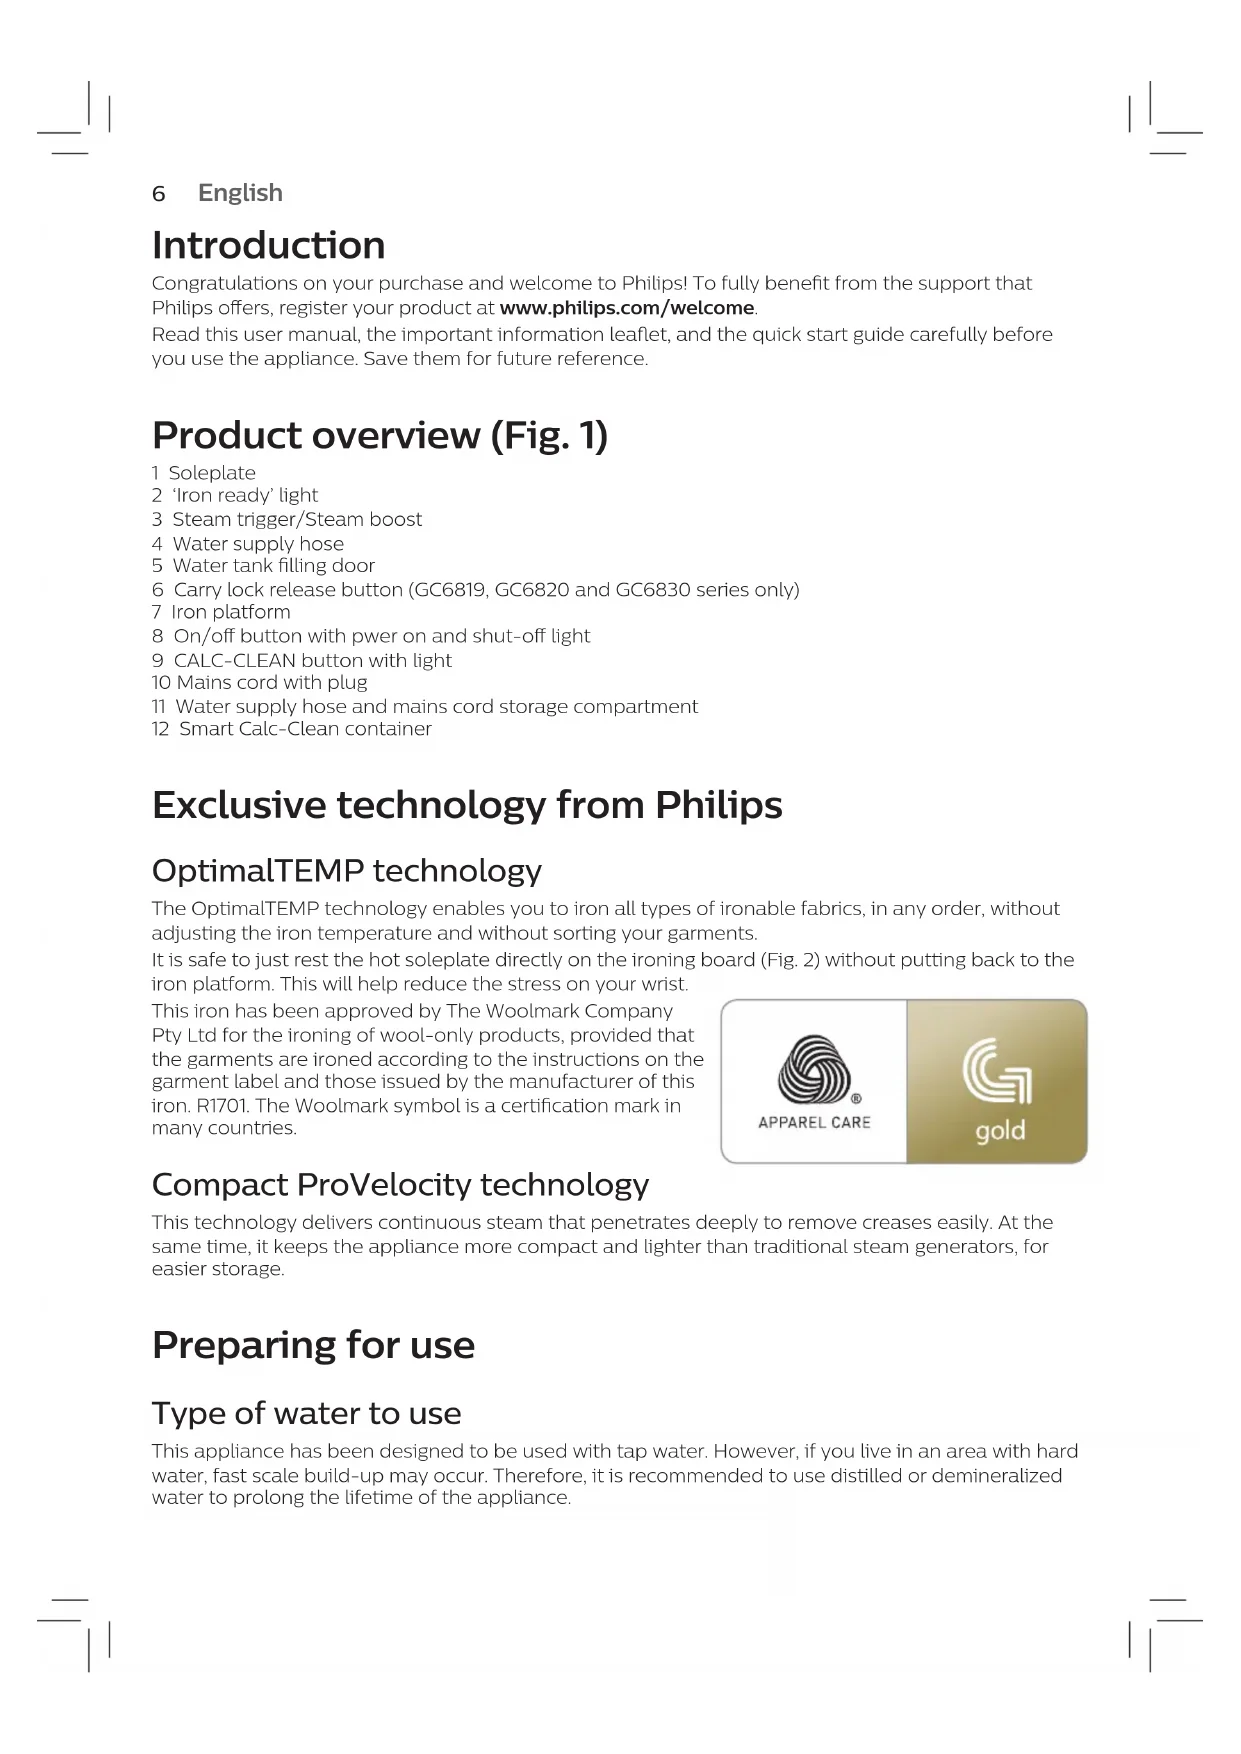
1English 6 Dansk 12 Deutsch 18 Español 25 Français 32 Italiano 39 Nederlands 46 Norsk 52 Português 58 Suomi 65 Svenska 716 Introduction Congratulations on your purchase and welcome to Philips! To fully benet from the support that Philips oers, register your product at www.philips.com/welcome. Read this user manual, the important information leaet, and the quick start guide carefully before you use the appliance. Save them for future reference. Product overview (Fig. 1) 1 Soleplate 2 ‘Iron ready’ light 3 Steam trigger/Steam boost 4 Water supply hose 5 Water tank lling door 6 Carry lock release button (GC6819, GC6820 and GC6830 series only) 7 Iron platform 8 On/o button with pwer on and shut-o light 9 CALC-CLEAN button with light 10 Mains cord with plug 11 Water supply hose and mains cord storage compartment 12 Smart Calc-Clean container Exclusive technology from Philips OptimalTEMP technology The OptimalTEMP technology enables you to iron all types of ironable fabrics, in any order, without adjusting the iron temperature and without sorting your garments. It is safe to just rest the hot soleplate directly on the ironing board (Fig. 2) without putting back to the iron platform. This will help reduce the stress on your wrist. This iron has been approved by The Woolmark Company Pty Ltd for the ironing of wool-only products, provided that the garments are ironed according to the instructions on the garment label and those issued by the manufacturer of this iron. R1701. The Woolmark symbol is a certication mark in many countries. Compact ProVelocity technology This technology delivers continuous steam that penetrates deeply to remove creases easily. At the same time, it keeps the appliance more compact and lighter than traditional steam generators, for easier storage. Preparing for use Type of water to use This appliance has been designed to be used with tap water. However, if you live in an area with hard water, fast scale build-up may occur. Therefore, it is recommended to use distilled or demineralized water to prolong the lifetime of the appliance. English7
Warning: Do not use perfumed water, water from the tumble dryer, vinegar, starch,
descaling agents, ironing aids, chemically descaled water or other chemicals, as they may cause water spitting, brown staining or damage to your appliance. Filling the water tank Fill the water tank before every use or when the water level in the water tank drops below the minimum level. You can rell the water tank at any time during use. 1 Open the water tank lling door (Fig. 3). 2 Fill the water tank up to the MAX indication (Fig. 4). 3 Close the water tank lling door (‘click’). Using the appliance Ironable fabrics Do not iron non-ironable fabrics. - Fabrics with these symbols (Fig. 5) are ironable, for example linen, cotton, polyester, silk, wool, viscose and rayon. - Fabrics with this symbol (Fig. 6) are not ironable. These fabrics include synthetic fabrics such as Spandex or elastane, Spandex-mixed fabrics and polyolens (e.g. polypropylene). Prints on garments are not ironable either. Ironing 1 Place the appliance on a stable and even surface. Note: In order to ensure safe ironing we recommend to always place the base on a stable ironing board. 2 Make sure that there is enough water in the water tank. 3 Remove the mains cord and water supply hose from the storage compartment. 4 Put the mains plug in an earthed wall socket and press the on/o button to switch on the appliance.Wait until the ‘iron ready’ light lights up continuously (Fig. 7). This takes about 2 minutes. 5 For GC6819, GC6820 and GC6830 series only: press the carry lock release button to unlock the iron from the iron platform (Fig. 8). 6 Press and hold the steam trigger to start ironing (Fig. 9). Note: For best ironing results, after ironing with steam, perform the last strokes without steam.
Warning: Never direct steam at people.
Note: When you use the appliance for the rst time, it may take 30 seconds for steam to come out of the appliance. Note: The pump is activated each time you press the steam trigger. It produces subtle rattling sound, which is normal. When there is no water in the water tank, the pump sound is louder. Fill up the water tank with water when the water level drops below the minimum level. Steam boost function 1 Press the steam trigger twice quickly to release a powerful boost of steam for 3 seconds (Fig. 10). Note: It is recommended to use the steam boost function only for stubborn crease. English8 Vertical ironing
Warning: Hot steam is emitted from the iron. Never attempt to remove wrinkles
from a garment while someone is wearing it (Fig. 11). Do not apply steam near your or someone else’s hand. You can use the steam iron in vertical position to remove wrinkles from hanging fabrics. 1 Hold the iron in vertical position, press the steam trigger and touch the garment lightly with the soleplate and move the iron up and down (Fig. 12). Safe rest Resting the iron while rearranging your garment While rearranging your garment, you can rest the iron either on the iron platform or horizontally on the ironing board (Fig. 2). The OptimalTEMP technology ensures the soleplate will not damage the ironing board cover. Auto shut-o - The appliances enters the standby mode if it has not been used for 5 minutes. The light of the on/ o button starts to ash. - To activate the appliance again, press the on/o button or the steam trigger. The appliance starts to heat up again. - The appliance switches o automatically if it has not been used for another 10 minutes after it enters the standby mode. The light in the on/o button goes o.
Warning: Never leave the appliance unattended when it is connected to the mains.
Always unplug the appliance after use. Cleaning and maintenance Smart Calc-Clean System Your appliance has been designed with a Smart Calc-Clean system to ensure that descaling and cleaning is done regularly. This helps to maintain a strong steam performance and prevents dirt and stains coming out of the soleplate over time. To ensure that the cleaning process is performed, the appliance gives regular reminders. Sound and light Calc-Clean reminder After 1 to 3 months of use, the Calc-Clean light starts ashing and the appliance starts beeping to indicate that you have to perform the Calc-Clean process (Fig. 13).Besides that, a second defense step to protect the appliance from scale is integrated: the steam function gets disabled if descaling is not done (Fig. 14). After descaling is done, the steam function will be restored. This takes place regardless of the type of water used.Note: The Calc-Clean process can be performed at any time, even when the sound and light reminder is not activated yet. English9 Performing the Calc-Clean process with the Calc-Clean container