IKE 31842T - Fridge Küppersbusch - Free user manual and instructions
Find the device manual for free IKE 31842T Küppersbusch in PDF.


| Product type | Integrated refrigerator-freezer |
| Brand | Küppersbusch |
| Model | IKE 31842T |
| Niche dimensions (H x W x D) | 1780 mm x 560 mm x 550 mm |
| Weight (estimated) | 60 kg |
| Power supply | 220-240 V, 50 Hz |
| Climate class | T, ST, N, SN (from +10°C to +43°C) |
| Refrigerator temperature (setting) | +2°C to +8°C |
| Freezer temperature (setting) | -15°C to -24°C |
| Coolmatic function | Rapid cooling of the refrigerator (6 hours) |
| Frostmatic function (Super Frost) | Rapid freezing, activate 6 to 24 hours before |
| Freezing capacity (max/24h) | Check the rating plate (estimated 10 kg) |
| Temperature alarm | Yes, visual and audible, can be deactivated |
| Interior lighting | Replaceable bulb, max power on light diffuser |
| Refrigerator defrosting | Automatic |
| Freezer defrosting | Manual, perform when frost > 4 mm |
| Maintenance | Cleaning with warm water and baking soda |
| Safety instructions | Unplug before cleaning; do not use metal objects for defrosting |
| Spare parts | Available from after-sales service (genuine parts) |
| Repairability | By authorized personnel only (refrigerant circuit contains hydrocarbons) |
Frequently Asked Questions - IKE 31842T Küppersbusch
User questions about IKE 31842T Küppersbusch
0 question about this device. Answer the ones you know or ask your own.
Ask a new question about this device
Download the instructions for your Fridge in PDF format for free! Find your manual IKE 31842T - Küppersbusch and take your electronic device back in hand. On this page are published all the documents necessary for the use of your device. IKE 31842T by Küppersbusch.
USER MANUAL IKE 31842T Küppersbusch
Integrated Fridge-Freezers
It is most important that this instruction book should be retained with the appliance for future reference. Should the appliance be sold or transferred to another owner, or should you move house and leave the appliance, always ensure that the book is supplied with the appliance. In order that the new owner can be acquainted with the functioning of the appliance and the relevant warnings.
If this appliance featuring magnetic door seals is to replace an older appliance having a spring lock (latch) on the door or ld, be sure to make that spring lock unusable before you discard the old appliance. This will prevent it from becoming a death-trap for a child.
This must be done before the appliance is built into These warnings are provided in the interface safety. You must read them carefully before installing or using the appliance.
General Safety
This appliance is designed to be operated by adults. Children should not be allowed to tamper with the controls or play with the product.
It is dangerous to alter the specifications or modify this product in any way.
- Care must be taken to ensure that the appliance does not stand on the electrical supply cable. Important: if the supply cord is damaged, it must be replaced by a special cord or assembly available from the manufacturer or its service agent.
Before any cleaning or maintenance work is carried out, be sure to switch off and unplug the appliance.
This appliance is heavy. Care should be taken when moving it
- Ice lollies can cause frost burns if consumed straight from the appliance.
- Take utmost care when handling your appliance so as not to cause any damages to the cooling unit with consequent possible fluid leakages.
- The appliance must not be located close to radiators or gas cookers.
- Avoid prolonged exposure of the appliance to direct sunlight.
- There must be adequate ventilation round the back of the appliance and any damage to the refrigerant circuit must be avoided.
- For freezers only (except built-in models): an ideal location is the cellar or basement.
- Do not use other electrical appliances (such as ice cream makers) Inside of refrigerating appliances, unless they are approved for this purpose by the manufacturer.
Service/Repair
- Any electrical work required to install this appliance should be carried out by a qualified electrician or competent person
This product should be serviced by an authorized 12
Service Centre, and only genuine spare parts should be used.
- Under no circumstances should you attempt to repair the appliance yourself. Repairs carried out by inexperienced persons may cause injury or more serious malfunctioning. Refer to your local Service Centre, and always
- This appliance contains hydrocarbons in its cooling unit; maintenance and recharging must therefore only be carried out by authorized technicians.
Use
- The domestic refrigerators and freezers are designed to be used specifically for the storage of edible foodstuffs only.
- Best performance is obtained with ambient temperature between +18^ and +43^ (class T); +18^ and -38^ (class ST); +16^ and +32^ (class N); +10^ and +32^ (class SN). The class of your appliance is shown on its rating plate.
Warning: when the ambient temperature is not included within the range indicated for the class of this appliance, the following instructions must be observed: when the ambient temperature drops below the minimum level, the storage temperature in the freezer compartment cannot be guaranteed; therefore it is advisable to use the food stored as soon as possible.
- Frozen food must not be re-frozen once it has been thawed out.
-
Manufacturers' storage recommendations should be strictly adhered to. Refer to relevant instructions.
-
The inner lining of the appliance consists of channels through which the refrigerant passes. If these should be punctured this would damage the appliance beyond repair and cause food loss. DO NOT USE SHARP INSTRUMENTS to scrape off frost or ice. Frost may be removed by using the scraper provided. Under no circumstances should solid ice be forced off the liner. Solid ice should be allowed to thaw when defrosting the appliance.
iAVERTISSEMENTS ET CONSEILS IMPORTANTS
This appliance complies with the following CE.E.C.Directives:
- 87/308 EEC of 2/6/87 relative to radio interference suppression.
- 73.23 EEC of 19.2.73 (Low Voltage Directive) and subsequent modifications;
- 89/336 EEC of 3.5.89 (Electromagnetic Compatibility Directive) and subsequent modifications.
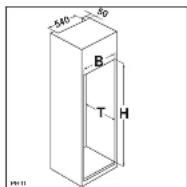
Dimensions of housing
Height 1780 mm
Depth 550 mm
Width 580mm
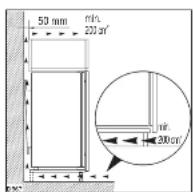
For safety reasons, minimum ventilation must be as shown in Fig.
Attention: keep ventilation openings clear of obstruction.
It is necessary that the niche is provided with a conduct of ventilation having the following dimensions:
Depth 50 mm
Width 540mm
ATTENTION
It must be possible to disconnect the appliance from the mains power supply; the plug must therefore be easily accessible after installation.
- Do not place carbonated or fizzy drinks in the freezer as it creates pressure on the container, which may cause it to explode, resulting in damage to the appliance.
Installation
During normal operation, the condenser and compressor at the back of the appliance heat up considerably. For safety reasons, minimum ventilation must be as shown in the relevant Figure.
Attention: keep ventilation openings clear of obstruction.
- If the appliance is transported horizontally, it is possible that the oil contained in the compressor flows in the refrigerant circuit. It is advisable to wait at least two hours before connecting the appliance to allow the oil to flow back in the compressor.
- There are working parts in this product which heat up. Always ensure that there is adequate ventilation as a failure to do this will result in component failure and possible food loss. See installation instructions.
- Parts which heat up should not be exposed. Wherever possible the back of the product should be against a wall.
- If the appliance has been transported horizontally, it is possible that the oil contained in the compressor flows in the refrigerant circuit. It is advisable to wait at least two hours before connecting the appliance to allow tie oil to flow back in the compressor.

Environment Protection
This appliance does not contain gasses which could damage the ozone layer, in either its refrigerant circuit or insulation materials. The appliance shall not be discarded together with the urban refuse and rubbish. Avoid damaging the cooling unit, especially at the rear near the heat exchanger. Information on your local disposal sites may be obtained from municipal authorities. The materials used on this appliance marked by the symbol are recyclable.
CONTENTS
Warnings 12
Use - Cleaning the interior .13 Use: Central Barrel, Temperature setting button, Tempersatve indicator, Supper cooling, Operation . 14
Use - Fresh food refrigeration - Movable shelves - Positioning the door shelves - Control Panel . . .15
Use - Temperature setting buttons - Temperature indicator - Super-Frost - Alarm reset - Operation
Freezing fresh food 16
Use - Storage of frozen food - Thawing Ice-cube production - Hints - Hints for refrigeration - Hints for
Freezing - Hints for storage of Frozen food 17
Maintenance - Periods of no operation - Periodic cleaning - Interior light - Defrosting 18
Customer service and spare parts - Installation - Location - Electrical connection 19
Installation - Dimensions of housing 20
USE
Cleaning the interior
Before using the appliance for the first time, wash the interior and all internal accessories with lukewarm water and some neutral soap so as to remove the typical smell of a brand-new product, then dry thoroughly.

Do not use detergents or abrasive powders, as these will damage the finish.
Use of the fridge
Control Panel
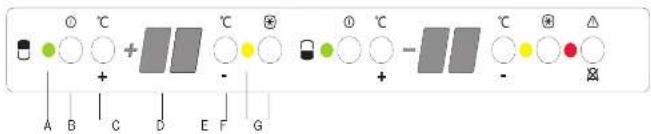
A. On/OFF light
B Fridge button ON/OFF
C Temperature setting button (warmest)
D Temperature indicator
E Temperature setting button (coldest)
F Super cooling light
G Super cooling button
A. Light ON/OFF
B. Button ON/OFF
ON: Press the button (B). The pilot light (A) switches on.
OFF: Keep press the button (B) until the pilot light (A) and the temperaure indicator switched off.
C-E.Temperature setting buttons
The temperature can be adjusted between +2^ and -8^ .
By pressing the button (C or E), the current temperature setting flashes on the indicator. It is possible to modify the setting temperature only with a flash indicator. To set a warmer temperature, press button (C). To set a colder temperature, press button (E). The indicator displays the newly selected temperature for a few seconds and then shows again the inside compartment temperature.
The newly selected-temperature must be reached after 24 hours.
Attention!
During the stability period by the first starting the temperature displayed can not correspond to the setting temperature. During this time it is possible that the temperature displayed is lower than the setting temperature.
D. Temperature indicator
During normal functioning the indicator shows the temperature inside the fridge.
Attention!
Difference between the temperature displayed and temperature setting is normal. Especially when:
- a new setting has recently been selected
- the door has been left open for a long time
warm food has been placed in the compartment
F. Super cooling pilot light
G. Super cooling button
The maximum performance is obtained by setting the supercooling function. It's recommended when loading large quantities of food.
Press the supercooling button (G). The relevant pilot light (F) switches on.
The internal temperature goes down to +2^
After about 6 hours the supercooling function switches off automatically.
Operation
Insert the plug in the power socket. Press the button ON/OFF (B). The fridge is switched on.
The fridge is pre-set to run at +5^ . This temperature will be reached in a few hours.
As soon as the appliance is switched on the temperature indicator (D) shows the current temperature inside the fridge.
However, when the ice becomes very thick on the inner liner, complete defrosting should be carried out and it is advisable to carry out this operation when the appliance is empty.
To carry out complete defroating of the freezer compartment as follows:
1. pull out the plug from the wall socket or turn the thermostat knob to the O - O setting;
2. remove any stored food, wrap it in several layers of newspaper and put it in a cool place;
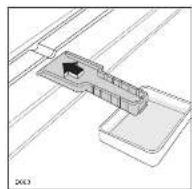
3. leave the door open, insert the plastic scraper in the appropriate seating at the bottom centre, placing a basin underneath to collect the defrost water;
4. when defrosting is completed, dry the interior thoroughly and refill the plug; keep the scraper for future use;
5. turn the thermostat knob back to the required setting or replace the plug in the power socket. After letting the appliance run for at least half an hour, replace the previously removed food into the compartment.

Important:
Never use sharp metal tools to scrape off frost from the evaporator as you could damage it.
Do not use a mechanical device or any artificial means to speed up the thawing process other than those recommended by the manufacturer.
A temperature rise of the frozen food packs, during defrostling, may shorten their safe storage life.
CUSTOMER SERVICE AND SPARE PARTS
If the appliance is not functioning properly, check that:
- the plug is firmly in the wall socket and the mains power switch is on;
- there is an electricity supply (find out by plugging in another appliance);
- the thermostat knob is in the correct position.
- if there are water drops on the bottom of the cabinet, check that the defrost water drain
opening is not obstructed (see "Defrosting" section).
If your appliance is still not working properly after making the above checks, contact the nearest service centre.
To obtain fast service, it is essential that when you apply for it you specify the model and serial number of your appliance which can be found on the guarantee certificate or on the rating plate located inside the appliance, on the bottom left-hand side.
INSTALLATION
Location
The appliance should be installed well away from sources of heat such as radiators, boilers, direct sunlight etc.
Electrical connection
Before plugging in, ensure that the voltage and frequency shown on the serial number plate correspond to your domestic power supply. Voltage can vary by ± 6% of the rated voltage.
For operation with different voltages, a suitably sized auto-transformer must be used.
The appliance must be earthed.
The power supply cable plug is provided with a contact for this purpose.
If the domestic power supply socket is not earthed, connect the appliance to a separate earth in compliance with current regulations, consulting a specialist technician.
The Manufacturer declines all responsibility if the above safety precautions are not observed.
MAINTENANCE
An unplug the appliance before carrying out any maintenance operation.
Warning
This appliance contains hydrocarbons in its cooling unit; maintenance and recharging must therefore only be carried out by authorized technicians.
Periodic cleaning
Clean the inside with warm water and bicarbonate of soda. Rinse and dry thoroughly.
Clean the condenser (black grill) and the compressor at the back of the appliance with a brush or a vacuum cleaner. This operation will improve the performance of the appliance and save electricity consumption.
Interior light
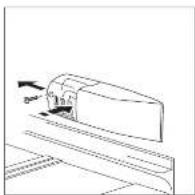
The light bulb inside the refrigerator compartment can be reached as follows:
unscrew the light cover securing screw.
- unhook the moving part as shown in the figure.
It the light does not come on when the door is open, check that it is screwed into place properly. If it still does not light up, change the bulb. The rating is shown on the light bulb cover.
Defrosting
Frost is automatically eliminated from the evaporator of the refrigerator compartment every time the motor compressor stops, during normal use. The defrost water drains out through a trough into a special container at the back of the appliance, over the motor compressor, where it evaporates.
It is important to periodically clean the defrost water drain hole in the middle of the refrigerator compartment channel to prevent the water overflowing and dripping onto the food inside. Use the special cleaner provided, which you will find already inserted into the drain hole.
The freezer compartment, however, will become progressively covered with frost. This should be removed with the special plastic scraper provided, whenever the thickness of the frost exceeds 4mm . During this operation it is not necessary to switch off the power supply or to remove the foodstuffs.
ds of non-operation
When the appliance is not in use for long periods, take the following precautions:
remove the plug from the wall socket; remove all food:
defrost and clean the interior and all accessories;
leave the door ajar to allow air to circulate to prevent unpleasant smells.
Fresh food refrigeration
To obtain the best performance:
- do not store warm food or evaporating liquids in the refrigerator;
- do cover or wrap the food, particularly if it has a strong flavour.
- Position food so that air can circulate freely round it.
Movable shelves
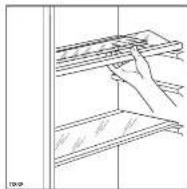
The walls of the refrigerator are equipped with a series of runners so that the shelves can be positioned as desired.
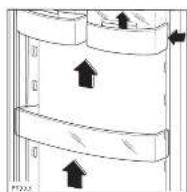
Positioning the door shelves
to permit storage of food packages of various sizes, the door shelves can be placed at different heights.
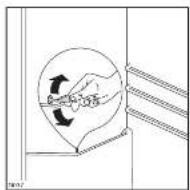
To make these adjustments proceed as follows: Gradually pull the shell in the direction of the arrows until it comes free, then reposition as required.
Use of the freezer
Control Panel
H. On/OFF light
1 Freezer button ON/OFF
J Temperature setting button (warmest)
K Temperature indicator
L Temperature setting button (coldest)
M Super frost light
N Super frost button
Alarm reset light
P Alarm reset button
H. Light ON/OFF
I. Button ON/OFF
ON: Press the button (I). The pilot light (H) switches on.
OFF: Keep press the button (I) until the pilot light (H) and the temperature indicator switched off.
J-L. Temperature setting buttons
The temperature can be adjusted between -15^ and -24^ .
By pressing the button (J or L), the current temperature setting flashes on the indicator. It is possible to modify the setting temperature only with a flash indicator. To set a warmer temperature, press button (J). To set a colder temperature, press button (L). The indicator displays the newly selected temperature for a few seconds and then shows again the inside compartment temperature.
The newly selected-temperature must be reached after 24 hours.
Attention!
During the stability period by the first starting the temperature displayed can not correspond to the setting temperature. During this time it is possible that the temperature displayed is lower than the setting temperature.
K. Temperature indicator
During normal functioning the indicator shows the warmest temperature inside the freezer.
Difference until 5^ inside the compartment are quite normal.
Attention!
Difference between the temperatu displayed and temperature setting is normal. Especially when:
- a new setting has recently been selected
the door has been left open for a long time.
warm food has been placed in the compartment
M. Super frost pilot light
N. Super frost button
To freeze fresh foods, the "Super frost" function must be activated. Press the super frost button (N). The relevant pilot light (M) switches on
The function can be deactivated at any time, by pressing the button (N), otherwise it automatically switched off. With deactivated functionth pilot light (M) switches off.
O Alarm reset light
P Alarm reset button
In the event of an abnormal temperature rise inside the freezer (e.g. power cut) warning light (O) will start to flash and a buzzer will sound.
After the temperature has returned to normal, the warning light (C) will continue to flash, although the buzzer has stopped.
When the alarm button () is pressed, the warmest temperature reached in the compartment flashes on the indicator (K).
If the power has been off for a long time, frozen food should be consumed as quickly as possible, or cooked and then re-frozen.
Operation
Insert the plug in the power socket. Press the button ON/OFF (1). The freezer is switched on.
The freezer is pre-set to run at -18^ . This temperature will be reached in a few hours
As soon as the appliance is switched on the temperature indicator (K) shows the current temperature inside the freezer, the alarm reset light (O) flashes and a buzzer sounds. Press the alarm reset button (P). The buzzer stops and the alarm light (O) continues to flash until the setting temperature is reached.
Freezing fresh food
To freeze fresh food, press the Super Frost button (N).
Place the food to be frozen in the upper compartment. The maximum quantity of food which can be frozen in 24 hrs. is shown on the rating plate; Warning!
When use the "Super Frost" function:
| about 6 hrs before | Introducing small quantities of fresh food (about 5 kg) |
| about 24 hrs before | Introducing the maximum quantity of food (see rating plate) |
| not needed | Introducing frozen food |
| not needed | Introducing small quantities of fresh food daily 2 kg maximum |
Storage of frozen food
When first starting-up or after a period out of use, before putting the products in the compartment let the appliance run for at least two hours on the fast frost setting, then push again the Super-frost button.
Important
If there is a power failure when food is in the freezer, do not open the door of the freezer compartment. The frozen food will not be affected if the power cut is of short duration (up to 6-8 hours) and the freezer compartment is full, otherwise, it is recommended that the food should be used within a short time (a temperature Increase increase of the frozen food shortens its safe storage period).
HINTS
Hints for refrigeration
Useful hints:
Meat (all types): wrap in polythene bags and place on the glass shelf above the vegetable drawrer.
For safely, store in this way only one or two days at the most.
Cooked foods, cold dishes, etc.: these should be covered and may be placed on any shelf.
Fruit and vegetables: these should be thoroughly cleaned and placed in the special drawer(s) provided.
Butter and cheese: these should be placed in special airtight containers or wrapped in aluminium foil or polythene bags to exclude as much air as possible.
Milk bottles: these should have a cap and should be stored in the bottle rack on the door.
Bananas, potatoes, onions and garlic, if not packed, must not be kept in the refrigerator.
Hints for freezing
To help you make the most of the freezing process, here are some important hints:
- the maximum quantity of food which can be frozen in 24 hrs. is shown on the rating plate;
- the freezing process takes 24 hours. No further food to be frozen should be added during this period;
- prepare food in small portions to enable it to be rapidly and completely frozen and to make it
Thawing
Deep-frozen or frozen food, prior to being used, can be thawed in the refrigerator compartment or at room temperature, depending on the time available for this operation.
Small pieces may even be cooked still frozen, directly from the freezer; in this case, cooking will take longer.
Ice-cube production
This appliance is equipped with one or more trays for the production of ice-cubes. Fill these trays with water, then put them in the freezer compartment.
Do not use metallic Instruments to remove the trays from the freezer.
possible subsequently to thaw only the quantity required:
- wrap up the food in aluminium foil or polythene and make sure that the packages are airtight;
- do not allow fresh, unfrozen food to touch food which is already frozen, thus avoiding a rise in temperature of the latter;
water ices, if consumed immediately after removal from the freezer compartment, can possibly cause the skin to be freeze burnt; - it is advisable to show the freezing-in date on each individual pack to enable you to keep tab of the storage time;
- on the inner door or special card (if supplied) you will find sketches of various animals and food types together with the recommended storage time (in months) from the time of freezing;
- do not put carbonated liquids (fizzy drinks, etc.) in the freezer compartment as they may burst.
Hints for storage of frozen food
To obtain the best performance from this appliance, you should:
- not open the door frequently or leave it open longer than absolutely necessary.
- Once defrosted, food deteriorates rapidly and cannot be refrozen.
- Do not exceed the storage period indicated by the food manufacturer.