
IPD01 - Other computer accessories HAIER - Free user manual and instructions
Find the device manual for free IPD01 HAIER in PDF.
User questions about IPD01 HAIER
0 question about this device. Answer the ones you know or ask your own.
Ask a new question about this device
Download the instructions for your Other computer accessories in PDF format for free! Find your manual IPD01 - HAIER and take your electronic device back in hand. On this page are published all the documents necessary for the use of your device. IPD01 by HAIER.
USER MANUAL IPD01 HAIER
Speaker for iPad / iPhone / iPod Docking
Model: IPD-01
User's Guide
Important Safety Instructions
When used in the directed manner, this unit has been designed and manufactured to ensure your personal safety. However, improper use can result in potential electrical shock or fire hazards. Please read all safety and operating instructions carefully before installation and use, and keep these instructions handy for future reference. Take special note of all warnings listed in these instructions and on the unit.
- Water and Moisture
The unit should not be used near water. For example: near a bathtub, washbowl, kitchen sink, laundry tub, swimming pool or in a set basement.
- Ventilation
The unit should be situated so that its location or position does not interfere with its proper ventilation. For example, it should not be situated on a bed, sofa, rug or similar surface that may block the ventilation openings. The ventilation should not be impeded by covering the ventilation openings with items, such as newspapers, table-cloths, curtains, etc. Also, it should not be placed in a built-in installation, such as a bookcase or cabinet, which may impede the flow of air through the ventilation openings.
- Heat & Flame
The unit should be situated away from heat sources such as radiators, heat registers, stoves or other appliances (including amplifiers) that produce heat.
No naked flame sources, such as lighted candles, should be placed on the apparatus.
- Power Source
The unit should be connected to a power supply only of the type described in the operating instructions or as marked on the appliance. Where the AC/DC Adaptor is used as the disconnect device, the disconnect device shall remain readily operable.
- Power Cord Protection
Power supply cords should be routed so that they are not likely to be walked on or pinched by items placed upon or against them. It is always best to have a clear area from where the cord exits the unit to where it is plugged into an AC outlet.
- Cleaning
The unit should be cleaned only as recommended. See the section "Care and Maintenance" of this manual for cleaning instructions.
- Object and Liquid Entry
Care should be taken so that objects do not fall and liquids are not spilled into any openings or vents located on the product. It shall not be exposed to dripping or splashing and that no objects filled with liquids, such as vases, shall be placed on the apparatus.
- Attachments
Do not use attachments no recommended by the product manufacturer.
- Lightning and Power Surge Protection
Unplug the unit from the wall outlet and disconnect the periods of time. This will prevent damage to the product due to lightning and power-line surges.
- Overloading
Do not overload wall outlets, extension cords, or integral convenience receptacles as this can result in a risk of fire of electric shock.
- Damage Requiring Service
This unit should be serviced by qualified service personnel when:
A.The power supply cord or plug has been damaged.
B. Objects have fallen into or liquid has been spilled into the enclosure.
C. The unit has been exposed to rain.
D.The unit has been dropped or the enclosure damaged.
E.The unit exhibits a marked change in performance or does not operate normally.
- Periods of Nonuse
If the unit is to be left unused for an extended period of time, such as a month or longer, the power cord should be unplugged from the unit to prevent damage or corrosion.
- Servicing
The user should not attempt to service the unit beyond those methods described in the user's operating instructions. Service methods not covered in the operating instructions should be referred to qualified service personnel.
Features
Thank you for purchasing the iPad/ iPhone /iPod Docking Speaker. This model incorporates following features :
Different iPod/iPhone/iPad models Player/ Re-charger
Audio line-in(AUX-IN) for connectingother digital audioplayer
- Preset EQ effect
Built-in 2 HighFidelity Speakers
- AC-DC poweradaptor operated
"Made for iPod", "Made for iPhone" and "Made for iPad" mean that an electronic accessory has been designed to connect specifically to iPod, iPhone or iPad respectively and has been certified by the developer to meet Apple performance standards. Apple is not responsible for the operation of this device or its compliance with safety and regulatory standards. Please note that the use of this accessory with iPad, iPhone or iPod may affect wireless performance.
iPhone, iPod, iPod classic, iPod nano, iPod shuffle and iPod touch are trademarks of Apple Inc., registered in the U.S. and other countries. iPad is a trademark of Apple Inc.
Installation
AC-DC Power Adaptor Connection
The unit is be powered by an external AC-DC power adaptor, required the output DC 5V 3500mA (included).
(1)Firmly and securely plug the adaptor's AC plug into AC main outlet.
(2)Connect the adaptor's DC output plug to the DC-in jack of the unit.
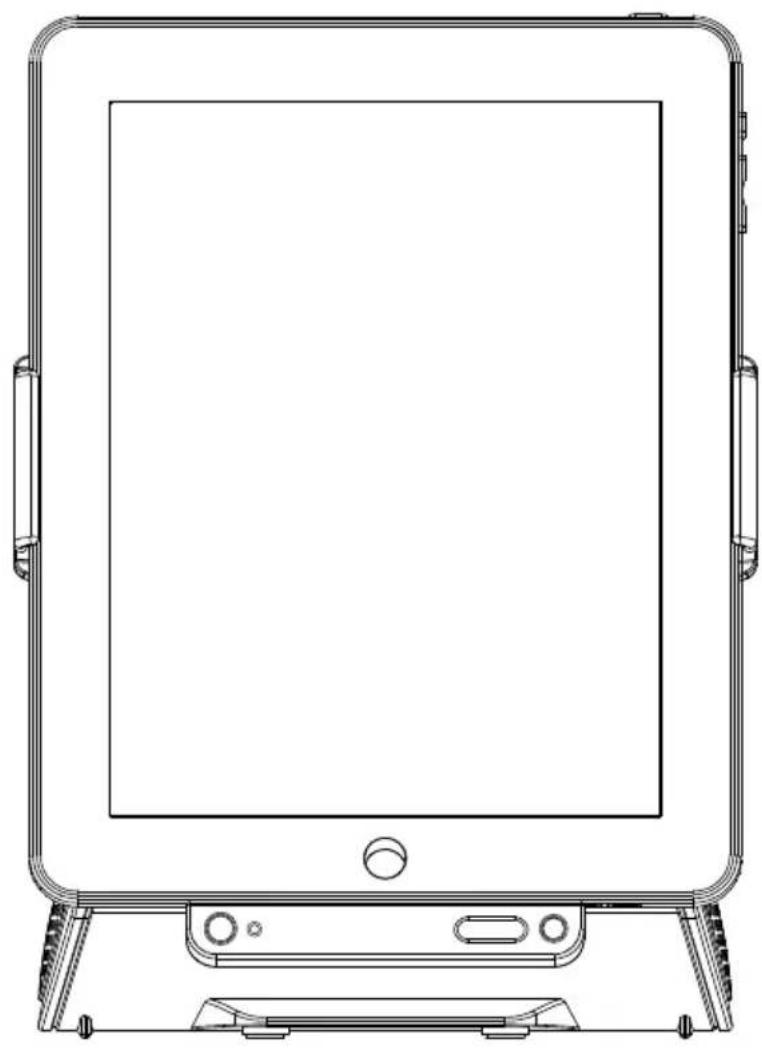
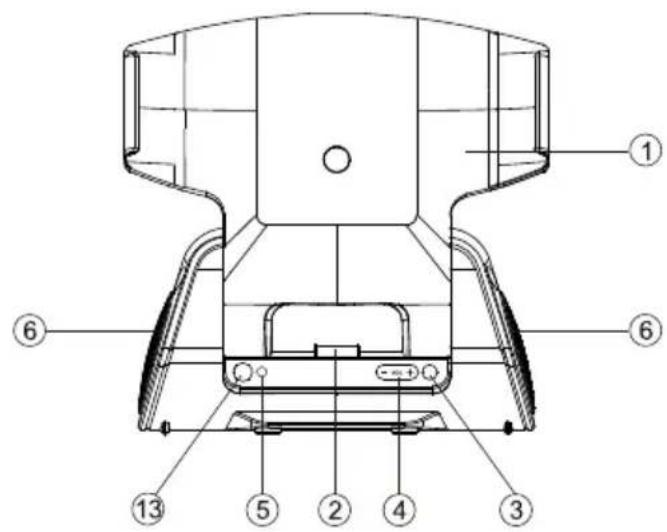
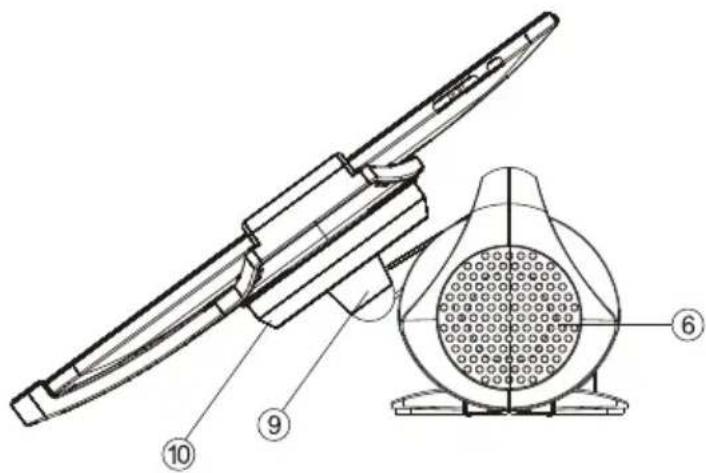
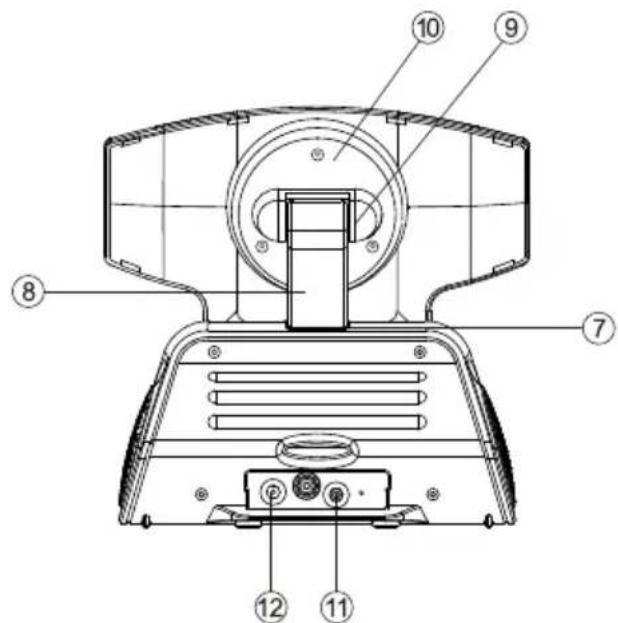
Description of Parts
Main Unit
Front View
Side View
Rear View
1.iPad Support Frame
2.iPad / iPhone / iPod docking connector
3.POwER 品 button----Turn the unit on/off;Select iPad or AUX IN (Auxiliary) mode
4.VOLUME + /-button----Adjust volume level up or down
5.Power Status indicator
6.Speakers
7. Base Hinge --- For Support Arm angle adjustment.
8.Support Arm ---- Connect the Support Frame to the main unit.
9.Frame Hinge ---- To adjust the viewing angle of the iPad Support Frame forward or back.
10. Rotating Head ---- To rotate the Support Frame 90 degrees counterclockwise (front view) for landscape operation.
11.AUX IN jack ---- Auxiliary audio signal input
12.DC-in jack ----For the connection of external DC power supply
13. Remote Control Infrared sensor
Description of Parts
Remote Control
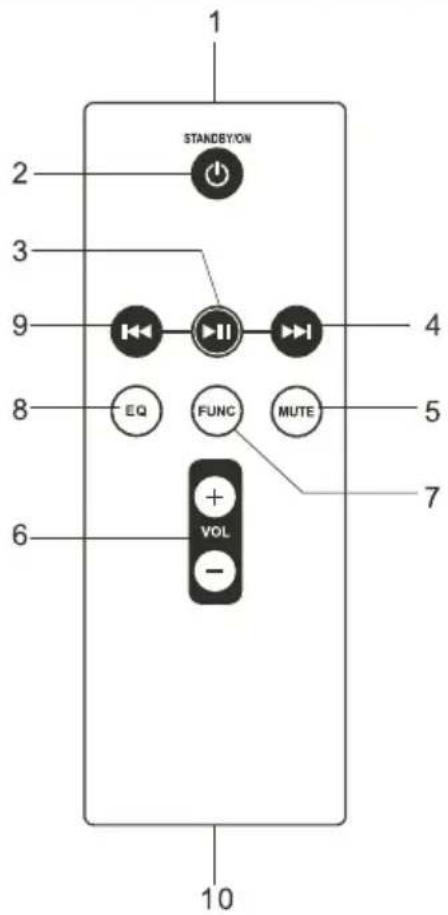
1.Infrared Transmitter
2.STANDBY/ON button --- Turn the unit on and off
3.iPod button ---- iPod play / pause function
4.iPod▶按钮 ---- Skip tracks Forward ; perform high-speed search
5.MUTE button --- Mute the volume
6.VOL + / - button --- Adjust volume level up and down
7 FUNC button --- Select iPad/iPhone or AUX (Auxiliary) mode
8.EQ button --- Select preset EQ effect
9.iPod button ---- Skip tracks backward ; perform high-speed search
10.Battery Compartment
Listening to iPad / iPhone / iPod
This model adopts different iPad / iPhone / iPod models.
1.Insert your iPad / iPhone / iPod into the docking port by placing the connector on the bottom of the iPad / iPhone / iPod onto connector in the docking bay.
Caution: Please be careful when seating the iPad / iPhone / iPod into the docking to avoid damaging the 30-pin connector on the iPad / iPhone / iPod or in the docking system.
-
Press the POWER button once to turn on the unit. Note: Press the POWER button which will toggle between iPad and AUX-IN mode.
-
Press the POWER button until iPad mode is selected, the power status indicator lights on. From your iPad / iPhone / iPod :
-
To start playback music, press the PLAY▶ button.
- To pause the music, press the PAUSE button.
- When a song playback, press and hold the / button to perform high speed search forward / backward.
To skip to next or previous song, press the button.
From the main unit :
- You may press the VOLUME + / - button to adjust the volume to a desired level.
Note : The volume level cannot be adjusted by the volume control of your iPad / iPhone / iPod after being docked.
- To turn off the unit, press and hold the POWER button until the power status indicator lights off.
When the unit is powered by the external DC adaptor and once the iPad / iPhone / iPod connected to the docking port, the unit recharges the iPad / iPhone / iPod battery.
Listening to an External Audio Source
The unit provides an auxiliary audio signal input for connecting external audio device.
- Connect an audio cable (not included) with 3.5mm stereo plug to the AUX IN jack located at the back of the unit.
- Connect the other end of the cable to Line Out jack or Headphone jack of your external audio device.
- Turn on the external audio device.
- Press the POWER button once to turn on the unit.
Note: Press the POWER button which will toggle between iPad and AUX-IN mode.
-
Press the POWER button until AUX-IN mode is selected, the power status indicator blinks.
-
The volume level can now be controlled through the main unit. Operate all other functions on the auxiliary device as usual.
Note :
- If you're connected the Line Out Jack of your external device then you only need to adjust the volume control of this unit. If you're connected the Headphone Jack of your external device, then you may need to adjust both the volume control of your external device and the volume control of this unit to find the most desirable volume setting.
- Press and hold the button turning off the unit when you finish listening. Don't forget to switch off the power of your external device as well.
Preset EQ
Preset EQ
The unit provides 4 preset EQsettings for yourselection.
In either iPad/iPhoneor AUX(auxiliary) mode :
- To select the preset EQ, press the EQ button from the remote control.
- Each press of the EQbutton will scroll through following selection.

Care and Maintenance
- Do not subject the unit to excessive force, shock, dust or extreme temperature.
- Do not tamper the internal components of the unit.
- Clean your unit with a damp (never wet) cloth. Solvent or detergent should never be used.
- Avoid leaving your unit in direct sunlight or in hot, humid or dusty places.
- Keep your unit away from heating appliances and sources of electrical noise such as fluorescent lamps or motors.
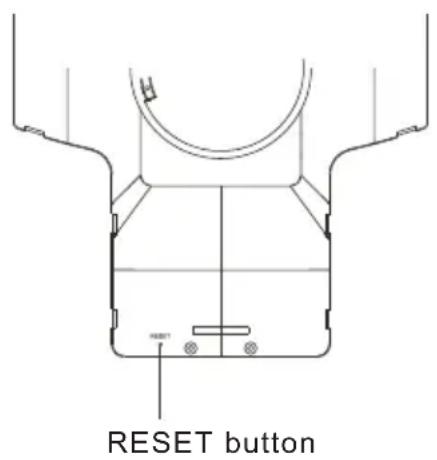
Resetting the Unit
If the unit experiences a power surge or electric shock, it is possible that the internal micro-controller may lock up and the unit will not respond to any commands from the panel controls.
- In this event, unplug and then reconnect the AC power plug into the wall outlet.
2.Use a straightened paper clip, toothpick or similar objects to press the RESET button located at the rear of the Support Frame (see the below figure). The reset operation clears the system memory and all of your previous settings will be erased.
CAUTION: DO NOT USE SHARP, POINTED OBJECT TO PRESS THE RESET BUTTON. IT MAY DAMAGE THE RESET SWITCH INSIDE THE UNIT.
Technical Data
Power Adaptor :
Input AC 100V - 240V ~ 50 / 60 Hz
Output DC 5V 3500mA
Power Supply for the unit : DC 5V 3500mA
Compliance with FCC Regulations
The equipment has been tested and found to comply with the limits for a Class B digital device, pursuant to Part 15 of the FCC Rules. These limits are designed to provide reasonable protection against harmful interference in a residential installation. This equipment generates, uses, and can radiate radio frequency enegy and, if not installed and used in accordance with the instructions, may cause harmful interference to radio communications. However, there is no guarantee that interference will not occur in a particular installation. If this equipment does cause harmful interference to radio or television reception, which can be determined by turning the equipment off and on, the user is encouraged to try to correct the interference by one or more of the following measures:
- Reorient or relocate the receiving antenna.
- Increase the separation between the equipment and receiver.
- Connect the equipment into an outlet on a circuit different from that to which the receiver is connected.
- Consult the dealer or an experienced radio/television technician for assistance.
THE SPECIFICATION AND EXTERNAL APPEARANCE OF THE SET ARE SUBJECT TO CHANGE WITHOUT PRIOR NOTICE.
Warranty
This Haier brand product, when shipped in its original container, will be free from defective workmanship and materials, and agrees that it will, at its option, either repair the defect or replace the defective product with a new or re-manufactured equivalent at no change to the purchaser, for parts or labor for the periods set forth below:
This warranty does not apply to the appearance of the product or the exterior of the product, which has been damaged or defaced, altered or modified in design or construction. It does not apply to the additional excluded items set forth below:
The warranty commences on the date the item was purchased and the original purchase receipt must be presented to the authorized service center before warranty repairs are rendered.
The limited warranty described herein is in addition to whatever implied warranties may be granted to purchasers by law. ALL IMPLIED WARRANTYES INCLUDING THE WARRANTYES OF MERCHANT ABILITIES AND FITNESS FOR USE ARE LIMITED TO THE PERIOD(s) FROM THE DATE OF PURCHASE SET FORTH BELOW. Some states do not allow limitations on how long an implied warranty lasts, so the above limitation may not apply to you.
Neither the sales personnel of the seller nor any other person is authorized to make any warranties other than those described herein, or to extend the duration of any warranties beyond the time period described herein on behalf of Haier.
The warranties described herein shall be the sole and exclusive warranties granted by Haier and shall be the sole and exclusive remedy available to the purchaser. Correction of defects in the manner and for the period of time described herein, shall constitute complete fulfillment of all abilities and
Responsibility of Haier to the purchaser with respect to the product, and shall
Constitute full satisfaction of all claims, whether based on contract, negligence, strict duality or otherwise. In no event shall Haier be liable, or in any way responsible for any damages or defects in the product which were caused by repairs or attempted repairs performed by anyone other than an authorized service center or dealer; nor shall Haier be liable, or in any way responsible for incidental or consequential economic or property damage. Some states do not allow the exclusion of incidental or consequential damages, so that above exclusion may not apply to you.
THIS WARRANTY GIVES YOU SPECIFIC LEGAL RIGHTS. YOU MAY ALSO HAVE OTHER RIGHTS WHICH VARY FROM STATE TO STATE.
Warranty period for this product: 90 days for Labor, one year for parts.
Additional items excluded from warranty coverage: nonrechargeable batteries.
Where to obtain service: For the location of the nearest Haier authorized service center or to obtain product literature, accessories, supplies or customer assistance, please call 1-877-337-3639.
What to do to obtain service: ship or carry in your product to an authorized service dealer or center .Be sure to have proof of purchase.
If you ship the product, be sure it ispackaged carefully. Haier America
New York, NY 10018