370 - Speaker Aurum - Free user manual and instructions
Find the device manual for free 370 Aurum in PDF.

User questions about 370 Aurum
0 question about this device. Answer the ones you know or ask your own.
Ask a new question about this device
Download the instructions for your Speaker in PDF format for free! Find your manual 370 - Aurum and take your electronic device back in hand. On this page are published all the documents necessary for the use of your device. 370 by Aurum.
USER MANUAL 370 Aurum
natural_image
Exterior view of a multi-tiered audio amplifier with speakers and decoders (no text or symbols visible)ENGLISH
DEUTSCH
FRANÇAIS
ESPAÑOL
USER INSTRUCTIONS
BEDIENUNGSANLEITUNG
NOTICE D'UTILISATION
natural_image
Line drawing of various electronic speakers arranged in a row (no text or symbols)


Contents/Inhalt/Sommaire/Índice
| ENGLISH | Safety notes 3-4Setting up 5-6Stands and wall mounts 6Connecting up your amplifier 6-9Beware of clipping 9Tips for better acoustics 10Care of loudspeakers 11What to do if your speakers don't sound right ? 12 | |
| DEUTSCH | Sicherheitshinweise 13-14Aufstellung 15-16Stative und Wandhalterungen 16Anschluss an den Verstärker 16-19Vorsicht Clipping 19Tipps für eine bessere Akustik 20Pflege der Lautsprecher 21Was tun in Störungsfällen ? 22 | |
| FRANÇAIS | Sécurité 23-24Installation 25-26Pieds et supports muraux 26Raccordement 26-29Attention au «clipping» 30Conseils pour une meilleure acoustique 30Nettoyage des haut-parleurs 31Que faire en cas d'anomalies ? 32 | |
| ESPAÑOL | Seguridad 33-34Disposición 35-36Soportes de pie y de pared 36Conexión al amplificador 36-39Culdado con el Clipping 39Consejos para una mejor acústica 40El mantenimiento de las cajas acústicas 41¿Qué hacer en caso de avería? 42 |
First of all, thank you for deciding on AURUM loudspeakers.
It is to satisfy the high expectations of music lovers and connoisseurs such as you that we build loudspeakers of a class that is well above average. Even though you may already be familiar with them, we list below a few ground rules that will enable you to make optimal use of your loudspeakers.
Safety advice for passive loudspeakers
Please take time to read through the manual carefully and follow all the steps describing how to set up and operate the loudspeakers. Keep the manual somewhere you can quickly access it should you have any questions later on.
- The stability of loudspeakers (especially large units) depends on the nature of the surface on which they stand. Carpets are often very poor for stability. Even an average bump can cause a loudspeaker to fall over and be a hazard for persons or pets in the vicinity. Stability can be significantly improved by using "spikes", but care should be taken during assembly as the sharp points can cause injury and the spikes can damage the floor. On smooth floors, the loudspeakers can be stabilised with Velcro or double-sided tape. Loudspeakers should never be used as a seat or as a substitute for a ladder!
- Use only wheeled furniture, stands or wall mounting systems and other devices for attaching and installing the products, which are available from the manufacturer and are sold for or with the product. To avoid damage or injury through tipping over, please be careful when moving table devices or stands on which the speakers are mounted. If wall-mounting the product, take special care that all components are securely screwed! Additional securing equipment (chains, etc.) should be fitted.
- The location for the loudspeakers should be dry and not too cold. Constant high humidity or strong sunlight (UV radiation) can cause your loudspeakers to age prematurely and consequently affect their functioning.
- Very high volume levels for long periods of time are not only annoying for your neighbours, but can also be harmful to the health of the user!
- When loudspeakers are overloaded with very high volume levels, there is a risk of individual components in crossover circuits or individual speakers burning out. In particularly bad cases, it is even possible for fire to break out inside a speaker. Speakers operated at these extremes should therefore not be left unattended.
- At high volumes, voltage levels of 30–50 V can be present at speaker terminals and components. Be very careful not to touch uninsulated terminal contacts of speakers when in operation. To avoid injury, never put hands or arms into sound outlets (bass reflex tubes). Children and pets, in particular, are at risk from this.
2
BDA AURUM 22.1005.indd 2-3


- For safety reasons, we generally forbid the opening of loudspeaker cabinets when in operation or connected since, as explained in the above paragraph, voltages of up to 50 volts can be present inside.
- Improper handling of mains voltage can cause fatal injury!
Passive loudspeakers must on no account be connected to the electricity supply!
Speaker terminals may only be connected to the appropriate output terminals of the amplifier. You should never connect these terminals to the electricity supply (230 V/115 V) in any way since that will otherwise also immediately destroy the loudspeaker and all connected products. Avoid fitting plugs to ends of speaker cables that could even remotely be confused with mains supply plugs.
- Loudspeakers that are not magnetically shielded can affect the colour of the TV picture or cause distortion. A distance of 50~cm is generally sufficient to avoid problems of this kind. Avoid placing items such as credit cards, diskettes, audio or video cassettes or other magnetic media on the loudspeaker. This could destroy the information stored on them. Similarly, avoid operating magnetic tape devices in the immediate vicinity.

natural_image
Warning symbol: triangular shape with exclamation mark inside, no text or numbers present
BDA AURUM 22.1005.indd 4-5


Setting up
To obtain optimal sound results, it is generally necessary to try out different set-ups. Since the room conditions have a major effect on sound reproduction, we suggest below a few useful approaches for positioning your AURUM loudspeakers.
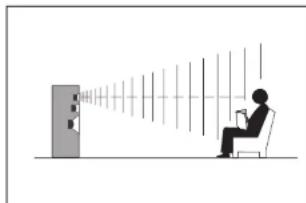
Main speakers (front)
Where the speakers are positioned in the listening space has a decisive effect on their sound. Placing the speakers near the corners of the room will essentially give you loud bass reproduction but with little outline. On the other hand, speakers positioned well away from the walls sound precise, but also very bright and thin. The best solution is to place the speakers with at least 30 cm between their backs and the nearest wall. To avoid loud wall reflections, the distance from the side walls of the
natural_image
Silhouette of a person sitting in a chair facing a wall-mounted screen with sound waves (no text or symbols visible)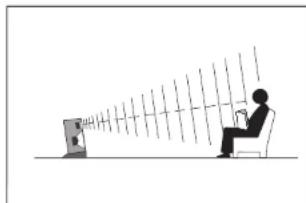
natural_image
Silhouette of a person sitting at a desk facing a screen with rays, no text or symbols present
room can even be 50 cm or more. Bookshelf speaker units sound best on a speaker stand or shelf, with the tweeters arranged at ear height. The cases should be angled and slightly tilted to achieve this.
Ss far as possible, the speakers should be equidistant from the listening position, while the distance of the speakers from each other can be rather less than the distance from the listener.
Front centre speaker
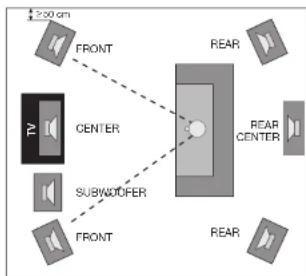
The centre loudspeaker is magnetically shielded, therefore causes neither colour faults nor distortion in the TV picture and should if possible be placed directly on the TV. If this is not possible, place the centre speaker horizontally beneath the TV, with the distance to the floor being at least 20 cm.
Apart from the above, we recommend angling the centre speaker so that the tweeter is aimed at the listener in order to enjoy its full sound potential.
text_image
250 cm FRONT CENTER SUBWODDER FRONT REAR REAR CENTER REARIn contrast to 5.1 surround sets, 6.1 systems have an additional rear centre speaker that should be placed behind and slightly above the typical listening position.
Rear speakers
Whether you direct the rear speakers toward the listening position is a matter of taste. Also, many listeners prefer the rear speakers to be positioned above ear height. This can be achieved by mounting the units on a sturdy wall bracket, a high speaker stand, a sideboard or shelf.
Stands and wall brackets
To obtain optimal positioning of the front and rear speakers, quadral offers suitable stands and wall brackets. Some speaker models also have a keyhole-shaped cut-out in the back of the speaker for wall mounting. Should you have any questions, please contact us on tel.: +49 (0) 511 7904-0, e-mail: ovs@quadral.com
Connecting to the amplifier
Before connecting the speakers to your hl-fi or surround system, make sure the amplifier/receiver is switched off and its status LED is not ill. To connect the speakers, you will need a two-core speaker cable for each speaker. Make sure these are of sufficient length and don't shorten the cables before checking they are long enough to hide behind furniture or under the carpet. For cables longer than 5 metres, we recommend a cross-sectional area of at least 2.5 sq mm per core in order to avoid unnecessary power loss. Strip the insulation of the cores to a length of around 10 mm at both ends of the cable so that they are bored for good contact.
Screw terminals
For connection, the speakers are provided with colour-coded screw terminals on the back of the cabinet. Loosen the screw terminals and feed the stripped end of the core into the hole that is now free. The two cores of speaker cables have different colouring or shape for recognition. Connect one core to the red, positive terminal - the remaining core to the black terminal. Tighten the screws hand-tight. To ensure correct polarity, check that the core connected to the red, positive terminal of the speaker is also the core that is connected to the red, positive terminal of the amplifier and that the other core is connected to the black, negative terminals of both the speaker and amplifier.

BDA AURUM 22.1005.indd 6-7


natural_image
Pure mechanical joint diagram without any text, numbers, or symbols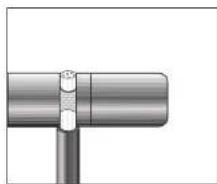
natural_image
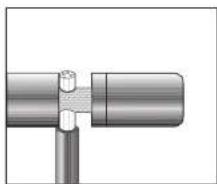
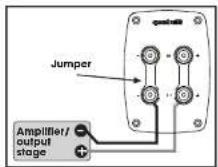
Pure mechanical assembly diagram showing a pipe joint with a bolted connection (no text or symbols)With the AURUM loudspeakers, you can choose between three modes of operation.
a) Conventional mode
Do not remove the jumpers,
connect the speaker cable
as shown in the illustration.
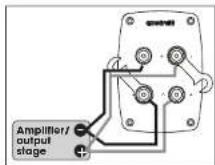
b) Blwiring mode
Open the jumpers after loosening the four screw terminals on the back of the speaker and connect the cable as shown in the illustration.
c) Blamping mode
Open the jumpers and connect the cables as shown in the illustration.

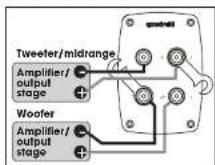
In the blwiring/blamping mode, the bass frequencies are controlled via the two lower terminals - and the midrange/treble frequencies via the two upper terminals.
Make sure you use the correct polarities in these modes and that you remove the jumpers on the speaker terminal to avoid damaging your amplifier.
Operation with a surround amplifier
flowchart
graph TD
    A["FRONT"] --> B["Subwoofer"]
    C["BEAR"] --> B
    B --> D["Low Level INPUT L R"]
    D --> E["SUB CENTER"]
    E --> F["Left"]
    G["FRONT"] --> H["Subwoofer"]
    I["BEAR"] --> H
    H --> J["Left"]
    K["FRONT"] --> L["Subwoofer"]
    M["BEAR"] --> L
    L --> N["Left"]
    O["FRONT"] --> P["Subwoofer"]
    Q["BEAR"] --> P
    P --> R["Left"]
    S["FRONT"] --> T["Subwoofer"]
    U["BEAR"] --> T
    T --> V["Left"]
Once you have positioned and connected your speakers as shown in the illustration, you should perform the necessary settings in the bass management system of your surround amplifier.
Make sure you read the user manual supplied by your amplifier's manufacturer before doing this.
Since bass management primarily depends on the loudspeaker configuration, we give only typical settings below.
a) Small and very small satellite speakers must be operated in "small" mode.
Perform the setting on your amplifier as follows:
Front: small
Centre: small
Rear: small
Subwoofer: yes
b) There is no definitive formula for the settings for compact speakers. In this case, the suitable mode may be "large" or "small". This depends on the volume level you prefer or the sound effect you wish to obtain (refer to the section "Caution, clipping!").
The settings on your amplifier can optionally be configured as follows:

BDA AURUM 22.1005.indd 8-9


Front: large/small
Centre: large/small
Rear: large/small
Subwoofer: yes
c) Floorstanding speakers or large bookshelf speakers that are suitable for powerful bass reproduction should be operated in "large" mode.
Perform the setting on the amplifier as follows:
Front: large
Centre: large
Rear: large
Subwoofer: yes/no
For the special AURUM centre speakers, we generally recommend "small" mode.

Subwoofer
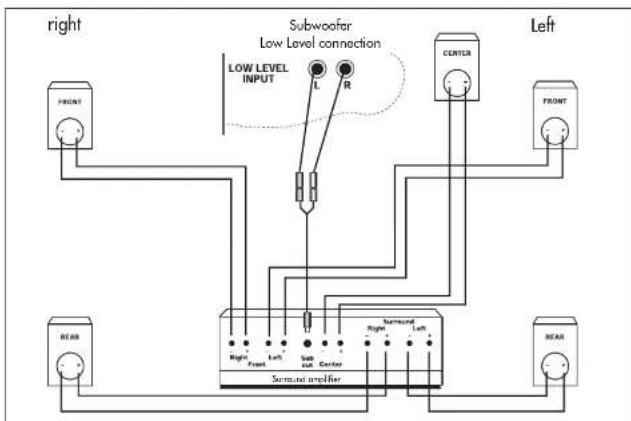
If your surround amplifier has a "line subwoofer" output, you can make use of this by using the Y cable shipped with the subwoofer (see illustration). In this case, you connect the front speakers directly to the front speaker terminals of your amplifier. Refer to the connection diagram for wiring your surround system.
Refer to the user manual of the active subwoofer for the necessary settings on your subwoofer!

Caution, clipping
Even if the rated output of an amplifier is significantly less than the load rating of the connected boxes, the speakers can easily be damaged by improper operation. This is because the rated output merely indicates how many watts the amplifier is capable of supplying to the speakers without distortion. When an amplifier is overloaded, if not only delivers a lot more power but also mixes in destructive direct current as well as high-frequency oscillations. This phenomenon is known as clipping and can be heard in the form of harsh distortion during loud passages. If you hear distortion, reduce the volume immediately to avoid damaging the speaker units. Amplifier clipping is a typical overload phenomenon that always occurs when you turn the volume and/or tone controls up too high. Even in the middle setting of the tone control, normal amplifiers reach their limits when loud pulses occur if you move the volume control significantly past the 12 o'clock position.

Tips for better acoustics
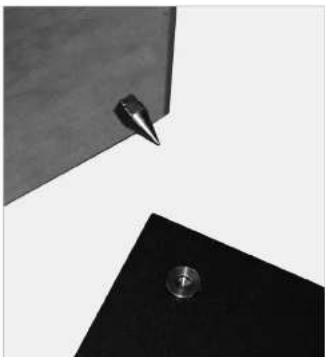
- To achieve better acoustic isolation of the loudspeakers from the floor, some floor-standing speakers are designed to accept spikes. Use of the spikes can be advantageous, depending on the living room / floor.
Fitting the spikes
The AURUM floor-standing speakers are fitted at the factory with isolating rubber dampers between speaker cabinet and base plate. If required, you can swap these rubber dampers for spikes, which are located in the front parts of the polystyrene packaging.
Mount the spikes as follows:
a) Lay the speakers on a soft surface and undo the four Allen screws holding the base plates using the supplied Allen key.
b) Remove the base plates and rubber dampers; unscrew the corrugated bushes from the four supplied spikes,
d) Screw all spikes hand-tight into the threaded sockets provided for this on the bottom of each speaker cabinet,
e) Place the base plates in their final position in the listening area.
f) Insert the four round support discs in the recesses provided for them in the base plates.
g) Place the speaker cabinets on the base plates so that the tips of the spikes sit in the central holes of the support discs.
h) Adjust the lock-nuts of the spikes to achieve precise and equal height adjustment!
i) Keep any not needed accessory materials safe together with the manual for possible later use!
2. For better acoustic isolation of centre or bookshelf speakers from the surface on which they stand, some of these loudspeakers are shipped with 4 self-adhesive rubber feet.
natural_image
Abstract geometric composition with a metallic pin and a circular hole on a black triangular base (no text or symbols)10
BDA AURUM 22.1005.indd 10-11


Care of loudspeakers
Your AURUM loudspeakers are best cleaned with a soft, dry cloth. The aluminium housing is best wiped in a longitudinal direction with a damp cloth. Do not use solvents.
You should only clean the loudspeaker systems (woofer, midrange units, etc.) when they have become very dirty (small amounts of dust have no effect on the acoustics). Use a soft, dry cloth or a soft brush with very gentle pressure, otherwise there is a risk of damaging the diaphragms.
We generally advise against cleaning the tweeter diaphragms because they are extremely sensitive to pressure!
If the silver front frame becomes dirty, spray dry foam cleaner (such as Centralin spra onto dirty areas, leave to work in, then simply remove with a vacuum cleaner. Do not brush off black front frames, instead tap off or remove the dirt carefully with adhesive tape. On no account clean using anything damp!
The technical details for your product can be found on the back of the speaker cabinet or on the packaging!


11
| Fault | Cause | Rectification |
| Audible distortion even at low volume | a) Fault in the electronics | a) The fault lies in the electronics if the problem affects both speakers. Swap over the left and right speakers if only one speaker is affected. If the problem is still on the same channel, your electronics are faulty.The speaker is faulty if the problem is now on the other channel.b) Please contact your dealer or our service (tel. +49 (0) 511-7904-0). |
| b) Fault in the speaker | ||
| No sound | a) Cobling incorrectb) Amplifier switched off | a) Check the cobling.b) Switch on the system. |
| Slender, bright sound. Sounds distant and unrealistic. | a) Incorrect polarity | a) Check to see if a terminal marked with + on the amplifier has been inadvertently connected to a terminal marked with - on the speaker or vice versa.b) Set up the speaker closer to a wall, but maintain a minimum clearance of 5 cm between the back of the speaker and the wall. |
| b) Unfavourable set-up | ||
| Bass notes too powerful | a) Unfavourable speaker set-up (e.g. in the corner of a room)b) Bass control on amplifier set high | a) Move the speaker further away from the adjacent walls.b) Set the bass control on your amplifier to a neutral position. |
| Lack of treble | a) The tweeters are not properly aligned | a) Position the speakers so that the tweeters are facing directly towards your listening position. |
12
BDA AURUM 22.1005.indd 12-13


natural_image
Silhouette of a person sitting in a chair facing a wall-mounted screen with beams of light (no text or symbols visible)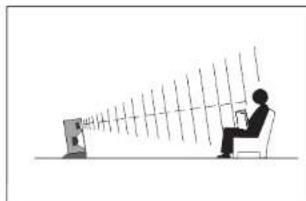
natural_image
Silhouette of a person sitting at a desk facing a computer screen with rays, no text or symbols visible
natural_image
Pure mechanical assembly diagram showing two connected cylindrical components with a central fastener (no text or symbols)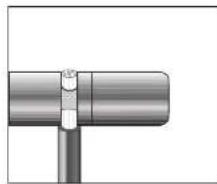
natural_image
Pure mechanical component diagram showing a cylindrical shaft connected to a vertical rod (no text or symbols)natural_image
Abstract geometric composition with a metallic pen tip and a small circular object on a black base (no text or symbols)20
BDA AURUM 22.1005.indd 20-21


natural_image
Silhouette of a person sitting in a chair facing a wall-mounted screen with sound waves (no text or symbols)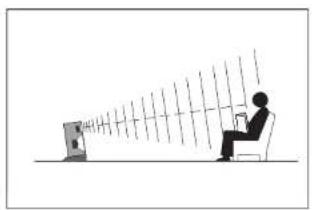
natural_image
Silhouette of a person sitting at a desk facing a computer, with rays extending outward (no text or symbols)

natural_image
Pure mechanical assembly diagram showing a shaft and flange without any text or symbols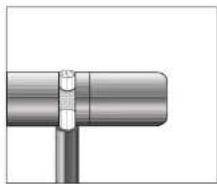
natural_image
Close-up of a metallic pipe joint with a bolted connector (no text or symbols visible)flowchart
Electrical wiring diagram showing connections between front/rear devices, subwoofer, and gauche components with labeled inputs and outputs.Frontal: large/small
Central: large/small
Attention aux distorsions
natural_image
Abstract geometric composition with a metallic knob and a pointed tip, no text or symbols presentAltavoz principal (frontal)
natural_image
Silhouette of a person sitting in a chair facing a wall-mounted screen with beams of light (no text or symbols visible)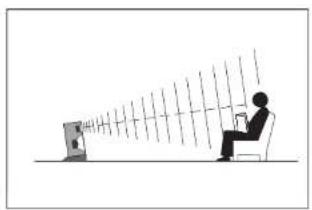
natural_image
Silhouette of a person sitting at a desk facing a screen with rays, no text or symbols presentnatural_image
Pure mechanical joint diagram without any text, numbers, or symbols
natural_image
Close-up of a metallic pipe joint with a bolted connector (no text or symbols visible)Frontal: large/small
Central: large/small
Posterior: large/small
Subwoofer: yes
natural_image
Abstract geometric composition with a metallic knob and a pointed tip, no text or symbols present40
BDA AURUM 22.1005.indd 40-41