
IPT6 - Speaker LENCO - Free user manual and instructions
Find the device manual for free IPT6 LENCO in PDF.
| Product Type | Speaker tower with docking station for iPod/iPhone |
| Brand | Lenco |
| Model | IPT6 |
| Power Supply | 100-240 V AC, 50/60 Hz |
| Memory Backup Batteries | 2 AAA (UM-4) batteries (not included) |
| Remote Control Battery | 1 CR2025 lithium battery (included) |
| Total Speaker Power | 80 W (Max.) |
| Speakers | 6 full-range speakers + subwoofer |
| Sound Technology | Wave Field Synthesis (WFS) with 3D effect |
| Radio Tuner | FM (stereo/mono) with 20 presets |
| Dock Compatibility | iPod and iPhone (30-pin connector) |
| Auxiliary Audio Input | 3.5 mm AUX-IN jack |
| Video Output | VIDEO-OUT jack (RCA composite) |
| Display | LED with dimmer |
| Clock/Alarm Functions | Dual alarm (wake with vibrator, iPod/iPhone or radio), sleep timer (15/30/45/60/90 min) |
| Maintenance | Clean with a damp cloth, do not use solvents |
| Safety | Double insulation, do not expose to water, unplug during storms |
| Repairability | Reset via RESET button, repairs by qualified personnel only |
Frequently Asked Questions - IPT6 LENCO
User questions about IPT6 LENCO
0 question about this device. Answer the ones you know or ask your own.
Ask a new question about this device
Download the instructions for your Speaker in PDF format for free! Find your manual IPT6 - LENCO and take your electronic device back in hand. On this page are published all the documents necessary for the use of your device. IPT6 by LENCO.
USER MANUAL IPT6 LENCO
natural_image
Black vertical electronic device with a smartphone on top, displaying time 12:35 (no visible text or symbols on the device body)User's Guide
Table of content
Important Safety Instructions....3
Features......4
Installation 5
Description of Parts ....5
Radio Tuner Operation 7
Listening to iPod / iPhone ....8
Listening to External Audio Source 9
3D Sound effect 9
Clock Setting....9
Alarm Operation....10
Sleep Timer Function....11
Care and Maintenance....11
Specifications....12
- Read these instructions carefully.
- Keep these instructions.
- Follow all instructions and install the device in accordance to the instructions.
- To reduce the risk of fire or electric shock, do not use this device near water.
- The device shall not be exposed to dripping or splashing and no objects filled with liquids, such as vases, shall be placed on the device.
- Do not block any ventilation openings.
- Do not install near any heat sources such as radiators, heat registers, stoves, or other equipment (including amplifiers) that produce heat.
- No flame or heat sources, such as lighted candles, should be placed on the device.
- Refer all servicing to qualified personnel only. Servicing is required when the device has been damaged in any way. For example: if the power-supply cord or plug is damaged, liquid has been spilled or objects have fallen into the device, the device has been exposed to rain or moisture, does not operate normally, or has been dropped.
- Clean only with dry cloth.
- Do not defeat the safety purpose of the polarized plug. If the provided plug does not fit into your outlet, consult your electrician.
- Protect the power cord from being walked on or pinched, particularly at plugs, convenience receptacles, and the point where they exit from the device.
- Unplug this device during lighting storms or when unused for long periods of time.
-
Only use attachments/accessories specified by the manufacturer.
-
Use this apparatus in moderate climate only.
- Don't expose batteries to excessive heat such as sunshine, fire or likely circumstances.
- Attention should be paid to the environmental regulations of battery disposal.

This symbol indicates that dangerous voltages constituting a risk of electric shock are present within this device.

This symbol indicates that there are important operating and maintenance instructions in the manual accompanying this device.

This symbol indicates that this product incorporates double insulation between hazardous main power voltage and user accessible parts. When
servicing use identical replacement parts only.
Features
Thank you for purchasing the TOWER SPEAKER with iPod / iPhone Docking.
This model has the following features:
- Possibility of docking different iPod/iPhone models.
- iPod/iPhone re-charger.
- FM radio receiver.
- Clock and dual Alarm timer function.
- Wake up Alarm (Buzzer, iPod/iPhone or Radio) with Snooze function.
- Sleep timer function.
- LED display.
- Audio line-in (AUX) for connecting another digital audio player.
- Built-in Subwoofer for heavy bass effects.
- Video output for watching iPod/iPhone movies at an external video display (e.g. TV set).
- Built-in 6 High Fidelity Speakers with wave field synthesis (WFS) technology to produce a 3D sound effect.
"Made for iPod" and "Made for iPhone" means that the device has been designed to connect to iPod or iPhone models and has been certified by the developer to meet Apple performance standards. Apple is not responsible for the operation of this device or its compliance with safety and regulatory standards. Please note that the use of this device with iPhone or iPod may affect wireless performance.
iPhone, iPod, iPod mini, iPod nano, iPod touch, iPod classic and iPod shuffle are trademarks of Apple Inc., registered in the U.S. and other countries.
iPhone, iPod devices are not included!
Installation
Clock setting battery back-up
A backup battery compartment is located at rear of the device.
(1) Open the clock battery compartment lid.
(2) Follow the polarity diagram as shown inside of the compartment and install 2 x AAA (UM-4) batteries (not included).
(3) Close the clock battery compartment lid.
Remote Control
The remote control operates on one DC3V CR2025 type Lithium battery (included).
To activate the remote control, remove the insulation tab attached in the battery compartment.
Warnings:
- Batteries shall not be exposed to excessive heat such as sunshine, fire or likewise.
- Be sure that the batteries are installed correctly. Wrong polarity may damage the device.
- Do not mix old and new batteries.
- Do not mix alkaline, standard (carbon-zinc) or rechargeable (nickel-cadmium) batteries.
- Only batteries of the same or equivalent type as recommend are to be used.
- If the device will not be used for an extended period of time, remove the battery.
- Do not dispose of batteries in fire; battery may explode or leak.
- Danger of explosion if battery is incorrectly replaced.
AC power Connection
(1) Connect the AC power cord to power socket at rear of the device.
(2) Firmly and securely plug the power cord's AC main plug into the AC main outlet.
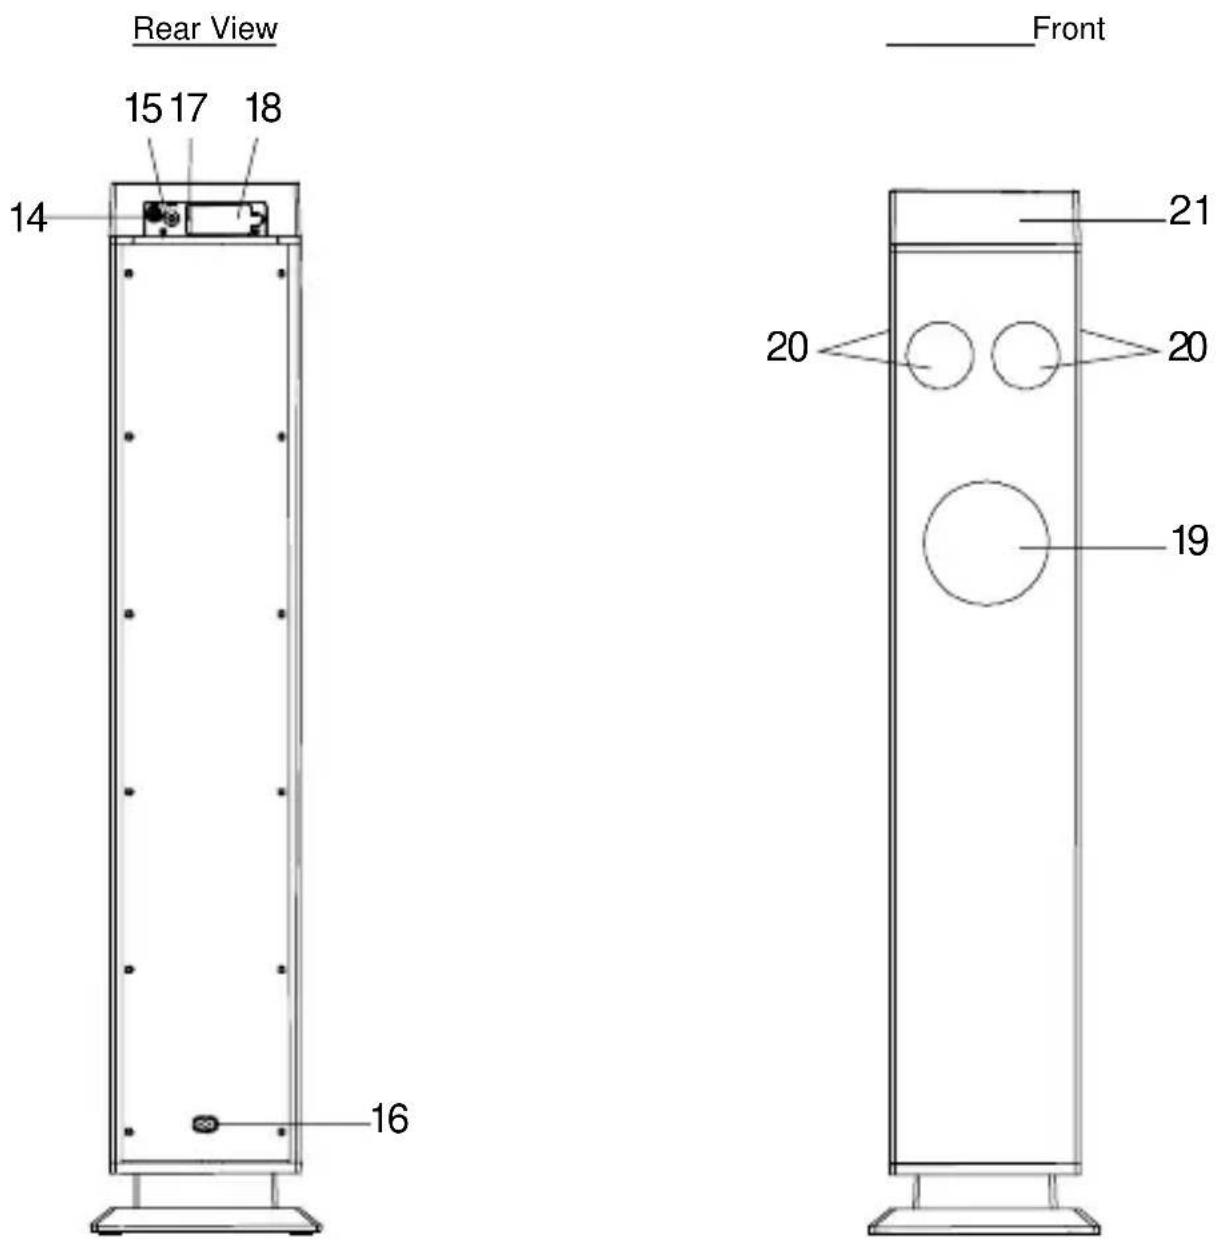
Description of Parts
Main Device
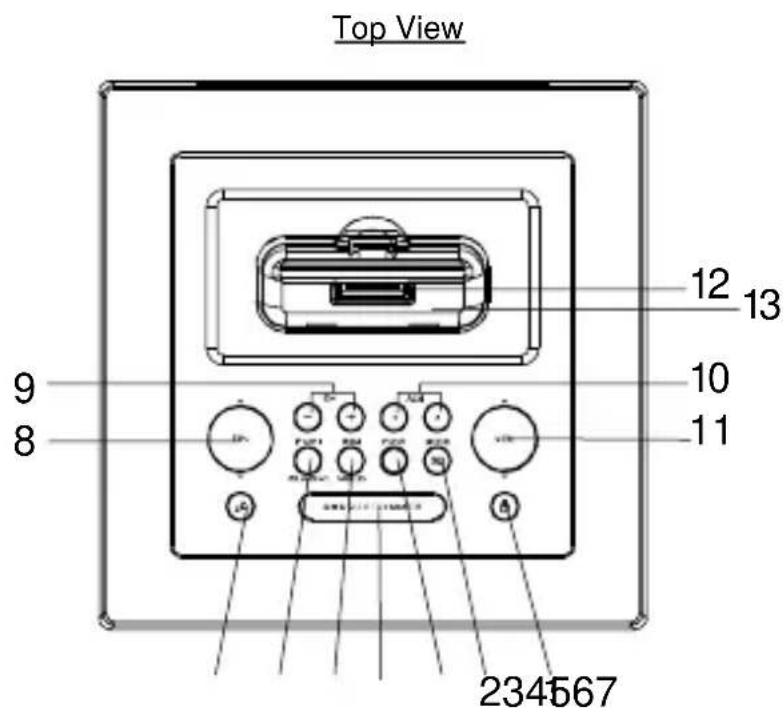
View
- POWER ⏻ button ---- To turn the device on and off.
- MODE / 3D button ---- Set clock and 12/24 hour format; Select 3D sound effect.
- FUNC (Function) button ---- Select FM radio / iPod/iPhone / AUX-In modes.
- SNOOZE / DIMMER button ---- Activate the snooze function; Turn LED display bright/dim.
- MEM / VIDEO ON/OFF button ---- Save preset radio station; Select video-out on/off in iPod/iPhone mode.
- iPod ▶ III /ST./MONO button ---- iPod/iPhone Play/Pause function; Select FM stereo / mono receiving.
- SLEEP zZ button ---- Select the time duration of the sleep timer.
- TUN ▲ / ▼ button ---- In radio mode: Tune the radio frequency up/down; In iPod/iPhone mode: Skip tracks Forward / Backward; perform high-speed search.
- CH +/- button ---- Select preset radio channel.
- ALM 1/2 button ---- Turn the alarm 1/2 on and off; Set alarm 1/2 time and alarm 1/2 source.
- VOL ▲ / button ---- Adjust volume level up or down.
- iPod/iPhone docking connector
- iPod/iPhone docking station
- VIDEO-OUT jack ---- Composite video output.
-
AUX-IN jack ---- Auxiliary audio signal input.
-
Power socket ---- For the AC power cord connection.
- RESET button ---- For resetting the device
- Memory backup battery compartment
- Subwoofer
- 6 Main Speakers
- LED Display
Description of Parts
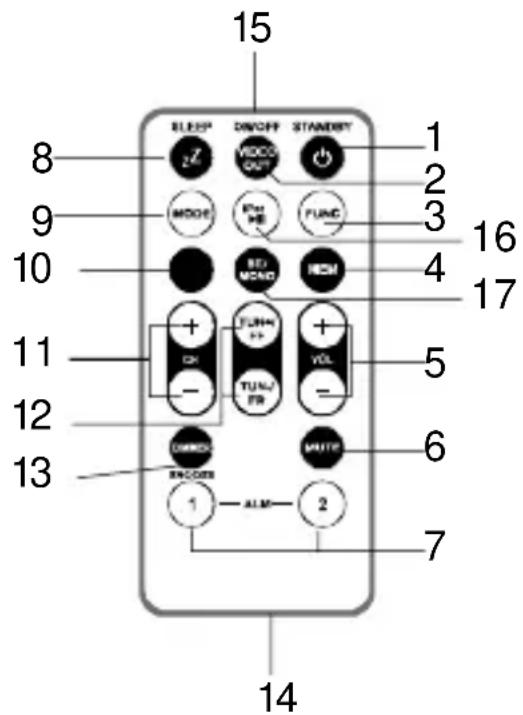
Remote Control
- STANDBY ⏻ button ---- To turn the device on and off.
-
VIDEO OUT ON/OFF button ---- Select video-out on/off in iPod/iPhone mode.
-
FUNC (Function) button ---- Select FM radio / iPod/iPhone / AUX-In modes.
-
MEM button ---- Save radio preset station.
-
VOL +/- button ---- Adjust volume level up or down.
-
MUTE button ---- Mute the volume.
-
ALM 1/2 button ---- Turn the alarm 1/2 on and off; Set alarm 1/2 time and alarm 1/2 source.
-
SLEEP zZ button ---- Select the time duration of the sleep timer.
-
MODE button ---- Set clock and 12/24 hour format.
-
3D button ---- Select 3D sound effect.
-
CH +/- button ---- Select preset radio channel.
-
TUN +/- FF/FR button ---- In radio mode: Tune the radio frequency up/down;
In iPod/iPhone mode: Skip tracks Forward / Backward; perform high-speed search.
-
SNOOZE / DIMMER button ---- Activate the snooze function; Turn LED display bright/dim.
-
Battery compartment
-
Infrared Transmitter
-
iPod ▶/ button ---- iPod/iPhone Play/Pause function.
- ST./MONO button ---- Select FM stereo / mono receiving.
Radio Tuner Operation
FM Antenna
Extend the FM antenna wire at the back panel for the best FM radio reception.
Radio Tuning
- Press the POWER ⏻ button to turn on the device.
- Press the FUNC button to select FM radio mode. A radio symbol will appear on the display. By pressing the ST./MONO button, FM stereo or mono receiving will be selected. The LED display will respectively show on (stereo)/ off (mono).
- To manually tune to a desired station, repeatedly press the TUN ▲ / ▼ button shortly.
- To automatically search for stations with strong signals, press and hold the TUN ▲ / ▼ button until the frequency digits on display begin to scan then release the button. The tuner will stop on the first strong signal it finds.
Notes:
- Use manual tuning to select weaker stations that might be skipped during automatic tuning.
- If the automatic tuning does not stop on the exact frequency of the station, for example, it stops on 100.9 MHz instead of 100.8 MHz, use the manual tuning method to "fine tune" to the exact frequency of the desired station.
Radio Preset Stations
The device allows you to store up to 20 FM stations for easy recall at any time.
How to Preset Stations
- Press the POWER button to turn on the device.
- Press the FUNC button to select FM radio mode.
- Tune to the radio station you want to store in memory by using the TUN / button.
- Press the MEM button. The preset channel number appears on display and blinking.
- To select desired preset station number, press the CH +/- button.
- To confirm preset location, press the MEM button again.
- Repeat step 3 to 6 to store other stations.
Notes:
- After a few seconds of delay, the device will automatically switch back to normal tuner mode.
- You can overwrite a preset station by storing the new frequency in its place.
Recalling Preset Station
In radio mode, press the CH +/- to select the desired preset radio channel. The preset channel number will be displayed shortly.
Listening to iPod / iPhone
This device can dock different iPod/iPhone models.
How to listen to your iPod/iPhone:
- Place your iPod/iPhone into the docking port by placing the connector on the bottom of the iPod/iPhone onto the connector in the docking bay.
Caution: Please be careful when placing the iPod/iPhone into the docking to avoid damaging the 30-pin connector on the iPod/iPhone or in the docking system.
-
Press the POWER button to turn on the device.
-
Press the FUNC button to select iPod/iPhone mode. The iPod symbol will appear on the display.
In iPod / iPhone mode:
- To start playback music, press the button once.
- To pause the music, press the button once.
- To resume music, press the button again.
- Pressing the VOL / +/- button adjusts the volume to the desired level.
Note: The volume level cannot be adjusted by using the volume control on your iPod / iPhone after being docked.
- During playback, press and hold the TUN / button (on the main device) or FF / FR button (on the remote control) to perform forward / backward high speed search.
- To skip to next or previous song, press the TUN / button (on the main device) or FF / FR button (on the remote control) shortly.
- To turn off the iPod / iPhone, press the button for about 3 seconds.
- To turn off the device, press the POWER button.
- When the device is connected to the AC main power and the iPod/iPhone placed in the docking station, the device will recharge the iPod/iPhone's battery.
Video Out from the iPod / iPhone
- Connect this device to a television or to another video display that has a composite video input.
- Securely dock the iPod (with video) / iPhone.
-
Connect the yellow RCA cable (not included) to the RCA video jack on the rear of the device.
-
Connect the other end of the yellow RCA cable to the VIDEO IN of the television or video display.
- Press the FUNC button to select iPod/iPhone mode.
- Select a movie from your iPod/iPhone menu.
- The movie will playback on the Apple device screen.
- Press the VIDEO OUT ON/OFF button to toggle between the video out "ON" to watch the movie on the TV, and video out "OFF" to watch movie on the Apple device screen.
Note:
- For earlier iPod models with video (with click wheel):
(a) choose video in the main menu, then select video setting.
(b) Set the TV Out section to "ON".
(c) Switch back to the movie library and playback a movie of your choice.
- For iPod Touch, iPhone: TV OUT is automatically set to "ON". The TV OUT setting is not available for user's selection.
Listening to an External Audio Source
- Connect an audio cable (not included) with a 3.5mm stereo plug from an auxiliary audio device to the AUX IN jack on the rear of the device.
- Press the POWER ⏻ button to turn on the device.
- To select auxiliary audio input, press the FUNC button. The "AUX" indicator will appear on the display.
- Turn on the external auxiliary audio device.
- The volume can be controlled through the device.
Operate all other functions on the external device as usual.
Notes: Press the POWER ⏻ button to turn off the device when you finish listening. Don't forget to switch off the power of the external audio device as well.
3D Sound effect
This model uses the wave field synthesis (WFS) technology to produce 3D sound effect. In either iPhone / iPod, Aux-In or Radio mode, you may press the 3D button to enable / disable the 3D sound effect. The LED display will respectively show on / off shortly.
Clock Setting
When the device is OFF (Standby mode):
Set 12/24 Hour format
- Press the MODE button entering 12/24 hour format setting mode.
- Press the VOL ▲ / to select 12 or 24 hour display format.
Set Clock
- Press the MODE button again. The clock digits will blink.
- Press the TUN ▲ / button to set the right hourtime.
- Press the VOL ▲ button to set the right minutetime.
Exit setting mode
- To save all settings, press the MODE (or SNOOZE) button or wait for a few seconds to exit the setting mode.
Alarm Operation
The device has a dual alarm timer. (alarm 1 and alarm 2). You can set the two alarm times individually.
When the device is OFF (Standby mode):
Setting the alarm time
- Press and hold the ALM 1 (2) button entering alarm setting mode.
- Press the TUN ▲ / button to set alarm hour.
- Press the VOL ▲ / button to set alarm minute.
Select wake up alarm source
- Press the ALM 1 (2) button again entering alarm source setting mode.
- Press the VOL ▲/ button to select alarm source BUZZER, iPod/iPhone or RADIO.
Save settings and activate alarm
- To save all settings and exit the setting mode, press the ALM 1 (2) button or wait for a few seconds.
- To activate the daily alarm, press the ALM 1 (2) button and the corresponding alarm source LED indicator (AL 1 / AL 2) appears on the display.
Notes:
- If "Wake with iPod" is selected but your iPod has not been docked, the alarm source will be redirected to the Alarm Buzzer automatically when the alarm time is reached.
- When "Wake with Radio" is selected, make sure the radio station which you want to wake up with to is tuned.
Wake to Buzzer
- When the alarm time is reached, the buzzer alarm will sound for 1 Minute. If no further button will be pressed, the alarm will go into "snooze" mode.
- The buzzer turns off for around 10 minutes and then will sound again. This cyclus will be repeated 5 times. After the sixth alarm is finished, the alarm will shut off until the same alarm time on the next day.
- You may also activate the snooze function manually after the alarm sounds by pressing the SNOOZE button. The buzzer stops during the snooze time (around 10 minutes) and then will sound again.
● To cancel the snooze before it expires, press the ALM 1 (2) button. - The snooze operation (including auto-snooze and manual snooze) can be repeated five times within 50 minutes from the set alarm time.
- To stop the alarm immediately after the buzzer sounds, you can also press the ALM 1 (2) button. It will be active again the following day. (The alarm source LED indicator (AL 1 / AL 2) is visual on the display).
Wake to iPod/iPhone or Radio
- When the alarm time is reached, the selected alarm source (iPod/iPhone or Radio) will automatically turn on. It starts softly and gradually becomes louder.
● It plays for 60 minutes then shuts off and resets itself for the following day. - During the activation of the alarm source, you may press the SNOOZE button to activate the snooze function. The alarm stops for the snooze time (around 10 minutes) then turns on again.
● To cancel the snooze before it expires, press the ALM 1 (2) button. - This manual snooze operation can be repeated five times within 50 minutes from the set alarm time. Each time the alarm turns on, it plays for 60 minutes (without pressing the snooze button).
- To stop the alarm immediately after the alarm sounds, you may also press the ALM 1 (2) button. It resets itself for the following day.
Sleep Timer Function
Sleep timer
This feature allows you to fall asleep while listening to the radio or iPod / iPhone for up to 90 Minutes.
The device shuts off automatically when this time expires.
How to activate the Sleep timer:
- Press the POWER button to turn the device on.
- Either tune to the desired radio station in the radio mode or playback music from the iPod / iPhone.
- Select the sleep timer to turn off the device after 15, 30, 45, 60 or 90 minutes, by pressing the SLEEP button repeatedly.
- To view the remaining sleep time, press the SLEEP button once.
- To turn the device off before the sleep timer counts down to zero, press the POWER button at any time.
Notes:
- If you are falling asleep with music from an external device connected to the AUX input, the sleep timer will shut off the power to this unit, but it will not turn off the external device.
Care and Maintenance
● Do not subject the device to excessive force, shock, dust or extreme temperature.
- Do not manipulate the internal components of the device.
- Clean your device with a damp (never wet) cloth. Solvent or detergent should never be used.
● Avoid leaving your device in direct sunlight or in hot, humid or dusty places.
- Keep your device away from heating appliances and sources of electrical noise such as fluorescent lamps or motors.
Resetting the Device
If the device experiences a power surge or electric shock, it is possible that the internal microcontroller may lock up and the device will not respond anymore to any commands from the panel controls.
- In this event, unplug and then reconnect the AC power plug into the wall outlet.
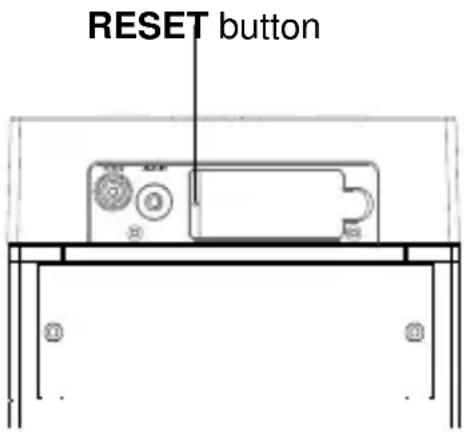
- Use a straightened paper clip, toothpick or similar objects to press the RESET button located at the rear of the main device (see the figure below). The reset operation clears the system memory and all of your previous settings will be erased.
CAUTION: DO NOT USE SHARP, POINTED OBJECT TO PRESS THE RESET BUTTON. IT MAY DAMAGE THE RESET SWITCH INSIDE THE DEVICE.
Specifications
Power Supply AC 100 - 240V \~ 50/60Hz
Battery Back-up for clock / memory DC3V--- 2 x AAA (UM-4) type (not included)
Remote Control battery DC3V --- 1 x CR2025 Lithium type (included)
Speaker Output Total 80W (Max.)

If at any time in the future you want to dispose this product, please note that electrical products should not be disposed with household waste. Find out where your nearest recycling centre is. Consult your local authority or retailer for more details (Waste Electrical and Electronic Equipment Directive).
THE SPECIFICATION AND EXTERNAL APPEARANCE OF THE DEVICE ARE SUBJECT TO CHANGE WITHOUT PRIOR NOTICE.
Lenco
IPT-6
natural_image
Black vertical digital stand with a smartphone on top, displaying time 12:35 (no visible text or symbols on the device itself)Benutzerhandbuch
Inhalt
natural_image
Black vertical electronic device with a smartphone on top, displaying time 12:35 (no visible text or symbols on the device body)Handleiding
Inhoudsopgave
Specifications....13
Bediening radiotuner
FM Antenne
natural_image
Black vertical electronic device with a smartphone on top, displaying time 12:35 (no visible text or symbols on the device body)MODE D'EMPLOI
Table des Matières
natural_image
Modern black vertical digital stand with a smartphone on top, displaying time 12:35 (no text or symbols on the device itself)Guía del usuario
Índice de contenido

- Table of content
- Features
- Installation
- Clock setting battery back-up
- Remote Control
- Warnings:
- AC power Connection
- Description of Parts
- Main Device
- Radio Tuner Operation
- FM Antenna
- Radio Tuning
- Notes:
- Radio Preset Stations
- How to Preset Stations
- Recalling Preset Station
- Listening to iPod / iPhone
- How to listen to your iPod/iPhone:
- In iPod / iPhone mode:
- Video Out from the iPod / iPhone
- Note:
- Listening to an External Audio Source
- 3D Sound effect
- Clock Setting
- Set 12/24 Hour format
- Set Clock
- Exit setting mode
- Alarm Operation
- Setting the alarm time
- Select wake up alarm source
- Save settings and activate alarm
- Wake to Buzzer
- Wake to iPod/iPhone or Radio
- Sleep Timer Function
- Sleep timer
- How to activate the Sleep timer:
- Care and Maintenance
- Resetting the Device
- Specifications
- Lenco
- IPT-6
- Inhalt
- Inhoudsopgave
- Bediening radiotuner
- FM Antenne
- Table des Matières
- Índice de contenido
Brand : LENCO
Model : IPT6
Category : Speaker