
PC5097 - Loudspeaker Marquant - Free user manual and instructions
Find the device manual for free PC5097 Marquant in PDF.

| Product type | Speaker with integrated audio system |
| Brand | Marquant |
| Model | PC5097 |
| Approximate dimensions (L x H x D) | 35 x 20 x 25 cm |
| Approximate weight | 2.5 kg |
| Power supply | Mains 230 V ~ 50 Hz; remote control battery (1x CR2025) |
| Output power | 2 x 10 W RMS |
| Main functions | AM/FM radio, CD/CD-R/RW player, iPod/iPhone docking station, USB port, SD/MMC card reader, copy function, equalizer (Classic, Rock, Pop, Jazz, Surround, Off) |
| Radio bands | AM (medium wave) and FM (stereo) |
| Radio presets | 9 per band (AM and FM) |
| Compatible audio formats | CD-Audio, CD-R/RW, MP3, WMA |
| Connectivity | USB port (front), SD/MMC card slot (front), headphone jack (not specified), telescopic FM antenna |
| Included accessories | Remote control, iPod adapters (8 pieces), power cable, user manual |
| iPod/iPhone compatibility | iPod mini, iPod 4G, iPod Photo, iPod nano 1G/2G, iPod 5G (video) via specific adapters |
| Maintenance and cleaning | Wipe with a soft, dry cloth. Do not use abrasive products or liquids. Avoid moisture and dust. |
| Safety instructions | Do not open the device. Do not expose to water or extreme temperatures. Disconnect during thunderstorms. Use only the provided adapter. |
| Spare parts and repairability | Parts not available separately. Contact Marquant after-sales service for any repairs. |
| General information | Downloadable manual in PDF format. Device with carrying handle. Blue LED display. |
Frequently Asked Questions - PC5097 Marquant
User questions about PC5097 Marquant
0 question about this device. Answer the ones you know or ask your own.
Ask a new question about this device
Download the instructions for your Loudspeaker in PDF format for free! Find your manual PC5097 - Marquant and take your electronic device back in hand. On this page are published all the documents necessary for the use of your device. PC5097 by Marquant.
USER MANUAL PC5097 Marquant
GEBRUIKERSHANDLEIDING MANUEL D'INSTRUCTIONS INSTRUCTION MANUAL
natural_image
Line drawing of a microwave oven with control panel (no text or symbols)
iPod is a trademark of Apple Inc., registered in the U.S. and other countries.
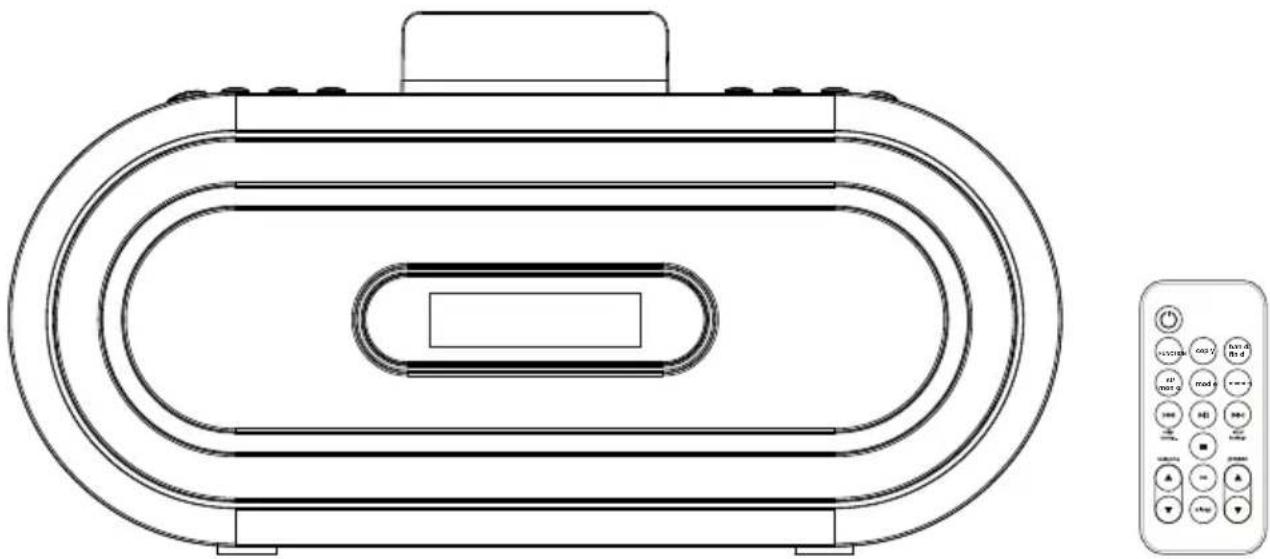
iPod DOCKING STATION MET CD & RADIO STATION D'ACCUEIL iPod AVEC CD & RADIO iPod DOCKING WITH CD & RADIO
VOORAANZIJDE

- Handvat
- CD-compartment
- PRESET + knop
- EQ (Equalizer) knop
- aan/uit-knop
- COPY knop
- FUNCTION knop
- BAND/FIND knop
- ST/ MONO knop
- SLEEP knop
- PRESET - knop
- iPod compartimentdeksel
-
VOLUME - knop
-
PLAY/ PAUSE (SPEEL AF/PAUZE) (▶)nop
- STOP (■) knop
- MODE knop
- MEMORY knop
- Skip ▶ Tuning + knop
- Skip 🖼Tuning - knop
- VOLUME + knop
- Drukgebied om het CD- compartiment te openen
- USB-aansluiting
- SD kaart-aansluiting
- Telescopische antenne
AFSTANDSBEDIENING
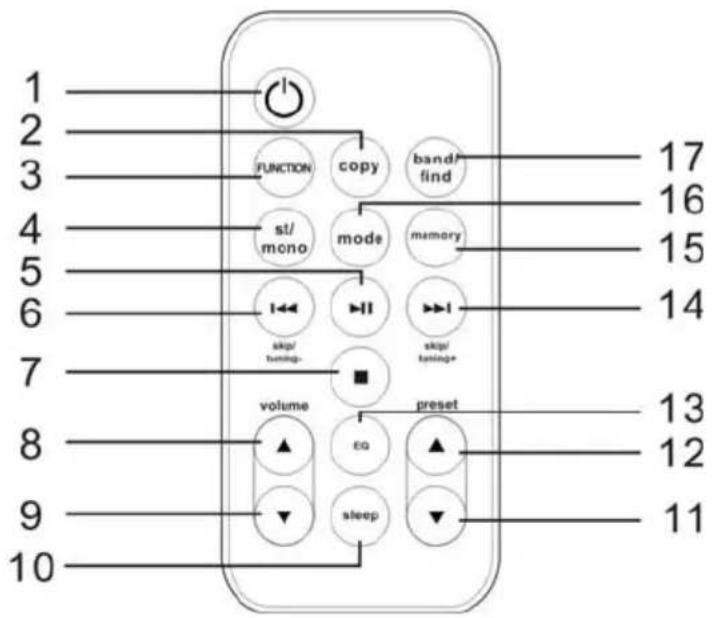
- aan/uit-knop
- COPY knop
- FUNCTION knop
- ST/ MONO knop
- PLAY/ PAUSE (SPEEL AF/PAUZE) (▶)knop
- Skip 🖼Tuning – knop
- STOP (■) knop
- VOLUME + knop
-
VOLUME - knop
-
SLEEP knop
- PRESET - knop
- PRESET + knop
- EQ (Equalizer) knop
- Skip ▼Tuning + knop
- MEMORY knop
- MODE knop
- BAND/FIND knop
iPod: Houd de Skip ▶/ Tuning + 0 of skip ▶/ Tuning - 0nop
OPMERKINGEN:
SPECIFICATIONS
GENERAL
AC Power 230V/50Hz
DC 12V Battery "C" x 8
Speaker 4 ohm x2
Output Power 3W x2
RADIO SECTION
Frequency Range (FM) 87.5-108MHz
Frequency Range (AM) 522-1620KHz
CD SECTION
Disc Diameter 4.72" (120mm)
Optical Source Semiconductor laser
Specifications are subject to change without notice.
AVANT
Follow these precautions when using a battery in this device:
- Use only the size and type of battery specified.
- Be sure to follow the correct polarity when installing the battery as indicated in the Battery Compartment. A reversed battery may cause damage to the device.
- If the device is not to be used for a long period of time, remove the battery to prevent damage or injury from possible battery leakage.
- Do not try to recharge a battery not intended to be recharged; it can overheat and rupture. (Follow battery manufacturer's directions.)
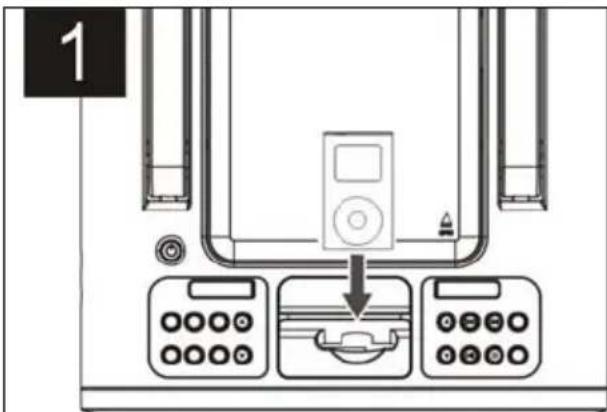
INSERTION D'UN IPOD
SPECIFICATIONS
GENERAL
AC Power 230V/50Hz
DC 12V Battery "C" x 8
Speaker 4 ohm x2
Output Power 3W x2
RADIO SECTION
Frequency Range (FM) 87.5-108MHz
Frequency Range (AM) 522-1620KHz
CD SECTION
Disc Diameter 4.72" (120mm)
Optical Source Semiconductor laser
WARNING
TO REDUCE THE RISK OF FIRE OR ELECTRIC SHOCK, DO NOT EXPOSE THIS APPLIANCE TO RAIN OR MOISTURE.
CAUTION
Use of controls or adjustments or performance of procedures other than those specified herein may result in hazardous radiation exposure.

This Compact Disc player is classified as CLASS 1 LASER product.
CAUTION!
Invisible laser radiation when open and interlocks defeated. Avoid exposure to beam.

- Do not damage the mains lead.
When not in use, disconnect the mains lead from the outlet. Grasp the plug, not the mains lead, when disconnecting the unit. - If water should enter the unit, electrical shock or a malfunction may result. Use in an area where there is low humidity and little dust.
- Do not disassemble or alter the unit in any way.
- Do not use the unit in areas where extremes in temperature occur (below 5^ C or exceeding 35^ C), or where it may be exposed to direct sunlight.
- Because of the CD player's extremely low noise and wide dynamic range, there is a tendency to turn the volume on the amplifier higher than necessary. Doing so may produce an excessively high output from the amplifier which can cause damage to your speakers. Please be careful in this regard.
- Sudden changes in the surrounding temperature can cause dew to form on the optical pickup lens inside the unit. Under this condition the unit may be unable to operate properly. If this should occur, remove the disc and allow the player to adjust to the surrounding temperature.
- This unit must be operated in a horizontal position.
- Please use the original CD or VCD or MP3 software, and any copy discs are not recommendable for use.
To prevent fire or shock hazard, do not expose this appliance to dripping or splashing. No objects filled with liquids, such as vases, shall be placed on the apparatus.
THIS UNIT SHOULD NOT BE ADJUSTED OR REPAIRED BY ANYONE EXCEPT PROPERLY QUALIFIED SERVICE PERSONNEL.
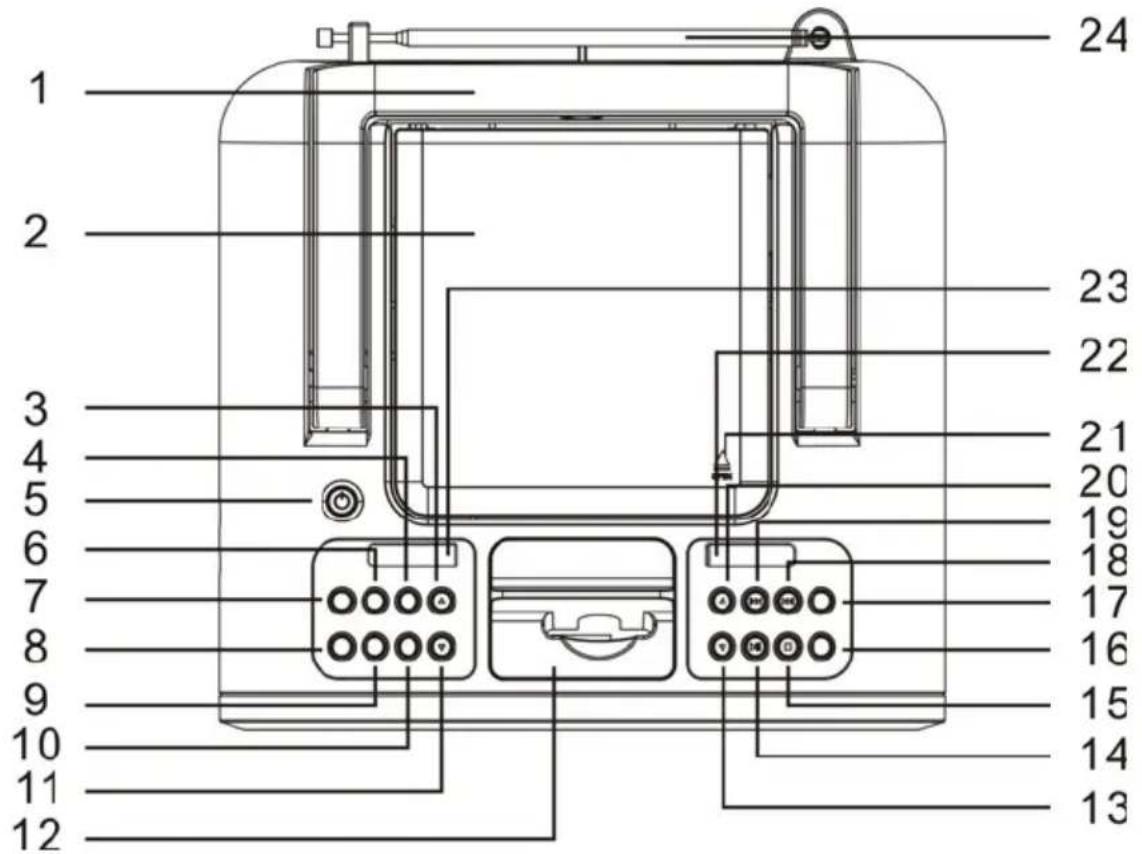
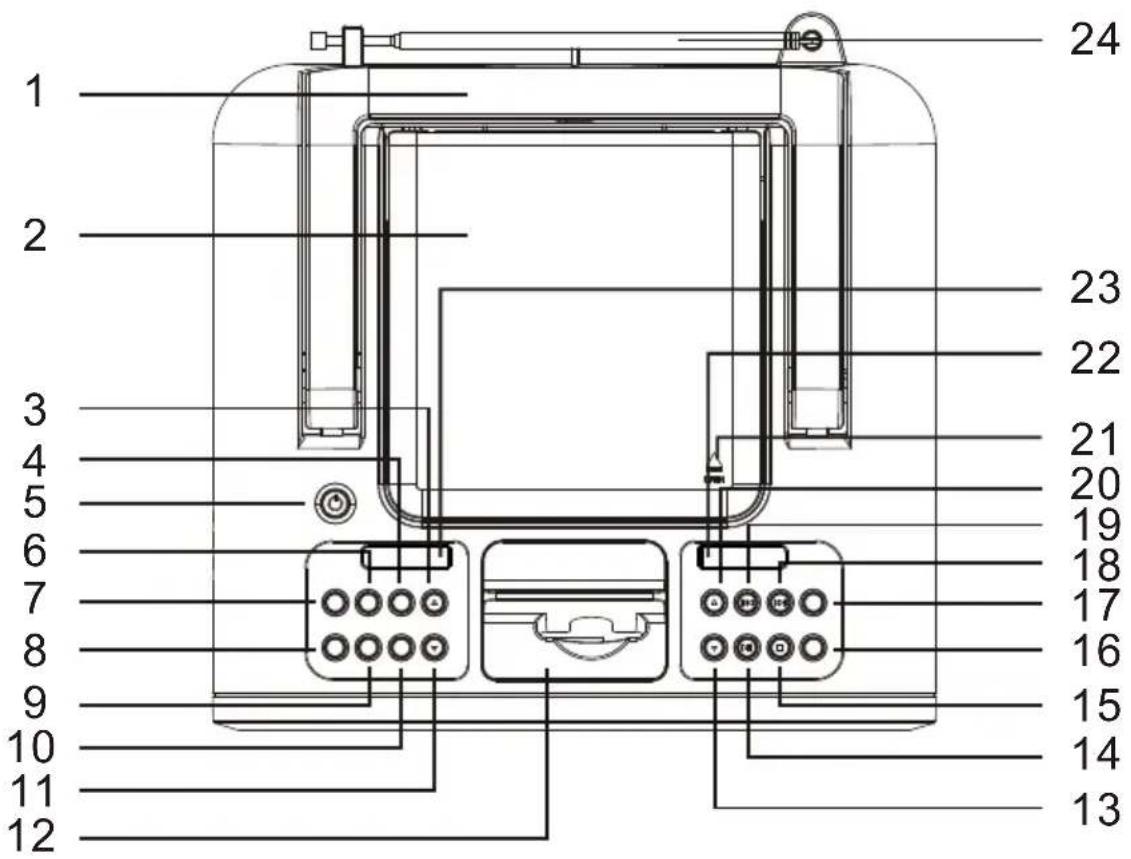
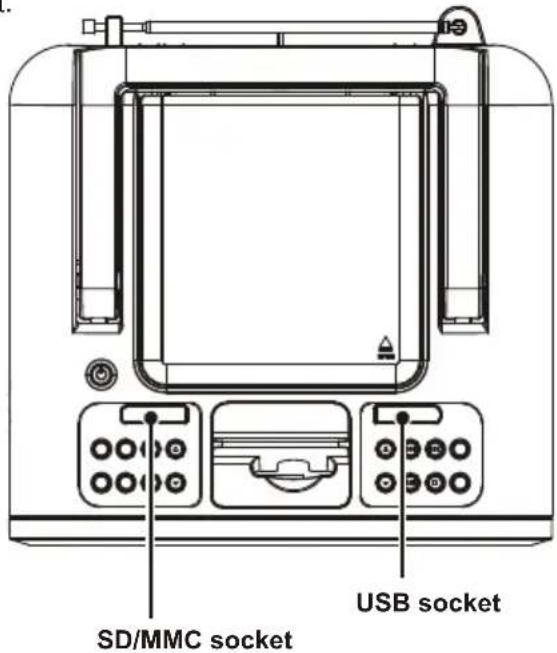
LOCATION OF CONTROLS
FRONT
-
Hand link
-
Disc Compartment
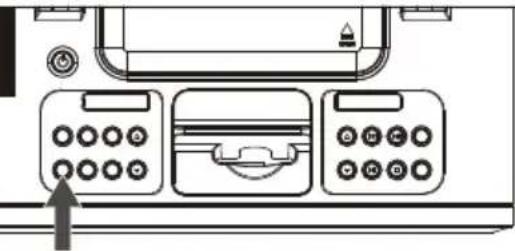
-
PRESET + Buttons
-
EQ (Equalizer) Button
-
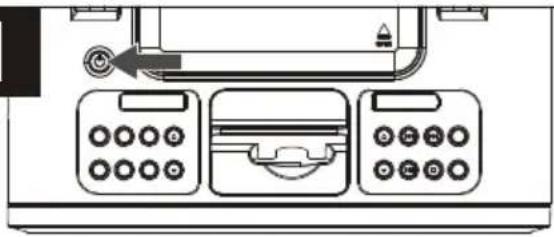
Power Button
-
COPY Button
-
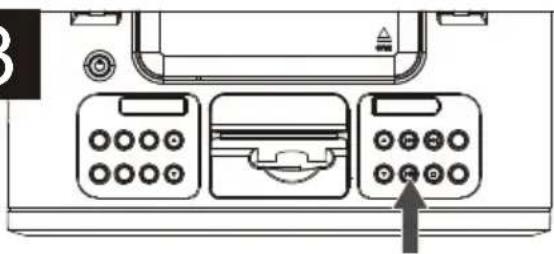
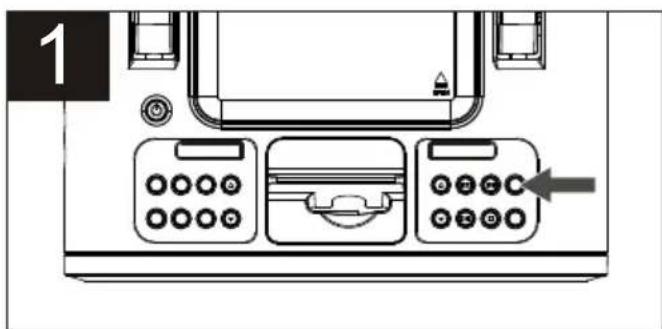
FUNCTION Button
-
BAND/FIND Button
-
ST/MONO Button
-
SLEEP Button
-
PRESET - Buttons
-
iPod Compartment Cover
-
VOLUME - Button
-
PLAY/PAUSE (▶) Button
-
STOP ( ■ ) Button
-
MODE Button
-
MEMORY Button
-
Skip ▶▶/Tuning+ Button
-
Skip ◀◀/Tuning- Button
-
VOLUME + Button
-
Disc Compartment Push Open Area
-
USB socket
-
SD CARD socket
-
Telescopic aerial
LOCATION OF CONTROLS (CONTINUED)
REMOTE 1
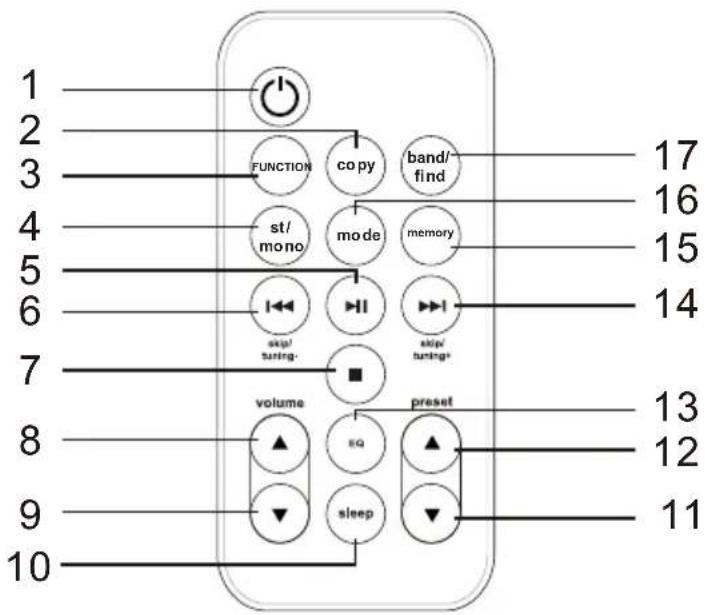
- Power Button
- Copy Button
- FUNCTION Button
- st/mono Button
- PLAY/PAUSE (▶) Button
- Skip ◀◀ /Tuning- Button
- STOP ( ■ ) Button
- VOLUME + Button
- VOLUME - Button
POWER SOURCE
REMOTE BATTERY INSTALLATION
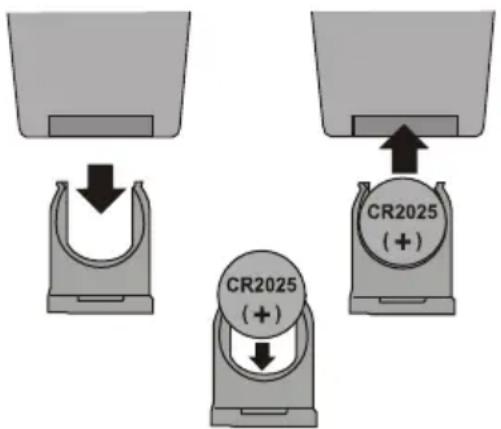
- Remove the Battery Compartment (on the bottom rear of the remote control) by sliding the compartment out. (You can insert a penny, or similar object, into the groove on the compartment to help slide it out.)
- Install a CR2025 battery, paying attention to the polarity diagram in the Battery Compartment (positive side up).
- Replace the Battery Compartment.
BATTERY PRECAUTIONS
Follow these precautions when using a battery in this device:
- Use only the size and type of battery specified.
- Be sure to follow the correct polarity when installing the battery as indicated in the Battery Compartment. A reversed battery may cause damage to the device.
- If the device is not to be used for a long period of time, remove the battery to prevent damage or injury from possible battery leakage.
- Do not try to recharge a battery not intended to be recharged; it can overheat and rupture. (Follow battery manufacturer's directions.)
PREPARATION FOR USE
SPEAKER CONNECTION
Place the speakers in convenient locations on either side of the unit. Usually a distance of five to eight feet between speakers provides the best stereo effect, but this may vary depending on the size and acoustics of the room. Locate the Right and Left Speaker jacks on the rear of the unit and connect the speakers to these jacks.
CAUTION: Only connect the speakers which are supplied with the unit. The use of any other or additional speakers may cause damage to the unit. Never operate the unit without the speakers connected.
OPTIONAL CONNECTIONS
AUX IN JACK (REAR OF UNIT)
Insert one end of the audio cable (not included) into the LINE OUT jack on your external audio unit and the other end into the AUX IN jack on the rear of this unit. Press the AUX button, the unit will be in AUX IN mode.
HEADPHONES JACK
For private listening, connect 3.5mm (32 ohm) stereo headphones (not included) to this jack. The speakers are automatically disconnected when the headphone plug is inserted in the jack.
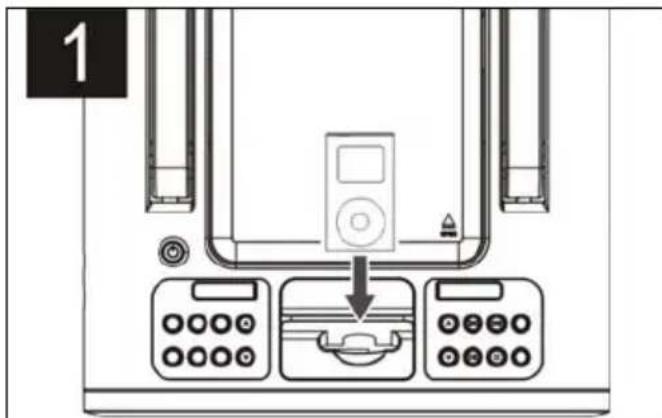
INSERTING AN iPod
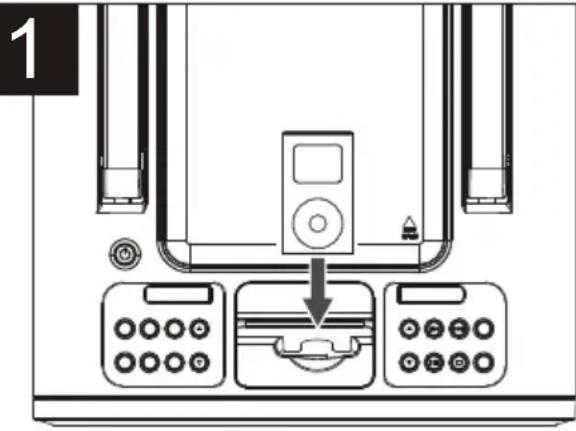
Insert the iPod (A) onto the connector (as shown). Gently push down so the connector on the iPod slides onto the connector on this unit. Push the iPod compartment back in gently.
2
If this unit is turned off, once you connect the iPod, it will start charging the battery until it is full. Then, if you disconnect the iPod, this unit will revert back to the mode that it was previously in. When the iPod is connected to this unit, it will be in the Pause mode.
PLEASE SEE NOTES ON THE NEXT PAGE
NOTES ON INSERTING AN iPod:
- CHARGING: When the iPod is inserted into the dock, whether this unit is on or off, the iPod's battery will charge until it is full.
- CHANGING THE MODE: You can press the FUNCTION button repeatedly to select between iPod/CD/Tuner mode as desired. To turn off the unit, press the Power button.
- To remove all items from this unit, with the iPod compartment pulled forward, remove the iPod from the connector first. Then remove the dock from the connector. To remove the dock, insert your finger (or other object) into the gap in the dock, then gently pull the dock out to remove it.
OPERATION
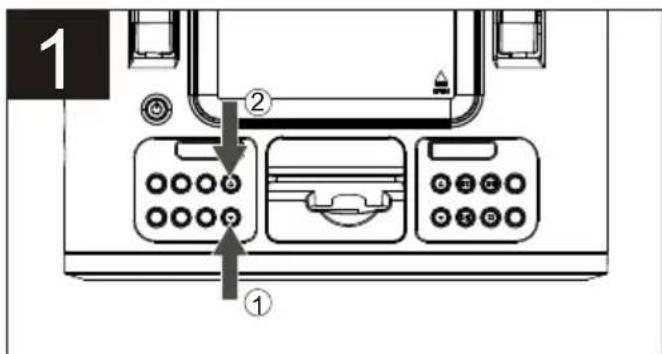
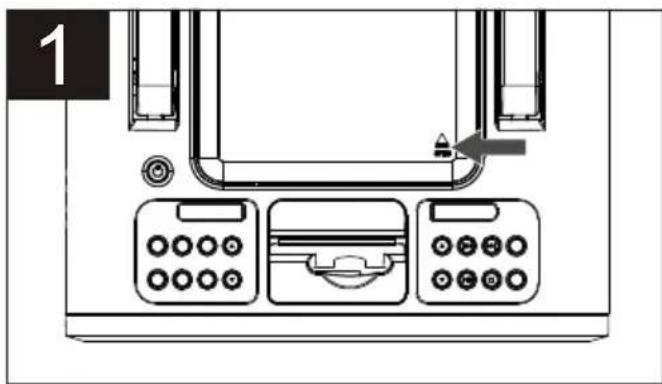
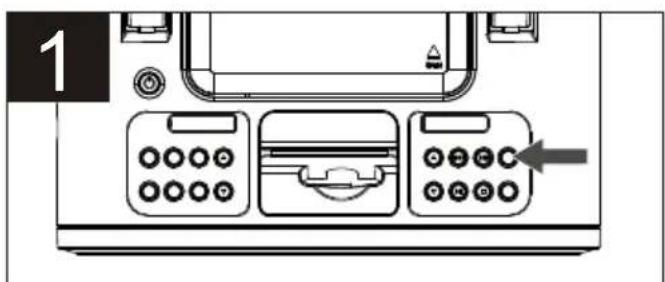
USING THE RADIO
1
natural_image
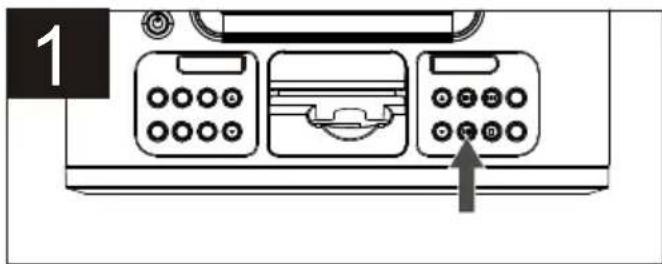
Diagram of a vintage typewriter with three front panels and a scroll, showing control buttons and a scroll wheel (no text or symbols)With an iPod connected (see page 9), turn this unit on by pressing the Power button; the backlight will light blue brightly.
2
natural_image
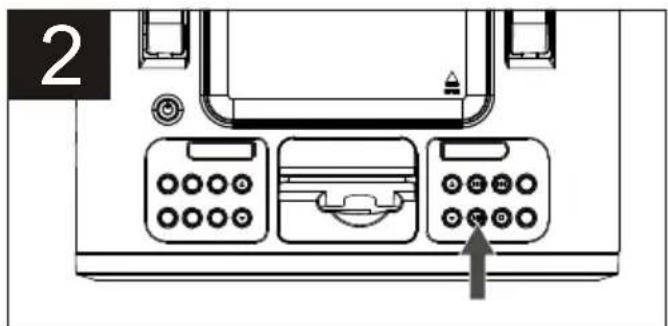
Diagram of a printer front panel with control buttons and a scroll inside (no text or symbols)Press the band/find button repeatedly to select the desired band (AM or FM).
NOTE: If the FM station you have selected is broadcasting in stereo, "ST" will appear in the display.
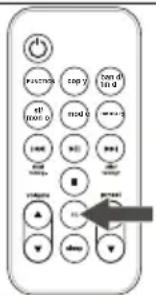
3
natural_image
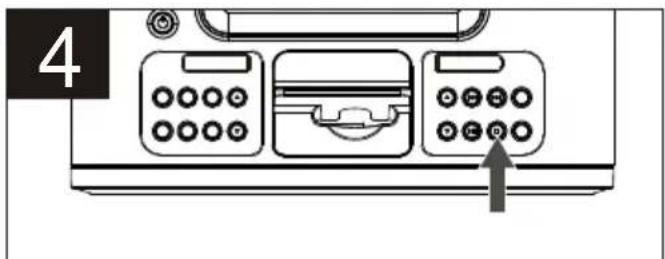
Diagram of a printer front panel with three buttons and a central display (no text or symbols)To play/pause/stop the iPod:
Press the Play/Pause ( ▶) button to start playback on your iPod. Press again to pause playback and press yet again to resume playback.
4
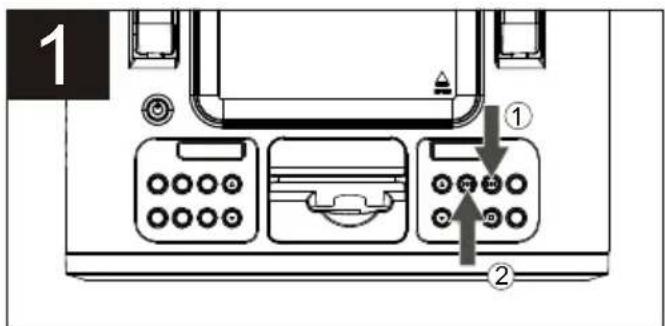
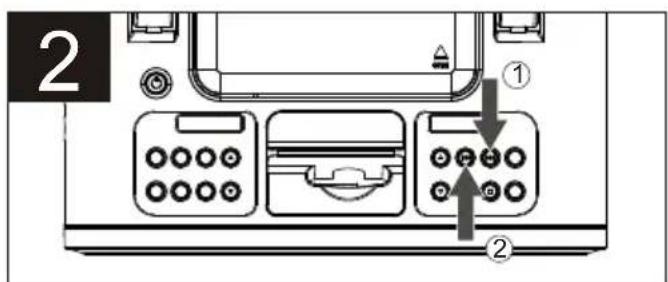
Repeatedly press the Skip ▶Tuning+ ① or Skip ◀◀/Tuning- ② button to manually advance the frequency in the display up or down until the desired frequency appears. For auto tuning, press and hold the Skip ▶◀/Tuning+ ① or Skip ◀◀/Tuning- ② button until the frequency in the display starts to scan and then release; the tuner will search and then stop on the next strong station it finds. Repeat this step until the desired frequency appears in the display.
Antennas
FM: Unravel and extend the FM wire antenna for best reception.
AM: Turn the unit for better AM reception.
OPERATION (CONTINUED)
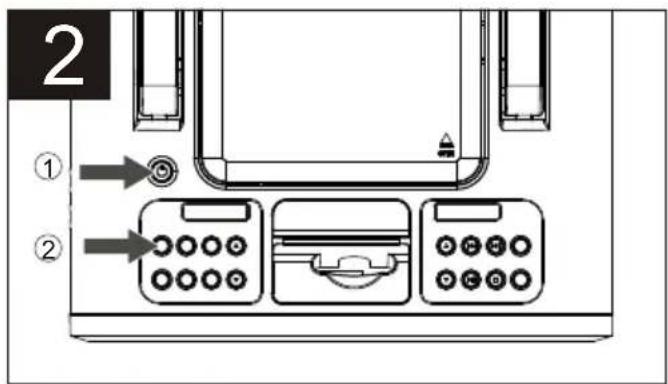
ADJUSTING THE VOLUME AND EQ (Equalizer)
1
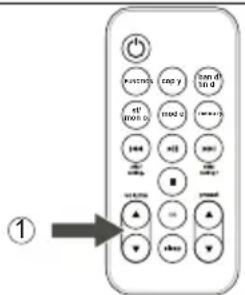
To adjust the main volume:
Press the VOLUME + and/or - button ● on the remote (shown) or on the main unit to increase and/or decrease the volume.
2
To adjust the EQ (Equalizer):
Press the EQ button on the remote (shown) or on the main unit to cycle through the following options: Classic Rock, Pop, Jazz Surround or Off (Normal).
NOTE:
- When this unit is turned off and back on again, the volume will resume at the level which you set before turning the unit off.
OPERATION (CONTINUED)
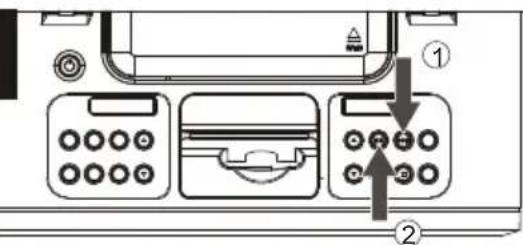
- Set function switch to USB or SD status.
- Insert USB or SD/MMC memorizer to USB or SD socket.
- Press PLAY/PAUSE to control PLAY/PAUSE mode.
- Turn volume button to adjust the sound volume.
- Press STOP key to stop playing.
- Press ▶▶TUNING/SKIP + to play next track.
- Press ◀◀◀ TUNING/SKIP - to play previous track.
- Press Play MODE to select the repeat mode(∅)→
→ ALL → Folder RAN). Normal
Press folder up or down button to select the folder, press ▶▶▶1 or ▶◀◀ to selected folder during the LCD flicker.
-
Press Memory to start program play when stopping; press stop button twice to delete all memory.
-
Press [STOP] key to stop playing. Press [FIND(MP3)] button, then press [TUNING/SKIP + or - (▶▶I or ◀◀◀) ] button to select the folder.
COPY OPERATION
- Play MP3/WMA from disc, press "copy" button, it will only copy the current song; in "TOC" station, press "copy" button, it will copy all songs.
- Remark: insert USB/SD together, press "copy" button, USB first, press "skip" button in 10s can select copy to SD or USB, after 10s if select nothing then it will defalt to USB automatic; only in SD station, it will copy to SD directly.
- USB MP3/WMA files copy to SD CARD, or SD CARD MP3/WMA files to USB. in "TOC" stution, copy all each other; and in "PLAY" stution, copy current "PLAYING SONGS" each other.
OPERATION (CONTINUED)
USING AN iPod WITH THIS UNIT
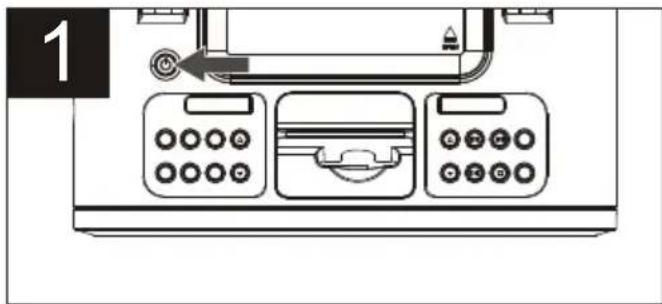
Turn this unit on by pressing the Power button; the backlight will light blue.
If you are not already in iPod mode, press FUNCTION button. You can operate the iPod using its own controls, as per its owner's manual, and the sound will be heard through this unit's speakers.
To skip forward or backward on the iPod: Press the Skip ▶Tuning+ ①or Skip ◀◀Tuning- ②button to skip to the next track or the beginning of the current track/ previous track.
To search forward or backward on the iPod: Press and hold the Skip ▶▶/Tuning+ ①r Skip ▶◀/Tuning- ②button to search within the currently-playing track.
NOTES:
• Once you turn on this unit, the iPod will be in Pause mode.
• See the next page for how to adjust the volume and EQ (Equalizer).
- To turn this unit off, press the Power button; the display will show the actual time again.
OPERATION (CONTINUED)
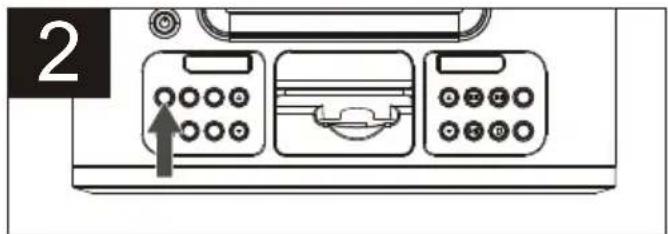
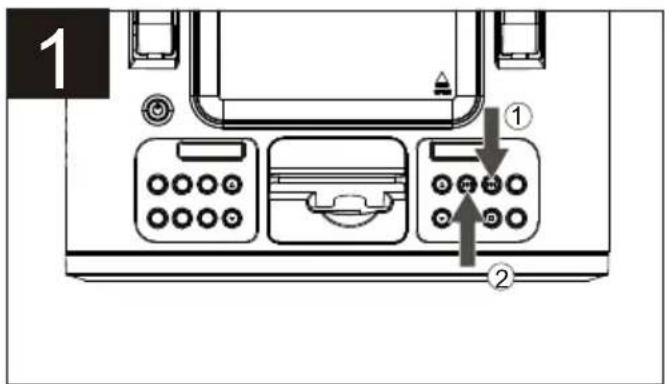
SETTING THE RADIO PRESETS (9 for each band)
Follow the steps on the previous page to tune a station. Press MEMORY button; "MEMORY" will appear and "1" will blink in the display.

Within three seconds, press the PRESET - ① or PRESET + ② button to select a desired Preset. Press the MEMORY button ③ again to confirm, the station will be saved into memory. Repeat to program additional presets in each band, as desired.
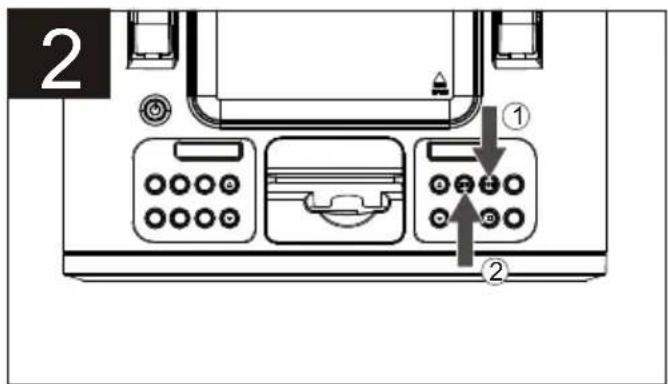
RETRIEVING RADIO PRESETS (9 for each band)
Follow Steps 1-3 on the previous page to turn the unit on and select a band. Press the PRESET - or PRESET + ② button repeatedly to retrieve the desired Preset.
NOTES:
• See page 8 for how to adjust the volume and EQ (Equalizer).
• To turn this unit off, press the Power button; the backlight will turn off.
OPERATION (CONTINUED)
USING CDs WITH THIS UNIT
Press the Disc Compartment "Push to Open" area and gently press the CD(s) onto the center spindle with the label side facing forward. Close the Disc Compartment.
NOTE: 3 inch single, standard CDs and CD-R/RWs can be used with this unit.
Turn this unit on by pressing the on/off button ①; the back light will light blue.
If you are not already in CD mode, press FUNCTION button ② the display will show the total tracks/playing time of Disc.
See page 8 for how to adjust the volume and EQ.
Select the disc that you wish to playback will start automatically; the current track and elapsed playing time will appear in the display.
When the disc is through playing, it will stop. Press the STOP ( ) button to stop the disc before it is finished.
OPERATION (CONTINUED)
TO PAUSE A CD
During playback, press the Play/Pause (▶) button to pause playback (the elapsed time will blink) and press yet again to resume playback.
DISC PLAYBACK NOTES:
- If a disc is inserted incorrectly, dirty, damaged or not present at all, "NO DISC" will appear in the display.
- Playback will stop when you open the playing disc's compartment, but it is not recommended to open the compartment before the STOP ( ) button is pressed.
• See page 8 for how to adjust the volume and EQ (Equalizer). - To turn this unit off, press the Power button; the backlight will turn off.
OPERATION (CONTINUED)
TO BEGIN PLAYBACK FROM A SPECIFIC TRACK
With the desired disc selected, you may press either the Skip ▶/ Tuning+ ①or Skip ◀◀Tuning- ② button to select a specific track for playback.
When the desired track is selected, press the Play/Pause (▶I) button. Playback will begin with the track you selected.
FORWARD/REVERSE SKIP/SEARCH
To skip forward or backward on the disc:
During playback, press the Skip Tuning+ or Skip ▶/Tuning-button to skip to the beginning of the current track / previous or next track.
To search forward or backward on the disc:
During playback, press and hold the Skip ▶▶/Tuning+ ①br Skip ▶◀/Tuning- ②button to search within the currently-playing track.
OPERATION (CONTINUED)
REPEAT ONE/ALL PLAYBACK
1
natural_image
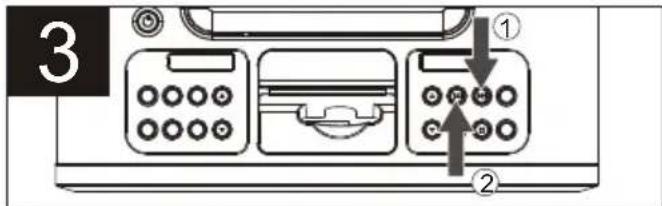
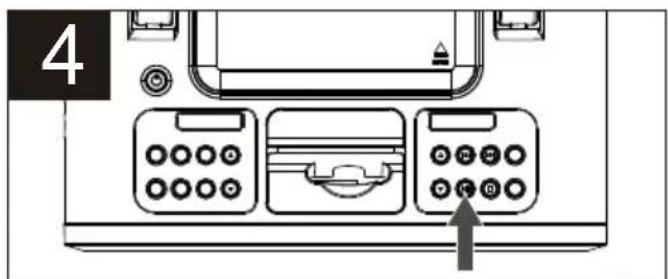
Line drawing of a three-panel computer interface with buttons and a mouse (no text or symbols)With the desired disc selected, press the MODE button once to select “ ⇌” Repeat One (will playback a single track continuously; see the previous page for how to select a desired track; “ ⇌” will appear in the display) or twice to select “ ⇌ALL” Repeat All (will playback all tracks/files on the disc continuously;“ ⇌ALL” will appear in the display).
2
natural_image
Diagram of a vintage computer control panel with buttons and an arrow pointing to the bottom panel (no text or symbols present)When the playback mode is selected, press the Play/Pause (▶II) button.
RANDOM/REPEAT RANDOM PLAYBACK
1

natural_image
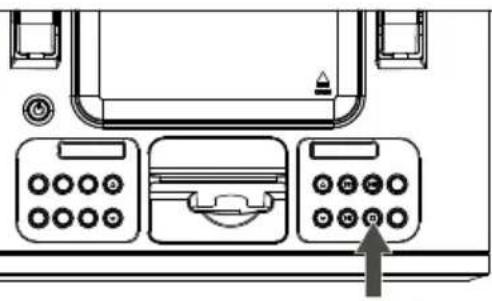
Line drawing of a vintage office desk with three front panels and a keypad, no text or symbols presentWith the desired disc selected, press the MODE button three times to select "RANDOM" (will randomly play the tracks on the disc once and then stop; "RAN." will in the display).
OPERATION (CONTINUED)
TO PROGRAM THE MEMORY (UP TO 20 TRACKS)
Programming is the ability to preselect the order in which a series of tracks will be played.
With the desired disc selected, press the MEMORY button. the track number and "PR01" (the program number) will blink/appear in the display.
Select a track to be programmed using the Skip ▶/Tuning+ ①r Skip ◀◀/Tuning- ②button.

Press the MEMORY button to memorize the track. Repeat Steps 2 and 3 to program additional tracks up to a maximum of 20 tracks.
Press the Play/Pause ( ▶) button to begin program playback.
NOTE:
- To clear the memory, while in the Stop mode, press the PROGRAM/Memory button followed by the STOP ( ▶ button.
SEE NEXT PAGE FOR MORE NOTES ON PROGRAMMING THE MEMORY.
OPERATION (CONTINUED)
PROGRAMMED REPEAT
1

natural_image
Diagram of a printer front panel with control buttons and a door, showing no text or symbols.It is also possible to use the Program and Repeat functions together to repeat a program. First, start Program playback as previously described, then press the MODE button twice to enter the Repeat ALL mode and the program will play repeatedly.
2
natural_image
Diagram of a device control panel with three buttons and an arrow pointing to the bottom panel (no text or symbols present)Programmed Repeat playback will continue indefinitely until you press the STOP ( ■ ) button to cancel the Repeat and Program modes.
OPERATION (CONTINUED)
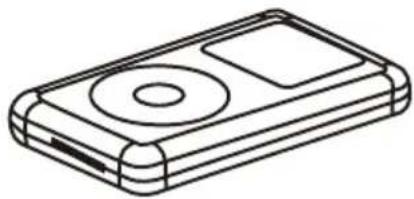
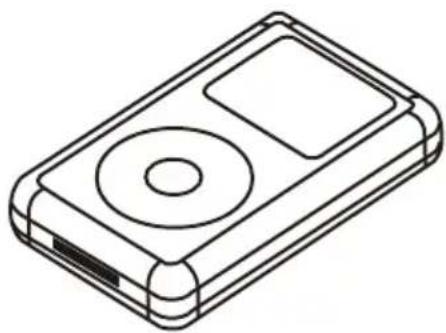
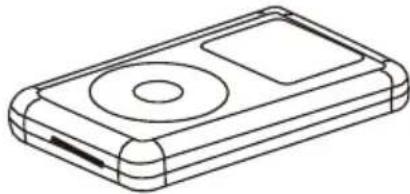
iPod DOCKS
Locate your iPod in the chart on the next two pages and select the respective dock (the Dock No. is engraved at the back of the docks as shown on the next page) to match with your iPod. Insert the corresponding dock and your iPod into the unit as described on page 10.
| iPod Type Memory | ||
 | iPod mini | 4 to 6GB |
 | Fourth Generation iPod | 20GB/ U2 Special Edition 20GB |
| 40GB | ||
 | iPod Photo/ iPod with color display | 20GB/ U2 Special Edition 20GB |
| 4O to 60GB |
OPERATION (CONTINUED)
| iPod Type Memory | ||
 | First Generation iPod nano | 1 to 8GB |
 | Generation iPod (w/Video) | 30GBFifth |
| 60GB/80GB | ||
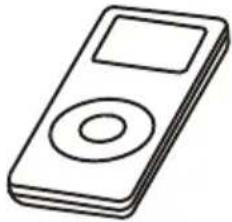 | Second Generation iPod nano | 2 to 8GB |
NOTE: The nine docks provided with this unit are not Universal Docks; they are for use with this model only. Do not use the Universal Docks; otherwise, this unit will be damaged.
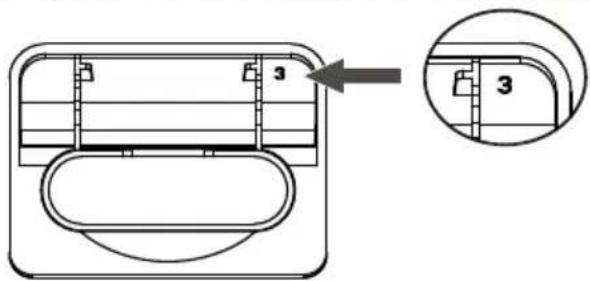
IMPORTANT! The Dock No.is engraved at the back of the docks.Please refer to the illustration below for the location of the Dock No.
TROUBLESHOOTING GUIDE
If you experience a problem with this unit, check the chart below before calling for service.
| SYMPTOM | CAUSE | SOLUTION |
| No sound. | Volume is set to minimum. | Increase volume. |
| AM or FM, no sound. | Not in Tuner mode. | Press the Power button, then the FUNCTION button to select Tuner. |
| AM/FM, poor sound. | Station is not tuned properly. | Retune the AM or FM broadcast station. |
| FM: Wire antenna is not extended. | Extend FM wire antenna. | |
| AM: Unit is not positioned correctly. | Rotate unit until best reception is obtained. | |
| iPod mode, no sound. | Incorrectly connected. | Check the connection. |
| Not in iPod mode. | Press the FUNCTION button to select iPod. | |
| CD mode, no or poor sound. | Not in CD mode. | Press the FUNCTION button to select CD. |
| Disc(s) inserted incorrectly | Reinsert disc(s) correctly. | |
| Dirty or defective disc(s). | Clean or replace disc(s). | |
| Moisture condensation on disc(s). | Wipe disc(s) with soft cloth. |
CARE AND MAINTENANCE
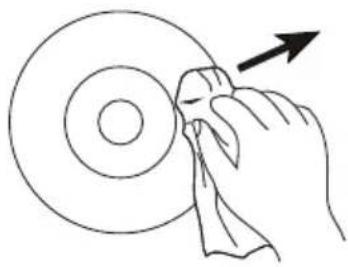
Caring for Compact Discs
- Treat the compact disc carefully. Handle the compact disc only by its edges. Never allow your fingers to come in contact with the shiny, unprinted side of the compact disc.

natural_image
Line drawing of two hands holding a circular object (no text or symbols)• Do not attach adhesive tape, stickers, etc. to the compact disc label.
- Clean the compact disc periodically with a soft, lint-free, dry cloth. Never use detergents or abrasive cleaners to clean the compact disc. If necessary, use a CD cleaning kit.
- If a compact disc skips or gets stuck on a section of the compact disc, it is probably dirty or damaged (scratched).
- When cleaning the compact disc, wipe in straight lines from the center of the compact disc to the outer edge of the compact disc. Never wipe in circular motions.
- This unit is designed to play only compact discs bearing the identification logo as shown here. Other compact discs may not conform to the CD standard and may not play properly.
- Compact discs should be stored in their cases after each use to avoid damage.
- Do not expose compact discs to direct sunlight, high humidity, high temperatures or dust, etc. Prolonged exposure or extreme temperatures can warp the compact disc.
- Do not stick or write anything on either side of the compact disc. Sharp writing instruments, or the ink, may damage the surface.
natural_image
Hand cleaning a circular object with a cloth, no text or symbols present

SPECIFICATIONS
GENERAL
AC Power 230V / 50Hz
DC 12V Battery "C" x8
Speaker 4 ohm x 2
Output Power 3W x 2
RADIO SECTION
Frequency Range (FM).... 87.5-108MHz
Frequency Range (AM) 522-1620KHz
CD SECTION
Disc Diameter 4.72" (120mm)
Optical Source . . . . . . . . . . . . . . . . . . . . . . . . . . . . . . . . . . . . . . . . . . . . . . . . . . . . . . Semiconductor laser
Specifications are subject to change without notice.

iPod music entertainment system
PC -5097

- GEBRUIKERSHANDLEIDING MANUEL D'INSTRUCTIONS INSTRUCTION MANUAL
- AFSTANDSBEDIENING
- OPMERKINGEN:
- SPECIFICATIONS
- GENERAL
- RADIO SECTION
- CD SECTION
- INSERTION D'UN IPOD
- WARNING
- CAUTION
- CAUTION!
- LOCATION OF CONTROLS
- FRONT
- LOCATION OF CONTROLS (CONTINUED)
- REMOTE 1
- POWER SOURCE
- REMOTE BATTERY INSTALLATION
- BATTERY PRECAUTIONS
- PREPARATION FOR USE
- SPEAKER CONNECTION
- OPTIONAL CONNECTIONS
- AUX IN JACK (REAR OF UNIT)
- HEADPHONES JACK
- INSERTING AN iPod
- 2
- PLEASE SEE NOTES ON THE NEXT PAGE
- NOTES ON INSERTING AN iPod:
- OPERATION
- USING THE RADIO
- To play/pause/stop the iPod:
- Antennas
- OPERATION (CONTINUED)
- ADJUSTING THE VOLUME AND EQ (Equalizer)
- To adjust the main volume:
- To adjust the EQ (Equalizer):
- NOTE:
- COPY OPERATION
- USING AN iPod WITH THIS UNIT
- NOTES:
- SETTING THE RADIO PRESETS (9 for each band)
- RETRIEVING RADIO PRESETS (9 for each band)
- USING CDs WITH THIS UNIT
- TO PAUSE A CD
- DISC PLAYBACK NOTES:
- TO BEGIN PLAYBACK FROM A SPECIFIC TRACK
- FORWARD/REVERSE SKIP/SEARCH
- To skip forward or backward on the disc:
- To search forward or backward on the disc:
- REPEAT ONE/ALL PLAYBACK
- 1
- RANDOM/REPEAT RANDOM PLAYBACK
- TO PROGRAM THE MEMORY (UP TO 20 TRACKS)
- PROGRAMMED REPEAT
- iPod DOCKS
- TROUBLESHOOTING GUIDE
- CARE AND MAINTENANCE
- Caring for Compact Discs
Brand : Marquant
Model : PC5097
Category : Loudspeaker