
DPI7689XP - Cooker DE DIETRICH - Free user manual and instructions
Find the device manual for free DPI7689XP DE DIETRICH in PDF.
User questions about DPI7689XP DE DIETRICH
0 question about this device. Answer the ones you know or ask your own.
Ask a new question about this device
Download the instructions for your Cooker in PDF format for free! Find your manual DPI7689XP - DE DIETRICH and take your electronic device back in hand. On this page are published all the documents necessary for the use of your device. DPI7689XP by DE DIETRICH.
USER MANUAL DPI7689XP DE DIETRICH
FR GUIDE D'UTILISATION
EN USER GUIDE 18
Interventions France 17

SECURITE ET PRECAUTIONS IMPORTANTES
RELATIONS CONSOMMATEURS FRANCE
Discovering De Dietrich products means experiencing unique emotions. The attraction is immediate from the moment you set eyes on the product. The sheer quality
of the design shines through, thanks to the timeless style and outstanding finishes which make each component an elegant and refined masterpiece in its own right, each one in perfect harmony with the others.
Next, comes the irresistible urge to touch it.
De Dietrich's design makes extensive use of robust and prestigious materials. By combining state-of-the-art technology with top quality materials, De Dietrich
produces beautifully crafted products to help you get the most from the culinary arts, a passion shared by all lovers of cooking and fine food.
We hope that you enjoy using this new appliance.
Thank you for choosing a De Dietrich product.
CONTENTS
EN
Safety and important precautions 20
Installation 23
Unpacking 23
Building in 23
Connection 23
Use 24
Control panel glossary 24
Power management 25
Choice of cookware 25
Cooking zone selection 25
Switching on and off 25
Power setting. 25
Horizone 26
Setting the timer 26
- Elapsed time key 273
Locking the controls. 27
Clean lock function 27
ICS function 27
Recall function 28
Switch function 28
Boil function 28
Horizone Play 29
Grill / Griddle function 29
Safety devices and recommendations. 29
Care 31
Problems 32
Environment 33
Customer service 34

IMPORTANT SAFETY ADVICE AND PRECAUTIONS
These instructions are also available on the brand's web site.
Please read this advice carefully before installing and using your appliance. These instructions are intended to protect your safety and the safety of others. Keep this manual with the appliance. If you sell or give the appliance to someone else, make sure that you also give them this manual.
- With a view to constantly improving our products, we reserve the right to make changes to their technical, functional or aesthetic characteristics in line with technological progress.
In order to easily locate the make, model number, etc. of your appliance, we recommend that you note this information on the "After-Sales Service Department and Customer Support" page.
This appliance can be used by children over 8 years old and persons with reduced physical, sensory or mental capabilities or without experience and knowledge if they have been correctly informed or trained in the use of the appliance in a safe way and understand the hazards involved.
Children must not be allowed to play with the appliance.
Cleaning and maintenance must not be carried out by children without supervision.
Children under 8 years old must be kept away from the hob unless they are supervised at all times.
The appliance and its accessible parts become hot during use.
Precautions must be taken to avoid touching the heating elements.
Metal objects such as knives, forks, spoons and lids must not be placed on the cooking surface as they may become hot.
Your hob is equipped with a child safety device that locks its operation after use or during cooking (See « Child Safety use» section).
Your appliance complies with applicable European Directives and regulations.
In order to avoid interferencebetween your cooking hoband a heart pacemaker, thepacemaker must be designedand – programmed – incompliance – with – theregulations that apply to it. Ask

IMPORTANT SAFETY ADVICE AND PRECAUTIONS
the pacemaker manufacturer or your GP.
Leaving oil or fat to cook unattended on a hob can be dangerous and lead to fire. NEVER attempt to extinguish a fire with water. Instead, switch off the appliance, then cover the flame with a lid or fire blanket.
CAUTION: cooking must be monitored. Short cooking requires constant surveillance. Danger of fire: do not store objects in the cooking zones. If the surface is cracked, turn off the appliance to avoid the risk of electric shock.
Do not use your hob until you have replaced the glass top. Avoid hard shocks from cookware: although the vitroceramic glass worktop is very sturdy, it is not unbreakable.
Do not place hot lids flat on your cooking hob. A suction effect may damage the vitroceramic surface. Avoid dragging cookware across the surface, which could damage
the decorative finish on the vitroceramic top in the long term.
Never use aluminium foil for cooking. Never place items wrapped in aluminium foil or packaged in aluminium dishes on your cooking hob. The aluminium will melt and permanently damage your appliance.
Do not store cleaning products or inflammable products in the cabinet underneath the hob.
If the power cable is damaged, it should be replaced by the manufacturer, its after-sales service department or a similarly qualified person, so as to avoid danger.
Ensure that the power cables of any electrical appliances plugged in close to the hob are not in contact with the cooking zones.
Never use a steam cleaner to clean your cooking hob.
The appliance is not designed to be switched on using an

IMPORTANT SAFETY ADVICE AND PRECAUTIONS
external timer or separate remote control system.
After use, turn off the hob using its control device and do not rely on the pan detector.
WARNING: Only use hob protectors designed by the manufacturer of the cooking appliance or listed as suitable in the user guide, or included with the appliance. The use of unsuitable protectors could cause accidents.
1.1 UNPACKING
Remove all the protective packing pieces. Check and respect the appliance's characteristics that appear on the nameplate (1.1.1).
Note the service and standard references shown on this plate in the boxes below for future reference.
Service:
Type:
1.2 BUILDING INTO A BASE UNIT
Check that the air intakes and outlets are free of obstruction (1.2.1). Comply with the information concerning the fitting dimensions (in millimetres) of the base unit destined to receive the hob.
- Fitting into the worktop See diagram (1.2.2)
- Fitting flush with the worktop See diagram (1.2.3
Except for models HorizonePlay
Check that air circulates correctly between the front and the back of your hob.
If you are installing the hob above a drawer (1.2.4) or above a built-in oven (1.2.5), comply with the dimensions provided on the illustrations to ensure a sufficient air outlet at the front. Apply the seal all around the edge of the hob (1.2.6), before fitting.
Fit the hob into the base unit (1.2.7).
If your hob is located above your oven, the hob's thermal safety devices can impede the simultaneous use of the hob and the oven's pyrolysis programme. Your hob is equipped with
an overheating prevention safety system. This safety device can trigger, for example, when the hob is installed over an oven that is not sufficiently insulated. The code «F7» then appears in the control zone. In such circumstances we recommend that you increase the hob's ventilation by creating an opening in the side of the cabinet (8 x 5 cm).
1.3 ELECTRICAL CONNECTIONS
These hobs must be connected to the mains via an all-pole cutoff device that complies with current installation regulations. A disconnection device must be incorporated into the fixed wiring. Identify the type of cable of your hob according to the number of wires and colours:
-5-wire cable (1.3.1) :
a) green/yellow, b) blue, c) brown, d) black, e) grey.
When power is first supplied to your hob, or after an extended power outage, an indicator light will appear on the control panel. Wait approximately 30 seconds or press any key on the control panel to make the information disappear and use your hob (this display is normal and is reserved for use by After-Sales Service, where applicable). In all cases, it should be disregarded.
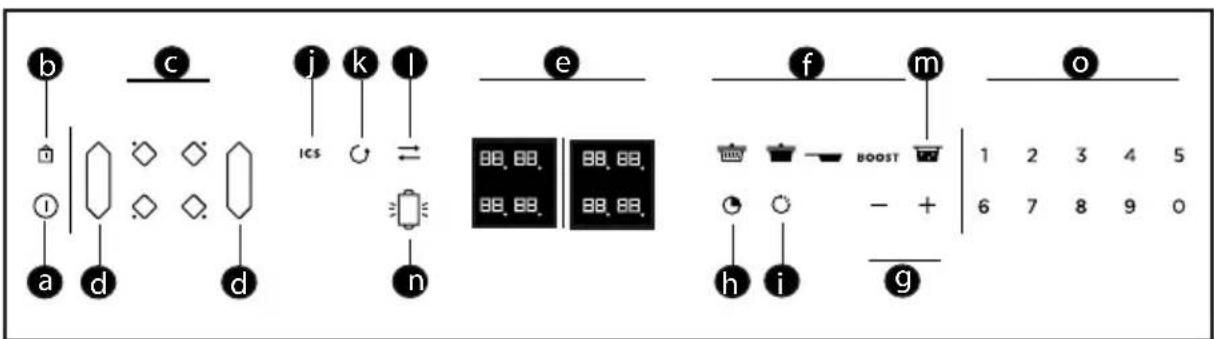
Control panel glossary
a switch on and off
= Locking / Clean Lock
Choice of cooking zone
diorizone
eDisplay
Pre-selection
Power / time setting
himer
Elapsed time function
SCS function
Recall function
Switch function
oil function
Grill function
Choice of numeric panel power / time
2.1 POWER MANAGEMENT
The total power consumed by your hob must be consistent with the power of your electrical installation.
| hob power in kW | Fuses / Circuit breaker (A) |
| 7,4 32 |

Ensure that the power selected is potible with the hob's fuses.
Depending on the power level selected, the division of power between the cooking zones will be affected.
2.2 CHOICE OF COOKWARE
Most cookware is compatible with induction. Only glass, terracotta, aluminium without a special base, copper and some non-magnetic stainless steels do not work with induction cooking.

We suggest that you choose cookware with a thick, flat
bottom. The heat will be distributed better and cooking will be more uniform. Never leave an empty pan to heat unattended.

Avoid putting cookware on the ol panel.
2.3 COOKING ZONE SELECTION
There are several cooking zones available. Select one which is suitable, based on the size of the pan. If the base of the cookware is too small, the power indicator will start to flash and the cooking zone will not work, even if the cookware's material is recommended for induction. Take care not to use pans which are smaller in diameter than the cooking zone (see table)
| Diameter of cooking zone | Max. power of cooking zone (Watts) | Diameter of bottom of cookware |
| 16 cm | 2400 | 10 to 18 cm |
| 18 cm | 2800 | 11 to 22 cm |
| 23 cm | 3700 | 12 to 24 cm |
| 28 cm | 5000 | 15 to 32 cm |
| Horizone | 5000 | 18 cm, oval fish kettles |
| 1/2 zone | 2800 | 11 to 22 cm |

- When several cooking zones are used at the same time, the hob manages its power distribution, so as not to keep its total power.
When you use maximum power (Boost) on several cooking zones at the same time, position pans to achieve the best positioning and avoid arrangements (2.3.1 - 2.3.2 - 2.3.3)
2.4 SWITCHING ON/OFF
Press the On/Off key a0" flashes in each zone for 8 seconds (2.4.1). If no pan is detected, select a zoner (2.4.2). If a pan is detected, the «0» flashes with a dot. You can then set the power level. The cooking area heats up automatically.
Switching off a zone on the hob
Press and hold the key for zone long beep sounds and the display goes off or an "H" appears (residual heat). Press the On/Off key to switch the hob off completely.
2.5 SETTING THE POWER
Press the + or - key (2.5.1) or use numeric keypad adjust your power level between 1 and 19. In this
2USE

case you can enter the number corresponding the desired power setting directly (2.5.2). Pressing the «0» key switches the hob off.
When switching on, you can go directly to maximum power (apart from boost) by pressing the "--" key for the zone.e.
Power presets
There are four keys available that provide direct access to pre-set power levels:
= power 2 - Keep warm
= power 10 - Simmer
= power 19 - Sear
BOOST = maximum power (2.5.3)
These power values can be modified, except for BOOST.
Proceed as follows:
The hob must be switched off.
- Press and hold or to select it.
- Set the new power setting by pressing on the + or - button.
- A beep will confirm your action after a few moments.
Note: Power levels must be between
1 and 3 for
4 and 11 for
12 and 19 for
2.6 HORIZONE
Horizonetech
The free zone is selected with touchkey
d (2.6.1). The power and timer are adjusted as for a normal cooking zone. To switch the zone off, press and hold
key a long beep sounds and the displays go off or the "H" symbol
appears.
Pressing the touchkey in front of or behind the zone deactivates the function and transfers the settings to the selected zone.
2.7 SETTING THE TIMER
Each cooking zone has a dedicated timer. It can be used as soon as the cooking zone is turned on.
To switch it on or change it, press the timer touchkey (2.7.1), and then
the ^+ or-2.9 or use the
In this case you can enter the figures for the desired time directly, one after the other.
Pressing the «0» key switches off the timer.
To make setting a very long time easier, you can go straight to 99 minutes by pressing the - touchkey.
At the end of cooking, the display indicates 0 and a warning beep sounds. To cancel this information, press any button for the particular cooking zone being used. Otherwise, they will switch off after a few seconds.
To stop the timer during cooking, press the + and - keys at the same time or return to 0 using the - key or enter "0" on the numeric keypad.
Independent timer
This function allows you to time an event, without cooking.
- Select a cooking zone you are not using (2.7.4).
- Press the
2USE
- Set the time with touchpad 9A "t" flashes in the display (2.7.5).
- At the end of your adjustment "t" becomes becomes fixed and the count begins.
Note:
You can stop a count in progress by keeping your finger on the touchpad of the selection on the display.
2.8 ELAPSED TIME key
This function displays the time since the power setting was last changed for a selected cooking zone. To use this
function, press the The elapsed time flashes in the selected zone's timer display (2.8.1).
If you want cooking to end within a
specific time, press the key and then, within 5 seconds, press + on the timer to increase the desired cooking time. The elapsed time is displayed fixed for 3 seconds and then the remaining time is displayed. A beep sounds to confirm your choice.
This function is available with or without the timer function.
Note: if the timer is showing a time, it is not possible to change it within 5
seconds of pressing After 5 seconds, the cooking time can be changed.
29 LOCKING THE CONTROLS
Child safety lock
Your hob has a child safety device which locks the controls when the hob is not in use or during cooking (to maintain the current settings). For safety reasons, only the stop key and the zone selection keys are still active
and allow the hob or a cooking zone to be switched off.
Locking
Press key (cadenas), until the "bloc" locking symbol appears in one of the displays and a beep confirms the operation (2.9.1).
Table locked in operation
The display of cooking zones in operation alternately indicates power and the locking symbol.
When you press the power or timer keys for the zones which are «on»:
«bloc» appears for 2 seconds and then switches off.
Unlocking
Press key until the "bloc" locking symbol disappears from the display and a beep confirms the operation.
CLEAN LOCK function
This function locks the hob off while it is being cleaned.
To activate Clean lock:
Give a short press on key padlock). A beep sounds and the «bloc» symbol flashes in the display.
After a predefined time, the lock will automatically disengage. Two beeps sound and «bloc» switches off. You can stop the Clean Lock at any moment by
pressing and holding touchkey
2.10 ICS FUNCTION
Intelligent Cooking System
This function optimises the choice of cooking zone for the diameter of cookware used.
Proceed as follows:
2USE
Place the pan on the cooking zone, e.g. 28 cm dia.).
Select Boost power and possibly a cooking time.
Appuyez sur la touche le symbole «ICS» apparait dans l'afficheur (2.10.1) - either the zone chosen is the best one for the pan and «ICS» disappears leaving the initial cooking parameters in the display.
- or the zone chosen is not the best one for the pan and the display then indicates which zone should be used and the settings are transferred to it automatically (2.10.2).
N.B.: The hob must be cold to use this function.
2.11 RECALL FUNCTION
This function lets you display the last «power and timer» settings for all the burners which were switched off less than 3 minutes previously.
To use this function, the hob must be unlocked. Press the On/Off key and then
give a short press on key (2.11). k
When the hob is operating, the function lets you see the power and timer settings for the burner(s) which have been switched off for less than 30 seconds.
2.12SWITCH FUNCTION
This function allows a pan to be moved from one zone to another while retaining the original settings (power and time).
Give a short press on the key; = = = = symbols scroll through the display. Select the zone to which you wish to move the pan. The settings will be transferred to the selected zone and you can now move the pan.
2.13 FONCTION BOIL
With this function you can boil and simmer water to cook pasta, for example.
Select a zone and give a short press on the "Boil" key (2.13.1) m
The default quantity of water displayed is 2 litres, but you can change it using the
- or - (913.2).
Set the quantity of water required (from 0.5 to 6 litres).
Confirm by pressing the BOil symbol on wait a few seconds for automatic confirmation.
Cooking starts.
A beep sounds when the water is boiling and the "Boil" symbol scrolls through the display (2.13.3).
You can then add the pasta and confirm by pressing the «Boil» key.
By default, the display shows the power and a cooking time of 8 minutes.
You can still adjust the power and the cooking time suggested.
A beep sounds out when cooking is finished.
NOTE: It is important that water is at ambient temperature at the start of cooking or the final result will be distorted.
Do not use a cast iron pan with this function.
You can also use this function to cook any food that needs to be cooked in boiling water.
Advice on how to save energy Cooking with the correctly sized lid saves energy. If you use a glass lid, you can control your cooking perfectly.
2.14 HORIZONE PLAY
HorizonePlay models
Your appliance is equipped with a guide at the rear of the cooking surface which allows De Dietrich accessories in the Horizone Play range, such as the chopping block, griddle or grill to be positioned.
Positioning accessories:
Position the groove (A) on your accessory on the guide (B) on your appliance (2.14).
Do not slip Horizone Play accessories on to the cooking surface or you could scratch it.
2.15 GRILL / GRIDDLE FUNCTION
This function allows you to use grill or griddle type accessories in the "Horzone" free zone, so that food can be grilled.
The "Horizonew must be selected; then give a short press on the Grill key
and "GRILL" appears in the upper display area (2.15.1). When the temperature required for the grill is reached, a beep sounds for 10 seconds and "GRILL" scrolls through the display (2.15.2).
The timer cannot be used with the Grill and Griddle functions.
The Elapsed time function can only be used in consultation mode.
Pressing keys 0, exits function.
In there is no pan in place, "Grill" flashes (like a power setting but you remain within the function).
2.16 SAFETY PRECAUTIONS AND RECOMMENDATIONS
Residual heat
After intensive use, the cooking area you have just used will remain hot for several minutes.
An "H" is displayed during this time (2.16.1). So, avoid touching the zones concerned.
Temperature limiter
Each cooking area is fitted with a safety sensor that continuously monitors the temperature of the bottom of the pan. In the event that an empty pan is left on a zone that is switched on, the sensor automatically adapts the power delivered by the hob and limits the risk of damaging the cookware or the hob.
Spillage protection
The hob may be switched off in the following three cases:
-
A spillage in the touchkey area (2.16.2).
-
Damp cloth placed over the touchkeys.
-
A metal object placed on the touchkeys (2.16.3).
Remove the object or clean and dry the touchkeys and then continue cooking.
In these cases, the symbol is displayed accompanied by an audible signal.
«Auto-Stop» system
If you forget to switch off a pan, your hotplate has an "Auto-Stop" safety function that automatically switches off the forgotten cooking zone after a preset time (between 1 and 10 hours based on the power level setting).
2USE
If the safety system is triggered, the cooking zone is shown as cut off with "AS" displayed on the control panel and a beep sounds for about 2 minutes. To stop it, simply press any of the control buttons.

Sounds similar to the ticking of a clock may be heard.
These sounds occur when the hob is in operation and disappear or decrease according to the heating configuration. Low whistling or humming may also occur depending on the model and on the quality of your pan. These noises are a normal part of induction technology and do not indicate a fault.

We do not recommend using any hob protection mechanisms.
For light soiling, use a kitchen sponge. Use hot water to wet the area to be cleaned and then wipe dry.
For burnt on food deposits, sugary spills, melted plastic, use a scouring sponge and/or a special glass cleaning scraper. Use hot water to wet the area to be cleaned, use a special glass cleaning scraper to remove the dirt, finish off with a scouring sponge and then wipe dry.
For rings and limescale marks, apply warm white vinegar to the dirt, leave to work and then wipe dry using a soft clean cloth.
To keep metal shining brightly and for weekly cleaning, use a special glass and ceramic hob cleaning product. Apply the special product (which contains silicone and has a naturally protective effect) to the vitroceramic hob.
Important note: Do not use power or abrasive sponges. Use cleaning creams and special gentle washing up sponges.
Care of the chopping block
Some precautions must be taken to maintain your product's quality and effectiveness. Before you use your chopping block for the first time, it should be oiled with cooking oil (one or two soup spoons rubbed over all surfaces with a clean cloth). This will maintain its appearance and ensure that it gives long service.
Care: Oil the block once a month. If the chopping board is only used for decoration, you are strongly advise to varnish it to prevent it from expanding or contracting.
NEVER wet the chopping board when cleaning it; scrape it with a knife blade or scraper to remove any excess dampness from cutting meat and keep the wood in perfect condition.
What you must never do to your chopping board:
- place it in contact with pans or very hot dishes.
- keep it too close to pulsed air heating or air conditioning, since these systems dry the air.
- over-exposure to sunlight in front of a window.
- excessive temperature differences.
- clamp it between two materials without allowing for expansion, if building it in.
- fitting it on a surface which is not yet dry during construction (plaster or cement which is still damp).
When using for the first time
You notice that something appears in the display. This is normal. It will disappear after 30 seconds.
The circuit breaker trips/blows a fuse or only one side of the hob works. The hob has been wired incorrectly. Check the wiring (see connections section).
The hob gives off a smell during the first few uses. The appliance is new. Heat each zone for half an hour with a pan full of water.
When switching on
The hob does not operate and the lights on the panel remain off.
There is no power to the hob. The power supply or connection is faulty. Inspect the fuses and the circuit-breaker.
The hob does not operate and another message is displayed. The electronic circuit does not operate properly. Call the After-Sales Service Department.
The hob does not work, the "bloc" information is displayed. Unlock the child safety lock.
Fault code F9: voltage is below 170 V.
Fault code F0: temperature is below 5^ .
During use:
The hob does not operate. The panel displays and a beep can be heard.
There was a spillage or an object obstructing the control panel. Clean or remove the object and continue cooking.
Code F7 is displayed.
The electronic circuits have overheated (see 'building in' section).
During the operation of a cooking area, the illuminated symbols of the control panel are still flashing.
The pan being used is not suitable.
The cookware makes a noise and your hob clicks during cooking (see section on "Safety devices and recommendations").
This is normal. With certain types of pan, heat passing from the hob to the pan causes this clicking.
The ventilation continues to operate after the hob is switched off.
This is normal. It helps cool the electronics. In the event of a persistent malfunction.
Switch off the hob for one minute. If the problem persists, contact the After-Sales Department.
·5ENVIRONMENT

CARE FOR THE ENVIRONMENT
This appliance's packaging can be recycled. Recycle is and so contribute to protecting the environment, by placing it in containers provided for the purpose by local authorities.
Your appliance also contains lots of
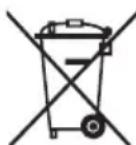
recyclable material. This logo indicates that used appliances should not be mixed with other waste.
The recycling of appliances organised by your manufacturer is carried out under the best conditions, in accordance with European Directive 2002/96/EC on the disposal of waste electronic and electrical equipment.
Contact your local authority or retailer for information on used appliance collection points close to your home.
Thank you for helping to protect the environment.
6CUSTOMER SERVICE
Any repairs made to your appliance must be carried out by a qualified professional authorised to work on the brand. When making contact, mention the complete reference of your appliance (model, type, serial number). This information appears on the manufacturer's nameplate attached to your equipment (1.1.1).
ES
ESTIMADO/A CLIENTE/A
FunciOn Clean lock 44
FunciOn ICS 45
FunciOn Recall 45
Funcion Switch 45
FunciOn Boil 45
Horizon Play 46
FunciOn Grill/Plancha 46
Procedal delfollowingmode:
