
CMI33 - Mixer Marquant - Free user manual and instructions
Find the device manual for free CMI33 Marquant in PDF.
| Product type | Mixing table |
| Brand | Marquant |
| Model | CMI33 |
| Power supply | Mains, AC cable included |
| Audio inputs | 2 line/phono inputs (RCA), 1 microphone input (6.35 mm jack) |
| Audio outputs | Master output (RCA), headphone output (6.35 mm jack), line audio output (RCA) |
| Additional connectors | USB for iPod/iPhone, host USB port, SD card reader |
| Video output | Video output (RCA) for iPod/iPhone |
| Main functions | Adjustable crossfader, 3-band equalizer (High, Mid, Low) per channel, adjustable gain, PFL, iPod/USB/SD control |
| Dimensions (approx.) | 30 x 20 x 8 cm |
| Weight (approx.) | 2 kg |
| Material | Metal chassis, plastic panels |
| Maintenance and cleaning | Unplug the device before cleaning. Use a soft, dry cloth. Do not use abrasive or liquid products. |
| Safety | Use only the supplied mains adapter. Do not expose to moisture or heat sources. |
| Spare parts and repairability | Contact Marquant customer service for spare parts. Repairs must be carried out by a professional. |
Frequently Asked Questions - CMI33 Marquant
User questions about CMI33 Marquant
0 question about this device. Answer the ones you know or ask your own.
Ask a new question about this device
Download the instructions for your Mixer in PDF format for free! Find your manual CMI33 - Marquant and take your electronic device back in hand. On this page are published all the documents necessary for the use of your device. CMI33 by Marquant.
USER MANUAL CMI33 Marquant
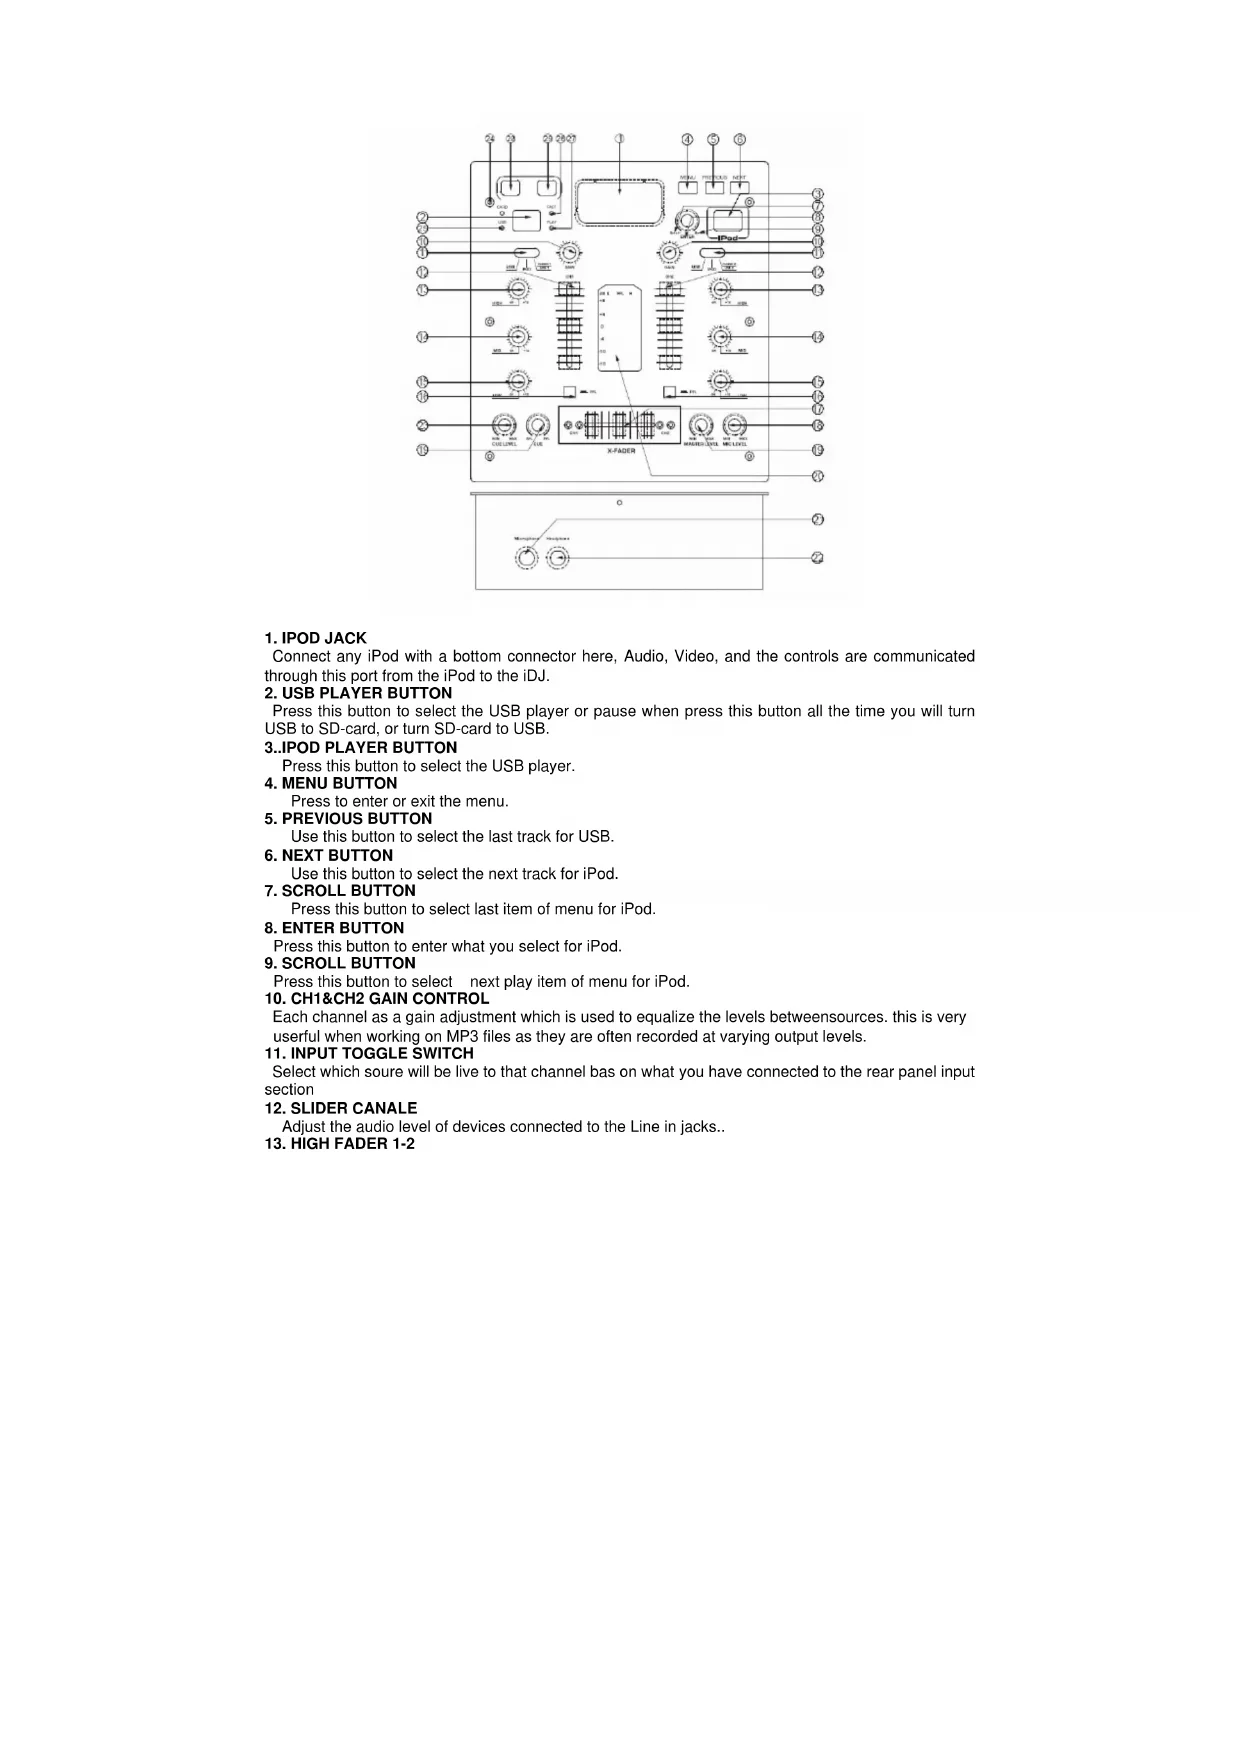
1. IPOD JACK
Connect any iPod with a bottom connector here, Audio, Video, and the controls are communicated through this port from the iPod to the iDJ.
2. USB PLAYER BUTTON
Press this button to select the USB player or pause when press this button all the time you will turn USB to SD-card, or turn SD-card to USB.
3..IPOD PLAYER BUTTON
Press this button to select the USB player.
4. MENU BUTTON
Press to enter or exit the menu.
5. PREVIOUS BUTTON
Use this button to select the last track for USB.
6. NEXT BUTTON
Use this button to select the next track for iPod.
7. SCROLL BUTTON
Press this button to select last item of menu for iPod.
8. ENTER BUTTON
Press this button to enter what you select for iPod.
9. SCROLL BUTTON
Press this button to select next play item of menu for iPod.
10. CH1&CH2 GAIN CONTROL
Each channel as a gain adjustment which is used to equalize the levels between sources. this is very useful when working on MP3 files as they are often recorded at varying output levels.
11. INPUT TOGGLE SWITCH
Select which soure will be live to that channel bas on what you have connected to the rear panel input section
12. SLIDER CANALE
Adjust the audio level of devices connected to the Line in jacks..
13. HIGH FADER 1-2
Adjust CH1&CH2 equalization of high
- MID FADER 1-2.
Adjust CH1&CH2 equalization of mid
- LOW FADER 1-2.
Adjust CH1&CH2 equalization of low
- PFL BUTTON
Press this button to select which the LED display.
- REPLACEABLE CROSSFADER
Achieves clean segues between the two input channel, Hard left selects channel 1. Hard right selects channel 2. With the, crossfader centered, both assigned channels are live. use the crossfader for fast and seamless segues from one selected channel to the other .
- MIC LEVEL
Adjust microphone level output.
- MASTER LEVEL
Adjust master level output.
- LED METER
Indicates the master output level.
- MICROPHONE INPUT
Plug 1/4" microphone plug in here.
- HEADPHONE OUTPUT
Plug 1/4" headphone plug in here.
- CUE LEVEL
Adjust CUE level output.
- CARD DISPLAY LED
When you select to play for SD-card, then this LED light.
- USB DISC DISPLAY LED
When you select to play for USB disc, then this LED light.
- FAST DISPLAY LED
This LED is used to display, when a song is fasting.
- PLAY DISPLAY LED
This LED is used to display, when turn on this mixer.
- PREVIOUS BUTTON
Use this button to select the last track for USB.
29.NEXT BUTTON
Use this button to select the next track for iPod
REAR PANEL FUNCTION
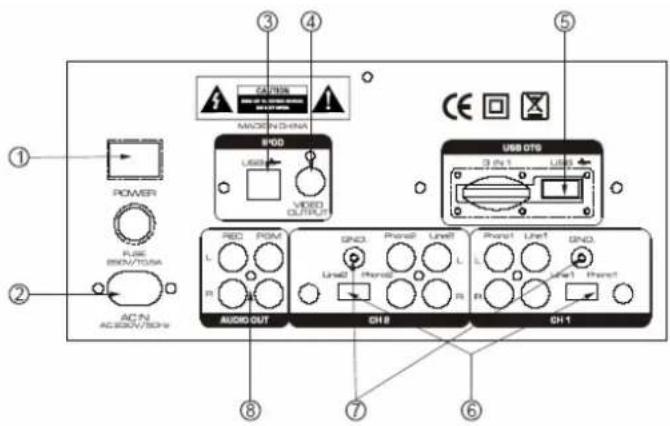
1. POWER BUTTON
Press the power switch to turn the unit on. To switch the power off press the power switch again.
2. AC CORD
Use this cable to connect the AC mains power to the unit.
3. USB OF IPOD
Connect to the USB for IPDO.
4. VIDEO OUTPUT
The video for each CD player is an output for these jacks. Connect to the line input of the mixer
5. USB
Connect to the USB.
6. LINE/PHONO INPUT SWITCH
Use this to allow either line level or phono level equipment to be plugged into your channel inputs. When phono input is selected, your signal is fed directly to the high-quality RIAA phono preamplifiers. Line level sources will overload the sensitive phono pre-amps and will sound very bad, so always be sure to toggle the line/phono switch over to line before connection of line sources.
7. GND
Grounding lug for turntable connection. Always use this connection when using turntables. (Your turntable cable should have a grounding wire)
8. AUDIO OUT
The audio for each CD player is an output for these jacks. Connect to the line input of the mixer.
FRENCH
FONCTIONS DU PANNEAU AVANT

1. PRISE POUR IPOD
1. BOUTON POWER
1.IPOD CONTACT
25.USB SCHIJF LED WEERGAVE SCHERM
iMIX-33 equipment is covered by a 1-year warranty on parts and labour except for Crossfaders (90 days). The following rules apply from the day the equipment leaves the factory: The date on the invoice is considered to be the date the warranty begins. Only companies approved by iMIX-33 are allowed to work on the equipment. Warranty becomes void when other service technicians open the equipment. During warranty period, defective equipment must be sent by pre-paid mail in the original box.
iMIX-33 will return the goods by pre-paid mail during the first year of warranty; thereafter the mailing cost is to be paid by the recipient Potentiometers have a limited lifetime and are not covered by the manufacturer for more than normal use. For all service enquiries, refer to your local distributor, as he is best able to help you.
SPECIFICATIONS:
Anti-Shock Buffer Memory :
Range of adjustments
Power supply :
Dimensions :
40 seconds
+/- 12%
230V/ 50Hz
240x260x120mm

- IPOD JACK
- USB PLAYER BUTTON
- 3..IPOD PLAYER BUTTON
- MENU BUTTON
- PREVIOUS BUTTON
- NEXT BUTTON
- SCROLL BUTTON
- ENTER BUTTON
- SCROLL BUTTON
- CH1&CH2 GAIN CONTROL
- INPUT TOGGLE SWITCH
- SLIDER CANALE
- HIGH FADER 1-2
- POWER BUTTON
- AC CORD
- USB OF IPOD
- VIDEO OUTPUT
- USB
- LINE/PHONO INPUT SWITCH
- GND
- AUDIO OUT
- FONCTIONS DU PANNEAU AVANT
- PRISE POUR IPOD
- BOUTON POWER
- 1.IPOD CONTACT
- 25.USB SCHIJF LED WEERGAVE SCHERM
- SPECIFICATIONS:
Brand : Marquant
Model : CMI33
Category : Mixer