
EKF966 - Coffee maker ELECTROLUX - Free user manual and instructions
Find the device manual for free EKF966 ELECTROLUX in PDF.
| Brand | Electrolux |
| Model | EKF966 |
| Product type | Drip coffee maker |
| Power supply | 220-240 V, 50/60 Hz, 1000 W |
| Reservoir capacity | 12 cups maximum |
| Delayed programming | Yes (24-hour clock, delayed start) |
| Aroma selector | Yes (1 to 4 cups strong brew) |
| Auto shut-off | Yes (approximately 40 minutes after brewing) |
| Carafe | Glass with handle and lid |
| Filter type | Reusable nylon filter + paper filter size 4-12 cups |
| Hot plate | Yes |
| Maintenance | Clean removable parts with soapy water; regular descaling required |
| Safety | Do not immerse; do not use without water; hot surfaces; unplug before cleaning |
| Recommended use | Household and similar (offices, hotels, etc.) |
Frequently Asked Questions - EKF966 ELECTROLUX
User questions about EKF966 ELECTROLUX
0 question about this device. Answer the ones you know or ask your own.
Ask a new question about this device
Download the instructions for your Coffee maker in PDF format for free! Find your manual EKF966 - ELECTROLUX and take your electronic device back in hand. On this page are published all the documents necessary for the use of your device. EKF966 by ELECTROLUX.
USER MANUAL EKF966 ELECTROLUX
Operating instructions
NI
Handleiding 17
FR
This appliance is intended to be used in household and similar applicacons such as:
- sta kitchen areas in shops, oces and other working environments;
- farm houses;
- by clients in hotels, motels and other residential type environments;
- bed and breakfast type environments.
If the supply cord is damaged, it must be replaced by the manufacturer, its service agent or similarly qualified persons in order to avoid a hazard.
The appliance must not be immersed.
This appliance can be used by children aged from 8 years and above if they have been given supervision or instrucon concerning use of the appliance in a safe way and if they understand the hazards involved.
Cleaning and user maintenance shall not be made by children unless they are older than 8 and supervised. Keep the appliance and its cord out of reach of children aged less
than 8 years.
Appliances can be used by persons with reduced physical, sensory or mental capabilities or lack of experience and knowledge if they have been given supervision or instrucon concerning use of the appliance in a safe way and understand the hazards involved.
Children shall not play with the appliance.
For the details on how to clean surfaces in contact with food and descaling please see secon "Cleaning and descaling" on page 07.
WARNING: Risks of injuries if you don't use this appliance correctly.
The heang element surface is subject to residual heat aer use.
IMPORTANT SAFETY INSTRUCTIONS
To reduce the risk of re, electric shock and/or injury to persons, basic safety precautions should always be followed when using electrical appliances, including the following:
- REAL ALL INSTRUCTIONS BEFORE USING THE COFFEE MAKER.
- Do not touch the hot surfaces of the coee maker. Do not open the cover while brewing. Scalding may occur if the cover is opened during the brewing cycles.
- To protect against electric shock, do not immerse the power cord, power plug or coee maker in water or any other liquids.
- Switch off and unplug the appliance from the mains socket when not in use or before cleaning.
- The plug shall be the main disconnect device and shall remain operable at all mes.
- Allow the appliance to cool before attaching accessories or cleaning.
- Do not operate the appliance with a damaged power cord or power plug, or
operate it aer the appliance malfuncons, or has been damaged in any manner. Return this appliance only to the nearest authorised service centre for examination, repair or adjustment.
- The use of accessory attachments not recommended by the manufacturer may result in re, electric shock or personal injury.
- Do not use the coee maker outdoors.
- Do not let the power cord hang over edge of table or counter, or allow it to come into contact with hot surfaces.
- Do not place this coee maker on or near a hot gas stove or electric burner or in a heated oven.
- Be careful not to get scalded by steam.
- Never switch on the appliance without water in the water tank.
- Only use the carafe supplied with this appliance. Never use it on a cooking surface.
- Do not use the carafe if it is cracked or the handle is loose.
- Do not operate the appliance without water in the tank.
- Never leave the empty carafe on the warming plate when the appliance is operang, otherwise the carafe is liable to crack.
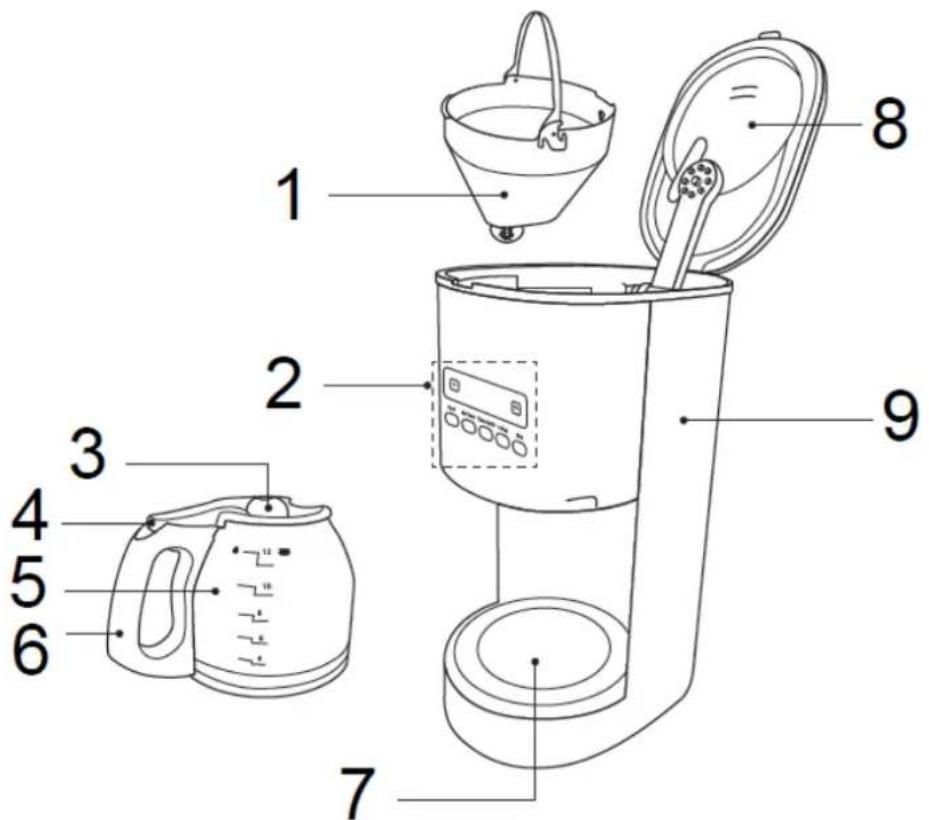
DESCRIPTION
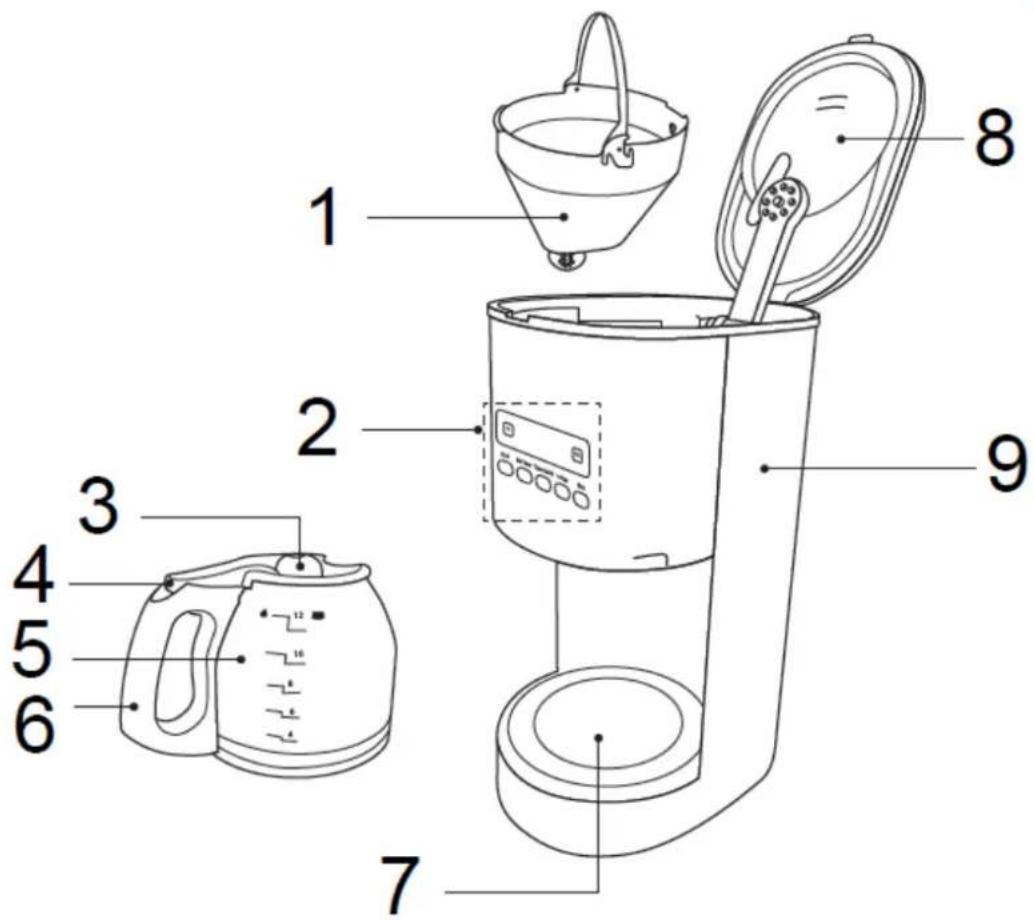
- Filter
- Control panel
- Carafe lid
- Lid open lever
-
Carafe
-
Carafe handle
- Warming plate
- Cover
- Water tank
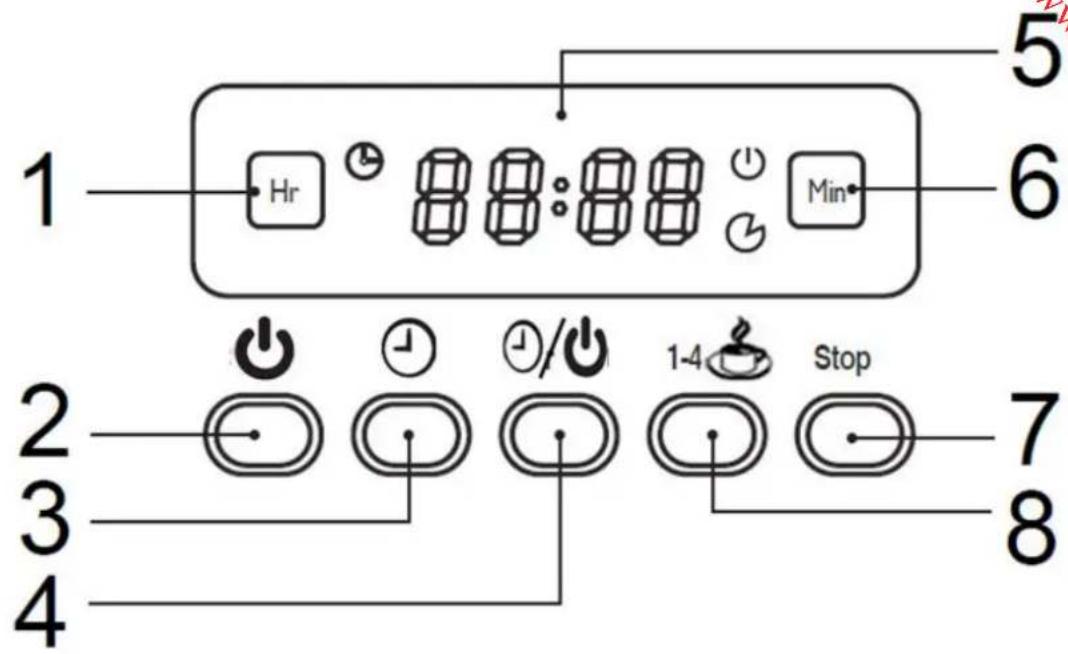
Control panel
Carefully unpack the appliance and remove all packaging materials.
Wipe the appliance with a slightly damp cloth. Dry thoroughly.
It is recommended to wash the drip coee system before rst use.
Fill the water tank with cold water and follow the direcons for making drip coee to make at least two carafes of coee without using ground coee.
MAKING DRIP COFFEE
Make sure the appliance is plugged in. The display will show "0:00".
- Place the appliance on dry, level and heat-resistant surface, away from any edge.
-
Open the cover and II the tank with water with fresh, cold water.
-
The markings on the water window and carafe indicate level of water required to brew the desired number of cups.
-
To avoid overow, do not Il the water tank with water past the 12-cup line.
-
Place the Iter into the Iter holder, making sure it is assembled correctly.
- Place a paper liter (not supplied) of 4-12 cup size into the nylon liter.
-
Add the desired ground coee in the paper Iter.
-
It is recommended to use a level spoon of ground coffee (approximately 6g) for every cup of coee.
-
Close the cover.
-
Slide the carafe into the appliance ensuring it sits correctly on the warming plate.
-
Press switch on the coee maker.
-
The power indicator light (①) will illuminate, indicating that the appliance is brewing coee.
-
The coffee will begin to ow from the liter holder aer a short me.
-
During brewing, you can remove the carafe from the warming plate. The brewing process does not stop during this period and only the ow of coee from the iter holder stops. Do not remove the carafe for longer than 15 seconds or the coee may overow the iter holder.
- Although the coffee maker has the above feature, it is not recommended to pour coee before the cycle has completed as do this may aect the avour of the coee.
-
It is normal for the appliance to emit steam while it is brewing coee.
-
When the brewing process is nished, you will hear a few beeps.
- To keep coffee warm aer the brewing process has nished, place the carafe on the warming plate.
- The appliance is designed to keep the coee warm for approximately 40 minutes and then the appliance will be turned o automatically.
- To turn o the appliance press Stop. The power indicator light ( ) will go out.
Programming the Automac Start
The appliance can be programmed to make drip coee automatically.
First, make sure the me is set correctly.
To set the clock in 24-hour cycle
Repeatedly press Hr and Min respectively to set the correct me.
-
To speed up me setng, press and hold Hr/Min to scroll through numbers quickly. To set the delayed start me
-
Press
-
The mer indicator light () ash.
-
While the mer indicator light is ashing, repeatedly press Hr and Min respectively to set the me you want to start brewing coee.
-
To speed up me setng, press and hold Hr/Min to scroll through numbers quickly.
-
After the desired me is set, press

-
The mer indicator light ( ) will stop ashing and the display will show the current me.
-
You may cancel the automac start funcon by pressing.

-
When the set me is reached, the appliance will start brewing coee.
-
The mer indicator light ( ) will go out whilst the power indicator light ( will illuminate.

Aroma Mode
You can enhance the avour of your coee by pressing. This feature acvates a unique brewing process, slowly releasing water into the liter. Coee grounds will be saturated a lile a me extracng the best avor and aroma from your coee.
Press . The aroma indicator light () will illuminate.
Press switch on the appliance. The appliance will start brewing coee.
CLEANING AND DESCALING
Turn o and unplug the appliance from the mains socket. Allow the appliance to cool down before cleaning.
Clean the outside of the appliance with a slightly damp cloth. Dry thoroughly. Clean the removable parts in warm soapy water then rinse them thoroughly. Never immerse the appliance in water. Do not use abrasive or chemical cleaning agents.
Dscaling
Regularly descale the appliance using a specic descaler.
-
Fill the tank with water and descaler to the 12-cup line. (Refer to the descaler instrucons for the scale of water and descaler.)
-
Place the carafe onto the warming plate.
-
Plug in the appliance and then press . Percolate the equivalent of a cupful and then press again to switch o the appliance.
-
Leave the soluon in the system for 15 minutes. Repeat steps 3 and 4 again.
-
Switch on the appliance and connue the brewing process unl the tank is completely empty.
-
Rinse out by operang the appliance using water at least three mes (3 full tanks of water).
SPECIFICATIONS
Ranges: 220-240V\~ 50/60Hz
1000W
DISPOSAL
As a responsible retailer we care about the environment.
As such we urge you to follow the correct disposal procedure for the appliance and packaging materials. This will help conserve natural resources and ensure that it is recycled in a manner that protects health and the environment.
You must dispose of this appliance and its packaging according to local laws and regulaons.
Because this appliance contains electronic components, the appliance and its accessories must be disposed of separately from household waste when the appliance reaches its end of life.
Contact your local authority to learn about disposal and recycling. The appliance should be taken to your local collecon point for recycling. Some collecon points accept appliance free of charge.
We apologise for any inconvenience caused by minor inconsistencies in these instrucons, which may occur as a result of product improvement and development.
ELECTROLUX 02/02/2015
FR
ATTENTION
BESCHRIJVING VAN HET APPARAAT
Controller ererst of de jd correct is ingesteld.
Om de klok in de 24-urcyclus in te stellen
- IMPORTANT SAFETY INSTRUCTIONS
- DESCRIPTION
- Control panel
- MAKING DRIP COFFEE
- Programming the Automac Start
- To set the clock in 24-hour cycle
- Aroma Mode
- CLEANING AND DESCALING
- Dscaling
- SPECIFICATIONS
- DISPOSAL
- As a responsible retailer we care about the environment.
- FR
- ATTENTION
- BESCHRIJVING VAN HET APPARAAT
- Om de klok in de 24-urcyclus in te stellen
Brand : ELECTROLUX
Model : EKF966
Category : Coffee maker