USER MANUAL BCR190 BRANDT
FR:MANUEL D'INSTRUCTIONS
NL: GEBRUIKERSHANDLEIDING
Downloaded from www.vandenborc.be
WARNING
This appliance is intended for domestic household use only and should not be used for any other purpose or in any other application, such as for non-domestic use or in a commercial environment.
Prior to cleaning or other maintenance, the appliance must be disconnected from the supply mains.
The ventilation should not be impeded by covering the ventilation openings with items, such as newspapers, table-cloths, curtains, etc.
No naked flame sources, such as lighted candles, should be placed on the apparatus.
The apparatus shall not be exposed to dripping or splashing and that no objects filled with liquids, such as vases, shall be placed on the apparatus.
Ventilation
Allow at least a 10 cm gap all around the product.
This apparatus is not suitable for use in a tropical climate.
Batteries (battery pack or batteries installed) shall not be exposed to excessive heat such as sunshine, fire or the like.
To protect the environment, use local recycling facilities for battery disposal.
Where the MAINS plug or an appliance coupler is used as the disconnect device, the disconnect device shall remain readily operable.
IMPORTANT SAFETY INSTRUCTIONS
Mains supply
This equipment is designed to operate from a 100-240 Volt, 50/60Hz AC mains supply. Other power sources may damage it.
Symbol

This mark is applied to show the equipment conforms to European safety and electromagnetic compatibility standards.
Battery handling and usage
Only adults should handle battery. Do not allow a child to use this apparatus unless the battery cover is securely attached to the unit.
The battery type used in the unit is one CR2032 3V Lithium battery which is accessible and can be replaced.
Remove the battery cover located at the rear of the unit to remove the battery.

To replace the battery:
Insert a new battery into the battery holder with the positive side facing up.
Replace the battery cover.
LOCATION OF CONTROL
Top View

Rear View

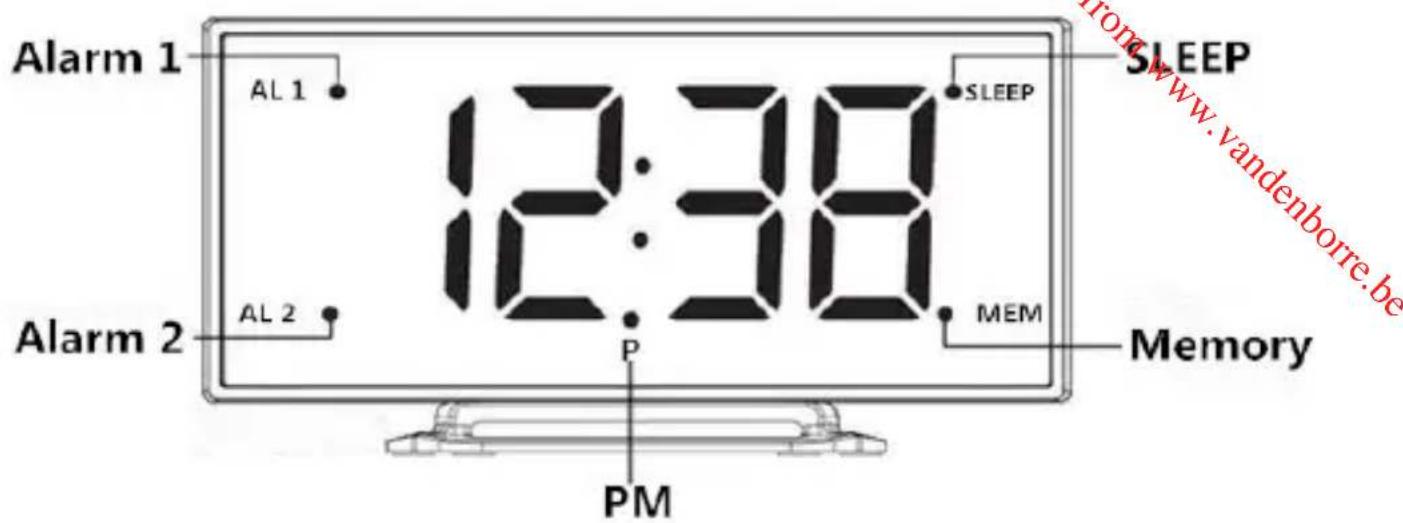
Indicator lights
BATTERY BACKUP
The clock and alarm settings can be protected against AC power failure with the battery for a short period of time. If no backup battery is installed or the power failure is prolonged, you will need to set the clock and alarm settings again.
SETTING THE CLOCK AND SNOOZE DURATION
- Place the unit on a flat stable surface.
- Connect one end of the power adapter into the DC 5V power jack on the rear of the unit. Plug the power adapter into the mains socket.
The display will show 0:00.
- Press SET once.
The hour digit will flash on the display.
-
While the hour digit is flashing, repeatedly press / until the desired hour appears. Press SET to confirm.
-
Press and hold / for fast setting.
The minute digits will flash on the display.
-
While the minute digits are flashing, repeatedly press / until the desired minutes appear. Press SET to confirm.
-
Press and hold / for fast setting.
The hour format will flash on the display.
-
While the hour format is flashing, repeatedly press / to select 12-hour or 24-hour format. Press SET to confirm.
The snooze time will flash on the display.
-
While the snooze time is flashing, repeatedly press / until the desired snooze time appears. Press SET to confirm.
-
Press and hold / for fast setting.
The snooze time can be selected from 5 to 60 minutes.
NOTE: In 12 hour format the Piñindicator will illuminate on the display for PM time.
The display will show "ON" and then the radio frequency in MHz.
-
Tune in to the desired station by repeatedly pressing /
-
The wire aerial located on the rear of the unit is for FM reception. The wire should be fully extended and positioned for optimum reception.
-
Press and hold / for 2 seconds and then release the button, the unit will scan the frequencies until a broadcasting station strong enough for good reception is found.
-
To set the volume, press VOL once. "L07" will flash on the display. While "L07" is flashing, repeatedly press / to set the desired volume from L01 (minimum) to L15 (maximum).
- To turn off the radio, press
NOTE: Keep your radio away from fluorescent lamps or other electronic devices which may cause interference to the radio.
PRESETTING YOUR FAVOURITE RADIO STATION
Up to 10 FM radio stations can be preset.
- Follow steps in "LISTENING TO THE RADIO" and tune in to the station that you wish to preset.
- Press and hold SET until the MEM indicator light appears and "01" flashes on the display.
- While the memory slot number is flashing, repeatedly press / to select the desired memory slot.
- Press SET again to store the station.
- Repeat steps above to store desired stations.
- To listen to preset radio stations, repeatedly press SET to select the desired radio station.
Before setting the alarm time, make sure the Clock has been set.
Setting Alarm 1 / Alarm 2
-
In clock time state, press. ALI·2
-
The AL1 indicator light will illuminate and the hour digits will flash on the display
-
While the hour digits are flashing, set hours for alarm 1 by repeatedly pressing / .
-
Press and hold / for fast setting.
-
Press ALI2 to confirm.
The minute digits will flash.
-
Whilst the minute digits are flashing, set minutes for alarm 1 by repeatedly pressing / .
-
Press and hold / for fast setting.
-
Press ALI2 to confirm.
-
"OFF" will flash on the display.
-
Whilst "OFF" is flashing, set the alarm to wake to the desired mode by repeatedly pressing / .
rd = wake-by-radio
bu= wake-by-buzzer
OFF=alarm off
-
Press ALI2 to confirm.
-
The AL2 indicator light will illuminate and hour digits will flash on the display.
-
Follow steps 2 to 7 to set the alarm 2.
-
When the alarm 1 or 2 is sounding, the AL1 or AL2 indicator light will flash.
-
The alarm will sound for 3 minutes at the preset time on each day and come back again after 9 minutes. The alarm will last for 1 hour.
To stop the alarm, Press RADIO or ALI or the alarm will come on again at the set time on the following days.
Snoopze function
When the alarm sounds, press Z z · . The alarm will be turned off and come on again after the set snooze duration.
NOTE: If your second alarm activates while the first alarm is sounding or it is in the snoozermode, the second alarm will override the first alarm (the first alarm will reset to come on the next day).
SLEEP TIMER
-
Press twice to enter the sleep mode.
-
The SLEEP indicator light will illuminate and "05" (5 minutes) will flash on the display.
-
While the sleep time is flashing, repeatedly press to set the desired sleep time from 5, 15, 30, 45, 60, 75 or 90 minutes.
- The radio will be turned off after the set sleep time has elapsed.
To check remaining sleep time, press RADIO SLEEP twice.
To turn off the radio before the sleep time has elapsed, press Zz
DIMMER CONTROL
In order to adapt the intensity of the display to suit the ambient room lighting, repeatedly press zz to select the display brightness among high, low and off settings. This can only be done when the radio is off or the unit is not sounding.
SPECIFICATIONS
FM 87.5-108.0MHz
INPUT: DC 5V 300mA
Battery backup: 1 x CR2032
We apologise for any inconvenience caused by minor inconsistencies in these instructions, which may occur as a result of product improvement and development.
Darty Plc © UK: EC1N 6TE 22/09/2014
AVERTISSEMENTS
Darty Plc © UK: EC1N 6TE 22/09/2014
WAARSCHUWINGEN
WERKING VAN DE DUBELE WEKKER
Darty Plc © UK: EC1N 6TE 22/09/2014
ADVERTENCIAS
Darty Plc © UK: EC1N 6TE 22 / 09 /2014