
SER1 - Receiver TECHNICS - Free user manual and instructions
Find the device manual for free SER1 TECHNICS in PDF.
| Product Type | Power Amplifier |
| Brand | Technics |
| Model | SE-R1 (SER1) |
| Dimensions (W × H × D) | 480 mm × 241 mm × 567 mm |
| Weight | Approx. 54 kg |
| Power Supply | 120 V AC, 60 Hz |
| Power Consumption | 250 W (operation) / 0.7 W (standby) / 0.3 W (off) |
| Output Power (FTC) | 150 W + 150 W (8 Ω, 20 Hz – 20 kHz) / 300 W + 300 W (4 Ω, 20 Hz – 20 kHz) |
| Frequency Response | 1 Hz – 90 kHz (−3 dB, 8 Ω) |
| Distortion (THD+N) | 0.05 % (1 kHz, 75 W, 8 Ω, 20 kHz LPF) |
| Input Sensitivity / Impedance | 1.2 Vrms / 47 kΩ (UNBALANCED and BALANCED, gain 0 dB) |
| Load Impedance | 4 Ω – 16 Ω (A or B, bi-wiring) / 8 Ω – 16 Ω (A+B) |
| Amplification | Digital with jitter reduction circuit and MID conversion |
| LAPC Technology | Load Adaptive Phase Calibration to optimize audio output |
| Driver | High-speed GaN-FET |
| Audio Inputs | Analog UNBALANCED (RCA), BALANCED (XLR), Digital (Technics Digital Link RJ45) |
| Speaker Outputs | 2 pairs (A and B), single-wiring or bi-wiring connection |
| Auto Power Off Function | Yes, after approx. 20 minutes without signal |
| Maintenance and Cleaning | Unplug the unit, clean with a soft dry cloth; avoid solvents |
| Safety | Do not expose to water, do not block vents, keep away from heat sources |
| Warranty | 5 years (parts and labor) in Canada |
Frequently Asked Questions - SER1 TECHNICS
User questions about SER1 TECHNICS
0 question about this device. Answer the ones you know or ask your own.
Ask a new question about this device
Download the instructions for your Receiver in PDF format for free! Find your manual SER1 - TECHNICS and take your electronic device back in hand. On this page are published all the documents necessary for the use of your device. SER1 by TECHNICS.
USER MANUAL SER1 TECHNICS
Music is borderless and timeless,
touching people's hearts across cultures and generations.
Each day the discovery of a truly emotive experience
from an unencountered sound awaits.
Let us take you on your journey to rediscover music.
Thank you for purchasing this product.
Please read these instructions carefully before using this product, and save this manual for future use.
If you have any questions, visit:
U.S.A.: www.panasonic.com/support
Canada: www.panasonic.ca/english/support
Register online at www.panasonic.com/register(U.S. customers only)
■ Features of this unit
This unit offers the following features:
Full-digital amplifier with a high-precision jitter reduction circuit and PWM conversion circuit
This unit is a full-digital amplifier. Its specially-designed jitter reduction circuit and high-precision PWM conversion circuit eliminate distortion, noise, and jitter.
LAPC (Load Adaptive Phase Calibration)
Adaptive processing of speaker impedance flattens frequency amplitude and phase characteristics. The result is the reproduction of sound with rich spatial expression.
GaN-FET Driver
High-speed, loss-less switching is required to achieve pure amplification of accurately generated PWM signals. For this reason, this unit is provided with a high-speed GaN-FET Driver with super-low ON resistance.
■ Recommended devices
We recommend using Technics devices (optional) for superior audio quality.
| Product name Model number | |
| Network Audio Control Player SU-R1 | |
| Speaker System SB-R1 |
IMPORTANT SAFETY INSTRUCTIONS
Read these operating instructions carefully before using the unit. Follow the safety instructions on the unit and the applicable safety instructions listed below. Keep these operating instructions handy for future reference.
1 Read these instructions.
2 Keep these instructions.
3 Heed all warnings.
4 Follow all instructions.
5 Do not use this apparatus near water.
6 Clean only with dry cloth.
7 Do not block any ventilation openings. Install in accordance with the manufacturer's instructions.
8 Do not install near any heat sources such as radiators, heat registers, stoves, or other apparatus (including amplifiers) that produce heat.
9 Do not defeat the safety purpose of the polarized or grounding-type plug. A polarized plug has two blades with one wider than the other. A grounding-type plug has two blades and a third grounding prong. The wide blade or the third prong are provided for your safety. If the provided plug does not fit into your outlet, consult an electrician for replacement of the obsolete outlet.
10 Protect the power cord from being walked on or pinched particularly at plugs, convenience receptacles, and the point where they exit from the apparatus.
11 Only use attachments/accessories specified by the manufacturer.
12 Use only with the cart, stand, tripod, bracket, or table specified by the manufacturer, or sold with the apparatus. When a cart is used, use caution when moving the cart/apparatus combination to avoid injury from tip-over.
13 Unplug this apparatus during lightning storms or when unused for long periods of time.
14 Refer all servicing to qualified service personnel. Servicing is required when the apparatus has been damaged in any way, such as power-supply cord or plug is damaged, liquid has been spilled or objects have fallen into the apparatus, the apparatus has been exposed to rain or moisture, does not operate normally, or has been dropped.
WARNING
Unit
• To reduce the risk of fire, electric shock or product damage,
- Do not expose this unit to rain, moisture, dripping or splashing.
- Do not place objects filled with liquids, such as vases, on this unit.
– Use only the recommended accessories.
- Do not remove covers.
- Do not repair this unit by yourself. Refer servicing to qualified service personnel.
- Do not place heavy items on this unit.
AC power supply cord
- The power plug is the disconnecting device. Install this unit so that the power plug can be unplugged from the socket outlet immediately.
CAUTION
Unit
- Do not place sources of naked flames, such as lighted candles, on this unit.
- Do not put any objects on this unit. This unit becomes hot while it is on.
- Do not touch the output terminals of the speakers with your hands or other objects while the speakers are in use. Depending on the conditions of use, doing so may expose you to high voltage.
Placement
- To reduce the risk of fire, electric shock or product damage,
- Do not install or place this unit in a bookcase, built-in cabinet or in another confined space. Ensure this unit is well ventilated.
- Do not obstruct this unit's ventilation openings with newspapers, tablecloths, curtains, and similar items.
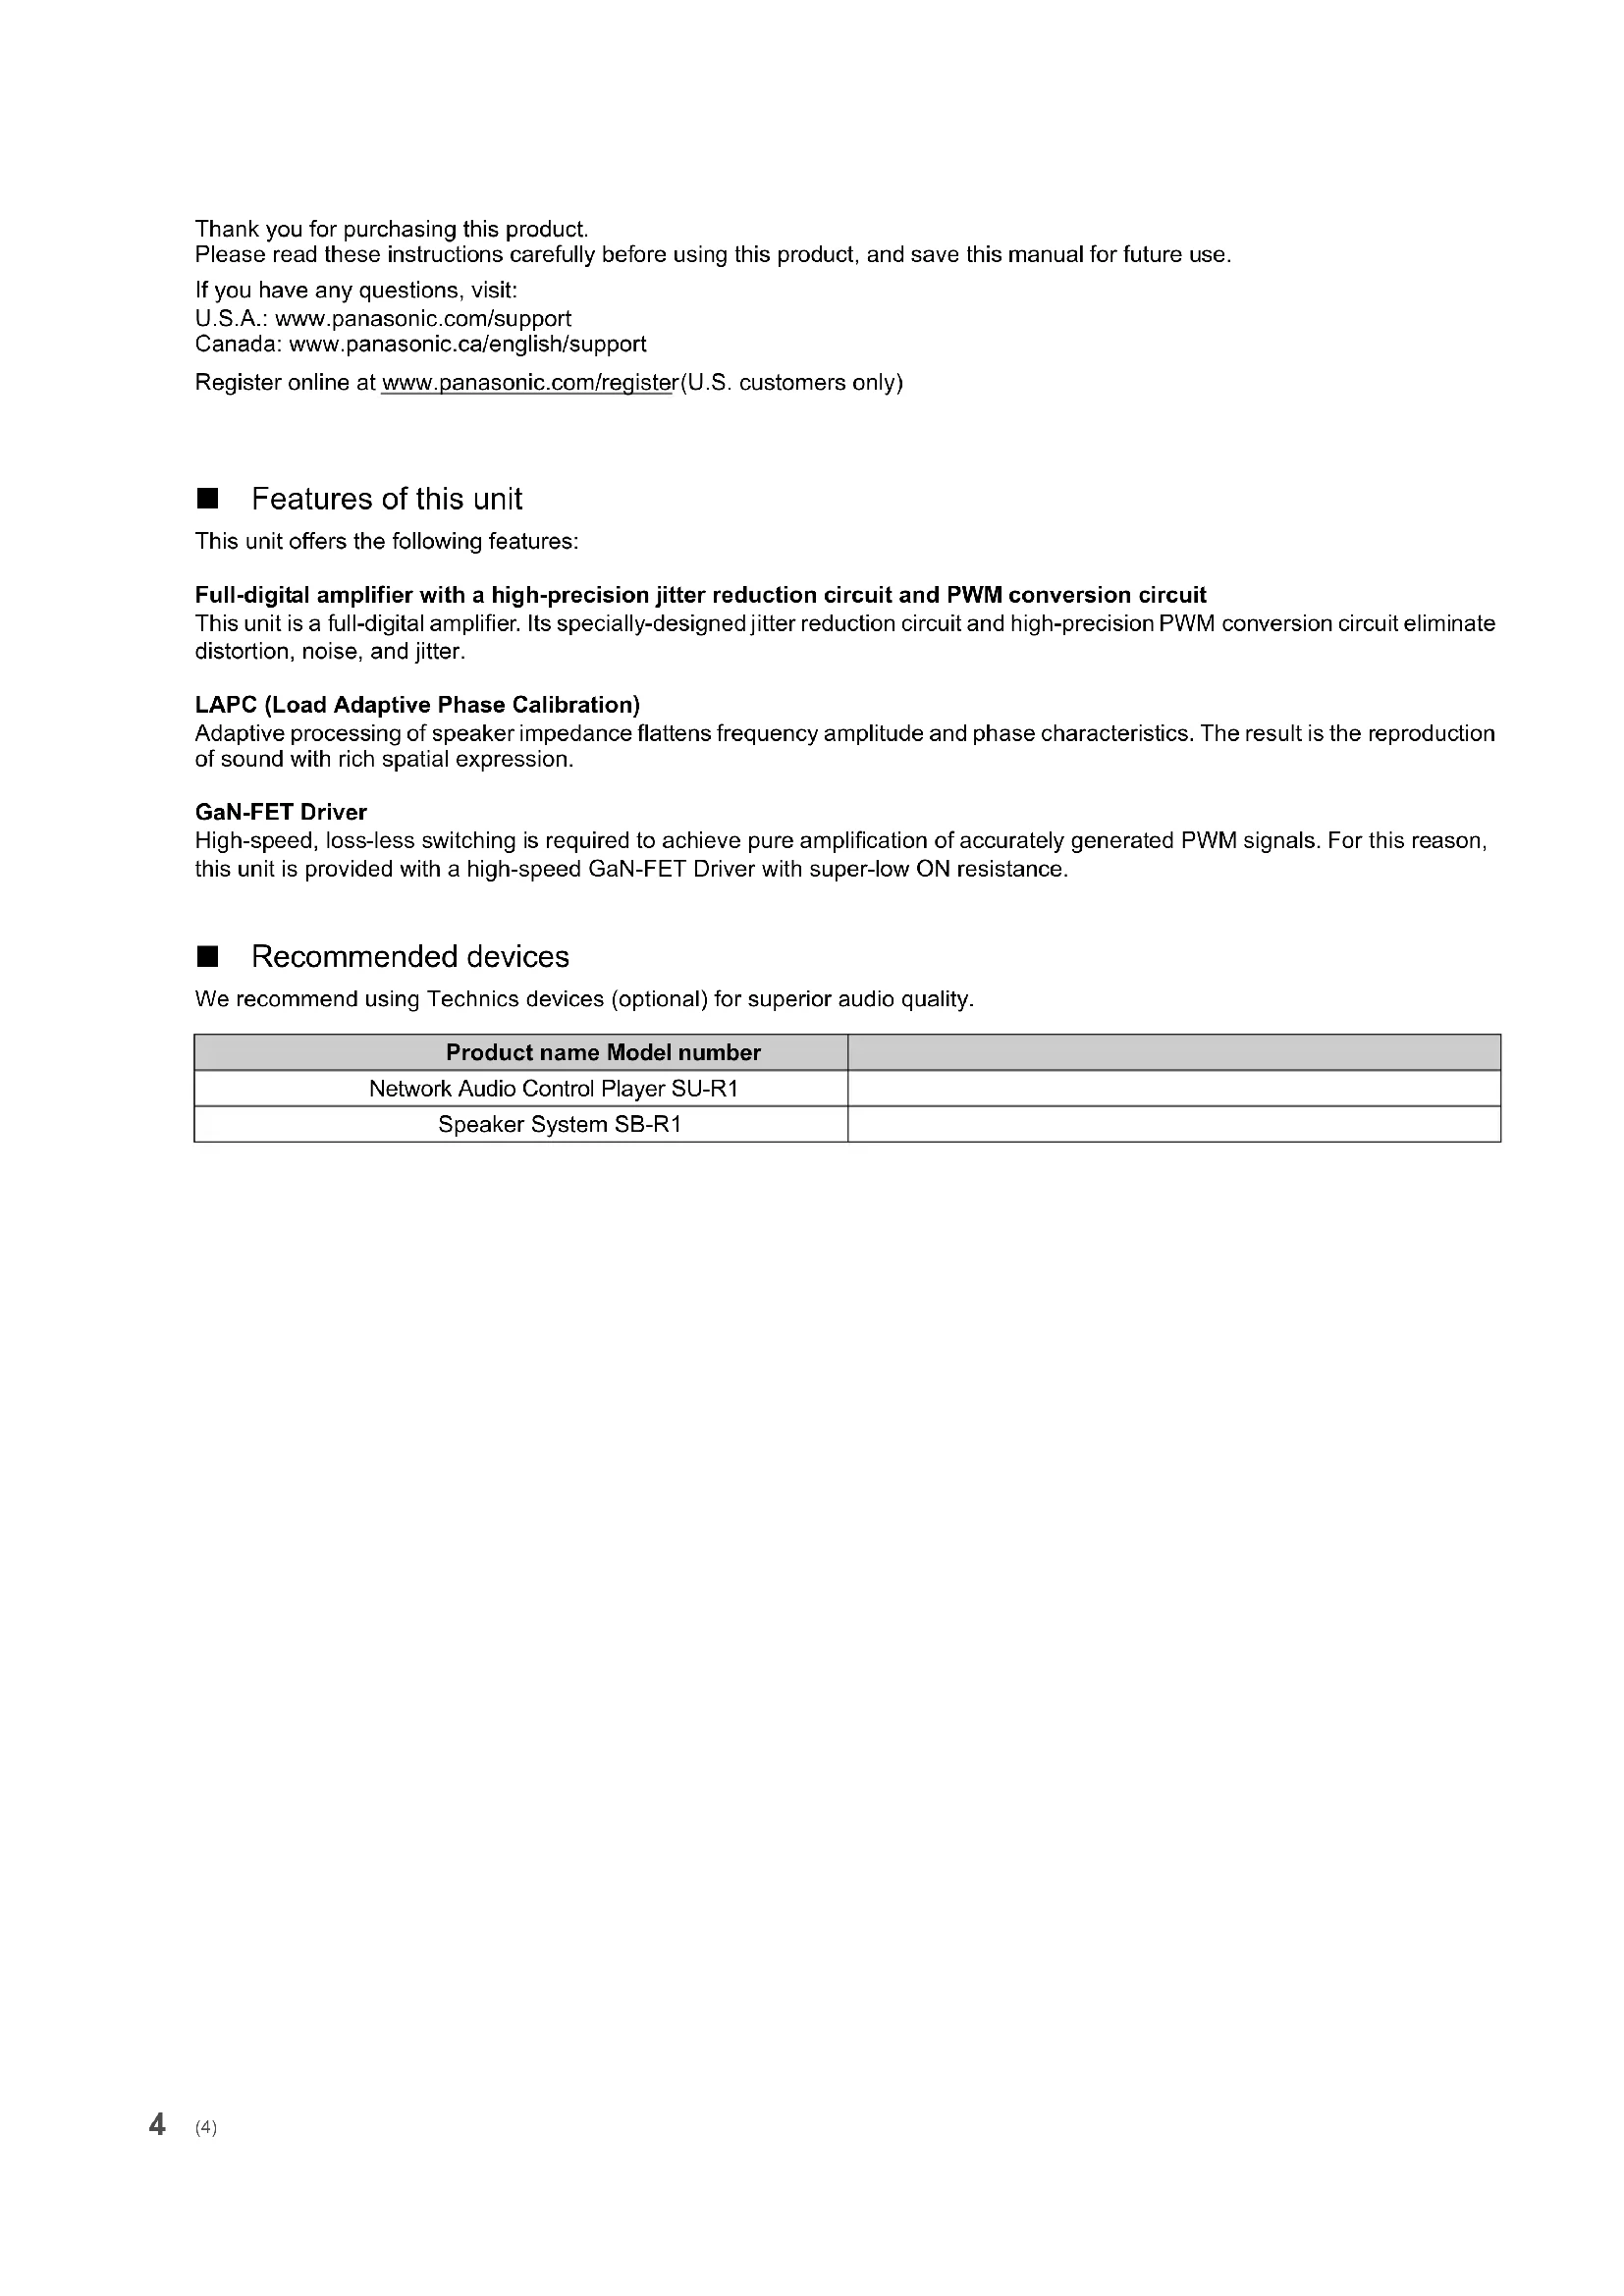
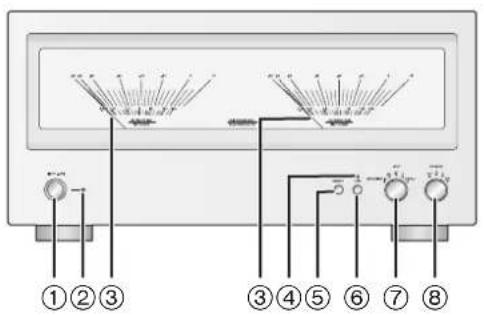
- More than one person is required to move or carry the unit.
- Ensure that the placement location is sturdy enough to accommodate the weight of this unit ( 15).
- Do not lift or carry this unit by holding any of its knobs. Doing so may cause this unit to fall, resulting in personal injury or malfunction of this unit.
- To reduce the risk of fire, electric shock or product damage, - Do not install or place this unit in a bookcase, built-in cabinet or in another confined space. Ensure this unit is well ventilated. - Do not obstruct this unit's ventilation openings with newspapers, tablecloths, curtains, and similar items. - More than one person is required to move or carry the unit. - Ensure that the placement location is sturdy enough to accommodate the weight of this unit (→ 15). - Do not lift or carry this unit by holding any of its knobs. Doing so may cause this unit to fall, resulting in personal injury or malfunction of this unit.
natural_image
Two people standing beside a rack with a tray, no visible text or symbols
CAUTION
RISK OFELECTRIC SHOCK DO NOTOPEN

CAUTION :
TO REDUCE THE RISK OF ELECTRIC SHOCK, DO NOT REMOVE SCREWS. NO USER-SERVICEABLE PARTS INSIDE. REFER SERVICING TO QUALIFIED SERVICE PERSONNEL.

The lightning flash with arrowhead symbol, within an equilateral triangle, is intended to alert the user to the presence of uninsulated "dangerous voltage" within the product's enclosure that may be of sufficient magnitude to constitute a risk of electric shock to persons.

The exclamation point within an equilateral triangle is intended to alert the user to the presence of important operating and maintenance (servicing) instructions in the literature accompanying the appliance.
Conforms to UL STD 60065.
Certified to CAN/CSA STD C22.2 No.60065.
THE FOLLOWING APPLIES ONLY IN THE U.S.A.
FCC Note:
This equipment has been tested and found to comply with the limits for a Class B digital device, pursuant to Part 15 of the FCC Rules. These limits are designed to provide reasonable protection against harmful interference in a residential installation. This equipment generates, uses, and can radiate radio frequency energy and, if not installed and used in accordance with the instructions, may cause harmful interference to radio communications. However, there is no guarantee that interference will not occur in a particular installation. If this equipment does cause harmful interference to radio or television reception, which can be determined by turning the equipment off and on, the user is encouraged to try to correct the interference by one or more of the following measures:
• Reorient or relocate the receiving antenna.
- Increase the separation between the equipment and receiver.
- Connect the equipment into an outlet on a circuit different from that to which the receiver is connected.
- Consult the dealer or an experienced radio/TV technician for help. FCC Caution: To assure continued compliance, follow the attached installation instructions and use only shielded interface cables when connecting to peripheral devices.
Any changes or modifications not expressly approved by the party responsible for compliance could void the user's authority to operate this equipment.
This device complies with Part 15 of the FCC Rules.
Operation is subject to the following two conditions:
(1) This device may not cause harmful interference, and (2) this device must accept any interference received, including interference that may cause undesired operation.
Responsible Party:
Panasonic Corporation of North America
Two Riverfront Plaza, Newark, NJ 07102-5490
Support Contact: http://www.panasonic.com/contactinfo
THE FOLLOWING APPLIES ONLY IN CANADA
CAN ICES-3(B)/NMB-3(B)

Information on Disposal in other Countries outside the European Union
This symbol is only valid in the European Union. If you wish to discard this product, please contact your local authorities or dealer and ask for the correct method of disposal.
Table of contents
IMPORTANT SAFETY INSTRUCTIONS....5
Accessories....6
Unit care 6
Control reference guide ....7
Getting started 8
Operations.... 13
Troubleshooting.... 14
Specifications.... 15
Limited Warranty (ONLY FOR U.S.A.).... 16
Limited Warranty (ONLY FOR CANADA).... 17
About descriptions in this Owner's Manual
- Pages to be referred to are indicated as “⇒ ○○”.
●The illustrations shown may differ from your unit.
Accessories
☐ 1 AC power supply cord (K2CB2YY00107)
(ONLY FOR CANADA)
The enclosed Canadian French label sheet corresponds to the English display on the unit.

- Product numbers provided in this Owner's Manual are correct as of December 2014. These may be subject to change.
- Do not use AC power supply cord with other equipment.
Unit care
Pull out the AC power supply cord from the outlet before maintenance. Clean this unit with a soft cloth.
- When dirt is heavy, wring a wet cloth tightly to wipe the dirt, and then wipe it with a soft cloth.
- Do not use solvents including benzine, thinner, alcohol, kitchen detergent, a chemical wiper, etc. This might cause the exterior case to be deformed or the coating to come off.
Control reference guide
This unit
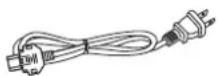
Front
① Unit on/off button OFF
Use this button to turn the unit on and off.
[1] (off): The unit is off.
[1(on): The unit is on.
- The unit is still using a small amount of power in off mode. Off mode uses less power. (⇒ 15)
② Power indicator
The color of the indicator changes according to the status of this unit.
| Blue The unit is on. | |
| Red | The unit is in standby mode.To turn on this unit from standby mode, press the unit on/off button on this unit to the [position, and press it again to the [position. |
③ Peak power meter
Display the output level.
④ LAPC indicator ( 13)
⑤ [DIMMER]
Adjust the brightness of the light and the indicators. Each press of this button switches the brightness.
⑥ [LAPC] ( 13)
Measure the characteristics of the amplifier and correct its output.
- The function does not work when the speaker selector knob is set to [OFF].
⑦ Input selector knob ( 13)
Select the input source or gain value.
⑧ Speaker selector knob (⇒ 13)
Select the output speakers.
Rear
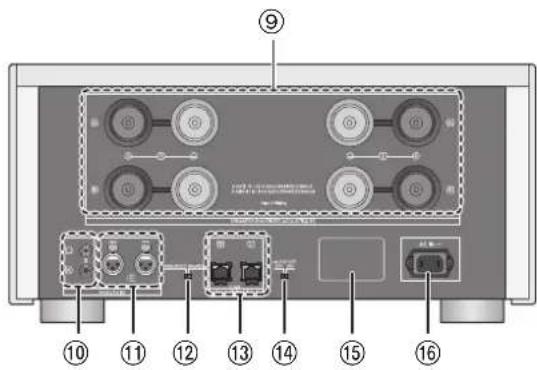
⑨ Speaker terminals [SPEAKERS] ( 8)
⑩ Analog audio input terminal [UNBALANCED] ( 11)
⑪ Analog audio input terminal [BALANCED] (⇒ 11)
⑫ Analog audio input selector switch ( 11) Switch the analog audio input.
- This switch does not work when the input selector knob is set to [DIGITAL].
⑬ System terminal [Technics Digital Link IN] ( 10)
⑭ Auto off switch [AUTO OFF]
Turn on/off auto off function.
- Auto off function: This unit is designed to conserve its power consumption and save energy. The unit will turn to standby mode automatically if there is no sound and it is not being used for approximately 20 minutes. - To cancel this function, set to [OFF].
⑮ Product identification marking The model number is indicated.
⑯ AC IN terminal [AC IN \~] (⇒ 12)
Getting started
- Turn off all equipment before connection and read the appropriate operating instructions.
- Do not connect the AC power supply cord until all other connections are complete.
- Insert the plugs of the cables to be connected all the way in.
- Do not bend cables at sharp angles.
WARNING: RISK OF HAZARDOUS ENERGY! MAKE PROPER SPEAKER CONNECTIONS. CONNECT CABLES AS DESCRIBED IN THIS OWNER'S MANUAL.
Speaker connection
■ Single wiring connection
e.g.,
SB-R1 Speaker cable Speaker cable SB-R1
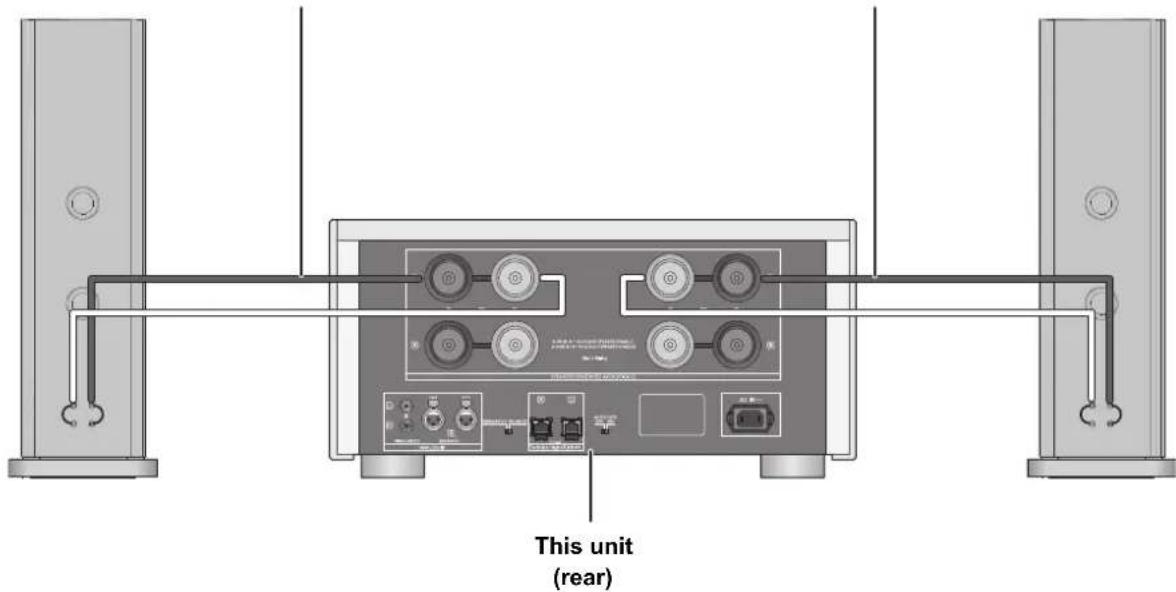
- When using single wiring connection, set the speaker selector knob to [A] or [B]. (→ 13)
1 Turn the knobs to loosen them, and insert the core wires.
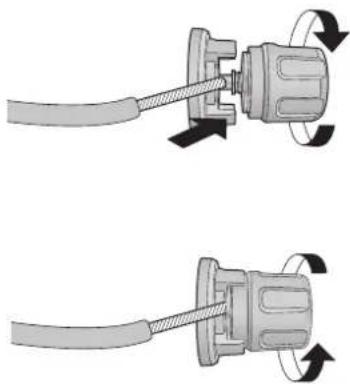
2 Tighten the knobs.
■ Bi-wiring connection
e.g.,

- When making bi-wiring connections, set the speaker selector knob to [A+B]. (→ 13)

- When the connections are completed, pull the speaker cables lightly to check that they are connected firmly.
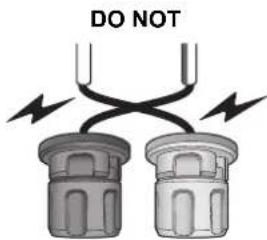
- Be careful not to cross (short-circuit) or reverse the polarity of the speaker wires as doing so may damage the amplifier.
- Wire the polarity (+/-) of the terminals correctly. Not doing so may adversely affect stereo effects or cause malfunction.
- For details, refer to the operating instructions of the speakers.
System control connection to an SU-R1
- You can input digital audio signals to this unit and play back music.
- You can automatically link this unit with the SU-R1 and operate them easily with the remote control of the SU-R1. (⇒ 14)
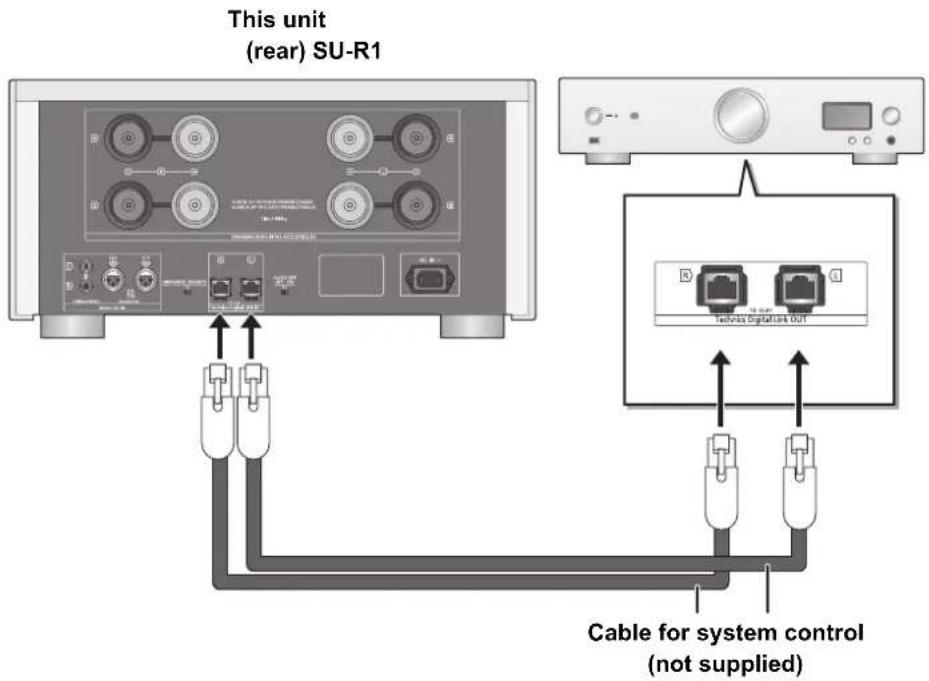

- When using the system control function, set the input selector knob to [DIGITAL]. (⇒ 13)
- Use category 7 or above straight LAN cables (STP) when connecting to peripheral devices.
- We recommend using cables with a length of 3m (9.9 ft) or less.
- Do not connect an SU-R1 in any other way than described above.
Connecting to analog audio output devices
You can input analog audio signals to this unit and play back music.
e.g.,
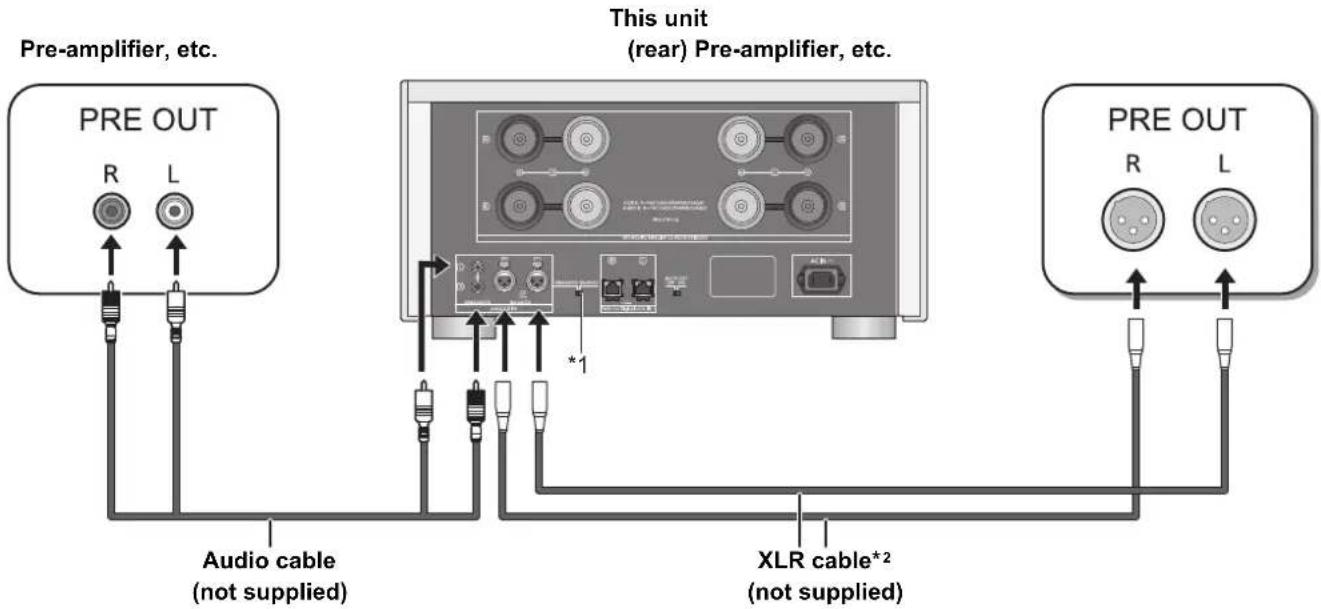
*1 Select [BALANCED] or [UNBALANCED]. Set the analog audio input selector switch to a position that corresponds to the device you want to play.
*2 We recommend using cables with a length of 3 m (9.9 ft) or less.
- When connecting to an analog audio output device, set the input selector knob to [ANALOG]. (→ 13)
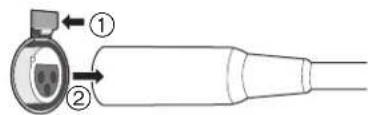
■ To disconnect the XLR cables
Pull out the XLR cables while pressing [PUSH] at the top of the terminals.
AC power supply cord connection
Connect only after all other connections are completed.
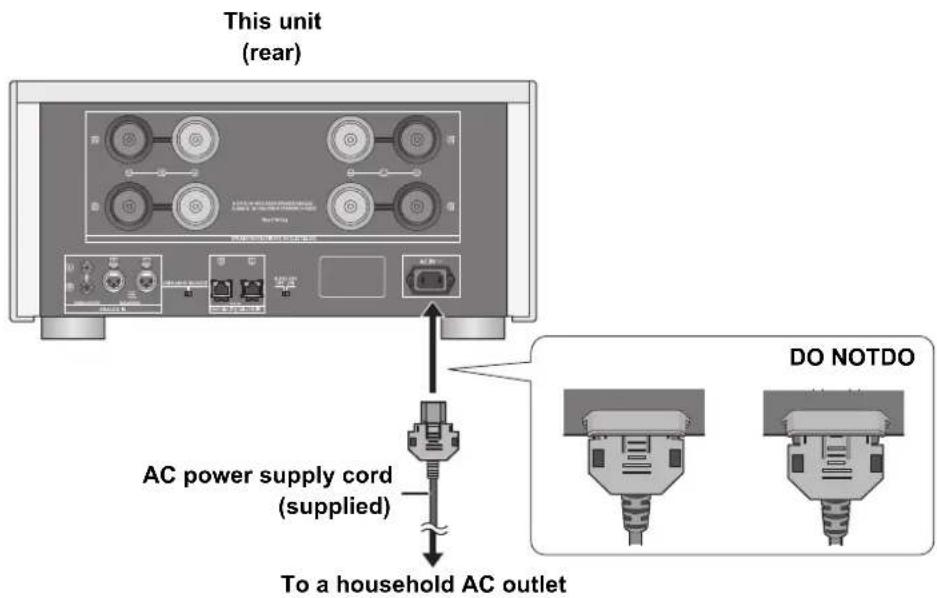
■ To disconnect the AC power supply cord from this unit
Pull out the AC power supply cord while pressing the top and bottom sides of the connector.
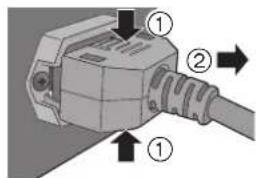

- Although the AC power switch is in the [■OFF] position, the unit is not completely disconnected from the mains. Remove the plug from the main electrical outlet if you will not be using the unit for an extended period of time. Place the unit so the plug can be easily removed.
Measuring the characteristics of the amplifier and correcting its output
To optimize the audio output, you can measure the amplifier characteristics and correct its output when it is connected to the speakers.
- Set the speaker selector knob to a position that corresponds to the connected speakers. ( right)
Test tone emitted during measurement
To ensure the measurement accuracy, the speakers output a test tone at regular intervals. (For approximately 4 minutes)
It is not possible to change the volume of the audio being output while the measurement is in progress.
1 Press the unit on/off button to the []@/1 position.
●The power indicator lights up in blue.
2 Press and hold [LAPC] until the LAPC indicator on this unit starts to blink.
- This unit will start measuring the characteristics of the amplifier. Check that a test tone is output from both the left and right speakers.
- If you press [LAPC], turn the speaker selector knob or operate other controls while the measurement is in progress, it will be canceled. The LAPC indicator on this unit will go off.
- When the measurement is complete, amplifier output correction will be automatically turned on. The LAPC indicator on this unit will light up.
■ Turning on/off the output correction function
Press [LAPC].
Each time you press the button:
| LAPC indicator lights up On | |
| LAPC indicator goes off Off |

- When the SU-R1 is connected via the system control function, you can operate using the SU-R1's remote control.
- The output correction setting is applied separately to each speaker terminal option (A/B/A+B).
- Depending on the type of the connected speakers, the effect of the output correction function may be minimal.
- The corrected output remains in effect until you measure the characteristics again. When you use other speakers, redo the measurement.
Operations
1 Press the unit on/off button to the []@/I position.
●The power indicator lights up in blue.
2 Turn the input selector knob.
Select a playback device and gain value.
| ANALOG (dB)(-30/-20/-10/0) | Select an optimal setting for the connected device. (⇒ below) |
| DIGITAL | Select this setting when using the system control function. |
3 Turn the speaker selector knob.
Select the speaker terminals from which audio will be output.
| OFF | Does not output audio. |
| A | Outputs audio from the speakers connected to the A terminals. |
| B | Outputs audio from the speakers connected to the B terminals. |
| A+B | Outputs audio from the speakers connected to the A and B terminals. |
4 Operate the device to be used for playback.
Input selector knob setting during analog input
- For normal operation, set the value to [0].
- For playback at low volume levels, lower the gain value of this unit by setting the input selector knob to [-30], [-20] or [-10] of [ANALOG (dB)]. This will minimize analog/digital conversion errors that occur on this unit.
Troubleshooting
Using the system control function
You can automatically link this unit with the SU-R1 and operate them easily with the remote control of the SU-R1.
Preparation
① Connect this unit and the SU-R1 with cables for system control. ( 10)
② Set the input selector knob to [DIGITAL]. (→ 13)
③ Press the unit on/off button on this unit and the SU-R1 to the [ ] position.
④ If "Digital Link" is set to "Off" on the SU-R1, change the setting to "On".
■ Switching this unit and the SU-R1 to on/standby simultaneously
- If you point the SU-R1's remote control at the SU-R1 and press [⏻] when this unit and the SU-R1 are in standby mode, this unit and the SU-R1 will be turned on simultaneously.
- If you point the SU-R1's remote control at the SU-R1 and press [⏻] when this unit and the SU-R1 are turned on, this unit and the SU-R1 will simultaneously enter standby mode.
■ Measuring the characteristics of the amplifier and correcting its output
You can operate using the SU-R1's remote control. ( 13)

- For information on the operations of the SU-R1, please also refer to its operating instructions.
Before requesting service, make the following checks. If you are uncertain about some of the check points, or if the solutions indicated in the following guide does not resolve the issue, then consult your dealer for instructions.
To return all settings to the factory defaults
When the following situations occur, reset the memory:
- There is no response when buttons are pressed.
- You want to clear and reset the memory contents.
When the unit is off:
① Press and hold [DIMMER].
② While continuing to hold [DIMMER], press the unit on/off button.
- Keep holding [DIMMER] until the power indicator and the LAPC indicator blink twice.
Heat buildup of this unit.
- This unit becomes warm when the volume is high. This is not a malfunction.
A "humming" sound can be heard during playback.
- An AC power supply cord or fluorescent light is near the cables. Keep other appliances and cords away from the cables of this unit.
- A strong magnetic field near a TV or other device may adversely affect the audio quality. Keep this unit away from such devices.
- The speakers may output noise when a device nearby is emitting powerful radio waves, such as when a mobile phone is on a call.
No sound.
- Check connections to speakers and other equipment. After checking the connections, measure the characteristics of the amplifier. (→ 13)
- Check to see if the correct input source is selected.
- Insert the plugs of the cables to be connected all the way in.
- Set the speaker selector knob to other than [OFF]. (→ 13)
The peak power meter does not operate.
- In the following cases, this meter does not operate:
- When the peak power meter light is turned off by pressing [DIMMER].
- When this unit is muted by pressing [MUTE] on the SU-R1's remote control. (Only when the input selector knob is set to [DIGITAL].)
- When the speaker selector knob is set to [OFF].
The system control function is not working.
- Connect the cables to the matching LR terminals on this unit and the SU-R1.
The unit turns off automatically.
- Is the auto off function turned on? (→ 7)
- If the SU-R1 is connected to this unit via the system control function, this unit may automatically enter standby mode when the SU-R1 enters standby mode. (⇒ 10, 14)
- This unit incorporates a protection circuit to prevent damage caused by heat buildup. When you use this unit at a high volume level for a long period of time, it may turn off automatically. Wait for this unit to cool down before turning on this unit again. (For approximately 3 minutes)
Specifications
GENERAL
Power supply AC 120 V, 60 Hz
Power consumption 250 W
Power consumption in standby mode Approx. 0.7 W
Power consumption in off mode Approx. 0.3 W
Dimensions (W×H×D)
480 mm×241 mm×567 mm
(18 7/8"×9 15/32"×22 11/32")
Mass (Weight) Approx. 54 kg
(119 lbs)
Operating temperature range
0^ to +40^ (+32^ to +104^)
Operating humidity range 35 % to 80 % RH (no condensation)
■ AMPLIFIER SECTION
FTC output power
150 W + 150 W (20 Hz to 20 kHz, T.H.D. 0.5 %, 8 Ω, 20 kHz LPF)
300 W + 300 W (20 Hz to 20 kHz, T.H.D. 0.5 %, 4 Ω, 20 kHz LPF)
Frequency response
1 Hz to 90 kHz ( -3 dB, 8 )
THD+N
0.05 % (1 kHz, 75 W, 8 Ω, 20 kHz LPF)
Input sensitivity/Input impedance
UNBALANCED
1.2 Vrms / 47 kΩ (ANALOG 0 dB)
BALANCED
1.2 Vrms / 47 kΩ (ANALOG 0 dB)
GAIN
29 dB (ANALOG 0 dB)
Load impedance
A or B, Bi-Wire
4 Ω to 16 Ω
A+B
8 Ω to 16 Ω
■ TERMINALS SECTION
Analog input
UNBALANCED
Pin jack
BALANCED
3 Pin XLR
Digital input
Technics Digital Link

- Specifications are subject to change without notice.
• Mass and dimensions are approximate.
Limited Warranty (ONLY FOR U.S.A.)
Technics Products – Limited Warranty
Limited Warranty Coverage
(For USA Only)
If your product does not work properly because of a defect in materials or workmanship, Panasonic Corporation of North America (referred to as "the warrantor") will, for the length of the period indicated on the chart below, which starts with the date of original purchase ("warranty period"), at its option either (a) repair your product with new or refurbished parts, (b) replace it with a new or a refurbished equivalent value product, or (c) refund your purchase price. The decision to repair, replace or refund will be made by the warrantor.
| Product or Part Name Parts | Labor | |
| Technics Stereo Power Amp | 5 (five) years 5 (five) years | Technics A |
| Technics Speaker System |
During the "Labor" warranty period there will be no charge for labor. During the "Parts" warranty period, there will be no charge for parts. This Limited Warranty excludes both parts and labor for non-rechargeable batteries, antennas, and cosmetic parts (cabinet). This warranty only applies to products purchased and serviced in the United States. This warranty is extended only to the original purchaser of a new product which was not sold "as is".
Mail-In Service--Online Repair Request
Online Repair Request
To submit a new repair request and for quick repair status visit our Web Site at www.panasonic.com/support.
When shipping the unit, carefully pack, include all supplied accessories listed in the Owner's Manual, and send it prepaid, adequately insured and packed well in a carton box. When shipping Lithium Ion batteries please visit our Web Site at www.panasonic.com/BatteryHandling as Panasonic is committed to providing the most up to date information. Include a letter detailing the complaint, a return address and provide a daytime phone number where you can be reached. A valid registered receipt is required under the Limited Warranty.
IF REPAIR IS NEEDED DURING THE WARRANTY PERIOD, THE PURCHASER WILL BE REQUIRED TO FURNISH A SALES RECEIPT/PROOF OF PURCHASE INDICATING DATE OF PURCHASE, AMOUNT PAID AND PLACE OF PURCHASE. CUSTOMER WILL BE CHARGED FOR THE REPAIR OF ANY UNIT RECEIVED WITHOUT SUCH PROOF OF PURCHASE.
Limited Warranty Limits and Exclusions
This warranty ONLY COVERS failures due to defects in materials or workmanship, and DOES NOT COVER normal wear and tear or cosmetic damage. The warranty ALSO DOES NOT COVER damages which occurred in shipment, or failures which are caused by products not supplied by the warrantor, or failures which result from accidents, misuse, abuse, neglect, mishandling, misapplication, alteration, faulty installation, set-up adjustments, misadjustment of consumer controls, improper maintenance, power line surge, lightning damage, modification, introduction of sand, humidity or liquids, commercial use such as hotel, office, restaurant, or other business or rental use of the product, or service by anyone other than a Factory Service Center or other Authorized Servicer, or damage that is attributable to acts of God.
THERE ARE NO EXPRESS WARRANTIES EXCEPT AS LISTED UNDER "LIMITED WARRANTY COVERAGE".
THE WARRANTY OR IS NOT LIABLE FOR INCIDENTAL OR CONSEQUENTIAL DAMAGES RESULTING FROM THE USE OF THIS PRODUCT, OR ARISING OUT OF ANY BREACH OF THIS WARRANTY.
(As examples, this excludes damages for lost time, travel to and from the servicer, loss of or damage to media or images, data or other memory or recorded content. The items listed are not exclusive, but for illustration only.) ALL EXPRESS AND IMPLIED WARRANTIES, INCLUDING THE WARRANTY OF MERCHANTABILITY, ARE LIMITED TO THE PERIOD OF THE LIMITED WARRANTY.
Some states do not allow the exclusion or limitation of incidental or consequential damages, or limitations on how long an implied warranty lasts, so the exclusions may not apply to you.
This warranty gives you specific legal rights and you may also have other rights which vary from state to state. If a problem with this product develops during or after the warranty period, you may contact your dealer or Service Center. If the problem is not handled to your satisfaction, then write to:
Consumer Affairs Department Panasonic Corporation of North America 661 Independence Pkwy Chesapeake, VA 23320
PARTS AND SERVICE, WHICH ARE NOT COVERED BY THIS LIMITED WARRANTY, ARE YOUR RESPONSIBILITY.
Shop
Accessories!
for all your Technics gear
Go to
www.panasonic.com/accessories
Get everything you need to get the most out of your Technics products
Accessories & Parts for your Camera, Phone, A/V products, TV, Computers & Networking, Personal
Care, Home Appliances, Headphones, Batteries, Backup Chargers & more...
Customer Services Directory
For Product Information, Operating Assistance, Parts, Owner's Manuals, Dealer and Service info go to www.panasonic.com/support
For the hearing or speech impaired TTY: 1-877-833-8855
As of October 2014
The model number and serial number of this product can be found on either the back or the bottom of the unit.
Please note them in the space provided below and keep for future reference.
MODEL NUMBER
SE-R1
SERIAL NUMBER
User memo:
DATE OF PURCHASE
DEALER NAME
DEALER ADDRESS
TELEPHONE NUMBER
Limited Warranty (ONLY FOR CANADA)
Panasonic Canada Inc.
5770 Ambler Drive, Mississauga, Ontario L4W 2T3
TECHNICS PRODUCT – LIMITED WARRANTY
Panasonic Canada Inc. warrants this product to be free from defects in material and workmanship under normal use and for a period as stated below from the date of original purchase agrees to, at its option either (a) repair your product with new or refurbished parts, (b) replace it with a new or a refurbished equivalent value product, or (c) refund your purchase price. The decision to repair, replace or refund will be made by Panasonic Canada Inc.
Technics Stereo Power Amp
5 (five) years parts and labourTechnics Network Audio Control Player
Technics Speaker System
This warranty is given only to the original purchaser, or the person for whom it was purchased as a gift, of a Technics brand product mentioned above sold by an authorized Panasonic dealer in Canada and purchased and used in Canada, which product was not sold "as is", and which product was delivered to you in new condition in the original packaging.
IN ORDER TO BE ELIGIBLE TO RECEIVE WARRANTY SERVICE HEREUNDER, A PURCHASE RECEIPT OR OTHER PROOF OF DATE OF ORIGINAL PURCHASE, SHOWING AMOUNT PAID AND PLACE OF PURCHASE IS REQUIRED
LIMITATIONS AND EXCLUSIONS
This warranty ONLY COVERS failures due to defects in materials or workmanship, and DOES NOT COVER normal wear and tear or cosmetic damage. The warranty ALSO DOES NOT COVER damages which occurred in shipment, or failures which are caused by products not supplied by Panasonic Canada Inc., or failures which result from accidents, misuse, abuse, neglect, mishandling, misapplication, alteration, faulty installation, set-up adjustments, misadjustment of consumer controls, improper maintenance, power line surge, lightning damage, modification, introduction of sand, humidity or liquids, commercial use such as hotel, office, restaurant, or other business or rental use of the product, or service by anyone other than an Authorized Servicer, or damage that is attributable to acts of God.
Dry cell batteries are also excluded from coverage under this warranty.
THIS EXPRESS, LIMITED WARRANTY IS IN LIEU OF ALL OTHER WARRANTIES, EXPRESS OR IMPLIED, INCLUDING ANY IMPLIED WARRANTIES OF MERCHANTABILITY AND FITNESS FOR A PARTICULAR PURPOSE. IN NO EVENT WILL PANASONIC CANADA INC. BE LIABLE FOR ANY SPECIAL, INDIRECT OR CONSEQUENTIAL DAMAGES RESULTING FROM THE USE OF THIS PRODUCT OR ARISING OUT OF ANY BREACH OF ANY EXPRESS OR IMPLIED WARRANTY. (As examples, this warranty excludes damages for lost time, travel to and from the Authorized Servicer, loss of or damage to media or images, data or other memory or recorded content. This list of items is not exhaustive, but for illustration only.)
In certain instances, some jurisdictions do not allow the exclusion or limitation of incidental or consequential damages, or the exclusion of implied warranties, so the above limitations and exclusions may not be applicable. This warranty gives you specific legal rights and you may have other rights which vary depending on your province or territory.
WARRANTY SERVICE
For product operation, repairs and information assistance, please visit our Support page on: www.panasonic.ca/english/support
IF YOU SHIP THE PRODUCT TO A SERVICENTRE
Carefully pack and send prepaid, adequately insured and preferably in the original carton. Include details of the defect claimed, and proof of date of original purchase.
natural_image
Two people handling a server rack or rack unit (no text or symbols visible)


AVIS: AFIN DE PRÉVENIR LE RISQUE DE CHOCS ÉLECTRIQUES, NE PAS RETIRER LES VIS. CONFIER TOUTE RÉPARATION À UN TECHNICIEN QUALIFIÉ.

natural_image
Diagram of a mechanical assembly with a coiled cable and rotating component (no text or symbols)2 Revisser les boutons.

natural_image
Diagram of a cable being inserted into a connector with rotation arrows (no text or symbols)natural_image
Two identical electrical connectors with black lightning bolts between them, no text or symbols present.
Panasonic Canada Inc.
5770, Ambler Drive, Mississauga (Ontario) L4W 2T3
PRODUIT TECHNICS – GARANTIE LIMITÉE
Delivering the Ultimate Emotive Musical Experience to All
At Technics we understand that the listening experience is not purely about technology but the magical and emotional relationship between people and music.
We want people to experience music as it was originally intended and enable them to feel the emotional impact that enthuses and delights them.
Through delivering this experience we want to support the development and enjoyment of the world's many musical cultures. This is our philosophy.
With a combination of our love of music and the vast high-end audio experience of the Technics team, we stand committed to building a brand that provides the ultimate emotive musical experience by music lovers, for music lovers.
Panasonic Corporation of North America
Two Riverfront Plaza, Newark, NJ 07102-5490
http://www.panasonic.com
Panasonic Canada Inc.
5770 Ambler Drive,
Mississauga, Ontario,
L4W 2T3
www.panasonic.com

- ■ Features of this unit
- Full-digital amplifier with a high-precision jitter reduction circuit and PWM conversion circuit
- LAPC (Load Adaptive Phase Calibration)
- GaN-FET Driver
- ■ Recommended devices
- IMPORTANT SAFETY INSTRUCTIONS
- WARNING
- Unit
- AC power supply cord
- CAUTION
- Placement
- THE FOLLOWING APPLIES ONLY IN THE U.S.A.
- FCC Note:
- THE FOLLOWING APPLIES ONLY IN CANADA
- Information on Disposal in other Countries outside the European Union
- Table of contents
- About descriptions in this Owner's Manual
- Accessories
- (ONLY FOR CANADA)
- Unit care
- Control reference guide
- This unit
- Front
- Rear
- Getting started
- Speaker connection
- ■ Bi-wiring connection
- System control connection to an SU-R1
- Connecting to analog audio output devices
- ■ To disconnect the XLR cables
- AC power supply cord connection
- ■ To disconnect the AC power supply cord from this unit
- Measuring the characteristics of the amplifier and correcting its output
- Test tone emitted during measurement
- Operations
- Input selector knob setting during analog input
- Troubleshooting
- Using the system control function
- Preparation
- ■ Switching this unit and the SU-R1 to on/standby simultaneously
- ■ Measuring the characteristics of the amplifier and correcting its output
- To return all settings to the factory defaults
- When the unit is off:
- Heat buildup of this unit.
- A "humming" sound can be heard during playback.
- No sound.
- The peak power meter does not operate.
- The system control function is not working.
- The unit turns off automatically.
- Specifications
- GENERAL
- ■ AMPLIFIER SECTION
- ■ TERMINALS SECTION
- Limited Warranty (ONLY FOR U.S.A.)
- Technics Products – Limited Warranty
- Limited Warranty Coverage
- (For USA Only)
- Online Repair Request
- Limited Warranty Limits and Exclusions
- Shop
- Accessories!
- Limited Warranty (ONLY FOR CANADA)
- TECHNICS PRODUCT – LIMITED WARRANTY
- LIMITATIONS AND EXCLUSIONS
- WARRANTY SERVICE
- PRODUIT TECHNICS – GARANTIE LIMITÉE
- Delivering the Ultimate Emotive Musical Experience to All
Brand : TECHNICS
Model : SER1
Category : Receiver