LineMiss XF113 - Oven Unox - Free user manual and instructions
Find the device manual for free LineMiss XF113 Unox in PDF.
User questions about LineMiss XF113 Unox
0 question about this device. Answer the ones you know or ask your own.
Ask a new question about this device
Download the instructions for your Oven in PDF format for free! Find your manual LineMiss XF113 - Unox and take your electronic device back in hand. On this page are published all the documents necessary for the use of your device. LineMiss XF113 by Unox.
USER MANUAL LineMiss XF113 Unox
I. Instructions for the installer page 3
1.DATA PLATE page 3
2.CERTIFICATION page 3
3. INSTALLATION - PRELIMINARY OPERATIONS
4. Installation 4.1 - ELECTRICAL CONNECTION 4.2 - WATER CONNECTION
II. Instructions for the user page 6
- INSTRUCTION FOR THE OPERATOR page 6
- NOTES FOR THE USE page 6
3.CONTROL PANEL page 6 3.1-DESCRIPTION AND USE OF "CLASSIC" CONTROL PANEL 3.2-DESCRIPTION AND USE OF"DYNAMIC"CONTROL PANEL
3.2 - DESCRIPTION AND USE OF "DYNAMIC" CONTROL PANEL page 10
- VARIOUS FUNCTIONS page 10
5.CLEANING OF THE OVEN page 10 - TURNING OFF IN CASE OF BREAKDOWN page 10
III. Cooking principles page 10
- COOKING TPOLOGIES page 11
- COOKING VARIABLES page 11
- USE OF PANS - GRIDS page 11
IV. Maintenance page 11
- ORDINARY MAINTENANCE page 11
- SPECIAL MAINTENANCE page 13
- MORE FREQUENT BREAKDOWNS page 14
APPENDIX - CONTROL PANELS page 15
I. INSTRUCTION FOR THE INSTALLER
Dear Customer, we would like to thank you and congratulate you on the purchase of one of UNOX products. The instructions and suggestions that follow concern the phases of a proper installation, as well as the use and maintenance for your safety and for the best use of the appliance.
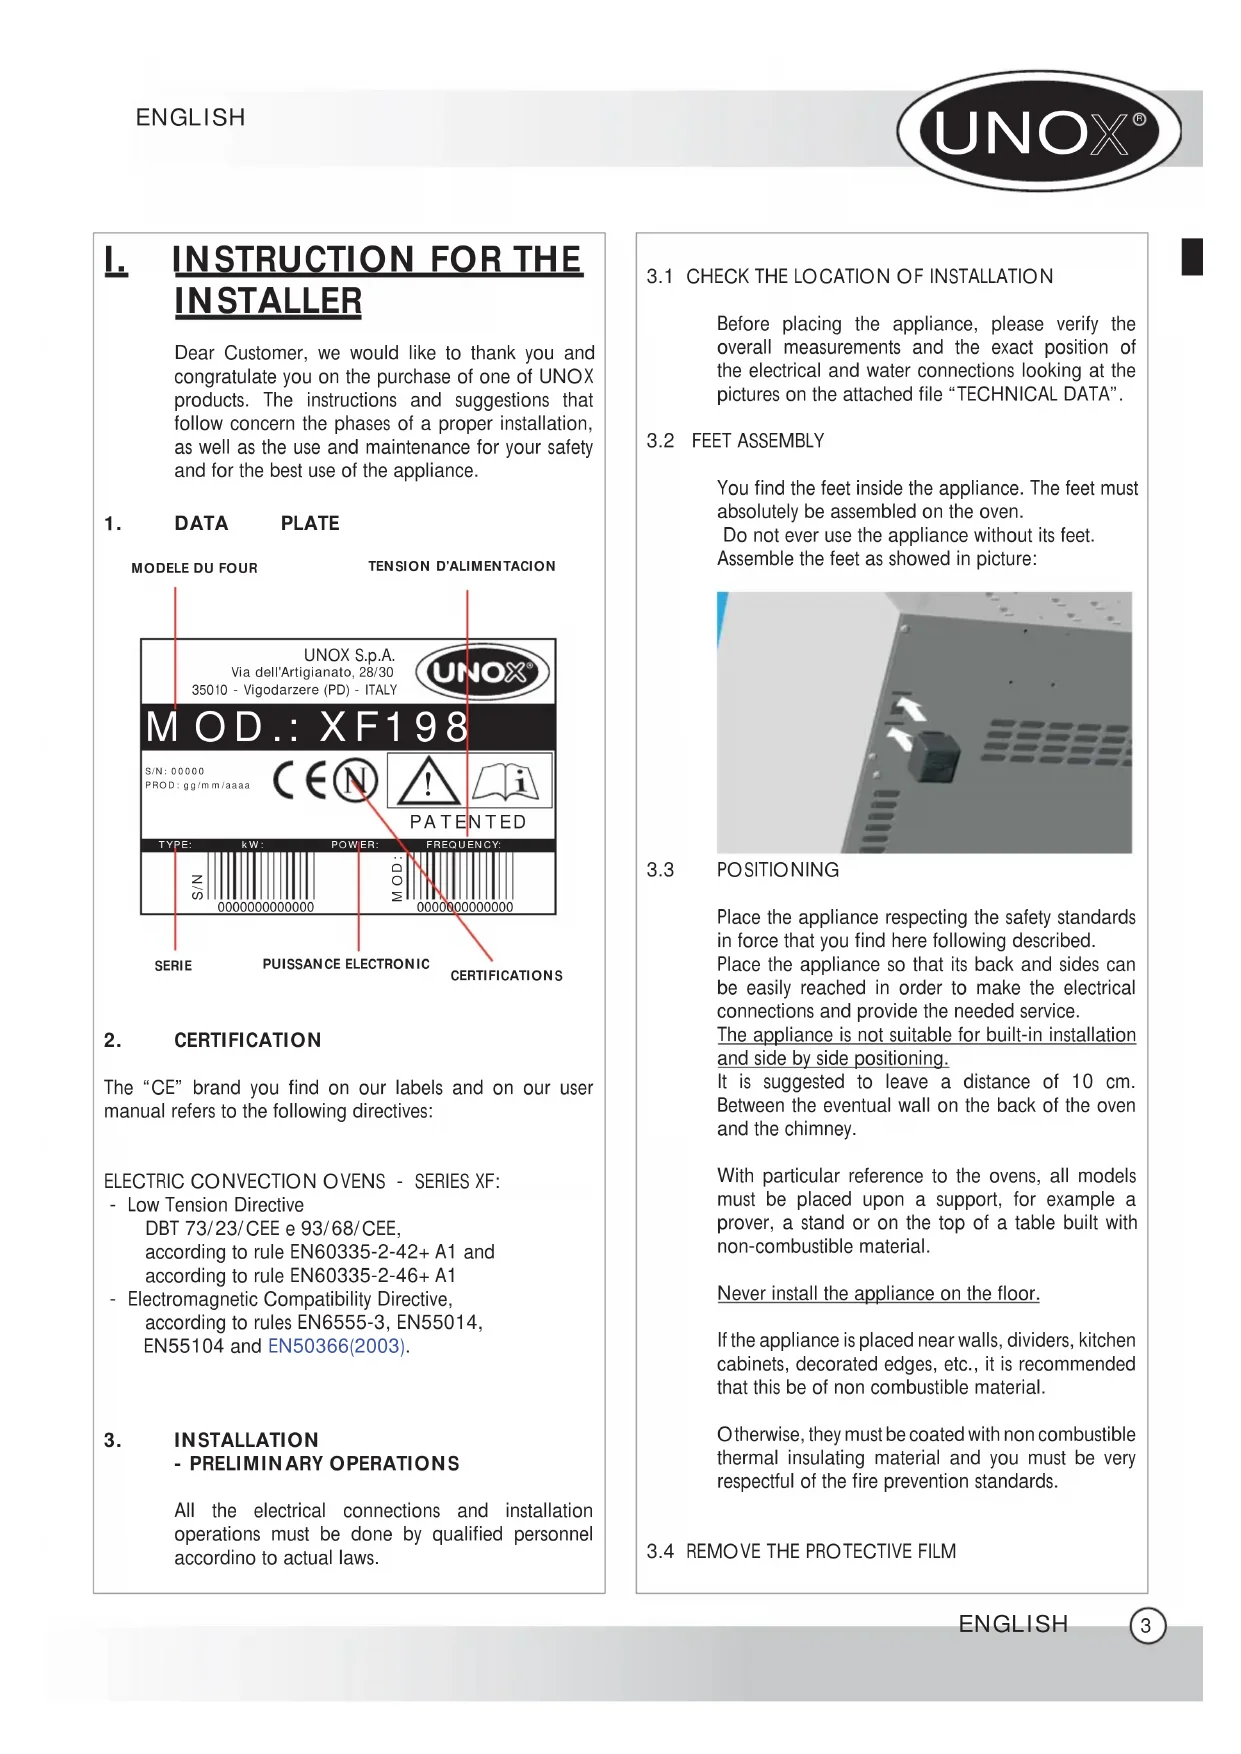
1. DATA PLATE
2. CERTIFICATION
The "CE" brand you find on our labels and on our user manual refers to the following directives:
ELECTRIC CONVECTION OVENS - SERIES XF:
- Low Tension Directive DBT 73/23/CEE e 93/68/CEE, according to rule EN60335-2-42+ A1 and according to rule EN60335-2-46+ A1
Electromagnetic Compatibility Directive, according to rules EN6555-3, EN55014, EN55104 and EN50366(2003).
3. INSTALLATION - PRELIMINARY OPERATIONS
All the electrical connections and installation operations must be done by qualified personnel according to actual laws.
3.1 CHECK THE LOCATION OF INSTALLATION
Before placing the appliance, please verify the overall measurements and the exact position of the electrical and water connections looking at the pictures on the attached file "TECHNICAL DATA".
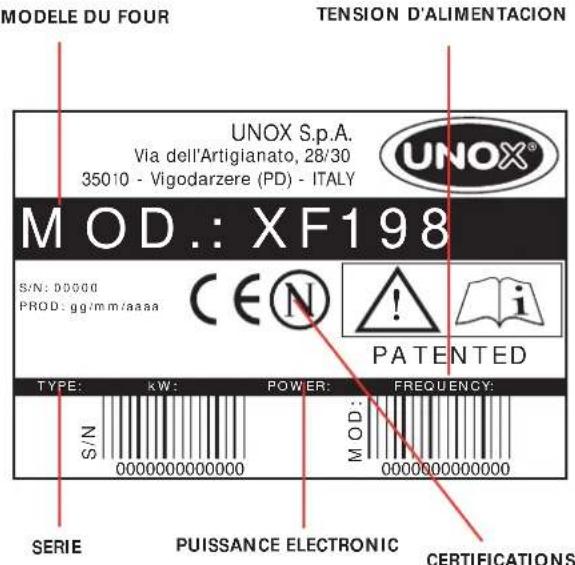
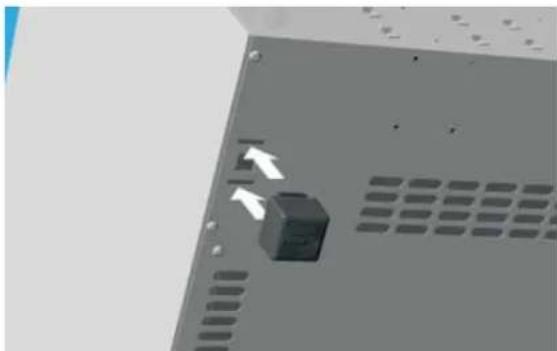
3.2 FEET ASSEMBLY
You find the feet inside the appliance. The feet must absolutely be assembled on the oven. Do not ever use the appliance without its feet. Assemble the feet as showed in picture:
3.3 POSITIONING
Place the appliance respecting the safety standards in force that you find here following described. Place the appliance so that its back and sides can be easily reached in order to make the electrical connections and provide the needed service. The appliance is not suitable for built-in installation and side by side positioning. It is suggested to leave a distance of 10~cm Between the eventual wall on the back of the oven and the chimney.
With particular reference to the ovens, all models must be placed upon a support, for example a prover, a stand or on the top of a table built with non-combustible material.
Never install the appliance on the floor.
If the appliance is placed near walls, dividers, kitchen cabinets, decorated edges, etc., it is recommended that this be of non combustible material.
Otherwise, they must be coated with non combustible thermal insulating material and you must be very respectful of the fire prevention standards.
3.4 REMOVE THE PROTECTIVE FILM
Carefully remove all the protective film from the external walls of the appliance. Pay attention not to leave any rest of glue on the sides.
If there should be any residue, please remove it with an appropriate solvent.
4. INSTALLATION
4.1 - ELECTRICAL CONNECTION
4.2 - WATER CONNECTION
4.1 ELECTRICAL CONNECTION
a- The connection to the electrical power supply system must be done by qualified personnel according to the standard in force. The installer is responsible for a correct electrical connection and for security rules observance.
Before connecting the appliance, make yourself sure that the voltage and the frequency correspond to those stated on the data plate of the appliance. The appliance must be placed so that the connection plug to the network can be easily reached.
Place an omni-polar switch between the appliance and the network. The switch must be easily accessible after installation. The contacts of this switch must have a minimum opening distance of 3mm and the switch must have an appropriate input. It is suggested to use a differential magnetothermal switch.
When the appliance is working, the power supply voltage must not diverge from the value of the nominal voltage, written on the technical data plate, by more than ± 10% .
b- The appliance must be connected to the ground line of the network.
Moreover, the appliance must be included in
an equipotential system whose efficiency must be properly checked according to the current law. This connection must be done between the different appliances using the terminal marked with the symbol:
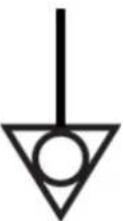
The equipotential conductor must have a minimum section of 10mm^2
POWER SUPPLY CONNECTION
1-Ovens equipped with cordset and Schuko plug (single phase 230V): is sufficient
to insert the plug in the proper socket (the socket must be suitable for the plug assembled in the oven)
2-Ovens equipped with cordset (three phases 400V+ Neutral): these ovens are equipped with electrical cord with 5 conductors: it is necessary to connect the proper three-phase 5 poles plugi with suitable capacity or you can connect the cord directly to the electrical panel.
In those ovens equipped with a cord with 5 conductors it is possible to substitute the power cord to adapt the appliance to the available type of current.
SCHEMA COLLEGAMENTO MORSETTIERA A 5 + 1 POLI
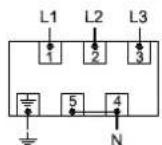
400V~3PH+N+PE
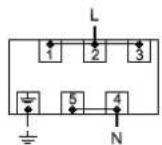
230V\~1PH+N+PE
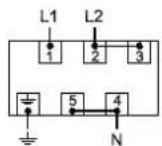
400V\~2PH+N+PE
Replacement of electric supply cable (in case of damage or change of electric connection) has to be done by authorized technical assistance service or anyway by someone with similar qualification.
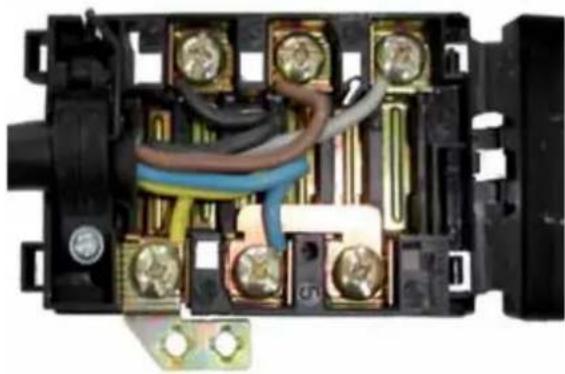
To substitute the power cord proceed as follows:
- Open the cover of the terminal board leveraging the two lateral small wings with a proper screw-driver (1)
- Unscrew the screws that lock the conductors (2)
- Unscrew the screw that locks the cordstopper (3)
- Remove the supplied cord
- Connect the conductors that you would like to use according to the chosen connection drawing; be sure to fix properly the screws of the clamps.
- Block the cord using the proper cordstopper
- Close the cover of the terminal board.
WARNING:
Connect the electrical cable to the terminal board as shown on the drawing: insert screw-wise the copper bridge and the electrical cable together under the screw. Tighten the screw paying attention that the cable and the copper bridge are well fixed under the screw. A wrong connection can cause the overheating of the terminal board which can also melt.
4.2 WATER CONNECTION
CONNECTION TO THE WATER NET
only for ovens with Humidity)
It is necessary to place a mechanical filter between the water system and the water connection of the oven.
Before connecting the water pipe to the oven, please let a certain quantity of water flow to clean the duct from any eventual remainder.
The water used in the oven must have a nominal pressure value included between 0.5 and 2 bars.
The water must have a hardness included between 0.5^ and 5^ (this in order to avoid formation of limestone deposits inside the electric valve and inside the cavity).
We suggest you to us a decalcification appliance in order to avoid fan balancing.
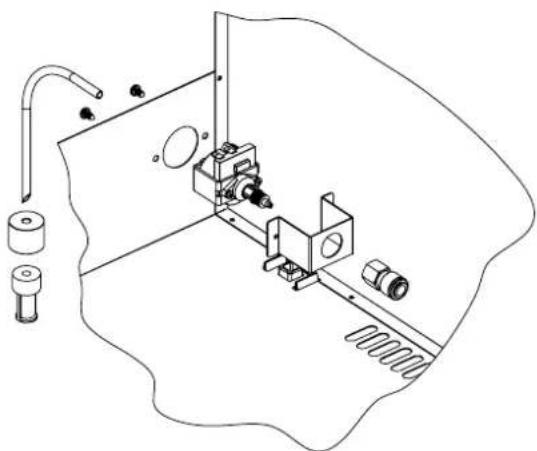
CONNECTION TO AN EXTERNAL WATER TANK
(Substitution of the water electric valve with the water pump)
In all models where this option is available, to substitute the electric water valve with the pump to suck water into the oven you must operate as follows:
- remove the back of the oven
- disconnect the power supply wires from the electric water valve
- fix the water pump (4) to the oven using the supplied support (5)
- connect the internal water pipe to the pump using the rapid connection
- connect the inlet water pipe (3) to the pump
- cut the other water pipe edge as shown on the drawing, insert the sinker (2) and fix it to the water filter.
- reassemble the back of the oven.
Use only decalcified water (see paragraph 4.2)
WARNING:
every time you have to use the appliance with the pump, always make yourself sure that there is water in the tank. If you use the pump without water in the tank, the pump itself can burn. If the pump utters an anomalous sound, it might be due to the lack of water in the tank.
FUMES EXIT FROM CAVITY
In the back side of the oven you find a fume chimney from which the fumes that come from the cavity are ejected. During each cooking cycle you will have hot and wet fumes coming out from this chimney (temperature and humidity of the fumes depend on the cooking parameters set on the oven and on the type and quantity of food put inside the oven).
The fumes that come out from the chimney can be guided outside the room where the oven is installed or can be condensated using the proper condensating hood available as an option (only in the ovens equipped with "DYNAMIC" control panel).
II. INSTRUCTIONS FOR THE USER
The appliance cannot be cleaned with a jet of water.
Never wash the cavity with acids or aggressive detergents. Use only water and soap.
The appliance is made for a specific professional use and must be used by qualified personnel only.
1. INSTRUCTIONS FOR THE OPERATOR
WARNING:
carefully read this user manual before starting to operate with the appliance as it gives you important information regarding safety during installation, use and maintenance of the appliance itself.
Keep the manual in a safe place where the different operators that work with the appliance can easily find and read it.
For any eventual repair, please apply only to authorized service centres. Always require original UNOX spare parts.
Failure to observe the above suggestions can compromise safety of the appliance and the guarantee will not be recognized anymore.
2. NOTES FOR USE
Premise:
This appliance must be used only in the way in which it was expressly intended. The ovens were designed to cook food as here below described. Every other use is to be considered improper.
The oven allows you to work on temperature between 0 and 260^ . It can be used to:
- bake all types of bread and pastry, both fresh and frozen;
cook all gastronomy preparations, fresh or frozen; - regeneration of refrigerated or frozen food;
cook meat, fish and all kind of vegetables.
When placing the food in the cooking chamber, leave at least 20mm between the trays in order to allow the hot air to circulate inside the cavity.
Please avoid to put salt on the food inside the cavity.
3. CONTROL PANEL
| OVENS MODEL | CONTROL PANEL TYPE |
| XF100-TG | Classic |
| XF100-GR | Classic |
| XF110-TG | Classic |
| XF110-GR | Classic |
| XF130-TG | Classic |
| XF130-GR | Classic |
| XF135-TG | Dynamic |
| XF138-TG | Dynamic |
| XF180 | Classic |
| XF185 | Dynamic |
| XF188 | Dynamic |
| XF190 | Classic |
| XF195 | Dynamic |
| XF103 | M annual |
| XF113 | M annual |
| XF133 | M annual |
| XF183 | M annual |
| XF193 | M annual |
3.1 DESCRIPTION AND USE OF Classic CONTROL PANEL
The control panel can work both in the manual and in the programmed mode.
For each cooking cycle (both in the manual and in the programmed mode) the operator can set cooking time and temperature.
MANUAL MODE
Switching On / Switching Off
As soon as current reaches the appliance, the control panel switches automatically on; on the display you will read the digits 0.00 (they express the time in hours.minutes), the LED of the "TIME" switches on as well as the lights inside the cavity.
15 minutes after the end of the cooking cycle (both in the manual and in the programmed mode) both in the cases that a program finishes or the operator pushes the START/STOP key, if no keys are pressed, the control panel switches automatically off. The lights, all the display and all the LEDs will be switched off, except for the START / STOP LED. To switch on the control panel it is sufficient to press the START/STOP key.
SELECT key.
The SELECT key allows the operator to select two
parameters: TIME and TEMPERATURE.
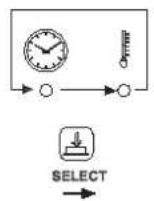
FIGURA ROLL UP PULSANTE SELECT CONTROLLO CLASSIC
TIME set up
To set the time of functioning, it is sufficient to operate on the + and - keys (time can be set from 0 hours and 01 minute to 9 hours and 59 minutes) When you read INF on the TIME display, the oven will work continuously until you stop it pressing the START/STOP key.
TEMPERATURE set up
To set the temperature desired inside the cavity it is sufficient to operate on the + and - keys (temperature can be set from 0 to 260^ starting temperature 30^ )
Start/Stop cooking cycle
It is possible to start the cooking cycle pressing the START / STOP key (the related LED will switch on). It is possible to stop the cooking cycle pressing the START / STOP key.
At the end of a cooking cycle the heating elements and motors will be switched off, the buzzer will ring for 15 seconds, the digits 0.00 will flash for 45 seconds on the display, the set temperature remains the one entered at the beginning of the cooking cycle and the START/STOP LED will remain turned on.
If during the 45 seconds of flashing digits (0.00) the operator set a time (using the + or - keys), the oven automatically starts functioning.
At the end of the 45 seconds or if the cooking cycle is interrupted by pressing the START / STOP keys, all the parameters previously set will turn into 0 (the operator will be in the same situation there is when the oven has just been turned on) and the START/ STOP LED will be switched off.
Visualization and modification of the cooking parameters during the functioning of the oven
While the oven is working, it is possible to visualize the parameters and modify them if the oven is working in the manual mode; to scroll the different parameters (time, temperature) you have to push the SELECT key.
If you select time, the display visualizes the remaining time (COUNTDOWN related to the selected step). If you select temperature, the display alternately visualizes for 4 seconds the set tempeture (fixed LED - it is possible to modify the temperature using + or - keys) and the measured temperature (flashing LED).
PROGRAMMED MODE
There are 70 programs available.
Memorization of a new program
To memorize a cooking program it is necessary to proceed as follows:
- enter the programming mode pushing the P key: on the display you will read the writing P01
- select the number of program you desire by using the + or - keys (the program number will show on the display)
- press the SELECT key
- set the cooking parameters as explained in the manual mode
save the program by pressing the MEM key for 5 seconds; the storage of the program will be confirmed by the sound of the buzzer and by the visualization of the chosen program number on the display - press the P key to go back to the manual mode.
Recall of a memorized program
To recall a memorized program it is necessary to proceed as follows:
- enter the programming mode pushing the P key: on the display you will read the writing P01
- select the number of program you desire by
using the + or - keys (the program number will show on the display)
- start the cooking program pressing the key START/STOP
While the oven works with a program the visualization of the cooking parameters is like the one you have in the manual mode.
While the oven works with a program IT IS NOT POSSIBLE to modify the cooking parameters.
It is possible to interrupt the cooking cycle by pressing the START / STOP key.
At the end of a cooking cycle the heating elements and motors will be switched off, the buzzer will ring for 15 seconds, the digits 0.00 will flash for 45 seconds on the display, the set temperature remains the one entered at the beginning of the cooking cycle and the START/STOP LED will remain turned on.
If during the 45 seconds of flashing digits (0.00) the operator set a time (using the + or - keys), the oven automatically starts functioning.
At the end of the 45 seconds or if the cooking cycle is interrupted by pressing the START / STOP keys, all the parameters previously set will turn into 0 (the operator will be in the same situation there is when the oven has just been turned on) and the START/ STOP LED will be switched off.
Automatic pre-heating
An automatic pre-heating phase is run only when you use the oven with programs.
When you start the program with the START / STOP key, the oven starts to heat up the cavity and you do not see any digit on the displays. When the oven reaches the pre-heating temperature, it gives a long sound. At this point, it is necessary to open the door, place the trays with the food to be cooked inside the oven and close the door: the chosen program will start automatically.
Pre-heating temperature is equal to the set temperature plus 30^ .
3.2 DESCRIPTION AND USE OF THE Dynamic CONTROL PANEL
The control panel can work both in the manual and in the programmed mode.
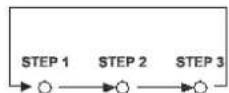
For each cooking cycle (both in the manual and in the programmed mode) the operator can set 3 cooking steps. For each step it is possible to enter desired time, cavity temperature, percentage of humidity.
MANUAL MODE
Switching On / Switching Off
As soon as current reaches the appliance, the control panel switches automatically on; on the display you will read the digits 0.00 (they express the time in hours.minutes), the LED of the "TIME" switches on as well as the lights inside the cavity.
15 minutes after the end of the cooking cycle (both in the manual and in the programmed mode) both in the cases that a program finishes or the operator pushes the START/STOP key, if no keys are pressed, the control panel switches automatically off. The lights, all the display and all the LEDs will be switched off, except for the START / STOP LED. To switch on the control panel it is sufficient to press the START/STOP key.
SELECT key.
The SELECT key allows the operator to select three parameters: TIME, TEMPERATURE and HUMIDITY.

FIGURA ROLL UP PULSANTE SELECT CONTROLLO DYNAMIC

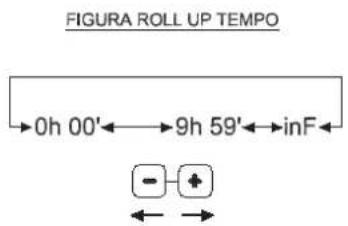
TIME set up
To set the time of functioning, it is sufficient to operate on the + and - keys (time can be set from 0 hours and 01 minute to 9 hours and 59 minutes)
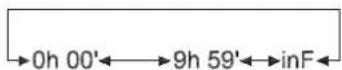
FIGURA ROLL UP TEMPO

When you read INF on the TIME display, the oven will work continuously until you stop it pressing the START/STOP key.
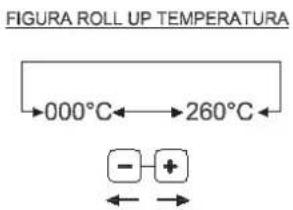
TEMPERATURE set up
To set the temperature desired inside the cavity it is sufficient to operate on the + and - keys (temperature can be set from 0 to 260^ starting temperature 30^ )
FIGURA ROLL UP PULSANTE STEP

HUMIDITY set up
To set the percentage of humidity desired inside the cavita it is sufficient to operate on the + and - keys (percentage of humidity can be set from 0 to 100% -5 levels of humidity).
STEP key
The STEP key allows you to select the desired cooking step.
Start/Stop cooking cycle
It is possible to start the cooking cycle pressing the START / STOP key (the related LED will switch on). It is possible to stop the cooking cycle pressing the START / STOP key.
At the end of a cooking cycle the heating elements and motors will be switched off, the buzzer will ring for 15 seconds, the digits 0.00 will flash for 45 seconds on the display, the set temperature remains the one entered at the beginning of the cooking cycle and the START/STOP LED will remain turned on.
If during the 45 seconds of flashing digits (0.00) the operator set a time (using the + or - keys), the oven automatically starts functioning.
At the end of the 45 seconds or if the cooking cycle is interrupted by pressing the START / STOP keys, all the parameters previously set will turn into 0 (the operator will be in the same situation there is when the oven has just been turned on) and the START/ STOP LED will be switched off.
Visualization and modification of the cooking parameters during the functioning of the oven
While the oven is working, it is possible to visualize the parameters and modify them if the oven is working in the manual mode; to scroll the different parameters (time, temperature, humidity) you have to push the SELECT key. To scroll the the different cooking steps, you have to keep pressed the STEP key.
If you select time, the display visualizes the remaining time (COUNTDOWN related to the selected step). If you select temperature, the display alternately visualizes for 4 seconds the set tempeture (fixed LED
- it is possible to modify the temperature using + or - keys) and the measured temperature (flashing LED).
If you select humidity, the display visualizes the set percentage of humidity (related to the selected step).
PROGRAMMED MODE
There are 70 programs available. Each program can be composed of 1, 2 or 3 cooking steps.
Memorization of a new program
To memorize a cooking program it is necessary to proceed as follows:
- enter the programming mode pushing the P key: on the display you will read the writing P01
- select the number of program you desire by using the + or - keys (the program number will show on the display)
- press the SELECT key
- set the cooking parameters as explained in the manual mode
save the program by pressing the MEM key for 5 seconds; the storage of the program will be confirmed by the sound of the buzzer and by the visualization of the chosen program number on the display - press the P key to go back to the manual mode,
Recall of a memorized program
To recall a memorized program it is necessary to proceed as follows:
- enter the programming mode pushing the P key: on the display you will read the writing P01
- select the number of program you desire by using the + or - keys (the program number will show on the display)
- start the cooking program pressing the key START/STOP
While the oven works with a program the visualization of the cooking parameters is like the one you have in the manual mode.
While the oven works with a program IT IS NOT POSSIBLE to modify the cooking parameters.
It is possible to interrupt the cooking cycle by pressing the START / STOP key.
At the end of a cooking cycle the heating elements and motors will be switched off, the buzzer will ring for 15 seconds, the digits 0.00 will flash for 45 seconds on the display, the set temperature remains the one entered at the beginning of the cooking
cycle and the START/STOP LED will remain turned on.
If during the 45 seconds of flashing digits (0.00) the operator set a time (using the + or - keys), the oven automatically starts functioning (with temperature and percentage of humidity entered in the last used step).
At the end of the 45 seconds or if the cooking cycle is interrupted by pressing the START / STOP keys, all the parameters previously set will turn into 0 (the operator will be in the same situation there is when the oven has just been turned on) and the START/ STOP LED will be switched off.
Automatic pre-heating
An automatic pre-heating phase is run only when you use the oven with programs.
When you start the program with the START / STOP key, the oven starts to heat up the cavity and you do not see any digit on the displays. When the oven reaches the pre-heating temperature, it gives a long sound. At this point, it is necessary to open the door, place the trays with the food to be cooked inside the oven and close the door: the chosen program will start automatically.
Pre-heating temperature is equal to the set temperature plus 30^
MANUAL WATER
While the oven is working (both in the manual and in the programmed mode) it is possible to introduce water inside the cavity by pressing the "MANUAL WATER" key. The electric water valve works only for the time the key is pressed.
3.3 DESCRIPTION AND USE OF M manual CONTROL BOARD
COOKING TIME SETTING
Time of cooking can be set by turning clockwise the knob situated on left side of the control board: time range is 0 -120 minutes.
By turning the knob anti-clockwise the oven works continuously.
By turning the knob you start the oven: the fan spins and internal light turns on.
When cooking time is over, the knob turns to "0" position and the oven turns off.
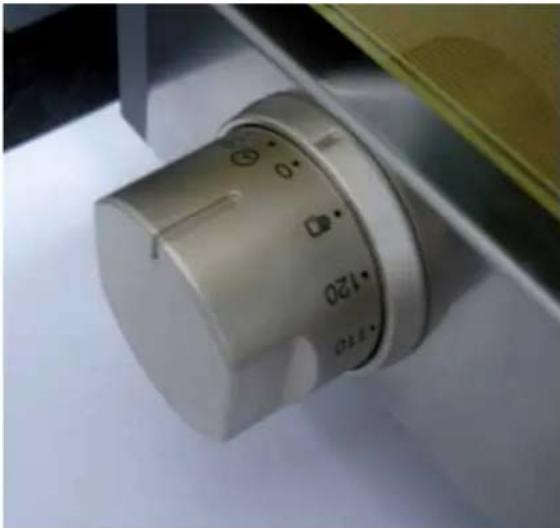
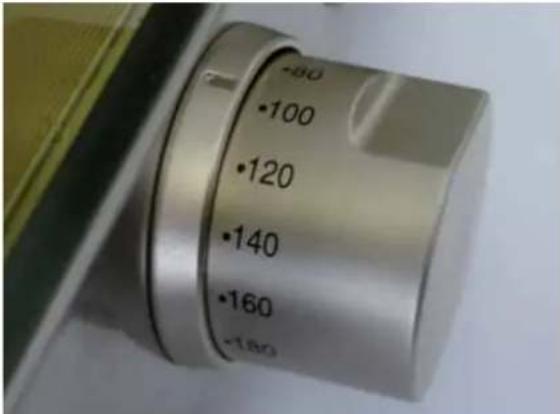
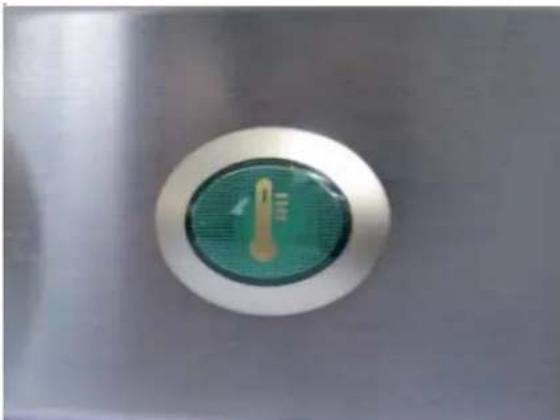
COOKING TEMPERATURE SETTING
The cooking temperature inside cooking chamber is set through the temperature knob (on right side of control board): temperature range is 0 - 300^
Temperature warning light on indicates that heating element is on; when set temperature is reached, the light turns off.
- DIFFERENT FUNCTIONS (SET UP ONLY IN OVENS WITH Classic, Dynamic and 800 Manual CONTROL BOARD)
OVEN DOOR MANAGEMENT
On each appliance there is a switch that stops the functioning of the oven when you open the door. When you open the door, the cooking cycle (both in the manual and in the programmed mode) goes into a pause (no parameter is lost). When you close the door, the cooking cycle starts again from where it stopped.
FUNCTIONING CYCLE OF FANS
Every 2 minutes the fans stop and reverse their direction of rotation.
- CLEANING
WARNING:
Before starting any maintenance or cleaning operation it is necessary to disconnect the electrical power supply and wait for the appliance to cool down.
5.1 FIRST USE OF THE OVEN
Before the first use of the appliance: clean the metal part with hot water and soap and rinse it. Never wash the inner part of the oven with acids or aggressive detergents.
With the empty cavity, heat the oven up for about 30 minutes at a temperature of 200^ to eliminate any thermic insulation smell.
5.2 CAVITY CLEANING
At the end of each cooking cycle, clean the cavity using only proper products.
Never clean the stainless steel with acids, aggressive detergents or other product containing chlorine (sodic hypochlorite, hydrochloric acid, etc.), even though they are diluted.
5.3 CLEANING OF THE EXTERNAL PART OF THE OVEN
Never use a jet of water in pressure to clean the external part of the oven. Only use wet clothes.
- TURNING OFF IN CASE OF BREAKDOWN
If there is a breakdown, deactivate the appliance:
- disconnect the electrical power supply automatic circuit breaker placed upstream from the appliance.
- consult a technical service center authorized by the manufacturer where you can find trained personnel.
III. COOKING PRINCIPLES
- COOKING TYPOLOGIES
The types of cooking you can realize with the appliance described on this manual are:
-
Bread and Pastry professional baking with:
-
CONVECTION
the baking is realized through hot air.
- CONVECTION + HUMIDITY (Humidity Versions)
the baking is realized through hot air with the addition of humidity.
1.1 MAIN COOKING MODES
Warning:
a- Before any use, heat up the oven setting a cavity temperature 30^ higher than the desired cooking temperature. This allows you to obtain the best baking uniformity.
b- Use of higher temperatures than those needed by the product causes an uneven baking.
C- Bread and Pastry baking: do not use trays with a height of more than 20~mm and avoid that the single units on the tray get in touch.
d- Do not overload the trays.
Convection cooking
In convection ovens the cooking is done by hot air that circulates round and round inside the cooking chamber. This allows to realize an even cooking, also because in this way the heat is homogeneously distributed.
An even baking is guaranteed also when the oven is fully loaded. The food is perfectly baked both on the surface, with a golden crust, and in the internal part, with a uniform structure and a constant residual humidity.
The main advantage is the possibility to cook at the same time different types of food without
mixing their flavours ( as long as the required cooking temperature is the same for all the cooked products).
Convection + HUMIDITY cooking
The cooking is done by hot air with the addition of a variable percentage of humidity, according to the type of food that has to be cooked.
2. COOKING VARIABLES
TEMPERATURE
The exact setting of the temperature grants a proper cooking of the food, both inside and outside.
A lower temperature than the proper one dries the food rather than cook it.
A higher temperature than the proper one burns the surface while the core of the food remains uncooked (sometimes this is desired, especially with meat dishes).
TIME
This variable depends a lot on the quantity of food put in the oven. The bigger the quantity of food, the longer the cooking time and vice versa.
A shorter cooking time than that required by the food does not allow to have completely cooked food.
A longer cooking time than that required by the food causes the burning of the food surface.
HUMIDITY
The combination of temperature and humidity allows different types of cooking depending on the kind of food that needs to be cooked, without desiccating the food itself.
QUANTITY OF FOOD
The quantity of food affects the cooking time.
The bigger the quantity of food, the longer the cooking time and vice versa.
An overload of the oven can give, as a result, an uneven cooking.
3. USE OF TRAYS - WIRE GRIDS
It is recommended the use of:
- Aluminium trays: Pastry, non-frozen bread
- Stainless steel trays: first courses, meat, fish, potatoes
- Wire grids: meat to be finished such as steaks, hot-dogs, sausages, frozen bread, frozen pizza
IV. MAINTENANCE
1. ORDINARY MAINTENANCE
All maintenance operations must be done only by qualified personnel.
Before starting any maintenance operation, you need to disconnect the appliance from the electrical power supply and wait for the appliance to cool down.
The parts that need ordinary maintenance can be reached removing the front control panel and the back of the oven.
The appliance must be regularly controlled (at least once a year). A specialized technician has to control the complete machine
All maintenance operations must be done only by qualified personnel.
Before starting any maintenance operation, you need to disconnect the appliance from the electrical power supply and wait for the appliance to cool down.
The parts that need special maintenance can be reached removing the front control panel and the back of the oven.
2.1 REPLACEMENT OF INTERNAL LAMP
To replace the internal lamp, please operate as follows:
- Disconnect the appliance from the power supply system and let it cool down.
- Remove the lateral supports.
- Unscrew the glass cover and replace the lamp with one with the same characteristics.
- Screw the glass cover back in.
- Reassemble the lateral supports.
2.2 REPLACEMENT OF THE FUSE
If the control panel is completely turned off, but the power supply reaches the appliance, the main reason could be a burned fuse on the power board (placed in the back part of the oven).
To replace the fuse, proceed as follows:
- press on the cover of the fuse holder and rotate it of about 20^ counterclockwise;
- remove the cover of the fuse holder;
remove the fuse from the cover of the fuse holder; -
replace the fuse with one with the same characteristics;
insert the cover of the fuse holder in its place; -
press the cover and rotate it of about 20^ clockwise.
2.3 REFIT OF THE SAFETY THERMOSTAT
The appliance is equipped with a safety thermostat with manual recovery. This safety thermostat is needed to protect the appliance from overheating. In case it is needed, it turns the appliance off.
This safety thermostat can be reached removing the black cap you find on the bottom part of the back of the oven: in case you need to refit it, push the key you have in the center of the thermostat so that it starts working again.
3. MORE FREQUENT BREAKDOWNS
| BREAKDOWN CAUSE SOLUTION | ||
| The oven is completely turned off | The tension of the electrical system is missing | Restore the tension |
| Safety thermostat intervention Refit the safety thermostat | ||
| Intervention of one of the fuse of the power board | Replacement of the fuse | |
| The connection to the electrical system not made in the correct way | Control the connection of the appliance to the electrical system | |
| The inflow of humidity in the cavity is on, but the water does not come out of the pipes | The water inlet is closed Open the water inlet | |
| The connection to the water system or to the external tank not made in the proper way | Control the connection to the water system or to the external tank | |
| No water in the external tank (in case the oven is connected to an external tank) | Pour water into the tank | |
| The filter on the water connection is closed by dirt | Clean the filter | |
| The oven does not start even though you set the time and pressed the START/STOP key | The door is open or it is not properly closed | Close the door in the correct way |
| Damaged door micro switch Contact a specialized technician for reparation | ||
| On the temperature display you can read EE1 | The wires that connect the cavity probe are not connected to the power board | Control the connections |
| Damaged cavità probe Contact a technician for reparation | ||
| There is water coming out of the cavity from the door basket, even though the door is closed | Damaged door basket Contact a specialized technician for reparation | |
| Loosened door mechanism Contact a specialized technician for reparation | ||
| The oven light does not turn on | Burnt lamp Sostituire la lampadina | |
| Loosened lamp Inserire in maniera corretta la lampadina nel portalampade | ||
| The cooking results are even | The fans do not reverse the rotating direction | Contact a specialized technician for reparation |
| One of the fans do not work (in case that you have an oven with more than one motor) | Contact a specialized technician for reparation | |
| One of the heating element is broken | Contact a specialized technician for reparation | |
LineMiss™ CONTROL PANELS
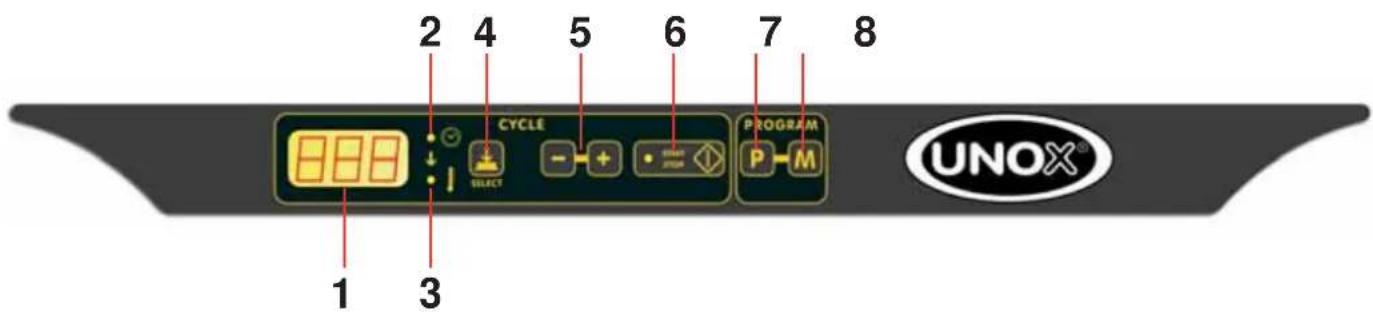
Classic Control Panel
1- display to visualize cooking parameters
2- cooking time LED
3- cooking temperature LED
4- time / temperature select key
5- cooking parameters increase / decrease key
6- START/STOP cooking cycle
7- programmed mode recall key
8- program storage key
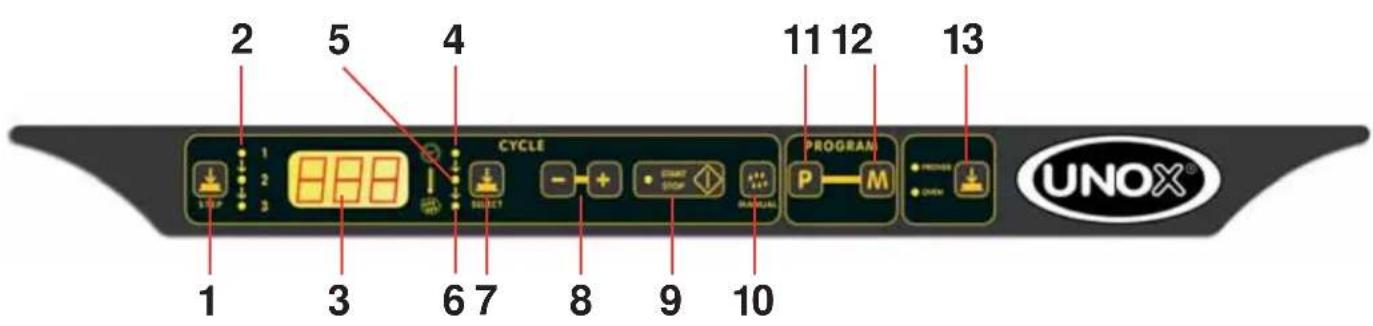
Dynamic Control Panel
1- key to select cooking step
2- cooking step LED
3- display to visualize cooking parameters
4- cooking time LED
5- cooking temperature LED
6- humidity LED
7- time / temperature / humidity select key
8- cooking parameters increase / decrease key
9- START/STOP cooking cycle
10- key to add water, manually
11- programmed mode recall key
12- program storage key
13- selection oven / prover
INDEX:
LA MODALITE MANUELLE
LA MODALITE PROGRAMMEE
LA MODALITE MANUELLE
LA MODALITE PROGRAMMEE
(per fornii series Umidity)
| MODELLO FORNO | TIPO PANNELLO COMANDI |
| XF100-TG | Classic |
| XF100-GR | Classic |
| XF110-TG | Classic |
| XF110-GR | Classic |
| XF130-TG | Classic |
| XF130-GR | Classic |
| XF135-TG | Dynamic |
| XF138-TG | Dynamic |
| XF180 | Classic |
| XF185 | Dynamic |
| XF188 | Dynamic |
| XF190 | Classic |
| XF195 | Dynamic |
| XF103 | M annual |
| XF113 | M annual |
| XF133 | M annual |
| XF183 | M annual |
| XF193 | M annual |
3.1 DESCRIZIONE E USO DEL PANNELLO COMANDI Classic
DBT 73/23/CEE y 93/68/CEE,