
MAG530 - Microwave Oven Pelgrim - Free user manual and instructions
Find the device manual for free MAG530 Pelgrim in PDF.

| Brand | Pelgrim |
| Model | MAG530 |
| Product type | Microwave oven |
| External dimensions (W x H x D) | 495 x 290 x 395 mm |
| Internal dimensions (W x H x D) | 320 x 225 x 330 mm |
| Weight | 15 kg |
| Power supply | 220-240 V ~ 50 Hz |
| Microwave frequency | 2450 MHz |
| Microwave power | 900 W (IEC 705) |
| Power levels | 5 (P-HI, P-80, P-60, P-40, P-20) |
| Maximum programming time | 59 minutes |
| Cooking functions | 1 or 2 stage cooking, defrost by weight or time, speedy cook, delayed start, pre-programmed menus (potatoes, vegetables, casserole, fish fillet, mincemeat, snacks) |
| Display | Digital clock 12/24h, function indicators |
| Child safety | Locking by Stop key (3 seconds) |
| Automatic stop | Yes, when door opens |
| Turntable | Yes, Pyrex, removable, dishwasher safe |
| Interior maintenance | Cleaning with soapy water, tray and foot dishwasher safe |
| Warranty | 5 years (parts), free labor 1st year |
| After-sales service | Pelgrim, ZI Keerstraat 1, B-9420 Erpe-Mere, Belgium, Tel.: (053) 80 62 08 |
Frequently Asked Questions - MAG530 Pelgrim
User questions about MAG530 Pelgrim
0 question about this device. Answer the ones you know or ask your own.
Ask a new question about this device
Download the instructions for your Microwave Oven in PDF format for free! Find your manual MAG530 - Pelgrim and take your electronic device back in hand. On this page are published all the documents necessary for the use of your device. MAG530 by Pelgrim.
USER MANUAL MAG530 Pelgrim
Service and guarantee 13
Safety 14
Precautions you must take 14
Appliance information 15
Appliance description 15
Control buttons 15
Accesories 15
Microwave settings 15
What you should know 16
General information 16
How your microwave oven works 17
Using your microwave 18
Setting the clock 18
Defrosting with weight setting. 18
Defrosting with time setting 19
Defrosting meat, poultry or fish 19
Cooking/heating in one stage 19
Cooking/heating in two stages 20
Defrosting with weight setting and
cooking/heating 20
Cooking/heating with the speedy cook
button 21
Cooking/heating with automatic start time .21
Preprogrammed menus 22
Child safety lock 23
Tips for use 23
Maintenance 24
Cleaning
Troubleshooting 24
For the fitter 25
Installing the microwave oven 25
Technical information 25
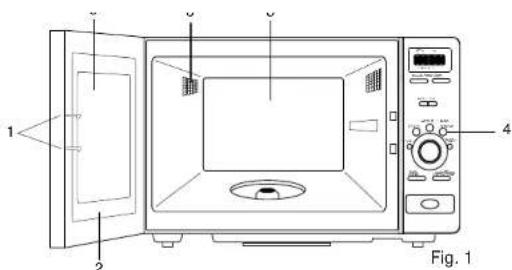
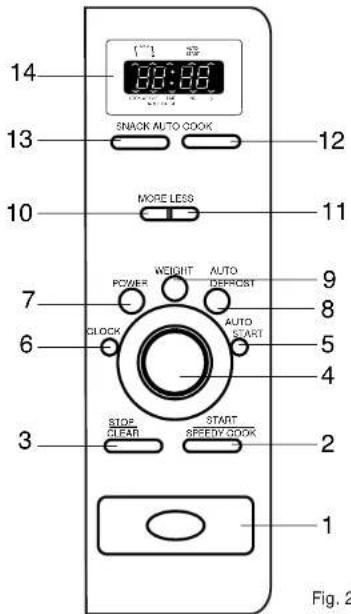
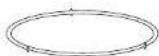
Fig. 3
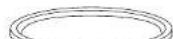
Fig. 4

300g300g1x
350g350g2x
400g400g3x
450g450g4x
500g500g5x
550g550g6x
600g600g7x
650g650g8x
700g700g9x
- Pelgrim gives a 5 year guarantee on the appliance, provided it is professionally installed by a qualified fitter in accordance with the installation instructions.
Pelgrim is obliged for the period of 5 year purchase date to replace parts free of charge.
For the period of 1 year from purchase date no charges will be made for house calls or labour.
This guarantee covers all defects caused by manufacturing fault or defective parts.
When service is required, purchase receipt and guarantee certificate must be presented.
Defects caused by incorrect installation or use are not covered by this guarantee.
Name and address of filter:
Purchase date:
#
Precautions you must take
Don't forget to remove the plastic film that protects the oven.
Have the appliance connected/ repaired by a qualified fitter.
The power supply must be disconnected before the appliance is cleaned or repaired. Remove the plug from the socket or switch the electricity off at the mains.
- Your microwave oven is safe only if the door is closing properly! Never put anything between the oven door and make sure that the door and seal are always clean.
Do not use the oven if there is any damage to the door (out of shape), the things or lock (defective or loose), or the seal.
The oven's ventilation outlets must not be sealed of or blocked in any way.
Take extra care when children are close by, as is the case with all household appliances, of course.
The oven must not be used without the roller guide and turntable.
Never use the oven to heat agressive chemicals (such as sulphur or chlorine compounds).
Do not use the oven for any purpose other
than food preparation, such as drying clothes or paper. These may catch fire.
Warning:
Liquids which you bring to the boil in the microwave oven may reach their boiling point without this being apparent from air bubbles in the liquid. This may result in the liquid suddenly boiling over when you want to take it out of the oven. You can prevent this by placing a teaspoon in the liquid, and then shaking the liquid a little both before you place it in the microwave oven and also halfway through the preparation process.
Attention:
If you warm up small quantities of powdery products in the microwave oven (when drying herbs, for example), there is a risk of spontaneous combustion. Should a fire break out in the microwave, keep the door closed, switch the microwave off and disconnect the appliance from the power supply.
Appliance description
See fig.1.
1 = Door safeguards/locks
2 = Door seal to prevent leaking of microwaves
3 = Oven interior
4 = Control panel
5 = Transparent raster, allows light to pass through but stops microwaves
6 = Air grate
Control buttons
See fig.2.
1 = Push button to release the door
2 = Start/Speedy cook button
3 = Stop/delete everything button
4 = Time selection button
5 = Automatic start button
6 = Clock selection button
7 = Power selection button (5 levels)
8 = Defrosting with time-setting or weight-setting button
9 = Weight-setting button
10 = "More" button, used to extend the cooking time
11 = "Less" button, used to shorten the automatic cooking time
12 = Preprogrammed auto cook menus selection button
13 = Preprogrammed snack menus selection button
14=Display
Accesories
The turntable roller guide
See fig. 3. This attachment supports the turntable. This attachment should always be in position when the microwave oven is in use.
The turntable
See fig.4.The turntable fits over the roller guide and is made of heat resistant glass.You should not place food directly on the turntable.
Note: the microwave oven may only be used if the drive frame and turntable are in position.
Microwave settings
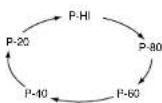
This microwave oven has 5 power levels, with a maximum power of 900W . You can select the power levels by repeatedly pressing the power selection button. In the table below, the power levels are displayed:
| Press power selection button | Power level (display) | Percentage of max. power |
| 1 x | P-HI | 100 % |
| 2 x | P-80 | 80 % |
| 3 x | P-60 | 60 % |
| 4 x | P-40 | 40 % |
| 5 x | P-20 | 20 % |
Gb
General information
Not all materials are fit for use in a microwave oven. The table below indicates which materials can be used.
Material Fit for use
Paper yes
Metal baking tins no
Aluminium foil no
Plastic yes
Heat-resistant plastic yes
Earthenware yes
Normal glass yes
Heat-resistant Glass yes
Plates with metallic decorative
edging no
Wire closure on a plastic bag no
Mercury thermometer no
Closed pot or a bottle with a
narrow neck no
- Your microwave oven is not suitable for:
Preserving/bottling food.
-Boiling eggs, these will explode as a
result of the increased pressure inside. - Heating frying oil.
- Never heat food for longer than necessary, allow for the fact that food will continue cooking for a while, after being removed from the microwave oven.
Use as little water as possible while cooking and use salt sparingly to preserve the natural flavours.
Stir or turn the food every now and then.
Always prick the skins of meat, poultry or fish. to help prevent them from spattering.
Covering the dishes will prevent spattering, shorten cooking, and help to preserve the level of moisture.
- Do not switch on an empty microwave oven, this may damage the oven.
The door can be opened during operation of the microwave oven, the oven will automatically switch off.
There could be some disturbance on your TV, this happens sometimes with household appliances such as a mixer, vacuum cleaner, oven etc.
The oven light is only burning when the oven is working. Sometimes the light can become a little fainter and you can hear clicking noises. This happens when the microwave oven is set at a lower power level.
During cooking condensation will form, especially on the door. Depending on the quantity and moisture level of the food being prepared there may even be a little water under the door. This is normal
During cooking heat and smoke can escape through the ventilation outlets. This is normal also.
G18
In your microwave oven you should preferably use round, shallow, heat-resistant dishes made of thick glass, ceramic, china, earthenware or heat-resistant plastic.
Large joints of meat
It is not right to cook large joints of meat at full power only. Select a power level of approximately 400 W (level 2). Sealing the meat quickly in hot fat in a pan, and then cooking it further in the microwave oven, is a much adopted method. Remember to allow for the fact that large joints will continue to cook for a long time once the microwave oven has stopped.
Small cuts of meat
Small cuts of meat such as steak, pork chops or cutlets will give the best results if you simply fry them in a frying pan on a traditional heat source.
- Products with a crust such as crispy bread rolls, croissants and puff pastry should not be heated in the microwave oven. This is better done in the hot-air oven.
How your microwave oven works
Microwaves are small electro-magnetic waves with which we are already familiar from the television, radio, radar and wireless telephones. Depending on the sort of food, the microwaves will penetrate between 2.5 and 3.7cm below the surface and will vibrate the molecules in the food at extremely high speed. The friction between the vibrating
molecules will create heat by which the food cooks.
Microwaves are only attracted by molecules of moisture. Glass, plastic and paper do not contain any moisture and will therefore remain relatively cool during cooking. The metal walls of the microwave oven an the raster in the door ensure that the microwaves stay within the oven. The microwave oven has been fitted with extra safeguards. Once the door is opened the oven will automatically stop the production of microwaves.

Setting the clock
As soon as you plug in the socket the display will show ".0". The clock will always show the current time, except when the oven is in use. You can choose between a 12 and a 24 hour indication. To set the clock, act as follows:
- Press the clock selection button. The display will show "12 H". The clock is set to a 12 hour indication. If you want to use a 24 hour indication, press the clock selection button again. The display will then show "24 H".
- Turn the time selection button to set the minutes. You can set the minutes between 0 and 59 minutes. The display will show the minutes blinking.
- Press the clock selection button. The minutes on the display stop blinking and the hour indication before the colon starts blinking.
- Turn the time selection button to set the hours. When using a 12 hour indication you can set the hours between 1 and 12. If you use a 24 hour indication the hours can be set between 0 and 23 hours.
- Press the clock selection button. The hours on the display stop blinking. The colon blinks every second and the clock has been set.
If there is a power cut or if the plug is removed from the socket the time setting will be deleted. Once the power supply is restored the display will show "0" again and the time will have to be reset. If you wish to see the time while the oven is in use press the clock selection button. The correct time will be visible for 3 seconds.
Defrosting with weight setting
- Press the auto defrost button. On the display the weight defrost indicator light will go on and the light near the "g" symbol will flash. The display will show "0".
- Turn the time selection button to set the weight of the food that has to be defrosted. You can set the weight between 200 and 3000 grams. The display will show the number of grams you choose.
- Press the start button, to start the microwave oven. The time necessary for defrosting is automatically set by the microwave oven. The indicator light near the "g" symbol will go off and the defrost indicator light will flash. During the defrosting cycle you may hear signals. Turn or stir the food and press the start button again to complete the defrosting. At the end of the defrosting time three beeps will sound. The normal time reappears at the display.
Defrosting with time setting
- Press the auto defrost button twice. On the display the time defrost indicator light will go on and "0" will be visible.
- Turn the time selection button to set the defrosting time. You can set the defrosting time between 10 seconds and 59 minutes.
- Press the start button, to start the microwave oven. The indicator light will flash. The display will show the resulting defrosting time. During the defrosting cycle you may hear signals. Turn or stir the food and press the start button again to complete the defrosting. At the end of the defrosting time three beeps will sound. The normal time reappears at the display.
Defrosting meat, poultry or fish
When defrosting fish or chicken the chicken legs or the tail of the fish will be defrosted sooner than the rest. Cover these parts with aluminium foil. Make sure that the foil does not stick out over the edge of the turntable to prevent sparks from flying.
We advise you to frequently check the centre of the food being defrosted. If you are able to prick into the center, with a skewer for example, you can switch the microwave oven off and leave the food to stand for a quarter of an hour before further preparation.
Remove the wrapping from meat, poultry or fish as soon as possible. The melted frost should also be drained frequently. The time

required for defrosting greatly depends on the density/thickness of the food and the temperature at which it was deep-frozen.
Cooking/heating in one stage
- Press the power selection button. On the display the stage 1 indicator light will go on and "P-HI" will be visible. By repeatedly pressing the power selection button, the oven will switch to a different power level, according to the figure below:
- Turn the time selection button to set the required cooking time. You can set the cooking time between 10 seconds and 59 minutes.
- Press the start button, to start the microwave oven. The indicator light will flash. The display will show the resulting defrosting time. At the end of the cooking time three beeps will sound. The normal time reappears at the display.
GB
Cooking/heating in 2 stages
In this mode you can program the oven to operate on two different power levels during to different cooking times.
- Press the power selection button. On the display, the stage 1 indicator light will go on and "P-HI" will be visible. Select the required power level for stage 1 by repeatedly pressing the power selection button.
- Turn the time selection button to set the required cooking time for stage 1. You can set the cooking time between 10 seconds and 59 minutes.
- Press the power selection button again. On the display, the stage 2 indicator light will go on and "P-HI" will be visible. Select the required power level for stage 2 by repeatedly pressing the power selection button.
- Turn the time selection button to set the required time for stage 2. You can set the time between 10 seconds and 59 minutes.
- Press the start button, to start the microwave oven. The stage 1 indicator light will flash to indicate that the oven is operating in stage 1. The display will show the resulting time of stage 1. At the end of stage 1 you will hear a signal and the oven will switch to stage 2. The stage 2 indicator light will flash. At the end of stage 2 three beeps will sound. The normal time reappears at the display.
Defrosting with weight setting and cooking heating
In this mode you can defrost a meal before cooking or heating it.
- Press the auto defrost button. On the display the weight defrost indicator light will go on and the light near the "g" symbol will flash. The display will show "0".
- Turn the time selection button to set the weight of the food that has to be defrosted.
- Press the power selection button. On the display, the stage 1 indicator light will go on and "P-HI" will be visible. Select the required power level by repeatedly pressing the power selection button.
- Turn the time selection button to set the required cooking/heating time. If you wish to cook or heat in 2 stages you can repeat steps 3 and 4 to set the time and the power level for the second stage.
- Press the start button, to start the microwave oven. The weight defrost indicator light will flash to indicate that the oven is defrosting. The display will show the resulting defrosting time. At the end of the defrosting you will hear a signal and the oven will start with cooking/heating according the stages that you programmed. At the end of stage 2 three beeps will sound. The normal time reappears at the display.
Cooking/heating with the speedy cook button
- Press the speedy cook button, the display shows "30". By pressing the button repeatedly in quick succession the time will increase by 30 seconds at a time. The time can be set at 5 minutes maximum. After you release the button the microwave will start automatically after 1.5 seconds, with the maximum power.
- Press the stop/clear button or open the door to interrupt the programme.
- Press the speedy cook button again to restart the programme.
Cooking/heating with automatic start time
With the auto start you can programme the oven to switch on automatically at a preset time. You can not combine the defrosting function with auto start. Make sure that the display shows the correct time before you set the automatic start time.
- Set the required cooking/heating program as described before but do not press the start button. You can programme up to 2 stages.
- Press the auto start button. On the display the auto start indicator light will go on and "00" will be visible.
- Turn the time selection button to set the minutes of the time you wish to set, for
[Tab]
example 30 minutes. The display will show "30".
4. Press the auto start button again.
- Turn the time selection button to set the hours of the time you wish to set, for example 11 hours. The display will show "11:30".
- Press the start button. The display shows the normal time and the indicator lights for the functions you programmed go on. The auto start indicator light and the colon between the hours and minutes start flashing. The microwave oven will start at the preset time. At the end of the programme three beeps will sound. The normal time reappears at the display.
If the oven door is opened after an automatic start time is set, you will have to press the start button again to let the normal time reappear in the display. The oven will then start at the preset time. To check the automatic start time when the normal time is visible, you must press the clock button. The preset time will then be visible for three seconds.
| Preprogrammed menus | Vegetables Display | Casserole Display | Press button |
| The microwave oven has 5 cooking programmes. If you select one of these programmes you only have to set the weight of the food yourself. The time and power settings are all automatically regulated. | 200 g 250 g 300 g 350 g 400 g | 200 g 400 g 600 g 800 g - | 1x 2x 3x 4x 5x |
- Press the weight button a number of times to set the weight of the food. The display will show a weight indication, depending on the programme you chose. The weight indications and the number of times you have to press the weight button for the programmes are displayed in the tables below. When the weight button is not touched for 1.5 seconds, the oven will start the programme.
| Baked potatoes | |
| Display | Press button |
| 1 (160-180 gram) | 1x |
| 2 (320-360 gram) | 2x |
| 3 (480-540 gram) | 3x |
| 4 (640-720 gram) | 4x |
The oven is also equipped with 3 programmes for the preparation of snacks.
- Press the auto cook button. On the display "SC-1" will be visible. By repeatedly pressing the auto cook button, the oven will switch to a different programme, according to the table below.
| Display | Dish | Press button |
| SC-1 | Pasta | 1x |
| SC-2 | Pizza | 2x |
| SC-3 | Dinner plate | 3x |
- Press the weight button a number of times
to set the weight of the food. The display will show a weight indication, depending on the programme you chose.
The weight indications and the number of times you have to press the weight button for the programmes, are displayed in the tables below. When the weight button is not touched for 1.5 seconds, the oven will start the programme.
Pasta Dinner plate
Display Display Press button
220g300g1x
Pizza
Display Press button
200g1x
300g2x
Change the automatic cooking time
With the more and less buttons you can change the automatically set cooking time. By pressing the more button once or twice before pressing the auto cook or snack button, the automatic cooking time is extended by 10 or 20 seconds. By pressing the less button once or twice before pressing the auto cook or snack button, the automatic cooking time is reduced by 10 or 20 seconds.
Child safety lock
The microwave oven is equipped with a safety lock which prevents small children from operating the oven. To set the safety lock, press the stop/clear button for 3 seconds. On the display the lock indicator light will light up. The microwave oven can not be operated any more. To clear the safety lock, press the stop/clear button for 3 seconds again.
Tips for use
Cook frozen vegetables immediately
Select the maximum power (level 5). Cover the vegetables en stir occasionally during cooking.
Frozen meals in aluminium trays
First remove the lid and then place the tray on the turntable. Defrost for the first 4-5 minutes at maximum power then at a low power (level 1 or 2). Once the meal is well-thawed switch to medium power (level 3).
Reheating meals
Always put the plate in the middle of the turntable with the thickest pieces of food pointing towards the edge of the turntable. Cover the plate with a lid or clingfilm (prick a few holes in the film) and set the microwave oven to level 5. Once the bottom of the plate is hot to the touch the micro-wave oven can be switched off.
Baby food
Heat the food in the bottle or pot without a lid for approximately 1 minute at level 1 or 2. Always check that food is not too hot before giving it to the baby!
G
CLEANING
General
The power supply must be disconnected before the appliance is cleaned or repaired. Remove the plug from the socket or switch the electricity off at the mains.
Oven interior
The oven interior and the oven door are best cleaned with hot soapy water, possibly with a liquid detergent and rinsed well with clean water.
The drive frame and the base of the oven should be cleaned regularly to prevent the drive system from making to much noise. You can clean the drive frame and the turntable in the dishwasher or in hot soapy water. The turntable in particular should be cleaned regularly to prevent bacteria forming.
The seal of the oven door should be kept clean. You must check now and then that the door closes properly.
Oven exterior
The oven exterior and the exterior of the door can also be cleaned with hot soapy water. The control panel should never be cleaned with agressive detergents; you could use a little Glassex on a soft cloth.
Troubleshooting
When the cooking results are not as you expected, sparking occurs in the oven, the oven does not start etc; try to locate the problem yourself before calling a mechanic. Use the checklist below to see if you did something wrong.
- Is the plug in the socket?
- Have you pressed the start button?
- Is the door closed properly?
- Are the power level, cooking time and cooking temperature set right?
Is there anything in the oven that does not belong there? - Did you use the right kitchen equipment/ containers?
- Did you use the right buttons?
Are the roller guide and the turntable placed in the oven? - Are the ventilation outlets blocked?
- Was the food sufficiently defrosted?
- Has the food been turned or stirred during cooking?
Installing the microwave oven
Remove all packaging material and check the oven for damage. Do not install the microwave oven if it is damaged, but immediately contact your supplier.
The microwave oven should always be connected to an earthed socket, in accordance with the correct safety regulations.
Place the microwave oven on a flat surface with sufficient space at the back and sides.
Technical information MAG 530
Power supply 220/240 V 50 HZ
Power consumption 1350 W
Microwave frequency 2450 MHz
Microwave capacity 1350 W
Microwave output (IEC 705) 900 W
Power levels 5
Timer setting maximum 59 min.
Appliance dimensions (w x h x d) 495 x 290 x 395 mm
Interior dimensions w× h× d 320× 225× 330mm
Weight 15 kg
#
D
Puisance connectee 1350 W


- #
- Precautions you must take
- Warning:
- Attention:
- Appliance description
- Control buttons
- Accesories
- The turntable roller guide
- The turntable
- Microwave settings
- Gb
- General information
- Material Fit for use
- G18
- Large joints of meat
- Small cuts of meat
- How your microwave oven works
- Setting the clock
- Defrosting with weight setting
- Defrosting with time setting
- Defrosting meat, poultry or fish
- Cooking/heating in one stage
- Cooking/heating in 2 stages
- Defrosting with weight setting and cooking heating
- Cooking/heating with the speedy cook button
- Cooking/heating with automatic start time
- [Tab]
- Press the auto start button again.
- Pasta Dinner plate
- Display Display Press button
- Pizza
- Display Press button
- Change the automatic cooking time
- Child safety lock
- Tips for use
- Cook frozen vegetables immediately
- Frozen meals in aluminium trays
- Reheating meals
- Baby food
- G
- CLEANING
- General
- Oven interior
- Oven exterior
- Troubleshooting
- Installing the microwave oven
- Technical information MAG 530
- D
Brand : Pelgrim
Model : MAG530
Category : Microwave Oven