DO206SW - Aspirateur DOMO - Free user manual and instructions
Find the device manual for free DO206SW DOMO in PDF.
Download the instructions for your Aspirateur in PDF format for free! Find your manual DO206SW - DOMO and take your electronic device back in hand. On this page are published all the documents necessary for the use of your device. DO206SW by DOMO.
USER MANUAL DO206SW DOMO
sind nicht in der Garantie eingeschlossen.
WARRANTY This appliance has a two year warranty period. During this period the manufacturer is
responsible for any failures which are the direct result of construction failure. When these
failures occur the appliance will be repaired or replaced if necessary. The warranty will
not be valid when the damage to the appliance is caused by wrong use, not following the
instructions or repairs executed by a third party. The warranty will only be valid if the
warranty application has been completed by the dealer at the time of purchase. All parts,
which are subject to wear, are excluded from the warranty
Geschäft, in dem Sie das Produkt gekauft haben.
RECYCLING INFORMATION The symbol on the product or on its packaging indicates that this product may not
be treated as household waste. Instead it shall be brought to the applicable collection
point for recycling of electrical and electronic equipment. By ensuring this product is
disposed of correctly, you will help prevent potential negative consequences for the
environment and human health, which could otherwise be caused by inappropriate
waste handling of this product. For more detailed information about recycling of this
product, please contact your local city offi ce, your household waste disposal service or
the shop where you purchased the product.DO206SW Wanneer het elektrisch snoer beschadigd is, moet het vervangen worden door de
oder einer gleichartig geschulten Person ersetzt werden, um Unglücke zu verhindern.
If the supply cord is damaged, it must be replaced by manufacturer of its service
agent or a similarly qualifi ed person in order to avoid a hazard.
5DO206SW BELANGRIJKE VEILIGHEIDSMAATREGELEN
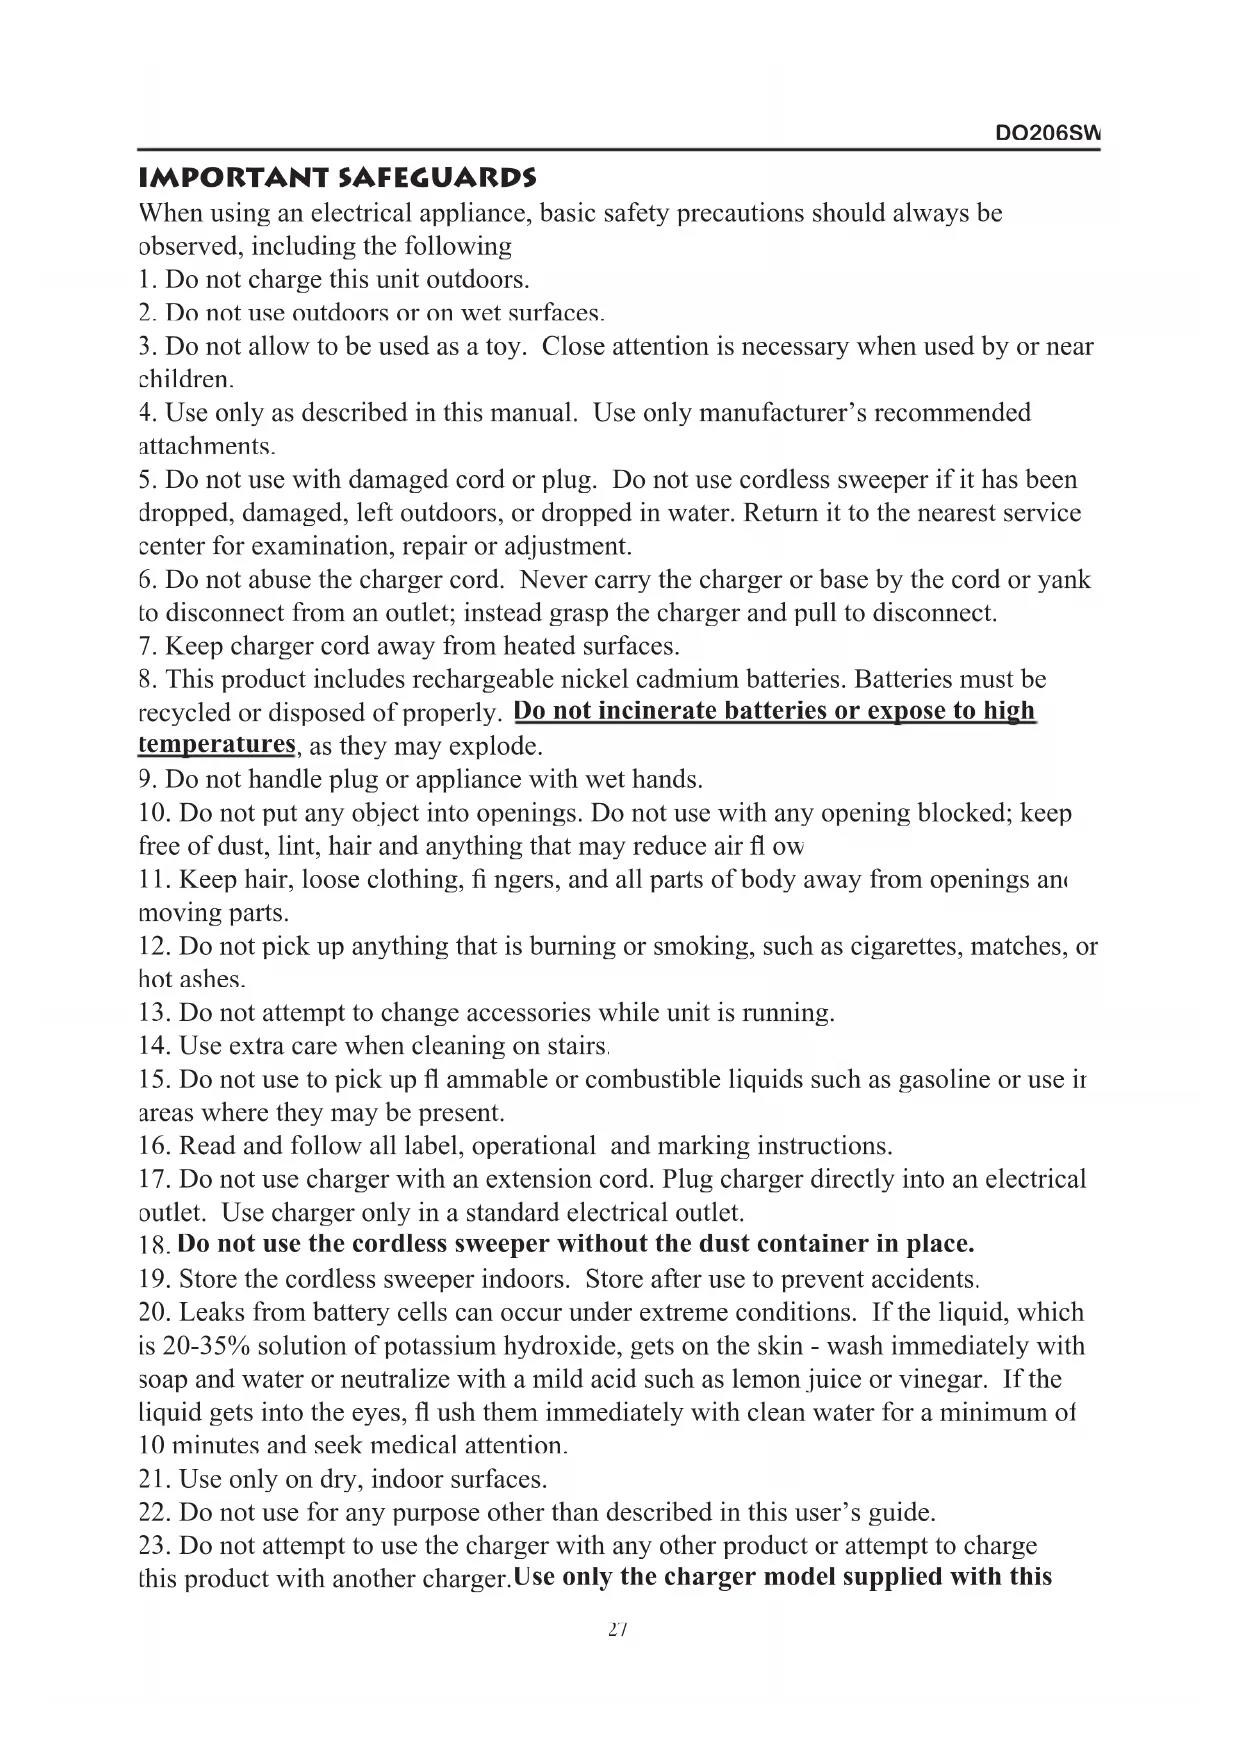
26DO206SW IMPORTANT SAFEGUARDS When using an electrical appliance, basic safety precautions should always be
observed, including the following
1. Do not charge this unit outdoors.
2. Do not use outdoors or on wet surfaces.
3. Do not allow to be used as a toy. Close attention is necessary when used by or near
4. Use only as described in this manual. Use only manufacturer’s recommended
5. Do not use with damaged cord or plug. Do not use cordless sweeper if it has been
dropped, damaged, left outdoors, or dropped in water. Return it to the nearest service
center for examination, repair or adjustment.
6. Do not abuse the charger cord. Never carry the charger or base by the cord or yank
to disconnect from an outlet; instead grasp the charger and pull to disconnect.
7. Keep charger cord away from heated surfaces.
8. This product includes rechargeable nickel cadmium batteries. Batteries must be
recycled or disposed of properly.
Do not incinerate batteries or expose to high
Do not incinerate batteries or expose to high
, as they may explode.
9. Do not handle plug or appliance with wet hands.
10. Do not put any object into openings. Do not use with any opening blocked; keep
free of dust, lint, hair and anything that may reduce air fl ow.
11. Keep hair, loose clothing, fi ngers, and all parts of body away from openings and
12. Do not pick up anything that is burning or smoking, such as cigarettes, matches, or
13. Do not attempt to change accessories while unit is running.
14. Use extra care when cleaning on stairs.
15. Do not use to pick up fl ammable or combustible liquids such as gasoline or use in
areas where they may be present.
16. Read and follow all label, operational and marking instructions.
17. Do not use charger with an extension cord. Plug charger directly into an electrical
outlet. Use charger only in a standard electrical outlet.
Do not use the cordless sweeper without the dust container in place.
19. Store the cordless sweeper indoors. Store after use to prevent accidents.
20. Leaks from battery cells can occur under extreme conditions. If the liquid, which
is 20-35% solution of potassium hydroxide, gets on the skin - wash immediately with
soap and water or neutralize with a mild acid such as lemon juice or vinegar. If the
liquid gets into the eyes, fl ush them immediately with clean water for a minimum of
10 minutes and seek medical attention.
21. Use only on dry, indoor surfaces.
22. Do not use for any purpose other than described in this user’s guide.
23. Do not attempt to use the charger with any other product or attempt to charge
this product with another charger.
Use only the charger model supplied with this
24. The appliance must be disconnected from the supply when removing the battery.
25. This appliance is not intended for use by persons (including children) with reduced
physical, sensory or mental capabilities, or lack of experience and knowledge, unless
they have been given supervision or instruction concerning use of the appliance by a
person responsible for their safety. Children should be supervised to ensure that they
do not play with the appliance
: Cordless Sweeper is shipped with the batteries uncharged. Charging of
the unit for 16-20 hours prior to fi rst use is required.
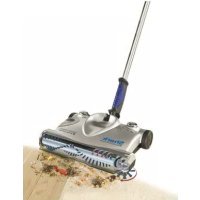
ASSEMBLING YOUR CORDLESS SWEEPER Before you start:
Your Cordless Sweeper will require very little assembly. You should remove it from
the carton and familiarize yourself with all the components listed per the exploded
view drawing . This will help you in the assembly and operation of your cordless
The charging adapter and the lower handle are shipped inside the dust
1. Insert the Edging Tool into the "square" hole under the bottom of the sweeper power
head. Gently but fi rmly push until the edging tool locks into place.
2. Insert the lower handle - small end - into the sweeper power head. Fix the handle
with the included screw.
3. Assemble the extension on the lower handle.
Please the telescopic tube on to the extention.
4. Place the handle into the upward
5. Plug the charging adapter into the sweeper
power head charging jack. Plug the charging
adapter cord into a standard electrical outlet.
HOW TO OPERATE YOUR CORDLESS SWEEPER
1. Before using, please ensure that the cordless
sweeper has been initially charged for 16-20 hours .
Your cordless sweeper will only operate properly when
the batteries are fully charged. Your sweeper will operate
for varying lengths of time on a full charge. This will depend
upon the type of surface being cleaned. (Longer operating
time on bare fl oors vs carpets.)
2. Push the On/Off switch to operate the unit. To turn off, press switch again.
CAUTION: Any electronic or electrical appliance should not be stored in or
exposed to areas of high heat or humidity. Do not store your cordless sweeper
close to stoves, radiators, furnaces or in a bathroom or bathing area
3. To release the handle to a comfortable position, apply pressure to the top of the
sweeper head with your foot while pulling back on the handle.
4. To change the speed of the sweeper, press on the speed control button. As you press
on it, the speed indicator light will change. If one light lights up, then you have the
low speed, two light, medium speed, three lights, high speed.
5. If the brush roll will jam, all the lights will fl ash. Turn unit off, remove obstruction
and then turn on again to restart.
CLEANING THE DUST CONTAINER
1. Pull the dust container straight out from the side.
2. Empty dust container contents. If desired- you
may rinse with water to clean the dust container - but
3. Replace dust container on cordless sweeper.
4. Periodically remove the transparent brush cover on the front of the cordless
sweeper and remove any build up of lint, hair or fi ber on the rotating brush. To
remove the cover - grip the cover from the bottom, pull out and upwards until the
cover unlocks from the side slots and tabs located on the top of the sweeper.
CAUTION: Do not accidentally turn unit on while cleaning. Do not clean while unit is
CHARGING THE CORDLESS SWEEPER
1. Connect the charger plug to the charging jack or
hole on the back of the sweeper. Plug the charging
adapter into the wall outlet.
2. This cordless sweeper is powered by Ni-Cd batteries.
Before fi rst use, they must be charged for a minimum of 16 hours.
3. When recharging the unit, the “On/Off” switch must be in the “OFF” position.
4. The charging light indicator on the top of the sweeper will illuminate to indicate
that the sweeper is properly charging.
5. To recharge, repeat step #1 above. Charging times will vary depending upon the
amount of usage between charging cycles.
When you place the sweeper to recharge and the charging indicator light does
illuminate, then press the On/Off button once to turn the sweeper off.
The charging indicator light should now light up.
Peak performance may only be realized after the unit has been charged and
discharged two (2) or three (3) times.
To maintain peak performance of your cordless sweeper, it is
recommended that the unit be fully discharged, then completely recharged at least
CAUTION : Use only with the battery pack supplied with the unit.
• Do not attempt to remove the battery pack from the unit to charge it.
• Never attempt to throw the battery pack or unit into a fi re or incinerate it.
• Do not attempt to remove or damage the battery casing.
• Battery must be recycled or disposed of properly at the end of it’s service life.
STORING THE CORDLESS SWEEPER Your cordless sweeper may be stored by using the slot on the back of the upper handle
and hanging it from a screw secured to a wall or other vertical surface. Always empty
your sweeper before hanging up for storage.
CHANGING THE ROTATING BRUSH, GEAR BOX & SQUEEGEE WARNING
: Use caution when changing the rotating brush and gear box so that the
unit does not turn ON when pressing down on the sweeper power head.
1. Remove the extension tube handle from the sweeper power head.
2. Turn sweeper power head upside down being careful
to accidentally turn the
3. Remove the transparent brush cover.
4. Push in on the locking tab of the gear box and lift gear box to remove.
5. Lift the brush bar end cap up from the slot.
6. Pull the brush bar out from the bushing and slip off the belt to remove the brush bar.
7. Insert the new brush bar by fi rst inserting the brush bar into the bushing on the end
opposite the driver belt.
8. Slip the belt over the brush bar cap.
9. Insert the brush bar into the slot.
10. Insert the gear box tabs into the tab slots and push down until it clicks into place.
11. To replace the squeegee, follow instructions above for removing the gear box and
slide the squeegee out from left to right.
BATTERY REMOVAL & DISPOSAL NOTE:
If uncertain as to how to remove your battery pack, we suggest you take
your sweeper to a reputable small appliance service technician to have this service
Follow these steps when battery removal is required.
This sweeper is equipped with Ni-Cd batteries and you need to dispose of them
properly. When the batteries are no longer good for use, they must be removed from
the sweeper for disposal. Do not remove the batteries for any
reason other than disposal of them.
Call your nearest recycling center for
information on the recycling and disposal of Ni-Cd batteries.WARNING
You must never use ordinary batteries for replacement as these may leak and cause
damage. Use only batteries suited for this type of sweeper.
Removal of Battery Pack
1. Remove the extension handles and dust cup container.
2. Turn unit over so that the base is facing upwards. Be careful not to turn the unit ON.
3. Push in locking tab and lift off battery assembly.
4. Place battery assembly aside.
5. Insert the new battery assembly into unit. Ensure that locking tab snaps in place.
CAUTION: This appliance contains Ni-Cd batteries. The batteries must be
recycled or disposed of properly.
CARE AND MAINTENANCE To improve the performance and life of your unit, we recommend you do the
1. Once a month clean the unit with a dry cloth, including the chamber which
the dust container fi ts into. Remove any hair, fi ber or other materials that
may have built up in the chamber, on the rotating brush or edging tool.
3. Do not pick up liquids or use on wet fl oors.
4. Do not use on concrete, tar or similar rough surfaces .
5. Don’t pick up pieces of string or fabrics with the sweeper.
6. Do not clean tasseled or frayed carpets with the sweeper.
32DO206SW TROUBLESHOOTING GUIDE PROBLEM POSSIBLE REASON POSSIBLE SOLUTION SWEEPER WILL NOT OPERATE
1. Batteries discharged.
2. No power in electrical
outlet supplying charging
3. Unit needs servicing.
2. Check fuse or breaker.
Replace fuse/reset breaker.
3. Call Customer Service.
SWEEPER WILL NOT PICK-UP
1. Dust container is full.
2. Unit needs recharging.
1. Empty dust container.
1. Dust container is full.
ROTATING BRUSH WILL NOT PICK UP
2. Dust container is full.
1. Check for excessive material
on brush or in bottom of
sweeper. Remove obstruction
from brushes and/or sweeper.
2. Empty and clean dust
2. Charging Adapter not
3. Batteries no longer
1. Check to ensure outlet is
working properly. (Easily
checked by plugging in
2. Replace charging adapter
3. See battery disposal pg. 8.