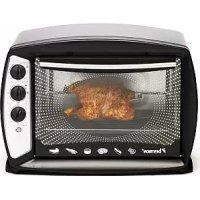
AGL30 - Oven BESTRON - Free user manual and instructions
Find the device manual for free AGL30 BESTRON in PDF.


| Product type | Oven with grill |
| Capacity | 26 liters |
| Power | 1600 W |
| Power supply | 220-240 V ~ 50 Hz |
| Cooking functions | Top heat, bottom heat, combined heat, fan forced, grill, rotisserie (spit) |
| Temperature control | Variable thermostat |
| Timer | With automatic shut-off and audible signal |
| Indicator light | On/off |
| Included accessories | Baking tray, grid, rotisserie spit with forks, removal handles |
| Material | Metal body, glass door |
| Cleaning | Tray, grid, spit and handles washable in hot water with mild detergent; interior and exterior with damp cloth |
| Safety | Automatic shut-off, minimum free space required (10 cm on sides, 30 cm above), removal handles to prevent burns |
| Warranty | 60 months (conditions apply) |
| Use | Household use only |
Frequently Asked Questions - AGL30 BESTRON
User questions about AGL30 BESTRON
0 question about this device. Answer the ones you know or ask your own.
Ask a new question about this device
Download the instructions for your Oven in PDF format for free! Find your manual AGL30 - BESTRON and take your electronic device back in hand. On this page are published all the documents necessary for the use of your device. AGL30 by BESTRON.
USER MANUAL AGL30 BESTRON
natural_image
Abstract black arrow symbol pointing right, no text or symbols presentBESTRON®
AGL30
natural_image
Line drawing of a microwave oven with open lid and control knobs (no text or symbols)Nederlands
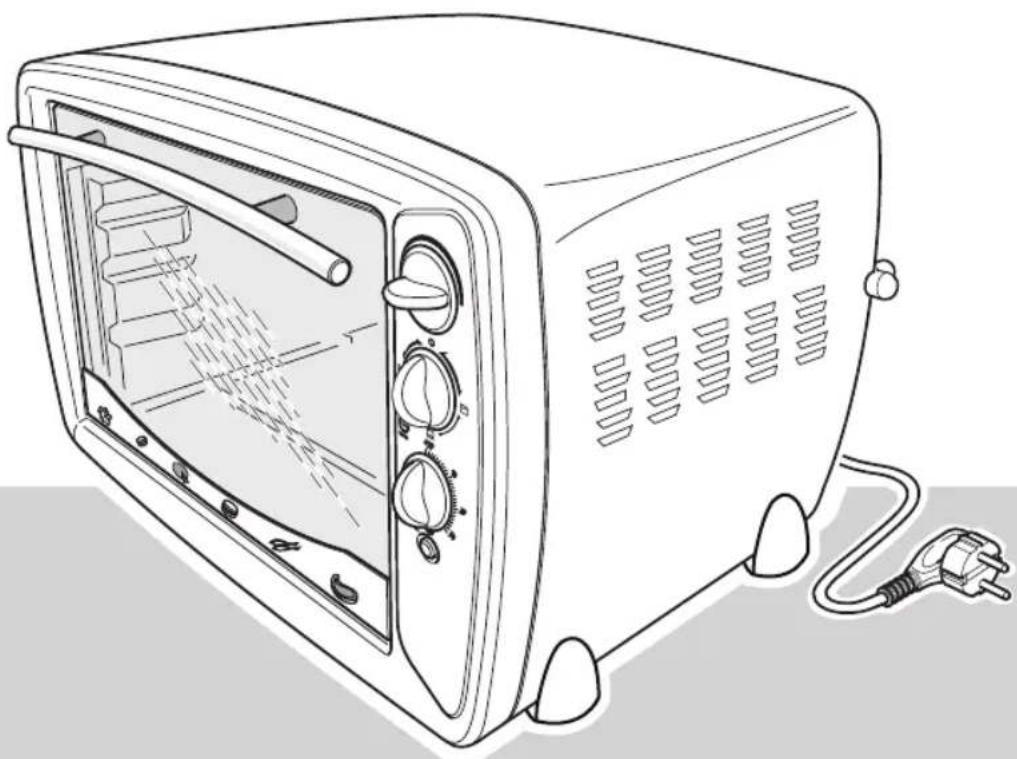
Instruction manual grill with oven
Italiano
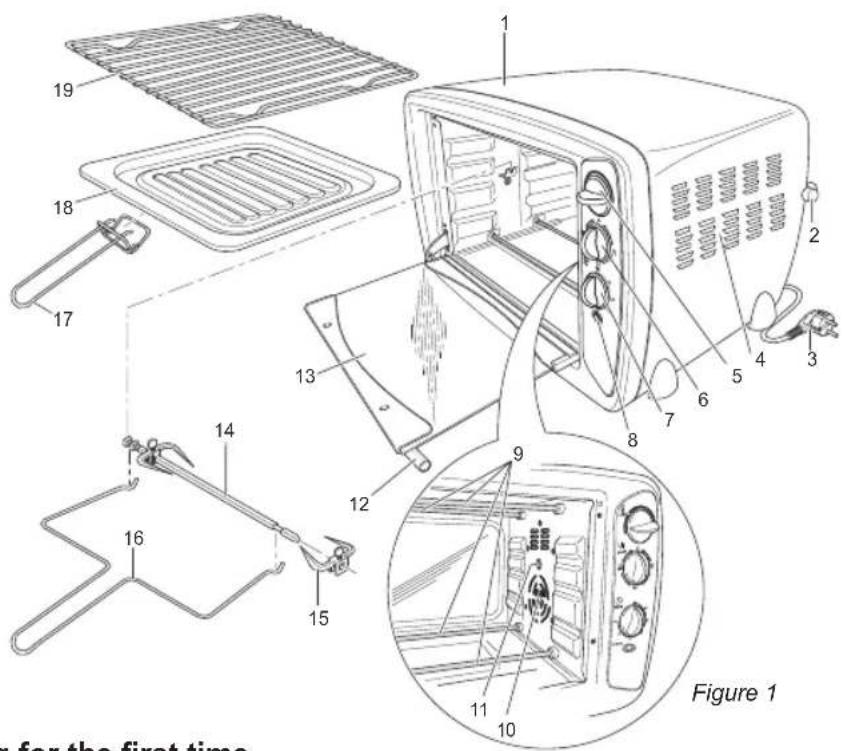
Figuur 1
natural_image
Line drawing of a hand using a toaster to open the door, showing internal components and a tool (no text or symbols)natural_image
Line drawing of a hand inserting a grater into a toaster oven (no text or symbols)natural_image
Technical line drawing of an open microwave oven with internal components and a cylindrical housing (no text or symbols)natural_image
Abstract line drawing with intersecting curves and a diagonal line (no text or symbols)natural_image
Line drawing of a hand using a toaster to open the grater (no text or symbols)natural_image
Line drawing of a microwave oven with a lid and handle, showing internal components and cooling mechanism (no text or symbols)natural_image
Line drawing of a hand using a lathe tool to adjust or install a microwave oven (no text or symbols present)natural_image
Abstract line drawing with intertwined curves and a diagonal line (no text or symbols)N. van de Vossenberg Qualitätskontrolle
natural_image
Line drawing of a hand opening a toaster oven with a handle, showing internal components and airflow direction (no text or symbols)Figure 3 Retirer la grille
natural_image
Technical line drawing of an open oven with internal compartments and a lid, showing no text or symbolsnatural_image
Line drawing of a hand using a lathe tool to adjust or install an open microwave oven (no text or symbols present)Figure 5 Retirer la broche
CONDITIONS DE GARANTIE
DÉCLARATION DE CONFORMITÉ CE
• Directive EMC 2004/108/EC
Congratulations with the purchase of this grill-oven, which you can use to toast, bake, grill and roast the most delicious dishes. The oven has a variable thermostat, convection function and top and bottom heating elements to equally heat the top and bottom of the 26 litre oven
SAFETY INSTRUCTIONS - General
- Please read these instructions carefully and retain them for reference.
• Use this appliance solely in accordance with these instructions. - This appliance is not intended for use by persons (including children) with reduced physical, sensory or mental capabilities, or lack of experience and knowledge, unless they have been given supervision or instruction concerning use of the appliance by a person responsible for their safety.
• Children should be supervised to ensure that they do not play with the appliance.
• Have any repairs carried out solely by a qualified electrician. Never try to repair the appliance yourself.
SAFETY INSTRUCTIONS - Electricity and heat
- Before use please verify that the mains voltage is the same as indicated on the rating plate of the appliance.
• Make sure that you always use an earthed wall socket to connect the appliance.
• Always remove the plug from the socket when the appliance is not in use. - Remove the plug from the wall socket by pulling the plug, not the power cord.
- Check the appliance's power cord regularly to make sure it is not damaged. Do not use the appliance if the power cord is damaged. Have a damaged power cord replaced by a qualified repair service.
- When using an extension lead always make sure that the entire cable is unwound from the reel.
- Use solely approved extension leads.
- Certain parts of the appliance may get hot. Do not touch these parts to prevent burning yourself.
- To prevent the risk of fire the appliance needs space to allow it to loose heat. Make sure that it has sufficient space around, and that it makes no contact with flammable material. Do not cover the appliance. Also make sure that the air vents are not covered or blocked.
- Never use the appliance when it is close to flammable materials.
- Make sure that the appliance, the power cord or the plug do not make contact with hot services, such as a hot hob or naked flame.
• Make sure that the appliance, the power cord and plug do not make contact with water..
SAFETY INSTRUCTIONS - During use
- Never use the appliance outdoors.
- Never use the appliance in a humid room.
- Place the appliance on a flat, stable surface.
• Make sure that your hands are dry before touching the appliance, power cord or plug. - Switch off the appliance and remove the plug from the wall socket in the event of a malfunction during use, and before cleaning the appliance, fitting or removing an accessory, or storing the appliance after use.
- Never leave the appliance unsupervised whilst it is in use.
- Never move the appliance whilst it is switched on or is still hot. Switch off the appliance, and wait until it has cooled down before you move it.
- Make sure there is sufficient free space around the appliance (at least 10cm), as well as above the appliance (at least 30cm).
- The oven's glass door becomes hot during use. Therefore, always use the handle to open and close the door.
- Use the removal tool to remove the baking tray, the grille or the roasting spit from the hot oven.
- Do not place the following items on top of the appliance: cardboard, plastic, paper, candles or flammable objects.
- Do not place heavy objects on the oven door when it is open.
- Carefully remove the baking tray when it contains hot juices or fat.
- Avoid water coming into contact with the oven door during or shortly after use. This may cause the glass to break.
- Do not place the appliance near a gas ring or another heat source, nor immediately next to an electrical fan. They may have a negative effect on the appliance's temperature control.
- Do not pick up the appliance if it falls into water. Remove the plug from the wall socket immediately and do not use the appliance any more.
- Clean the appliance thoroughly after use (see "Cleaning and maintenance").
- Never immerse the appliance, the power cord or the plug in water or any other fluid.
- This appliance may not be used through an external timer or by means of a remote control.
OPERATION - General
The grill-oven is only intended for domestic use, not for professional use.
- Housing
- Spacer
- Power cord and plug
- Ventilation slots
- 'TEMPerature' knob (temperature)
- 'selector' knob (top and/or bottom heating element)
- 'TIMER' knob
- On/Off indicator light
- Heating elements
- Convection ventilator
- Roasting spit drive sleeve
- Door handle
- Door
- Roasting spit
- Roasting spit clamp
- Roasting spit removal tool
- Baking tray/grille removal tool
- Baking tray
- Grille
OPERATION - Before using for the first time
- Remove the packaging.
- Clean all the accessories to remove any residue that may be left from the manufacturing process (see "Cleaning and maintenance"). Dry them thoroughly.
- Turn on the top and bottom heating elements for 15 minutes at the highest temperature with the door open. This will remove any packaging odour from the appliance.
The appliance may emit a little smoke and a characteristic smell when you switch it on for the first time. This is normal, and will soon stop. Make sure the appliance has sufficient ventilation.
OPERATION - Preheating
It is not necessary to preheat the oven. In certain cases, however, you may achieve a better result if the oven is preheated, for example, for meat that must be cooked medium rare or when baking a cake
OPERATION - Convection function
The fan in the back of the oven blows hot air into the oven. This is used to heat the dishes. You can use several levels at the same time, thus saving energy. Because of the intensiv heat you can select a temperature of 20 °C lower then indicated in the conventional recepy.
| Position Control Switch | Settings |
| OFF Off | |
| Top heat | |
| Bottom heat | |
| Top and bottom heat |
baking cakes,
cookies and apple tarts. You can bake on multiple levels simultaneously if desired, in which case the tins should be aligned directly under one another. Baking sheets with cookies should be positioned on the second and third levels.
OPERATION - Baking
- Open the oven door.
- Place the baking tray with the food at the desired height in the grooves in the oven.
- Close the oven door.
- Use the TEMPerature knob to set the required temperature.
- Rotate the selector knob to the setting
- Use the TIMER knob to set the baking time. The amount of time required depends on the type and quantity of food. The On/Off indicator will be lit.
- Bake the food until it is cooked. The oven will turn itself off automatically and a sound signal will be heard once the baking time has elapsed. The On/Off indicator light will go out.
If the food is ready but the baking time has not yet elapsed, you can turn off the oven by rotating the selector knob to "OFF". The timer will continue, but the oven will no longer be heated.
- Wear oven gloves.
- Open the oven door. Take care! The door is hot.
natural_image
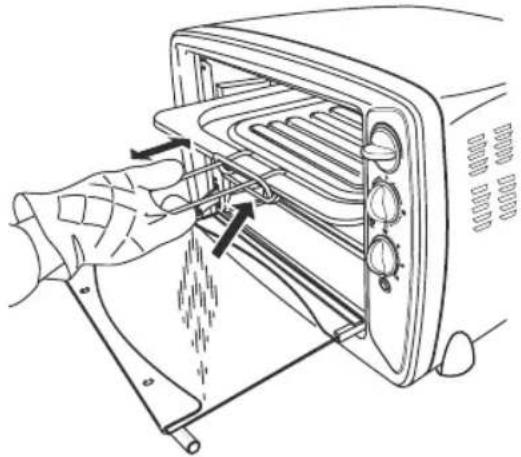
Line drawing of a toaster oven with hand inserting a pan into the door (no text or symbols)Figure 2 Removing the baking tray
- Use the removal tool to remove the baking tray from the oven.
- Close the oven door.
- Remove the food from the baking tray and put it on a plate. Take care! The food is hot.
- Once you have finished, rotate the selector knob to "OFF" and remove the plug from the plug socket.
OPERATION - Grilling
You can use the grill function to give fish, poultry and oven dishes a golden brown crust.
1. Open the oven door.
2. Place the baking tray in the bottom groove in the oven. The baking tray will collect any juice and fat whilst grilling and prevent the juice and fat from getting on the bottom heating element.
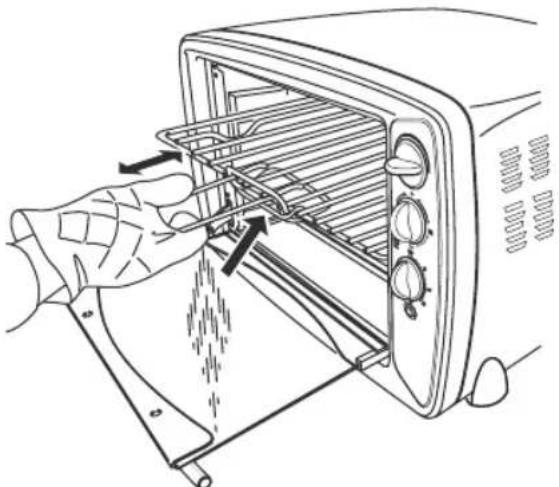
3. Place the grille with the food in the middle or top grooves in the oven.
4. Leave the oven door slightly open so as to allow the air to circulate.
5. Use the TEMPerature knob to set the required temperature.
6. Rotate the selector knob to the setting
7. Use the TIMER knob to set the grilling time. The amount of time required depends on the type and quantity of food. The On/Off indicator will be lit.
8. Grill the food until it is cooked. The oven will turn itself off automatically and a sound signal will be heard once the grilling time has elapsed. The On/Off indicator light will go out.
If the food is ready but the grilling time has not yet elapsed, you can turn off the grill by rotating the selector knob to "OFF". The timer will continue, but the grill will no longer be turned on.
-
Wear oven gloves.
-
Open the oven door. Take care! The door is hot.
natural_image
Line drawing of a hand opening a toaster oven with a hand holding the tray (no text or symbols)Figure 3 Removing the grille
- Use the removal tool to remove the grille with the food from the oven.
- Remove the food from the grille and put it on a plate. Take care! The food is hot.
- Use the removal tool to remove the baking tray from the oven. Take care! Any juice and fat on the baking tray will be hot!
- Close the oven door.
- Once you have finished grilling, rotate the selector knob to "OFF" and remove the plug from the plug socket.
OPERATION - Using the roasting spit
You can use the roasting spit to roast meat and poultry to a nice, even brown colour.
- Open the oven door.
- Place the baking tray in the bottom groove in the oven. The baking tray will collect any juice and fat whilst roasting and prevent it from getting on the bottom heating element.
- Remove the clamp from the round end of the roasting spit.
- Spike the meat or poultry to be roasted on the round end of the roasting spit. Make sure the roasting spit is inserted through the middle of the meat or poultry.
- Use the clamps to secure the meat or poultry to the roasting spit.
natural_image
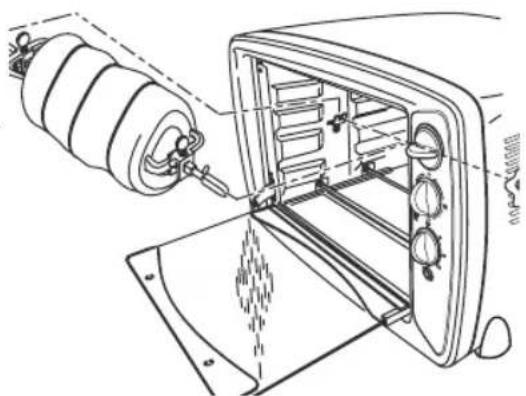
Line drawing of a toaster oven with handlebars and lid, showing internal components (no text or symbols)Figure 4 Fitting the roasting spit
- Place the roasting spit with the meat or poultry in the oven. Insert the round end of the roasting spit into the drive sleeve. Place the straight end of the roasting spit on the support.
Make sure the meat or poultry does not touch the top heating element when turning.
- Leave the oven door slightly open so as to allow the air to circulate.
- Use the TEMPerature knob to set the required temperature.
- Rotate the Selector knob to the setting When using the roasting spit we advise you to use only the top heat, because the bottom heat elements are covered by the baking tray which catches grease and therefore it has no effect.
- Use the TIMER knob to set the roasting time. The amount of time required depends on the type and quantity of food. The On/Off indicator will be lit.
- Roast the meat or poultry until it is cooked. The oven will turn itself off automatically and a sound signal will be heard once the roasting time has elapsed. The On/Off indicator light will go out.
If the meat or poultry is ready but the roasting time has not yet elapsed, you can turn off the oven by rotating the selector knob to "OFF". The timer will continue, but the oven will no longer be heated.
- Wear oven gloves.
- Open the oven door. Take care! The door is hot.
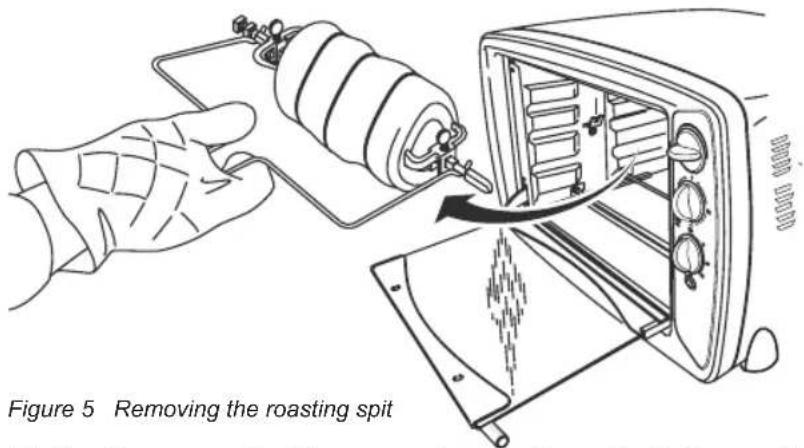
- Use the removal tool to remove the roasting spit with the meat or poultry and place it on a plate.
- Close the oven door.
- Remove the clamp from the round end of the roasting spit and remove the meat or poultry from the roasting spit. Take care! The roasting spit and the meat or poultry are hot.
- Use the removal tool to remove the baking tray from the oven. Take care! Any juice and fat on the baking tray will be hot!
- Once you have finished, rotate the SELECTOR knob to "OFF" and remove the plug from the plug socket.
CLEANING AND MAINTENANCE
Clean the appliance every time after use.
- Remove the plug from the wall socket and allow the appliance to cool down completely.
- Use warm water with a small amount of washing-up liquid to clean the baking tray, the grille, the roasting spit and the removal tool. Rinse the items with plenty of water and dry them thoroughly.
- Use a damp cloth to clean the interior and exterior of the oven and the door. Dry them thoroughly.
- Place all the items back in the oven and store the oven
• Make sure the plug has been removed from the plug socket before cleaning the appliance.
- Never use corrosive or scouring cleaning agents or sharp objects (such as knives or hard brushes) to clean the appliance.
- Never immerse the appliance, the power cord or the plug in water or any other fluid.
TECHNICAL INFORMATION
Type: AGL30
Output: 1600W
Power supply: 220-240V \~ 50Hz
THE ENVIRONMENT

- Dispose of packaging material, such as plastic and boxes, in the appropriate waste containers. When this product reaches the end of its useful life do not dispose of it by putting it in a dustbin; hand it in at a collection point for the reuse of electrical and electronic equipment. Please refer to the symbols on the product, the user's instructions or the packaging.
- The materials can be re-used as indicated. Your help in the re-use, recycling or other means of making use of old electrical equipment will make an important contribution to the protection of the environment.
- Contact your municipality for the address of the appropriate collection point in your neighbourhood.
GUARANTEE TERMS
The importer guarantees the appliance against defects caused by manufacturing and/or material faults for 60 months from the date of purchase, subject to the following conditions.
- No charges will be made for labour costs or materials during the warranty period. Any repairs carried out during the warranty period do not extend the warranty period.
-
The importer automatically becomes the owner of any faulty parts that he replaces or a faulty appliance (in the event of replacement of the appliance).
-
All claims submitted under warranty must be accompanied by the original bill of sale.
-
Claims under warranty must be submitted to the dealer where the appliance was purchased or to the importer.
-
The warranty is issued solely to the first purchaser and cannot be transferred.
-
The warranty does not cover damage caused by:
a. Accidents, incorrect use, wear and/or neglect.
b. Faulty installation and/or use in a manner contravening the prevailing legal, technical or safety regulations.
c. Connection to a mains voltage other than the voltage specified on the type plate.
d. Unauthorized modifications.
e. Repairs carried out by third parties.
f. Careless transport, i.e. without suitable packaging materials or protection.
- No claims may be made under this warranty for:
a. Losses incurred during transport.
b. The removal or changing of the appliance's serial number.
-
The guarantee does not cover power cords, lamps or glass parts.
-
No claims can be submitted under this warranty for damage other than the repair or replacement of faulty parts. The importer can never be held responsible for any consequential loss or damage or any other consequences, resulting either directly or indirectly from the appliance supplied by the importer.
-
In case of claims under guarantee you can contact your dealer where the appliance is purchased. Bestron offers you also the possibility to send the appliance directly to our Service Department. Do not send your appliance without consulting us. The package may be refused and any any costs will be for your account. Please contact the Service Department and they will tell you how to pack and send the appliance.
-
This appliance is not suitable for professional use.
SERVICE
If a fault should occur please contact the BESTRON service department:
THE NETHERLANDS:
BESTRON NEDERLAND BV
Bestron Service
Moeskampweg 20
5222 AW 's-Hertogenbosch
Tel: +31 (0) 73 - 623 11 21
Fax: +31 (0) 73 - 621 23 96
Email: info@bestron.com
Internet: www.bestron.com
CE DECLARATION OF CONFORMITY
This product conforms to the essential requirements of the following EU safety directives:
• EMC Directive 2004/108/EC
• Low Voltage Directive 2006/95/EC
natural_image
Line drawing of a hand opening a toaster oven with a hand placing a tray into the front pan (no text or symbols)natural_image
Technical line drawing of a microwave oven with internal components and a hand operating the lid (no text or symbols)natural_image
Line drawing of a hand using a lathe tool to adjust or install a microwave oven (no text or symbols present)natural_image
Abstract line drawing with intersecting curves and a small mark (no text or symbols)natural_image
Line drawing of a hand opening a toaster oven with a hand placing a pan into the door (no text or symbols)Figura 3 Sacar la parrilla
natural_image
Line drawing of a microwave oven with open lid and internal compartments (no text or symbols)natural_image
Line drawing of a hand using a lathe tool to adjust or install an oven (no text or symbols present)natural_image
Line drawing of a microwave oven with a small electrical outlet connected to the right side (no text or symbols)
BESTRON®
AGL30
v 060111-08

- BESTRON®
- CONDITIONS DE GARANTIE
- DÉCLARATION DE CONFORMITÉ CE
- SAFETY INSTRUCTIONS - General
- SAFETY INSTRUCTIONS - Electricity and heat
- SAFETY INSTRUCTIONS - During use
- OPERATION - General
- OPERATION - Before using for the first time
- OPERATION - Preheating
- OPERATION - Convection function
- OPERATION - Baking
- OPERATION - Grilling
- OPERATION - Using the roasting spit
- CLEANING AND MAINTENANCE
- TECHNICAL INFORMATION
- THE ENVIRONMENT
- GUARANTEE TERMS
- SERVICE
- THE NETHERLANDS:
- CE DECLARATION OF CONFORMITY
Brand : BESTRON
Model : AGL30
Category : Oven