
MP601 - Mp3 player COBY - Free user manual and instructions
Find the device manual for free MP601 COBY in PDF.
| Product Type | Portable MP3 and Video Player |
| Model | MP601 |
| Brand | Coby |
| Dimensions | Approximately 90 x 40 x 10 mm |
| Weight | Approximately 60 g |
| Power Supply | Rechargeable lithium-ion battery via USB port |
| Storage Capacity | Internal memory (capacity not specified) + expansion via memory card (type not specified) |
| Main Functions | MP3, WMA playback; video playback (AVI, etc.); photo display; voice recording; FM radio; repeat and shuffle function |
| Display | Color LCD screen (size not specified) |
| Connectivity | USB 2.0 port for file transfer and charging |
| Audio Output | 3.5mm headphone jack |
| Supported Formats | Audio: MP3, WMA; video: AVI (likely); image: JPEG |
| Battery Life | Approximately 8 hours of audio playback (estimated) |
| Care and Cleaning | Clean with a soft, dry cloth; avoid moisture and dust |
| Safety | Do not expose to water, shocks, or high temperatures; use only compatible accessories |
| Spare Parts and Repairability | No information on repairability; spare parts not provided by manufacturer |
| Included Accessories | Earphones, USB cable, user manual |
| General Information | Device from the MP601/MP620/MP707 series; compatible with Windows and Mac |
Frequently Asked Questions - MP601 COBY
User questions about MP601 COBY
0 question about this device. Answer the ones you know or ask your own.
Ask a new question about this device
Download the instructions for your Mp3 player in PDF format for free! Find your manual MP601 - COBY and take your electronic device back in hand. On this page are published all the documents necessary for the use of your device. MP601 by COBY.
USER MANUAL MP601 COBY
Charging the Battery. 7
Charging with a Computer 7
Turning the Player On/Off 7
Resetting the Player 8
Disabling the Controls (Hold) 8
MAIN MENU 9
Main Menu Controls 9
MUSIC MODE 10
Music Browser Controls. 10
Using the Quick Play List 11
Now Playing Controls (Music Playback) 11
Quick Option Menu 12
PHOTO MODE 14
Photo Browser Controls 14
Photo Viewer Controls 15
VIDEO MODE 16
Movie Browser Controls 16
MoviePlaybackControls 17
RADIO MODE 18
Radio Tuning Controls 18
Quick Option Menu 19
TEXT MODE 20
Text Browser Controls 20
Text Reader Controls 20
Quick Option Menu 20
EXPLORER MODE 22
Explorer Controls 22
SETUP MODE 23
COBY MEDIA MANAGER 25
Installing Coby Media Manager (Windows) 25
Installing Coby Media Manager (Mac OS X) 27
SPECIFICATIONS 29
MP601 series 29
MP620 series. 30
MP707 series 31
TROUBLESHOOTING & SUPPORT 32
SAFETYNOTICES 35
Thank You

Congratulations on your purchase of a Coby Video & MP3 player. This manual is designed to help you easily set up and begin using your new player right away. Please read this manual carefully and retain it for future reference.
Package Contents
Please make sure that the items shown below are included in the package. Should an item be missing, please contact the local retailer from which you purchased this product.
Coby Video & MP3 player
USB Cable
Instruction Manual & Documentation
Professional Stereo Earphones

This package may contain plastic bags or other materials that pose a hazard to children. Be sure to safely dispose of all packing materials after opening.
Features
Integrated flash memory
CD full-color display
Plays music, video, photos and text
D3 and LRC support for song and synchronized lyric information display
Integrated FM Radio
USB 2.0 Hi-speed for fast file transfers
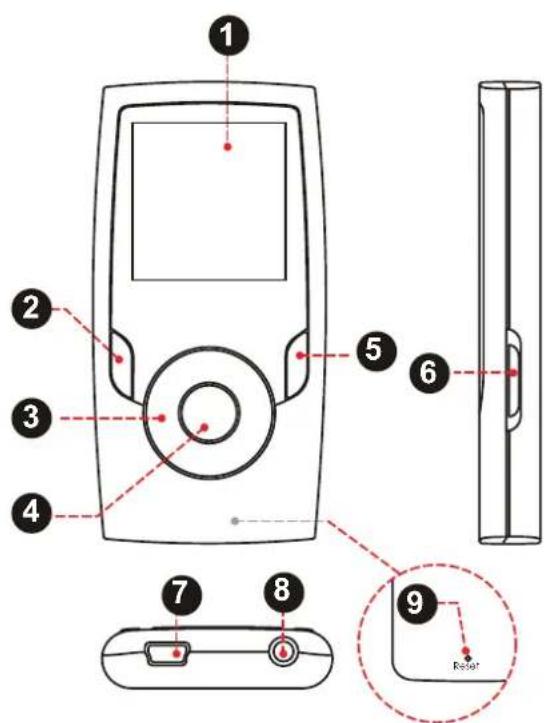
Controls at a Glance

| Front View | ||
| 1. LCD Display | ||
| 2. Menu Button | <MENU> | |
| 3. Control Buttons | ◎ | <UP> |
| ◎ | <DOWN> | |
| ◎ | <LEFT> | |
| ◎ | <RIGHT> | |
| 4. Enter Button <ENTER> | ||
| 5. Option Button <OPTION> | ||
| Side View | ||
| 6. Power Button Press and hold the button to power the player on or off. | <POWER> | |
| Bottom View | ||
| 7. USB Port/Charge | ||
| 8. 3.5mm Headphone Jack | ||
| Rear View | ||
| 9. Reset Button <RESET> | ||
Getting Started

Charging the Battery
Your player has an integrated rechargeable battery. Upon initial use, the battery should be charged fully to ensure optimal performance and battery life.
If the player has not been used in a while, the battery may need to be recharged overnight (about 8 hours).

The battery used in this device may present a fire or chemical burn if mistreated. Do not disassemble, incinerate, or heat the battery. Do not leave the battery in a place subject to direct sunlight, or in a car with its windows closed.

Do not connect the player to a power source other than that which is indicated here or on the label as this may result in the risk of fire or electric shock.
Charging with a Computer
Your player can be charged through a USB computer connection. Use the supplied USB cable to connect the player to a high-power USB port of a computer. The computer must be powered on and not in sleep mode.

When the player is connected and charging, a USB symbol will be displayed on the player's screen.
Turning the Player On/Off
To turn the player on, slide and hold the
To turn the player off, slide and hold the
Resetting the Player
Reset the player if it should freeze and not respond or otherwise malfunction.
Disconnect your player if it is connected to a 1. computer.
Use a paper clip to gently press the

A lock icon will appear on the screen when the controls are disabled. Re-enable the controls to continue.
Disabling the Controls (Hold)
When the
You may want to disable the controls to avoid turning on the player or activating the controls accidentally when it is in your pocket or bag.
To disable the controls, slide the
switch up until it clicks into the "Hold" position.
To enable the controls, slide the
Main Menu

When you turn on the player, you will see the Main menu. The Main menu gives you access to the different function modes of your player. These modes are:
Music: Browse and play music.
Photo:Browse and view Photo.
Video: Browse and play Video.
Radio: Listen to FM radio broadcasts.
Text: Browse and read text files.
Explorer:Browse all files.
Settings: Adjust the player's options.

Select "Extras" from the Main Menu to get the "Text" and "Explorer" menus.
Main Menu Controls
To browse through the different modes, press <UP> or <DOWN> .
To select a mode, press the
Music Mode

Browse for and play your music files.

If you have loaded new music files onto the player, the music library will need to be refreshed when you enter Music mode. This process may take several minutes. You will not be able to access the Music Browser screen until you refresh the music library.
For more information about how to get music onto your player, please refer to the section "Coby Media Manager".
Music Browser Controls
When you choose MUSIC mode from the Main menu, you will see the Music Browser screen. You can choose to browse your music by song name, album, artist, or genre, or you may choose "Browser" to view the music files and folders on the player.
| Function Key Action | |
| To browse through the list Press or | <DOWN> |
| To select an item Press | |
| To return to the previous screen Press | <LEFT> |
| To return to the Now Playing screen | Press <MENU> |
| To return to the Main menu | Hold <MENU> |

If your music files contain ID3 song information tags, you will be able to view your tracks by Artist, Album, or Genre. To view all files (including those that do not contain ID3 information), select "All Songs" or use the "Browser" option.
If music is already playing, you will have the additional option to return to the Now Playing screen.
Using the Quick Play List
To create a quick Play List that contains your favorite songs:
Select "Browser" from the Music Browser 1. screen.
Use the Browser controls to select a song to 2. add.
Press and hold
Press

This quick Play List can be played from the Quick Option menu of the Now Playing screen.
Now Playing Controls (Music Playback)
To start playing music, browse for a song and then press
When a song is playing, the Now Playing screen appears (see below).
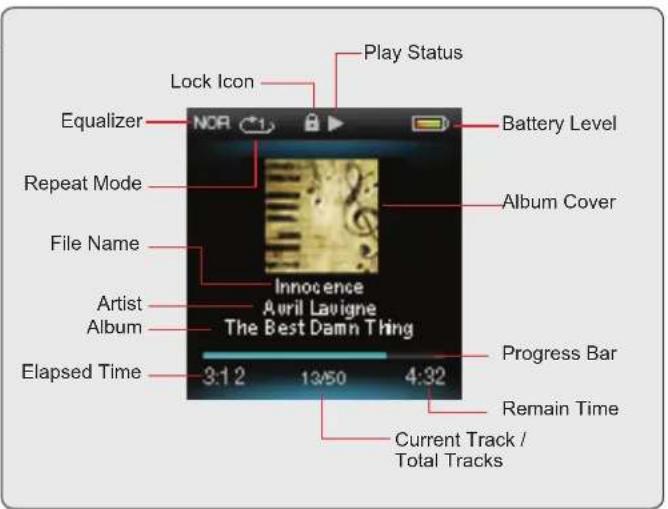
The following functions may be performed from the Now Playing screen.
| Function Key Action | |
| To play the next track Press <RIGHT> | |
| To play the previous track Press <LEFT> | |
| To forward-scan quickly through the current track | Hold <RIGHT> |
| To reverse-scan quickly through the current track | Hold <LEFT> |
| To pause/resume playback Press <ENTER> | |
| To access the Quick Option menu (see below for details) | Hold <ENTER> |
| To adjust the volume level Press <UP> or <DOWN> | |
| To return to the Music Browser screen | Press <MENU> |
| To return to the Main menu Hold <MENU> |
Quick Option Menu
To access the quick option menu, press and hold
To browse through the settings, press <UP> or
To select a setting, press ENTER>
To return to the previous screen, press LEFT
Equalizer
Select a digital equalizer preset to optimize the way the player processes audio signals. The options are: Normal, Pop, Rock, Classic, Jazz, and Bass.
Repeat
Change the repeat options to adjust the order in which tracks are played.
Item Description
No Repeat Play tracks in normal order and no repeat.
One Play the current track repeatedly.
All Play all tracks repeatedly.
RandomAll Play all tracks in random order.
Dir Normal Repeat all tracks in the current folder.

Lyric display requires a“.LRC”lyric file which may be found on the internet or may be created with a Lyric file editor. Lyric files can contain synchronized timing information as well as lyric information.
Lyric files must have the same name as its corresponding music file (e.g., "SongTitle1. Irc" and "SongTitle1.mp3") and must be placed in the same directory.
Library
Return to the Music Browser screen.
Play List
Selet "Play List" and then "My List" to play a list of your favorite songs.

To add songs to the list, see the section "Music Mode > Music Browser Controls > Using the Quick Playlist".
Lyric
Set the Lyric display ON or OFF.
Photo Mode

Browse for and view your photo files.

For more information about how to get photos onto your player, please refer to the section "Coby Media Manager".
Photo Browser Controls
When you choose Photo mode from the Main menu, you will see the Photo Browser screen. Your Photo will be displayed as thumbnail images.
Use the Photo Browser to find all Photo files loaded on your player.
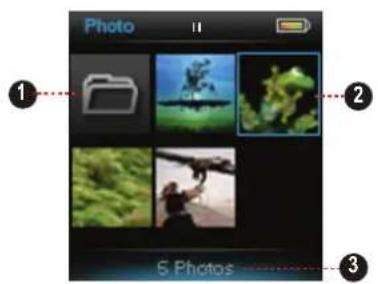
Folder1.
Photo2.
Name of the selected 3. folder or photo
| Function Key Action | |
| To browse through the Photo & folders | Press<UP>,<DOWN>,<LEFT>,<RIGHT> |
| To select/view an item | Press<ENTER> |
| To return to the previous screen | Press<MENU> |
| To return to the Main menu | Hold<MENU> |
Photo Viewer Controls
To view a Photo, browse through the thumbnail Photo and then press
The following functions may be performed from the Photo Viewer screen.
| Function Key Action | |
| To view the next Photo Press<RIGHT> | |
| To view the previous Photo Press<LEFT> | |
| To start or stop slideshow mode Press<ENTER> | |
| To return to the Photo Browser screen Press<MENU> | |
| To return to the Main menu Hold<MENU> |
Video Mode

Browse for and play your movie files.

Your player supports MTV files. Videos may need to be encoded with the included software for device playback.
For more information about converting video, please refer to the section "Coby Media Manager".
Use the Movie Browser to find all movie files loaded on your player.
| Function Key Action | |
| To browse through the list of movie files & folders | Press or <DOWN> |
| To select/play an item | Press <ENTER> |
| To return to the previous screen Press <LEFT> | |
| To return to the Main menu Hold <MENU> | |
Movie Browser Controls
When you choose Video mode from the Main menu, you will see the Movie Browser screen.
MoviePlaybackControls
The following functions may be performed from the Now Playing screen.
| Function Key Action | |
| To play the next movie Press <RIGHT> | |
| To play the previous movie Press <LEFT> | |
| To forward-scan quickly through the current movie Hold <RIGHT> | |
| To reverse-scan quickly through the current movie Hold <LEFT> | |
| To pause/resume playback Press <ENTER> | |
| To adjust the volume level Press <UP> or <DOWN> | |
| To return to the Movie Browser screen Press <MENU> | |
| To return to the Main menu Hold <MENU> |
Radio Mode

Listen to FM radio broadcasts.

You must have a pair of headphones connected to the headphone jack to receive FM broadcasts; your player will utilize the headphone cord as an antenna.
Radio Tuning Controls
When you choose RADIO from the Main menu, you will see the Radio Tuning screen. You can search for stations, tune to stations manually, or tune to preset stations.

You must have saved preset stations prior to using preset tuning mode. Hold
The following functions may be performed from the Radio Tuning screen.
| Function Key Action | |
| To toggle between normal (normal) and preset tuning | Press<ENTER> |
| To tune to a higher station Press<RIGHT> | |
| To tune to a lower station Press<LEFT> | |
| To scan to the next highest station (normal mode only) | Hold<RIGHT> |
| To scan to the next lowest station (normal mode only) | Hold<LEFT> |
| To access the Quick Option menu Press<OPTION> | |
| To adjust the volume level Press<UP> or <DOWN> | |
| To return to the Main menu | Hold<MENU> |
Quick Option Menu
To access the quick option menu, press
To browse through the settings, press <UP> or DOWN
To select a setting, press
To return to the previous screen, press
- Music play time is an estimated value based on playing an MP3 encoded at 128 kbps. Actual play time may vary depending on encoding method used and other factors.
MP620 series
| Display Type 1.8° | TFT LCD @ 128x160 |
| Memory MP620-2GB: 2GB Flash MP620-4GB: 4GB Flash MP620-8GB: 8GB Flash | |
| Audio Format Support | MP3, WMA |
| Video Format Support | MTV: 128x160, 25fps |
| Photo Format Support | JPEG, BMP |
| Song Info Support | ID3, Windows Media |
| FM Frequency Range | 87.5 - 108.0MHz |
| PC Interface USB | 2.0 (MSC) |
MP620 series
| Plug and Play Support | Windows 7/Vista/XP Macintosh OS X |
| Audio Output 3.5mm Stereo (Headphone) | |
| Power Rechargeable Li-Poly Battery USB Charge | |
| Play Time Music: 8 hours* | |
- Music play time is an estimated value based on playing an MP3 encoded at 128 kbps. Actual play time may vary depending on encoding method used and other factors.
MP707 series
| Display Type 2.0" | TFT LCD @ 176x220 |
| Memory MP707-2 | GB: 2GB Flash MP707-4GB: 4GB Flash MP707-8GB: 8GB Flash |
| Audio Format Support | MP3, WMA |
| Video Format Support | MTV: 176x220, 25fps |
| Photo Format Support | JPEG, BMP |
| Song Info Support | ID3, Windows Media |
| FM Frequency Range | 87.5 - 108.0MHz |
| PC Interface USB | 2.0 (MSC) |
MP707 series
| Plug and Play Support | Windows 7/Vista/XP Macintosh OS X |
| Audio Output 3.5 | mm Stereo (Headphone) |
| Power Rechargeable Li-Poly Battery USB Charge | |
| Play Time Music: 11 hours* | |
- Music play time is an estimated value based on playing an MP3 encoded at 128 kbps. Actual play time may vary depending on encoding method used and other factors.
Troubleshooting & Support
If you have a problem with this device, please check our website at www.cobyusa.com for Frequently Asked Questions (FAQ) and product updates. If these resources do not resolve the problem, please contact Technical Support.
Address Coby Electronics Technical Support
150 Knowlton Way
Savannah, Georgia 31407
Email techsupport@cobyusa.com
Web www.cobyusa.com
Phone 800-727-3592: Monday to Friday, 8:30AM-9:00PM EST
Saturday, 9:00 AM-5:30PM EST
718-416-3197: Monday to Friday, 8:00AM-5:30PM EST
The player does not turn on.
Ensure that the player is fully charged. Try charging the player overnight (8 hours).
Reset the player (use a paper clip to gently press the Reset button on the rear of the player) and try again.
The buttons do not work.
Reset the player (use a paper clip to gently press the Reset button on the rear of the player) and try again.
I cannot transfer files to the player.
Ensure that your computer is running a sup- ported operating system.
If using a USB extension cable, ensure that it is securely attached to the player and the PC, or try using another USB cable.
Ensure that the player's memory capacity is not full.
There is no sound during playback.
Check the volume level.
Ensure that the headphones are attached securely to the player.
The sound quality of the music is poor.
Try playing the file on your computer. If the sound quality is still poor, try downloading the file again or re-encoding the file yourself.
Ensure that the bit rate of the file is not too low. The higher the bit rate of the file, the better it will sound. The minimum recommended bitrate is 128kbps for MP3s and 96kbps for WMAs.
Try lowering the volume of the player.
Ensure that the headphones are attached securely to the player.
The player will not play my music file.
Ensure that the file is in a compatible format.
The file may be copy-protected and you no longer have authorization to play this file. If you feel this is in error, please contact the service from which you downloaded the file.
The LCD characters are corrupted or something is wrong with the display.
Ensure that the correct menu language has been set.
Reset the player (use a paper clip to gently press the Reset button on the rear of the player) and try again.
The player has malfunctioned.
Reset the player (use a paper clip to gently press the Reset button on the rear of the player) and try again.
Safety Notices


CAUTION
WARNING: SHOCK HAZARD. DO NOT OPEN. AVIS: RISQUE DE CHOC ELECTRIQUE. NE PAS OUVRIR

CAUTION: TO REDUCE THE RISK OF FIRE AND ELECTRIC SHOCK, DO NOT REMOVE THE COVER (OR BACK) OF THE UNIT. REFER SERVICING ONLY TO QUALIFIED SERVICE PERSONNEL.

The lightning flash with arrowhead symbol within an equilateral triangle is intended to alert the user to the presence of uninsulated "dangerous voltage" within the product's enclosure that may be of sufficient magnitude to constitute a risk of electric shock.

The exclamation point within an equilateral triangle is intended to alert the user to the presence of important operation and servicing instructions in the literature accompanying the appliance.

For recycling or disposal information about this product, please contact your local authorities or the Electronics Industries Alliance: www.eiae.org.
For Customer Use:
Enter below the serial number that is located on the rear of the unit. Retain this information for future reference.
Model No.
Serial No.
WARNING: To prevent fire or shock hazard, do not expose this device to rain or moisture. Dangerous high voltage is present inside the enclosure. Do not open the cabinet.
Protect your hearing: Hearing experts advise against the constant use of personal stereos played at high volume. Constant exposure to high volumes can lead to hearing loss. If you should experience ringing in the ears or hearing loss, discontinue use and seek medical advice.
Note: If the product suddenly has no response or powers off, an electrostatic discharge may be the cause. In this circumstance, please follow the procedures below for recovery:
Turn off the unit by pushing and holding the slide button at the right (Power off position) for 15 seconds.
Turn on the unit again
FCC Statement:
This device complies with Part 15 of the FCC Rules. Operation is subject to the following two conditions:
(1) This device may not cause harmful interference, and
(2) This device must accept any interference received, including interference that may cause undesired operation.
Note: This equipment has been tested and found to comply with the limits for Class B digital devices, pursuant to Part 15 of the FCC rules. These limits are designed to provide reasonable protection against harmful interference in a residential installation. This equipment generates, uses and can radiate radio frequency energy and, if not installed and used in accordance with the instructions, may cause harmful interference to radio communications. However, there is no guarantee that interference will not occur in a particular installation. If this equipment does cause harmful interference to radio or television reception, which can be determined by turning the equipment off and on, the user is encouraged to try to correct the interference by one or more of the following measures:
Reorient or relocate the receiving antenna.
Increase the separation between the equipment and receiver.
Connect the equipment into an outlet on a circuit different from that to which the receiver is connected.
Consult the dealer or an experienced radio/TV technician for help
Use of shielded cable is required to comply with Class B limits in Subpart B of Part 15 of the FCC rules.
Do not make any changes or modifications to the equipment unless otherwise specified in the manual. If such changes or modifications should be made, you could be required to stop operation of the equipment.
Important Safety Instructions
Read Instructions: All the safety and operating instruc-1. tions should be read before the product is operated.
Retain Instructions: The safety and operating instruc-2. tions should be retained for future reference.
HeedWarnings: All warnings on the product and in 3. the operating instructions should be adhered to.
Follow Instructions: All operating and usage instruc-4. tions should be followed.
Cleaning: Unplug this product from the wall outlet be-5. fore cleaning. Do not use liquid cleaners or aerosol cleaners. Use a damp cloth for cleaning.
Attachments: Use only attachments recommended by 6. the manufacturer. Use of other attachments may be hazardous.
Water and Moisture: Do not use this product near 7. water (e.g., near a bath tub, washbowl, kitchen sink, laundry tub, in wet basements, or near a swimming pool and the like).
- Ventilation: Slots and openings in the cabinet are provided for ventilation to ensure reliable operation of the product and to protect it from overheating. These openings should never be blocked by placing the product on a bed, sofa, rug, or other similar surface. This product should not be placed in a built-in installation such as a bookcase or rack unless proper ventila
tion is provided or the manufacturer instructions have been adhered to.
Power Sources: This product should be operated only 9 from the type of power source indicated on the rating label. If you are not sure of the type of power supply to your home, consult your product dealer or local power company. For products intended to operate from battery power or other sources, refer to the operating instructions.
Overloading: Do not overload wall outlets, extension 10. cords, or integral convenience receptacles as this can result in a risk of fire or electric shock.
Object and Liquid Entry: Never push objects of any 11. kind into this product through openings as they may touch dangerous voltage points or shout-out parts that could result in a fire or electric shock. Never spill liquid of any kind on the product.
Servicing: Do not attempt to service this product your-12. self as opening or removing covers may expose you to dangerous voltage or other hazards. Refer all servicing to qualified service personnel.
Damage Requiring Service: Unplug this product from 13. the wall outlet and refer servicing to qualified service personnel under the following conditions: a) when the power-supply or plug is damaged; b) if liquid has been spilled or if objects have fallen into the product; c) if the product has been exposed to rain or water; d) if

- PHOTO MODE 14
- VIDEO MODE 16
- RADIO MODE 18
- TEXT MODE 20
- EXPLORER MODE 22
- COBY MEDIA MANAGER 25
- SPECIFICATIONS 29
- TROUBLESHOOTING & SUPPORT 32
- SAFETYNOTICES 35
- Thank You
- Package Contents
- Features
- Controls at a Glance
- Getting Started
- Charging the Battery
- Charging with a Computer
- Turning the Player On/Off
- Resetting the Player
- Disabling the Controls (Hold)
- Main Menu
- Main Menu Controls
- Music Mode
- Music Browser Controls
- Using the Quick Play List
- Now Playing Controls (Music Playback)
- Quick Option Menu
- Equalizer
- Repeat
- Item Description
- Library
- Play List
- Lyric
- Photo Mode
- Browse for and view your photo files.
- Photo Browser Controls
- Photo Viewer Controls
- Video Mode
- Browse for and play your movie files.
- Movie Browser Controls
- MoviePlaybackControls
- Radio Mode
- Listen to FM radio broadcasts.
- Radio Tuning Controls
- Text Mode
- Text Browser Controls
- Text Reader Controls
- Bookmark
- SetFontColor
- Auto Scroll
- Auto Scroll Time
- Explorer Mode
- Explorer Controls
- Setup Mode
- Coby Media Manager
- Installing Coby Media Manager (Windows)
- Installing Coby Media Manager (Mac OS X)
- Specifications
- Troubleshooting & Support
- The player does not turn on.
- The buttons do not work.
- I cannot transfer files to the player.
- There is no sound during playback.
- The sound quality of the music is poor.
- The player will not play my music file.
- The LCD characters are corrupted or something is wrong with the display.
- The player has malfunctioned.
- Safety Notices
- CAUTION
- For Customer Use:
- FCC Statement:
- Important Safety Instructions
Brand : COBY
Model : MP601
Category : Mp3 player