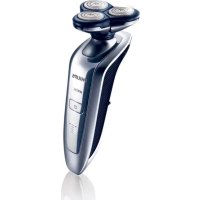
Q8155 - Shaver PHILIPS - Free user manual and instructions
Find the device manual for free Q8155 PHILIPS in PDF.
Download the instructions for your Shaver in PDF format for free! Find your manual Q8155 - PHILIPS and take your electronic device back in hand. On this page are published all the documents necessary for the use of your device. Q8155 by PHILIPS.
USER MANUAL Q8155 PHILIPS
Congratulations on your purchase and welcome
to Philips! To fully benet from the support that
Philips offers, register your product at www.philips.
Read this user manual carefully before you use the
appliance and save it for future reference.
- Make sure the adapter does not get wet.
- The adapter contains a transformer. Do not cut
off the adapter to replace it with another plug, as
this causes a hazardous situation.
- This appliance is not intended for use by persons
(including children) with reduced physical, sensory
or mental capabilities, or lack of experience
and knowledge, unless they have been given
supervision or instruction concerning use of the
appliance by a person responsible for their safety.
- Children should be supervised to ensure that they
do not play with the appliance.
- Only use the adapter supplied.
- The adapter transforms 100-240 volts to a safe
low voltage of less than 24 volts.
- Do not use the shaver or adapter if it is damaged.
- If the adapter is damaged, always have it replaced
with one of the original type in order to avoid a
- Charge, use and store the appliance at a
temperature between 15°C and 35°C.
ENGLISH- HQ8150/HQ8140: Never immerse the charging
stand in water nor rinse it under the tap.
- Do not recharge the shaver in a closed pouch.
- Always unplug the shaver before you clean it
- The shaver complies with the internationally
approved IEC safety regulations and can be safely
cleaned under the tap.
- Be careful with hot water. Always check if the
water is not too hot, to prevent your hands from
- This washable shaver is not suitable for shaving in
- Do not immerse the shaver in water.
- Water may leak from the socket at the bottom
of the appliance, when you rinse it. This is normal
and not dangerous because all electronics are
enclosed in a sealed shell inside the shaver.
Electromagnetic elds (EMF)
This Philips appliance complies with all standards
regarding electromagnetic elds (EMF). If handled
properly and according to the instructions in this
user manual, the appliance is safe to use based on
scientic evidence available today.
Make sure the appliance is switched off before you
Charging takes approx. 1 hour.
ENGLISH 5You can also shave without charging by connecting
the shaver to the mains.
- During charging, the charging light lights up green
Battery fully charged
- When the battery is fully charged, the top light
Battery running low (HQ8155/HQ8150 only)
- When the battery is running low, the bottom light
When you switch off the shaver, this light ashes a
Cordless shaving time
When the shaver is fully charged, it has a cordless
shaving time of up to 55 minutes.
Charging the appliance
HQ8155/HQ8150 only: Charge the shaver when the
bottom light lights up red.
Do not recharge the shaver in a closed pouch.
1 Put the appliance plug in the shaver.
2 Put the adapter in the wall socket.
3 Remove the adapter from the wall socket and
pull the appliance plug out of the shaver when
the battery is fully charged.
Charging stand (HQ8150/HQ8140 only)
You can also charge the appliance by placing it in the
charging stand, if provided.
ENGLISH6- Place the shaver properly in the plugged-in
- Lift the shaver from the stand without tilting it.
1 Switch on the shaver by pressing the on/off
, The blue light ring round the on/off button lights
up to indicate that the motor is running.
2 Move the shaving heads quickly over your skin,
making both straight and circular movements.
- Shaving on a dry face gives the best results.
- Your skin may need 2 or 3 weeks to get
accustomed to the Philips shaving system.
3 Switch off the shaver by pressing the on/off
, The blue light ring round the on/off button goes
4 Clean the shaver (see chapter ‘Cleaning and
EnglisH 75 Put the protection cap on the shaver every
time you have used it, to prevent damage.
You can use the trimmer to groom your sideburns
1 Open the trimmer by pushing the slide
The trimmer can be activated while the motor is
2 Close the trimmer (‘click’).
Cleaning and maintenance
Regular cleaning guarantees better shaving
The normal way to clean the appliance is to rinse
the shaving unit and the hair chamber with hot
water every time you have used the shaver.
Be careful with hot water. Always check if the
water is not too hot, to prevent your hands from
Note: Water may leak from the socket at the bottom of
the appliance when you rinse it. This is normal and not
ENGLISH8Every day: shaving unit and hair chamber
1 Switch off the shaver, remove the adapter from
the wall socket and pull the appliance plug out
2 Press the release button to open the shaving
3 Clean the shaving unit and the hair chamber by
rinsing them under a hot tap for some time.
- Make sure you clean the inside as well as the
outside of the shaving unit.
4 Close the shaving unit and shake off excess
Never dry the shaving unit with a towel or tissue,
as this may damage the shaving heads.
5 Open the shaving unit again and leave it open
to let the appliance dry completely.
You can also clean the hair chamber without water
by using the brush supplied.
Every six months: shaving heads
1 Open the shaving unit, turn the lock
anticlockwise (1) and remove the retaining
EnglisH 92 Clean the cutters and guards with the brush
Do not clean more than one cutter and guard
at a time, since they are all matching sets. If you
accidentally mix up the cutters and guards, it
may take several weeks before optimal shaving
performance is restored.
3 Put the shaving heads back into the shaving
unit. Put the retaining frame back into the
shaving unit and turn the lock clockwise.
4 Close the shaving unit.
Clean the trimmer every time you have used it.
1 Switch off the shaver, remove the adapter from
the wall socket and pull the appliance plug out
2 Clean the trimmer with the brush supplied.
3 Lubricate the trimmer teeth with a drop of
sewing machine oil every six months.
Charging stand (HQ8150/HQ8140 only)
You can clean the charging stand with a moist cloth.
1 Put the protection cap on the shaver to
2 The appliance can be stored in the pouch
3 The shaver can be stored in the charging stand,
Replace the shaving heads every two years for
optimal shaving results.
Replace damaged or worn shaving heads with HQ9
Philips shaving heads only.
Note: Do not mix up the cutters and the guards to
guarantee optimal shaving performance.
1 Switch off the shaver, remove the adapter from
the wall socket and pull the appliance plug out
2 Press the release button to open the shaving
3 Turn the lock anticlockwise (1) and remove the
retaining frame (2).
ENGLISH 114 Remove the shaving heads and place new ones
in the shaving unit. Put the retaining frame
back into the shaving unit and turn the lock
Make sure that the projections of the shaving
heads t exactly into the recesses.
5 Close the shaving unit.
The following accessories are available:
- HQ8500/HQ8000 adapter.
- HQ9 Philips shaving heads.
- HQ110 Philips Shaving Head Cleaning Spray.
- Do not throw away the appliance with the normal
household waste at the end of its life, but hand
it in at an ofcial collection point for recycling. By
doing this, you help to preserve the environment.
- The built-in rechargeable battery contains
substances that may pollute the environment.
Always remove the battery before you discard
and hand in the appliance at an ofcial collection
point. Dispose of the battery at an ofcial
collection point for batteries. If you have trouble
removing the battery, you can also take the
appliance to a Philips service centre. The staff of
this centre will remove the battery for you and
will dispose of it in an environmentally safe way.
EnglisH12Removing the rechargeable battery
Only remove the rechargeable battery if it is
1 Remove the adapter from the wall socket and
pull the appliance plug out of the shaver.
2 Let the shaver run until it stops and undo the
two screws at the back of the shaver.
3 Undo the two screws in the hair chamber.
4 Undo the three screws in the power unit.
5 Bend the 4 hooks aside (1) to take out the
Be careful, the hooks are very sharp.
6 Remove the power unit cover with a
7 Remove the rechargeable battery.
Be careful, the battery strips are very sharp.
Do not connect the shaver to the mains again after
you have removed the rechargeable battery.
EnglisH 13Guarantee and service
If you need service or information or if you have a
problem, please visit the Philips website at
www.philips.com or contact the Philips Consumer
Care Centre in your country (you nd its phone
number in the worldwide guarantee leaet). If there
is no Consumer Care Centre in your country, go to
your local Philips dealer.
Guarantee restrictions
The shaving heads (cutters and guards) are not
covered by the terms of the international guarantee
because they are subject to wear.
EnglisH14Troubleshooting
1 Reduced shaving performance.
- Cause 1: the shaving heads are dirty.You have not
rinsed the shaver long enough or the water you
used was not hot enough.
Clean the shaver thoroughly before you continue
shaving. See chapter ‘Cleaning and maintenance’.
- Cause 2: long hairs are obstructing the shaving
Clean the cutters and guards with the brush
supplied. See chapter ‘Cleaning and maintenance’,
section ‘Every six months: shaving heads’.
- Cause 3: the shaving heads are damaged or worn.
Replace the shaving heads. See chapter
2 The shaver does not work when the on/off
- Cause 1: the rechargeable battery is empty.
Recharge the battery. See chapter ‘Charging’.
- Cause 2: the appliance is not connected to the
Put the adapter in the wall socket.
3 The shaving unit has come off the shaver.
- The shaving unit has not been placed correctly.
- If the shaving unit becomes detached from the
shaver, you can easily put it back by inserting the
hinge into the slot in the rim of the hair chamber
and pushing it home until it locks into place
2 Limpe as lâminas e as guardas com o pincel de
Limpe as lâminas e as guardas com o pincel de