
AVENT SCF310 - Baby products PHILIPS - Free user manual and instructions
Find the device manual for free AVENT SCF310 PHILIPS in PDF.
User questions about AVENT SCF310 PHILIPS
0 question about this device. Answer the ones you know or ask your own.
Ask a new question about this device
Download the instructions for your Baby products in PDF format for free! Find your manual AVENT SCF310 - PHILIPS and take your electronic device back in hand. On this page are published all the documents necessary for the use of your device. AVENT SCF310 by PHILIPS.
USER MANUAL AVENT SCF310 PHILIPS
EN Call TOLL-FREE: 1.800.54.AVENT
ES Llame gratuitamence: 1.800.54.AVENT
FR Appeliez SANS FRAIS:1.800.54.AVENT
This product is a personal care item and therefore cannot be returned unless opened. If the pump is defective, we will kindly provide replacement parts or new ones. Please use our technical support for any questions regarding this product please complete our top five return letters at 1,800.54 AVENT. Our representatives will be happy to assist you. Please do not return this item to the retailer.
www.philips.com/AVENT
USA. Philips Consumer Lifestyle, a Division of Philips Electronics North America Corporation, 700 Box 10311, Stamford, CT 69804.
Canada: Philips Electronics Ltd, 286 Hillmount Road, Norham, ON L8C5N
Theorem 1.1. (a) Let be a finitely generated module over a field K . Then the set of all finitely generated modules over K is closed and is a submodule of K .
AVENT

PHILIPS
EN Manual breast pump
ES Extractor De Leche Manual
FR Tire-lait manuel

2.
6. Assembly Instructions / Instrucciones De Montaje / Instruction d'assemblage

IMPORTANT: DO NOT LOSE THE WHITE VALUE. YOUR PUMP WILL NOT BE USED ON ANYTHING BUT THE VENTURE. IF I AM SPACING IT, I'LL LET YOU KNOW.
IMPORTANT: NO PIERDA LA VALUA BLANCA, EI EXTRACTOR NO FUNCIONA (1) AND 2. A PAPER OF THE CONGRESSOR, THE CONGRESSOR, AND PAPER 4. In particular, the paper is adapted to a PAPER AVANT directations.
IMPORTANT: JE PERDEZ PAS LA VALVE BLANCH, SI ELIS EST MISEP.
SOSTER: A PAPER OF THE CONGRESSOR.
[See previous versions and chapters on Philips AVN7].
Please take five minutes to read through the WHOLE of this leaflet before you use your Philips AVENT manual breast pump for the first time.
Contents
- Introducing the Philips AVENT manual breast pump
- Detailed parts guide
3.Clearing - Mainstreaming the clear line of your crack pain
- When to express milk
7 Hints to help you succeed - How to use the manual breast pump
- Feeding your baby yoy expressed breast milk
- Choosing the right nipple for your baby
- Troubleshooting Guide
Should you ever lose these instructions, they are available on our website: www.phillips.com/AVENT
1. Introducing the Philips AVENT manual breast pump
The Philips AVENT manual breast pump is a breakthrough in breast pump design. The Let-down Massage Cushion is designed to imitate your baby's suckling action to provide fast milk flow – quietly, comfortably and gently. The pump is easy to assemble, discreet to use and all parts are dishwasher safe.
Doctors recommend that breast milk is the best nutrition for babies during the first year, combined with solid food after the first 6 months. Your milk is specially adapted to your baby's needs and contains antibodies which help protect your baby against infection and allergies.
A breast pump will help you breastfeed longer. You can express and store your milk so that – whether you are out for a few hours, taking a well deserved rest, or back at work – your baby can still enjoy the benefits of your breast milk, even if you can't be there to give it yourself. As the pump is so quiet and discreet you can take it with you anywhere, allowing you to express milk at your own convenience and maintain your milk supply. You can continue to provide breast milk to your baby even when you return to work.
EN
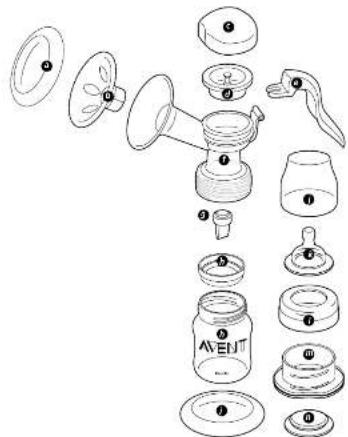
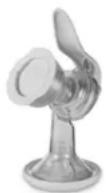
2. Detailed parts guide
MANUAL BREAST PUMP
a) Funnel cover/Stand
b) Let-down Massage Cushion
c) Pump cover
d) Silicone diaphragm and stem*
e) Handle
f) Pump body
g) White valve
BOTTLE
h) Philips AVENT feeding bottle (4oz/125ml)
or adaptor ring
i) Stand (same as a)
j) Dome cap
k) Extra Soft Nipple, Newborn Flow (0m + )
I) Screw ring
m) Sealing base
n) Sealing disc
*spares included
3. Cleaning
Before you use your breast pump for the first time and every time before use:
Separate all parts, then wash in the dishwasher or in warm soapy water. Do not use antibacterial cleaners/detergents.
Caution: Take care when cleaning the white valve.
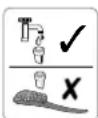
If it gets damaged, your breast pump will not function properly. To clean the white valve, rub it gently between your fingers in warm soapy water. Do not insert objects as this may cause damage.
4. Maintaining the cleanliness of your breast pump
After cleaning all parts, insert the white valve (g) and fit the diaphragm with stem (d) onto the pump body (f). Clip the cover (a) over the funnel and Let-down Massage Cushion (b) and screw on the sealing base (m) in place of the Philips AVENT feeding bottle (h).
EN
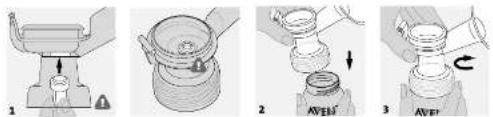
5. How to assemble the manual breast pump
Please refer to diagram 6 at the beginning of this leaflet. Separate all parts and ensure pump has been cleaned as in section 3:
1) Wash your hands thoroughly. Click the white valve (g) into the pump body (f) from underneath.
2) Place the pump body (f) onto the Philips AVENT feeding bottle (h).
3) Twist gently clockwise until secure. DO NOT OVERTIGHTEN!
4) Place the silicone diaphragm with stem (d) into the pump body (f). Make sure it fits securely round the rim by pressing down with your fingers to ensure a perfect seal. (This is easier if assembled while wet.)
5) Place the forked end of the handle (e) under the silicone diaphragm and stem (d) and push down gently on the handle until it clicks into place.
6) Carefully insert the Let-down Massage Cushion (b) into the pump funnel (f) making sure it is perfectly sealed all round the rim of the funnel. (This is easier if assembled while wet.)
7) Click the pump cover (c) onto the pump body (f). To make the pump completely stable insert the bottle into the stand (a).
*ALWAYS insert the adaptor ring when using a polypropylene bottle
EN
6. When to express milk
1) If possible, wait until your milk supply and breastfeeding schedule are well established, normally at least 2-4 weeks after birth, unless told otherwise by your health care professional or breastfeeding advisor.
2) The exceptions to the above are:
a) If you are expressing milk for your baby to be given in hospital.
b) If your breasts are engorged (painful or swollen), you can express a small amount of milk before or between feeds to ease the pain and to help your baby latch on more easily.
c) If you have sore or cracked nipples, you may wish to express your milk until they are healed.
d) If you are separated from your baby and wish to continue to breastfeed when you are reunited, you should express your milk regularly to stimulate your milk supply.
3) You will need to find the right times of the day for you to express your milk, e.g.
a) Early in the morning when your breasts are full, just before or after your baby's first feed.
b) After nursing, if your baby has not emptied both breasts.
c) Between feeds, or on a break if you have returned to work.
7. Hints to help you succeed
Using a breast pump takes practice - you may need to make several attempts before you succeed, but because the breast pump is so simple and easy to use, you will soon get used to expressing your milk.
1) Familiarize yourself with the pump and pieces prior to use.
2) Choose a time when you're not rushed and won't be interrupted.
3) Having your baby or a photograph of your baby nearby can help encourage 'let-down'.
EN
4) Placing a warm cloth on the breasts for a few minutes before you start pumping can encourage milk flow and soothe painful breasts.
5) Warmth and relaxation can encourage milk flow. Try expressing after a bath or shower.
6) Try expressing from one breast while your baby is feeding from the other, or continue expressing just after nursing.
7) Repositioning the pump on the breast from time to time can help stimulate your milk ducts.
Practice with your pump to find the best technique for you. However, if the process becomes painful, stop and consult your breastfeeding advisor. If the pump does not come away easily from the breast, it may be necessary to break the suction by placing a finger between the breast and Let-down Massage Cushion or between the breast and pump funnel.
8. How to use the manual breast pump
1) Wash your hands thoroughly and make sure your breasts are clean. Gently squeeze a little milk from each nipple to ensure milk ducts are not blocked.
2) Make sure you have cleaned and carefully assembled your pump exactly as shown in sections 3 and 6.
3) Consult the 'Hints to help you succeed' section.
4) Relax in a comfortable chair, leaning slightly forward (use cushions to support your back). Make sure you have a glass of water nearby.
5) Press the funnel and Let-down Massage Cushion of the pump firmly against your breast, making sure that no air can escape - otherwise there will be no suction.
6) As you gently push down on the pump handle you will feel the suction on your breast. You don't need to depress the handle fully to create a vacuum; only as much as is comfortable. Your milk will soon start flowing even though you may not use all the suction the pump can generate.
7) Begin by pumping 5-6 times rapidly to initiate let-down. Then, hold the handle down for 2-3 seconds, and allow it to return to its resting place. These 2-3 second cycles imitate your baby's natural suckling pattern and allow the milk to flow into the bottle between strokes.
EN
8) Milk should begin to flow after the first few strokes. Don't worry if your milk does not flow immediately. Relax and continue pumping.
Do not continue pumping for more than 5 minutes at a time if NO result is achieved. Try expressing at another time during the day.
Please remember that, should the process become painful or uncomfortable, you should stop using the pump and consult your health care professional or breastfeeding advisor.
9) On average you will need to pump for 10 minutes to express 2-4oz or 60-125ml. However, this is just a guide and varies from woman to woman. If you find that you regularly express more than 4oz / 125ml per session, please use a 9oz/260ml Philips AVENT feeding bottle.
Do not overfill Philips AVENT feeding bottles and keep upright, otherwise milk may leak from below the pump body.
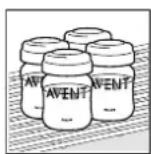
9. Storing your breast milk
- Breast milk can be stored in the fridge or freezer in clean breast milk containers (Philips AVENT bottles fitted with sealing discs).
- Only milk collected with a clean pump should be stored and fed to your baby.
- Expressed milk should be refrigerated immediately.
- Expressed breast milk can be stored in the refrigerator for up to 24 hours (not in the door), the freezer for up to 3 months or 6 months in a zero-degree freezer.
- If you are storing milk in the fridge to add to during the day, only add milk which has been expressed into a clean container. Milk can only be kept like this for a maximum of 24 hours (from first expression) after which it must be used immediately or frozen for future use.
EN
Storing your milk in the fridge
If your expressed breast milk will be fed to your baby within 24 hours, it can be stored in the fridge (not in the door) in an assembled Philips AVENT feeding bottle. Assemble a clean nipple, screw ring and dome cap and attach onto the body of the Philips AVENT bottle.
Storing your milk in the freezer
To store in the freezer, use an Philips AVENT sealing disc in place of the nipple and dome cap. The storage containers should be clearly labelled with the date and time of expression and older milk used up first.
NEVER refreeze breast milk. DO NOT add fresh breast milk to already frozen milk. ALWAYS discard any milk that is left over at the end of a feed.
10. Feeding your baby your expressed breast milk
If breast milk has been stored in an Philips AVENT breast milk container, replace the sealing disc with a clean Philips AVENT nipple.
Frozen breast milk should be defrosted overnight in the refrigerator. However, in an emergency, it can be defrosted in a jug of hot water. Once thawed use within 24 hours.
Stand the Philips AVENT feeding bottle in a bowl of hot water, or alternatively, for a safe and fast way to warm feeds, use the Philips AVENT bottle and baby food warmer. Always check milk or food temperature before feeding.
Never heat milk in a microwave as this may destroy valuable nutrients and antibodies. In addition, the uneven heating may cause hot spots in the liquid which could cause burns to the throat.
Never immerse a frozen milk container in boiling water as this may cause it to crack/split.
EN
11. Choosing the right nipple for your baby
Philips AVENT nipples can be used on the Philips AVENT feeding bottle.
Philips AVENT nipples are clearly numbered on the side to indicate flow rate.
| 0m+ | 1 hole | NEWBORN FLOW EXTRA SOFT SILICONE NIPPLE Ideal for newborns and breastfed babies of all ages. |
| 1m+ | 2 holes | SLOW FLOW EXTRA SOFT SILICONE NIPPLE Ideal for newborns and breastfed babies of all ages. |
| 3m+ | 3 holes | MEDIUM FLOW SOFT SILICONE NIPPLE For bottle fed babies at 3 months of age and up. |
| 6m+ | 4 holes | FAST FLOW SOFT SILICONE NIPPLE Offers a faster flow for older babies. |
| 3m+ | 1 slot | VARIABLE FLOW SOFT SILICONE NIPPLE - SLOT CUT Provides an extra fast flow and accommodates thicker liquids. Flow rate can be varied by turning the bottle to align the I, II or III markings on the nipple with baby's nose. |
EN
12. Troubleshooting Guide
| Lack of suction | Check that all the pump components have been assembled correctly and that the white valve is the right way up. Ensure that the diaphragm and Let-down Massage Cushion are fitted securely to the pump body and a perfect seal is created. |
| No milk being expressed | Ensure suction is created and the pump is correctly assembled. Relax and try again, expression may improve after practice. Please refer to the ‘Hints to help you succeed’ section. |
| Pain in the breast area when expressing | You may be pumping too hard. You do not need to use all the suction the pump can generate. Try depressing the handle halfway and remember the 2-3 second pumping rhythm. Consult your health professional/breastfeeding advisor. |
| Milk is drawn up the Let-down Massage Cushion | Remove and refit the Let-down Massage Cushion ensuring it is firmly attached and pushed far enough down the funnel. Try leaning slightly forward. |
| Cracking/discoloration of pump parts | Avoid contact with abrasive or antibacterial detergents as these can damage the plastic. Combinations of detergents, cleaning products, sterilizing solution, softened water and temperature fluctuations may, under certain circumstances, cause the plastic to crack. If this or any other signs of aging occur, do not use. Contact Philips AVENT Customer Services for spare parts. Other items in the dishwasher may cause discoloration of the device. Keep the product out of direct sunlight, as prolonged exposure may cause discolouration. |
| Lost or broken parts | Spare parts are available through Philips AVENT Customer Services (see back cover for contact details). |
| Pump does not come away easily | If the pump does not come away easily from the breast, it may be necessary to break the suction by placing a finger between the breast and Let-Down Massage Cushion or between the breast and pump funnel. |
If you are still experiencing problems, please contact Philips AVENT Customer Services (see back cover for contact details). Alternatively contact your health care professional/breastfeeding advisor.
| 42 codes: | 42133 5413 191 |
| Product: LFT MANUAL | BPUMP INSTRUCT - TEXT |
| Languages: UEESFR (3 languages) | |
| To print colours: Artwork set-up as: PMS647C | Being printed: BLACK | |
| Profile/dimensions: W105mm x H148.5mm | |
| Extent: 32pp booklet + 8pp fold out cover | |
| Replaces: | 42133 5411 010 |
| Matches size/fold spec: | 42133 5411 010 |
| Barcodes: - | |
| PZN: - | |
| Point 6 ref: 11683-MBPump UsesFR_3191_Txt.indd | |
| Date: 1st November 2010 | |
| Created by: Point 6 Design. +44 (020) 89625880 | |
P6 PROOF DETAILS
Manual Breast Pump Instruct Lft - USESFR (Text)
PLEASE NOTE:
This PDF file has been converted to greyscale using Acrobat Pro. The original artwork was set-up CMYK and Pantone 647C. Any questions contact Point 6 Design