
DPF 7900 LED - Digital photo frame TELEFUNKEN - Free user manual and instructions
Find the device manual for free DPF 7900 LED TELEFUNKEN in PDF.
| Product type | Digital photo frame |
| Brand | TELEFUNKEN |
| Model | DPF 7900 |
| Screen size | 7 inches (17.78 cm) |
| Resolution | 480 x 234 pixels |
| Display ratio | 16:9 |
| Supported image formats | JPEG |
| Storage media | SD/MMC cards, Memory Stick, USB keys |
| Display settings | Brightness, contrast, color, tint |
| Transition effects | Normal, random, fade, curtain, opening, cross |
| Display duration | Fast (3s), Medium (5s), Slow (8s) |
| Multiple display | 2, 3 or 4 images simultaneously |
| Energy saving mode | 2h, 4h, 8h |
| Power supply | Input: 100-240 V AC 50/60 Hz, Output: 5 V DC 2 A |
| Dimensions (L x H x D) | 205 x 135 x 20 mm |
| Weight | 362 g |
| Box contents | Frame, power adapter, remote control, cleaning cloth |
| Special functions | Rotation, zoom, slideshow, reset |
| Care and cleaning | Use a soft dry cloth, avoid abrasive products |
| Safety | Do not expose to water, do not block openings, do not repair yourself |
| Warranty | 12 months |
| After-sales service | Phone: 05 45 60 82 51, Email: assistance@sopeg.fr |
Frequently Asked Questions - DPF 7900 LED TELEFUNKEN
User questions about DPF 7900 LED TELEFUNKEN
0 question about this device. Answer the ones you know or ask your own.
Ask a new question about this device
Download the instructions for your Digital photo frame in PDF format for free! Find your manual DPF 7900 LED - TELEFUNKEN and take your electronic device back in hand. On this page are published all the documents necessary for the use of your device. DPF 7900 LED by TELEFUNKEN.
USER MANUAL DPF 7900 LED TELEFUNKEN
natural_image
Interior scene of a modern living room with a flat-screen TV displaying two smiling children, a white sofa, and a red pillow in the background (no visible text or symbols)I. Learn about and install your frame....2
- Box contents....2
- Frame diagrams....2
- Installation....2
II. Use your frame....3
- Reading a memory card or a USB key ....3
III. Settings ....3
- Setup menu....3
- Secondary menu....4
IV. Hot keys on the remote control ....4
V. Other information ....4
VI. Safety instructions....5
VII. Warranty....5
VIII. Specifications....7
I. Learn about and install your frame
Thank you for your recent purchase of a TELEFUNKEN DPF 7900 digital photo frame. Before using your device, please consult these operating instructions and keep them so you may refer to them later on.
1. Box contents
- 1 digital photo frame
- 1 AC adaptor
- 1 remote control
- 1 dust cloth
2. Frame diagrams

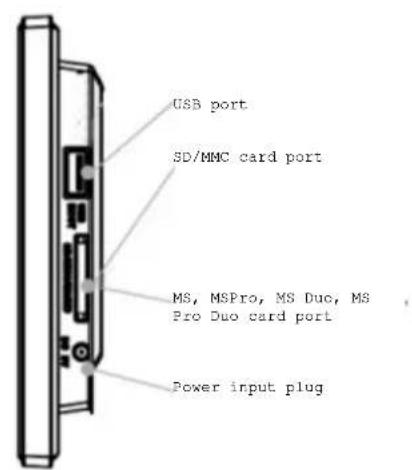
3. Installation
- Take your frame and its accessories out of their packaging.
- Remove the plastic film protecting the front of the frame.
- Pull the plastic tab protecting the contacts in the remote control.
- Stand the frame in the desired location, pulling the adjustable stand towards you (see diagram above).
- Connect the electrical cord to the frame in the space provided.
- Plug your frame into an outlet. Your frame will start up automatically.
II. Use your frame
1. Reading a memory card or a USB key
If your frame is off:
- Insert your card or USB key in the space provided.
- Switch on your frame: The slideshow will automatically play the contents of your memory card or USB key.
If your frame is on:
- Insert your card or USB key in the space provided : the slideshow will automatically play the contents of your memory card or USB key.
III. Settings
When your frame is displaying the cards selection screen, Press « Setup » on your remote control to display the menu.
If your frame is playing the slideshow, press twice on the « Exit » key of your remote control pour display the cards selection screen. Then press « Setup » on your remote control to display the menu.
When the setup menu is displayed, « High/low » keys of the remote control allow you to select the parameters to adjust, and the « Right/Left » keys, allow you to adjust the parameter.
When the right adjustment is selected, press « Enter » on the remote control to confirm.
Select this line using the "Up/Down" keys on the remote in order to access this menu. You will then be able to make adjustments with the remote's arrow keys:
- The language (French, English, German, Spanish, Portuguese, Italian, Netherlands)
- Magic window (possibility to display 2, 3 ou 4 pictures at the same time)
- Display image size (original or full screen)
- Slidshow transitions (Normal, random, fade, curtain, open door, cross comb)
- Slideshow speed (fast : 3s, medium : 5s, slow : 8s)
- Slideshow shuffle
- Power saving (Turn off after : 2h, 4h, 8h)
- Reset (Factory default settings)
TELEFUNKEN®
2. Secondary menu
When the frame is playing the slideshow, you can display another menu:
Press « Setup » on your remote control during the slideshow.
The slideshow stops, and a new menu is displayed, which allows you to :
- Rotate your pictures
IV. Hot keys on the remote control
There are 3 hot keys on your remote control :
« Slideshow » key allows you to launch the slideshow whenever you want
« Zoom » key allows you to zoom on a picture without displaying the secondary menu. You can navigate in the picture with the arrow keys of your remote control
« Rotate » allows you to rotate your picture without displaying the secondary menu.
V. Other information
For more information, you can download the complete operating instructions at:
http://www.telefunken-digital.com
VI. Safety instructions
Handle the digital photo frame with care, and avoid touching the screen; fingerprints are difficult to remove.
Always set the digital photo frame on a flat and stable surface to prevent it from falling and being damaged.
Avoid exposing the digital photo frame to the sun or high temperatures, as these may damage the frame or reduce its operational life. Do not place it near heat sources like radiators or space heaters. Do not position the frame facing direct sunlight in order to avoid reflections.
Avoid exposing the digital photo frame to rain, water, or moisture. Do not place it in a sink or basin where it may come in contact with water.
Never place heavy or sharp objects on the frame, the screen, or the frame's power supply.
Make sure not to plug the digital photo frame into an outlet or cord with a power supply that is too high. This may cause overheating, a fire, or electrical shock.
Be careful of the location of the power cord; it must not be walked on or come in contact with other objects. Do not place the cord under a rug. Regularly check the condition of the cord to prevent damage. If the cord is damaged, unplug it and replace it.
Ventilation
The openings and spaces for memory cards allow the frame to vent. To ensure optimal use of the frame and to prevent overheating, these openings must not be covered or blocked.
Keep the digital frame at a sufficient distance from the wall to ensure it vents.
Do not place the digital photo frame on a bed or sofa so that it does not overheat. Caution!
Never remove the plastic cover on the back of the frame. The digital photo frame has electrical circuits and you could be hurt if you touch them.
Do not try to repair the digital photo frame by yourself.
VII. Warranty
The warranty does not cover damage caused if you (or any unauthorized person) tried to repair the frame.
If the frame is emitting smoke, noise, or an unusual smell, immediately turn it off and unplug it. Contact your store.
If you do not use the digital frame for a while, make sure to unplug the power cord.
The warranty concerns the digital photo frame and does not include the accessories. The following are considered accessories:
The power supply unit,
The remote (according to model).
However, these accessories may be ordered from our technical division:
By email: assistance@sopeg.fr
Warranty period
This digital frame is under warranty for 12 months. The warranty period begins on the date the frame is purchased.
The warranty must be proven by presenting the original invoice or receipt on which the date and model purchased appear.
Coverage
A defective digital frame must be returned complete to your distributor with an explanation.
If this digital frame presents a defect during the warranty period, the authorized After-Sales Service will repair any defective component or manufacturing defect. The After-Sales Service will unilaterally decide whether to repair or replace the digital frame, in part or in whole.
The initial purchase date will determine the starting date for the warranty period.
If the digital frame is repaired or exchanged by our After-Sales Service, the warranty period is not extended.
Exclusions
Damage or defects caused by the improper use or handling of the digital frame, or by the use of accessories, which are not original or not recommended in these instructions, are not covered by the warranty.
The warranty does not cover damage caused by outside elements, like lightning, water, or fire, or any other damage caused during transport.
No warranty coverage may be claimed if the digital frame's serial number has been modified, removed, erased, or made illegible.
No warranty coverage may be claimed if the digital frame has been repaired, altered, or modified by the buyer or any repair personnel not officially qualified and authorized.
The manufacturer does not guarantee the technical properties described in this manual. The hardware and accessories described in this manual are subject to change without advance notice. For this reason, the manufacturer reserves the right to change the related documents, components, options, and characteristics without advance notice.
Compliance with current regulations:
This digital frame complies with current CE marking standards, and is compatible with the RoHS standard.
Recycling end-of-life electrical equipment and electronics
Used electrical and electronic devices must not be discarded with ordinary household refuse.
The presence of the symbol on the product or its packaging serves as a reminder of this.
Some materials constituting this product may be recycled if you take them to an appropriate recycling centre. By reusing the components and raw materials of old devices, you contribute significantly to protecting the environment.
For further information on collection sites for used equipment, you can enquire at your city hall, the waste treatment department, or the shop where you purchased the product.
VIII. Specifications
| Features DPF 7900 | |
| Screen | 7" |
| Resolution | 480 x 234 |
| Image ratio | 16/9 |
| Compatible files | JPEG |
| Compatible cards | SD/MMC, MS, USB keys |
| Screen position | Adjustable on 2 levels |
| Screen adjustments | Brightness, contrast, color, tint |
| Setting buttons | 6 + remote control |
| Transition effects | 4 + random |
| Slideshow speed | 3 (slow, medium, fast) |
| Power supply input | 100-240 V AC 50/60 Hz |
| Power supply output | 5V DC 2Ah |
| Dimensions | 205 x 135 x 20 mm |
| Weight | 362 g |
INSTRUCCIONES DE USO MARCOS DE FOTOS DIGITALES TELEFUNKEN DPF 7900
I. Descubra e instale su marco....2
- Fazer girar as imagens

- Learn about and install your frame....2
- Use your frame....3
- Settings ....3
- Hot keys on the remote control ....4
- Learn about and install your frame
- Box contents
- Frame diagrams
- Installation
- Use your frame
- Reading a memory card or a USB key
- If your frame is off:
- If your frame is on:
- Settings
- TELEFUNKEN®
- Secondary menu
- Hot keys on the remote control
- Other information
- Safety instructions
- Ventilation
- Warranty
- Warranty period
- Coverage
- Exclusions
- Compliance with current regulations:
- Recycling end-of-life electrical equipment and electronics
- INSTRUCCIONES DE USO MARCOS DE FOTOS DIGITALES TELEFUNKEN DPF 7900
- Descubra e instale su marco....2
Brand : TELEFUNKEN
Model : DPF 7900 LED
Category : Digital photo frame