
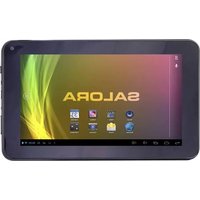
TAB9702 - Tablet SALORA - Free user manual and instructions
Find the device manual for free TAB9702 SALORA in PDF.

| Product type | Touch tablet |
| Brand | Salora |
| Model | TAB9702 |
| Dimensions (L×W×H) | 243 × 190.5 × 11 mm |
| Weight | Approximately 590 g |
| Screen | 9.7 inches, resolution 1024 × 768 pixels |
| Operating system | Android 4.1 |
| Processor | ARM Cortex-A9 clocked at 1.5 GHz |
| RAM | 1024 MB DDR3 |
| Internal storage | 8 GB |
| Wi-Fi connectivity | 802.11 b/g/n |
| Connectors | Micro-USB, Micro-SD (up to 32 GB), headphone jack |
| Battery | Lithium-polymer 3.7 V, 6000 mAh |
| Battery life | Up to 15 h music, 4 h web browsing, 4.5 h video |
| Operating temperature | From -10°C to 45°C |
| Power supply | AC adapter included (via micro-USB port) |
| Included accessories | AC adapter, USB cable, OTG cable, user manual |
| Main functions | Web browsing, multimedia playback, games, Android apps, file management |
| Care and cleaning | Do not use alcohol, thinner, or gasoline; wipe with a soft dry cloth |
| Safety precautions | Do not use near water, avoid shocks and dust, do not disassemble, do not use while driving |
| Reset | Reset button on the right side to restore default settings |
| Memory compatibility | Micro-SD card up to 32 GB |
Frequently Asked Questions - TAB9702 SALORA
User questions about TAB9702 SALORA
0 question about this device. Answer the ones you know or ask your own.
Ask a new question about this device
Download the instructions for your Tablet in PDF format for free! Find your manual TAB9702 - SALORA and take your electronic device back in hand. On this page are published all the documents necessary for the use of your device. TAB9702 by SALORA.
USER MANUAL TAB9702 SALORA
4.4 Installingen applications
Thanks For Purchasing Your Tablet
This user manual has been specially designed to guide you through the functions and features of your device.
1) Please read this manual carefully before using your device to ensure safe and correct use.
2) The descriptions in this manual are based on the default settings of your device.
3) Do not use this unit near water. Do not place over the unit any container with liquid inside.
4) Please do not put your device in high temperature, moisture or dust place; the tablet is not waterproof.
5) Avoid falling or violent collision, do not violently shake the touch screen, otherwise, it could lead to damage or display unnatural.
6) If system shutdown automatically, bootable again soon after the shutdown.
7) Please charge the tablet regularly if not use it for long time to avoid the damage caused by the excessive consumption from battery.
8) Do not disassemble or use alcohol, thinner or benzene class to swab product surface.
9) Please do not use the tablet when driving or walking in the street, otherwise it may lead an accident.
10) Please choose the appropriate volume, if had tinnitus, please lower the volume or stop using.
11) Memory space available dishonest nominal for the android system itself takes up part of the memory space and the operation of the program will also take up space if you open them.
12) Storage capacity that dishonest nominal for android system occupies about hundreds of MB storage capacity, also in order to install the software needs, the system must lay off certain storage capacity, so the actual usable space and nominal space have deviation.
13) When CPU in high-speed operation, especially in 3D games or in long time playback high-definition video, the cover will have some of hot.
14) Please keep this manual for future reference.
| Cate | Chapter One(overview) | ||
| 1.1 | Appearance | 1 | |
| 1.2 | Buttons | 2 | |
| 1.3 | Open and shut down | 2 | |
| 1.4 | Open and close standby mode | 2 | |
| 1.5 | Lock and unlock the screen | 2 | |
| 1.6 | Homepage information column | 3 | |
| 1.7 | Text input | 3 | |
| 1.8 | Reset | 4 | |
| 1.9 | USB Connect | 4 | |
| 1.10 | Accessories | 4 | |
| Chapter Two (Internet) | |||
| 2.1 | Browser | 4 | |
| Chapter Three (Applications) | |||
| 3.1 | EXplorer | 5 | |
| 3.2 | Downloads | 5 | |
| Chapter Four (System setting) | |||
| 4.1 | Wireless networks setting | 6 | |
| 4.2 | Sound setting | 6 | |
| 4.3 | Display setting | 7 | |
| 4.4 | Application setting | 7 | |
| 4.5 | Date & Time setting | 8 | |
| 4.6 | Language and input setting | 8 | |
| Chapter Five (Specification) | 9 |
Chapter One:Overview
1.1 Appearance
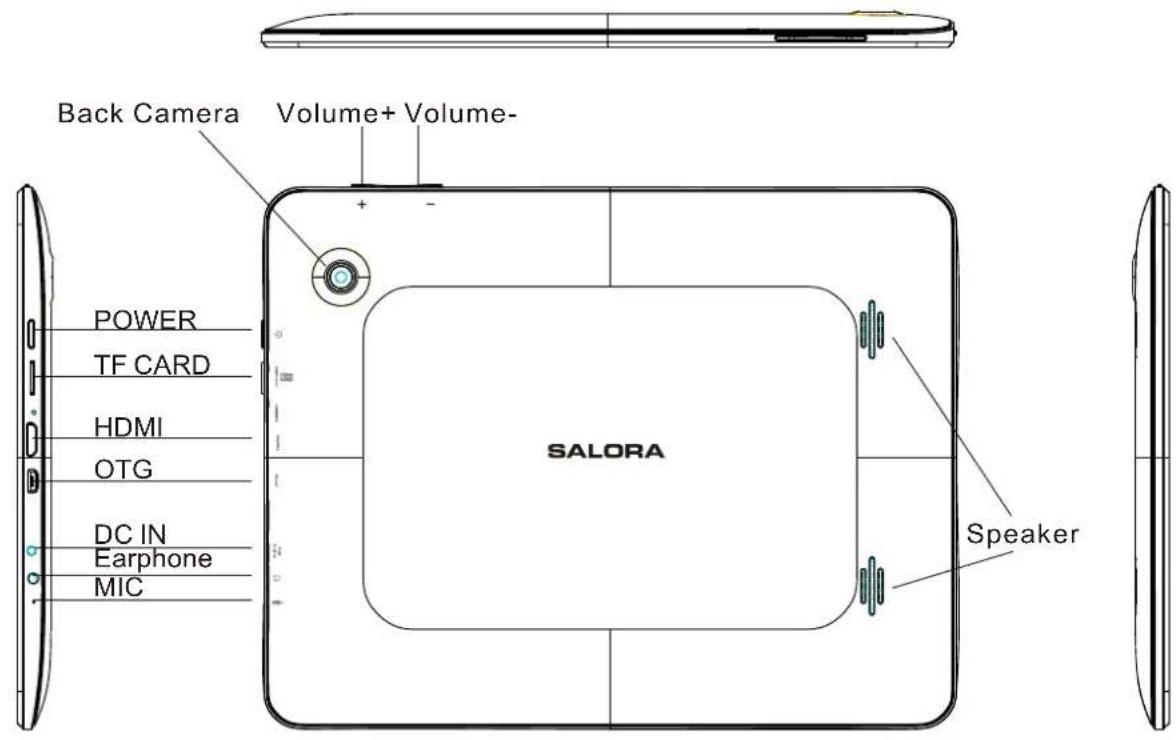
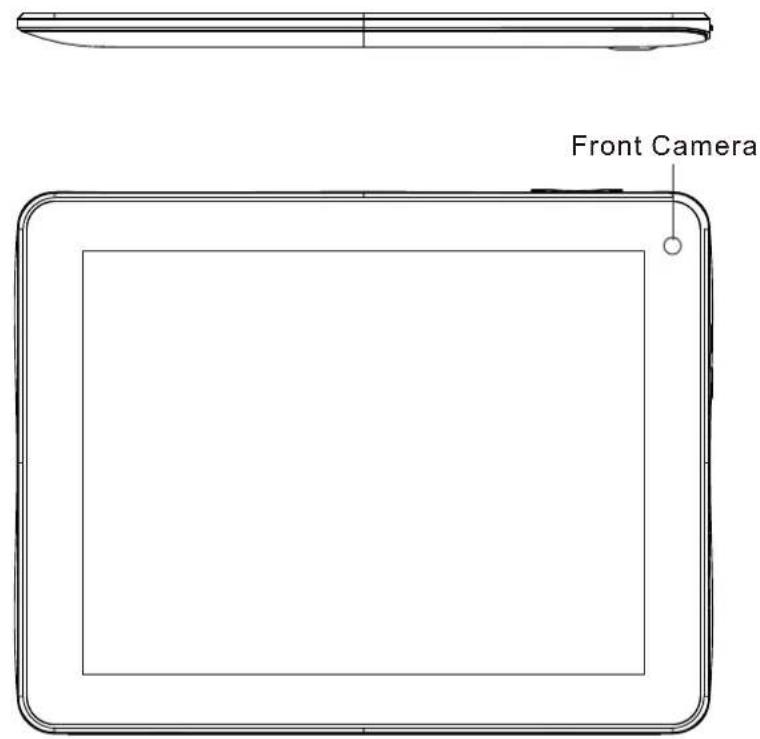
1.2 Buttons
Power button
Long press the power button 2-3 seconds to open the screen When open the tablet, short press this button to enter the off-screen state and short press again to light up the screen.
Volume
Press Volume+/- to adjust the volume.
1.3 Open and shut down
Open
Long press the power button (see the appearance) 2-3 seconds, pictures will show up until to the interface.
Shut down
Long press the power button, then the screen shows you like to shut down, press OK to shut down in charging state, when the tablet is off, press the power button, it will shows charging feature, once again to click power button, the tablet will be opened.
1.4 Open and close standby mode
Open the standby mode
In boot mode, you can tap the power button, the system will into the standby mode which can save power.
Close the standby mode
In the standby mode, light tap of the power button of the device, enter the normal state.
1.5 Lock and unlock the screen
Lock
You can set the sleep time in the system of display.
The system will sleep automatically and lock the screen to the standby mode if without any inactivity when reaches the preset of standby time.
Unlock
Move the sign to unlock, show as below.
Drag this to unlock the screen and enter the application interface.
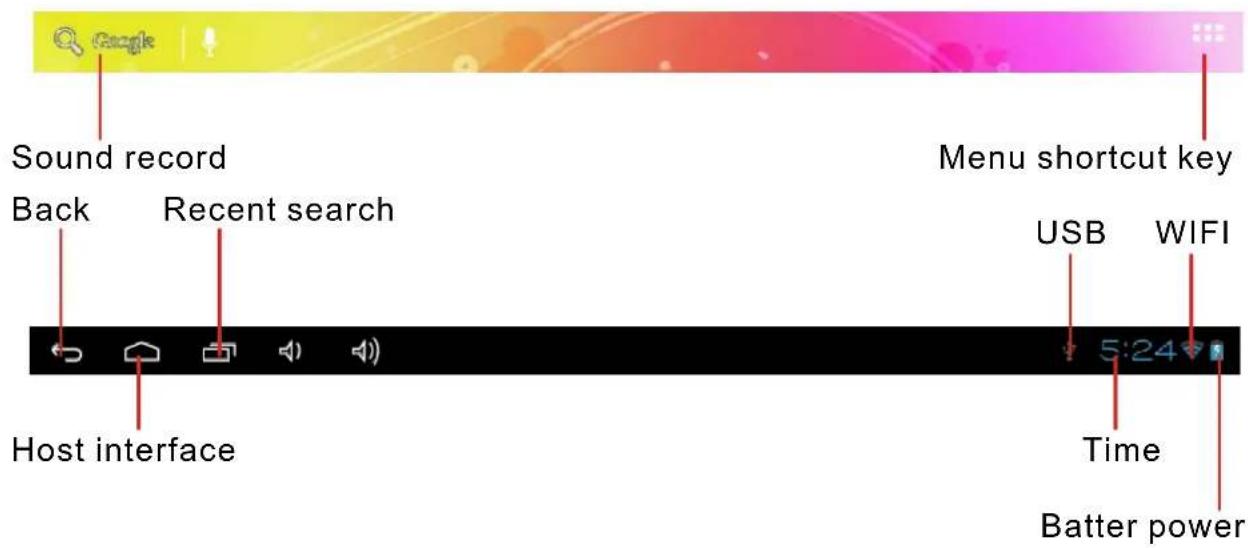
1.6 Homepage Information Column
1.7 Text Input
When use the tablet, you can use the virtual keyboard to enter text, number, symbols directly by touching screen. After selecting the Android input method, the default keyboard show as below:
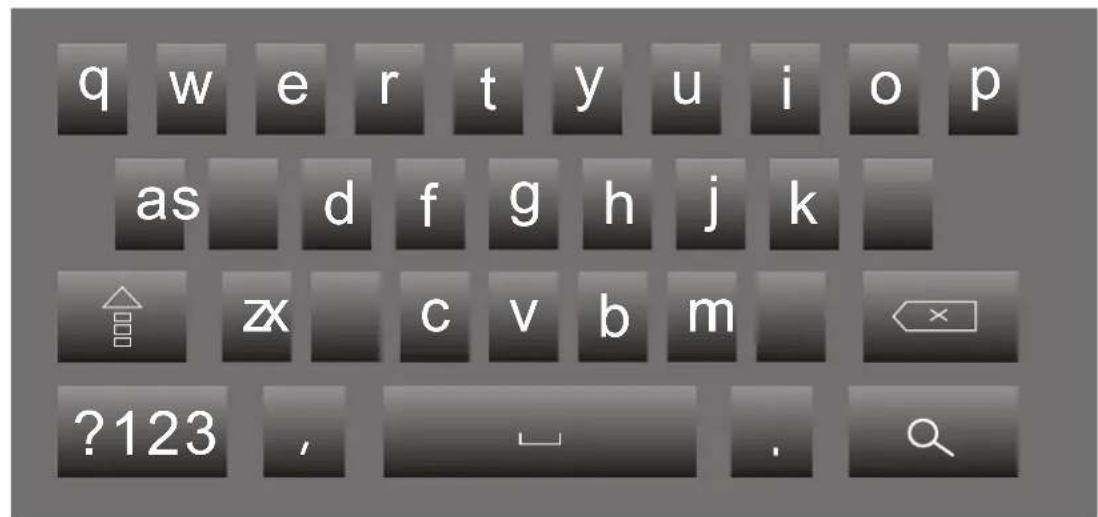
To switch the numbers and letters, please press this ?123 To switch the capital and lowercase letter, please press
1.8 Reset
Press the reset button on the right side of the device, then you device will restart and reset.
1.9 USB connect
Please connect PC with in-box USB cable for your tablet and you will see on your tablet, click this sign and turn on USB storage to connect your device.
Turn off USB storage to disconnect your device with PC.
1.10 Accessories
| Power Adapter | 1 |
| USB Cable | 1 |
| User manual | 1 |
| OTG Cable | 1 |
Chapter two: Internet
2.1 Browser
Require network support before using a web browser, if there are network supporting problems, please contact your network operator or the service provider.
Table's web browser can connect to the Internet.
via WIFI to satisfy your business and individual network needs .
Please touch (Setting) to set up the WIFI so that can use the browser normally.
Touch here (Browser) in the application list to enter the browser pages; the default homepage is the Recently Viewed showing recently viewed pages.
Browser supports the following features.

Enter the URL-touch the input area to get the soft keyboard, then text the UPL.
Bookmark searchclick this ☆ to add into the bookmark
Touch this to read the favorite website that collected
Touch this to search the internet
Touch this + to add new browser
Touch this to close the browser
Chapter three: Application
3.1 Explorer
Touch here (File manager) in the application list, it supports the files mutual copy in this two places SD Card, internal memory and USB.
3.2 Downloads
Click here ↓ in the application list; you can preview the downloading or done document contents.
Click download file to stop or delete the download contents
Chapter Four: System setting
Click here (Setting) to enter the system setting interface.
4.1 Wireless networks setting
This setting module includes: the wireless and network Settings The wireless local area network Settings
Open wireless LAN switches, the system will scan available wireless network automatically and display the wireless local area network in the list
Among them, if the local area networks have the sign behind it, it represents the network has been encryption, it needs to enter the password to connection.
The sign represents the networks do not need a password can be connected directly
You can choose the network from the list you want m click it to connect directly, also you can click the advanced, then click connected to network; you can also select add wireless local area network to add by hand
Network notice: open the switch, it will notice if there any opne networks
The wireless local area network certificate: the wireless local area network loading and management
4.2 Sound setting
In Sound setting, you can choose mute switch which can get more detailed settings if you need. Press volume button to set up proper volume you need, including media volume/ notice volume and the volume of alarm colck.
4.3 Display setting
Display settings contains: Brightness, Wallpapers Settings, Automatic rotating Settings, Dormancy time and Font size.
Brightness
The user can adjust brightness manually to get the lightness you want.
Wallpaper Settings
In the wallpaper setting, you can set up the wall paper and dynamic wallpaper; the wallpaper can be chosen from gallery.
Dormancy time
When the screens in light state a period of time, it will automatically lock to save the power if without any operations.
Font size
You can set up the font size according to individual's favorite, there were respectively: small, ordinary, big, huge.
4.4 Application setting
In the application setting, you can manage the running services and access rights management and development but only for developer.
Application management
In this setting, it is easy to manage and delete some applications that have been installed.
First, get into the application list, click the according to name sort buttons to order the alphabet and number; click the all menu to scan the running program or programs that provide by a third party software developers.
Click on an application, you can see the application's relevant information to clear
The cache, unload programs, clear the default value or forced to stop operation, etc
Running services
In this setting, you can end and set up some programs that are running
Access management
In this setting, by using the opening or prohibition to manage the applications to access content permissions.
4.5 Date & Time setting
In this setting interface, you can set up your system time and series options.
Time setting
You can use automatic time from the network, to choose the time zone, to set specific date and time and display format in time setting.
4.6 Language and input Setting
In this setting interface, you can choose the language you want
Input method
In here the input methods can be set by users, you can add the words in the dictionary or to delete.
Android keyboard
You can set up automatic capital function of opening or closing.
Chapter Five (Specification)
| Dimension(mm*mm*mm) | 243×190.5×11 |
| Weight | Approx 590g |
| LCD | 9.7 "1024 × 768 |
| OS | Android 4.1 |
| Processor | ARM Cortex-A9@1.5GHz |
| Memory | 1024MB DDR3 RAM, 8GB internal |
| WI-FI | 802.11b/g/n |
| Connections | Micro-USB, Micro-SD (up to 32GB), Headphone Jack |
| Battery | 3.7V 6000mAh Li-Poly |
| Service time | Up to 15h music mode, 4h internet, 4.5h video |
| Operating temperature | Between -10°C to 45 °C |

If at any time in the future you should need to dispose of this product please note that waste electrical products should not be disposed of with household waste. Please recycle where facilities exist. Check with your Local Authority or retailer for recycling advice. (Waste Electrical and Electronic equipment Directive)
4.4 Réglages applications


- Installingen applications
- Thanks For Purchasing Your Tablet
- Chapter One:Overview
- Appearance
- Buttons
- Power button
- Volume
- Open and shut down
- Open
- Shut down
- Open and close standby mode
- Open the standby mode
- Close the standby mode
- Lock and unlock the screen
- Lock
- Unlock
- Homepage Information Column
- Text Input
- Reset
- USB connect
- Accessories
- Chapter two: Internet
- Browser
- Chapter three: Application
- Explorer
- Downloads
- Chapter Four: System setting
- Wireless networks setting
- Sound setting
- Display setting
- Brightness
- Wallpaper Settings
- Dormancy time
- Font size
- Application setting
- Application management
- Running services
- Access management
- Date & Time setting
- Time setting
- Language and input Setting
- Input method
- Android keyboard
- Chapter Five (Specification)
- Réglages applications
Brand : SALORA
Model : TAB9702
Category : Tablet