EC65320BB - Cooker GORENJE - Free user manual and instructions
Find the device manual for free EC65320BB GORENJE in PDF.
| Product Type | Electric Range |
| Brand | Gorenje |
| Model | EC65320BB |
| Color | Black |
| Oven Type | Electric with electronic programmer |
| Cooktop Type | Ceramic glass |
| Number of Burners | 4 |
| Display | Digital screen with clock |
| Controls | Touch controls |
| Programmer Functions | Cooking duration, end of cooking, delayed programming, audible alarm |
| Sound Volume Adjustment | Yes, 4 levels |
| Child Safety | Programmer lock |
| Power Supply | 230 V ~ 50 Hz |
| Total Power | Approximately 7 kW |
| Oven Capacity | Approximately 60 L |
| Dimensions (H x W x D) | 85 x 50 x 60 cm |
| Net Weight | Approximately 45 kg |
| Care and Cleaning | Clean with a damp cloth and mild detergent |
| Energy Class | A |
Frequently Asked Questions - EC65320BB GORENJE
User questions about EC65320BB GORENJE
0 question about this device. Answer the ones you know or ask your own.
Ask a new question about this device
Download the instructions for your Cooker in PDF format for free! Find your manual EC65320BB - GORENJE and take your electronic device back in hand. On this page are published all the documents necessary for the use of your device. EC65320BB by GORENJE.
USER MANUAL EC65320BB GORENJE
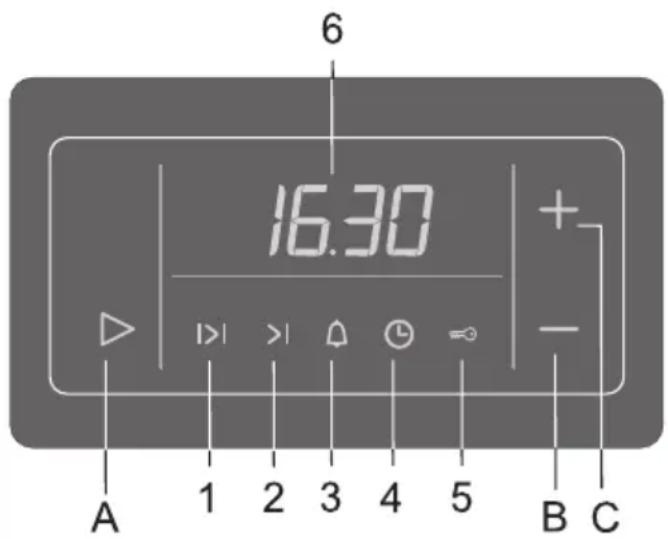
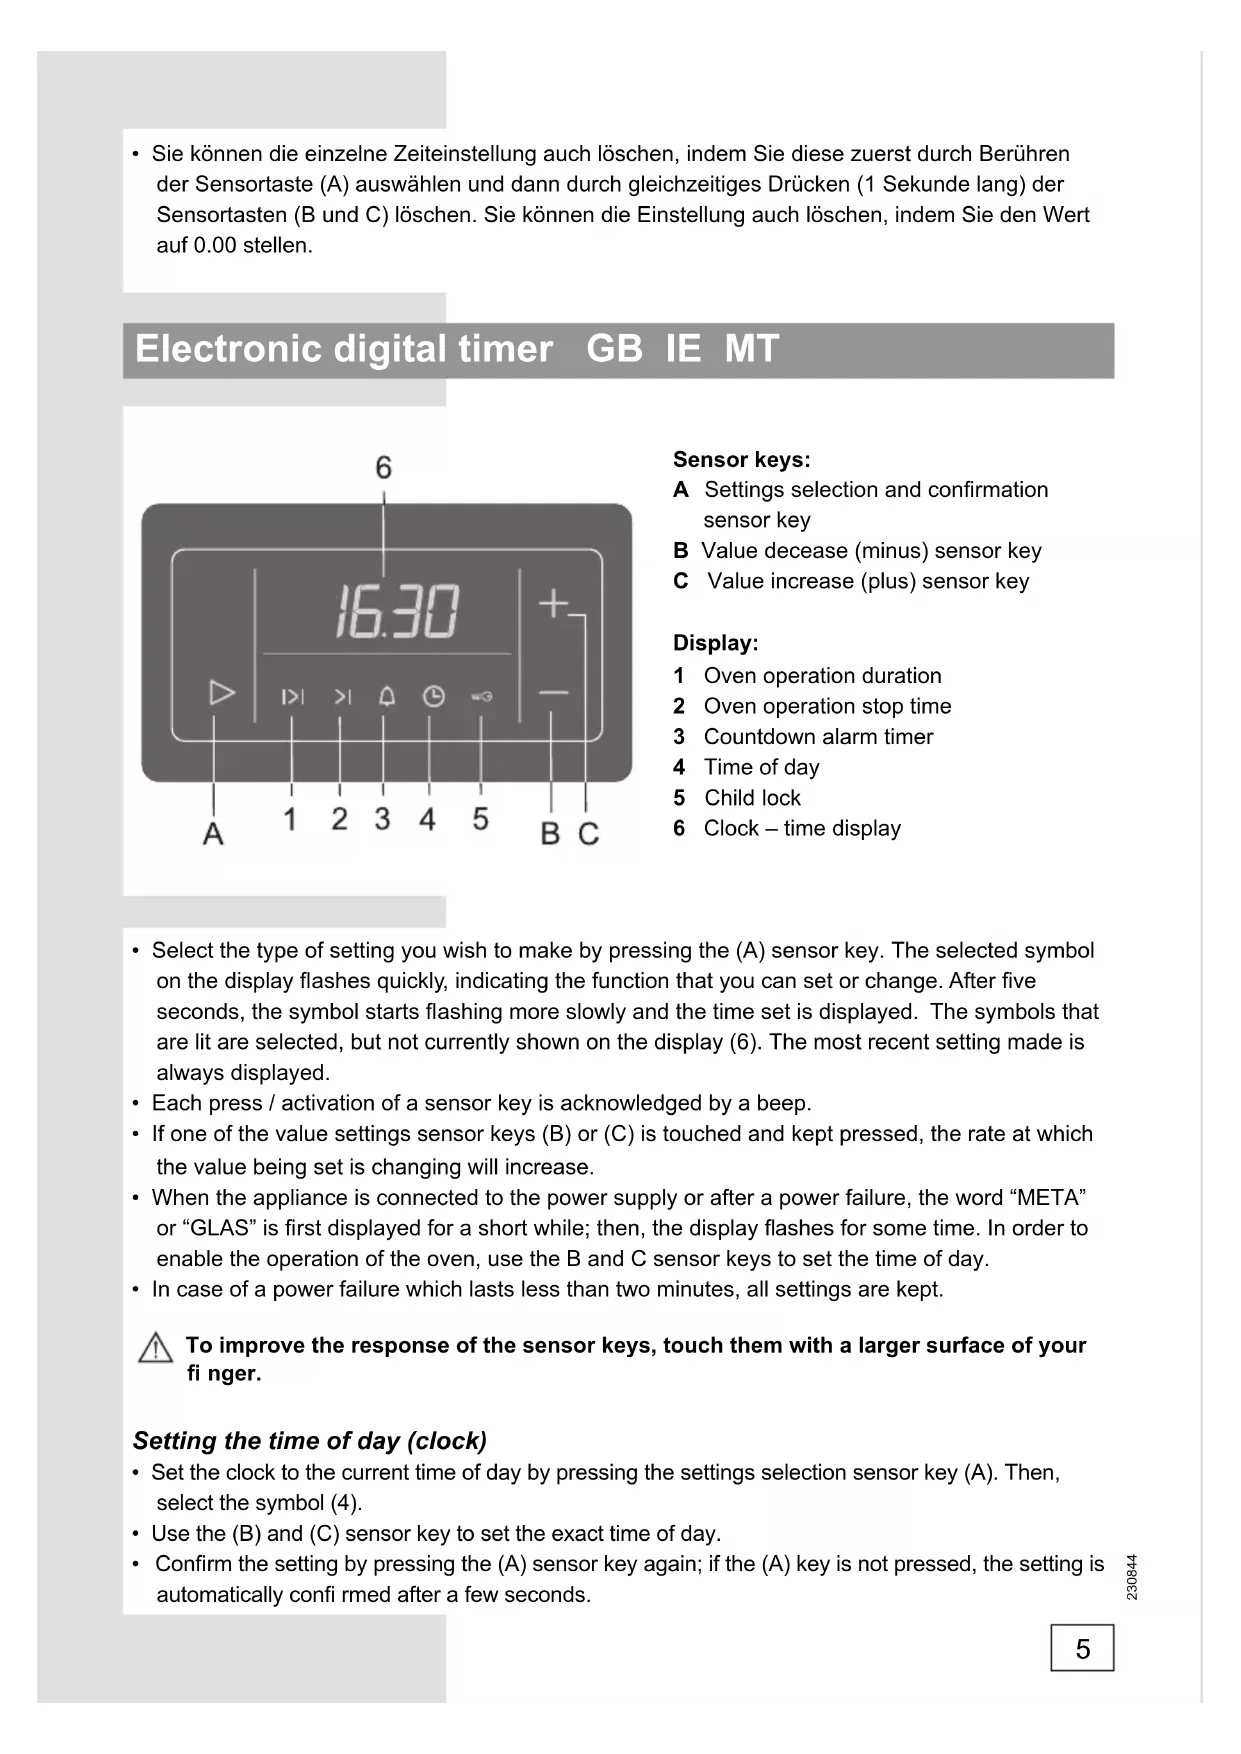
A Settings selection and confirmation sensor key
B Value decease (minus) sensor key
C Value increase (plus) sensor key
Display:
1 Oven operation duration
2 Oven operation stop time
3 Countdown alarm timer
4 Time of day
5 Child lock
6 Clock – time display
- Select the type of setting you wish to make by pressing the (A) sensor key. The selected symbol on the display flashes quickly, indicating the function that you can set or change. After five seconds, the symbol starts flashing more slowly and the time set is displayed. The symbols that are lit are selected, but not currently shown on the display (6). The most recent setting made is always displayed.
• Each press / activation of a sensor key is acknowledged by a beep. - If one of the value settings sensor keys (B) or (C) is touched and kept pressed, the rate at which the value being set is changing will increase.
- When the appliance is connected to the power supply or after a power failure, the word “META” or “GLAS” is first displayed for a short while; then, the display flashes for some time. In order to enable the operation of the oven, use the B and C sensor keys to set the time of day.
- In case of a power failure which lasts less than two minutes, all settings are kept.

To improve the response of the sensor keys, touch them with a larger surface of your finger.
Setting the time of day (clock)
- Set the clock to the current time of day by pressing the settings selection sensor key (A). Then, select the symbol (4).
- Use the (B) and (C) sensor key to set the exact time of day.
- Confirm the setting by pressing the (A) sensor key again; if the (A) key is not pressed, the setting is automatically confirmed after a few seconds.
The program timer can be used to program the oven operation in three ways:
- Cooking time setting – immediate start of oven operation; after a set period of time, the oven is turned off automatically.
- Cooking end time setting – the time at which oven operation is to end is set.
- Delayed start setting – automatic start and end of oven operation at a selected time.
Setting the cooking time
With this program mode, the duration of oven operation is set (cooking time). Maximum setting allowed is 10 hours.
- Press the (A) sensor key to select the symbol (1). Use the (B) and (C) sensor keys to set the duration / cooking time.
- Turn on the oven (use the corresponding oven knobs to set the operation mode and temperature). After the expiration of the set time, the oven will automatically stop operating (end of cooking time). An intermittent beep will sound, which can be stopped by pressing any key; if no key is pressed, the beep stops after one minute.
- The symbol (1) and the sign (_:__) will flash. If you wish to resume cooking, press the (A) sensor key and set a new duration if necessary.
Setting the cooking end time
This mode allows you to set the time at which the oven should stop operating. Maximum setting allowed is 10 hours relative to the current time of day.
- Make sure the current time of day is set correctly.
- Use the (A) sensor key and select the symbol (2). The current time of day is indicated on the display. Press the (B) and (C) sensor keys to set the cooking end time.
- Turn on the oven (use the corresponding oven knobs to set the operation mode and temperature). The oven starts to operate immediately and stops operation at the set time. An intermittent beep will sound, which can be stopped by pressing any key; if no key is pressed, the beep stops after one minute.
- The symbol (1) and the sign (_:__) will flash. If you wish to resume cooking, press the (A) sensor key and set a new duration if necessary.
Setting the oven delayed start
With this operation mode, two settings have to be made: cooking time (duration of oven operation) and cooking end time (tie at which the operation should stop).
Cooking end time can be delayed by a maximum of 24 hours relative to the current time of day.
- Make sure the current time of day is set correctly.
- First, set the cooking time: Press the (A) sensor key to select the symbol (1). Use the (B) and (C) sensor keys to set the duration / cooking time.
- Then, set the cooking end time: Use the (A) sensor key and select the symbol (2). (A sum of the current time of day and the oven operation time is automatically shown on the display). Press the (B) and (C) sensor keys to set the cooking end time.
- The timer will wait for the start of the cooking – both symbols (1 and 2) are lit.
- Turn on the oven (use the corresponding oven knobs to set the operation mode and temperature). At the corresponding time, the oven starts operating automatically (the symbol (2) goes off upon the start of operation), and switches off when the set cooking time has elapsed. An intermittent beep will sound, which can be stopped by pressing any key; if no key is pressed, the beep stops after one minute.
- The symbol (1) and the sign (_:__) will flash. If you wish to resume cooking, press the (A) sensor key and set a new duration if necessary.
Setting the alarm timer
The clock can also be used independently of the oven operation, as an alarm timer that sounds an alarm after the expiration of a preset time.
- Use the (A) sensor key to select the symbol (3). Then, use the (B) and (C) sensor keys to set the time before the alarm sounds. Maximum setting allowed is 10 hours.
- When the set time has elapsed, an intermittent beep will sound, which can be stopped by pressing any key; if no key is pressed, the beep stops after one minute. The symbol (3) will go off.

The last minute of the timer countdown is displayed in second intervals.
Setting the beep volume (loudness)
The alarm volume can be set when no timer function is activated (only current time of day is displayed).
- Press the (B) sensor key and hold it approximately three seconds; a volume indicator will appear, and the corresponding sample sound will sound. "oooo" indicates maximum volume, and "o" indicates minimum volume. Use the (B) sensor key to select among the four loudness levels.
- Confirm the selected volume level by pressing the (A) sensor key; if the (A) sensor key is not pressed, the setting will be confirmed and stored automatically after a few seconds.
Setting the child lock
The clock may be locked only after one of time functions had been previously set (period of operation, end of operation, or alarm). The oven will function normally, but you will not be able to change settings.
Activation: Press the (A) sensor key to select the symbol (5). Use the (B) and (C) sensor keys to activate the child lock; the display will read "ON". Confirm the setting by pressing the (A) sensor key.
Deactivation: Press the (B) or (C) sensor to deactivate the child lock; "OFF" is displayed.
The setting must be confirmed by pressing the (A) sensor key.
Display dimmer
One minute after the appliance is turned off, the display will be dimmed.
Deleting the timer settings
- All timer settings can be deleted any time by pressing the (B) and (C) sensor keys simultaneously and holding them for three seconds. The set programs are automatically interrupted and the timer switches to display of the current time of day.
- Any timer setting can also be deleted in the following way: selecting it using the (A) sensor key, then press the (B) and (C) sensor keys simultaneously. Another way to delete a setting is by setting the timer value to "0.00".