HRSC 184 XE - Fridge HOOVER - Free user manual and instructions
Find the device manual for free HRSC 184 XE HOOVER in PDF.
Download the instructions for your Fridge in PDF format for free! Find your manual HRSC 184 XE - HOOVER and take your electronic device back in hand. On this page are published all the documents necessary for the use of your device. HRSC 184 XE by HOOVER.
USER MANUAL HRSC 184 XE HOOVER
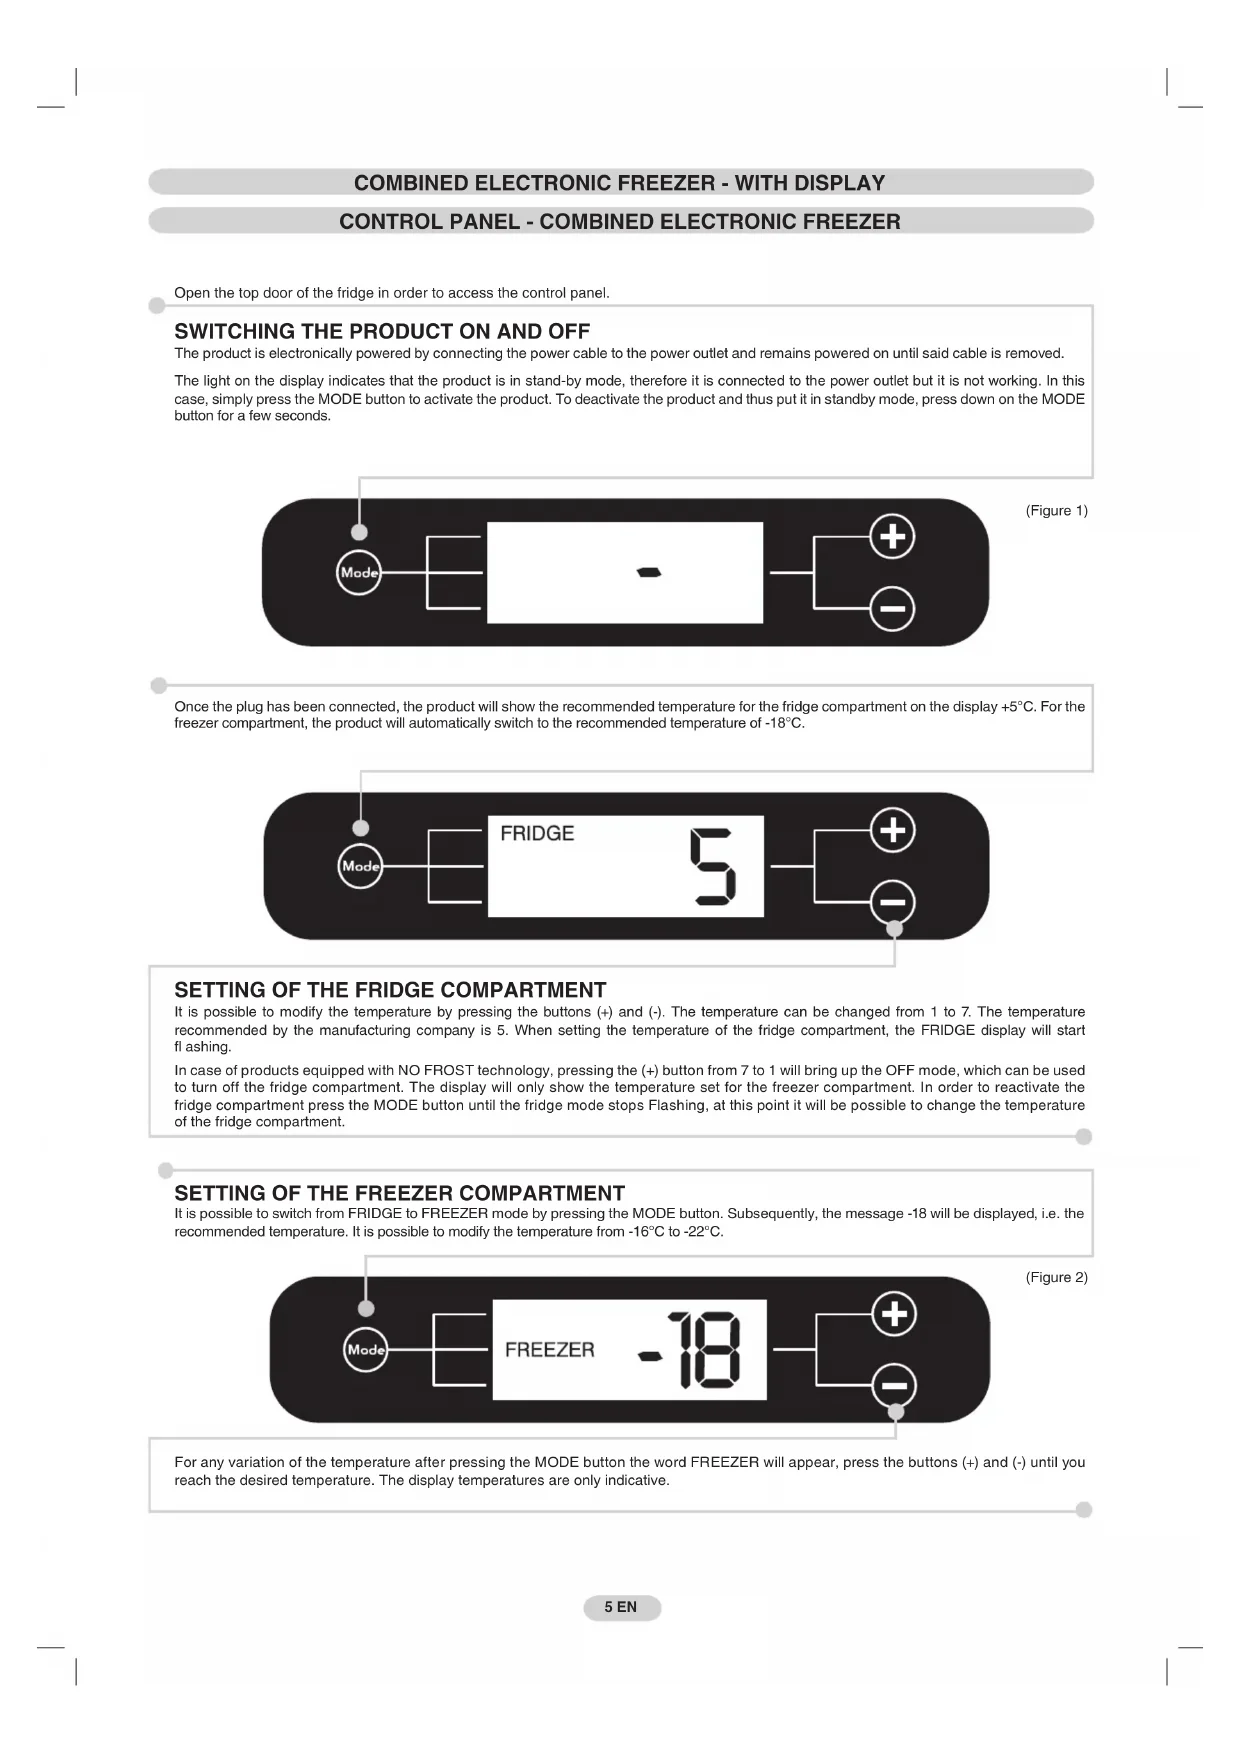
NOTE PER TUTTI I PRODOTTI - ELETTRONICI E MECCANICICOMBINED ELECTRONIC FREEZER - WITH DISPLAY CONTROL PANEL - COMBINED ELECTRONIC FREEZER Open the top door of the fridge in order to access the control panel.
SWITCHING THE PRODUCT ON AND OFF The product is electronically powered by connecting the power cable to the power outlet and remains powered on until said cable is removed.
The light on the display indicates that the product is in stand-by mode, therefore it is connected to the power outlet but it is not working. In this
case, simply press the MODE button to activate the product. To deactivate the product and thus put it in standby mode, press down on the MODE
button for a few seconds.
SETTING OF THE FRIDGE COMPARTMENT It is possible to modify the temperature by pressing the buttons (+) and (-). The temperature can be changed from 1 to 7. The temperature
recommended by the manufacturing company is 5. When setting the temperature of the fridge compartment, the FRIDGE display will start
In case of products equipped with NO FROST technology, pressing the (+) button from 7 to 1 will bring up the OFF mode, which can be used
to turn off the fridge compartment. The display will only show the temperature set for the freezer compartment. In order to reactivate the
fridge compartment press the MODE button until the fridge mode stops Flashing, at this point it will be possible to change the temperature
of the fridge compartment.
SETTING OF THE FREEZER COMPARTMENT It is possible to switch from FRIDGE to FREEZER mode by pressing the MODE button. Subsequently, the message -18 will be displayed, i.e. the
recommended temperature. It is possible to modify the temperature from -16°C to -22°C.
For any variation of the temperature after pressing the MODE button the word FREEZER will appear, press the buttons (+) and (-) until you
reach the desired temperature. The display temperatures are only indicative.
5 EN Once the plug has been connected, the product will show the recommended temperature for the fridge compartment on the display +5°C. For the
freezer compartment, the product will automatically switch to the recommended temperature of -18°C.6 IT
6 EN SUPER OPTIONFREEZING / SUPER OPTION - COMBINED ELECTRONIC FREEZER SUPER OPTIONFAULTS AND ERRORS - COMBINED ELECTRONIC Every error or fault will be automatically shown in the display which will indicate a number preceded by the letter „E” (Error). In this case, try
switching the product off and back on again. If the error persists, contact the technical assistance.
In case of products equipped with NO FROST technology, after a power-cut, the message „PF” (Power Fail) will be shown on the display. In
case of a power-cut lasting over 10-12 hours, check that the foodstuffs has remained unchanged in order to consume it within 24 hours or
proceed to cook it or freeze it.
ELECTRONIC products without NO FROST technology: Press the (+) button in order to activate the SUPER function. Place the foods to
be frozen into the freezer compartment. At the end of the preset time, the product will automatically exit the SUPER function. If you wish to
interrupt the SUPER function in advance, press the (-) button.
ELECTRONIC products with NO FROST technology: Press the (+) button in order to activate the SUPER function. After 8 hours, place the
foods to be frozen in the freezer compartment. At the end of the preset time, the product will automatically exit the SUPER function. If you
wish to interrupt the SUPER function in advance, press the (-) button.
The rating plate states the maximum quantity of foods that can be frozen (see fi gure 6).
Press the mode button repeatedly until the message SUPER is displayed.
In case of a power-cut lasting over 10-12 hours, check that the foodstuffs has remained unchanged in order to consume it within 24 hours or
proceed to cook it or freeze it.
COMBINED MECHANICAL - WITHOUT DISPLAY CONTROL PANEL - COMBINED MECHANICAL FREEZING OF THE FREEZER COMPARTMENT - COMBINED MECHANICAL The thermostat box to control the appliance is located inside the fridge compartment
on the top right. To check whether the appliance is functioning, make sure that the
thermostat knob is not set on "0". Adjust the knob according to the desired temperature
In this product the freezer compartment is automatically defrosted.
In products without NO FROST technology, the presence of a slight layer of frost or
drops of water when the freezer is working is normal.
Make sure the water outlet is always clean. Make sure foods do not touch the back or
sides of the fridge compartment
Important: If the room temperature is very warm, appliances without NO FROST technology may work continuously and a layer of frost will deposit
on the back of the fridge compartment. In this case, turn the knob to lower
Place the foods to be freezer drawer, at the start of the freezing process, therefore not making the fridge compartment excessivley cold, it may be
necessary to turn the thermostat knob up or down, according to the load and room temperature. Once the freezing process is completed, return the
thermostat knob to the usual value. The rating plate states the maximum quantity of foods that can be frozen, (see fi gure 6).
In the case of a fridge without electronic display, open the top door of the fridge in order to reach the control panel (thermostat box).DEFROSTING OF THE FREEZER COMPARTMENT - COMBINED MECHANICAL In case of a fridge with NO FROST technology, the freezer compartment does not need to be defrosted
because this product is equipped with an automatic system which prevents ice from forming.
For the version without NO FROST technology, we recommend manually defrosting the freezer area
when the layer of frost is more than 3 mm thick. Turn the knob to "0", open the door and place the foods
in a cool place. Leave the door open as long as is necessary for the layer of frost to melt. Dry the inside
of the freezer with a sponge/cloth. Reposition the foodstuffs and reset the knob to the usual values.
N.B.: This is the rating plate. If you need to contact our Service Department in the event of
faults, remember to give them the information on the plate.
N.B.: For better air circulation, leave some room between the
N.B.: To TEST consumption and preservation standards, remove
all drawers except for the bottom one.
DRAINING WATER - COMBINED MECHANICAL In some models of mechanical refrigerators (without display) and without NO FROST technology, the freezer has a system for draining water while
defrosting. This system comprises:
A drip tray which must be pulled out so water can fl ow into a basin.
A drainage basin (not supplied).
In fridges with NO FROST technology, the system for draining water while defrosting is automatic.
7 EN REVERSING THE OPENING OF THE DOORS Place or tilt the fridge at a 45° angle, since it is
necessary to work on the bottom of the appliance
Remove the bottom hinge by removing the screws,
the plug and washers, then remove the bottom door.
Unscrew the central hinge and remove the
Unscrew the hinge from the fridge door and
mount the one supplied on the other side
Remove the caps (A) and (B), loosen the
screws and partially remove the panel taking
care not to damage the rear electrical part.
Unscrew the right hinge
Flip the top left-hand hinge found in the
Fit the panel, and secure with the screws
Reassemble the hinges and doors working
from bottom to top, 1 2 3
Put the appliance in an upright position and
wait two hours before turning it on
In order to obtain the correct alignment of the
doors it is necessary to work on the middle hinge.
NOTES FOR ALL PRODUCTS - ELECTRONIC AND MECHANICALELEKTRONISCH GESTEUERTE KÜHL-/GEFRRIERKOMBINATION - MIT DISPLAY BEDIENFELD - ELEKTRONISCH GESTEUERTE KÜHL-/GEFRRIERKOMBINATION
Retire as tampas (A) e (B), desaperte os parafusos