PowerPro FC8761 - Aspirateur PHILIPS - Free user manual and instructions
Find the device manual for free PowerPro FC8761 PHILIPS in PDF.
Download the instructions for your Aspirateur in PDF format for free! Find your manual PowerPro FC8761 - PHILIPS and take your electronic device back in hand. On this page are published all the documents necessary for the use of your device. PowerPro FC8761 by PHILIPS.
USER MANUAL PowerPro FC8761 PHILIPS
Register your product and get support at
Congratulations on your purchase and welcome to Philips! To fully benet from the support that
Philips offers, register your product at www.philips.com/welcome.
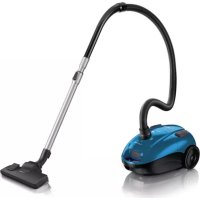
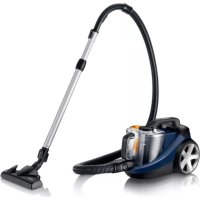
General description (Fig. 1)
12 Dust bucket release button
13 Dust bucket with handle
15 Hose connection opening
17 Hose connection release buttons
22 Combination nozzle (specic types only)
24 AeroSeal nozzle (specic types only)
26 TriActive nozzle (specic types only)
28 Turbo nozzle (specic types only)
30 Super Parquet nozzle (specic types only)
32 Crevice nozzle (specic types only)
33 Small nozzle (specic types only)
34 Telescopic tube with easy-release button
35 Brush nozzle (specic types only)
Read this user manual carefully before you use the appliance and save it for future reference.
- Never vacuum up water or any other liquid. Never vacuum up ammable substances and do
not vacuum up ashes until they are cold.
- Check if the voltage indicated on the appliance corresponds to the local mains voltage before
you connect the appliance.
- Do not use the appliance if the plug, the mains cord or the appliance itself is damaged.
- If the mains cord is damaged, you must have it replaced by Philips, a service centre authorised by
Philips or similarly qualied persons in order to avoid a hazard.
- This appliance can be used by children aged 8 or above and by persons with reduced physical,
sensory or mental capabilities, or lack of experience and knowledge, if they have been given
instructions in safe use of the appliance and supervision to establish safe use and if they have
been made aware of the hazards involved.
- Do not allow children to play with the appliance.
- Children are only allowed to empty and clean the dust bucket and clean or replace the lters
- Do not point the hose, the tube or any other accessory at the eyes or ears nor put it in your
mouth when it is connected to the vacuum cleaner and the vacuum cleaner is switched on.
- The plug must be removed from the socket-outlet before cleaning or maintaining the appliance.
- Do not clean any parts of the appliance in the dishwasher.
- Make sure the main lter and the foam lter are completely dry before you place them back
into the appliance after cleaning.
- When you use the appliance to vacuum ashes, ne sand, lime, cement dust and similar
substances, the pores of the foam lter become clogged. If you notice a strong decrease in
suction power, clean the foam lter.
- Only use the original Philips lters, do not attempt to make any of the lters yourself.
- Never use the appliance without any of the lters. This damages the motor and shortens the life
- Do not vacuum up large objects as this may cause the air passage in the tube or hose to
- The appliance does not work if the dust bucket or the dust bucket lid is not properly placed.
- For the best performance, clean both the main lter and foam lter at least 4 times per year.
- Do not remove any of the rubber sealings.
- Do not clean any of the rubber sealings with cleaning detergent.
- You should not rinse the dust bucket under the tap. If you accidentally did this anyway, make
sure that you remove and dry the detachable cover before you put the dust bucket back into
- During vacuum cleaning, especially in rooms with low air humidity, your vacuum cleaner builds
up static electricity. As a result you can experience electric shocks when you touch the tube or
other steel parts of your vacuum cleaner. These shocks are not harmful to you and do not
damage the appliance. To reduce this inconvenience we advise you:
1 to discharge the appliance by frequently holding the tube against other metal objects in the
room (for example legs of a table or chair, radiator etc.); (Fig. 2)
2 to raise the air humidity level in the room by placing water in the room. For example, you can
hang containers lled with water from your radiators or place bowls lled with water on or
near your radiators (Fig. 3).
ENGLISH 7Electromagnetic elds (EMF)
This Philips appliance complies with all standards regarding electromagnetic elds (EMF). If handled
properly and according to the instructions in this user manual, the appliance is safe to use based on
scientic evidence available today.
1 To connect the hose, insert it into the hose connection opening until it snaps into place
2 To disconnect the hose, press the release buttons (1) and pull the hose out of the hose
connection opening (2) (Fig. 5).
1 To connect the tube to the handgrip of the hose, insert the handgrip into the tube. Fit the
spring-loaded lock button into the opening in the tube until it snaps into place (‘click’) (Fig. 6).
- To disconnect the tube, push the easy-release button and pull the handgrip out of the tube.
1 Move the tube lock up or down to adjust the tube length so that the handgrip is at hip
Connecting the nozzles
- To connect the nozzle or an accessory to the tube, insert the tube into the nozzle or accessory.
Fit the spring-loaded lock button into the opening in the nozzle or accessory until it snaps into
place (‘click’). (Fig. 8)
Note: You can also connect the nozzle or accessories directly to the handgrip.
AeroSeal nozzle (specic types only)
The AeroSeal nozzle is specially designed to reach deeper into oor crevices and carpets to capture
more dust and uff at each stroke.
- Use the hard oor setting to clean hard oors (for instance tiled, parqueted, laminated and
linoleumed ooring): push the rocker switch on top of the nozzle with your foot to make the
brush strip come out of the housing (Fig. 9).
- Use the carpet setting to clean carpets: push the rocker switch again to make the brush strip
disappear into the nozzle housing (Fig. 10).
TriActive nozzle (specic types only)
The TriActive nozzle is a multi-purpose nozzle for carpets and hard oors.
- The side brushes catch more dust and dirt at the sides of the nozzle and allow you to clean
better along furniture and other obstacles (Fig. 11).
- The opening at the front of the nozzle allows you to vacuum larger particles (Fig. 12).
1 Tocleanhardoors,pushtherockerswitchontopofthenozzlewithyourfoot(Fig.13).
, Thebrushstripforcleaninghardoorscomesoutofthehousing.Atthesametime,the
wheel is lifted to prevent scratching and to increase manoeuvrability.
2 To clean carpets, push the rocker switch again. (Fig. 14)
, Thebrushstripdisappearsintothenozzlehousingandthewheelisloweredautomatically.
Combination nozzle (specic types only)
The combination nozzle can be used on either carpets or hard oors.
ENGLISH81 Tocleanhardoors,pushtherockerswitchontopofthenozzlewithyourfoot(Fig.15).
, Thebrushstripforcleaninghardoorscomesoutofthenozzlehousing.
2 To clean carpets, push the rocker switch again. (Fig. 16)
, Thebrushstripdisappearsintothenozzlehousing.
Crevice nozzle, small nozzle and brush nozzle (specic types only)
1 Connectthesmallnozzle,crevicenozzleorbrushnozzledirectlytothehandgriportothe
1 Use the crevice nozzle to clean narrow corners or hard-to-reach places.
2 Use the small nozzle to clean small areas, e.g. the seats of chairs and sofas.
3 Use the brush nozzle to clean computers, bookshelves etc.
1 Pull the cord out of the appliance completely and insert the mains plug into the wall socket.
2 Press the on/off button on top of the appliance with your foot to switch on the
appliance (Fig. 19).
3 Ifyouwanttopauseforamoment,inserttheparkingridgeonthenozzleintotheparking
slot to park the tube in a convenient position (Fig. 20).
Adjusting suction power
- During vacuuming, you can adjust the suction power with the suction power
knob on top of the appliance (Fig. 21).
- Use maximum suction power to vacuum very dirty carpets and hard oors.
- Use moderate suction power to vacuum carpets.
- Use minimum suction power to vacuum furniture, table carpets, etc.
Tip: By reducing suction power, you can move the nozzle across the oor more easily.
Cleaning and maintenance
The plug must be removed from the socket-outlet before cleaning or maintaining the appliance.
Do not clean any part of the appliance in the dishwasher.
Emptying the dust bucket
Note: For optimal performance, empty the dust bucket after use. Always empty the dust bucket when the
Caution: Children are only allowed to empty and clean the dust bucket and clean or replace the
ltersundersupervision.
ENGLISH 91 Press the dust bucket release button, grab the dust bucket handle and lift the dust bucket out
of the appliance. (Fig. 23)
2 Remove the lid of the dust bucket (Fig. 24).
5 Put the dust bucket back into the appliance and push down the top handle (‘click’) (Fig. 27).
Caution: You should not rinse the dust bucket under the tap. If you accidentally did this anyway,
make sure that you remove and dry the detachable cover before you put the dust bucket back
into the appliance. (Fig. 28)
Cleaning and replacing the lters
Caution:Donotuseanyotherlters.UseonlyoriginalPhilipsHEPAlters.Formore
informationonorderingHEPAlters,seechapter‘Orderingaccessories’.
Note: In case of normal use you do not have to replace the main lter.
Note: Only replace the foam lter when it is very dirty and cannot be cleaned properly or when it is
Cleaning the foam lter and the main lter
Tip: To prevent dirty hands, you can use the tag to remove the lter.
3 Cleanthefoamlterandthemainlterunderthetap(Fig.31).
Neveruseabrushorcleaningagenttocleanthefoamlterandthemainlter.Donotclean
them in the washing machine or dishwasher either.
Note: Cleaning does not restore the original colour of the lter, but it does restore its ltration power.
4 Wringoutthebluefoamlter(Fig.32).
5 Letthefoamlterandthemainlterdryforatleast24hours,outofdirectsunlight(Fig.33).
Makesurethatthefoamlterandthemainlterarecompletelydry.
English10Cleaning the Super Clean Air HEPA lter
Clean the Super Clean Air HEPA lter every 6 months. You can clean the Super Clean Air Hepa
lter max. 4 times. Replace the lter after it has been cleaned 4 times.
1 Todetachtheltergrille,pushthetabdownwards(1)andpullthegrilletowardsyou
4 Carefullyshakethewaterfromthesurfaceofthelter.Letthelterdrycompletely(atleast
2 hours) before you put it back into the vacuum cleaner.
Note: Cleaning does not restore the original colour of the lter, but does restore its ltration power.
5 Clickthelterbackintoplace(Fig.39).
Note: Make sure the tab of the lter is located at the top.
Note: Make sure the tab of the lter is located at the top.
4 Reattachtheltergrilletothevacuumcleaner.(Fig.40)
1 Switch off the appliance and remove the mains plug from the wall socket.
2 Press the cord rewind button to rewind the cord (Fig. 41).
3 Puttheapplianceinuprightposition.Inserttheridgeonthenozzleintothestorageslotto
store the tube, adjust the tube to the shortest length and then put away the
appliance. (Fig. 42)
Ordering accessories
To purchase accessories for this appliance, please visit our website www.philips.com/shop. If you
have any difculties obtaining accessories for your appliance, please contact the Philips Consumer
Care Centre in your country. You will nd its contact details in the worldwide guarantee leaet. You
can also visit www. philips.com/support.
- HEPA lters are available under type number FC8038.
- Foam lters are available under type number 4322 004.9369.0.
ENGLISH 11Environment
- Do not throw away the appliance with the normal household waste at the end of its life, but
hand it in at an ofcial collection point for recycling. By doing this, you help to preserve the
environment (Fig. 43).
- To save energy, switch off the appliance when you stop vacuum cleaning, even if it is only for a
Guarantee and service
If you need service or information or if you have a problem, please visit the Philips website at
www.philips.com or contact the Philips Consumer Care Centre in your country. You nd its phone
number in the worldwide guarantee leaet. If there is no Consumer Care Centre in your country, go
to your local Philips dealer.
This chapter summarises the most common problems you could encounter with the appliance. If
you are unable to solve the problem with the information below, contact the Consumer Care
Centre in your country.
1 Thesuctionpowerisinsufcient
- Perhaps the dust bucket is full.
If necessary, empty the dust bucket.
- Perhaps the suction power knob is not at right setting.
- Perhaps the dust bucket lid is not placed correctly.
Place the lid correctly.
- Perhaps the lters need to be cleaned or replaced.
If necessary, clean or replace the lters.
- Perhaps the nozzle, tube or hose is blocked up.
- To remove the obstruction, disconnect the blocked-up part (hose or tube) and connect it (as
well as possible) the other way round. Switch on the vacuum cleaner to force the air through
the blocked-up part in opposite direction (Fig. 44).
2 Itisdifculttomovethenozzleovertheoor.
- By reducing suction power, you can move the nozzle across the oor more easily
www.Philips. com/support.