PowerLife FC8443 - Vacuum Cleaner PHILIPS - Free user manual and instructions
Find the device manual for free PowerLife FC8443 PHILIPS in PDF.
Download the instructions for your Vacuum Cleaner in PDF format for free! Find your manual PowerLife FC8443 - PHILIPS and take your electronic device back in hand. On this page are published all the documents necessary for the use of your device. PowerLife FC8443 by PHILIPS.
USER MANUAL PowerLife FC8443 PHILIPS
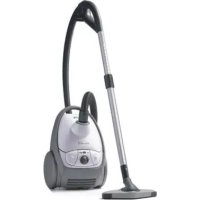
Introduction Congratulations on your purchase and welcome to Philips! To fully benet from the support that Philips offers, register your product at www.philips.com/welcome. General description (Fig. 1) 1 Cover 2 Cord rewind button 3 Dustbag full indicator 4 On/off button 5 Rear wheel 6 Hose connector 7 Hose connection opening 8 Cover release tab 9 Handle 10 Dustbag 11 Motor protection lter 12 Motor protection lter holder 13 Motor inlet 14 Swivel wheel 15 Type plate 16 Storage slot 17 Mains cord with plug 18 Exhaust micro lter grille 19 Exhaust micro lter 20 Parking slot 21 Rocker switch for carpet/hard oor settings 22 Combination nozzle 23 Tube parts 24 Hose with handgrip and suction power slide Important Read this user manual carefully before you use the appliance and save it for future reference. Danger - Never vacuum up water or any other liquid. Never vacuum up ammable substances and do not vacuum up ashes until they are cold. Warning - Check if the voltage indicated on the appliance corresponds to the local mains voltage before you connect the appliance. - Do not use the appliance if the mains cord, the plug or the appliance itself is damaged. - If the mains cord is damaged, you must have it replaced by Philips, a service centre authorised by Philips or similarly qualied persons in order to avoid a hazard. - The plug must be removed from the socket-outlet before cleaning or maintaining the appliance.
This appliance is not intended for use by persons (including children) with reduced physical, sensory or mental capabilities, or lack of experience and knowledge, unless they have been given supervision or instruction concerning use of the appliance by a person responsible for their safety. - Children should be supervised to ensure that they do not play with the appliance. - Do not point the hose, the tube or any other accessory at the eyes or ears nor put it in your mouth when it is connected to the vacuum cleaner and the vacuum cleaner is switched on. - Do not clean any part of the vacuum cleaner in the dishwasher. ENGLISHCaution - Do not vacuum up large objects as this may cause the air passage in the tube or hose to become obstructed. - When you use the vacuum cleaner to vacuum ashes, ne sand, lime, cement dust and similar substances, the pores of the dustbag and the motor protection lter become clogged. If you notice a strong decrease in suction power, replace the dustbag and clean the motor protection lter. - Never use the appliance without a dustbag or the motor protection lter. This could damage the motor and shorten the life of the appliance. Only use Philips s-bag
dustbags or Philips reusable dustbag. - Noiselevel: Lc= 84 dB(A) Electromagnetic elds (EMF) This Philips appliance complies with all standards regarding electromagnetic elds (EMF). If handled properly and according to the instructions in this user manual, the appliance is safe to use based on scientic evidence available today. Preparing for use Hose 1 To connect the hose, push the hose connector into the hose connection opening (‘click’) (Fig. 2). 2 To disconnect the hose, press the release buttons (1) and pull the hose connector out of the hose connection opening (2) (Fig. 3). Tube parts 1 Push the handgrip into the suction tube. (Fig. 4) To remove it, turn the handle slightly and pull it off the tube. 2 Insert one tube part into the other part. Combination nozzle You can use the combination nozzle on carpet (with the brush strips folded in) or on hard oors (with the brush strips folded out). Using the appliance Vacuum cleaning 1 Pull the cord out of the appliance and insert the mains plug into the wall socket. 2 Press the on/off button on top of the appliance with your foot to switch on the appliance (Fig. 5). Note: If you want to pause for a moment, insert the ridge on the nozzle into the parking slot to park the tube in a convenient position (Fig. 6). Cleaning and maintenance The plug must be removed from the socket-outlet before cleaning or maintaining the appliance. 1 Clean the appliance and its parts with a damp cloth. Do not clean any part of the vacuum cleaner in the dishwasher. ENGLISH 7Cleaning the motor protection lter To maintain optimal performance, clean the motor protection lter at least once a year. 1 Pull the cover upwards to open it (Fig. 7). 2 Lift the dustbag out of the appliance (Fig. 8). 3 Pullthelterholderwiththemotorprotectionlteroutoftheappliance(Fig.9). 4 Takethemotorprotectionlteroutoftheholderandshakethemotorprotectionlter over a dustbin to clean it. 5 Putthelterinthelterholderandslidethelterholderbackintotheappliance. 6 Put the dustbag back into the appliance, and close the cover. Emptying the reusable washable dustbag In some countries, this vacuum cleaner comes with a reusable washable dustbag. You can use this dustbag instead of disposable dustbags. To remove and insert the reusable dustbag, follow the instructions in chapter ‘Replacing the dustbag’. To empty the dustbag: 1 Slide the clip off the dustbag sideways. 2 Shake out the contents into a dustbin. 3 To close the dustbag, slide the clip back onto the bottom edge of the dustbag. Replacement The plug must be removed from the socket-outlet before cleaning or maintaining the appliance. Replacing the disposable dustbag - Replace the dustbag as soon as the dustbag-full indicator has changed colour permanently, i.e. even when the nozzle is not placed on the oor (Fig. 10). 1 Pull the cover upwards to open it and tilt the dustbag holder forward. (Fig. 7) 2 Pull at the cardboard tag to remove the full dustbag from the holder (Fig. 8). , When you do this, the dustbag is sealed automatically. 3 Slide the cardboard front of the new dustbag into the two grooves of the dustbag holder as far as possible (Fig. 11). 4 Tilt the dustbag holder backward (Fig. 12). Note: If no dustbag has been inserted, you cannot close the cover. 5 Push the cover downwards to close it. Replacing the exhaust micro lter Alwaysunplugtheappliancebeforeyoureplacealter. Replace the exhaust micro lter every 12 months. 1 The plug must be removed from the socket-outlet. 2 Opentheexhaustmicroltergrille. 3 Removethelterandplacethenewlterintheappliance. ENGLISH84 Toclosetheexhaustgrille,rstalignthelugsonthebottomofthegrillewiththeslotsinthe appliance (1). Then press the tab back on the appliance until the grille locks into place (2) (‘click’) (Fig. 13). Ordering accessories To purchase accessories for this appliance, go to your Philips dealer, Philips service centre or contact the Philips Consumer Care Centre in your country. You can also visit www.philips.com/support. Ordering Philips s-bag
classic long performance dustbags last 50% longer than standard dustbags, thanks their non-clogging material. Available under type number FC8021. - Reusable washable dustbags (some countries only) are available under code number