REOLINK Argus PT - Surveillance Camera

Argus PT - Surveillance Camera REOLINK - Free user manual and instructions

Find the device manual for free Argus PT REOLINK in PDF.

📄 9 pages English EN Download 💬 AI Question 13 questions ⚙️ Specs
Notice REOLINK Argus PT - page 3
View the manual : Français FR English EN
Pick your language and provide your email: we'll send you a specifically translated version.
Product Type Wireless Outdoor Surveillance Camera
Brand Reolink
Model Argus PT
Video Resolution 1920 x 1080 pixels (Full HD)
Viewing Angle Horizontal Pan 355°, Vertical Tilt 140°
Night Vision Yes, up to 10 meters with infrared LEDs
Power Rechargeable Li-ion 6000 mAh battery (included)
Battery Life Up to 6 months in normal use (depending on settings)
Connectivity Wi-Fi 2.4 GHz (802.11 b/g/n)
Storage microSD card up to 128 GB (not included) or Reolink cloud
Audio Built-in microphone and speaker (two-way audio)
Motion Detection Yes, with push alerts and customizable zones
Protection Rating IP65 (weatherproof)
Operating Temperature -10°C to 55°C
Dimensions 106 x 88 x 126 mm
Weight 550 g (with battery)
Mounting Wall or ceiling (mount and screws included)
Compatibility iOS, Android, PC (via Reolink client)
Certifications CE, FCC, ISED
Maintenance and Cleaning Clean the lens with a soft, dry cloth. Avoid chemical products.
Security SSL/TLS encryption, two-factor authentication, firmware update
Spare Parts and Repairability Replaceable battery, mounting bracket available as option
Warranty 2 years (excluding battery)

Frequently Asked Questions - Argus PT REOLINK

What is the battery life of the Reolink Argus PT?
Battery life can reach 6 months in normal use, but varies depending on recording frequency, motion detection, and temperature.
Is the Reolink Argus PT rainproof?
Yes, it has an IP65 rating, making it resistant to rain and dust.
How to record videos on the Reolink Argus PT?
You can record on a microSD card (up to 128 GB, not included) or use Reolink cloud (optional subscription).
Can the Reolink Argus PT be used wirelessly?
Yes, it works on 2.4 GHz Wi-Fi and does not require a network cable, but needs battery power.
Does the Reolink Argus PT detect motion?
Yes, it has a built-in PIR motion detector that sends push alerts to your smartphone when motion is detected.
Can you talk through the Reolink Argus PT camera?
Yes, it is equipped with a microphone and speaker allowing real-time two-way audio communication.
How to install the Reolink Argus PT?
Attach the mount to the wall or ceiling with the provided screws, insert the battery, and follow the Reolink app instructions to set up Wi-Fi.
What is the video quality of the Reolink Argus PT?
It offers 1080p Full HD resolution (1920 x 1080 pixels) with infrared night vision up to 10 meters.
Can the Reolink Argus PT be remotely oriented?
Yes, thanks to its pan and tilt motor, you can rotate it horizontally 355° and vertically 140° via the app.
Does the Reolink Argus PT work with solar panels?
Yes, it is compatible with the Reolink solar panel (sold separately) for continuous charging and extended battery life.

User questions about Argus PT REOLINK

3 questions about this device. Answer the ones you know or ask your own.

Ask a new question about this device

The email remains private: it is only used to notify you if someone responds to your question.

What is the impact of disabling the PIR sensor on the REOLINK Argus PT camera?
Frequently Asked Questions - 27 j
Response Notice-Facile

The PIR (Passive Infrared Sensor) is a fundamental component of the REOLINK Argus PT camera for motion detection. Disabling this sensor has direct impacts on the operation and battery life of your device.

Impact on battery life: The PIR sensor continuously consumes energy to analyze the passive infrared of its environment. By disabling it, the camera saves this continuous consumption, which can significantly extend the overall battery life. Depending on the model, the battery life typically ranges from 2 to 6 months based on usage; disabling the PIR can substantially increase this duration since the camera will no longer need to keep this sensor active.

Impact on detection and alerts: Once the PIR sensor is disabled, the camera will no longer automatically record detected movements. You will not receive real-time notifications during an intrusion or activity within the field of view. You will need to manually activate recording or check the live video feed via the Reolink app to monitor your area.

Reduction of false alerts: If your environment generates many irrelevant movements (pets, branches, pedestrian traffic), disabling the PIR can eliminate these nuisance notifications. This advantage is particularly useful in installations that are overexposed to false movements.

When to disable the PIR sensor: This option is recommended if you do not want the camera to trigger automatic recordings and if battery conservation is a priority. It is suitable for installations where manual and scheduled monitoring is sufficient, or as a backup mode to extend battery life at the end of the charge.

Respond (be the first)
What is a PIR sensor on the REOLINK Argus PT camera and what is it used for?
Frequently Asked Questions - 27 j
Response Notice-Facile

The PIR sensor (Passive Infrared Sensor) is a motion sensor integrated into the REOLINK Argus PT camera. It works by detecting changes in heat emitted by moving objects and people. The term "passive" means that it does not produce its own radiation, but only detects changes in heat present in its environment, making it effective for identifying suspicious activity without consuming energy for active emission.

Role of the PIR sensor: The sensor serves three essential functions. First, it detects any movement within its field of view by identifying changes in heat, which generally corresponds to the presence of a person or an animal. Then, when movement is detected, the camera automatically triggers video recording or takes photos, allowing important events to be captured without manual intervention. Finally, the sensor sends real-time alerts to your smartphone via the Reolink app, instantly notifying you of any detected activity.

Optimal installation of the sensor on the Argus PT: To benefit from maximum efficiency of the PIR sensor, it is crucial to follow the installation conditions recommended by the manufacturer. The camera must be installed upside down (with the lens facing down) to ensure both better waterproofing and maximum efficiency of the PIR sensor. Additionally, install the camera at a height of 2 to 3 meters (7 to 10 feet) above the ground, as this height significantly maximizes the detection range of the sensor. Finally, position the camera at an angle rather than directly facing a wall, as an object approaching vertically to the PIR sensor may not be detected properly.

Impact on battery consumption: The PIR sensor consumes energy continuously when active. Since the Argus PT is not designed to operate 24/7 at full capacity, but rather to record movement events and allow on-demand live viewing, you can optimize battery life by disabling the sensor in the Reolink app settings, under the Detection or Alerts section. This deactivation significantly reduces energy consumption, which is particularly useful if you currently do not need motion detection. However, note that disabling the PIR means giving up automatic recording and instant alerts, and you will then need to manually monitor the camera. To extend battery life while maintaining good detection, you may also consider using compatible Reolink solar panels, which will continuously recharge the camera.

Respond (be the first)
Why isn't the solar panel of my REOLINK Argus PT camera charging the battery?
Frequently Asked Questions - 27 j
Response Notice-Facile

If the solar panel of your REOLINK Argus PT camera is not charging the battery, several causes may explain this issue. Here are the points to check and possible solutions:

1. Check sun exposure

The solar panel must be placed in a location where it receives direct and maximum sunlight. Ensure that it is not in the shade of trees, buildings, or other obstacles that could reduce sunlight.

2. Check the connection between the solar panel and the camera

Make sure the cable is properly connected and that the connection is secure. In the Reolink app, a solar panel icon should appear to indicate that the camera is receiving solar power.

3. Consider the ambient temperature

Solar panel charging works efficiently between 0°C and 45°C. In colder temperatures, the battery may not charge properly. In this case, recharge the camera with a DC5V/2A power adapter indoors before reconnecting the solar panel.

4. Reduce the camera's energy consumption

  • Decrease the frequency of alerts and live previews in the app.
  • Disable the PIR sensor if you are not using it, as it can increase consumption.

Excessive consumption may exceed the solar panel's charging capacity, especially in low light conditions.

5. Perform a partial reset

Recharge the camera to over 50% with a power adapter, then reconnect the solar panel in a well-sunny position. Monitor if the battery charge increases afterwards.

6. Test with another solar panel

If the problem persists, try using another compatible solar panel to check if the issue is with the panel itself.

By following these steps, you should be able to identify and resolve most solar charging issues with your REOLINK Argus PT camera.

Respond (be the first)

Download the instructions for your Surveillance Camera in PDF format for free! Find your manual Argus PT - REOLINK and take your electronic device back in hand. On this page are published all the documents necessary for the use of your device. Argus PT by REOLINK.

USER MANUAL Argus PT REOLINK

Install the Camera 7

Safety Instructions of Battery Usage 12

Troubleshooting 13

Specification 14

Notification of Compliance 14

What's in the Box
REOLINK Argus PT - What's in the Box - 1
Camera

REOLINK Argus PT - What's in the Box - 2
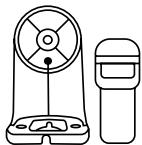
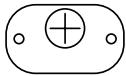
Camera Bracket

REOLINK Argus PT - What's in the Box - 3
Mount Base

REOLINK Argus PT - What's in the Box - 4
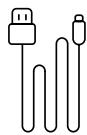
Type-C Cable

REOLINK Argus PT - What's in the Box - 5
Antenna

REOLINK Argus PT - What's in the Box - 6
Reset Needle

REOLINK Argus PT - What's in the Box - 7
Quick Start Guide

REOLINK Argus PT - What's in the Box - 8
Surveillance Sign

REOLINK Argus PT - What's in the Box - 9
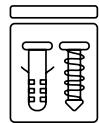
Pack of Screws

REOLINK Argus PT - What's in the Box - 10
Mounting Template

REOLINK Argus PT - What's in the Box - 11
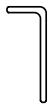
Hex Key

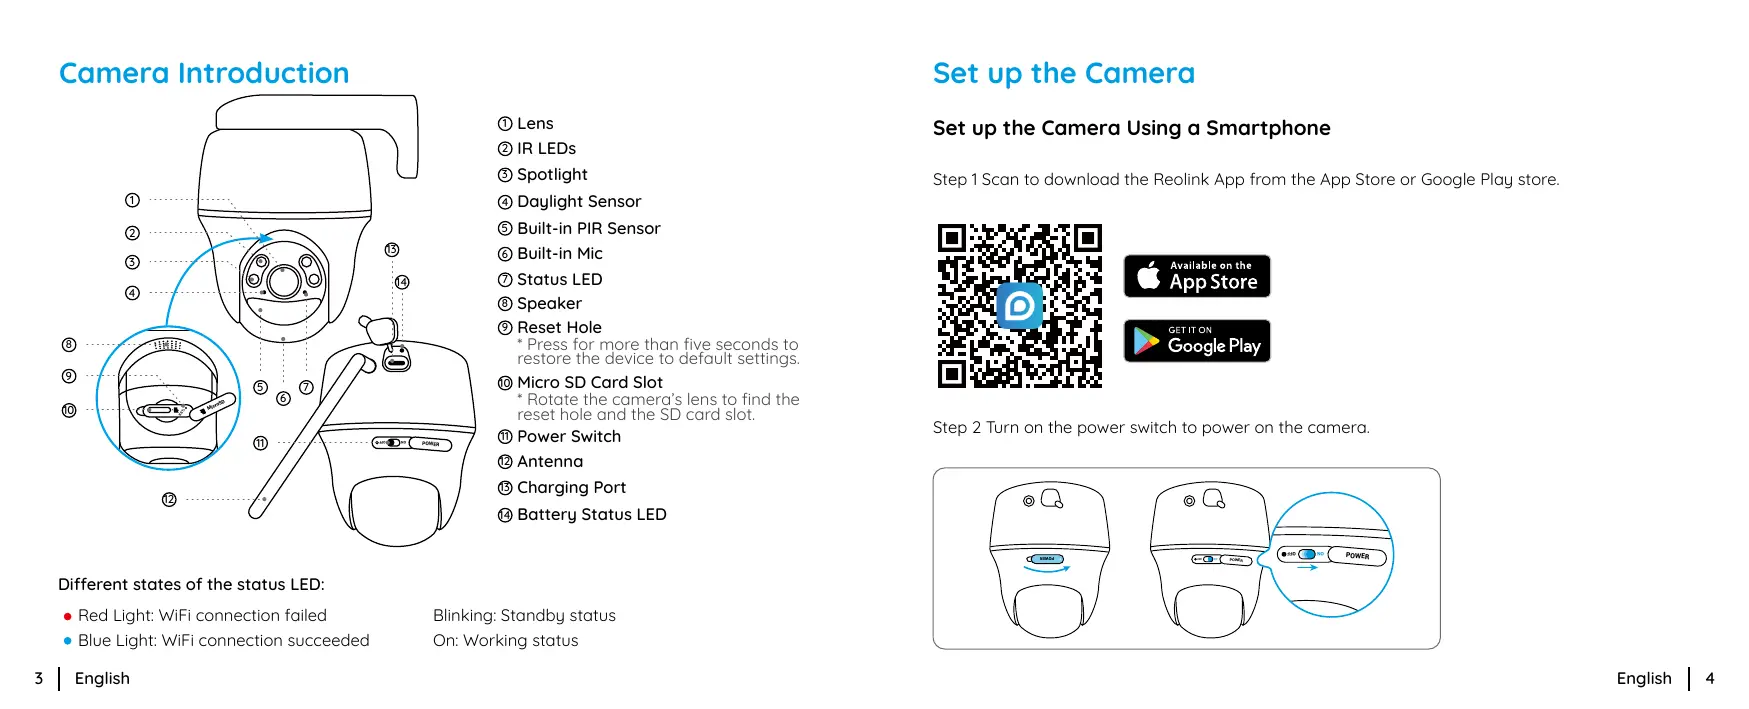
Camera Introduction

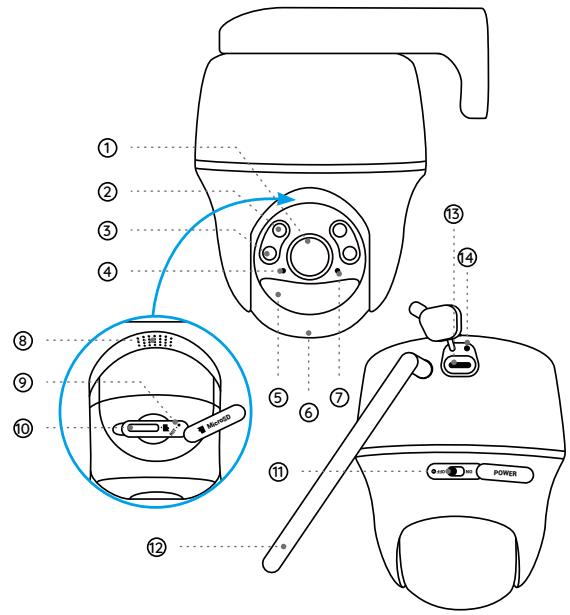
REOLINK Argus PT - Camera Introduction - 1

⑨ Reset Hole

(1) Lens
② IR LEDs
③ Spotlight
④ Daylight Sensor
⑤ Built-in PIR Sensor
⑥ Built-in Mic
⑦ Status LED
Speaker

  • Press for more than five seconds to restore the device to default settings.

Micro SD Card Slot
* Rotate the camera's lens to find the reset hole and the SD card slot.
① Power Switch
Antenna
③ Charging Port
Battery Status LED

Different states of the status LED:

Red Light:WiFi connection failed
- Blue Light: WiFi connection succeeded

Blinking: Standby status

On: Working status

Set up the Camera

Set up the Camera Using a Smartphone

Step 1 Scan to download the Reolink App from the App Store or Google Play store.

REOLINK Argus PT - Set up the Camera Using a Smartphone - 1

REOLINK Argus PT - Set up the Camera Using a Smartphone - 2

Available on the

App Store

REOLINK Argus PT - Set up the Camera Using a Smartphone - 3

GET IT ON

Google Play

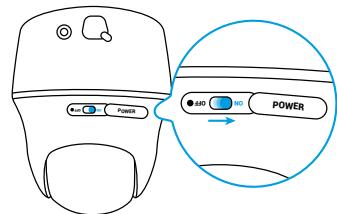
Step 2 Turn on the power switch to power on the camera.
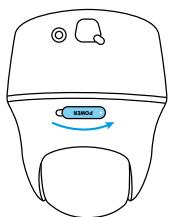
REOLINK Argus PT - Set up the Camera Using a Smartphone - 4

REOLINK Argus PT - Set up the Camera Using a Smartphone - 5

Step 3 Launch the Reolink App, click the “+” button in the top right corner to add the camera. Scan the QR code on the device and follow the onscreen instructions to finish initial setup.

NOTE: This device supports 2.4 GHz and 5 GHz Wi-Fi networks. It is recommended to connect the device to 5 GHz Wi-Fi for a better network experience.
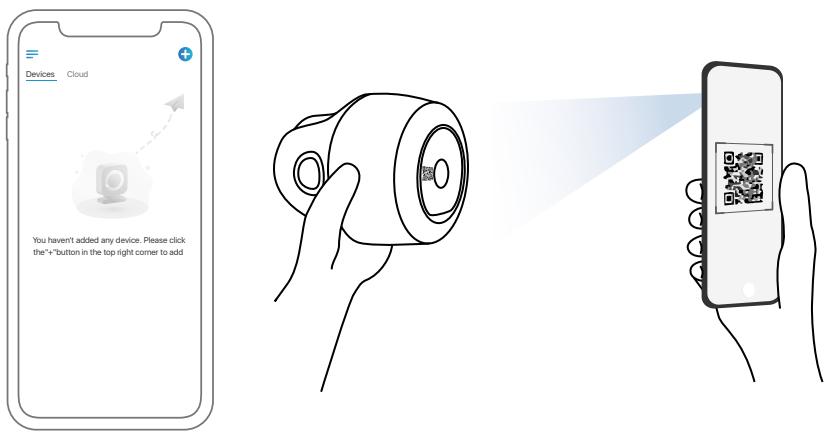
REOLINK Argus PT - Set up the Camera Using a Smartphone - 6

Set up the Camera on PC (Optional)

Step 1 Download and install the Reolink Client: Go to https://reolink.com > Support > App&Client.

Step 2 Launch the Reolink Client, click the “+” button, input the UID code of the camera to add it and follow the onscreen instructions to finish initial setup.

Charge the Camera

It's recommended to fully charge the battery before mounting the camera.
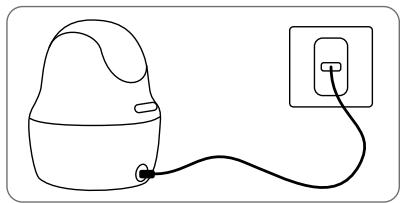
REOLINK Argus PT - Charge the Camera - 1

Charge the battery with a power adapter. (not included)

Charging Indicator:

Orange LED: Charing

Green LED: Fully charged
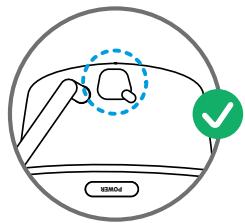
REOLINK Argus PT - Charge the Camera - 2

For better weatherproof performance, please always cover the charging port with the rubber plug after charging the battery.

Install the Camera

Notes on Camera Installation Position

  • The camera MUST be installed upside down for better waterproof performance and better PIR motion sensor's efficiency.
  • Install the camera 2-3 meters (7-10 ft) above the ground. This height maximizes the detection range of the PIR motion sensor.
  • For better motion detection performance, please install the camera angularly.

NOTE: If a moving object approaches the PIR sensor vertically, the camera may fail to detect motion.

Mount the Camera
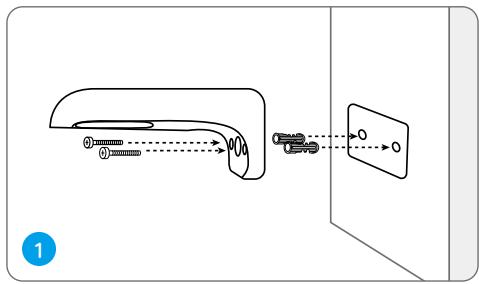
REOLINK Argus PT - Mount the Camera - 1
Drill holes in accordance with the mounting hole template and screw the camera bracket to the wall.
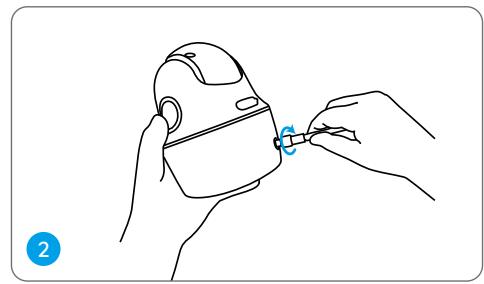
REOLINK Argus PT - Mount the Camera - 2
Install the antenna to the camera.

NOTE: Use the drywall anchors included in the package if needed.

REOLINK Argus PT - Mount the Camera - 3
Align the white hole on the camera top with the white hollow screw on the bracket. Use a wrench and a hex head screw provided to secure the camera into place. Then cover the rubber plug.

Mount the Camera to Ceiling
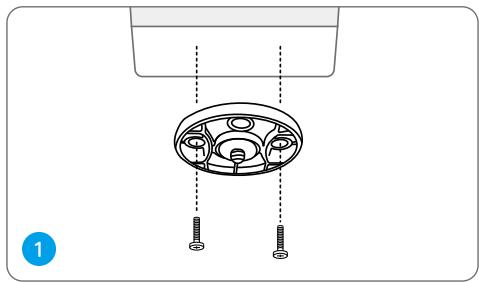
REOLINK Argus PT - Mount the Camera to Ceiling - 1

REOLINK Argus PT - Mount the Camera to Ceiling - 2
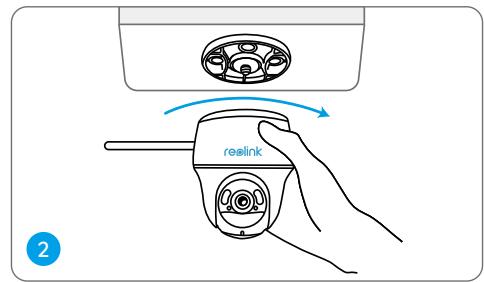
Install the mount base to the ceiling. Align the camera with the mount base and turn the camera unit clockwise to lock it in position.

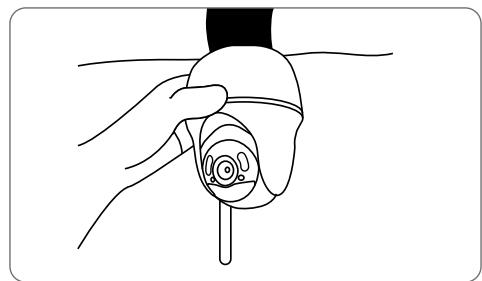
Install the Camera with Loop Strap

You are allowed to strap the camera to a tree with both the security mount and ceiling bracket. Thread the provided strap to the plate and fasten it to a tree. Next, attach the camera to the plate and you are good to go.
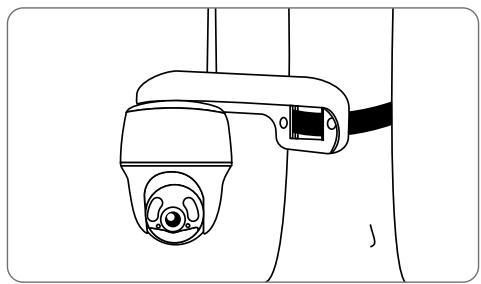
REOLINK Argus PT - Install the Camera with Loop Strap - 1

REOLINK Argus PT - Install the Camera with Loop Strap - 2

Safety Instructions of Battery Usage

The camera is not designed for running 24/7 at full capacity or around-the-clock live streaming. It's designed to record motion events and to live view remotely only when you need it. Learn useful tips on how to extend the battery life in this post: https://support.reolink.com/hc/en-us/articles/360006991893

  1. Do not remove a built-in battery from the camera.
  2. Charge the battery with a standard and high-quality DC 5V battery charger or Reolink solar panel. It's not compatible with solar panels from any other brands.
  3. Charge the battery only if in temperatures between 0^ and 45^ . The battery is intended for use only in temperatures between -10^ and 55^ .
  4. Keep the charging port dry, clean and free of any debris. Cover it with the rubber plug after the battery is fully charged.
  5. Do not charge, use or store the battery next to areas that may become hot. Examples include, but are not limited to, on or near a space heater, cooking surface, cooking appliance, iron, radiator, or fireplace.
  6. Do not use the battery if its case appears damaged, swollen, or compromised. Examples include, but are not limited to, leaking, odors, dents, corrosion, rust, cracks, swelling, melting, and scratches.
  7. Always follow the local waste and recycling laws to dispose of used batteries.

Troubleshooting

Camera is Not Powering On

If your camera is not powering on, please try the following solutions:

  • Make sure the power switch is turned on.
  • Charge the battery with a DC 5V/2A power adapter. When the green light is on, the battery is fully charged

If these won't work, contact Reolink Support.

Failed to Scan QR Code on the Phone

If you cannot scan the QR code on your phone, please try the following solutions:

  • Remove the protective film from the camera lens.
  • Wipe the camera lens with a dry paper/ towel/tissue.
  • Vary the distance between your camera and the mobile phone so that the camera can focus better.

  • Try to scan the QR code under sufficient lighting.

If these won't work, contact Reolink Support.

Failed to Connect to WiFi During Initial Setup Process

If the camera fails to connect to WiFi, please try the following solutions:

  • Ensure that you have entered the correct WiFi password.
  • Put the camera closer to your router to ensure a strong WiFi signal.
  • Change the encryption method of the WiFi network to WPA2-PSK/WPA-PSK (safer encryption) on your router interface.
  • Change your WiFi SSID or password and make sure that SSID is within 31 characters and password is within 64 characters.

If these won't work, contact Reolink Support.

Specification

Operating Temperature:

-10°C to 55°C (14°F to 131°F)

Size: 98 × 122 ~mm

Weight: 481g

For more specifications, visit the Reolink official website.

Notification of Compliance

REOLINK Argus PT - Notification of Compliance - 1

CE Declaration of Conformity

Reolink declares that this device is in compliance with the essential requirements and other relevant provisions of Directive 2014/53/EU and Directive 2014/30/EU.

UKCA Declaration of Conformity

Reolink declares that this product is in compliance with Radio Equipment Regulations 2017 and Electromagnetic Compatibility Regulations 2016.

FCC Compliance Statements

This device complies with Part 15 of the FCC Rules. Operation is subject to the following two conditions: (1) this device may not cause harmful interference, and (2) this device must accept any interference received, including interference that may cause undesired operation.

Note: This equipment has been tested and found to comply with the limits for a Class B digital device, pursuant to Part 15 of the FCC Rules. These limits are designed to provide reasonable protection against harmful interference in a residential installation. This equipment generates, uses and can radiate radio frequency energy and, if not installed and used in accordance with the instructions, may cause harmful interference to radio communications. However, there is no guarantee that interference will not occur in a particular installation. If this equipment does cause harmful interference to radio or television reception, which can be determined by turning the equipment off and on, the user is encouraged to try to correct the interference by one or more of the following measures:

  • Reorient or relocate the receiving antenna.
  • Increase the separation between the equipment and receiver.
  • Connect the equipment into an outlet on a circuit different from that to which the receiver is connected.
  • Consult the dealer or an experienced radio/ TV technician for help.

Caution: Changes or modifications not expressly approved by the party responsible for compliance could void the user's authority to operate the equipment.

FCC Radiation Exposure statement

This equipment complies with FCC radiation exposure limits set forth for an uncontrolled environment. This equipment should be installed and operated with minimum distance 20cm between the radiator and your body.

ISED Compliance Statements

This device contains licence-exempt transmitter(s)/receiver(s) that comply with Innovation, Science and Economic Development Canada's licence-exempt RSS(s). Operation is subject to the following two conditions:

(1) This device may not cause interference.
(2) This device must accept any interference, including interference that may cause undesired operation of the device.

ISED Radiation Exposure statement

This equipment complies with IC RSS-102 radiation exposure limits set forth for an uncontrolled environment. This equipment should be installed and operated with minimum distance 20 cm between the radiator and your body.

The radio transmitter IC: 26839-2305B has been approved by Innovation, Science and Economic Development Canada to use the following antenna types with a specified maximum allowable gain. Antenna types not included in this list whose gain is higher than the maximum gain of any of the listed types are strictly prohibited from use with this device.

Type of antennaExternal antenna
Antenna Gain2400-2500(2.89dBi)
5150-5850(2.55dBi)
Impedance50Ohm
ManufactureShenzhen Yingjia Chuang electronic technology Co., LTD
Manual assistant
Powered by Anthropic
Waiting for your message
Product information

Brand : REOLINK

Model : Argus PT

Category : Surveillance Camera