
86BDL4152E - Monitor PHILIPS - Free user manual and instructions
Find the device manual for free 86BDL4152E PHILIPS in PDF.
User questions about 86BDL4152E PHILIPS
0 question about this device. Answer the ones you know or ask your own.
Ask a new question about this device
Download the instructions for your Monitor in PDF format for free! Find your manual 86BDL4152E - PHILIPS and take your electronic device back in hand. On this page are published all the documents necessary for the use of your device. 86BDL4152E by PHILIPS.
USER MANUAL 86BDL4152E PHILIPS
natural_image
Modern flat-screen monitor displaying abstract geometric design with gradient lighting and glowing lines (no text or symbols visible)User Manual (English)
Table Of Contents
- Safety Instructions .... 1
- Unpacking and Installation....11
2.1. Unpacking 11
2.2. Package Contents......14
2.3. Installation Notes....14
2.4. Mounting on a Wall 15
- Parts and Functions ..... 16
3.1. Control Panel....16
3.2. Input/Output Terminals....17
3.3. Inserting the batteries in the remote control 18
3.4. Handling the remote control....18
3.5. Operating range of the remote control .... 18
3.6. Remote Control....19
3.7. AC Switch Cover 23
- Connecting External Equipment 24
4.1. Connecting External Equipment (Multimedia Player) 24
4.2. Connecting a PC....24
4.3. Connecting Audio Equipment....25
4.4. Connecting Multiple Displays in a Daisy-chain Configuration 25
4.5. IR connection....26
4.6. IR Pass-through Connection....26
4.7. Touch Operation....27
- Operation....29
5.1. Watch the Connected Video Source......29
5.2. Change Picture Format....29
5.3. Launcher 29
5.4. Media Player....30
5.5. Browser....33
5.6. PDF Player....37
5.7. CMND & Play....39
5.8. Kiosk....40
5.9. Custom App 44
5.10. Side Bar....45
- Whiteboard....46
6.1. Main page 46
6.2. Toolbar 46
6.3. Page switch and preview 47
6.4. Gesture control 47
6.5. Exit 48
6.6. Annotation mode 48
- File manager....49
7.1. File manager....49
7.2. Display switch....49
- Setting UI....50
8.1. Network & internet....50
8.2. Portable hotspot....51
8.3. Signage Display....52
8.4. App & notification 61
8.5. Display 61
8.6. Security 62
8.7. System....62
8.8. About....62
- OSD Menu 63
9.1. Navigating the OSD Menu 63
9.2. OSD Menu Overview 63
9.3. Android Settings......67
- Supported Media Formats......68
- Input Mode 69
- Pixel Defect Policy 70
12.1. Pixels and Sub-Pixels....70
12.2. Types of Pixel Defects + Dot Definition.....70
12.3. Bright Dot Defects....70
12.4. Dark Dot Defects 71
12.5. Proximity of Pixel Defects 71
12.6. Pixel Defect Tolerances....71
12.7. MURA....71
- Cleaning and Troubleshooting 72
13.1. Cleaning 72
13.2. Troubleshooting....73
- Technical Specifications....75
Warranty policy for Philips Professional Display Solutions....77
Index....79
1. Safety Instructions
Safety precautions and maintenance

WARNING: Use of controls, adjustments or procedures other than those specified in this documentation may result in exposure to shock, electrical hazards and/or mechanical hazards.
Read and follow these instructions when connecting and using your display:
This product is intended for use in professional installations in business settings only and is not suitable for domestic purposes. Any use other than that for which this device is intended can void the warranty.
This product contains an operating system. If it is shut down directly using the AC switch, it may damage the program and prevent it from powering on again. If the system is unable to power on due to frequent shutdowns, please try a factory reset. Please note that all data stored in the system will be lost when the display is rebooted after a factory reset.
Operation:
- Keep the display out of direct sunlight and away from stoves or any other heat sources.
- Keep the display away from oil, otherwise the plastic cover may be damaged.
- Remove any object that could fall into ventilation holes or prevent proper cooling of the display's electronics.
- Do not block the ventilation holes on the cabinet.
- When positioning the display, make sure the power plug and outlet are easily accessible.
- When turning off the display by detaching the power cord, wait 6 seconds before re-attaching the power cord for normal operation.
- Ensure the use of an approved power cord provided by Philips at all times. If your power cord is missing, please contact your local service center.
- Do not subject the display to severe vibration or high impact conditions during operation.
- Do not knock or drop the display during operation or transportation.
- The eye bolt is for usage in short-time maintenance and installation. We suggest not to use the eye bolt for more than 1 hour. Prolong usage is prohibited. Please keep a clear safety area under the display while using the eye bolt.
Maintenance:
- To protect your display from possible damage, do not put excessive pressure on the LCD panel. When moving your display, grasp the frame to lift; do not lift the display by placing your hand or fingers on the LCD panel.
- Unplug the display if you are not going to use it for an extensive period of time.
- Unplug the display if you need to clean it with a slightly damp cloth. The screen may be wiped with a dry cloth when the power is off. However, never use organic solvent, such as, alcohol, or ammonia-based liquids to clean your display.
- To avoid the risk of shock or permanent damage to the set, do not expose the display to dust, rain, water or an excessively moist environment.
- If your display becomes wet, wipe it with dry cloth as soon as possible.
- If a foreign substance or water gets in your display, turn the power off immediately and disconnect the power cord. Then remove the foreign substance or water, and send the unit to the maintenance center.
- Do not store or use the display in locations exposed to heat, direct sunlight or extreme cold.
- In order to maintain the best performance of your display and ensure a longer lifetime, we strongly recommend using the display in a location that falls within the following temperature and humidity ranges.
- Temperature: 0-40°C 32-104°F
- Humidity: 20-80% RH
• LCD panel temperature need to be 25 degrees Celsius at all time for better luminance performance.
IMPORTANT: Always activate a moving screen saver program when you leave your display unattended. Always activate a periodic screen refresh application if the unit will display unchanging static content. Uninterrupted display of still or static images over an extended period may cause "burn in", also known as "after-imaging" or "ghost imaging", on your screen. This is a well-known phenomenon in LCD panel technology. In most cases, the "burned in" or "after-imaging" or "ghost imaging" will disappear gradually over a period of time after the power has been switched off.
WARNING: Severe "burn-in" or "after-image" or "ghost image" symptoms will not disappear and cannot be repaired. This is also not covered under the terms of your warranty.
Service:
- The casing cover should be opened only by qualified service personnel.
- If there is any need for repair or integration, please contact your local service center.
- Do not leave your display under direct sunlight.

If your display does not operate normally, having followed the instructions set out in this document, please contact a technician or your local service center.
Stability Hazard
The device may fall, causing serious personal injury or death. To prevent injury, this device must be securely attached to the floor/wall in accordance with the installation instructions.
Read and follow these instructions when connecting and using your display:

- Unplug the display if you are not going to use it for an extensive period of time.
- Unplug the display if you need to clean it with a slightly damp cloth. The screen many be wiped with a dry cloth when the power is off. However, never use alcohol, solvents or ammonia-based liquids.
- Consult a service technician if the display does not operate normally when you have followed the instructions in this manual.
- The casing cover should be opened only by qualified service personnel.
- Keep the display out of direct sunlight and away from stoves or any other heat sources.
- Remove any object that could fall into the vents or prevent proper cooling of the display's electronics.
- Do not block the ventilation holes on the cabinet.
- Keep the display dry. To avoid electric shock, do not expose it to rain or excessive moisture.
- When turning off the display by detaching the power cable or DC power cord, wait for 6 seconds before re-attaching the power cable or DC power cord for normal operation..
- To avoid the risk of shock or permanent damage to the set do not expose the display to rain or excessive moisture.
- When positioning the display, make sure the power plug and outlet are easily accessible.
- IMPORTANT: Always activate a screen saver program during your application. If a still image in high contrast remains on the screen for an extended period of time, it may leave an 'after-image' or 'ghost image' on the front of the screen. This is a well-known phenomenon that is caused by the shortcomings inherent in LCD technology. In most cases the afterimage will disappear gradually over a period of time after the power has been switched off. Be aware that the after-image symptom cannot be repaired and is not covered under warranty.
- If provided with a 3-pin attachment plug on the power cord, plug the cord into a grounded (earthed) 3-pin outlet. Do not disable the power cord grounding pin, for example, by attaching a 2-pin adapter. The grounding pin is an important safety feature.
EU Declaration of Conformity/UK Declaration of Conformity
This device complies with the requirements set out in the Council Directive on the Approximation of the Laws of the Member States relating to Electromagnetic Compatibility (2014/30/EU), Low-voltage Directive (2014/35/EU), RoHS directive (2011/65/EU), ErP directive (2009/125/EC). The Radio Equipment Directive(2014/53/EU) or Radio Equipment Regulations 2017(for UK).
This product has been tested and found to comply with the harmonized standards for Information Technology Equipment, these harmonized standards published under Directives of Official Journal of the European Union.
ESD Warnings
When user close to the monitor may cause the equipment discharge and reboot to the display of main menu.
Warning:
This equipment is compliant with Class A of EN55032/CISPR 32. In a residential environment this equipment may cause radio interference.
Federal Communications Commission (FCC) Notice (U.S. Only)

NOTE: This equipment has been tested and found to comply with the limits for a Class A digital device, pursuant to part 15 of the FCC Rules. These limits are designed to provide reasonable protection against harmful interference when the equipment is operated in a commercial environment. This equipment generates, uses, and can radiate radio frequency energy and, if not installed and used in accordance with the instruction manual, may cause harmful interference to radio communications. Operation of this equipment in a residential area is likely to cause harmful interference in which case the user will be required to correct the interference at his own expense.

Changes or modifications not expressly approved by the party responsible for compliance could void the user's authority to operate the equipment.
Use only an RF shielded cable that was supplied with the display when connecting this display to a computer device.
To prevent damage which may result in fire or shock hazard, do not expose this appliance to rain or excessive moisture.
This device complies with Part 15 of the FCC / ISED's licence-exempt RSSs Rules. Operation is subject to the following two conditions: (1) This device may not cause harmful interference, and (2) this device must accept any interference received, including interference that may cause undesired operation.
The device is restricted to indoor use only when operating in the 5150 to 5350MHz frequency range. (for 5G product only)
 | AT | BE | BG | HR | CY | CZ | DK |
| EE | FI | FR | DE | EL | HU | IE | |
| IT | LV | LT | LU | MT | NL | PL | |
| PT | RO | SK | SI | ES | SE | UK(NI) | |
| UK |
Radiation Exposure Statement:
This equipment complies with CE radiation exposure limits set forth for an uncontrolled environment. This equipment should be installed and operated with minimum distance 20cm between the radiator & body.
The frequency, mode and the maximum transmitted power in EU are listed below:
2400-2483.5MHz: < 20 dBm (EIRP) (for 2.4G product only)
5150-5250MHz: < 23 dBm (EIRP)
5250-5350MHz: < 23 dBm (EIRP)
5470-5725MHz: < 30 dBm (EIRP)
5725-5825MHz: < 13.98 dBm (EIRP)
FCC/ISED/CE-RED Caution:
Any changes or modifications not expressly approved by the party responsible for compliance could void the user's authority to operate this equipment.
This transmitter must not be co-located or operating in conjunction with any other antenna or transmitter.
Operations in the 5GHz products are restricted to indoor usage only.
Industry Canada statement:
This device complies with RSS-247 of the Industry Canada Rules. Operation is subject to the following two conditions: (1) This device may not cause harmful interference, and (2) this device must accept any interference received, including interference that may cause undesired operation.
Radiation Exposure Statement:
This equipment complies with FCC/ISED/CE-RED radiation exposure limits set forth for an uncontrolled environment. This equipment should be installed and operated with minimum distance 20cm between the radiator & your body.
Polish Center for Testing and Certification Notice
The equipment should draw power from a socket with an attached protection circuit (a three-prong socket). All equipment that works together (computer, display, printer, and so on) should have the same power supply source.
The phasing conductor of the room's electrical installation should have a reserve short-circuit protection device in the form of a fuse with a nominal value no larger than 16 amperes (A).
To completely switch off the equipment, the power supply cable must be removed from the power supply socket, which should be located near the equipment and easily accessible.
A protection mark "B" confirms that the equipment is in compliance with the protection usage requirements of standards PN-93/T-42107 and PN-89/E-06251.
Electric, Magnetic and Electromagnetic Fields ("EMF")
- We manufacture and sell many products targeted at consumers, which, like any electronic apparatus, in general have the ability to emit and receive electromagnetic signals.
- One of our leading Business Principles is to take all necessary health and safety measures for our products, to comply with all applicable legal requirements and to stay well within the EMF standards applicable at the time of producing the products.
- We are committed to develop, produce and market products that cause no adverse health effects.
- We confirm that if its products are handled properly for their intended use, they are safe to use according to scientific evidence available today.
- We play an active role in the development of international EMF and safety standards, enabling us to anticipate further developments in standardization for early integration in its products.
Information for U.K. only
text_image
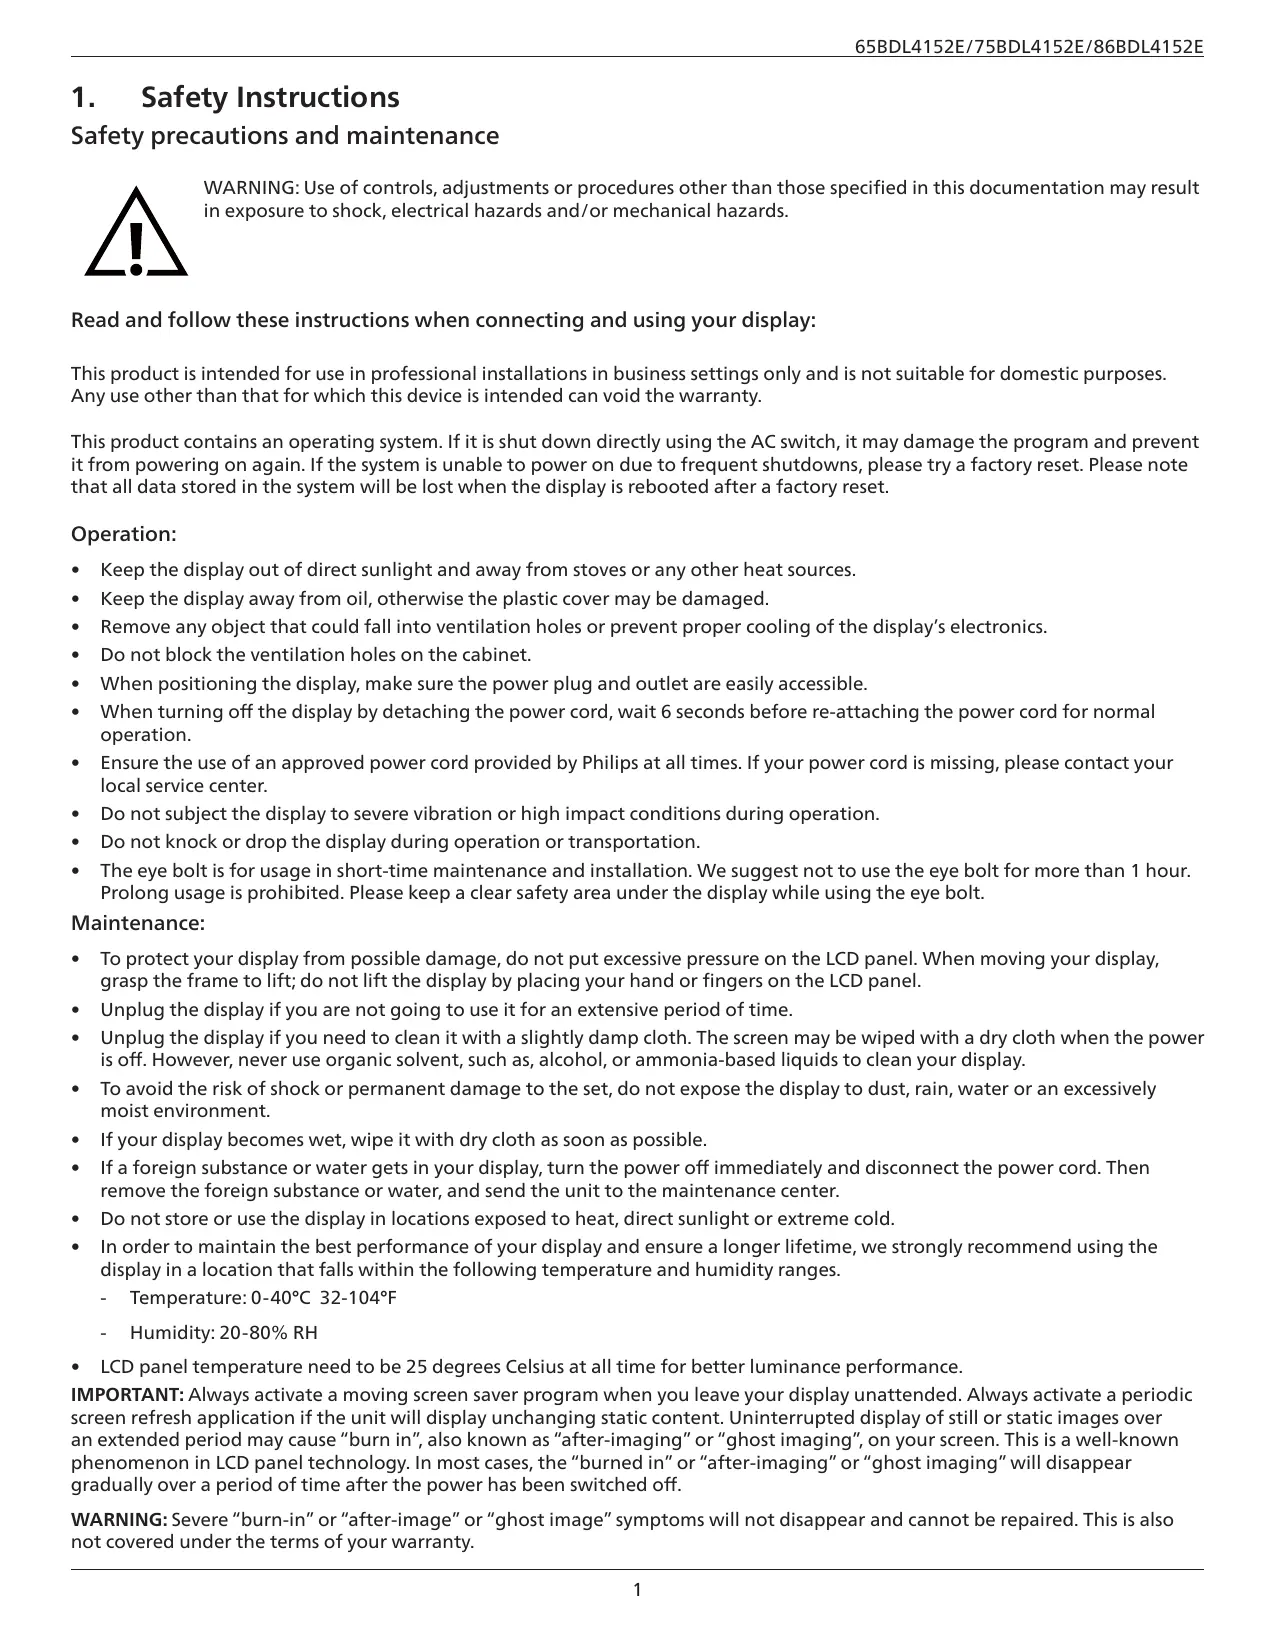
(B) (A)WARNING - THIS APPLIANCE MUST BE EARTHED.
Important:
This apparatus is supplied with an approved moulded 13A plug. To change a fuse in this type of plug proceed as follows:+
- Remove fuse cover and fuse.
- Fit new fuse which should be a BS 1362 5A,A.S.T.A. or BSI approved type.
- Refit the fuse cover.
If the fitted plug is not suitable for your socket outlets, it should be cut off and an appropriate 3-pin plug fitted in its place.
If the mains plug contains a fuse, this should have a value of 5A. If a plug without a fuse is used, the fuse at the distribution board should not be greater than 5A.
Note: The severed plug must be destroyed to avoid a possible shock hazard should it be inserted into a 13A socket elsewhere.
natural_image
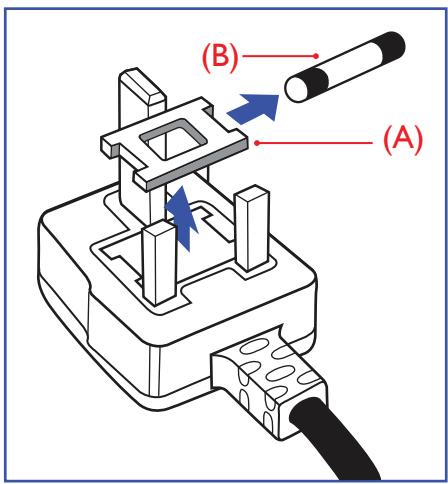
Diagram of a car electrical plug with colored wires and connectors (no text or labels)How to connect a plug
The wires in the mains lead are coloured in accordance with the following code: BLUE - "NEUTRAL" ("N")
BROWN - "LIVE" ("L")
GREEN & YELLOW - "EARTH" ("E")
- The GREEN & YELLOW wire must be connected to the terminal in the plug which is marked with the letter "E" or by the Earth symbol or coloured GREEN or GREEN & YELLOW.
- The BLUE wire must be connected to the terminal which is marked with the letter "N" or coloured BLACK.
- The BROWN wire must be connected to the terminal which marked with the letter "L" or coloured RED.
Before replacing the plug cover, make certain that the cord grip is clamped over the sheath of the lead - not simply over the three wires.
North Europe (Nordic Countries) Information
Placering/Ventilation
WARNING:
FÖRSÄKRA DIG OM ATT HUVUDBRYTARE OCH UTTAG ÄR LÄTÄTKOMLIGA, NÄR DU STÄLLER DIN UTRUSTNING PÅPLATS.
Placering/Ventilation
ADVARSEL:
S∅RG VED PLACERINGEN FOR, AT NETLEDNINGENS STIK OG STIKKONTAKT ER NEMT TILGÆNGELIGE.
Paikka/Ilmankierto
VAROITUS:
SIJOITA LAITE SITEN, ETTÄ VERKKOJOHTO VOIDAAAN TARVITTAESSA HELPOSTI IRROTTAA PISTORASIASTA.
End-of-Life Disposal
Your new Public Information Display contains materials that can be recycled and reused. Specialized companies can recycle your product to increase the amount of reusable materials and to minimize the amount to be disposed of.
Please find out about the local regulations on how to dispose of your old display from your local Philips dealer.
(For customers in Canada and U.S.A.)
This product may contain lead and/or mercury. Dispose of in accordance to local-state and federal regulations. For additional information on recycling contact www.eia.org (Consumer Education Initiative)
Waste Electrical and Electronic Equipment-WEEE
Attention users in European Union private households

This marking on the product or on its packaging illustrates that, under European Directive 2012/19/EU governing used electrical and electronic appliances, this product may not be disposed of with normal household waste. You are responsible for disposal of this equipment through a designated waste electrical and electronic equipment collection. To determine the locations for dropping off such waste electrical and electronic, contact your local government office, the waste disposal organization that serves your household or the store at which you purchased the product.
Attention users in United States:
Please dispose of according to all Local, State and Federal Laws. For the disposal or recycling information, contact: www.mygreenelectronics.com or www.eiae.org.
End of Life Directives-Recycling

Your new Public Information Display contains several materials that can be recycled for new users.
Please dispose of according to all Local, State, and Federal laws.
Restriction on Hazardous Substances statement (India)
This product complies with the "E-Waste (Management) Rules, 2016" CHAPTER V, rule 16, sub-rule (1). Whereas New Electrical and Electronic Equipment and their components or consumables or parts or spares do not contain Lead, Mercury, Cadmium, Hexavalent Chromium, polybrominated biphenyls and polybrominated diphenyl ethers beyond a maximum concentration value of 0.1% by weight in homogenous materials for lead, mercury, hexavalent chromium, polybrominated biphenyls and polybrominated diphenyl ethers and of 0.01% by weight in homogenous materials for cadmium. except of exemptions set in Schedule 2 of the Rule.
E-Waste Declaration for India

This symbol on the product or on its packaging indicates that this product must not be disposed of with your other household waste. Instead it is your responsibility to dispose of your waste equipment by handing it over to a designated collection point for the recycling of waste electrical and electronic equipment. The separate collection and recycling of your waste equipment at the time of disposal will help to conserve natural resources and ensure that it is recycled in a manner that protects human health and the environment. For more information about E -waste please visit http://www.india.philips.com/about/sustainability/recycling/index.page and to know where you can drop off your waste equipment for recycling in India please contact on below given contact details.
Helpline number: 1800-425-6396 (Monday to Saturday, 9 a.m. to 5:30 pm)
E-mail: india.callcentre@tpv-tech.com
Batteries

For EU: The crossed-out wheeled bin implies that used batteries should not be put to the general household waste! There is a separate collection system for used batteries, to allow proper treatment and recycling in accordance with legislation.
Please contact your local authority for details on the collection and recycling schemes.
For Switzerland: The used battery is to be returned to the selling point.
For other non-EU countries: Please contact your local authority for correct method of disposal of the used battery. According to EU directive 2006/66/EC, the battery can't be disposed improperly. The battery shall be separated to collect by local service.

Information for FAC:
2. Unpacking and Installation
2.1. Unpacking
- This product is packed in a carton, together with the standard accessories.
- Any other optional accessories will be packed separately.
• As this product is high and heavy, the operation of moving the device is recommended to be performed by two technicians.
• After opening the carton, ensure that the contents are complete and in good condition.
■ Before Unpacking
- Please read and fully understand unpacking notice before installation.
- Please check the packaging for any abnormalities, such as creaking, dents, etc.
- Please do necessary inspection before you move the display out of the carton.
• Always have an experienced technician install the display to prevent any damage.
Notice
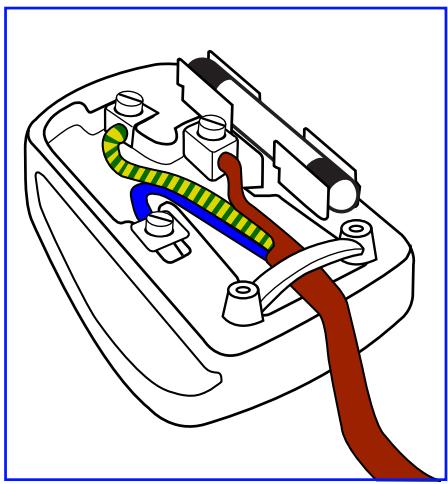
• Take the display out of the carton box by two or four adults with both hands.
- Hold onto the handles when moving the display.
text_image
Diagram illustrating hand positioning and assembly steps with labeled components and directional arrows- Please keep the display upright when moving it.
natural_image
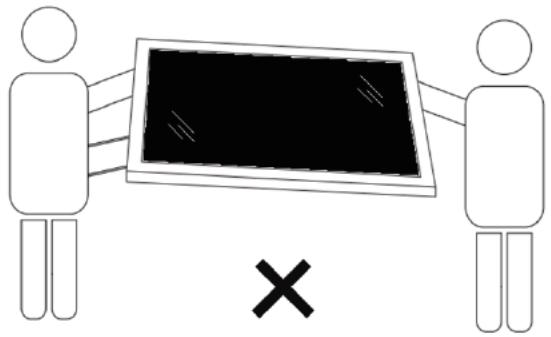
Two stick figures holding a blank blackboard with an 'X' symbol below (no text or symbols on the board)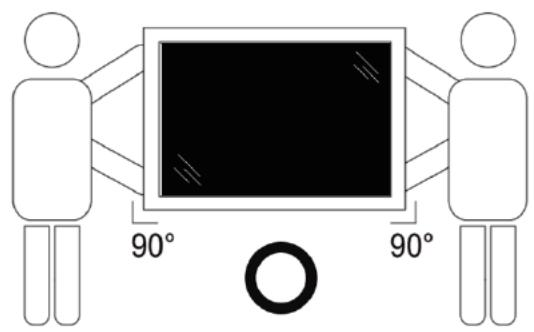
natural_image
Diagram showing two human figures with a central screen and 90-degree angle labels (no text or symbols beyond basic geometry)- Place the display vertically and its weight should spread evenly on the surface.
text_image
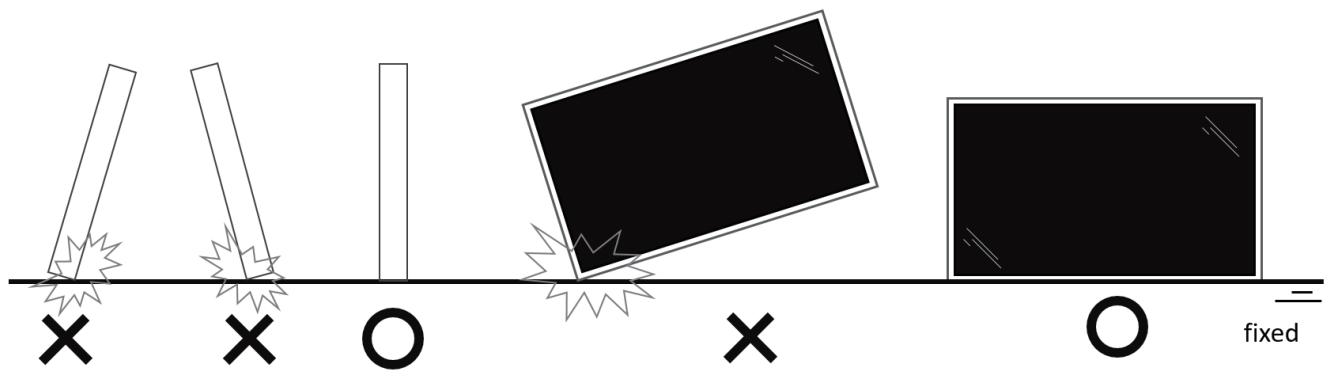
fixed- Keep the display upright, without bending or twisting it while moving.
natural_image
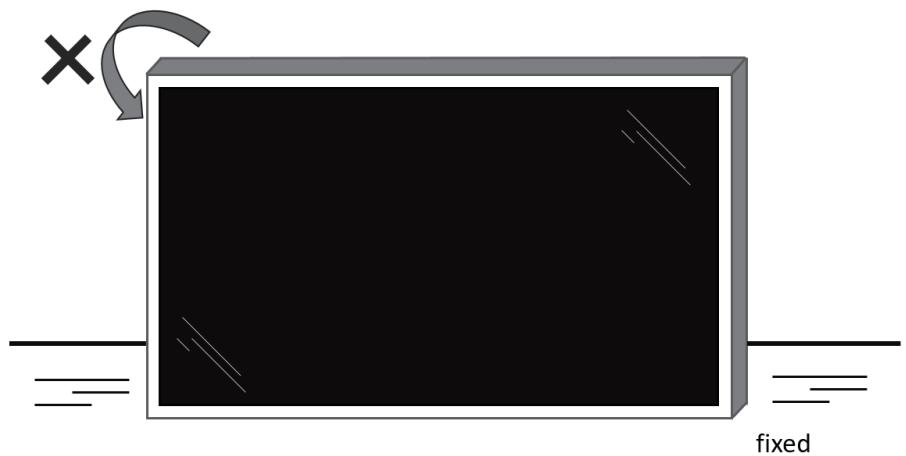
Simple 3D diagram of a rectangular block with an arrow and 'fixed' label, no text or symbols on the main structure.■ Unpacking Process
- Remove the tape.
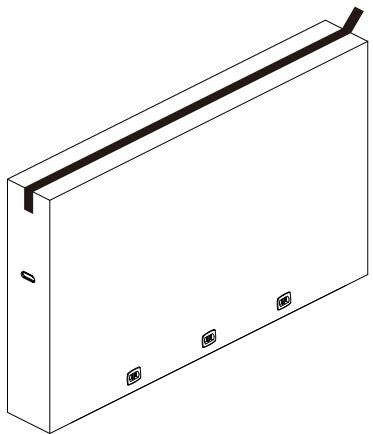
natural_image
Isometric line drawing of a rectangular panel with a central black strip and four small square cutouts at the bottom (no text or symbols)- Remove all accessories and top cushion from the top opening of the packaging.
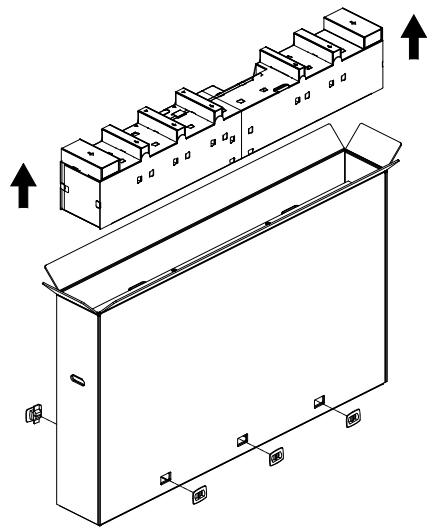
natural_image
Technical line drawing of a mechanical assembly with mounting holes and housing (no text or symbols)- Discard the cardboard and open the packing bag.
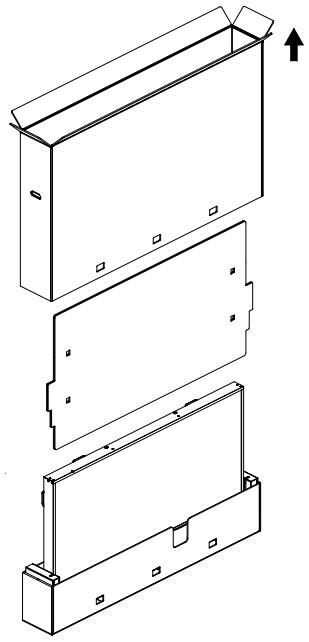
natural_image
Technical line drawing of a three-step assembly of a rectangular box with mounting holes and internal compartments (no text or symbols)- Install the wall mount kit (*) while the display is still in the bottom cushion.(* need to purchase separately)
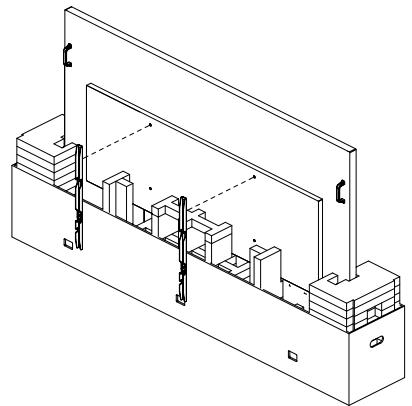
natural_image
Isometric line drawing of a structural assembly with beams and supports (no text or symbols)- Two people on the sides should hold the top handles from the back of the display, while two others help hold the display from the bottom.
natural_image
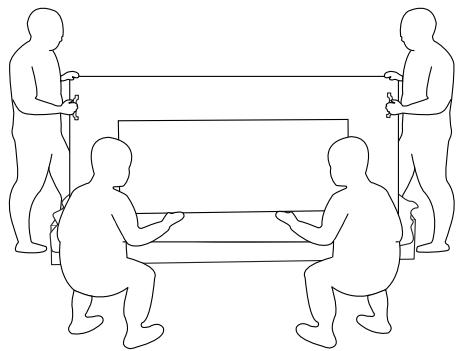
Line drawing of four figures seated around a table with horizontal bars, no text or symbols present- Carefully move the display until the bottom handles are out of the box. Two people on the sides should hold the 4 handles, while two others stand at the front and back of the display to support the bottom.
natural_image
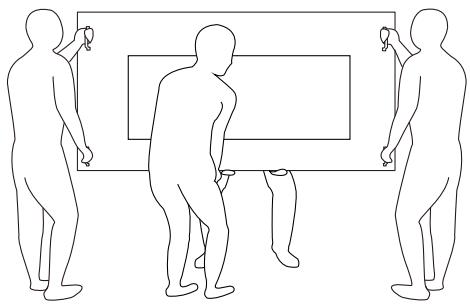
Line drawing of three human figures in various poses, one holding a rectangular object, with no text or symbols present.- The person who was initially at the back of the display should move to the front, so that all four people can mount the display onto the wall.
natural_image
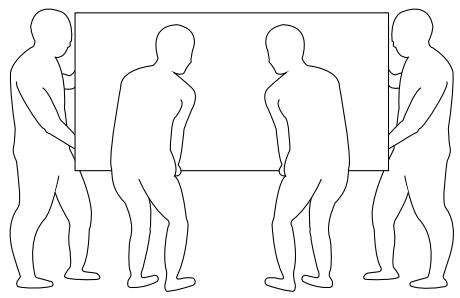
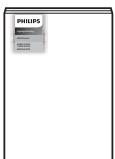
Line drawing of four human figures in a row, standing and holding rectangular frames (no text or symbols)2.2. Package Contents
Please verify that you received the following items with your package content:
- LCD Display
- Quick start guide
• Remote Control and AAA batteries - Power cable
- Touch USB
- Touch pen
- AC Switch Cover
• CRD32 Wi-Fi module - Cleaning cloth
- USB Cover
- Cable Clip
- Philips logo plate
natural_image
Blank whiteboard with a thin black border and small rectangular buttons at the bottom (no text or symbols)LCD display
Remote Control and AAA Batteries
Quick start guide
* The supplied power cord varies depending on destination.

Power Cord
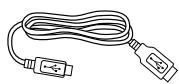
Touch USB

Touch pen

AC Switch Cover
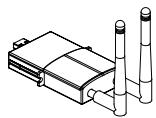
CRD32 Wi-Fi module

Cleaning cloth

Cable Clip x 2PCS

Philips logo plate
* Items may differ in different locations
* Display design and accessories may differ from the images shown.
NOTES:
- For all other regions, apply a power cord that conforms to the AC voltage of the power socket and has been approved by and complies with the safety regulations of the particular country (Type H05W-F, 2G or 3G, 0.75 or 1mm^2 should be used).
- Keep the packaging materials appropriately after unpacking the product.
2.3. Installation Notes
- Only use the power cable provided with this product. If an extension cord is required, please consult your service agent.
- The product should be installed on a flat surface, or the product may tip over. Leave a space between the rear of the product and the wall for proper ventilation. Do not install the product in a kitchen, bathroom or a place exposed to moisture, failure to do so may shorten the life of the internal parts.
- Do not install the product where it is 3000m and higher in altitude. Failure to do so may result in malfunctions.
2.4. Mounting on a Wall
To mount this display on a wall, a standard wall-mounting kit (commercially available) is required. It is recommended that you use a mounting interface that complied with TUV-GS and /or UL1678 standard in North America.

text_image
Protective Sheet VESA Grid Table- Prepare a flat and horizontal surface that is larger than the display and spread a thick protective sheet on it to facilitate your operation without scratching the screen.
- Ensure you have all accessories for all types of mounting (wall mount, ceiling mount, table stand, etc).
- Follow the instructions that came with the base mounting kit. Failure to follow the correct mounting procedures could result in damage to the equipment, or injury to the user or installer. The product warranty does not cover the damage caused by improper installation.
- For the wall-mounting kit, use the M8 mounting screws (with a length 15 mm longer than the thickness of the mounting bracket) and tighten them securely.
2.4.1. VESA Grid
| 65BDL4152E | 500(H) x 400(V) mm |
| 75BDL4152E | 600(H) x 400(V) mm |
| 86BDL4152E | 800(H) x 400(V) mm |
Caution:
To prevent the display from falling:
- For wall or ceiling mounting, we recommend that you install the display with metal brackets which are commercially available. For detailed instructions about the installation, refer to the guide provided with the bracket.
- To prevent the display from falling in case of earthquake or other natural disaster, please consult the manufacturer of the bracket for the mounting location.
• As this product is high and heavy, the installation of this product is recommended to be performed by four technicians.
Required space for ventilation
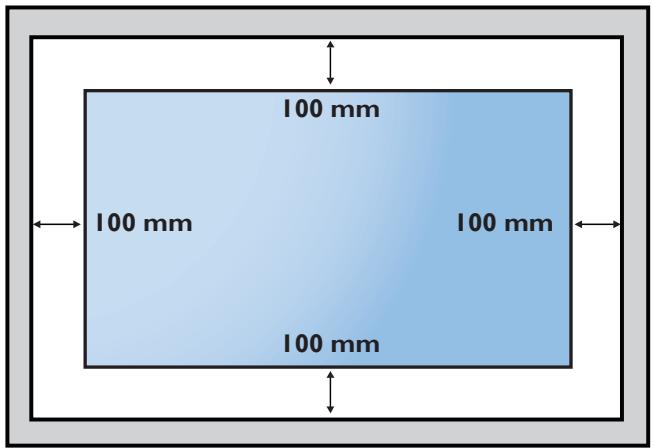
Leave a space of 100 mm at the top, rear, right and left of the display for ventilation.
Note: We recommend you contact a professional technician when installing the display on a wall. We are not responsible for any damage to the product if the installation is not performed by a professional technician.
text_image
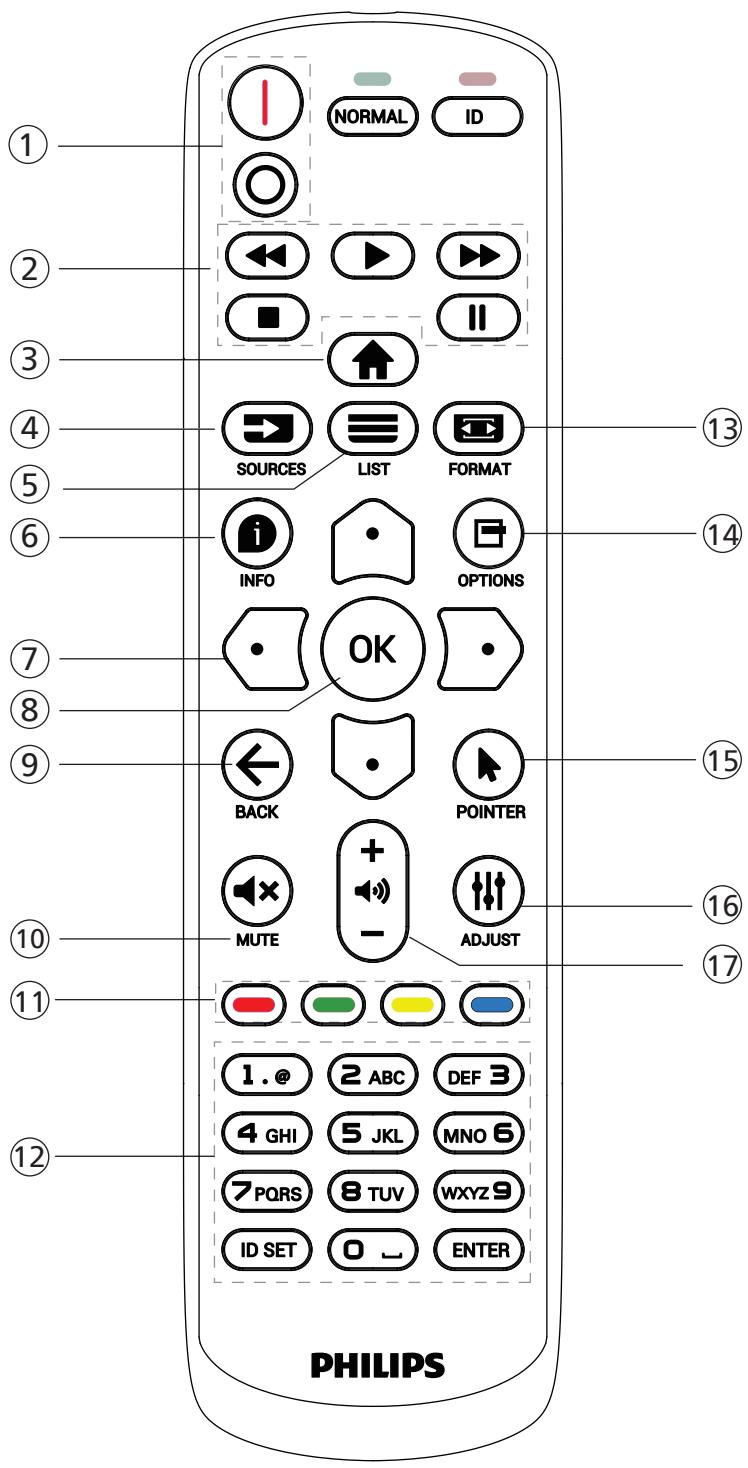
100 mm 100 mm 100 mm 100 mm3. Parts and Functions
3.1. Control Panel

text_image
USB U6B-B2 U6B-C2 HDMI 3 IH ⑧ ⑨ ⑩ ⑪ ① ② ③ ④ ⑤ ⑥ ⑦① [ ⏻ ]button
Press this button to turn the display on or put it in standby mode.
② [播放] button
Press this button to mute or unmute the sound.
③ [播放] button
Decrease the audio output level.
④ [播放+] button
Increase the audio output level.
⑤ [INPUT] button
Select an input source.
⑥ [ ] button
Return to the previous menu while the OSD menu is On. This button can also be used to activate the OSD menu when the OSD menu is Off.
⑦ Remote control sensor and power status indicator
- Receive command signals from the remote control.
- Indicate the operating status of the display:
- Light green when the display is turned On
- Light red when the display is in the standby mode
- When {SCHEDULE} is enabled, the light blinks green and red
- If the light blinks red, it indicates that a failure has been detected
- Lights off when the main power of the display is turned off
* Use an IR sensor cable for better remote control performance. (Please refer to the instructions on 26)
⑧ USB PORT
Connect to a USB storage device.
⑨ USB-B2
Touch connector to PC.
⑩ USB-C2
Support display and touch function.
⑪ HDMI3 IN
HDMI video/audio input.
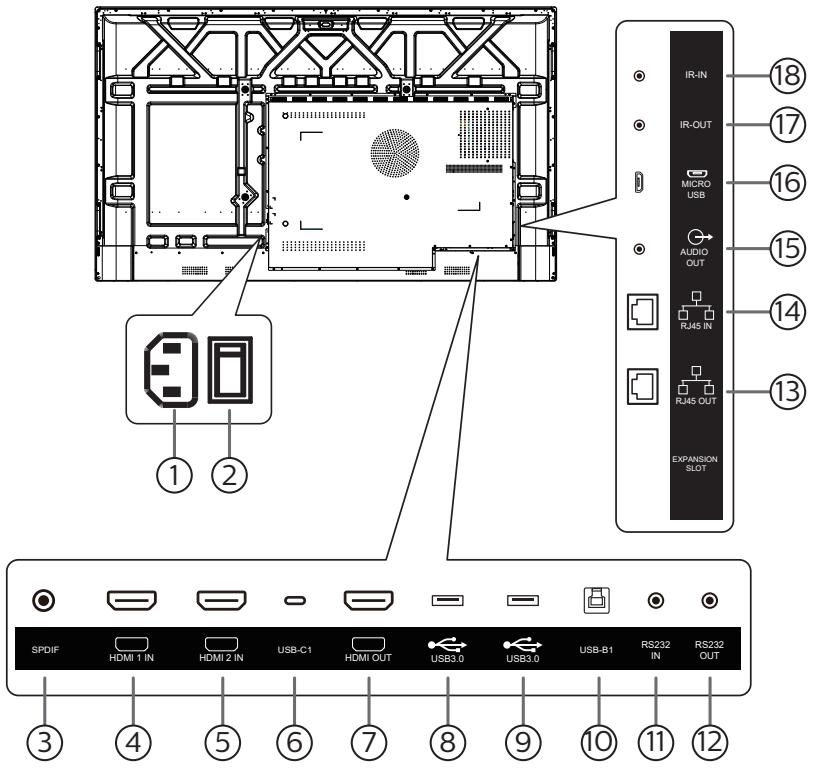
3.2. Input/Output Terminals
text_image
IR-IN IR-OUT MICRO USB AUDIO OUT RJ45 IN RJ45 OUT EXPANSION SLOT ① ② ③ ④ ⑤ ⑥ ⑦ ⑧ ⑨ ⑩ ⑪ ⑫ ⑬① AC IN
AC power input from the wall outlet.
② MAIN POWER SWITCH
Switch the main power between On and Off.
③ SPDIF
Digital audio output.
④ HDMI1 IN / ⑤ HDMI2 IN
HDMI video/audio input.
⑥ USB-C1
Support display and touch function.
⑦ HDMI OUT
HDMI video/audio output.
⑧ USB 3.0 / ⑨ USB 3.0
Connect to a USB storage device.
⑩ USB-B1
Touch connector to PC.
⑪ RS232 IN / ⑫ RS232 OUT
RS232 network input / output for the loop-through function.
⑬ RJ-45 OUT / ⑭ RJ-45 IN
The LAN control function is used for sending the remote control signal from the control center.
⑮ AUDIO OUT
Audio output to external AV device.
⑯ MICRO USB
Support ADB data transmission, OTG is not supported.
⑰ IR OUT / ⑱ IR IN
IR signal input / output for the loop-through function.
NOTES:
- This display's remote control sensor will stop working if the jack [IR IN] is connected.
- To remotely control your A/V device via this display, refer to page 26 for IR Pass Through connection.
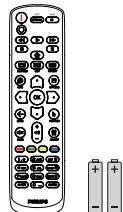
3.3. Inserting the batteries in the remote control
The remote control is powered by two 1.5V AAA batteries.
To install or replace the batteries:
- Press and then slide the cover to open it.
- Insert the batteries with the correct polarity (+) and (−).
- Replace the cover.
Caution:
Incorrect use of batteries may cause leakage or explosion. Be sure to follow the instructions below:
- Insert "AAA" batteries with the correct polarity (+ and -).
- Do not mix battery types.
- Do not use a new battery with a used one together. Otherwise, it may cause leakage or shorten the life of the batteries.
- Remove the dead batteries immediately to avoid battery leakage in the battery compartment. Do not touch exposed battery acid, as it may cause injury to your skin.
- Disposal of a battery into fire or a hot oven, or mechanically crushing or cutting of a battery, that can result in an explosion; leaving a battery in an extremely high temperature surrounding environment that can result in an explosion or the leakage of flammable liquid or gas; and a battery subjected to extremely low air pressure that may result in an explosion or the leakage of flammable liquid or gas.
Note: Remove the batteries from the battery compartment when not using for an extended period of time.
3.4. Handling the remote control
- Do not drop or apply shock to the remote control.
- Do not allow any liquid to get inside the remote control. If water has entered the remote control, wipe the remote control with a dry cloth immediately.
- Do not place the remote control near heat and steam sources.
- Do not attempt to disassemble the remote control, unless you need to place batteries in the remote control.
3.5. Operating range of the remote control
Point the top front of the remote control at the remote sensor on the display when you press the buttons.
Use the remote control within a distance of less than 4m/16ft from the display's sensor, and a horizontal and vertical angle of less than 20°.
Note: The remote control may not function properly when the remote control sensor on the display is under direct sunlight or strong illumination, or when there is an object between the remote control and the remote sensor of the display.
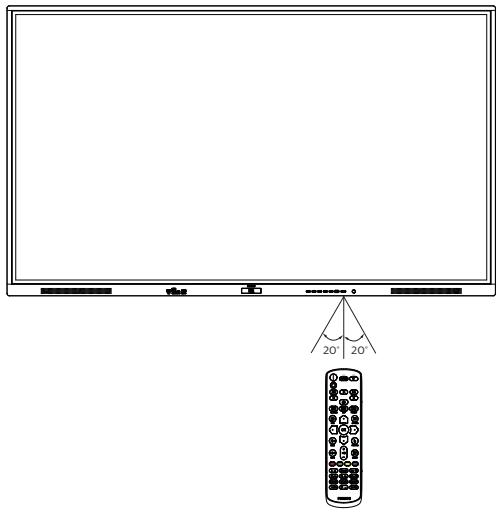
text_image
20° 20°3.6. Remote Control
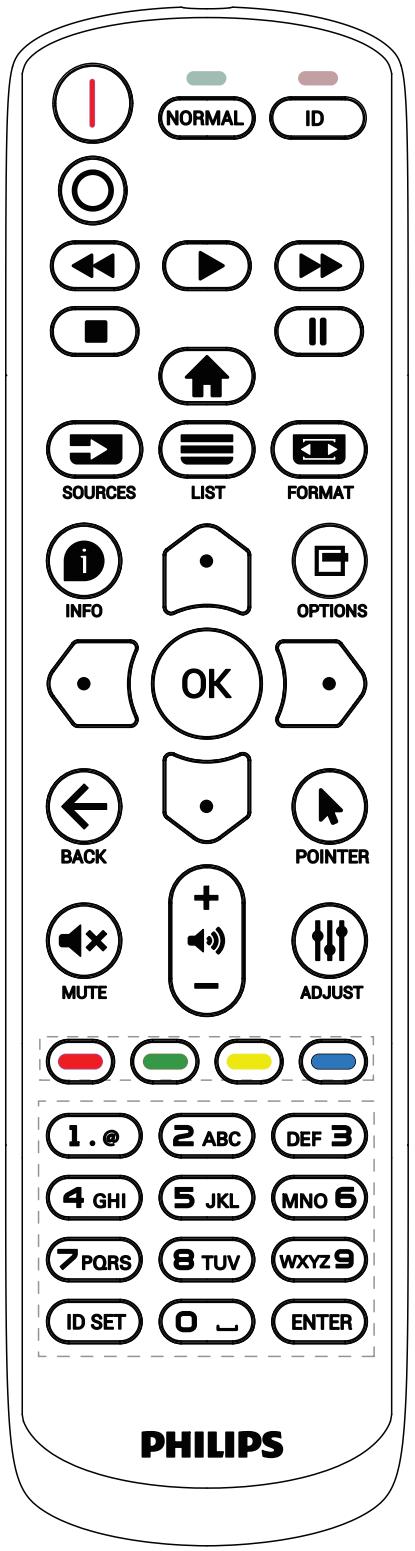
3.6.1. General functions

text_image
1 2 3 4 5 6 7 8 9 10 11 12 NORMAL ID SOURCES LIST FORMAT INFO OPTIONS OK BACK POINTER MUTE ADJUST 1. @ 2 ABC DEF 3 4 GHI 5 JKL MNO 6 7 PQRS 8 TUVWXYZ 9 ID SET 0 ENTER PHILIPS① [I/O] POWER button
[1]Turn the power On.
[O]Turn the power Off.
② [PLAY] buttons
Control playback of media files.(for Media Input only) Freeze feature
Pause: hotkey for freezing all inputs content.
Play: hotkey for unfreezing all input content.
③ [↑] HOME button
Root Menu: Access the OSD menu.
Others: Exit the OSD menu.
④ [→] SOURCE button
Root Menu: Choose input source.
⑤ [≡] LIST button
Reserved.
⑥ [i] INFO button
Show Information OSD.
⑦ NAVIGATION buttons
[ ]
Root Menu: Go to the OSD of Smart picture.
Main Menu: Move the selected item up to make adjustment.
IR Daisy Chain Menu: Increase the controlled Group ID number.
[ shield]
Root Menu: Go to the OSD of Audio source.
Main Menu: Move the selected item down to make adjustment.
IR Daisy Chain Menu: Decrease the controlled Group ID number.
[∅]
Main Menu: Go to the previous level of menu.
Source Menu: Exit from the source menu.
Volume Menu: Decrease the volume.
[∅]
Main Menu: Go to the next level of menu or set selected option.
Source Menu: Go to the selected source.
Volume Menu: Increase the volume.
⑧ [OK] button
Root Menu: Go to the OSD of IR daisy chain in Primary/Secondary mode.
Main Menu: Confirm an entry or selection.
⑨ [←] BACK button
Return to the previous page or exit from the previous function.
⑩ [◀×] MUTE button
Mute or unmute the sound.
⑪ [—] [—] [—] [—] COLOR buttons
[●] Hotkey to turn on and off backlight.
⑫ [Number/ ID SET/ ENTER] button
Enter text for network setting.
Press to set the display ID. Refer to 3.6.2. ID Remote Control for more details.
⑬ [ ] FORMAT button
Select image zoom mode from Full, 4:3, 1:1, 16:9, 21:9 or Custom.
⑭ [☐] OPTIONS button
Reserved.
⑮ [▶] POINTER button
Reserved.
⑯ [↑↑] ADJUST button
Go to the OSD of Auto Adjust (for VGA only).
⑰ [—] [+] VOLUME button
Adjust the volume.
3.6.2. ID Remote Control
Set remote control ID number when using several displays.
text_image
NORMAL ID SOURCES LIST FORMAT INFO OPTIONS OK BACK POINTER MUTE ADJUST 1. @ 2 ABC DEF 3 4 GHI 5 JKL MNO 6 7 PQRS 8 TUV WXYZ 9 ID SET 0 ENTER PHILIPSPress the [ID] button and the red LED blinks twice.
- Press [ID SET] button for more than 1 second to enter the ID Mode. The red LED lights up. Press the [ID SET] button again will exit the ID Mode. The red LED lights off.
Press the digit numbers [0] \~ [9] to select the display to be controlled.
For example: press [0] and [1] for display No.1, press [1] and [1] for display No.11.
The numbers available are [01] \~ [255].
- If no button is pressed within 10 seconds, it will exit from the ID mode.
- If a wrong button is pressed, wait for 1 second until the red LED lights off and then turns on again, then press the correct digits.
- Press [ENTER] button to confirm your selection. The red LED blinks twice and then lights off.
NOTE:
- Press [NORMAL] button. The green LED blinks twice, indicating that the display is under normal operation.
- It is necessary to set up the ID number for each display before selecting its ID number.
3.6.3. Remote Control buttons on Android source
text_image
1 NORMAL ID 2 SOURCES LIST FORMAT 3 INFO OPTIONS 4 OK 5 BACK POINTER 6 MUTE ADJUST 7 13 14 8 15 16 17 11 PHILIPS 1. @ 2 ABC DEF 3 4 GHI 5 JKL MNO 6 7 PQRS 8 TUVWXYZ 9 ID SET 0 ENTER① [I/O] POWER button
Turn the display On or standby mode.
The button is only controlled by Scalar.
② [PLAY] buttons
- Control playback of media (video/audio/picture) files.
There are 4 ways to play the media files.
1) File Manager
Find the media file from the File Manager and select it to play.
2) Media Player -> Compose -> edit or add a new playlist -> choose any media files -> press ▶ button to play the media file directly.
3) Media Player -> Play -> choose non-empty play list -> press OK to play all media files from the playlist.
4) Set media playlist in Boot on Source or Schedule by OSD menu.
- When playing a video or music file, you can press button to stop playing. If you press ▶ again, playback will be started from the beginning of the file.
- When playing a video or music file, you can press button to pause playing.
- All media files should be located in the folder of "philips", under the root directory of the specified storage (internal/USB/SD Card). All sub-folders (video/photo/music) are named by media types and shouldn't be changed.
videos: {root dir of storage}/philips/video/
photos: {root dir of storage}/philips/photo/
music: {root dir of storage}/philips/music/
Note that the root directories of three storages are
Internal storage: /sdcard
USB storage: /mnt/usb_storage
SD card : /mnt/external_sd
③ [↑] HOME button
Access the OSD menu.
The button is only controlled by Scalar.
④ [→] SOURCE button
Select an input source.
The button is only controlled by Scalar.
⑤ [≡] LIST button
- In the content of the web page, move the focus up to the next selectable items.
- Move the focus up to the next control or widget such as buttons.
⑥ [i] INFO button
- Display information about the current input signal. It is shown by Scalar.
- Media Player -> Compose -> edit or add a new playlist -> choose any media files -> press ⓘ to show the information of the selected media file.
⑦ NAVIGATION buttons
- Navigate through the menus and select an item.
- In the content of the web page, these buttons are for controlling the scroll bar of the screen. Press 🔔 or 🔵 for moving the vertical scroll bar up or down. Press 🔕 or 🔽 for moving the horizontal scroll bar left or right.
⑧ [OK] button
Confirm an entry or selection.
⑨ [←] BACK button
Return to the previous page or exit from the previous function.
⑩ [◀×] MUTE button
Mute or unmute the sound.
The button is only controlled by Scalar.
⑪ [—] [—] [—] [—] COLOR buttons
[●] Hotkey to turn on and off backlight.
⑫ [Number/ ID SET/ ENTER] button
ID SET 📋 and ENTER 📋 are reserved on Android source. These buttons are only controlled by Scalar.
⑬ [←] FORMAT button
Change picture format. The button is only controlled by Scalar.
⑭ [☐] OPTIONS button
Open the toolbox from Media Player.
- Media Player ->Compose -> Edit or add a new playlist -> press to open a toolbox. The toolbox will slide from the left side of the screen.
⑮ [▶] POINTER buttons
Reserved.
⑯ [↑↑] ADJUST button
- In the content of the web page, move the focus down to the next selectable items.
- Move the focus down to the next control or widget such as buttons.
⑰ [—] [+] VOLUME button
Adjust volume level. The buttons are only controlled by Scalar.
3.7. AC Switch Cover
• Use AC Switch Cover to cover the AC switch.
- Install the AC Switch Cover.
- Fix the AC switch cover with the screw from the accessory kit.

natural_image
Technical line drawing of a wall-mounted electrical outlet with mounting holes and wiring (no text or symbols)4. Connecting External Equipment
4.1. Connecting External Equipment (Multimedia Player)
4.1.1. Using HDMI video input
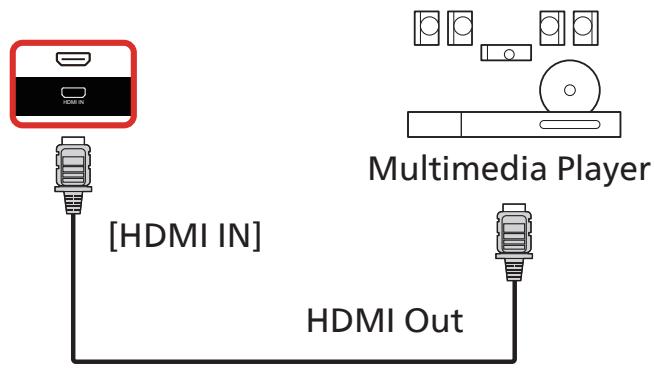
text_image
[HDMI IN] Multimedia Player HDMI Out4.2. Connecting a PC
4.2.1. Using HDMI input
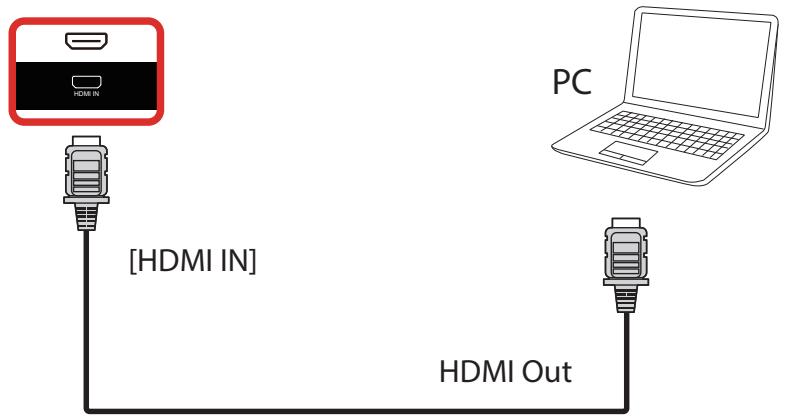
flowchart
graph TD
    A["PC"] -->|HDMI IN| B["Hybrid"]
    B -->|HDMI Out| C["Hybrid"]
4.2.2. Using HDMI input with USB-B (touch connector to PC)
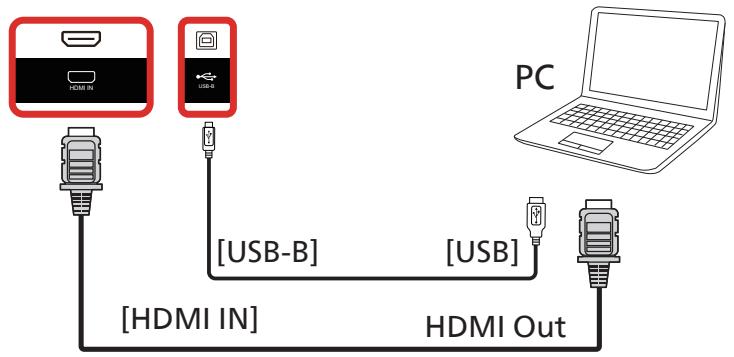
flowchart
graph TD
    A["PC"] -->|USB-B| B["USB"]
    A -->|USB-B| C["HDMI IN"]
    A -->|USB-B| D["HDMI Out"]
    B -->|HDMI IN| C
    D -->|HDMI Out| C
NOTE: Refer to 8.3.5. System Tools => Touch access I/O for USB-B preference.
4.3. Connecting Audio Equipment
4.3.1. Connecting an external audio device
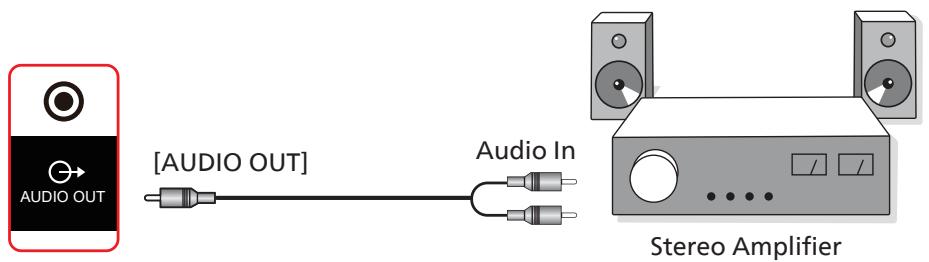
text_image
[AUDIO OUT] Audio In Stereo Amplifier4.4. Connecting Multiple Displays in a Daisy-chain Configuration
You can interconnect multiple displays to create a daisy-chain configuration for applications such as a menu board.
4.4.1. Display control connection
Connect the [RS232 OUT] connector of DISPLAY 1 to the [RS232 IN] connector of DISPLAY 2.
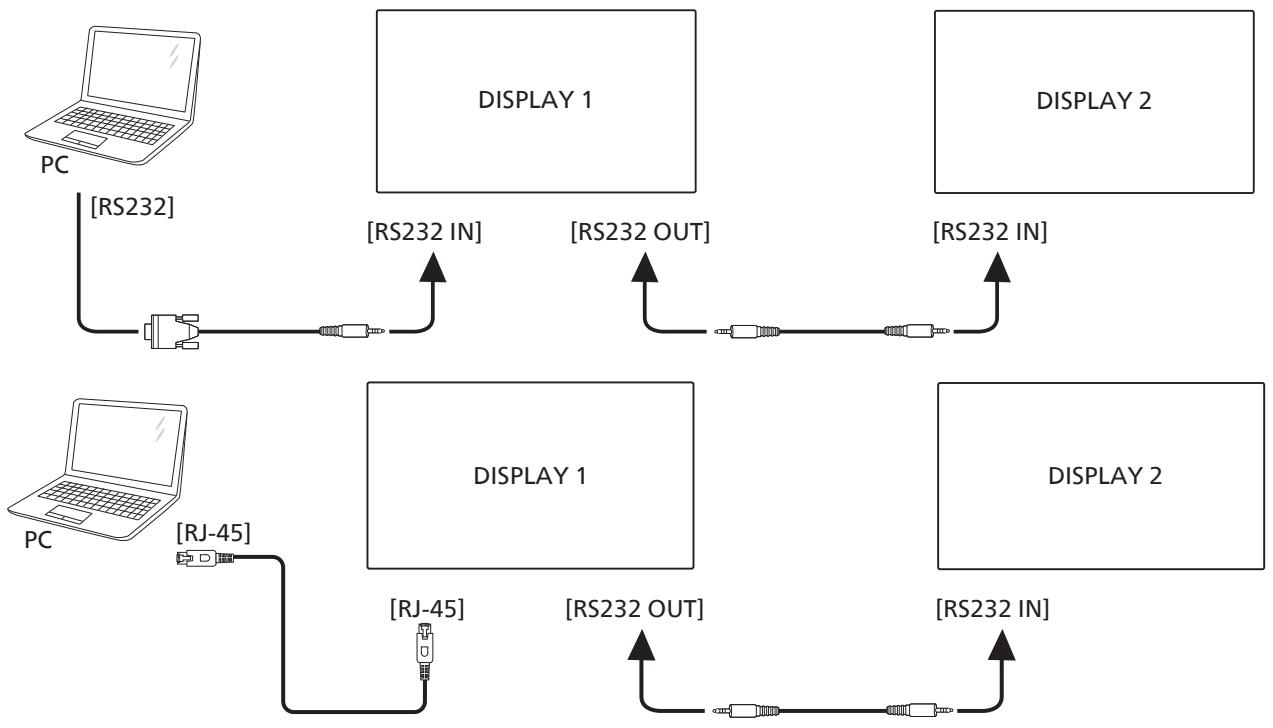
flowchart
graph TD
    A["PC"] -->|[RS232]| B["Switch"]
    B --> C["RS232 IN"]
    C --> D["DISPLAY 1"]
    D -->|[RS232 OUT]| E["Switch"]
    E --> F["RS232 IN"]
    F --> G["DISPLAY 2"]
    G -->|[RS232 OUT]
    G --> H["DISPLAY 1"]
    H -->|[RS232 IN]
    H --> I["DISPLAY 2"]
    I --> J["PC"]
    J -->|[RJ-45]| K["Switch"]
    K --> L["RS232 OUT"]
    L --> M["DISPLAY 1"]
    M --> N["RS232 IN"]
    M --> O["DISPLAY 2"]
4.5. IR connection
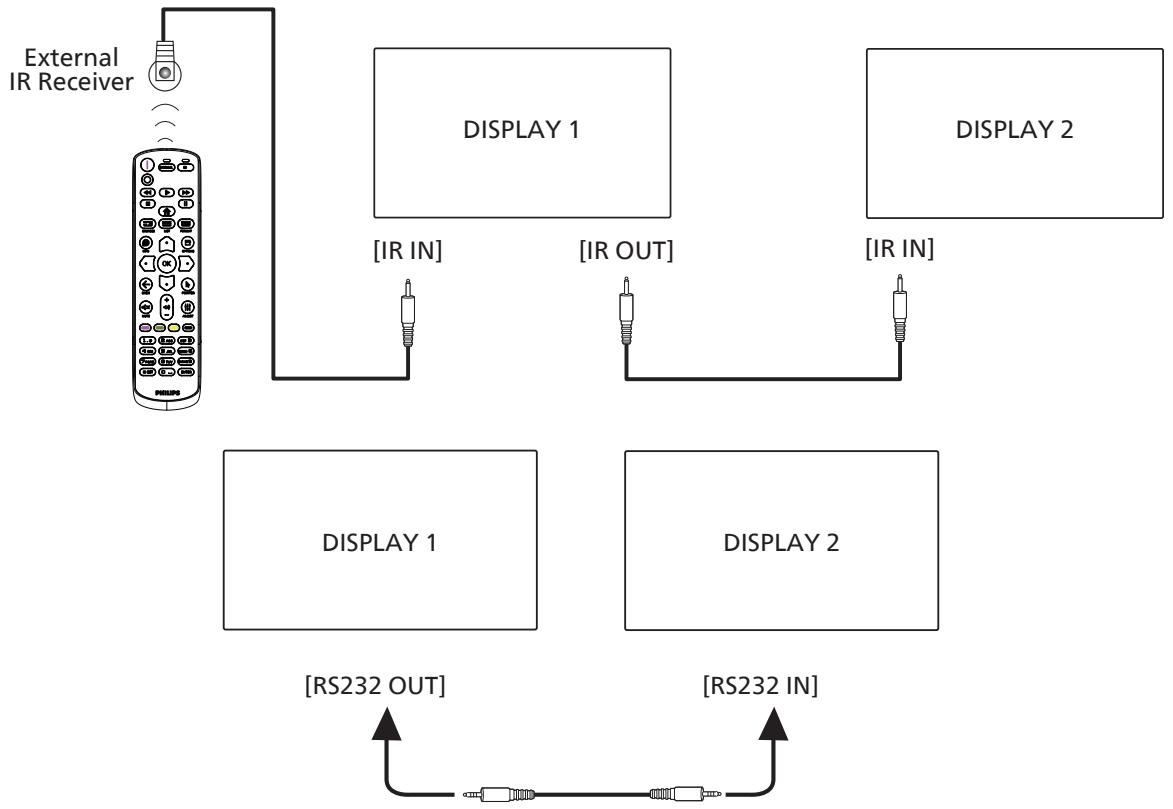
flowchart
graph TD
    A["External IR Receiver"] --> B["Display 1"]
    A --> C["Display 2"]
    B --> D["IR IN"]
    B --> E["IR OUT"]
    C --> F["IR IN"]
    C --> G["IR OUT"]
    H["DISPLAY 1"] --> I["RS232 OUT"]
    J["DISPLAY 2"] --> K["RS232 IN"]
NOTE:
- The remote control sensor of this display will stop working if the [IR IN] is connected.
- IR loop through connection can support up to 9 displays.
- IR in daisy chain via RS232 connection can support up to 9 displays.
4.6. IR Pass-through Connection
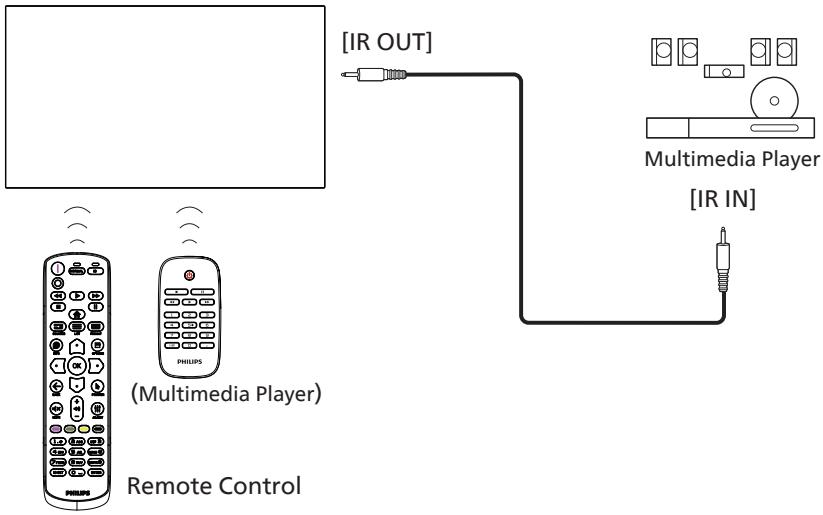
flowchart
graph TD
    A["Remote Control"] -->|IR OUT| B["Multimedia Player"]
    A -->|IR IN| C["Multimedia Player"]
4.7. Touch Operation
This display is equipped with a touch-sensitive screen and supports the Windows Touch features either by single touch or multi-touch operation. You can touch the pictures or text on the display gently with your fingers, and the system will react.
This section explains about the touch operation on the display. For further detail on how to run the touch operation, please refer to the Windows operation instruction.
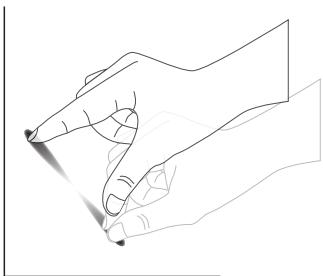
Single Tap
Touch the target on the screen with one fingertip for one quick tap, then release.
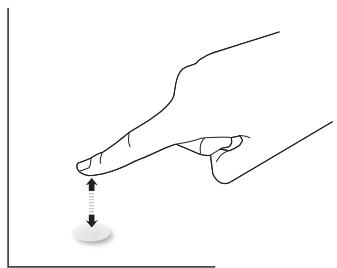
natural_image
Line drawing of a hand holding a finger with a dotted line indicating movement or point (no text or symbols)Please note that a touch screen will respond to a light touch from your fingertip when tapping on touch screen.
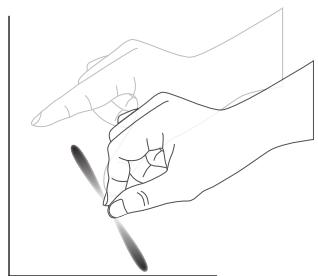
Double Tap
Touch the target on the screen with one fingertip for two quick taps, then release.
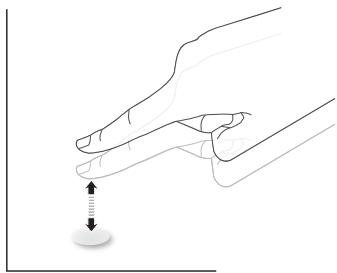
natural_image
Illustration of two hands holding a small circular object with a double-headed arrow indicating vertical motion (no text or symbols)Pan
Touch the target on the screen with one fingertip and move across the target without losing direct contact, then release.
natural_image
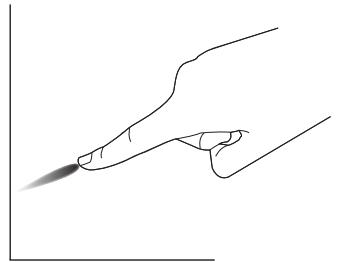
Line drawing of a hand holding a pen or stylus, with no text or symbols presentFlick
Touch the target on the screen with one fingertip and brush the surface quickly.
natural_image
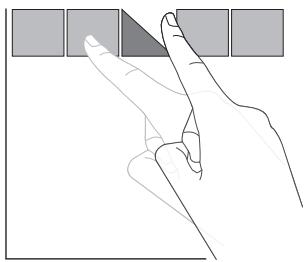
Illustration of a hand pointing at four square buttons (no text or symbols)Zoom in
Touch the target on the screen with two fingertips held together and move them apart to zoom in (magnify) the screen image.
natural_image
Line drawing of two hands holding a pen, no text or symbols presentZoom out
Touch the target on the screen with two fingertips stretched apart and move them closer to zoom out (shrink) the screen image.
natural_image
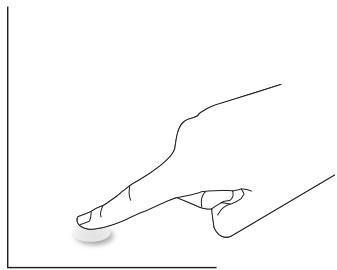
Line drawing of a hand holding a propeller (no text or symbols)Touch and Hold
Touch and hold the target on the screen with one fingertip for a while to display a context menu or options page for an item.
natural_image
Line drawing of a hand pressing a button on a line (no text or symbols)Avoid
- Avoid scratching with sharp object on the screen. Only use your fingertips to perform touch operation.
- Do not expose the screen to intensive light, spotlight, or wide-spread light.
- Do not install the product to a location where is close to the windows or glass-doors as the direct sunlight may affect the touch-control performance.
- To avoid screen interference with each other, do not place 2 touch screens side by side as shown below.
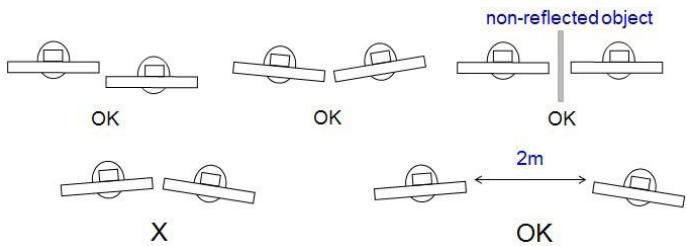
text_image
non-reflected object OK OK OK X 2m OKFig. Touch screens interference
The multi Touch function is not supported by Mac OS. The OS supported is listed below.
| Item | Description | ||
| Operating Systems Supported by Plug-and-Play | Windows 7, 8/8.1, 10 | ||
| Supported Modes of Operation by the Operating System | OS | Single Touch | Multi Touch |
| Windows 7, 8/8.1, 10 | O | O* | |
| Mac OSX before (include) 10.15 | O | X | |
| Mac OSX after (include) 10.10 | O | X | |
| Chrome 38+ | O | O** | |
| Android 4.0, Kernel after (include) 3.6 | O | O*** | |
| Linux | O**** | O***** | |
| * Support multi-touch. ** Kernel 3.15 upward. *** Support 10-point touch. **** CentOS, Debian, Fedora, Gentoo, Mandrake(Mandriva), Meego, Red Hat, Slackware, SuSE(OpenSuSE), Ubuntu(Xubuntu), and Yellow Dog etc. *****Kernel 3.15 upward. | |||
- We highly recommend that you use the latest Service Pack with all Windows 7 OS.
- Digitizer input to Windows refers to touch digitizer as opposed to touch stylus in tablet PCs.
- Set as default by Microsoft.
5. Operation
Note: The control button described in this section is mainly on the remote control unless specified otherwise.
5.1. Watch the Connected Video Source
-
Press the [→] SOURCE button.
-
Press [☐] or [☐] button to select a device, then press [OK] button.
5.2. Change Picture Format
You can change the picture format to suit the video source. Each video source has its available picture formats.
The available picture formats depend on the video source:
- Press [☐] FORMAT button to select a picture format.
• PC mode: {Full} / {4:3} / {Real} / {21:9} / {Custom}.
• Video mode: {Full} / {4:3} / {Real} / {21:9} / {Custom}.
5.3. Launcher
Launcher:
- You can press "Source" and select "Home" to start up.
- Multiple Home shortcut items can be added to the Launcher.
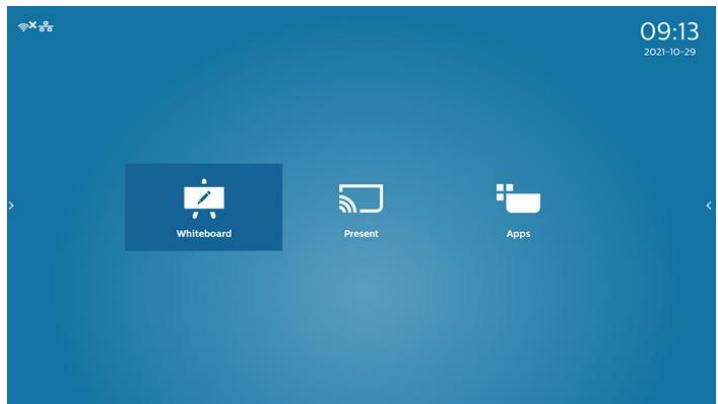
The Launcher consists of the following Apps:
"Whiteboard", "Present" and "Apps".
Whiteboard: go to whiteboard page.
Present: go to interact page.
Apps: show all apps.
text_image
09:13 2021-10-29 Whiteboard Present AppsAdd multiple home shortcuts to the homepage:
Settings -> Signage Display -> General settings -> Home shortcut.
| Home shortcut | ||
| Whiteboard | App | Whiteboard |
| Present | App | InterAct |
| Apps | App | All Apps |
| Conference | App | |
| Shortcut 1 | ||
| Shortcut 2 | ||
| Shortcut 3 | ||
| Shortcut 4 | ||
1) Whiteboard page:
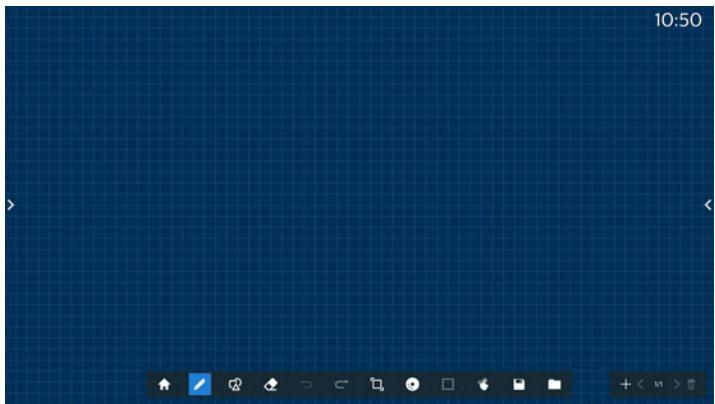
natural_image
Blue grid background with tool icons at bottom (no readable text or symbols)2) Present page:
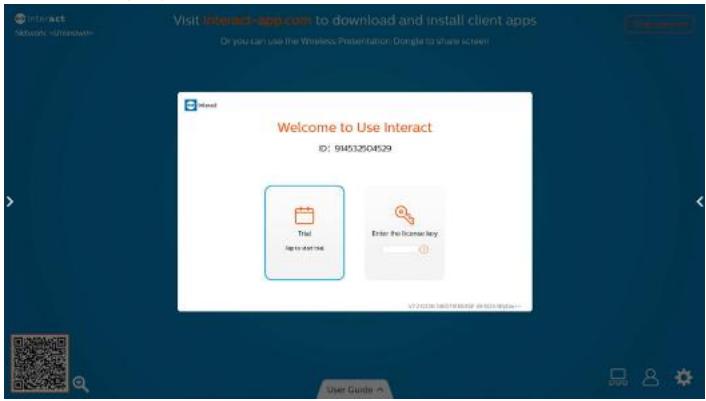
text_image
Visit interact-app.com to download and install client apps Or you can Use the Wireless Presentation: Dongla to share screen! Welcome to Use Interact ID: 94532504529 Trial App to start Enter the license key © 2023/10/07/2023 @ 6:00:00:00:00 User Guide: © 2023/10/07/2023 @ 6:00:00:00:003) Apps page:
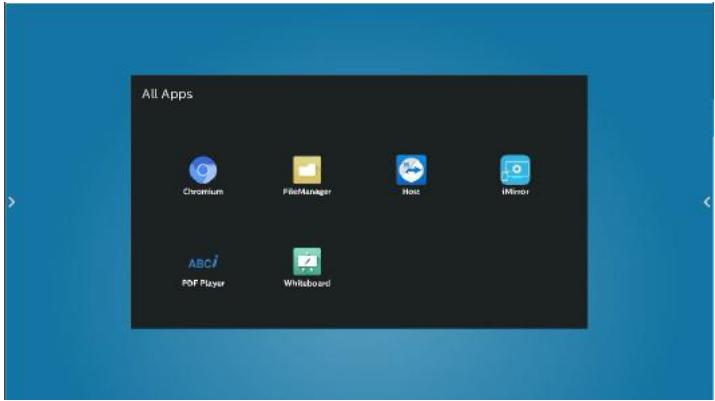
text_image
All Apps Chromium FileManager Host iMirror PDF Player Whitelboard5.4. Media Player
5.4.1. OSD menu interaction with media player:
1. Boot on source:
- Input:
■ If you select Media player as the source, the system will enter media player automatically after the boot process is completed.
- Playlist:
■ Main page: go to the main page of media player.
■ Playlist 1 - Playlist 7: go to media player and playback File1 - File7 of playlist automatically
■ USB Autoplay: go to media player and play USB files automatically.
2. Schedule:
- Schedule list:
■ Set up to 7 schedules.
- Enable:
■ Enable/disable schedule.
- Start time:
■ Set start time.
- End time:
■ Set end time.
- Playlist:
■ 1-7 : go to media player and playback File1 - File7 of playlist automatically.
■ USB AutoPlay: media player autoplay media file of USB storage.
- Days of the week:
■ Set Sunday, Monday, Tuesday, Wednesday, Thursday, Friday, Saturday. - Every week:
■ Set a weekly schedule. - Save:
■ Save the schedule.
5.4.2. Media Player introduction:
- The main page of Media Player, this page consists of three options: "Play", "Compose" and "Settings". Play: select a playlist to play. Compose: edit a playlist. Settings: set the properties of Media Player.

text_image
Media Player Play Compose Settings- Select "Play" on the main page, first you should choose one playlist to play between FILE 1 and FILE 7. The pencil icon means that the playlist contains the content.

text_image
PlayList File 1 File 2 File 3 File 4 File 5 File 6 File 7- Select "Compose" on the main page, first you should select one playlist to edit between FILE 1 and FILE 7. The pencil icon means that the playlist contains the content.

text_image
PlayList File 1 File 2 File 3 File 4 File 5 File 6 File 7- If an empty playlist is selected, the App will guide you through selecting the media source.
All media files should be stored in /philips/ of root directory.
For example,
videos: {root dir of storage}/philips/video/photos: {root dir of storage}/philips/photo/music : {root dir of storage}/philips/music/

text_image
Select media from ? Internal USB- If you select "USB" storage, the App will guide you through selecting the USB device.

text_image
Select USB storage TPV354G- To edit or delete a non-empty playlist, select the desired playlist that has a pencil icon on right side of the selected file.

text_image
Edit or Delete ? Edit Delete- Once you start to edit a playlist, you will see below screen.
Source - files in storage.
Playlist – files in playlist.
Option – launch the side menu bar.
Play key – play the media file.
Info key – show the media information.
Touch file - select/deselect a file.
Note:
When long press on one of the directories in Source, full path will then be displayed.
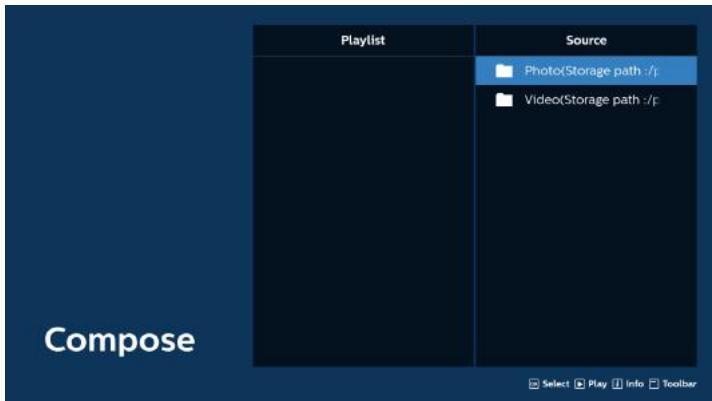
text_image
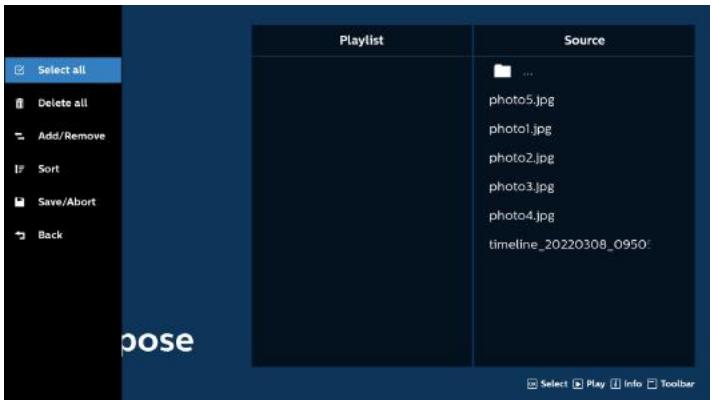
Playlist Source Photo(Storage path :/p Video(Storage path :/p Compose Select Play Info Toolbar7-1 From the side menu bar, the following functions are available:
- select all: select all storage files.
- delete all: delete all playlist files.
- add/remove: update playlist from source.
- sort: sort playlist.
- save/abort: save or abort playlist.
- back: return to the previous menu.
text_image
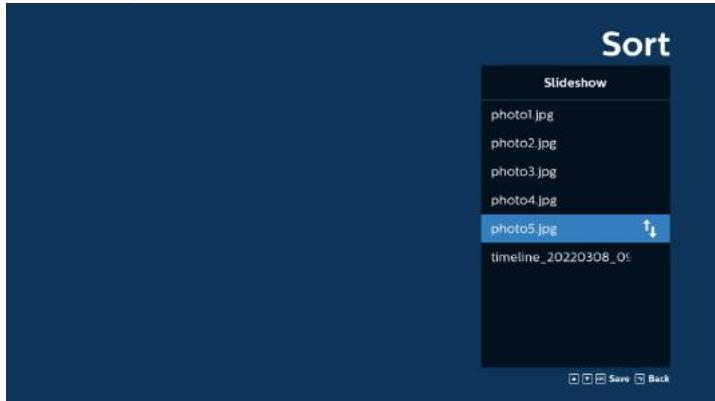
Select all Delete all Add/Remove Sort Save/Abort Back Playlist Source ... photo5.jpg photo1.jpg photo2.jpg photo3.jpg photo4.jpg timeline_20220308_0950: pose Select Play Info Toolbar- If "Sort" is selected, you can customize the file order severally.
text_image
Sort Slideshow photo1.jpg photo2.jpg photo3.jpg photo4.jpg photo5.jpg ↑↓ timeline_20220308_09 Save Back- After selecting the desired file, press "Info" key to obtain the detailed information.
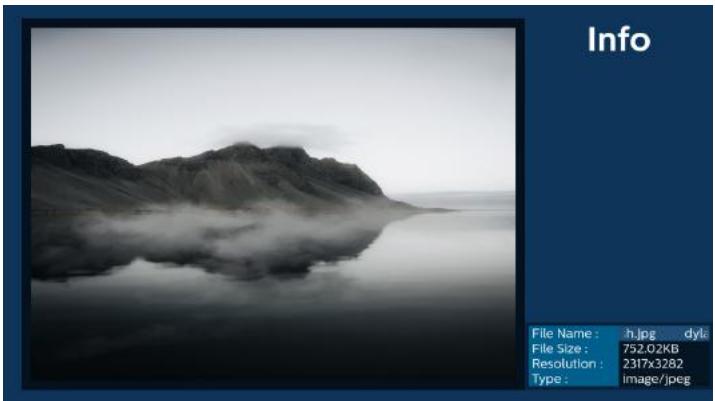
text_image
Info File Name : h.jpg ... dyle File Size : 752.02KB Resolution : 2317x3282 Type : image/jpeg- After selecting the desired file, press "Play" key to play the media file immediately.

natural_image
Black-and-white landscape photo of a mountain reflected in calm water, no text or symbols visible- If you create a playlist with all image files, you will be asked to add a background music to the slideshow before saving.

text_image
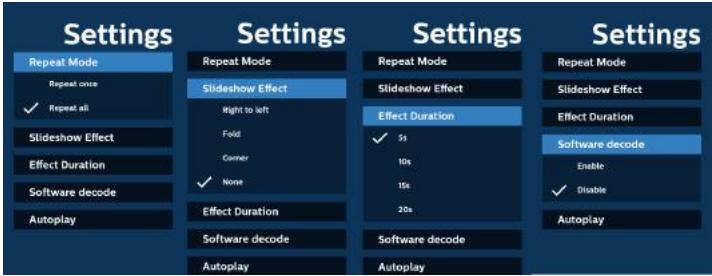
Add background music to slideshow? Yes No- Select "Settings" on the main page, there are 5 options available: "Repeat Mode", "Slideshow Effect", "Effect Duration", "Software Decode" and "USB Autoplay". Repeat mode: set the repeat mode. Slideshow Effect: photo slideshow effect. Effect Duration: duration of photo effect. Software Decode: no black screen between video play. USB Autoplay: Plug in the USB device and it will play the files from USB root path automatically.
text_image
Settings Repeat Mode Repeat once ✓ Repeat all Slideshow Effect Effect Duration Software decode Autoplay Settings Repeat Mode Slideshow Effect Right to left Fold Corner ✓ None Effect Duration Software decode Autoplay Settings Repeat Mode Slideshow Effect Effect Duration ✓ 5s 10s 15s 30s Software decode Autoplay Settings Repeat Mode Slideshow Effect Effect Duration Software decode Enable ✓ Disable Autoplay- Media Player import text file
Step 1. Create media player text file.
- File name: mpplaylistX.txt, "X" means playlist number(1,2,3,4,5,6,7).
Ex. mpplaylist1.txt, mpplaylist2.txt
- Content:
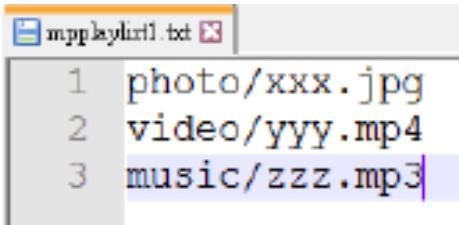
text_image
1 photo/xxx.jpg 2 video/yyy.mp4 3 music/zzz.mp3Note: If the playlist contains video and music files, the screen becomes black when playing music file.
Step 2. Copy "mpplaylistX.txt" to "philips" folder of internal storage. You may use FTP to do this.
- File path : /storage/emulated/legacy/philips (for DL, PL) Ex. /storage/emulated/legacy/philips/mpplaylist1.txt
Step 3. Prepare media files to "photo", "video" and "music" folder under "philips" folder, internal storage only.
- Ex. /storage/emulated/legacy/philips/photo/xxx.jpg /storage/emulated/legacy/philips/video/yyy.mp4 /storage/emulated/legacy/philips/photo/zzz.mp3
Step 4. Start media player app, it will automatically import media player text file.
Note: Once the playlist file (text) is imported, if user changes playlist via remote control, this change will not be reflected in the playlist text file.
5.5. Browser
Before using this feature, ensure that the system is connected successfully to the network.
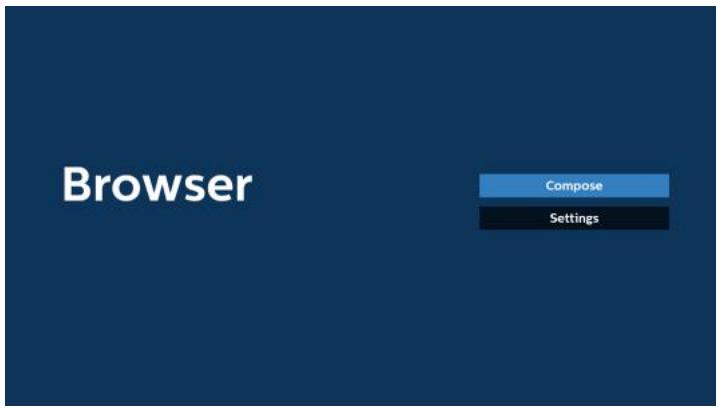
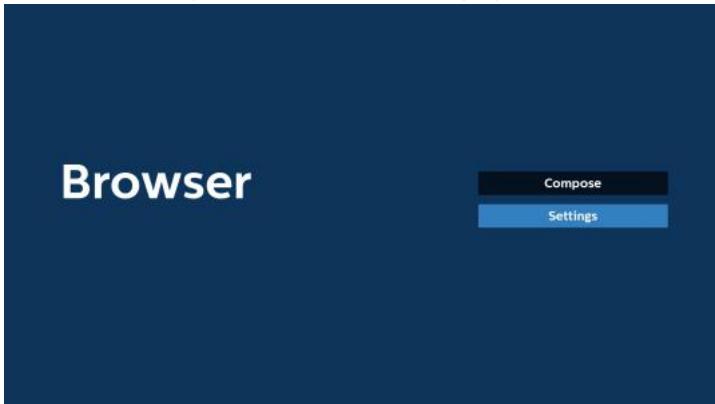
- Main page of "Browser" App which allows you to make related settings.
text_image
Browser Compose Settings- Press "Compose" then enter the next page.
Users can choose between 1\~7.
A dialog box appears after the selection is made.
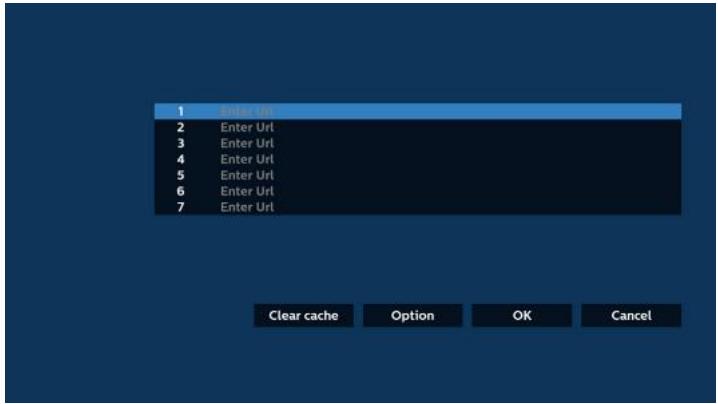
text_image
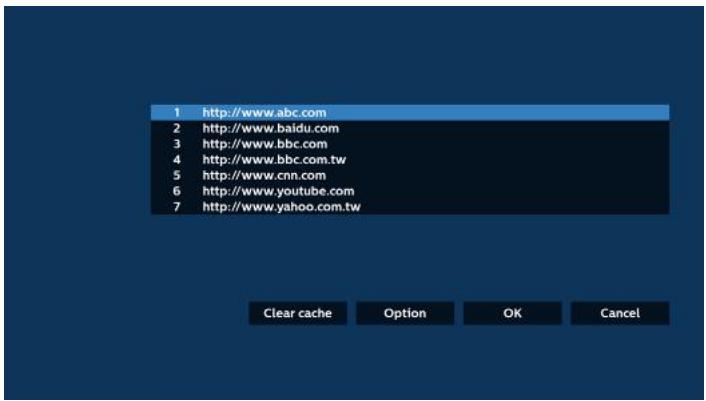
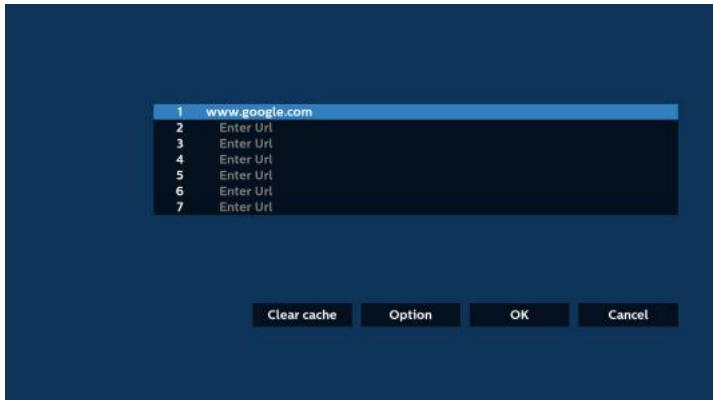
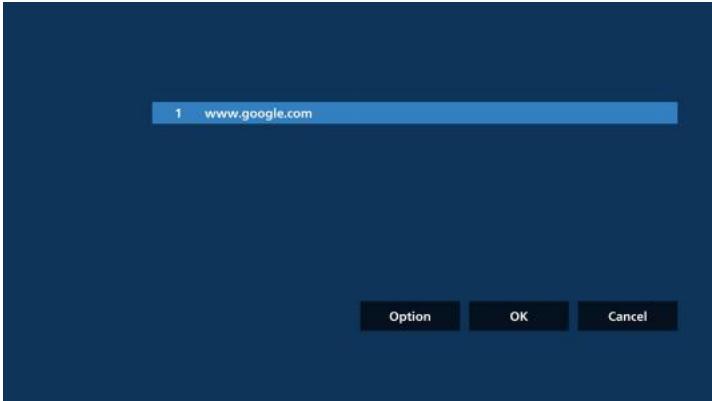
1 Enter Url 2 Enter Url 3 Enter Url 4 Enter Url 5 Enter Url 6 Enter Url 7 Enter Url Clear cache Option OK Cancel- Use the on-screen keyboard to enter URL and press the OK button, the data will be saved in the List.
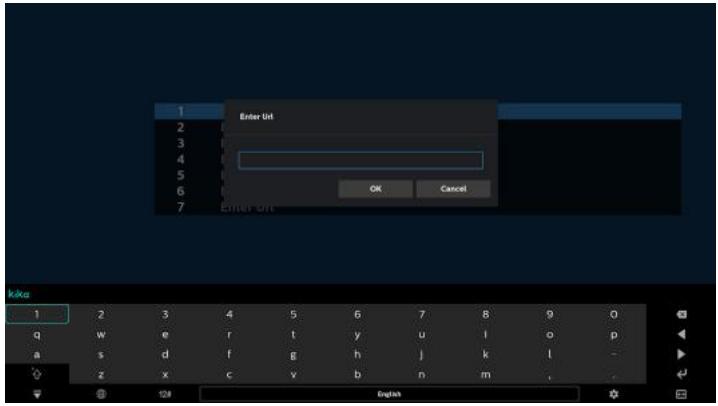
text_image
Enter UI OK Cancel Kiko 1 2 3 4 5 6 7 8 9 0 q w e r t y u l o p a s d f g h j k l - z x c v b n m ,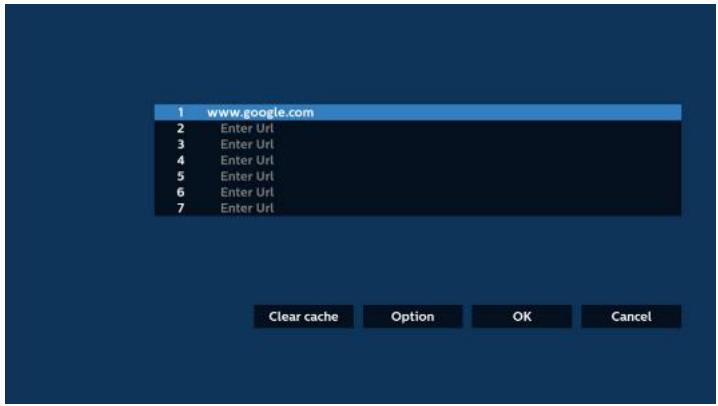
text_image
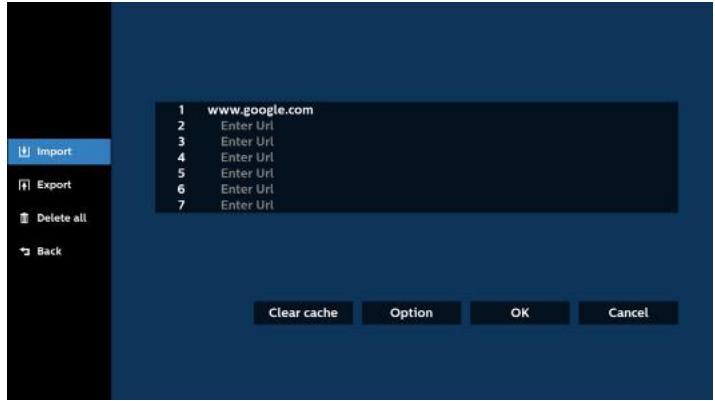
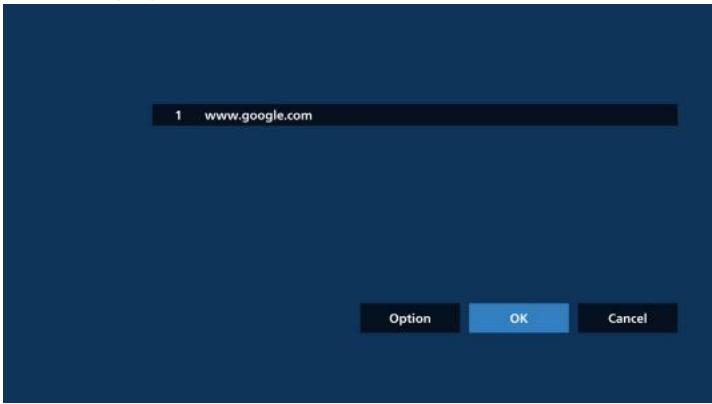
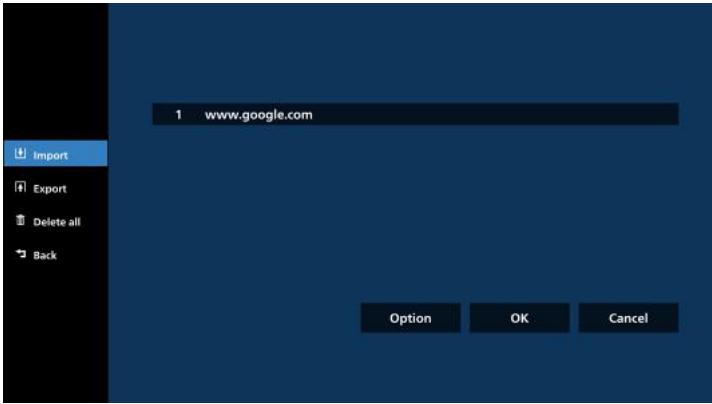
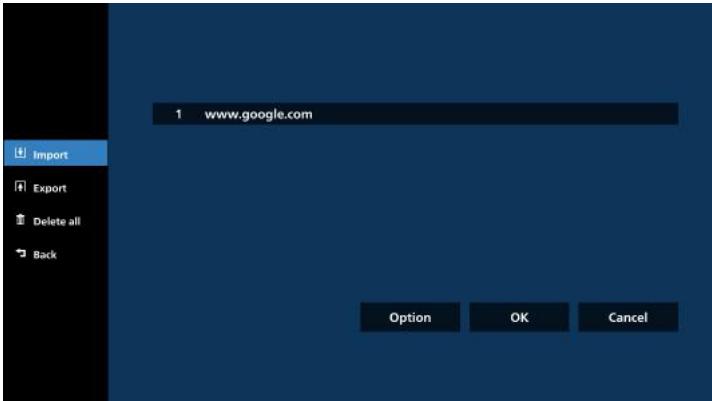
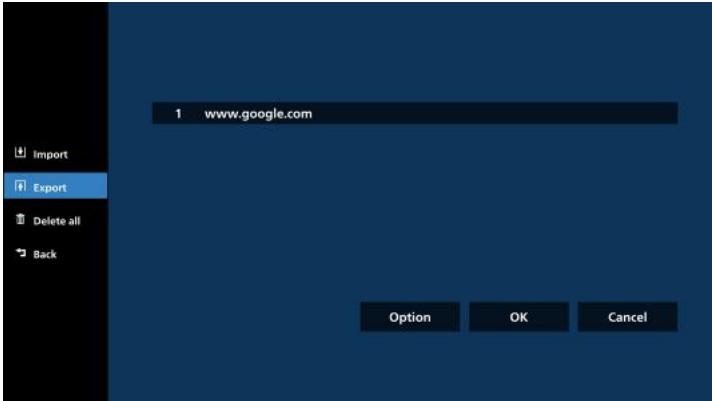
1 www.google.com 2 Enter Url 3 Enter Url 4 Enter Url 5 Enter Url 6 Enter Url 7 Enter Url Clear cache Option OK Cancel- Press "Option" and a list will appear on the left side.
Import: Import the file of URL list
Export: Export the file of URL list
Delete all: Delete all URL records from the main screen
Back: Close the side menu bar

text_image
1 www.google.com 2 Enter Url 3 Enter Url 4 Enter Url 5 Enter Url 6 Enter Url 7 Enter Url Clear cache Option OK Cancel Import Export Delete all Back4.1 Import
- Select import.
text_image
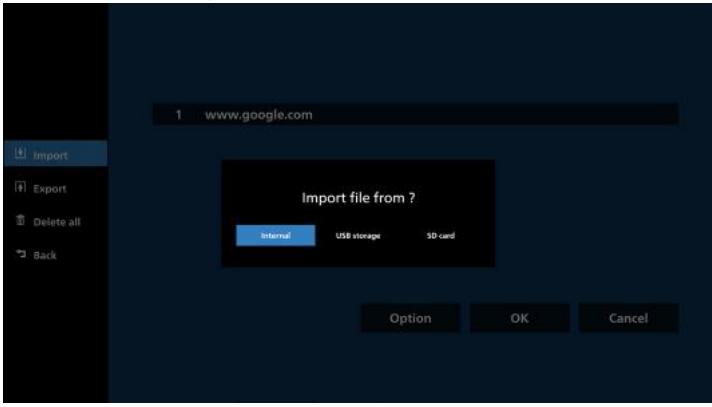
1 www.google.com 2 Enter Url 3 Enter Url 4 Enter Url 5 Enter Url 6 Enter Url 7 Enter Url Clear cache Option OK Cancel Import Export Delete all Back- Select the storage from which the file will be imported.
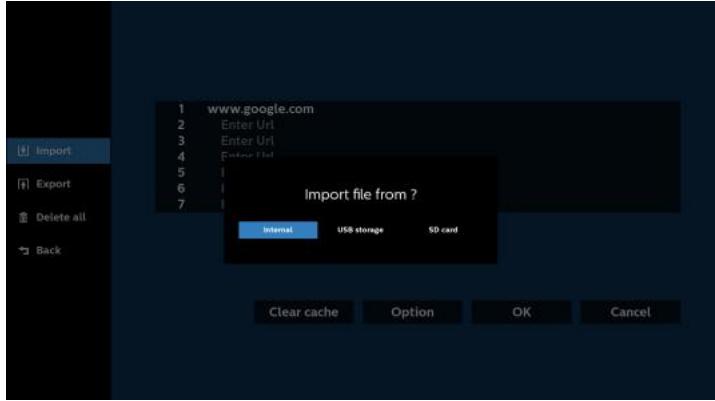
text_image
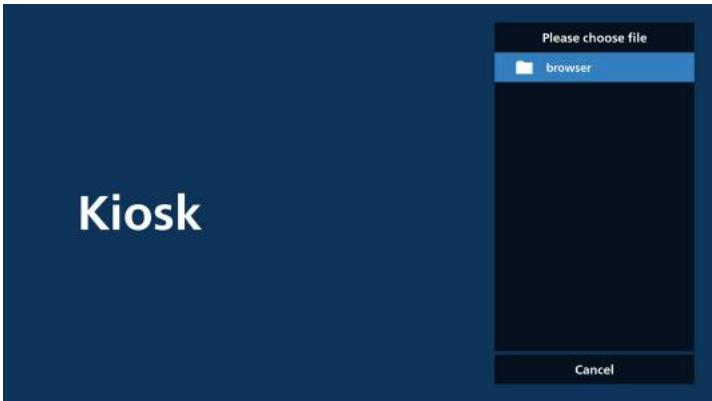
Import 1 www.google.com 2 Enter Url 3 Enter Url 4 Enter Url 5 6 7 Import file from ? Internal USB storage SD card Clear cache Option OK Cancel- Select a browser file.
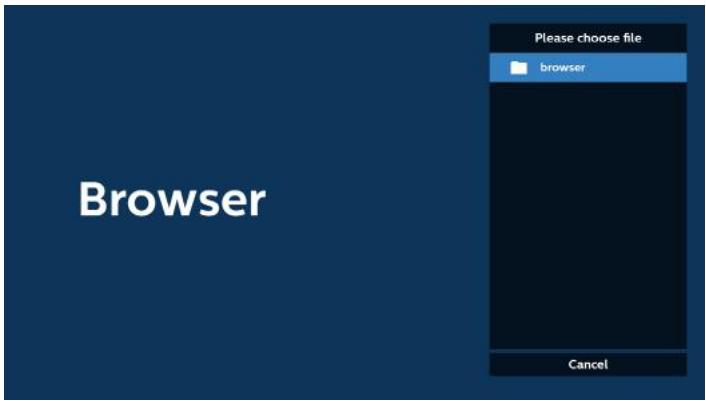
text_image
Browser Please choose file browser Cancel- Import the browser file and the URL will be listed on the screen.
text_image
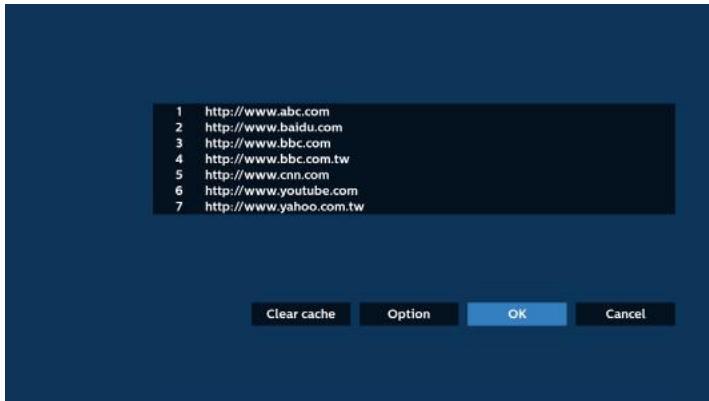
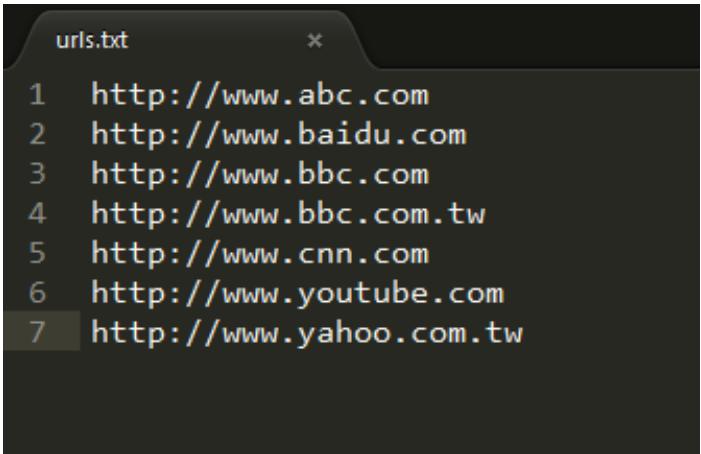
1 http://www.abc.com 2 http://www.baidu.com 3 http://www.bbc.com 4 http://www.bbc.com.tw 5 http://www.cnn.com 6 http://www.youtube.com 7 http://www.yahoo.com.tw Clear cache Option OK Cancel- The file format supported for import is ".txt".
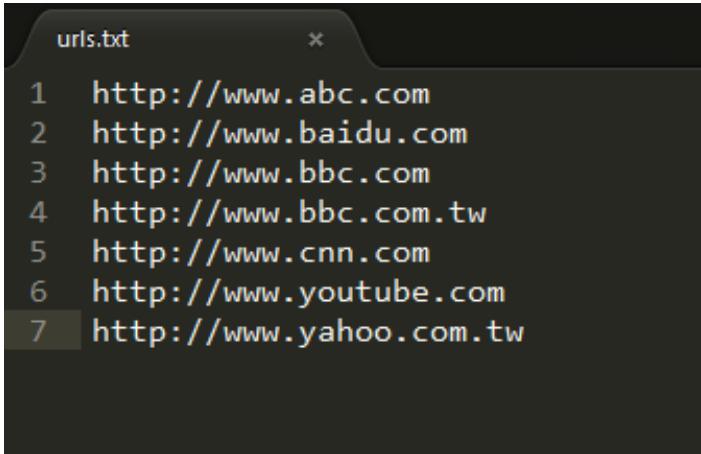
text_image
urls.txt 1 http://www.abc.com 2 http://www.baidu.com 3 http://www.bbc.com 4 http://www.bbc.com.tw 5 http://www.cnn.com 6 http://www.youtube.com 7 http://www.yahoo.com.tw4.2 Export:
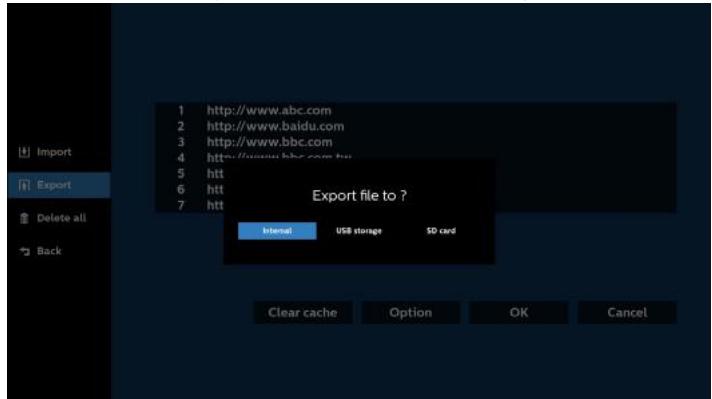
- Select export.

text_image
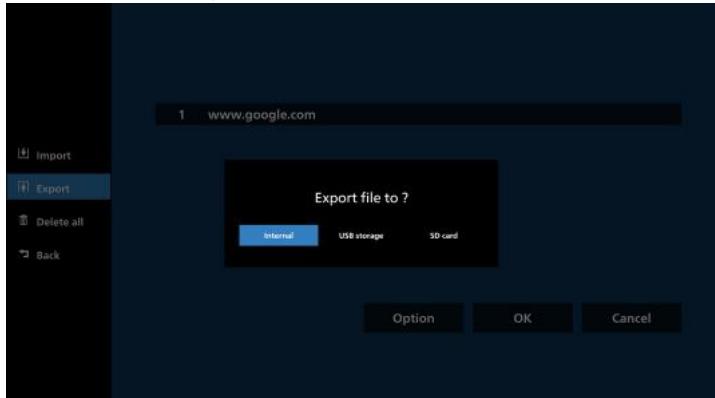
Import Export Delete all Back 1 http://www.abc.com 2 http://www.baidu.com 3 http://www.bbc.com 4 http://www.bbc.com.tw 5 http://www.cnn.com 6 http://www.youtube.com 7 http://www.yahoo.com.tw Clear cache Option OK Cancel- Select the storage where the file will be exported to.
text_image
Import Export Delete all Back 1 http://www.abc.com 2 http://www.baidu.com 3 http://www.bbc.com 4 http://www.bbc.com.tw 5 htt 6 htt 7 htt Export file to ? Internal USB storage SD card Clear cache Option OK Cancel- A dialog box displays the path of the file to be saved as well as the file name. Press the "Save" button to save the URL.
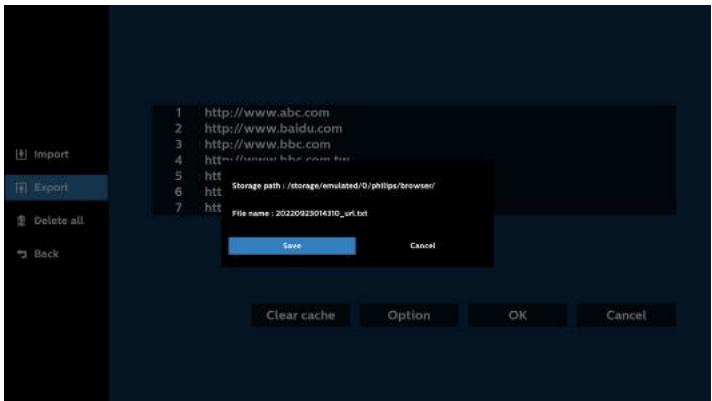
text_image
Import Export Delete all Back 1 http://www.abc.com 2 http://www.baidu.com 3 http://www.bbc.com 4 http://www.bbc.com.tw 5 ht Storage path /storage/emulated/0/phlps/browser/ 6 ht File name : 20220923014310prt.txt 7 ht Save Cancel Clear cache Option OK Cancel- Press the "OK" button to save the URL record.
text_image
1 http://www.abc.com 2 http://www.baidu.com 3 http://www.bbc.com 4 http://www.bbc.com.tw 5 http://www.cnn.com 6 http://www.youtube.com 7 http://www.yahoo.com.tw Clear cache Option OK Cancel
text_image
Browser Compose Settings- If you select a non-empty item from the URL list, a message will appear asking if you want to edit or play the URL. If you select "Edit" a dialog box allows you to edit the URL. If you select "Play", a web page of the selected URL appears.
text_image
1 www.google.com 2 Enter Url 3 Enter Url 4 Enter Url 5 Enter Url 6 Enter Url 7 Enter Url Clear cache Option OK Cancel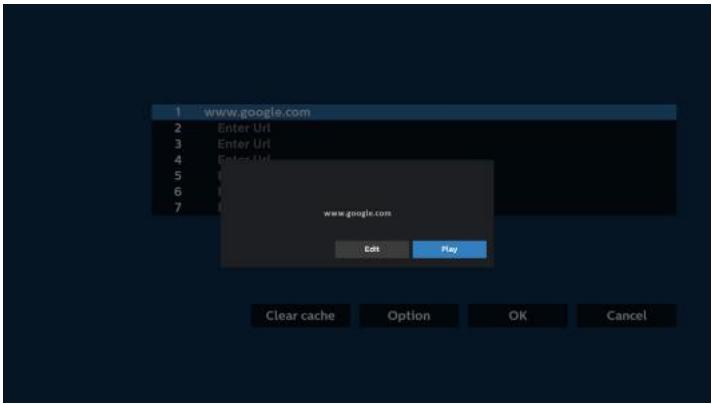
text_image
1 www.google.com 2 Enter Url 3 Enter Url 4 Enter Url 5 6 7 www.google.com Edit Play Clear cache Option OK Cancel- Press "Settings" then enter the next page.
text_image
Browser Compose Settings7.1 Incognito
a. Enable : Display webpages using incognito mode.
b. Disable: Display webpages using non-incognito mode.
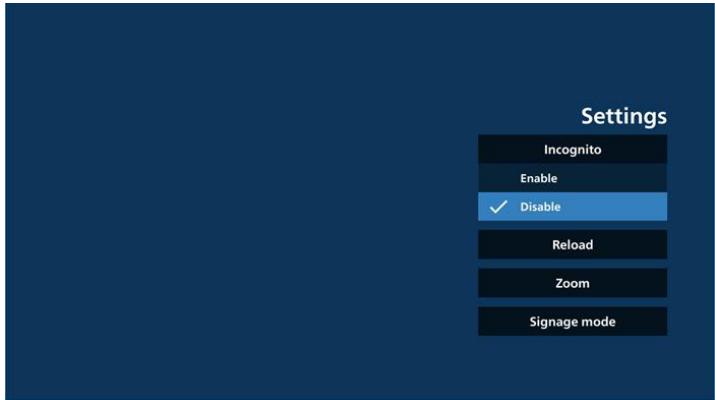
text_image
Settings Incognito Enable ✓ Disable Reload Zoom Signage mode7.2 Reload
Allow users to set the webpage reload time.
a. If the enable checkbox is unchecked, the default reload time is 60 seconds.
Note:
In this case, the webpage only reloads when the network state changes.
If the network state is always connected, the webpage will not reload after 60 seconds.
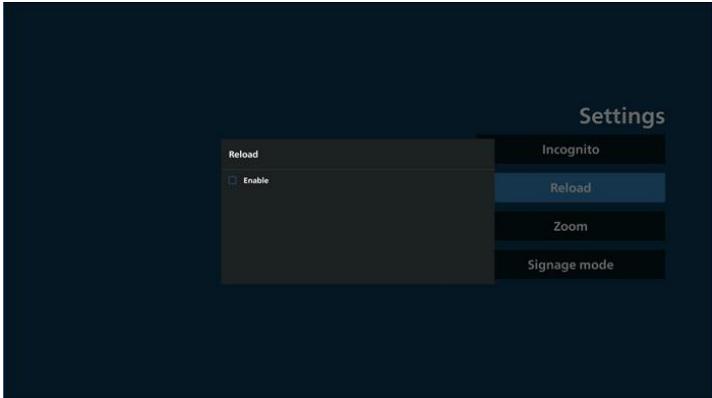
text_image
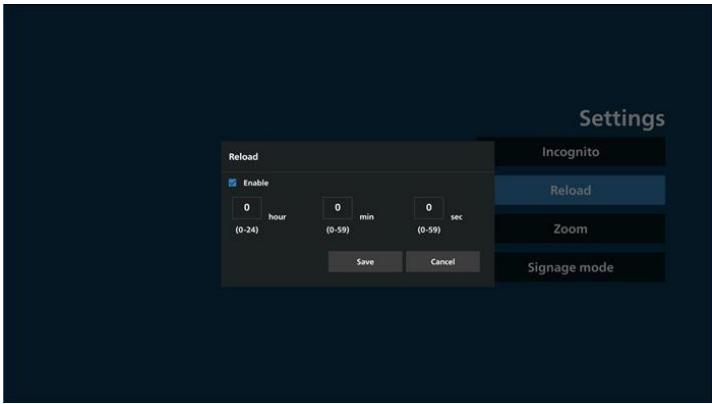
Settings Reload Enable Incognito Reload Zoom Signage modeb. If the enable checkbox is checked, you can set the reload time.
text_image
Settings Reload Enable 0 hour 0 min 0 sec (0-24) (0-59) (0-59) Save Cancel Incognito Reload Zoom Signage mode7.3 Zoom
Allow user to zoom in or out of a web page using two fingers. The webpage must also support this option. The option is enabled by default.
For example:
Zoom in and out on www.google.com home page.
text_image
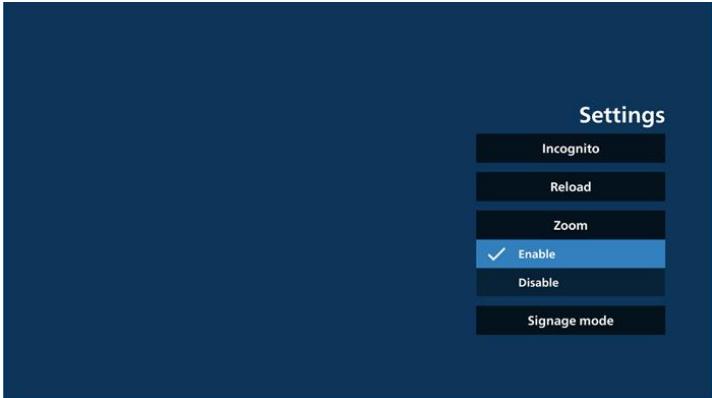
Settings Incognito Reload Zoom ✓ Enable Disable Signage mode7.4 Signage mode
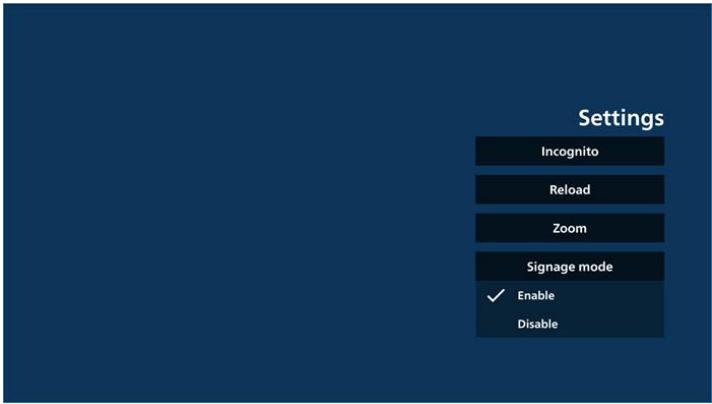
Enable going back to the Browser Compose page when the user returns from another app's activity. Disable keeping the Browser screen on the latest webpage. The option is enabled by default.
Open www.google.com and search for "PDF demo file". Click one PDF file in search result, the PDF file will be downloaded and opened. When user press "Back"
button, the screen goes back to Browser Compose page if the option is enabled. The screen goes back to the search result if disabled.
text_image
Settings Incognito Reload Zoom Signage mode ✓ Enable Disable8. OSD menu interaction with Browser
8.1 Boot on source
Set OSD menu > Configuration1 > Boot on source > set BROWSER Play List to 0.
Then PD will show Browser after rebooting.
Set OSD menu > Configuration1 > Boot on source > Input be BROWSER Play List be 1.
Then PD will show the web page with 1st URL in Browser app.
8.2 Schedule
Set OSD menu > Advanced option > Schedule >
On time1, Off time2, Browser as input, any day of the week and Play List.
Then PD will show the web page with URL in Browser app at time1 and finish at time2.
9. How to edit the URL list via FTP
Step 1. Create a text file of media player.
- File name: bookmarklist.txt.
- Content:
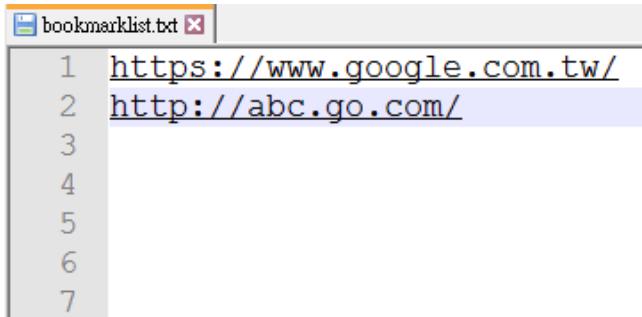
text_image
bookmarklist.txt 1 https://www.google.com.tw/ 2 http://abc.go.com/Step 2. Copy bookmarklist.txt to "philips" folder of your internal storage. You may use FTP to do this.
- File path: /storage/emulated/legacy/philips (for DL, PL)
Ex. /storage/emulated/legacy/philips/bookmarklist.txt
Step 3. Start Browser App, it will import the text file of Browser automatically.
Note. Once the playlist file (text) is imported, any changes made through the remote control will not be recorded in the playlist text file.
10. Offline browsing
10-1. Offline browsing - Android 10
When URL 1 has set address, and use OSD schedule to open URL 1 web page, the browser app will automatically save URL 1 address home web page data to local storage.
If the network is disconnected while the OSD scheduler is opening the browser app, the browser app will automatically open the URL1 address home page from local storage. If the browser cannot find URL1 address home page data in local storage, the screen will be black.
Note:
a. Browser app can only save URL1 address home page data, data for URL2 to URL7 cannot be saved.
b. Local storage: /storage/sdcard0/Download/OfflineBrowsing
c. The compose page will show a "Clear cache" button, pressing this button can clear URL 1 address home page data in the local storage.
10-2. Offline browsing - Android 11
When URL 1 has set address, and use OSD schedule to open URL 1 web page, the browser app will automatically save URL 1 screenshot to local storage. The screenshot frequency is every 5 seconds and is only done 12 times.
If the network is disconnected while the OSD schedule is opening the browser app, the browser app will automatically open URL 1 screenshot from local storage.
Note:
a. Browser app can only save URL 1 screenshot, URL 2 to URL 7 cannot be saved.
b. Local storage: /storage/sdcard0/Download/OfflineBrowsing/1/screenshot.png
c. The compose page will show a "Clear cache" button, pressing this button can clear URL 1 address home page data and screenshot in the local storage.
5.6. PDF Player
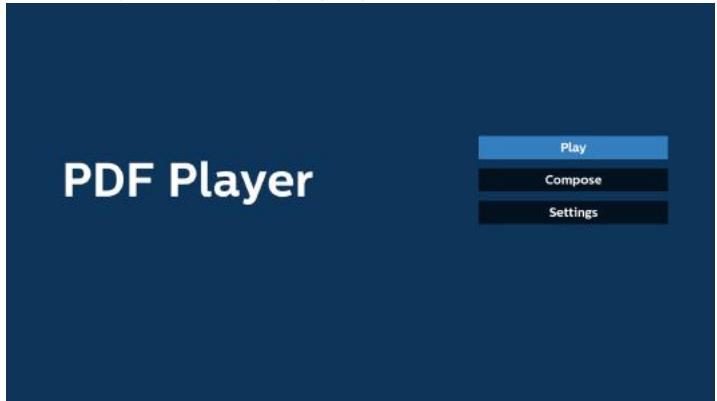
5.6.1. PDF Player introduction:
- The main page of PDF Player, this page consists of three options: "Play", "Compose" and "Settings".
Play: select a playlist to play.
Compose: edit the playlist.
Settings: set PDF Player properties.
text_image
PDF Player Play Compose Settings- Select "Play" on the main page, first you should select one playlist to play between FILE 1 and FILE 7.
The pencil icon means that the playlist contains the content.

text_image
PlayList File 1 File 2 File 3 File 4 File 5 File 6 File 7- Select "Compose" on the main page, first you should select one playlist to edit between FILE 1 and FILE 7.
The pencil icon means that the playlist contains the content.

text_image
PlayList File 1 File 2 File 3 File 4 File 5 File 6 File 7- If an empty playlist is selected, the App will guide you through selecting the media source.
All media files should be stored in /philips/ of root directory. For example,
pdfs : {root dir of storage}/philips/pdf/

text_image
Select media from ? Internal USBNote:
- If the USB stick cannot be found, the following message will be displayed. "Please plug in USB storage".
-
Internal storage is always available, so it can navigate to the next page.
-
To edit or delete a non-empty playlist, select the desired playlist that has a pencil icon on right side of the file.

text_image
Edit or Delete ? Edit Delete- Once you start to edit a playlist, a menu is displayed as below.
Source- files saved in the memory storage.
Playlist– files saved in the playlist.
The following functions can be operated through the corresponding keys on the remote control.
Option key – launch the side menu bar
Play key – play the media file.
Info key – show the media info.
Ok key – select/deselect a file.
6-1. From the side menu bar, the following functions are available:
- Select all: select all files saved in the storage.
- Delete all: delete all playlist files.
- Add/Remove: add or remove a playlist from source.
- Sort: sort the playlist.
- Save/abort: save or abort the playlist.
- Back: return to the previous menu.
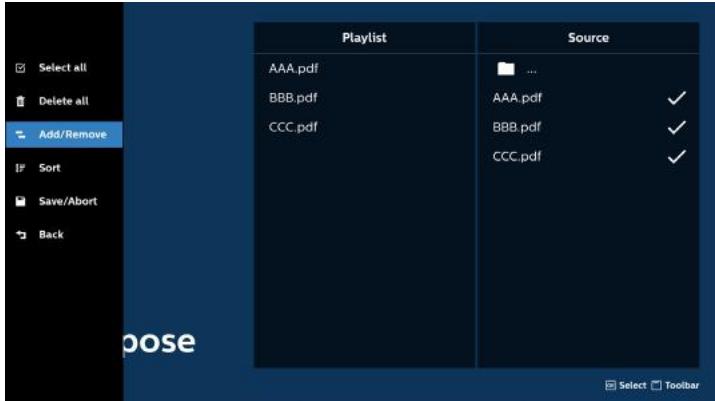
text_image
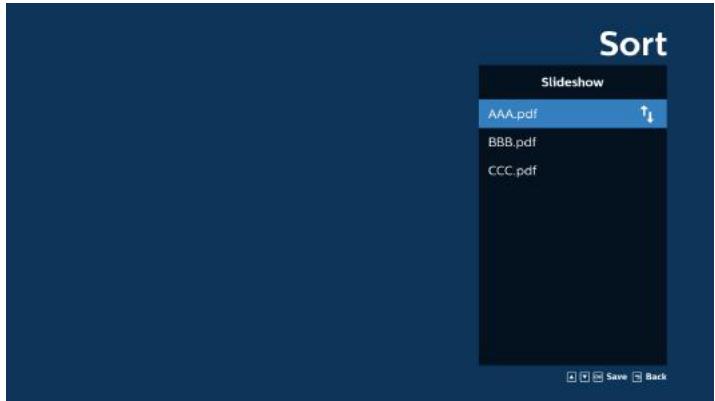
Select all Delete all Add/Remove Sort Save/Abort Back Playlist AAA.pdf BBB.pdf CCC.pdf Source ... AAA.pdf BBB.pdf CCC.pdf ✓ ✓ ✓ ✓ Choose Select Toolbar- If "Sort" is selected, you can customize the file order severally.
text_image
Sort Slideshow AAA.pdf ↑↓ BBB.pdf CCC.pdf Save Back- Select "Settings" on the main page, there are two options available: "Repeat Mode" and "Effect Duration".
Repeat Mode: set the repeat mode.
Effect Duration: duration of photo effect.
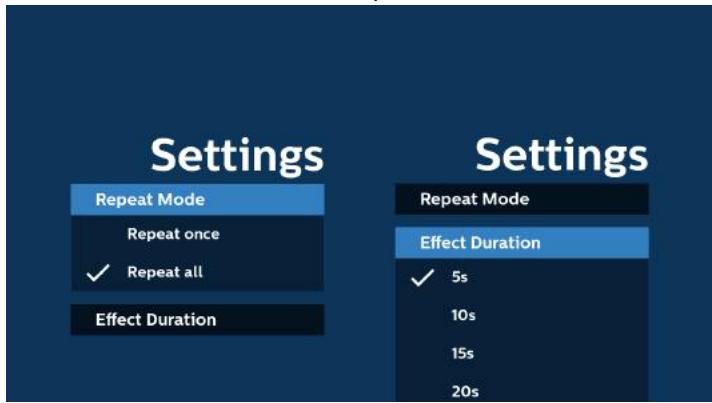
text_image
Settings Repeat Mode Repeat once ✓ Repeat all Effect Duration Settings Repeat Mode Effect Duration ✓ 5s 10s 15s 20s- How to edit the PDF list via FTP:
Step 1. Create a text file of PDF player.
- File name : pdfplaylistX.txt, "X" means playlist number(1,2,3,4,5,6,7).
Ex. pdfplaylist1.txt, pdfplaylist2.txt
- Content:
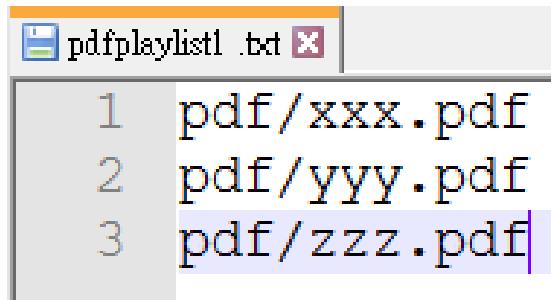
text_image
pdfplaylist1.txt 1 pdf/xxx.pdf 2 pdf/yyy.pdf 3 pdf/zzz.pdfStep 2. Copy pdfplaylistX.txt to "philips" folder of the internal storage. You may use FTP to do this.
- File path : /storage/emulated/legacy/philips (for DL, PL)
Ex. /storage/emulated/legacy/philips/pdfplaylist1.txt
Step 3. Add the PDF files to the "PDF" folder in the "philips" folder of your internal storage.
- Ex. /storage/emulated/legacy/philips/pdf/xxx.pdf /storage/emulated/legacy/philips/pdf/yyy.pdf /storage/emulated/legacy/philips/pdf/zzz.pdf
Step 4. Start the PDF player App, it will import the text file of PDF player automatically.
Note. Once the playlist file (text) is imported, any changes made through the remote control will not be recorded in the playlist text file.
Media Hotkey:
Play: play the file.
Pause: pause.
Fast forward: skip to the next page. If the page is close to the end of file, it will go to the next file.
Rewind: skip back to the previous page. If the page is close to the beginning of file, it will go to the last file.
Stop: return to the first page of file.
Arrow keys:
Up/Down/Left/Right: Adjust the page. (when the page is zoomed in/out)
Left: Previous page. (when the page is not zoomed in/out)
Right: Next page. (when the page is not zoomed in/out)
Combination key:
Number key + OK key: select a specific page and press OK key to change the page.
- Press a number key.
- Press OK key, the page number will be shown at the bottom of the page. If the page number exceeds the total page number, the current page number will remain at the bottom of the page.
Note:
If you plug in two or more USB disks to edit the playlist, playback from the playlist cannot be guaranteed after powering on/off, due to the USB storage path may be changed. It is strongly recommended to use only one USB disk when editing the playlist.
5.7. CMND & Play
1) Server
Setup CMND & Play server address
2) Account
Setup CMND & Play account
3) PIN Code
Setup CMND & Play PIN code
(4) Version
There are two options, Ver.2 and Ver.3
Ver. 2
use 2.0/2.2 agreement
Ver. 3
use 3.0/3.1 agreement
(5) Content
There are 3 options available: internal storage, SD card and USB storage.
If Ver.2, is selected, Server/Account/PIN code will be shown in gray and cannot be set.
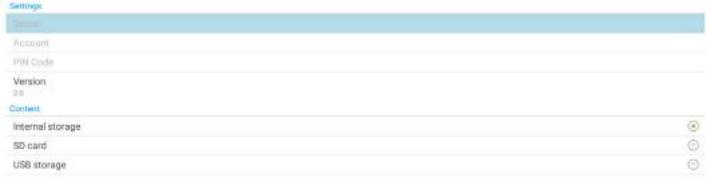
text_image
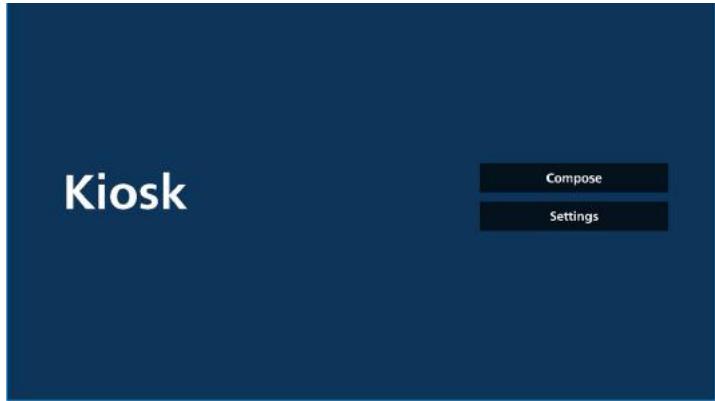
Settings Account PIN Code Version 2.6 Content Internal storage SD card USB storage5.8. Kiosk
Before using this feature, ensure that the system is connected successfully to the network.
- Main page of "Kiosk" App which allows you to make related settings.
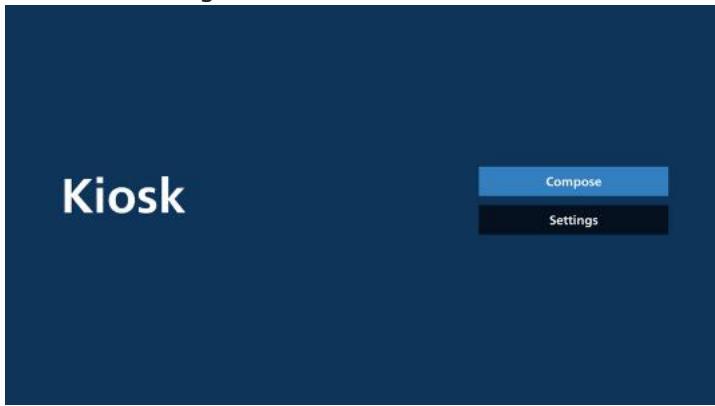
text_image
Kiosk Compose Settings- Press "Compose" then enter the next page.
Choose from the list to edit the URL. There is only one URL for Kiosk.
A dialog box appears after the selection is made.
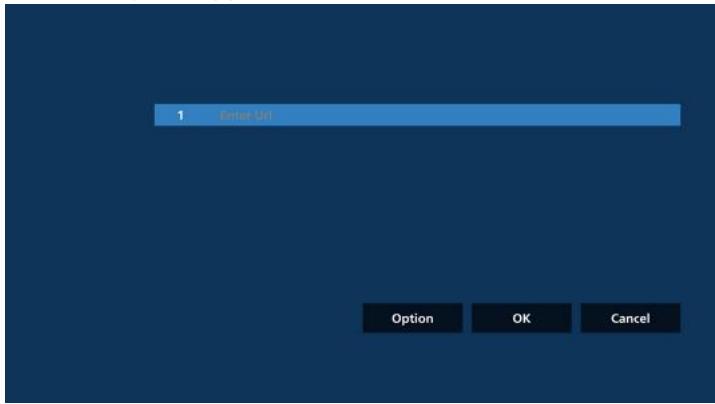
text_image
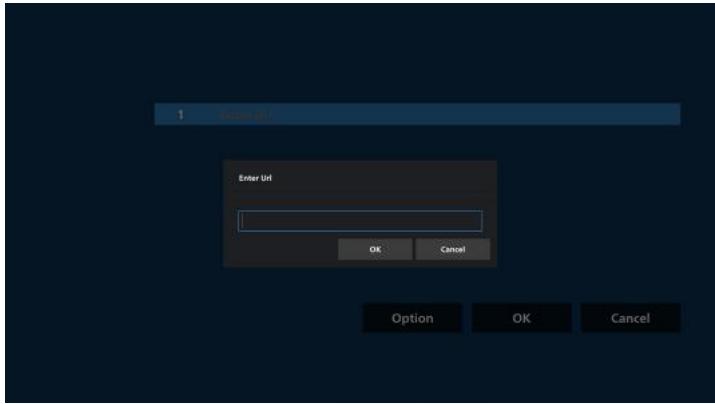
1 Enter UI Option OK Cancel- Use the on-screen keyboard to enter URL and press the OK button, the data will be saved in the List.
text_image
1 Enter url Enter url OK Cancel Option OK Cancel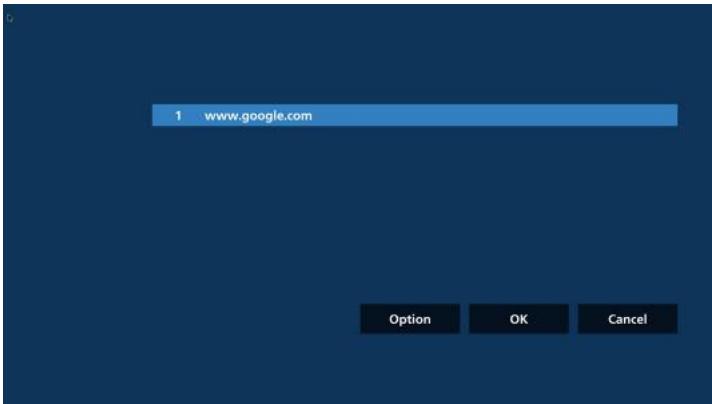
text_image
1 www.google.com Option OK Cancel- Press OK then URL records will be saved and go back to home page.
text_image
1 www.google.com Option OK Cancel
text_image
Kiosk Compose Settings Save successfully- In the URL list page, if you select a non-empty item, a dialog will appear asking whether you would like to edit or play the URL. If you press "Edit," a URL edit dialog will appear. If you press "Play," the web page of the item's URL will be displayed.

text_image
1 www.google.com Option OK Cancel
text_image
1 www.google.com www.google.com Edit Play Option OK Cancel6. Compose Options
Press "Option" and a list will appear on the left.
Import: Import URL list file
Export: Export URL list file
Delete all: Delete all records of URLs in the URL list page.
Back: Close the list from the left side.
text_image
1 www.google.com Import Export Delete all Back Option OK Cancel6-1. Import
a. Click import
text_image
1 www.google.com Import Export Delete all Back Option OK Cancelb. Choose storage
text_image
1 www.google.com Import Export Delete all Back Import file from ? Internal USB storage SD card Option OK Cancelc. Choose a file that contains URLs.
text_image
Kiosk Please choose file browser Canceld. Import a file and the URL will be displayed on the list.
text_image
1 www.google.com Option OK Cancele. File format for import
The file format should look like the example below, with the file extension "txt".
text_image
urls.txt 1 http://www.abc.com 2 http://www.baidu.com 3 http://www.bbc.com 4 http://www.bbc.com.tw 5 http://www.cnn.com 6 http://www.youtube.com 7 http://www.yahoo.com.tw6-2. Export
a. Click export
text_image
1 www.google.com Import Export Delete all Back Option OK Cancelb. Choose storage
text_image
1 www.google.com Import Export Delete all Back Export file to ? Internal USB storage 3D card Option OK Cancelc. The file name and path to be saved will be displayed. Press the "Save" button to save the URLs to the file.

text_image
1 www.google.com Import Export Delete all Back Storage path : /storage/emulated/0/ph/lips/browser/ File name : 20230106091856_url.txt Save Cancel Option OK Cancel7. Settings
Press "Settings" to enter the settings page.
text_image
Kiosk Compose Settings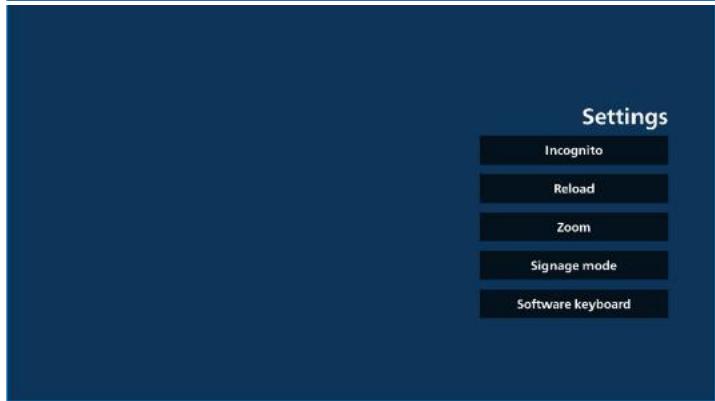
text_image
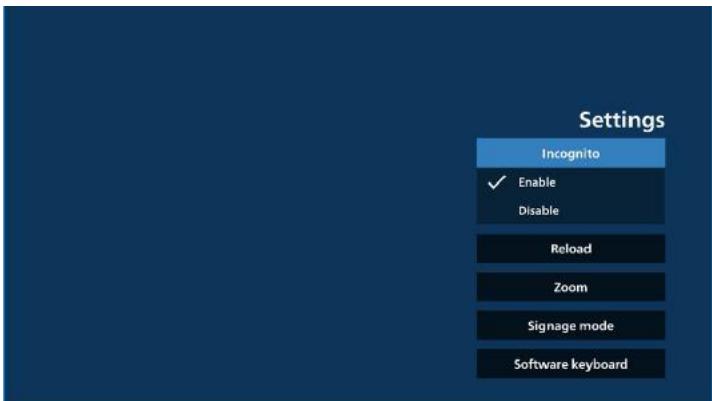
Settings Incognito Reload Zoom Signage mode Software keyboard7-1 Incognito
Select "Enable" to display webpages using incognito mode. Select "Disable" to display webpages using non-incognito mode.
text_image
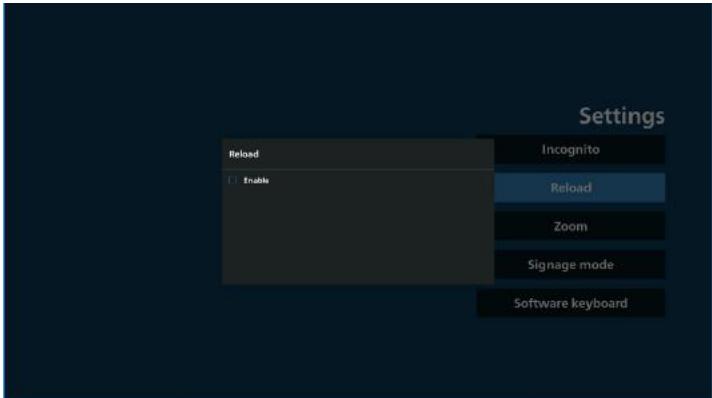
Settings Incognito ✓ Enable Disable Reload Zoom Signage mode Software keyboard7-2 Reload
Allow users to set the webpage auto reload time. Reload time will reset and the countdown will restart if the user touches the screen.
a. If the enable check box is unchecked, disable auto reload.
text_image
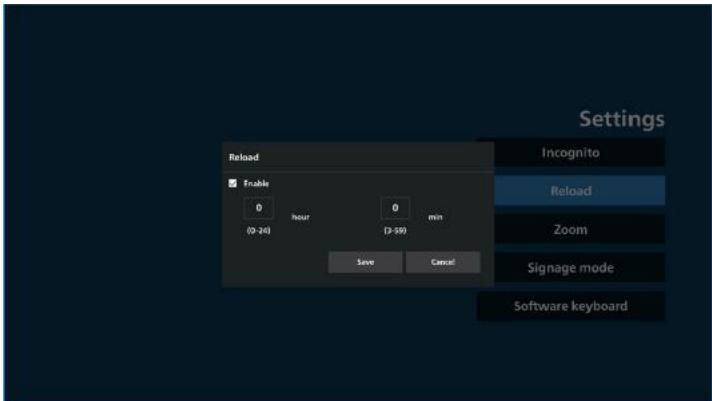
Settings Reload Enable Incognito Reload Zoom Signage mode Software keyboardb. If the enable check box is checked, user can set up the auto reload time.
text_image
Settings Reload Enable 0 hour 0 min (0-24) (3-59) Save Cancel Incognito Reload Zoom Signage mode Software keyboard7-3 Zoom
Allow user to zoom in or out of a web page using two fingers. The webpage must support this option. This option is enabled by default.
For example:
Zoom in and out on www.google.com home page.
text_image
Settings Incognito Reload Zoom ✓ Enable Disable Signage mode Software keyboard7-4 Signage mode
Return to Kiosk home page while user is back from other APK's activity. With this option disabled, the kiosk screen will keep on the latest webpage. The webpage must support this option which is enabled by default.
For example:
Open www.google.com and search for "PDF demo file". Click one PDF file in the search results and the browser will download the PDF file and open the PDF APK to display the PDF content. When the user presses the "Back" button in the navigation bar, the kiosk will display the homepage if this option is enabled. Additionally, if this option is disabled, the kiosk will display the search results page.
text_image
Settings Incognito Reload Zoom Signage mode ✓ Enable Disable Software keyboard7-5 Software Keyboard
This option uses to enable/disable the display of the Input Method Editor (IME) on the webpage. If the user disables this option, the IME will not appear when clicking on the input text area.
text_image
Settings Incognito Reload Zoom Signage mode Software keyboard ✓ Enable Disable8. OSD menu interaction with Kiosk
1. Boot on source
Set OSD menu => Configuration1 => Boot on source => Input is Kiosk
Play List is 0 (cannot be changed)
It will show the web page with URL in Kiosk app at time1 and finish at time2.
2. Schedule
Set OSD menu => Advanced option => Schedule =>
On time1, Off time2, Input is Kiosk, any day of the week, and Play List.
Finally check the right box.
Then PD will show web page with URL in Kiosk app at time1 and finish at time2.
Note:
a. The Kiosk App can only save data from the URL 1 address home page.
b. To edit URL 1, user needs to open it from all apps or Settings -> Signage Display -> Source settings -> Android Source -> Kiosk.
c. If starting the Kiosk from the source menu, the kiosk will open the URL automatically.
d. If URL 1 has not been edited, the kiosk shows a home page when starting it from the source menu.
5.9. Custom App
User can set up the application for Customer Source.
5.9.1. OSD Menu operation:
RCU: Source -> Custom
If a custom APK is set, the PD will open the customer App when switching the source to Customer mode.
If the custom APK is not set, the PD will show a black screen when switching the source to Customer mode.

5.9.2. Configure custom source
Access Android settings -> Signage Display -> Source settings -> Custom App
text_image
Custom app Select app Force restart custom app Disable5.9.3. Select app
Save
Select the App, click the "Save" button to perform save function.
Forget
Press "Forget" button to remove previously stored information.
Cancel
Press "Cancel" button to quit without saving changes made. If no custom APK is installed, the list will be blank, and the "Save" and "Forget" buttons will be grayed out.
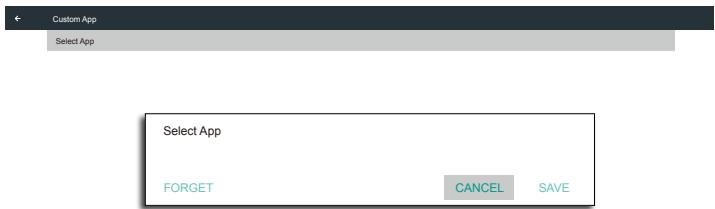
text_image
Custom App Select App Select App FORGET CANCEL SAVEIf custom APK is installed, user can select it from the list.
• Case 1: Not setting Custom App.
Custom App will display and the focus is on the first item automatically.
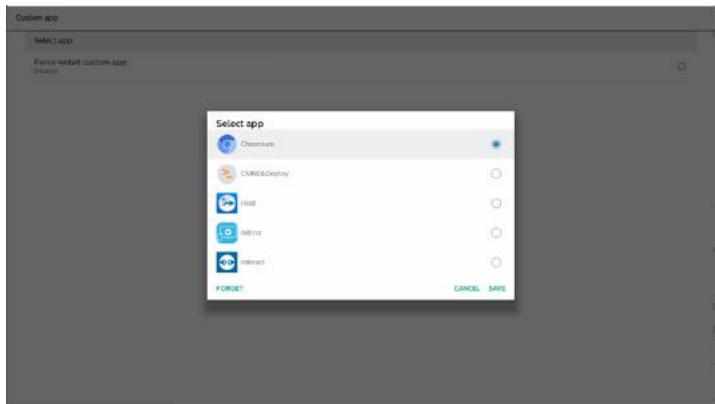
text_image
Custom app Select app Force returned custom app Clear Select app Chromium CMRO&Display Host Mirror Interact FORGET CANCEL,SANSAfter setup, the screen shows App's name.
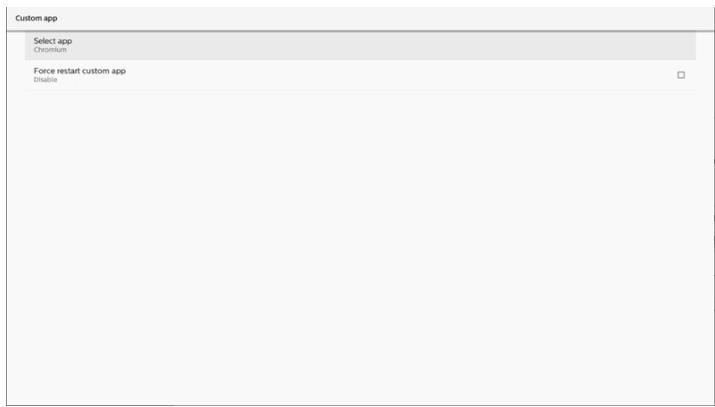
text_image
Custom app Select app Chromium Force restart custom app Disable5.9.4. Force restart custom app
Force restart the selected app when it is down or not responding.
text_image
Custom app Select app Chromium Force restart custom app Disable5.10. Side Bar
text_image
Vertical toolbar with 10 labeled icons including navigation, menu, gear, and function buttons① Hide
Hide side bar.
② Home
Open Home.
③ Source menu
Open source menu.
④ Annotation
Open Annotation.
⑤ OSD Menu
Open OSD menu.
⑥ My Favorite
Open my favorite, add or remove frequently used APK.
⑦ Tool
Touch Lock: Lock the touch function. When touch
function is locked, input the password to unlock it.
Default password is 123. To set another password, go to:
Settings -> Signage Display -> System tools -> Touch lock password.
⑧ Quick info
It will display the information of Time, Network and Monitor Information.
⑨ History
Show history app.
⑩ Back
Return to the previous page or exit from the previous function.
6. Whiteboard
6.1. Main page
text_image
09:18 Sidebar Toolbar Page Switch① Sketchpad area: Display the writing effect of the brush and the insertion effect of the picture.
② Toolbar: Provide a variety of tools for writing.
③ Page switch & preview: Page switch and page preview.
④ Sidebar: Display the home page, annotation and return.
6.2. Toolbar
text_image
09:18 brush shape eraser undo redo toolbar minimization background more writing save file managementBrush: Provide single point writing and set the brush strokes.
Graphics: Create shapes, graphics and templates.
Eraser: Erase the brush contents in the current sketchpad, and it supports point erasing, circle erasing, and one-click screen clearing.
Previous step: Undo a step.
Next step: Redo a step.
Toolbar Minimization: Fold up the whiteboard toolbar.
Background color: Select and set the background color for each page of the board.
☐ Marquee: Tap the "Marquee" icon and select an object to perform operations such as copying, deleting and moving the level.
Multi-point writing: support simultaneous writing of 20 points.
Save: Support saving of three file formats (picture, PDF, whiteboard).
Folder: Open the file manager, you can choose the pictures to be inserted into the sketchpad.
6.2.1. Brush
text_image
09:19 Pain/RespectionSet the pen type, thickness and color. Support markers as the writing pen.
6.2.2. Graphics
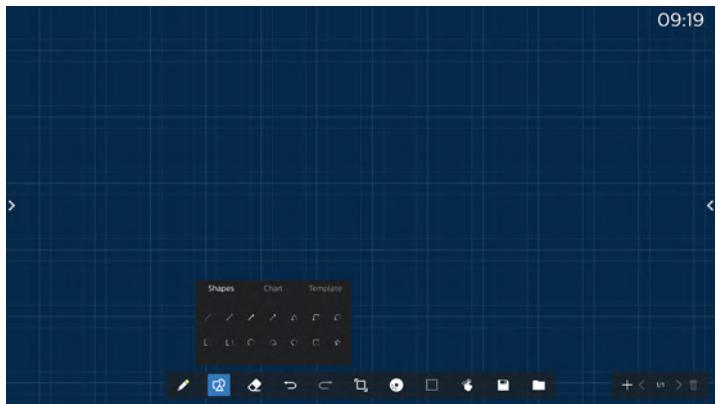
text_image
09:19 Shapes Chart TemplateProvide the commonly used shapes, graphics and templates to choose from.
6.2.3. Background color
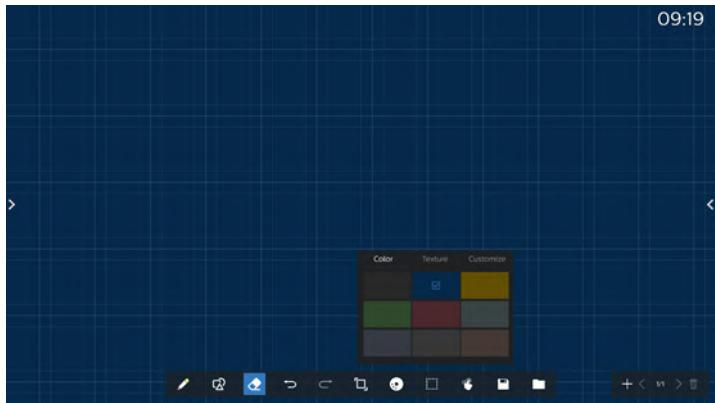
text_image
09:19 Color Texture CustomizeProvide preselected background colors, textures and backgrounds can be customized.
6.2.4. Marquee
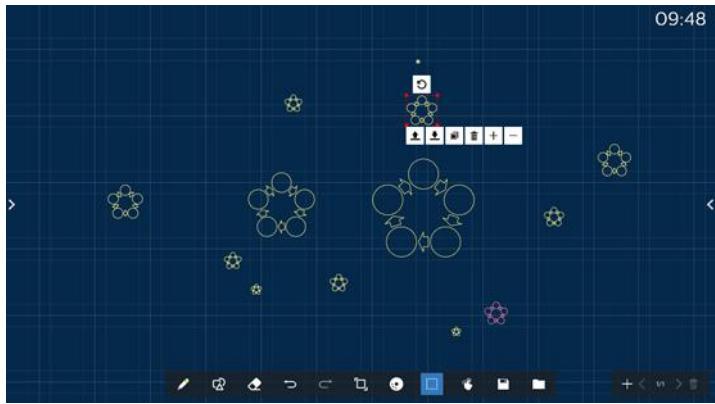
text_image
09:48Select the objects (writing objects and pictures) on the sketchpad, and perform operations such as layer relation (upper layer, lower layer), zoom, move, copy, rotate and delete.
6.2.5. Save
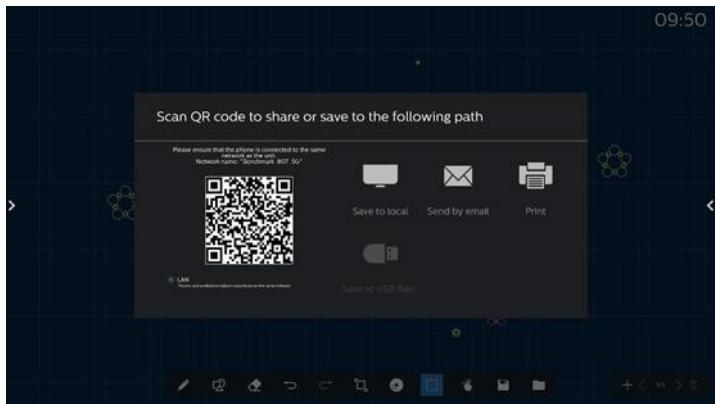
text_image
Scan QR code to share or save to the following path Please ensure that the phone is connected to the same http://www.96888/96888/96888/96888/96888/96888/96888/96888/96888/96888/96888/96888/96888/96888/96888/96888/96888/968 Save to local Send by email Print Save to USB RailTo save the current page, you can: scan the code, save it to a local/USB drive, email it, or print it.
6.3. Page switch and preview
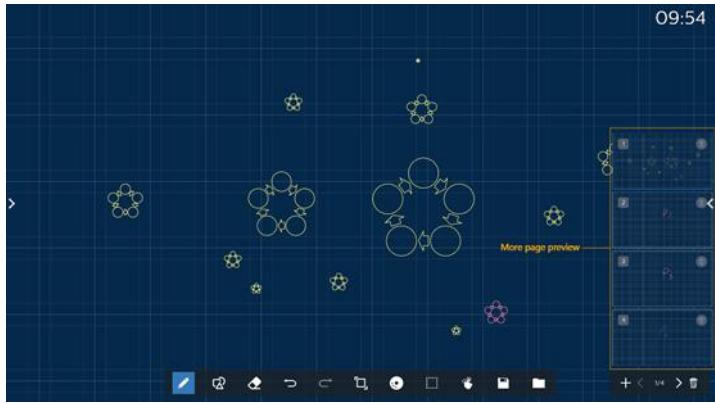
text_image
09:54 More page previewPage preview: You can preview all the pages that have been added.
Add Page: Add a blank page to the last page.
Switch pages: You can click the previous page / next page to switch pages, or select any page in the preview.
Delete page: You can delete the current page, and cancel the deletion.
6.4. Gesture control
6.4.1. Gesture erasing
Control the eraser size according to the contact surface, and use gesture to erase the brush writing effect that needs to be erased. This gesture also works in annotation mode.
6.4.2. Pinch to Zoom
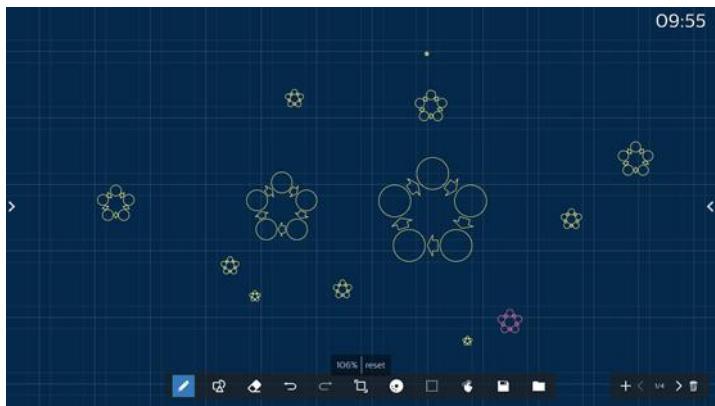
natural_image
Game interface screenshot showing a grid with circular and star icons, no readable text or symbols on the diagram itself.In single point mode, the canvas can be enlarged to 300% or reduced to 50% according to the distance between two fingers. After zooming in and out, the canvas can be reset to original size.
In this process, all objects on the canvas are scaled to the same scale.
6.4.3. Pinch to move
In single point mode, you can move the canvas in the same direction by holding both fingers on the sketchpad.
In this process, all objects on the canvas will move with the canvas.
6.5. Exit
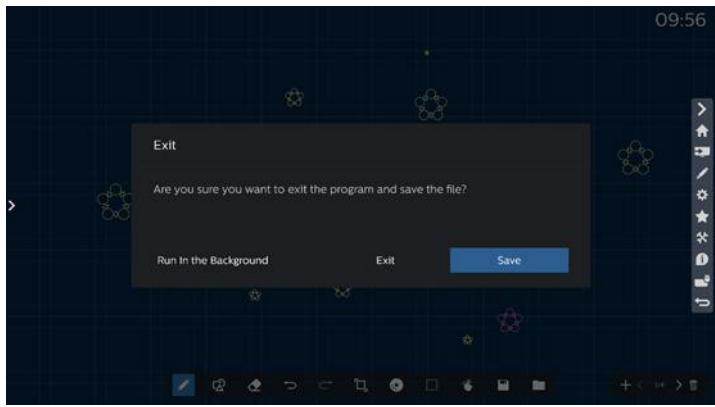
text_image
Exit Are you sure you want to exit the program and save the file? Run In the Background Exit SaveRun in the background: Although you exit from whiteboard mode, it is still running in the background also.
Exit: Close the whiteboard and exit without saving the current file.
Save: You need to save the current file first, then close the whiteboard and exit.
6.6. Annotation mode
Entry: Tap the arrow to display the sidebar, select annotation mode.
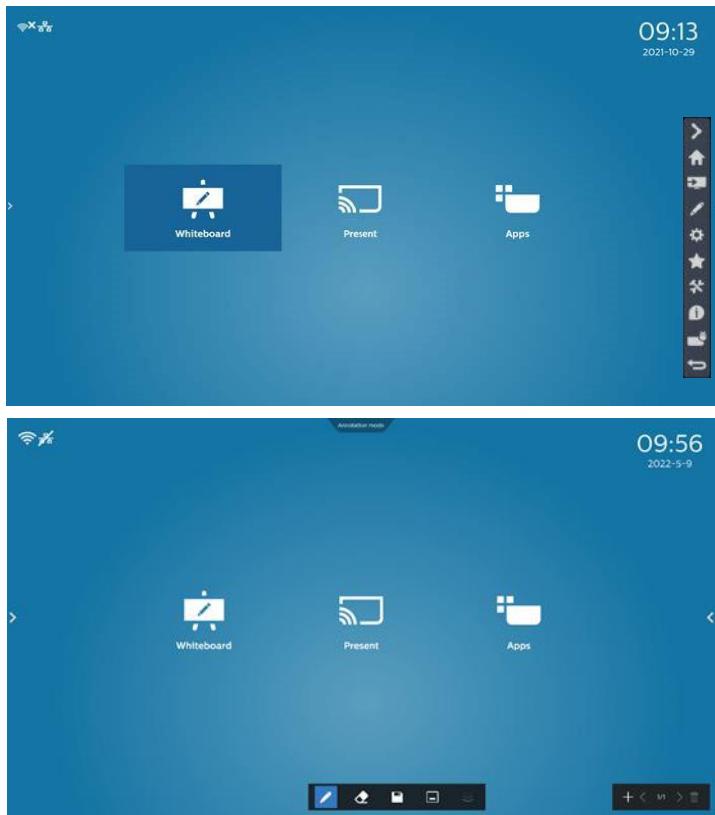
text_image
09:13 2021-10-29 Whiteboard Present Apps Annotation mode 09:56 2022-5-9 Whiteboard Present AppsTap to enter annotation mode, you can write with a brush on the current screen; you can choose the brush thickness and color.
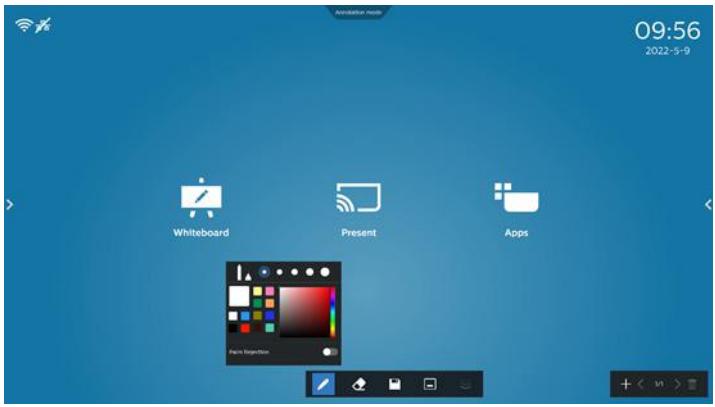
text_image
09:56 2022-5-9 Whiteboard Present Apps6.6.1. Eraser
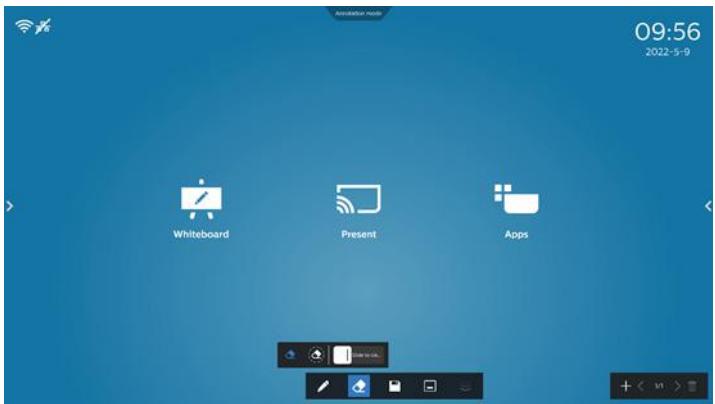
text_image
09:56 2022-5-9 Whiteboard Present AppsErase current annotation content by point erasing, circle erasing, and one-click screen clearing.
Point erasing: Follow the contact to erase part of the content.
Circle erasing: select an area to erase part of the content.

One-click screen clearing: Clear all annotations.
7. File manager
Entry: On the Android homepage, click the file manager icon to enter the native file manager.
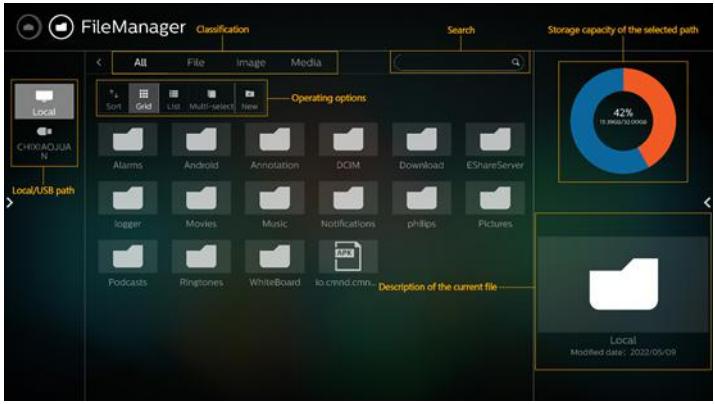
text_image
FileManager Classification Search All File Image Media Storage capacity of the selected path Local CHINA.OAO/JIA N Local/USB path Sort Grid List Multi-Select New Operating options Alarms Android Annotation DCIM Download EShareServer logger Movies Music Notifications phillips Pictures Podcasts Ringtones WhiteBoard to cmnd.cmn. Description of the current file 42% 10.000/30.000/0000 Local Modified date: 2022/05/097.1. File manager
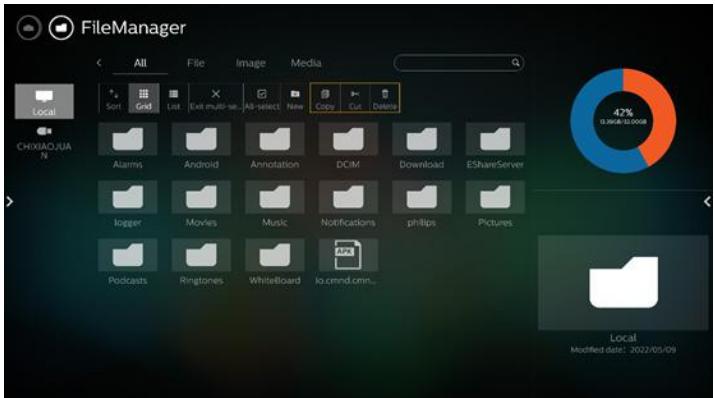
text_image
FileManager All File Image Media Local Sort Grid List Exit multi-sa... Job-select Name Copy Cut Delete CHIXIAO/JUA N Alarms Android Annotation DCIM Download EShareServer logger Movies Music Notifications philips Pictures Podcasts Ringtones WhiteBoard io.cmnd.cmn.. Local Modified date: 2022/05/09Select a file and rename, copy, paste, cut, or delete it.
7.2. Display switch
Files are displayed in list mode.
text_image
FileManager All File Image Media Sort Grid List Multi-select New Alarms /storage/emulated/0/Alarms 2022/05/19 Android /storage/emulated/0/Android 2022/05/18 Annotation /storage/emulated/0/Annotation 2022/05/18 DCIM /storage/emulated/0/DCIM 2022/05/19 Download /storage/emulated/0/Download 2022/05/18 EShareServer /storage/emulated/0/EShareServer 2022/05/18 logger 2022/05/19 42% @SAGA/32.0008 Local Modified date: 2022/05/09Files are displayed in thumbnail mode.
text_image
FileManager All File Image Media Sort Grid List Multi-select New Alarms Android Annotation DCIM Download EShareServer logger Movies Music Notifications philips Pictures Podcasts Ringtones WhiteBoard io.cmnd.cmm.. 42% 18:00AM/12:00PM Local Modified date: 2022/05/098. Setting UI
Setting menu consists of the following items:
(1). Network & Internet
(2). Signage Display
(3). Apps & notification
(4). Display
(5). Security
(6). System
(7). About
text_image
Network & internet Wireless & networks Signage Display Signage Display Apps & notifications apps. default Display Font size Security Device admin apps System Developer options About 6SBDL4052E8.1. Network & internet
Settings for Wi-Fi, Ethernet and hotspot network settings.

text_image
Network & Internet WiFi GIF Ethernet Portable hotspot GIF8.1.1. Wi-Fi
Turn on and connect
Tap "Use Wi-Fi" to enable or disable Wi-Fi.
text_image
Wi-Fi Use Wi-Fi To use wireless network, turn Wi-Fi on To improve location accuracy, turn on Wi-Fi scanning in scanning settings Wi-Fi preferences Wi-Fi is a default or automatically Wi-Fi data usage Hi-Fi has 3.2%When you have Wi-Fi turned on, device searches for available Wi-Fi networks. Device automatically connects to nearby Wi-Fi networks that you've connected to before.

text_image
User W1.01 + Add network Searching for W1.01networks...All available Wi-Fi are listed.

text_image
Use WiFi TPV Guest Saccut ASUS_AO1200_2.4G ASUS_AO1200_5GTap a network to connect. A lock icon is shown beside the network that requires password. 🔒
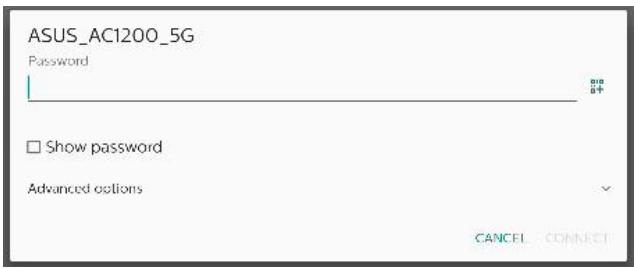
text_image
ASUS_AC1200_5G Password Show password Advanced options CANCEL CONNECTTap advanced options for more detail options, such as Static IP assignment.
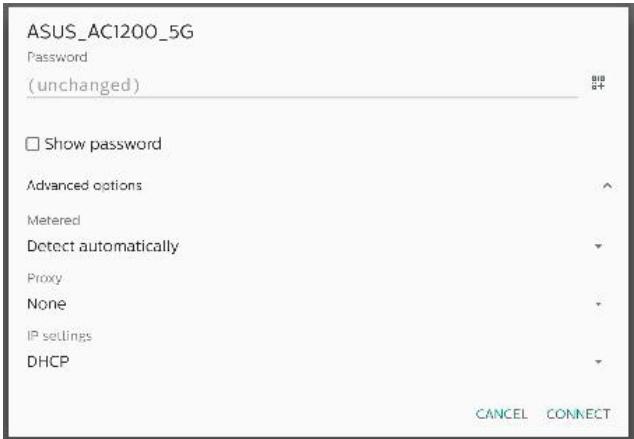
text_image
ASUS_AC1200_5G Password (unchanged) # Show password Advanced options Metered Detect automatically Proxy None IP settings DHCP CANCEL CONNECTTap "connect" to save options and connect to a network.
Add networks
Tap "Add network" to add the network that is not on the list.
Enter Wi-Fi SSID and select security type to connect a hidden network.
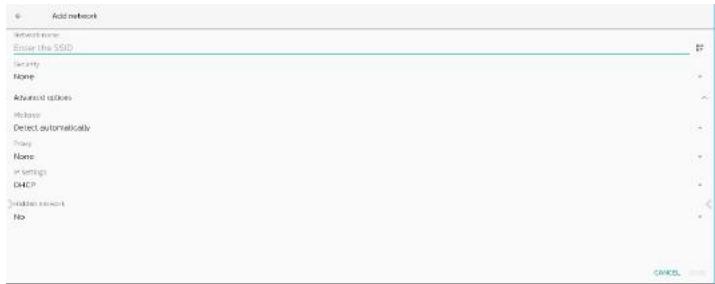
text_image
Add network Network name Enter the SSD Security None Advanced options None Detect automatically Prog None Settings DACP Hidden network No CANCELChange saved networks
Click saved networks to control the listed saved networks.

text_image
Served networks SPV1-Net Services TPV1-GuidUser can forget, connect and share this network
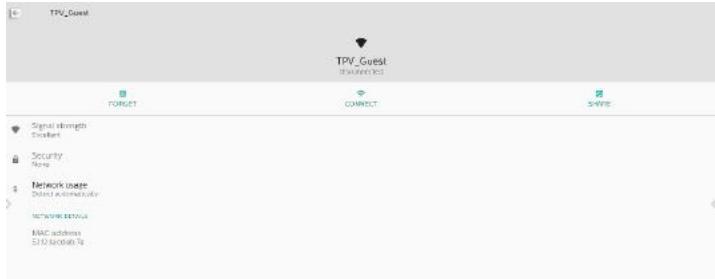
text_image
TPV_Guest TPV_Guest Status: FORGET CONNECT SAVE Signal strength Excellent Security None Network usage Dialled automaticity Maintenance status MAC address S10 network 76Quick option for listed networks. User can connect, forget or modify a network.

text_image
Wi-Fi Use Wi-Fi TPV Guest Saved ASUS_AC12C ASUS_AC12C D-Link_Simco... TPV Guest Connect Forget ModifyWi-Fi modification dialog:
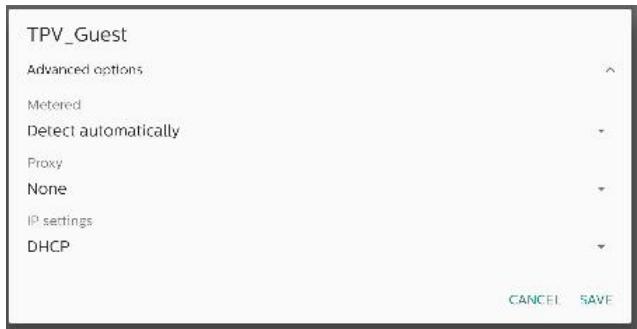
text_image
TPV_Guest Advanced options Metered Detect automatically Proxy None IP settings DHCP CANCEL SAVEWi-Fi data usage
Show information about the current Wi-Fi connection.
Wi-Fi data usage O B used Mar 2 - 30
8.1.2. Ethernet
Tap to switch Ethernet between On and Off.
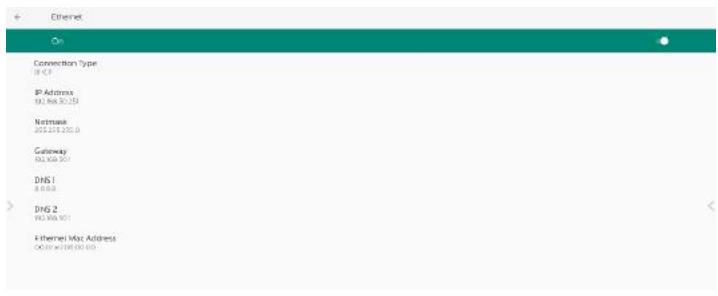
text_image
Ethernet On Connection Type IP Address 10. Web ID: 359 Network 2012/2013/0.0 Gateway 10. Web ID: 359 DNS 1 8.0.0.0 DNS 2 10. Web ID: 359 Ethernet Max Address X:10.6718.00.00Connection Type
Select connection type from DHCP and Static IP.
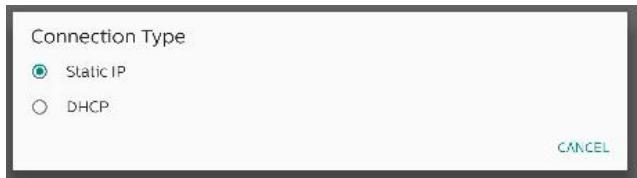
text_image
Connection Type Static IP DHCP CANCELDHCP
The IP Address, Netmask, DNS Address and Gateway settings are assigned by DHCP server, they are not modifiable. If connection is successful, it will show current network settings.
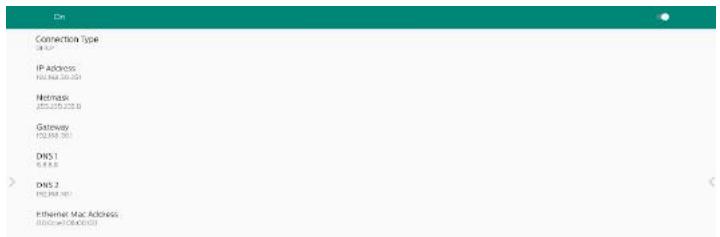
text_image
On Connection Type IP Address: 102.868.30.051 Netmask 205.299.299.8 Gateway 152.868.30.0 DNS1 0.8.8.8 DNS 2 192.868.19.1 Ethernet Mac Address: 102.868.30.051Static IP
User can assign device's IP Address, Netmask, DNS address and Gateway settings of Ethernet in Static IP connection type.
Note:
- IP address, Netmask, DNS server address and gateway address are necessary.
- input limitation Format: number 0-9, decimal point "."
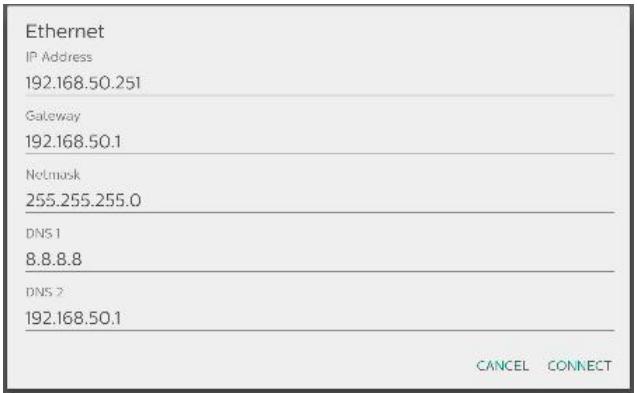
text_image
Ethernet IP Address 192.168.50.251 Gateway 192.168.50.1 Netmask 255.255.255.0 DNS 1 8.8.8.8 DNS 2 192.168.50.1 CANCEL CONNECT8.2. Portable hotspot
Enable tethering.

text_image
Hotspot & gathering WiFi hotspot 4 devices connected Use hotspot and setting to provide internet to other devices through your mobile data connection. Apps can also create a hotspot to share content with nearby devices.Tap on "On"/"Off" to enable/disable hotspot.
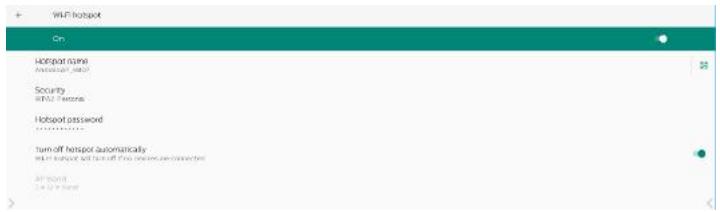
text_image
WiFi hotspot On Airport name Ameristar, 2007 Security WiFi Features Hotspot password Turn-off hotspot automatically Turn-off hotspot and turn-off free access can connect to All rights All rights reservedUser can modify hotspot name and security options.
8.3. Signage Display
Settings for signage display features.
| Signage Display |
| General settings |
| Server settings |
| Source settings |
| Network application |
| System tools |
| Misc. |
| System updates |
8.3.1. General Settings
| General settings |
| Signage display namePD 000ce7080000 |
| Boot Logo |
| Navigation bar |
| Home shortcut |
Signage Display Name
Default signage display name is "PD_{Ethernet_MAC_Address}". User can change the name with maximum 36 characters in length.
| Please enter signage display name | |
| PD_000ce7060000 | |
| CANCEL OK | |
Boot Logo
Set up personal boot animation to show when system powers on. This option is available only when OSD menu -> Configuration -> Logo is set to "User".
| Boot Logo |
| Choose Boot Animation |
System will search and list "bootanimation.zip" in the root folder's external storage and bootanimation.zip that user saved last time. When "Save" is selected, system will copy the selected file to or overwrite bootanimation.zip file under / data/local/bootanimation/folder.
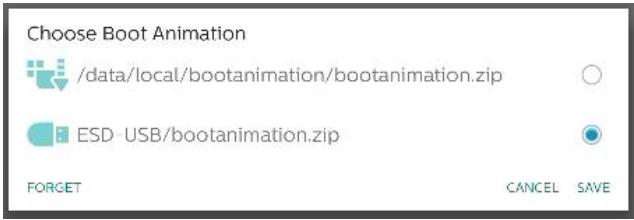
text_image
Choose Boot Animation /data/local/bootanimation/bootanimation.zip ESD-USB/bootanimation.zip FORGET CANCEL SAVEClick "FORGET" to remove the bootanimation.zip already stored in /data/local/bootanimation/ folder.
Navigation bar
Set the behavior of the navigation bar.
| Normalization for | |
| Main Switch | |
| Always on | + |
| Always off | ○ |
| Auto hide | ○ |
Always on: Always show navigation bar on the screen.
Always off: Never show navigation bar on the screen.
Auto hide: The navigation bar will be hidden if there is no user activity for 10 seconds.
NOTE:
Navigation bar never shows on Kiosk source.
Home Shortcut
Define a shortcut on the Home screen. User can add App or sources to the home screen.
NOTE:
By default, whiteboard shortcut launches whiteboard APK, present shortcut launches interact APK, Apps shortcuts will list all installed APKs in the system. User can change the default action by following the steps in the next section.
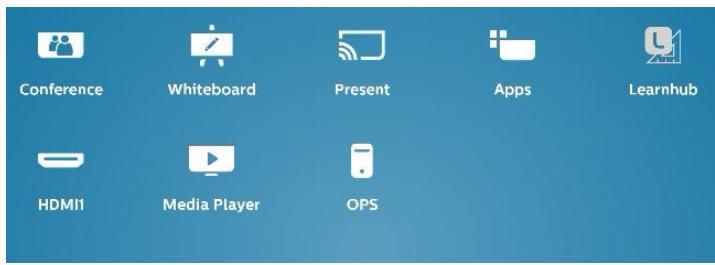
text_image
Conference Whiteboard Present Apps Learnhub HDMI1 Media Player OPSChoose App for Home shortcut
Select Apps for conference shortcut. First, select which shortcut to be changed.
| Home shortcut | ||
| Whiteboard | App | Whiteboard |
| Present | App | Interact |
| Apps | App | Apps |
| Conference | App | Chromium |
| Shortcut 1 | App | Learnhub |
| Shortcut 2 | Source | HDMI1 |
| Shortcut 3 | Source | Media Player |
| Shortcut 4 | Source | OPS |
Tap App.
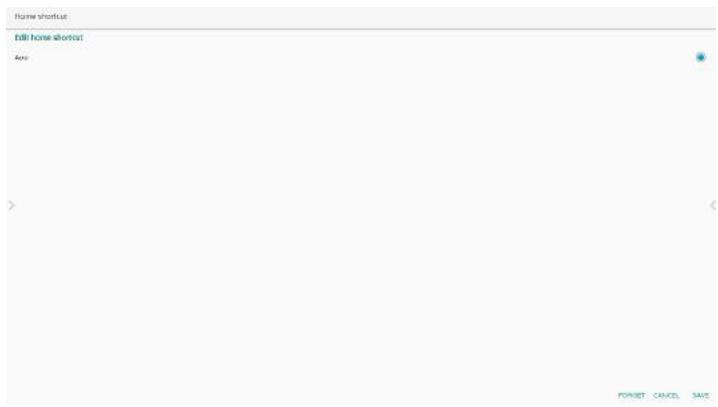
text_image
Home shortcut Fill horse shortcut Auto POCKET CANCEL SAVESelect an installed App to create the shortcut.
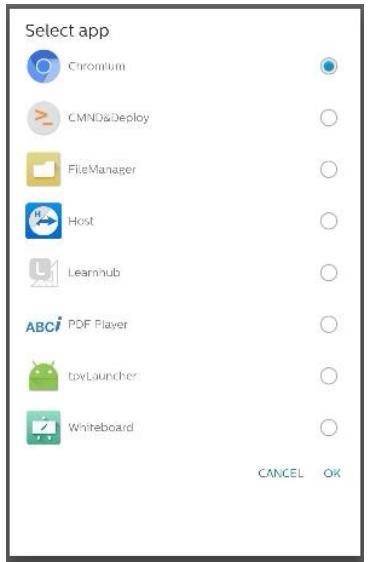
text_image
Select app Chromium CMND&Deploy FileManager Host Learnhub ABCi PDF Player tpxLauncher Whiteboard CANCEL OKClick "FORGET" to clean previous settings. "CANCEL" to ignore changes.
Click "SAVE" and go back to Home shortcut page.
Note:
Only one App can be selected for Conference shortcut.
Conference Icon is fixed by the system, it will not change to the user selected App's icon. If no App is selected, this shortcut will be hidden.

Choose Source for Home shortcut
Choose "Source" on the Edit home shortcut page.

text_image
Home shortcut Edit Home shortcut Add Source: FORNET CANCEL SAVEChoose a source for this shortcut.
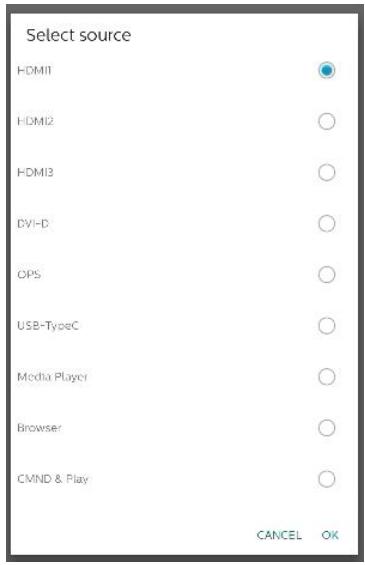
text_image
Select source HDMI HDMI2 HDMI3 DVHD OPS USB-TypeC Media Player Browser CMND & Play CANCEL OKClick "FORGET" to clean previous settings. "CANCEL" to ignore changes.
Click "SAVE" and go back to Home shortcut page.
Change Home shortcut label name
Label names for Whiteboard, Present, Apps and Conference are editable.
| Home shortcut | ||
| Whiteboard | App | Whiteboard |
| Present | App | Interact |
| Apps | App | Apps |
| Conference | App | Chromium |
| Shortcut 1 | App | Learnhub |
| Shortcut 2 | Source | HDMI1 |
| Shortcut 3 | Source | Media Player |
| Shortcut 4 | Source | OPS |
Ex: click on Whiteboard to change its label name.
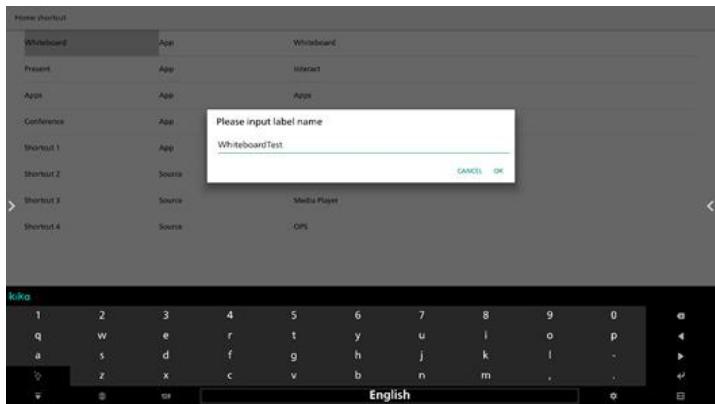
text_image
Please input label name WhiteboardTest CANCEL OK 1 2 3 4 5 6 7 8 9 0 q w e r t y u i o p a s d f g h j k l . z x c v b n m . EnglishThe name changed will be reflected on the home page.
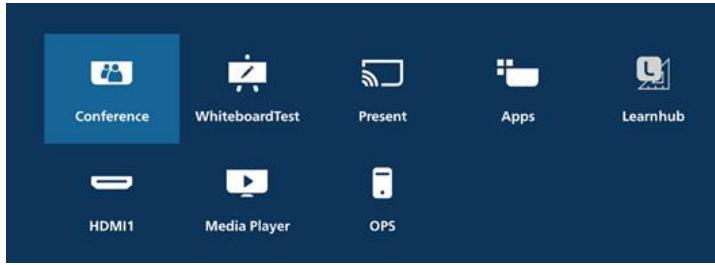
text_image
Conference WhiteboardTest Present Apps Learnhub HDMI1 Media Player OPS8.3.2. Server Settings
FTP
Settings -> Signage Display -> Server Settings -> FTP
text_image
FTP Main Switch Enable Enable FTP Account 10.00.00 Password Storage Port Internal String Port 2011Click the checkbox to enable/disable FTP server feature. When enabled, user can setup account, password and port number.
a. Account: The user name for logging into the FTP server. The length of name is limited to 4\~20 charters, and it only allows [a-z][A-Z][0-9].
b. Password: The password for logging into the FTP server. Password length is limited to 6\~20 charters, and it only allows [a-z][A-Z][0-9]. The password will only be displayed as "*" after it has been set up.
c. Storage path: The FTP server will access internal storage only. It is not editable by user.
d. Port: The port number for FTP server. Available port number ranges from 1025 to 65535, default is 2121. The following port number cannot be used:
8000 / 9988 / 15220 / 28123 / 28124 and SICP network port (default 5000).
Finally, manually reboot the system to apply FTP settings.
Remote Control
Settings -> Signage Display -> Server Settings -> Remote Control
text_image
Remote control Main Switch Enable Enable Remote control Server Bind Server is unbindedClick Enable checkbox to enable/disable remote control client service, default is disabled. To use remote control, the device must be bound with the remote control server.
"Server" for user to input remote control server for URL address (with https://prefix). If the device has not been bound with remote control server before, input the PIN code provided by server.
Bind status:
(1). When the device is not connected to network, it shows "Network is disconnected".
(2). If the device is not connected with remote control server, it shows "Server is disconnected".
(3). If the device is connected but not bound with server, it shows "Server is unbinded".
(4). If device is bound with server successfully, it shows "Server is binded".
(5). If PIN code is not correct, it shows "Error PIN code".
ADB over Network
You can access ADB over a network connection with default port 5555.
ADB Over Network
Disable

8.3.3. Source Setting
Settings -> Signage Display -> Source Settings
Source settings
Android source
Source label/enable
Android Source
User can configure Android source APK's detail options.
Android source
Media player
Browser
Kiosk
CMND & Play
Custom app
Media Player
Settings -> Signage Display -> Source Settings -> Media Player Open Media Player APK's edit play list activity and edit effect settings activity.
Media player
Edit Play List
Edit Effect Settings
Edit play list opens MediaPlayer playlist compose page.

text_image
PlayList File 1 File 2 File 3 File 4 File 5 File 6 File 7Edit effect settings opens MediaPlayer settings page.
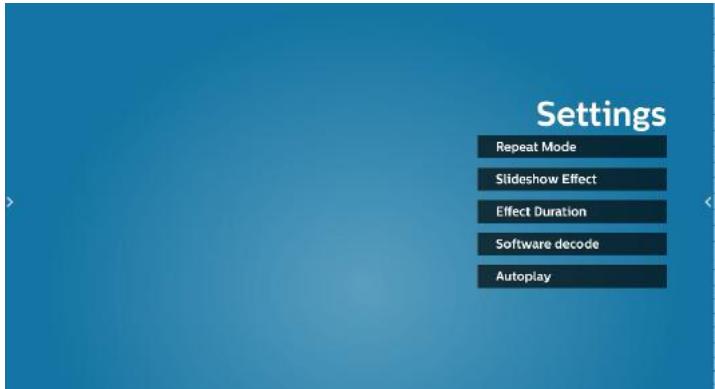
text_image
Settings Repeat Mode Slideshow Effect Effect Duration Software decode AutoplayBrowser
Settings -> Signage Display -> Source Settings -> Browser Open Browser APK's main activity.
Browser
Edit Bookmark
Kiosk
Settings -> Signage Display -> Source Settings -> Kiosk Open Kiosk APK's main activity.
Kiosk
Edit Kiosk
CMND & Play
Settings -> Signage Display -> Source Settings -> CMND & Play
| CMND & Play | |
| Settings |
CMND & Play APK settings activity
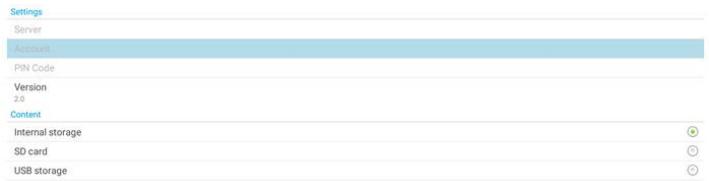
text_image
Settings Server Account PIN Code Version 2.0 Content Internal storage SD card USB storage(1). Server
Set up CMND & Play Server IP address. Not available in 2.0 protocol.
(2). Account
Set up CMND & Play Server account, account should be a string comprising [a-z][A-Z][0-9]. Not available in 2.0 protocol.
(3). PIN Code
Set up CMND & Play PIN code. Not available in 2.0 protocol.
(4). Version
Set up CMND & Play server protocol version.
(a). 2.0: Used for protocol version 2.0/2.2 (default)
(b). 3.0: Used for protocol version 3.0/3.1 (default when user select JP language in OOBE)
(3). Content CMND & Play APK supports content playback from internal storage (select "Internal Storage") and external storage (select "SD card" or "USB storage"). CMDN & Play APK will search content from the selected storage. System default is set to internal storage. Please note that external storage cannot be removed (plug-out) when CMND & Play is playing content. In addition, external storage must have free disk space greater than twice the size of CMS file for extracting CMS content.
Custom app
Settings -> Signage Display -> Source settings -> Custom app User can set up custom source APK. The selected APK will be launched when switching to the custom input source. If custom source APK is not set, the system will show Home screen when switching to the custom input source.
Select App
Select a specific APP for custom APP source.

text_image
Custom app Select app Force restart custom app DisableIf user set up APK for custom app source, it will show APK name. If not, it means that custom App is not configured.
Select a specific APP for custom APP source.
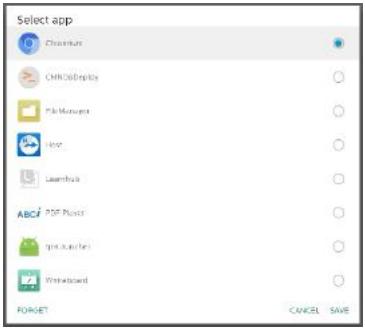
text_image
Select app Chorium CMROBride File Manager Icon Launchbox ABCi PDF Player Image Player Writerboard FORGET CANCEL SAVENote:
Most pre-installed APKs will not be shown on the list. It only lists the APKs installed manually by user or removable APKs.
Buttons:
(1). FORGET
Clear custom source application. It turns gray if custom source application is not set.
(2). CANCEL
Cancel and close the dialog.
(3). SAVE
Click SAVE to choose the selected APK as custom source application.
Force Restart Custom APP
The system can monitor whether custom APP is present or crashing when "Force Restart Custom App" is enabled. If the custom App is not present and boot on source is set to "Custom App", the system will launch custom App again.
Default is disabled.

Source label & enable settings
User can enable/disable external the source on source menu. In addition, user can change the name of external source.
Tap the checkbox to enable/disable external source.
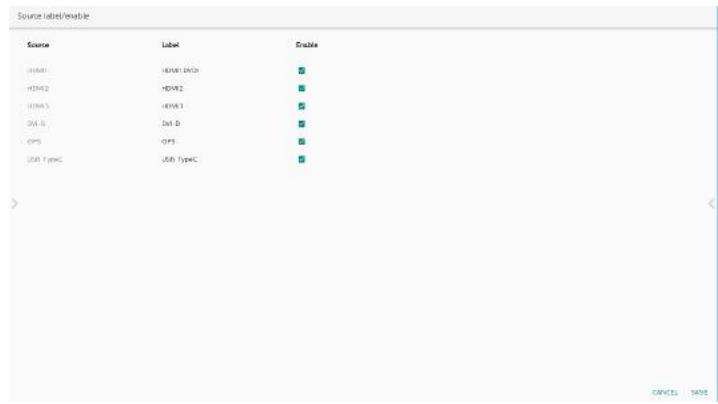
text_image
Source label/enable Source Label Enable IDAM1 IDAM1 IDAM2 IDAM2 IDAM2 IDAM3 IDAM3 IDAM D D GPS GPS IDAM TypeC OK Cancel SaveTap on the label name of the source to change it.
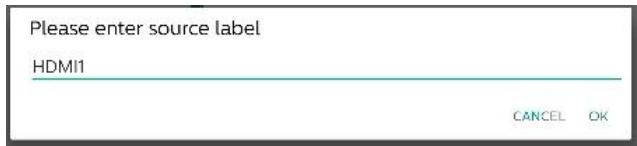
text_image
Please enter source label HDMI1 CANCEL OKFinally, tap "SAVE" to save changes or "CANCEL" to ignore changes.
8.3.4. Network Application
Settings -> Signage Display -> Network Application
| Network application |
| Proxy |
| SICP network port |
Proxy
Settings -> Signage Display -> Network Application -> Proxy Enable/disable network proxy by tapping "Enable" checkbox. User can set up host IP and port number of the proxy server. Default is disabled.
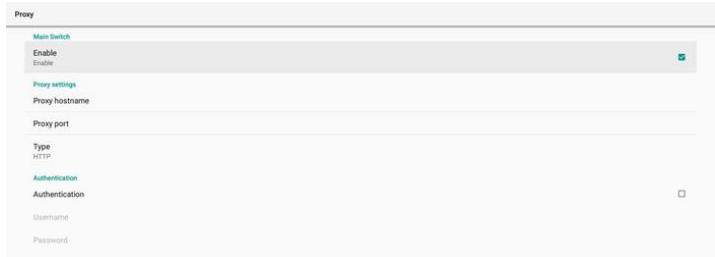
text_image
Proxy Main Switch Enable Enable Proxy settings Proxy hostname Proxy port Type HTTP Authentication Authentication Username PasswordSystem supports the following proxy types: HTTP, HTTPS, SOCKS4, and SOCKS5. Choose one for your proxy server.

text_image
Type HTTP Authentication Authentication Username Password Type HTTP HTTPS SOCKS4 SOCKS5 CANCELIf authorization with login name and password is required for proxy serer, enable the checkbox for these items.

text_image
Authentication Authentication Username PasswordSICP Network Port
Settings -> Signage Display -> Network Application -> SICP Network Port
Set up SICP default port and enable/disable network SICP. Default SICP is enabled with port 5000.
Note:
Port number ranges from 1025 \~ 65535.
The following ports are occupied, they cannot be assigned to SICP network port: 8000, 9988, 15220, 28123, 28124 and FTP port (default 2121).

text_image
SICP network port Main Switch Enable Enable SICP network port SICP network port 5000 (Connected)8.3.5. System Tools
Settings -> Signage Display -> System Tools
Settings system features for signage display.
(1). Clear Storage
(2). Reset
(3). Auto restart
(4). Import & Export
(5). Clone
(6). Security
(7). Admin Password
(8). Touch lock password
(9). Touch Access I/O
(10). Swipe up
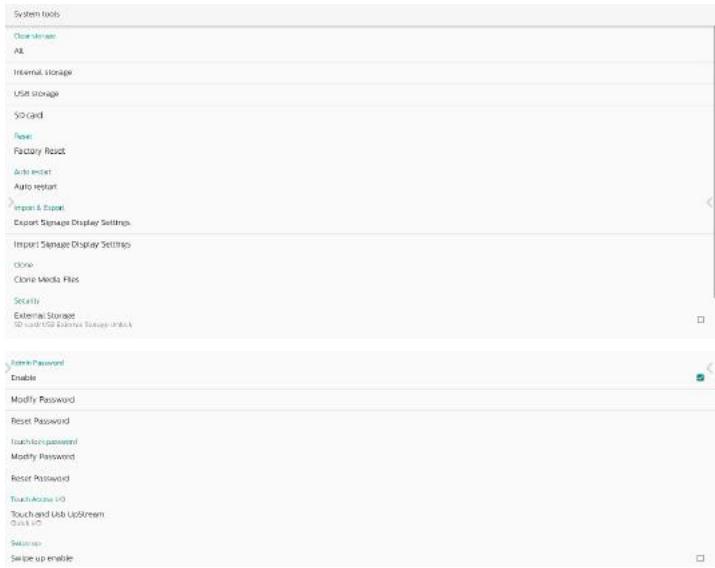
text_image
System tools Clearview Alt Internal Storage User Storage S/O card Reset Factory Reset Auto Event Auto Event Import & Export Export Signage Display Settings Import Signage Display Settings Clone Clone Media Files Security External Storage Show/Use License (Logos) (Logos) Remove Password Enable Modify Password Reset Password Touch/Use password Modify Password Reset Password Touch/Use USB Touch and Use UpStream Close USB Setters: Save up enableClear Storage
Settings -> Signage Display -> System Tools -> Clear Storage

text_image
Clear storage All Internal storage USB storage SD cardUse to clear all data under {storage}/philips/ folder in internal and external storage
(1). All: Clear philips/ folder in the internal storage, USB and SD card.
(2). Internal Storage
Clear philips/ folder in the internal storage only.
(3). USB Storage
Clear philips/ folder in the USB storage only.
(4). SD Card
Clear philips/ folder in the SD card only.
The folders to be cleared will be listed. Press "RESET" to clear all data under the listed folder. Or press back key to leave and take no further action.
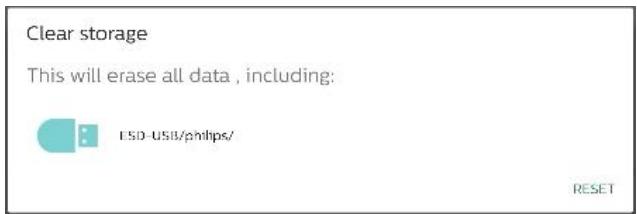
text_image
Clear storage This will erase all data, including: ESD-USB/ρ/hbps/ RESETReset
Settings -> Signage Display -> System Tools -> Reset

Factory Reset
Factory reset allows you to clear all user data and settings. The system will auto reboot and jump to OOBE after it is finished.
Important Note:
- All system data will be erased and cannot be reverted, including device settings, installed APPs, APPs' data,
download files, music, photos and all data under /data. However, data in USB storage and SD card will not be cleared, only data from internal storage will be cleared.
- Please make sure AC adapter and power are both present during factory rest process.
Power off the system only when OOBE shows on the screen again.
Factory Reset
This will erase all data from your Signage Display's internal storage, including:
• System and app data and settings
- System and app of
- Downloaded apps
• Music
• Photos
- Other user data
Erase all your personal information and downloaded apps?
You can't reverse this action! The system will reboot later!
FACTORY RESET
Tap "Factory Reset" and you will be prompted to confirm the reset action. Note that doing so will erase all data from internal storage and this action cannot be reverted.
Reset?
Erase all your personal information and downloaded apps? You can't reverse this action! The system will reboot later!
CANCEL OK
Auto restart
Set a specific time for the system to auto restart everyday.
Auto restart
Auto restart
Set auto restart feature enabled or disabled.

text_image
Auto insert Max Search Decaline Enable Auto insert Reset timeUse time picker to set restart time.
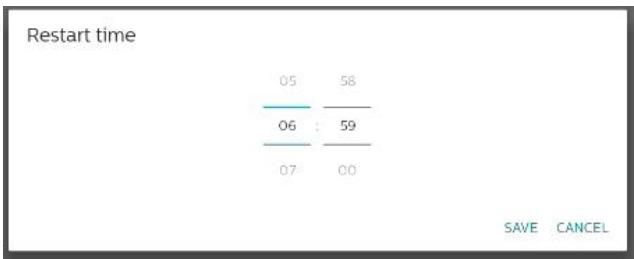
bar
Restart time | Category | Value | |---|---| | 05 | 58 | | 06 | 59 | | 07 | 00 | SAVE CANCELSelect "SAVE" and the system will restart at the specified time.
Auto restart
Безгач плюе
表决结果:9票
Import & Export
Settings -> Signage Display -> System Tools -> Export & Import
Import & Export Export Signage Display Settings Import Signage Display Settings
This feature allows you to import database settings and 3rd party APK to other devices. Please note that:
(1). Export data to BDL4152E-clone.zip file under {storage}/philips/clone folder.
(2). Support the old cloning method of files and place them under {storage}/philips/sys_backup:
a. AndroidPDMediaPlayerData.db
b. AndroidPDUrlListData.db
c. AndroidPDPdfData.db
d. menu_settings.db
e. runtime-permissions.xml
f. settings_global.xml
g. settings_secure.xml
h. settings_system.xml
i. signage_settings.db
j. smartcms.db
The latest exported data will be archived in a ZIP file.
(3). "Signage Display Name" will not be imported.
Export Signage Display Settings
System exports data and third party APKs into {storage}/philips/clone/ BDL4152E -clone.zip file in the selected storage (internal storage, SD card or USB storage).
Export Signage Display Settings
Please Wait...
Note:
If the selected storage (internal storage, USB or SD card external storage) does not contain philips/ folder, the system will create it automatically.
All available storage media are listed for user to select.
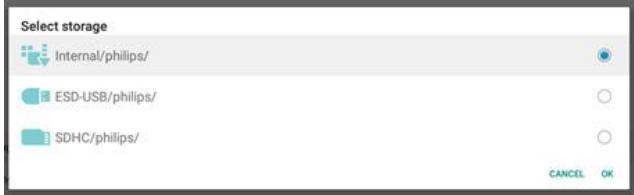
text_image
Select storage Internal/philips/ ESD-USB/philips/ SDHC/philips/ CANCEL OKImport Signage Display Settings
Import data from philips/clone/BDL4152E-clone.zip file of selected storage (internal Storage, SD Card or USB storage). System imports the following data in ZIP file:
(1). Import Database in BDL4152E-clone.zip
(2). Import 3 ^rd party APK in BDL4152E-clone.zip
All available storage media are listed (internal storage, USB and SD card).
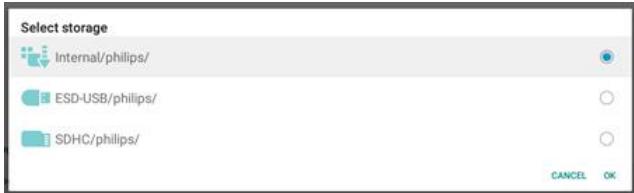
text_image
Select storage Internal/philips/ ESD-USB/philips/ SDHC/philips/ CANCEL OKA dialog box appears to ask the user to confirm the importing operation. Click "OK" to start importing data.
Import Signage Display Settings Are you sure you want to import the settings and apps? After importing successfully, the system will load the settings, install all apps and reboot automatically.
CANCEL OK
Clone
Settings -> Signage Display -> System Tools -> Clone
Clone Clone Media Files
Clone Media Files
Clone media files from the selected source storage to target storage.
(1). System clone files under the following list of folder:
a. philips/photo
b. philips/music
c. philips/video
d. philips/cms
e. philips/pdf
f. philips/browser
(2). Clone CMS files (file extension is ".cms"):
a. Source storage
Source is the internal storage.
Check if there is CMS file in FTP.
If there is no CMS file in FTP, check philips/ folder in source storage.
Source is external storage (SD card or USB storage) Check CMS file in root directory of storage.
b. Target storage
Target is the internal storage.
CMS file will be saved in philips/ folder.
Target is the external storage (SD card or USB storage)
CMS file will be saved to the root directory of the storage.
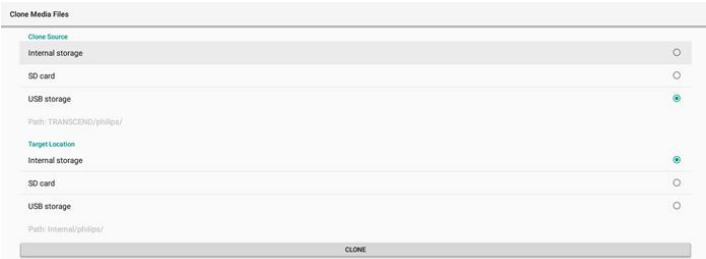
text_image
Clone Media Files Clone Source Internal storage SD card USB storage Path: TRANSCEND\philips// Target Location Internal storage SD card USB storage Path: Internal\philips/ CLONESecurity
External Storage Lock
To disable power for USB port and SD card.
Admin Password
Settings -> Signage Display -> System tools -> Admin Password

text_image
Admin Password Enable Password Recent PasswordEnable
Enable or disable Admin Password. Default is disable.

(1). Unchecked: Disable.
(2). Checked: Enable.
Note:
After enabling, you need the password to login Admin Mode. Default password is "1234".
Modify Password
Settings -> Signage Display -> System tools -> Admin Password -> Modify Password.
User can change the password for logging into Admin Mode by following the steps below:
(1). Enter the current password first. Default password is "1234".
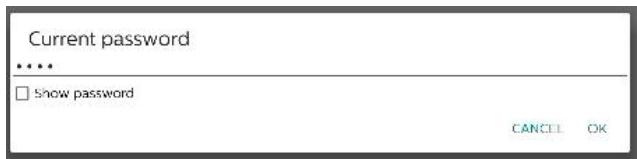
text_image
Current password •••• □ Show password CANCEL OKIf the current password is not correct, you will see an "Incorrect password" toast message.
Incorrect password.
(2). Enter a new password.
text_image
New password □ show password CANCEL OK(3). Enter the new password again.
text_image
New password again □ show password CANCEL OKTry again if the new password is not correct.
text_image
New password again Not match, please try again. □ Show password CANCEL OKIf the password is changed successfully, you will see a "Successful" toast message.
Successful
Reset password
Settings -> Signage Display -> System tools -> Admin Password -> Reset Password.

text_image
Reset Admin Password? CANCEL OKReset the password to default "1234". If succeed, you will see a "Successful" toast message.
Successful
Touch lock password
The default touch unlock password is 123.
Hint Dialog Enable
Enabling this function will show a hint dialog to notify user that touch is locked.

Modify password
Change the default touch unlock password. First, enter the current touch unlock password.
text_image
Current password □ show password CANCEL OKIf the current password is not correct, you will see an "Incorrect password" toast message.
Incorrect password.
Next, enter the new password.
text_image
New password □ show password CANCEL OKEnter the new password again.
text_image
New password again □ Show password CANCEL OKTry again if the new password is not correct.
text_image
New password again Not match, please try again. □ Show password CANCEL OKIf the password is changed successfully, you will see a "Successful" toast message.
Successful
Reset password
Reset default touch unlock password to 123.

text_image
Reset Touch Lock Password? CANCEL OKIf succeed, you will see a "Successful" toast message.
Successful
Touch access I/O
This option changes USB and Touch upstream port to auto-select or fix in Quick I/O (side of device) or Rear I/O (back of device).
Touch Access I/O Touch and USB-UpStream Quick I/O
Touch and USB Upstream
This option specifies which I/O USB and touch will switch to when changing the source to external sources.
The auto option allows users to use the upstream port located near the external source input port. When auto options is selected, the system will configure the upstream port to the Rear I/O for HDMI 1, HDMI 2 and DVI sources, and to Quick I/O for HDMI 3 source in the BDL4152E module.
text_image
Redirect Touch/USB to Side I/O Rear I/O Auto CANCEL OKNote that OPS source and USB-TypeC source do not follow this setting.
Swipe up
Swipe up to bring the source menu.
Swipe up enable
Click checkbox to enable the swipe up gesture to bring up the source menu.
Swipe up enable
Firmware update message
Click the checkbox to enable a notification dialog when the system finds that the firmware version (HDMI, USB-TypeC and HDMI output chips' FW) is not the same as the firmware in internal storage.
Firmware update message Firmware update message enable
The notification dialog will pop up each time the system boots up and will close after 5 seconds.
Example of USB-TypeC FW upgrade notification dialog.

8.3.6. Misc.
TeamViewer support
Enable or disable TeamViewer support. TeamViewer will send a virtual HOME key to open Admin mode. Default is enable.
TeamViewer Support Enable
TeamViewerHost APKs will automatically install into the system. Otherwise, system will remove them if "TeamViewer Support" is disabled.
The following APK will be listed in Settings->Apps if TeamViewer support is enabled.
Host 30.38 MB
Hide the close button of whiteboard
Show or hide the close button of whiteboard APK. Enable (hide) as default.
Hide the close button of extraboard Delete
The close button on the lower right corner of whiteboard
APK:

Change wallpaper
Change Home's wallpaper.
Change wallpaper
Place wallpaper images under internal storage philips/wallpaper folder. Please note that wallpaper can only be stored in internal storage. Wallpaper image uses PNG or JPG format. The system will list all available image files for wallpaper.
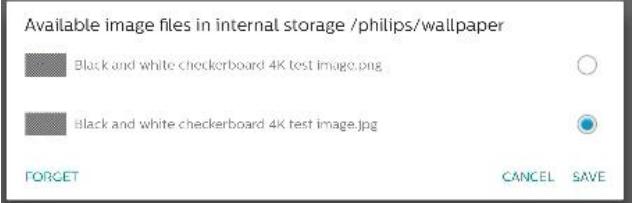
text_image
Available image files in internal storage /philips/wallpaper Black and white checkerboard 4K test image.png Black and white checkerboard 4K test image.jpg FORGET CANCEL SAVETap "SAVE" to apply changes, "CANCEL" to ignore. "FORGET" will restore to default wallpaper.
Change the color of the icons on Home
Allows user to change the color of icons on the Home screen. Select a color and "SAVE" to apply. Press "FORGET" to restore color to default color which is white..
Change the color of the icons on Home
Color section dialog
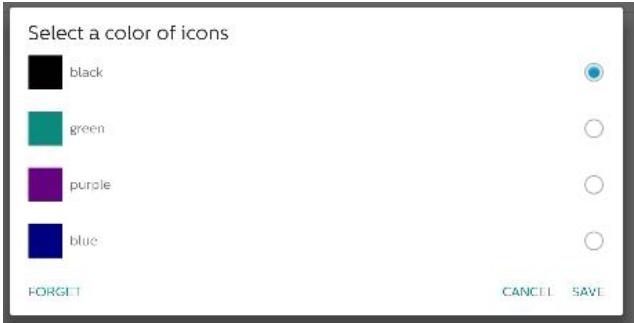
text_image
Select a color of icons black green purple blue FORGET CANCEL SAVEWhite (default)

text_image
Whiteboard Present Apps LearnhubBlack

text_image
Whiteboard Present Apps LearnhubGreen

text_image
Whiteboard Present Apps LearnhubPurple

text_image
Whiteboard Present Apps LearnhubBlue

text_image
Whiteboard Present Apps LearnhubErP Lot 5
Allows the device to match ErP Lot5 power saving features. Enable by default.
ErP Lot 5 Enable

8.3.7. System updates
Upgrade the system from storage.
Local update
Settings -> Signage Display -> System updates -> Local update
The system will automatically search "update.zip" in the root folder of external storage. If the system found "update.zip" in external storage, a list appears for user to select the file for an update.
System updates
Local update
After selecting the file from the list, the system will reboot and do system update.
Please note that:
a. Keep the system power alive during system update, do not remove power adapter.
b. Currently, the system only supports full Android update.
c. The update file must be named as "update.zip" only.
d. The "update.zip" file must be located in the root folder of the external storage.
Remote update
Settings -> Signage Display -> System updates -> Remote update
Please keep the network connected and available. Choose "Latest" or "Download code" to download the "update.zip" to the root folder from the Remote FW server. If "Download Code" is selected, you need to input a 10-digit code obtained from the remote FW server.
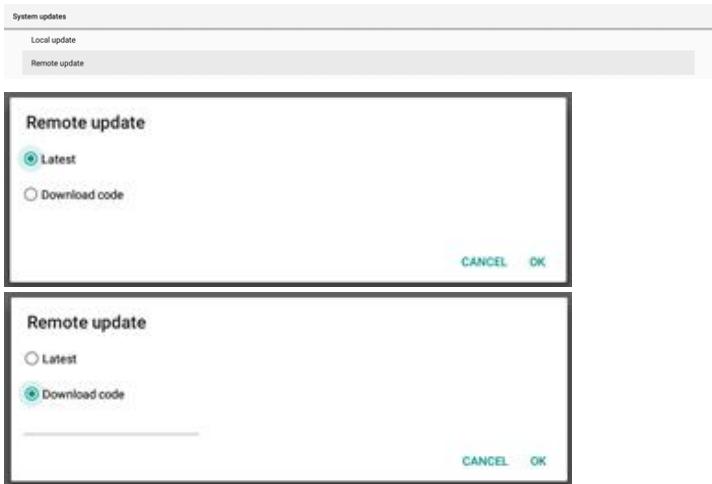
text_image
System updates Local update Remote update Remote update Latest Download code CANCEL OK Remote update Latest Download code CANCEL OKTap "OK" and wait for 5 minutes to download "update.zip" according to network speed. If the download is successful, the system will automatically transfer to the "Local update" process. The system will reboot and do system update. Please note that:
a. Keep the system power alive during system update, do not remove the power adapter.
b. Currently, the system only supports full Android update.
Firmware updates
HDMI update
Used to update the FW of the HDMI switch chip.
System will check internal/hdmi_driver.bin file FW version in the system with current HDMI switch FW, and add internal BIN file to the file selection dialog if FW version is different. System will search for hdmi_driver.bin file in the root folder of the SD card and USB storage, and add to file list when found.
USB-TypeC update
Used to update the FW of the HDMI USB-TypeC control chip. System will check internal/typec_fw.bin file FW version in the system with current HDMI switch FW, and add internal BIN file to the file selection dialog if the FW version is different. System will search for typec_fw.bin file in the root folder of the SD card and USB storage, and add to file list when found.
HDMI output update
Used to update the FW of the HDMI output chip.
System will check internal/output_driver.bin file FW version in the system with current HDMI switch FW, and add internal BIN file to the file selection dialog if FW version is different. System will search for output_driver.bin file in the root folder of the SD card and USB storage, and add to file list when found.
USB-TypeC update as an example:
- Select a BIN file for update. Press "OK".

text_image
System update Local update Remote update HDMI update typeC update HDMI output update Select storage Internal/typec_fw.bin HAOSHENG/typec_fw.bin CANCEL OK- Press "OK" to start the upgrade.
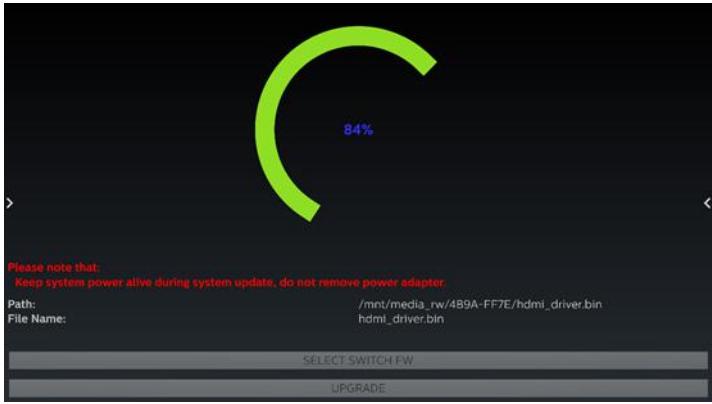
pie
| Category | Value (%) | |---|---| | Please note that: Keep system power alive during system update, do not remove power adapter. | 84 | | Path: /mnt/media_rw/489A-FF7E/hdmi_driver.bin | File Name: hdlI_driver.bin | | SELECT SWITCH FW | | | UPGRADE | |- The system will reboot when the update is finished.
Important note:
Please DO NOT remove the power cable or shutdown the device while the upgrade is in progress.
8.4. App & notification
Application information and notification settings for installed application in the system.

text_image
Apps & notifications tpvLauncher 1 mm ago Recently signed apps SmartCMS 2 mm ago Kiosk 2 mm ago Notifications On-line access Default apps Permission manager App using storage of information8.4.1. See All Apps
List all applications installed in the system, check the current settings and information for each App. such as notification, permission, storage & cache, network usage and other settings.
8.5. Display
8.5.1. Font size
Set the system's default font size.

text_image
Display Font size LargeAdjust the system's font size by dragging the slide bar, default is "Largest".
| Sample text The Wonderful Wizard of Oz Chapter 11: The Wonderful Emerald City of Oz Even with eyes protected by the green spatulae Dorothy and her friends were at first added by the brillancy of the wonderful City. The streets were lived with beautiful houses all built of green manhole and studied everywhere with sparkling emeralds. They walked out a passage of the same green manhole, and where the blocks were joined together were rows of emeralids, set clearly, and greening in the brightness of the sun. The window passes some of green music, even the sky above the City had a green tree, and the rest of the sun were green. There were more people, men, women and children, walking about, and these were all dressed in green clothes and had greenish skines. They looked at Dorothy another strongly assisted company with wondering eyes, and the children all on away and hit behind their myths when they saw the lamp, but to be spider to them. Many shops stood in the street, and Dorothy saw that everything in them was green. Green candy and green popcorn were affected for sale, as well as green shows green huts and green clothes of all sorts. At one place a smart was selling green lemonade, and when the children bought it Dorothy could see that they paid for it with green medicines. There seemed to be no longer than animals of any kind, then men carried things around in little green sorts, which they pushed before them. Everyone answered happy and contented and prosperous. | Largest A Make the text on screen smaller or larger. A Preview |
8.6. Security
Android system security settings.

text_image
Security Unknown sources Device admin apps No at the apps8.6.1. Unknown sources
Enable this option to allow 3^rd party application installation.

8.6.2. Device admin apps
List and control installed device admin applications, if installed.
8.7. System
Input method and developer options of Android system.

text_image
System Keycards KLA TV keyboard Developer options8.7.1. Keyboards
Control software keyboards and physical keyboards.

text_image
Keyboards Current Keyboard Virtual keyboard Kina - TV Keyboard Physical keyboard Risikos, cks, mics, oms, TP, M, PC, and TP, S, T, C8.7.2. Current keyboard
List all available keyboards to set up default keyboard.

text_image
Choose input method Kika - TV Keyboard8.7.3. Virtual keyboard
Control each IME detail settings. Manage keyboards to enable or disable IMEs. If the system has only one IME installed, user cannot disable it. At last one IME in the system is necessary.

text_image
Virtual keyboard Kits - TV Keyboard Manage keyboards8.7.4. Physical keyboard
Settings of physical keyboard.
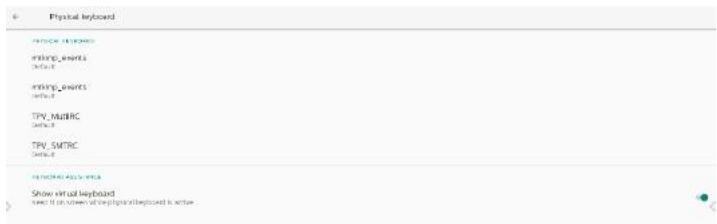
text_image
Physical keyboard RIPICAR SYSTEMS RIPICAR EVENTS DATA: 1 RIPICAR EVENTS DATA: 2 TPV_MATRC DATA: 3 TPV_SMRC DATA: 4 RICHARD APPLICATIONS Show virtual keyboard Text: If it is screened at the physical keyboard is active8.7.5. Developer options
Android system developer options for engineer development.
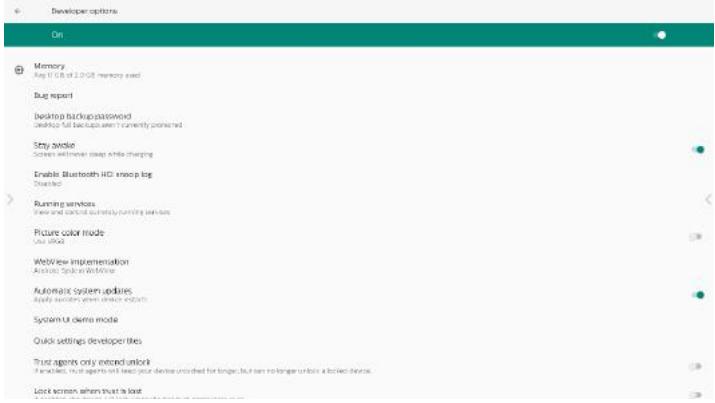
text_image
Developer options On Memory Aug 17 GB of 20 GB memory slot Bug report Desktop backup/satwood Desktop 54 backups when I currently powered Sety sidebar Screen with never sleep while charging Enable Bluetooth HCI snap log Disks Running services New and/or currently running services Picture color mode Use audio WebView Implementation Active Tools in Workforce Automatic system updates Apply services your device icons System or delta mode Quick settings developer files Trust agents only extend union If switches, no agents will keep your devices unshed for longer, but can no longer unlock a locked device. Lock screen when trust is last8.8. About
Shows system SICP version, legal information, model name, Android version and others.
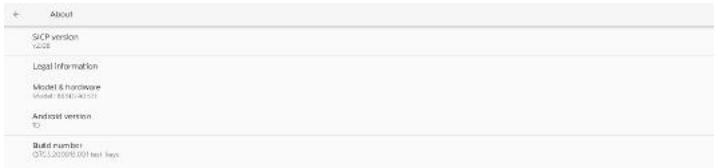
text_image
About SICP version 12.00E Legal Information Model & hardware Model: $500/400T Android version TO Build number OTCJ2008/EU01 test keys8.8.1. Legal Information
Shows the open source licenses, third-party licenses, system WebView licenses and Wallpapers license.
| Legal Information |
| About Open Source License |
| Third-party licenses |
| System WebView licenses |
| Wallpapers Satellite imagery providers ©2014 CNES / Asium, DigitalGlobe, Bluesky |
9. OSD Menu
An overview of the On-Screen Display (OSD) structure is shown below. You can use it as a reference for further adjustment of your display.
9.1. Navigating the OSD Menu
9.1.1. Navigating the OSD menu using the remote control
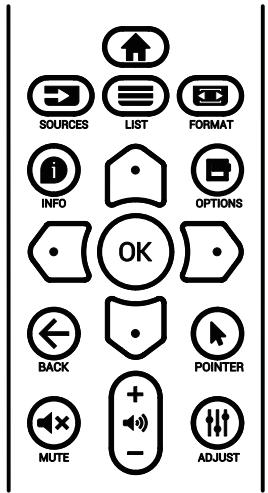
text_image
SOURCES LIST FORMAT INFO OPTIONS OK BACK POINTER MUTE ADJUST- Press [♠] button on the remote control to display the OSD menu.
- Press [💡] or [💡] button to select the item to adjust.
- Press [OK] or [☐] button to enter the submenu.
- In the submenu, press [☐] or [☐] button to toggle between items, press [☐] or [☐] button to adjust the settings. If there is a submenu, press [OK] or [☐] button to enter the submenu.
- Press [←] button to return to the previous menu, or press [↑] button to exit from the OSD menu.
9.1.2. Navigating the OSD menu using the display's control buttons
- Press [MENU] button to display the OSD menu.
- Press [+] or [-] button to select the item to adjust.
- Press [+] button to enter the submenu.
- In the submenu, press [▲] or [▼] button to toggle between items, press [+] or [—] button to adjust settings. If there is a submenu, press [+] button to enter the submenu.
- Press [MENU] button to return to the previous menu, or keep pressing [MENU] button to exit from the OSD menu.
9.2. OSD Menu Overview
9.2.1. Picture menu
| Picture | Brightness | 80 |
| Screen | Contrast | 50 |
| Audio | Sharpness | 10 |
| Configuration | Black Level | 50 |
| Advanced | Tint | 50 |
| Android Settings | Color | 55 |
| Noise reduction | Off | |
| Gamma selection | Native | |
| Color temperature | Native | |
| Color control | Action | |
| Overscan | Off | |
| PQ Bypass | Off | |
| Picture reset | Action |
Brightness
Adjust the brightness of this display's backlight.
Contrast
Adjust the contrast ratio for the input signal.
Note: VIDEO source only
Sharpness
Reserved.
Black level
Adjust the image brightness for the background.
Note: VIDEO source only. sRGB picture mode is standard and cannot be changed.
Tint (Hue)
Adjust the tint of the screen.
Press + button the flesh tone color becomes greenish.
Press - button the flesh tone color becomes purplish.
Note: VIDEO source only
Color (Saturation)
Adjust the color of the screen.
Press + button to increase color depth.
Press - button to decrease color depth.
Note: VIDEO source only
Noise reduction
Reserved.
Gamma selection
Select a display gamma. It refers to the brightness performance curve of signal input. Choose from {Native} / {2.2} / {2.4} / {s gamma} / {D-image}.
Note: VIDEO source only. sRGB picture mode is standard and cannot be changed.
Color temperature
Adjust the color temperature.
The image becomes reddish as the color temperature decreases, and becomes bluish as the color temperature increases.
Note: VIDEO source only.
Color Control
The color levels of red, green, and blue can be adjusted by the color bars.
R: Red gain, G: Green gain, B: Blue gain.
Overscan
If you encounter problems with overscanning, you can change display area of the image.
• {ON}: Display 95% of the total image area.
• {OFF}: Display 100% of the total image area.
Note: VIDEO source only.
PQ Bypass
Bypass all PQ settings.
This option is used when HDMI input is another device's HDMI output depending on HDMI daisy chain HW design. Except the 1st one, all the rest should have this function enabled to bypass all PQ settings.
{ON}: Enable PQ Bypass
{OFF}: Disable PQ Bypass
NOTE: When setting PQ Bypass from ON to OFF (including factory reset), system will reboot.
Picture reset
Reset all settings in the Picture menu.
Select "RESET" to restore factory preset data.
Press "CANCEL" button to cancel and then return to the previous menu.
9.2.2. Screen menu
text_image
Picture Screen Audio Configuration Advanced Android Settings Zoom mode Custom Zoom Screen reset Full Action ActionZoom mode
Choose one for video input: {Full} / {Real} / {21:9}/ {4:3}/ {Custom}
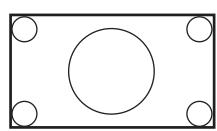
Full
This mode restores the correct proportions of pictures transmitted in 16:9 using the full screen display.
 | RealThis mode displays the image pixel-by-pixel on screen without scaling the original image size. |
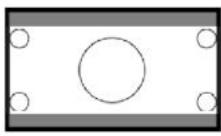 | 21:9The picture is reproduced in 21:9 format and a black band at the top and bottom. |
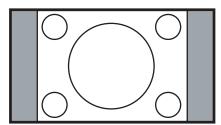 | 4:3The picture is reproduced in 4:3 format and a black band is displayed on either side of the picture. |
| CustomChoose to apply the custom zoom settings in the Custom Zoom submenu. |
Custom zoom
You can use this function to further customize the zoom settings to suit the image you want to display.
Note: This item is functional only when the {Zoom mode} is set to {Custom}.

Zoom
Expands the horizontal and vertical sizes of the image simultaneously.
H zoom
Expands the horizontal size of the image only.
V zoom
Expands the vertical size of the image only.
H position
Moves the horizontal position of the image left or right.
V position
Moves the vertical position of the image up or down.
Screen reset
Reset all settings in the Screen menu to factory preset values.
9.2.3. Audio menu
| Picture | Balance | 50 |
| Screen | Treble | 50 |
| Audio | Bass | 50 |
| Configuration | Volume | 4 |
| Advanced | Audio out (line out) | 20 |
| Android Settings | Maximum volume | 100 |
| Minimum volume | 0 | |
| Mute | Off | |
| Audio reset | Action | |
| Audio Out Sync | Off | |
| Speaker Settings | On |
Balance
Adjust to emphasize left or right audio output balance. Note: Only can adjust balance for speaker output.
Treble
Adjust to increase or decrease higher-pitched sounds.
Bass
Adjust to increase or decrease lower-pitched sounds.
Volume
Adjust the volume.
Audio Out (line out)
Adjust to increase or decrease the line out audio output level (volume).
Note: This function will be disabled when Audio Out Sync is ON.
Maximum volume
Adjust limitation for the maximum volume setting.
Minimum Volume
Adjust limitation for the minimum volume setting.
Mute
Turn the mute function on/off.
Audio reset
Reset all settings in the Audio menu to factory preset values.
Audio Out Sync
Line out volume sync with internal speaker Volume.
{On}: Enable the function and gray out Audio Out (line out) Volume.
{Off}: Disable the function.
Speaker Setting
Turn internal speaker {On}/{Off}.
9.2.4. Configuration menu
| Picture | Switch on state | Force on |
| Screen | Panel saving | Action |
| Audio | RS232 routing | RS232 |
| Configuration | Boot on source | Action |
| Advanced | Logo | On |
| Android Settings | WOL | Off |
| Light sensor | Off | |
| Human sensor | Off | |
| HDMI version | ||
| Information OSD | 10 | |
| Monitor ID | Action | |
| Heat status | xxxxxx | |
| Configuration reset | Action |
Switch on state
Select the display status when you connect the power cord next time.
- {Power off} - The display will remain off when the power cord is connected.
- {Forced on} - The display will turn on when the power cord is connected.
- {Last status} - The display will return to the previous power status (on/off/standby mode) when the power cord is connected.
Panel saving
Choose to enable the panel saving functions and thus reduce the risk of image persistence or ghost imaging.
- {Brightness} - Select {On} and the image brightness will reduce to an appropriate level. The Brightness setting in the Picture menu cannot be changed when this setting is enabled.
- {Pixel Shift} - Select the time interval ({Auto}, {10-900} seconds, {Off}) for display to slightly expand the image size and shift the position of pixels in four directions (up, down, left and right). Activating pixel shift will disable H position, V position and Zoom mode in Screen menu.
Note: Video source only.
RS232 routing
Select RS232 routing path
- {RS232} – RS232 is routed from 2.5mm phone jack
• {LAN->RS232} – RS232 is routed from RJ45
• {OPS RS232} – RS232 is routed from OPS
Boot on source
Choose to select a source when booting up.
- {Input} – Select input source when booting up.
- {Playlist} – Select playlist index for Media Player, Browser. 0 indicates there is no playlist.
Logo
Choose to enable or disable the picture of Logo when turning on your display.
- {Off} – Both static Philips logo and Android boot animation will not be shown.
- {On} – Default value. Both Philips logo and Android boot animation will be shown.
- {User} – Static Philips logo will not be shown, only user-selected boot animation will be shown in Android settings.
Note: Logo will not be rotated even thought rotation setting is set.
WOL (Wake on LAN)
Allow the display to be turned on by a network message.
Note: This function only works in power save mode 1.
Light sensor
Choose to turn on or off the light sensor function.
Human sensor
Choose to turn on or off the human sensor function.
HDMI version
Set the HDMI version to 1.4 or 2.0.
Notes: 1. HDMI input source only.
- If timing setting to 4K60Hz the screen display abnormal, please set the HDMI version to 1.4.
Information OSD
Set the period of time the information OSD display on the upper left corner of the screen. The information OSD will display when input source and signal are changed.
The options are {Off, 1 - 60} seconds.
Monitor ID
Set the ID number for controlling the display via the RS232 connection. Each display must have a unique ID number when multiple sets of the display are connected. Monitor ID number range is between 1 and 255.
• {Monitor ID} set range in {1-255}. The default setting is 1.
- {Monitor group} set range in {1-254}. The default setting is 1.
Heat Status
Current thermal status.
Configuration reset
Reset all settings in Configuration menu to factory preset values.
Factory Reset
Reset all customized settings in Picture, Screen, Audio, Configuration and Advanced Option to the factory default values.
9.2.5. Advanced Option menu
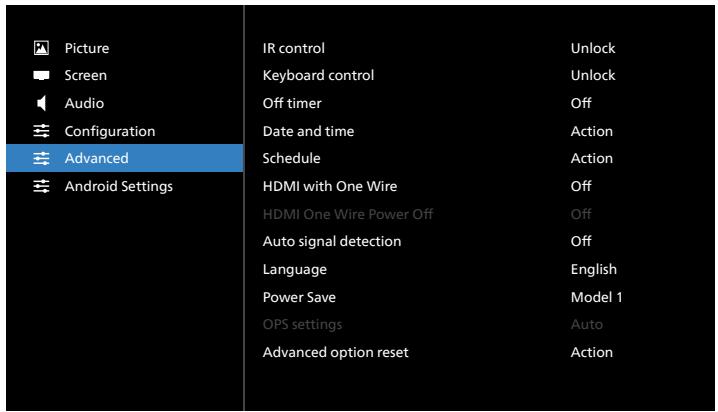
text_image
Picture Screen Audio Configuration Advanced Android Settings IR control Keyboard control Off timer Date and time Schedule HDMI with One Wire HDMI One Wire Power Off Auto signal detection Language Power Save OPS settings Advanced option reset Unlock Unlock Off Action Action Off Off English Model 1 Auto ActionIR control
Select the operation mode of the remote control when multiple displays are connected via RS232 connection.
- {Unlock} - All displays can be operated normally by the remote control unit.
- {Lock All} / {Lock all but Volume} / {Lock all but Power} / {Lock all except PWR &VOL} - Lock the remote control function of this display. To unlock, press and hold the INFO button on the remote control for 6 (six) seconds.
- {Primary} - Designate this display as the primary display for remote control operation. Only this display can be operated by the remote control. (In primary mode, IR key will always be processed regardless of the monitor ID/group settings).
- {Secondary} - Designate this display as the secondary display. This display cannot be operated by the remote control, and will only receive the control signal from the primary display via RS232 connection.
Keyboard control
Choose to enable or disable the display keyboard (control buttons) function.
- {Unlock} - Enable the keyboard function.
- {Lock All} / {Lock all but Volume} / {Lock all but Power} / {Lock all except PWR & VOL} - Disable the keyboard function.
Note: "Keyboard Control Lock Mode" This function completely disables the access to all Keyboard Control functions. To enable or disable the keyboard control lock, press both [VOL+] and [UP] buttons and hold down continuously more than 3 seconds.
Off timer
Set automatic power off time (in hours).
Date and time
Adjust the current date and time for the display's internal clock.
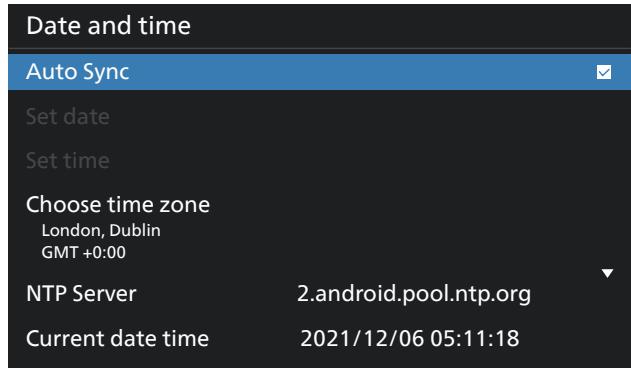
text_image
Date and time Auto Sync Set date Set time Choose time zone London, Dublin GMT +0:00 NTP Server 2.android.pool.ntp.org Current date time 2021/12/06 05:11:18- {Auto Sync} - Auto sync display's clock with NTP server.
Schedule
Allow user setup up to seven different scheduled intervals of display activity.
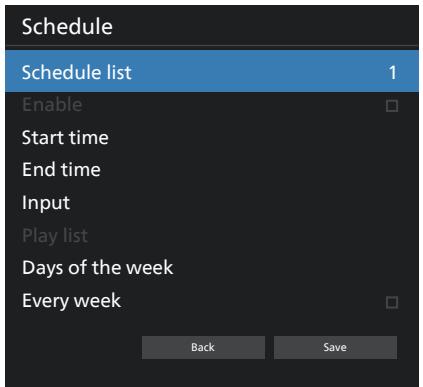
text_image
Schedule Schedule list 1 Enable Start time End time Input Play list Days of the week Every week Back Save- {Schedule list} – Select 1-7 schedules to edit.
- {Enable} – Enable/disable selected schedule. If time conflict with other schedule or start/end time, input source are empty, user cannot enable this schedule.
- {Start time} – Set start time.
• {End time} – Set end time. - {Input} – Set input source, system will go to selected source automatically at start time.
- {Play list} – Set playlist 1-7 for Media Player and Browser sources.
- {Days of the week} – Set Sunday, Monday, Tuesday, Wednesday, Thursday, Friday and Saturday.
• {Every week} – Set lifecycle. - {Back} – Cancel and do not change schedule data.
- {SAVE} – Save schedule data.
HDMI with One Wire
Enable or disable HDMI CEC.
HDMI One Wire Power Off
Allow user to set multiple devices to standby mode by pressing the power button. This function is only available when HDMI CEC is enabled.
Auto signal detection
OPTION:
{Off}, {All}, {Failover}
{Off}: Disable Auto signal detection
{All}: HDMI1 -> HDMI2 -> HDMI3* -> DVI** -> TYPE-C* -> VGA* -> OPS* -> Media Player -> Browser -> CMND & Play -> Kiosk -> Custom -> Home
* Not all modules have all source in this list. DVI can be DVI-I or DVI-D
* Media Player, Browser will only try playlist index 1 {Failover}:
Failover 1: Home (default)
Failover 2: Home (default)
Faliover 3: Home (default)
Failover 4: Home (default)
Failover 5: Home (default)
Failover 6: Home (default)
Failover 7: Home (default)
Failover 8: Home (default)
Failover 9: Home (default) *
Failover 10: Home (default) *
Failover 11: Home (default) *
Failover 12: Home (default) *
Failover 13: Home (default) *
* Not all modules have all 13 failover list, depends on total source of module
Language
Select the language used in the OSD menu.
The options are: English/Deutsch/ 简体中文 /Français/ Italiano/Español/Pyscký/Polski/Türkçe/ 繁體中文 / 日本語 / Português/I قي ب رع ل/Danish/Swedish/Finnish/Norwegian/Dutch/Czech/Lithuanian/Latvian/Estonian.
Power Save
Mode 1 [TCP off, WOL on, auto off]
Mode 2 reserved
Mode 3 [TCP on, WOL off, auto on/off]
Mode 4 [TCP on, WOL off, no auto on/off]
| Power Save | RCU Power Button Off | No Signal | WOL | Android (ARM) |
| Mode 1 | DC OFF | DC OFF | V | ARM off |
| Mode 3 | Backlight OFF | when signal is back, system wake up | X | ARM on |
| Mode 4 | Backlight OFF | Backlight always on, show no signal | X | ARM on |
Following table is the action for Android board with different power mode.
| Power mode | Mode 1 | Mode 3, Mode 4 |
| DC off | System shutdown | 1. Media Player, Browser, PDF Player, Kiosk and CMND & Play will close.2. Android system goes to default black launcher. |
| DC on | System boot up | Android system reboot. If Logo settings is off, system directly turn backlight on without rebooting. |
OPS settings
Set the OPS configuration under each power condition.
- {Auto} - After selecting {Card OPS} for video source input, the OPS will be set to off when the display power is set to off, or vice versa. If you set to other video source inputs, the OPS will always be set to on.
- {Always off} - The OPS will always be set to off.
- {Always on} - The OPS will always be set to on.
Advanced option reset
Reset all settings except {Date and Time} in the advanced option menu to factory preset values.
9.3. Android Settings
Open Android Settings
- When enabled admin password from Android Setting -> System tools, it must enter the password before entering the android settings.
Default password is 1234.
10. Supported Media Formats
USB Multimedia Formats
| Video format | ||
| Video Codec | Resolution | Bit Rate |
| MPEG1/2 | 1080P@60fps | 80Mbps |
| MPEG4 | 1080P@60fps | 80Mbps |
| H.263 | 1080P@60fps | 80Mbps |
| H.264 | 4K2K@120fps | 200Mbps |
| H.265 | 4K2K@120fps | 200Mbps |
| VP8 | 1080P@60fps | 60Mbps |
| VP9 | 4K2K@120fps | 100Mbps |
| Audio format | |||
| Audio Codec | Sampling Rate: | Channel | Bit Rate |
| MPEG1/2/2.5 Layer3 | 8KHz-48KHz | 2 | 8Kbps-320Kbps |
| MPEG1/2 Layer1 | 16KHz-48KHz | 2 | 32Kbps-448Kbps |
| MPEG1/2 Layer2 | 16KHz-48KHz | 2 | 8Kbps-384Kbps |
| AAC, HEAAC | 8KHz-48KHz | 5.1 | AAC-LC: 12Kbps-576Kbps V1:6Kbps-288Kbps V2:3Kbps-144Kbps |
| Photo format | |
| Image | Resolution |
| JPEG | 3840 x 2160 |
| PNG | 3840 x 2160 |
| BMP | 3840 x 2160 |
| WebP | 3840 x 2160 |
NOTES:
- Sound or video may not work if the contents have a standard bit rate/frame rate above the compatible Frame/sec listed in the table above.
- Video content with a Bit rate or Frame rate larger than the rate specified in the table above can cause choppy video during playback.
11. Input Mode
Timing support (Computer formats):
| Item | Resolution | Refresh rate |
| 1 | 720x400 | 70 |
| 2 | 640x480 | 60, 67, 75 |
| 3 | 800x600 | 60 |
| 4 | 832x624 | 75 |
| 5 | 1024x768 | 60 |
| 6 | 1152x870 | 75 |
| 7 | 1280x720 | 60 |
| 8 | 1920x1080 | 60 |
| 9 | 1440x900 | 60 |
| 10 | 1680x1050 | 60 |
| 11 | 3840x2160 | 30, 60 |
Timing support (Video format):
| Item | Resolution | Refresh rate |
| 1 | 480i, 480p | 60 |
| 2 | 576i, 576p | 50 |
| 3 | 720p | 50, 60 |
| 4 | 1080i, 1080p | 50, 60 |
- The PC text quality is optimum in UHD mode (3840 x 2160, 60Hz).
- Your PC display screen might appear different depending on the manufacturer (and your particular version of Windows).
- Check your PC instruction book for information about connecting your PC to a display.
- If a vertical and horizontal frequency-select mode exists, select 60Hz (vertical) and 31.5KHz (horizontal). In some cases, abnormal signals (such as stripes) might appear on the screen when the PC power is turned off (or if the PC is disconnected). If so, press the [INPUT] button to enter the video mode. Also, make sure that the PC is connected.
- When horizontal synchronous signals seem irregular in RGB mode, check PC power saving mode or cable connections.
- The display settings table complies to the IBM/VESA standards, and based on the analog input.
- The DVI support mode is regarded as same to the PC support mode.
- The best timing for the vertical frequency to each mode is 60Hz.
• In UHD mode (3840 x 2160, 60Hz), Pixel Rate HDMI:594, TYPE-C:533.25.
12. Pixel Defect Policy
We strive to deliver the highest quality products and use some of the industry's most advanced manufacturing processes whilst practicing stringent quality control. However, pixel or sub-pixel defects on the PDP / TFT panels used in Plasma- & LCD- displays are sometimes unavoidable. No manufacturer can guarantee that all panels will be free from pixel defects, but Philips guarantees that any Plasma- & LCD- displays with an unacceptable number of defects will be repaired during the warranty period in line with your local guarantee conditions.
This notice explains the different types of pixel defects and defines the acceptable defect level for the LCD screen. In order to qualify for repair under warranty, the number of pixel defects must exceed a certain level as shown in the reference table. If the LCD screen is within specification a warranty exchange / claim back will be refused. Additionally, because some types or combinations of pixel defects are more noticeable than others, Philips sets even higher quality standards for those.
12.1. Pixels and Sub-Pixels
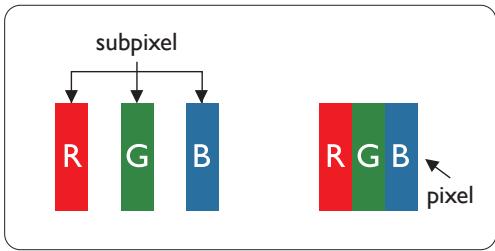
flowchart
graph TD
    A["subpixel"] --> B["R"]
    A --> C["G"]
    A --> D["B"]
    E["pixel"] --> F["R"]
    E --> G["G"]
    E --> H["B"]
A pixel, or picture element, is composed of three sub-pixels in the primary colors of red, green and blue. Many pixels together form an image. When all sub-pixels of a pixel are lit, the three colored sub-pixels together appear as a single white pixel. When all are dark, the three colored sub-pixels together appear as a single black pixel. Other combinations of lit and dark sub-pixels appear as single pixels of other colors.
12.2. Types of Pixel Defects + Dot Definition
Pixel and sub-pixel defects appear on the screen in different ways. There are three categories of pixel defects and several types of sub-pixel defects within each category.
Dot definition = What is a defective "Dot"? :
One or more defective, adjacent sub-pixel are defined as one "dot". The no. of defective sub-pixels are not relevant to define a defective dot. This means that a defective dot can consist of one, two or three defective sub-pixels which can be dark or lit.

text_image
R G BOne dot = One Pixel; consists of three sub-pixels of Red, Green, and Blue.
12.3. Bright Dot Defects
Bright dot defects appear as pixels or sub-pixels that are always lit or "on". These are the examples of bright dot defects:
text_image
G R BOne lit red, green or blue sub pixel
text_image
P Y CTwo adjacent lit sub pixels:
$$ \text { Red } + \text { Blue } = \text { Purple } $$
$$ \text { Red } + \text { Green } = \text { Yellow } $$
$$ \text { Green } + \text { Blue } = \text { Cyan (Light Blue) } $$

text_image
WThree adjacent lit sub pixels (one white pixel)
12.4. Dark Dot Defects
Black dot defects appear as pixels or sub-pixels that are always dark or "off". These are the examples of black dot defects:
natural_image
Simple black vertical rectangle on white background, no text or symbols presentOne dark dot
natural_image
Simple black square centered within a rounded rectangle (no text or symbols)Two adjacent dark dots = 1 pair of dark dots
flowchart
graph TD
    A[" "] --> B[" "]
Two dark dots, specifications defines the minimum distance between dark dots
12.5. Proximity of Pixel Defects
Because pixel and sub-pixels defects of the same type that are nearby one another may be more noticeable, Philips also specifies tolerances for the proximity of pixel defects. In the table below you can find specifications about:
- Allowed amount of adjacent dark dots = (adjacent dark dots = 1 pair of dark dots)
• Minimum distance between dark dots
• Total no. of all defective dots
12.6. Pixel Defect Tolerances
In order to qualify for repair due to pixel defects during the warranty period, a PDP / TFT panel in a Philips Plasma / LCD- display must have pixel or sub-pixel defects exceeding the tolerances listed in the following table.
| BRIGHT DOT EFFECT | ACCEPTABLE LEVEL |
| 1 lit sub pixel | 2 |
| BLACK DOT EFFECT | ACCEPTABLE LEVEL |
| 1 dark sub pixel | 10 |
| TOTAL DOT DEFECTS OF ALL TYPES | 12 |
Note: * 1 or 2 adjacent sub pixel defects = 1 dot defect
12.7. MURA
Dark spots or patches may occasionally appear on some liquid crystal display (LCD) panels. This is known within the industry as Mura, which is a Japanese term for “unevenness.” It is used to describe an irregular pattern or area in which uneven screen uniformity appears under certain conditions. Mura is a result of the deterioration of the liquid crystal alignment layer and is most commonly caused by long-term operation under high ambient temperatures. It is an industry-wide phenomenon and Mura is not repairable. It is also not covered by our warranty terms.
Mura has been around since the introduction of LCD technology and with screens getting bigger and in operation 24/7, many displays are running in low light conditions. This all adds to the possibility of Mura affecting displays.
HOW TO SPOT MURA
There are many symptoms of Mura and also multiple causes. Several of these are listed below:
- Impurities or foreign particles in the crystal matrix
- Uneven distribution of LCD matrix during manufacturing
• Non-uniform luminance distribution of the backlight
• Panel assembly induced stress - Flaws within the LCD cells
• Thermal induced stress - high temperature operation over long periods of time
HOW TO AVOID MURA
Although we can not guarantee the complete eradication of Mura every time, in general the appearance of Mura can be minimized by these methods:
• Lower the backlight brightness
• Use a screen saver
- Reduce the ambient temperature around the unit
13. Cleaning and Troubleshooting
13.1. Cleaning
Caution When Using the Display
- Do not bring your hands, face or objects close to the ventilation holes of the display. The top of the display is usually very hot due to the high temperature of exhaust air being released through the ventilation holes. Burns or personal injuries may occur if any body parts are brought too close. Placing any object near the top of the display could also result in heat related damage to the object as well as the display itself.
- Be sure to disconnect all cables before moving the monitor. Moving the monitor with its cables attached may damage the cables and thus cause fire or electric shock.
- Disconnect the power plug from the wall outlet as a safety precaution before carrying out any type of cleaning or maintenance procedure.
Front Panel Cleaning Instructions
- The front of the display has been specially treated. Wipe the surface gently using only a cleaning cloth or a soft, lint-free cloth.
- If the surface becomes dirty, soak a soft, lint-free cloth in a mild detergent solution. Wring the cloth to remove excess liquid. Wipe the surface of the display to remove dirt. Then use a dry cloth of the same type to dry.
- Do not scratch or hit the surface of the panel with fingers or hard objects of any kind.
- Do not use volatile substances such as insert sprays, solvents and thinners.
Cabinet Cleaning Instructions
- If the cabinet becomes dirty, wipe the cabinet with a soft, dry cloth.
- If the cabinet is extremely dirty, soak a lint-free cloth in a mild detergent solution. Wring the cloth to remove as much moisture as possible. Wipe the cabinet. Use another dry cloth to wipe over until the surface is dry.
- Do not use solution that contains oil to clean the plastic parts. Such product damage the plastic parts and void the warranty.
- Do not allow any water or detergent to come into contact with the surface of the display. If water or moisture gets inside the unit, operating problems, electrical and shock hazards may result.
- Do not scratch or hit the cabinet with fingers or hard objects of any kind.
- Do not use volatile substances such as insert sprays, solvents and thinners on the cabinet.
- Do not place anything made from rubber or PVC near the cabinet for any extended periods of time.
13.2. Troubleshooting
| Symptom | Possible Cause | Remedy |
| No picture is displayed | 1. The power cord is disconnected.2. The main power switch on the back of the display is not switched on.3. The selected input has no connection.4. The display is in the standby mode. | 1. Plug in the power cord.2. Make sure that the power switch is switched on.3. Connect a signal connection to the display. |
| Interference displayed on the display or an audible noise is heard | Caused by surrounding electrical appliances or fluorescent lights. | Move the display to another location to see if the interference is reduced. |
| Color is abnormal | The signal cable is not connected properly. | Make sure that the signal cable is attached firmly to the back of the display. |
| Picture is distorted with abnormal patterns | 1. The signal cable is not connected properly.2. The input signal is beyond the capabilities of the display. | 1. Make sure that the signal cable is attached firmly.2. Check the video signal source to see if it is beyond the range of the display. Please verify its specifications with this display's specification section. |
| Display image doesn't fill up the full size of the screen | 1. The zoom mode is not set correctly.2. Scan Mode may be set incorrectly to underscan.3. If the image exceeds the screen size, Scan Mode may need to be set to Underscan. | Use the Zoom mode or Custom zoom function in the Screen menu to fine tune display geometry and time frequency parameter. |
| Can hear sound, but no picture | Source signal cable is connected improperly. | Make sure that both video inputs and sound inputs are correctly connected. |
| Can see picture but no sound is heard | 1. Source signal cable is connected improperly.2. Volume is turned all the way down.3. {Mute} is turned on.4. No external speaker is connected. | 1. Make sure that both video inputs and sound inputs are connected correctly.2. Press [+] or [−] button to hear sound.3. Switch MUTE off by using the [◀×] button.4. Connect external speakers and adjust the volume to a suitable level. |
| Some picture elements do not light up | Some pixels of the display are off. | This display is designed using an extremely high level of precision technology: however, sometimes some pixels of the display may not display. This is not a malfunction.. |
| After-Images can still be seen on the display after the display is powered off. (Examples of still pictures include logos, video games, computer images, and images displayed in 4:3 normal mode) | A still picture is displayed for an over extended period of time | Do not allow a still image to be displayed for an extended period of time as this can cause a permanent after-image to remain on the display. |
| How to setup the settings in the menu to control all the monitors at the same time and individually via RC? | Daisy chained by RS232 and no IR cable | 1. The first display sets as “Primary” on OSD (Advanced option/IR control item), others set as “Secondary”.2. The setup OSD will show on top left side of the display.(Toggle MENU will show again if it disappear)3. Default setting: ID NO: 0, GP NO: 0, this setting can control all displays by IR.The “+”, “-” can change “ID NO” to control signal display by “Monitor ID”.The “UP”, “DOWN” can change “GP NO” to control multi-display by “Group ID”.*The first display is always controlled by IR. |
| How is the RC working? | Daisy chain: no connection of RS232 and IR cable | No setting is required. Connect with IR cables and control by IR.*This may cause out-of-synchronizm phenomenon. It is suggested to use the above settings with RS-232 cable. |
14. Technical Specifications
Display:
| Item | Specifications | ||
| 65BDL4152E | 75BDL4152E | 86BDL4152E | |
| Screen Size (Active Area) | 163.9 cm / 64.5 inches | 189.3 cm / 74.5 inches | 217.4 cm / 85.6 inches |
| Aspect Ratio | 16:9 | 16:9 | 16:9 |
| Number of pixels | 3840 (H) x 2160 (V) | 3840 (H) x 2160 (V) | 3840 (H) x 2160 (V) |
| Pixel pitch | 0.372(H) x 0.372 (V) [mm] | 0.4296 (H) x 0.4296 (V) [mm] | 0.4935 (H) x 0.4935 (V) [mm] |
| Displayable colors | 1.07 Billion colors | 1.07 Billion colors | 1.07 Billion colors |
| Brightness (typical) | 350 cd/m2 | 350 cd/m2 | 350 cd/m2 |
| Contrast ratio (typical) | 1200:1 | 1200:1 | 4000:1 |
| Viewing angle | 178 degrees | 178 degrees | 178 degrees |
In/Out Terminals:
| Item | Specifications | |
| Speaker Output | Internal Speakers | 15W (L) + 15W (R) [RMS]/8Ω82 dB/W/M/160 Hz - 13 KHz |
| Audio Output | 3.5mm phone jack x 1 | 0.5V [rms] (Normal) / 2 Channel (L+R) |
| RS232 | 3.5mm phone jack x 2 | RS232 in / RS232 out |
| RJ-45 | RJ-45 Jack x 2 (8 pin) | 10/100 LAN port |
| HDMI Input | HDMI Jack x 3(Type A) (19 pin) | Digital RGB: TMDS (Video + Audio)MAX: Video - 720p, 1080p, 3840 x 2160/60 HzAudio - 48 KHz/ 2 Channel (L+R)Supports LPCM only |
| HDMI Output | HDMI Jack x 1(Type A) (19 pin) | Digital RGB: TMDS (Video + Audio)MAX: Video - 720p, 1080p, 3840 x 2160/60 HzAudio - 48 KHz/ 2 Channel (L+R)Supports LPCM only |
| IR Input/Output | 3.5mm x 2 | IR pass through |
| Micro USB | Micro USB | |
| USB-B | USB-B x2 | Connect touch function to external PC |
| USB Input | USB2.0 TypeA x1 | USB 2.0, Multimedia play |
| USB Input | USB3.0 TypeA x2 | USB 3.0, Multimedia play and service port |
| USB C | Type C : 65w x2 | Power Delivery: 5V/3A , 9V/3A,12V/3A,15V/3A,20V/3.25A |
General:
| Item | Specifications | ||
| 65BDL4152E | 75BDL4152E | 86BDL4152E | |
| Power Input | 100 - 240V~, 50/60Hz | 100 - 240V~, 50/60Hz | 100 - 240V~, 50/60Hz |
| Power Consumption (Max) | TBD W | TBD W | TBD W |
| Power Consumption (Typ.) | TBD W | TBD W | TBD W |
| Power Consumption (Standby mode & Off mode) | <0.5 W | <0.5 W | <0.5 W |
| AC Switch Off Mode (W) | 0 W | 0 W | 0 W |
| Dimensions (Without Stand) [W x H x D] | TBD mm | TBD mm | TBD mm |
| Weight (Without Stand) | TBD Kg | TBD Kg | TBD Kg |
| Gross Weight (Without Stand) | TBD Kg | TBD Kg | TBD Kg |
Environmental Condition:
| Item | Specifications | |
| Temperature | Operational | 0 - 40°C |
| Storage | -20 - 60°C | |
| Humidity | Operational | 20 - 80% RH (No condensation) |
| Storage | 5 - 95% RH (No condensation) | |
| Altitude | Operational | 0 - 3,000 m |
| Storage / Shipment | 0 - 9,000 m | |
Warranty policy for Philips Professional Display Solutions
Thank you for purchasing this Philips product. Philips products are designed and manufactured with high standards and deliver high quality performance, ease of use and ease of installation. If you encounter any difficulties while using your product, we recommend that you first consult the user manual or the information in the support section of the website, where (depending on the product type) you may find a downloadable user manual, frequently asked questions, instruction videos or a support forum.
LIMITED WARRANTY
In the unlikely event the product requires service, we will arrange for your Philips product to be serviced free-of-charge within the warranty period, provided that the product was used in accordance with the user manual (e.g. in the intended environment).
For these product categories, a partner company of Philips is the warrantor of the product. Please check the documentation supplied with your product.
WHO IS COVERED?
Your Warranty coverage begins from the first date of purchase of the product. You need to provide proof of purchase to receive warranty service. A valid sales receipt or other valid document showing that you purchased the product is considered proof of purchase.
WHAT IS COVERED?
If any defect due to faulty materials and/or workmanship occurs within the warranty period, we will make arrangements for a free of charge service. Where a repair is not possible or not commercially viable, we may replace the product with a new or equivalent refurbished product with similar functionality. Replacement will be offered at our discretion and the warranty will continue from the date of original purchase of the first date of purchase of the product. Please note that all parts, including repaired and replaced parts, are covered only for the duration of the original warranty period.
WHAT IS EXCLUDED? Your warranty does not cover:
- Consequential damages (including but not limited to loss of data or loss of income), nor compensation for activities done by yourself, such as regular maintenance, installing firmware updates or saving or restoring data (Some states do not allow the exclusion of incidental or consequential damages, so the above exclusion may not apply to you. This includes, but is not limited to, prerecorded material, whether copyrighted or not copyrighted.)
- Labor charges for installation or setup of the product, adjustment of customer controls on the product, and installation or repair of various types of external devices (e.g., WiFi, antenna, USB dongles, OPS type devices) and other systems outside of the product.
- Reception problems caused by signal conditions or cable or antenna systems outside the unit.
- A product that requires modification or adaptation to enable it to operate in any country other than the country for which it was designed, manufactured, approved and/or authorized, or repair of products damaged by these modifications.
- If the model or production number on the product has been altered, deleted, removed or made illegible.
The warranty applies on condition that the product has been handled properly for its intended use and in accordance with the operating instructions
To Obtain Warranty Service And Information
For detailed warranty coverage information and additional support requirement and help line, please contact the seller and/or system integrator you purchased the product from. Please note in the USA, this limited warranty is only valid for Products purchased in the Continental United States, Alaska, and Hawaii.
Before Requesting Service
Please check your user's manual before requesting service. Adjustments of the controls discussed there may save you a service call.
WARRANTY PERIOD
Warranty period for PHILIPS signage display is listed as below, for areas not covered in this table, please follow their warranty statement.
Standard warranty period for PHILIPS signage display is listed as below, for areas not covered in this table, please follow the local warranty statement.
| Region | Standard Warranty Period |
| USA, Canada | 3 years |
| China | 1 year |
| Japan | 3 years |
| Rest of world | 3 years |
| Mexico | 3 years |
| Brazil | 3 years |
| Chile | 3 years |
| Peru | 3 years |
Note that for professional products, the specific warranty terms of the sale- or purchase agreement may apply.
Index
A
AC Switch Cover 23
Android Settings 68
B
Browser 34
C
Change Picture Format 30
Cleaning and Troubleshooting 73
Connecting a PC 24
Connecting Audio Equipment 25
Connecting External Equipment 24
Connecting External Equipment (Multimedia Player) 24
Connecting Multiple Displays in a Daisy-chain Configuration 26
Control Panel 15
H
Handling the remote control 17
|
Input Mode 70
Input/Output Terminals 16
Inserting the batteries in the remote control 17
Installation Notes 13
IR connection 26
IR Pass-through Connection 27
L
Launcher 30
M
Media Player 31
Mounting on a Wall 14
N
Navigating the OSD Menu 64
O
Operating range of the remote control 17
Operation 30
OSD Menu 64
OSD Menu Overview 64
P
Package Contents 13
Parts and Functions 15
PDF Player 38
Pixel Defect Policy 71
R
Remote Control 18
S
Safety Instructions 1
Setting UI 51
Side Bar 46
Supported Media Formats 69
T
Technical Specifications 76
Touch Operation 28
U
Unpacking 11
Unpacking and Installation 11
USB Cover 22
W
Warranty policy for Philips Professional Display Solutions 78
Watch the Connected Video Source 30

2024 © TOP Victory Investments Ltd. All rights reserved.
This product has been manufactured by and is sold under the responsibility of Top Victory Investments Ltd., and Top Victory Investments Ltd. is the warrantor in relation to this product. Philips and the Philips Shield Emblem are registered trademarks of Koninklijke Philips N.V. and are used under license.
Specifications are subject to change without notice.
Version: V0.01 2023-12-15