
MOJ-DC500 - Dashcam Skybell - Free user manual and instructions
Find the device manual for free MOJ-DC500 Skybell in PDF.
| Product Type | Dashcam (dashboard camera) |
| Brand | Skybell |
| Model | MOJ-DC500 |
| Dimensions (approx.) | 10 cm × 5 cm × 3 cm |
| Weight (approx.) | 80 g |
| Power supply | 12 V cigarette lighter adapter or 5 V USB |
| Recording resolution | Full HD 1080p |
| Viewing angle | 170° wide angle |
| Night vision | Yes, infrared |
| Motion detection | Yes, built-in |
| Storage | microSD card (not included) up to 32 GB |
| Built-in battery | Lithium-ion, battery life about 30 min |
| Main features | Loop recording, impact detection, timestamp |
| Care and cleaning | Clean the lens with a soft, lint-free cloth. Avoid solvents. |
| Safety | Do not expose to temperatures above 60 °C or below -10 °C. Keep at least 20 cm away from the body. |
| Spare parts and repairability | Mounting bracket, power cable, power adapter: available separately. |
| General information | Compliant with Industry Canada CNR standards. ISED certified. |
Frequently Asked Questions - MOJ-DC500 Skybell
User questions about MOJ-DC500 Skybell
0 question about this device. Answer the ones you know or ask your own.
Ask a new question about this device
Download the instructions for your Dashcam in PDF format for free! Find your manual MOJ-DC500 - Skybell and take your electronic device back in hand. On this page are published all the documents necessary for the use of your device. MOJ-DC500 by Skybell.
USER MANUAL MOJ-DC500 Skybell
Secure. Intelligent. Professional Grade.
Product Overview
The TrakView dashcam is an all-in-one, OBD-II powered Dashcam that features 4G LTE connectivity, GPS, dual-facing HD cameras, up to 256 GB of storage, and with vehicle diagnostics plus built-in ADAS capabilities. The TrakView Dashcam delivers high-value use cases for both consumers and fleets, with access to real-time location tracking data, video monitoring services, and vehicle health insights.
The TrakView Dashcam is designed to mount to the vehicle's front windshield. Power is provided to the Dashcam via the OBD-II port. In the case when the ignition is OFF, the Dashcam is powered by its internal battery. The camera has two 2MP camera sensors to provide a forward-facing view of traffic and a rear-facing view of the driver and passenger compartment. Video images, location data, and vehicle performance information are sent to the Cloud via a 4G modem. This information can be monitored and viewed using the Mojio Force mobile application (iOS and Android). Recording can be initiated by pushing the REC button on the rear or remotely via the App. The rear LED indicators display the product's current operating status and error conditions.
Technical Specifications
Power
5VDC via USB-C port
Cellular Connection
Cat4 LTE: Bands 2, 4, 12, 17, 66, 71 (carrier dependent)
Imaging
Front Camera: Color, 1937 x 1097, 2.1MP
Interior Camera: Color, 1920 x 1080, 2.1 MP
Video
Front Camera Video: 480p/720p/1080p H.264 @30fps, H.264
Interior Camera Video: 480p/720p H.264 @30fps, H.264
Mounting
Suction cup attachment to windshield
Mobile Application
Mojio Force; Supports Android 8.1 or iOS 9.0 or later
LED Indicator
Front panel, back-lit RGB. Colors are user selectable.
Audio
Speaker: Built-in, 1 watt
Microphone: Omni-directional, -42 +/- 3 dB
Technical Specifications, cont.
Memory
Micro SD Card, 64 GB to 256 Gb
Front LED Indicator
REC - red
Rear LED Indicators
REC-red
PWR - red/amber
LTE-red/green
Finish/Color
Matte and high gloss black
Dimensions
h: 6.2in/157mm, w: 3.9in/99mm, d: 2.1in/53mm Weight: 8.5oz/240g
Environment
-5°C to 50°C / 23°F to 122°F
LED Indicators and Key Features
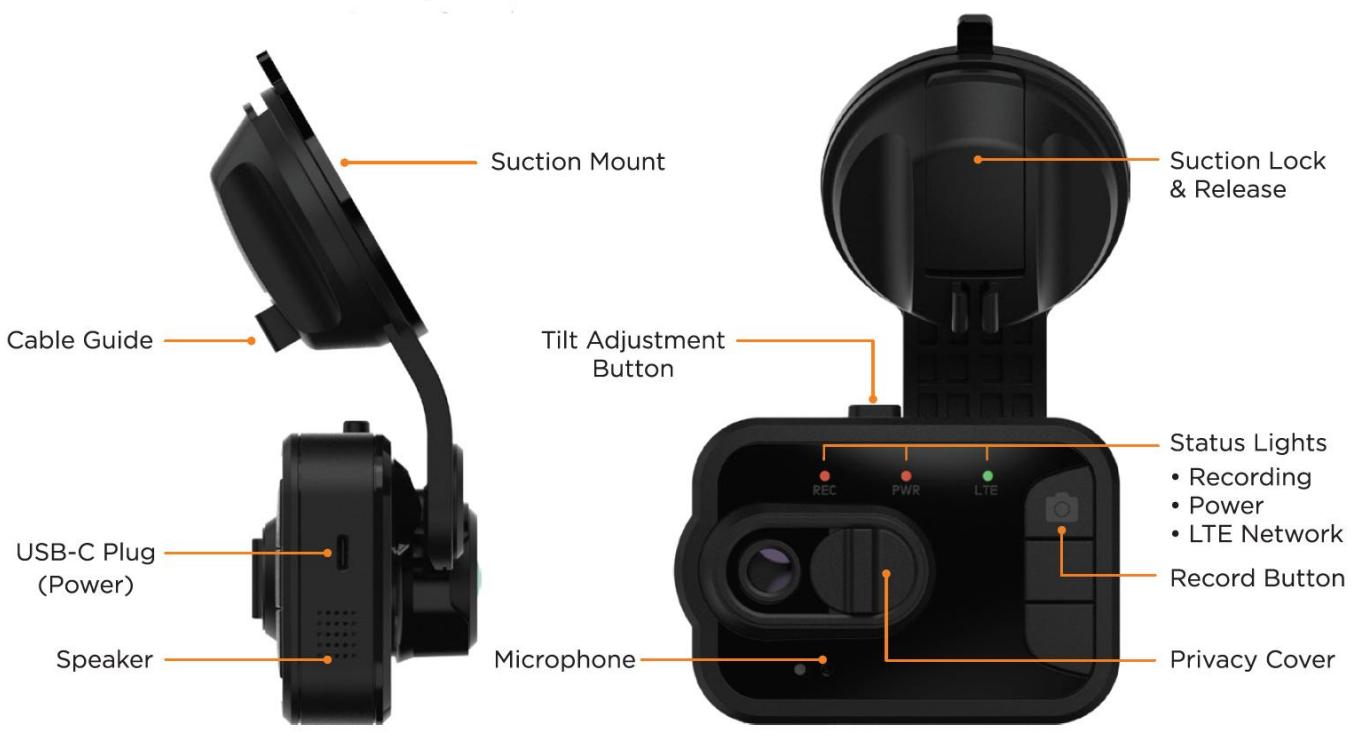
When the REC LED is illuminated (solid) red, the dashcam is in normal recording mode.
When the REC LED is flashing (rapid) red, the SD card is missing or there is an SD card memory error.
When the REC LED is flashing (moderate) red, the dashcam is in event recording mode.
When the PWR LED is illuminated (solid) red, the dashcam is ON and powered by the vehicle. When the PWR LED is illuminated (solid) amber, the dashcam is running from its internal battery.
When the PWR LED is flashing (slow) red, the dashcam is in standby mode.
SKYBELL
TECHNOLOGIES, INC.
When the LTE LED is flashing (moderate) green, there is an active connection to the LTE network.
When the LTE LED is flashing (fast) green, an LTE connection is established.
When the LTE LED is illuminated (solid) red, there is no connection to the LTE network
SKYBELL
TECHNOLOGIES, INC.
Installation and Set Up
- If you don't have the Force by Mojio App, scan the QR code below to install it on your smartphone (iOS or Android).


Download on the App Store

GET IT ON Google Play
- Sign into your account and follow the prompts to activate your dashcam and complete the setup.
- Plug one end of the supplied USB-C cable into the dashcam. Plug the other end of the USB-C cable into the OBD-II dongle.
- With the engine OFF, plug the OBD-II dongle into the vehicle's ODB-II port.
- Turn the engine ON to activate the dashcam and cellular connection. A live video stream should be viewable in the phone App.
- The TrakView Dashcam mounts to the front windshield. Select a location near the rear-view mirror that will not interfere with the mirror nor block the driver's view of the roadway.
- Press and hold the tilt adjustment button to achieve the proper up/down angle for the dashcam.
- Certain states or jurisdictions may restrict the placement of the dashcam in certain locations. Please refer to your local Department of Transportation (DOT) website for more details.
- Once a suitable location has been determined, clean the windshield surface
SKYBELL
TECHNOLOGIES, INC.
with alcohol and allow the surface to fully dry. Release the suction cup lock and push the suction cup against the clean windshield area.
- When satisfied with the dashcam's positioning, lock the suction mount.
- Use the provided cable tuck tool to hide the USB-C cable under the vehicle's window trim.

- Always pay careful attention to the road while driving
- Do not drive distracted
Refer to your vehicle's warning and indicator lights for the most current diagnostic information - Always consult the owner's manual for maintenance guidelines
Need additional help? Scan the QR code below to watch our installation video and access additional resources.

FCC Statement:
This device complies with part 15 of the FCC Rules. Operation is subject to the following two conditions:
(1) This device may not cause harmful interference, and
(2) this device must accept any interference received, including interference that may cause undesired operation.
Warning: Any Changes or modifications not expressly approved by the party responsible for compliance could void the user's authority to operate the equipment.
This transmitter must not be co-located or operating in conjunction with any other antenna or transmitter.
Note: This equipment has been tested and found to comply with the limits for a Class B digital device, pursuant to part 15 of the FCC Rules. These limits are designed to provide reasonable protection against harmful interference in a residential installation. This equipment generates uses and can radiate radio frequency energy and, if not installed and used in accordance with the instructions, may cause harmful interference to radio communications. However, there is no guarantee that interference will not occur in a particular installation. If this equipment does cause harmful interference to radio or television reception, which can be determined by turning the equipment off and on, the user is encouraged to try to correct the interference by one or more of the following measures:
- Reorient or relocate the receiving antenna.
- Increase the separation between the equipment and receiver.
- Connect the equipment into an outlet on a circuit different from that to which the receiver is connected.
- Consult the dealer or an experienced radio/TV technician for help.
This equipment complies with FCC radiation exposure limits set forth for an uncontrolled environment. This equipment should be installed and operated with a minimum distance of 20~cm between the radiator and your body.
ISED Statement:
This device complies with Industry Canada license-exempt RSS standard(s).Operation is subject to the following two conditions: (1) This device may not cause interference, and (2) This device must accept any interference, including interference that may cause undesired operation of the device.
This equipment complies with ISED radiation exposure limits set forth for an uncontrolled environment. This equipment should be installed and operated with a minimum distance of 20 cm between the radiator and your body.
RF Exposure Statement:
The distance between the user and the Dashcam should be no less than 20 cm.