6507R - Remote control vehicle Traxxas - Free user manual and instructions
Find the device manual for free 6507R Traxxas in PDF.

User questions about 6507R Traxxas
0 question about this device. Answer the ones you know or ask your own.
Ask a new question about this device
Download the instructions for your Remote control vehicle in PDF format for free! Find your manual 6507R - Traxxas and take your electronic device back in hand. On this page are published all the documents necessary for the use of your device. 6507R by Traxxas.
USER MANUAL 6507R Traxxas
MODELS/MODELES6507R,6509R
TRAAS
OWNER'S MANUAL
MANUEL DU PROPRIÉTAIRE
WARRANTY AND PRECAUTIONS
4 TRANSMITTER AND RECEIVER
5 GETTING STARTED
Basic Adjustments 5
Battery Installation 6
Model Profiles.. 6
Binding Instructions. 8
Traxxas Stability Management ..8
9 ADVANCED
TUNING GUIDE
Available Tuning Adjustments...9
Traxxas Link Wireless Module..12
Transmitter LED Codes. 14
Traxxas Link Model Memory....15
16 MENU TREE5
Entire contents ©2022 Traxxas.
Other brand names and marks are the property of their respective holders and are used only for purposes of identification. No part of this manual may be reproduced or distributed in print or electronic media without the express written permission of Traxxas. Specifications are subject to change without notice.
Important Radio System Precautions
- For maximum range, always point the front of the transmitter toward the model.
- Do not kink the receiver's antenna wire. Kinks in the antenna wire will reduce range.
- DO NOT CUT any part of the receiver's antenna wire. Cutting the antenna will reduce range.
- Extend the antenna wire in the model as far as possible for maximum range. It is not necessary to extend the antenna wire out of the body, but wrapping or coiling the antenna wire should be avoided.
- Do not allow the antenna wire to extend outside the body without the protection of an antenna tube, or the antenna wire may get cut or damaged, reducing range. It is recommended to keep the wire inside the body (in the antenna tube) to prevent the chance of damage.
- To prevent loss of radio range do not kink or cut the black wire, do not bend or cut the metal tip, and do not cut the white wire at the end of the metal tip.
Warranty Information
Traxxas warrants your Traxxas electronic components to be free from defects in materials or workmanship for a period of thirty (30) days from the date of purchase. Before returning any product for warranty service, please contact our service department at 1-888-TRAXXAS (U.S. residents only) to discuss the problem you are having with the product. After contacting Traxxas, send the defective unit along with your proof of purchase indicating the date purchased, your return address, e-mail, a daytime phone number, and a brief description of the problem to:
Traxxs, 6250 Traxxs Way, McKinney, Texas 75070
Phone: 972-549-3000 Internet: Traxxs.com E-mail: support@Traxxs.com
Detailed Limitations for Electronic Components:
- Allowing water, moisture, or other foreign material to enter the component or get onto the PC board.
- Exceeding the maximum input voltage of the electronic component.
- Reverse voltage application.
- Incorrect installation or wiring.
- Components worn from use.
Splices to the input or switch harnesses. - Disassembling the case.
- Excessive force when adjusting, pressing, or turning any of the controls.
- Tampering with the internal electronics.
- Incorrect wiring of an FET servo.
- Allowing exposed wiring to short circuit.
- Any damage caused by crash, flooding, or act of God.
Limitations
Any and all warranty coverage does not cover replacement of parts and components damaged by abuse, neglect, improper or unreasonable use, crash damage, water or excessive moisture, chemical damage, improper or infrequent maintenance, accident, unauthorized alteration or modification, or items that are considered consumable. Traxxas will not pay for the cost of shipping or transportation of a defective component from you to us.
Limitations of Liability
Traxxas makes no other warranties expressed or implied. Traxxas shall not be liable for any special, indirect, incidental, or consequential damages arising out of the assembly, installation, or use of their products or any accessory or chemical required to use their products. By the act of operating/using the product, the user accepts all resulting liability. In no case shall Traxxas' liability exceed the actual purchase price paid for the product. Traxxas reserves the right to modify warranty provisions without notice. All warranty claims will be handled directly by Traxxas. The Traxxas warranty gives the customer specific legal rights and possibly other rights that vary from state to state. All dollar amounts stated are in United States
dollars. The term "lifetime" shall refer to the product's production life at Traxxas. Traxxas is not obligated to provide upgraded products at a reduced rate when a previous product's production cycle has ended.
Traxxas encourages you to register your model online at Traxxas.com/register.
Traxxas Lifetime Electronics Warranty
After the expiration date of the free warranty period, Traxxas will repair electronic components for a flat rate. The electronic products covered by this extended service plan include electronic speed controls, transmitters, receivers, servos, and battery chargers. Motors, batteries, and mechanical speed controls are not covered. The covered repairs are limited to non-mechanical components that have NOT been subjected to abuse, misuse, or neglect. Products damaged by intentional abuse, misuse, modification, or neglect, may be subject to additional charges. Visit Traxxas.com or call 1-888-TRAXXAS (1-888-872-9927) for details on extended warranty service and rates.
FCC Compliance
This device complies with Part 15 of the FCC Rules. Operation is subject to the following two conditions: (1) this device may not cause harmful interference, and (2) this device must accept any interference received, including interference that may cause undesired operation.
Note: This equipment has been tested and found to comply with the limits for a Class B digital device, pursuant to Part 15 of the FCC Rules. These limits are designed to provide reasonable protection against harmful interference in a residential installation. This equipment generates, uses and can radiate radio frequency energy and, if not installed and used in accordance with the instructions, may cause harmful interference to radio communications. However, there is no guarantee that interference will not occur in a particular installation.
If this equipment does cause harmful interference to radio or television reception, which can be determined by turning the equipment off and on, the user is encouraged to try to correct the interference by one or more of the following measures:
- Reorient or relocate the receiving antenna.
- Increase the separation between the equipment and receiver.
- Connect the equipment into an outlet on a circuit different from that to which the receiver is connected.
- Consult the dealer or an experienced radio/TV technician for help.
WARNING: Changes or modifications not expressly approved by the party responsible for compliance could void the user's authority to operate the equipment.
Firmware Version Identification Number (FVIN)
To locate the FVIN using the Traxxas Link App (see page 12):
From the main screen of the Traxxas Link App, select SUPPORT.
From the SUPPORT screen, select ABOUT.
TQi Transmitter: The FVIN is the first number in the listed version of the TQi Transmitter Subsystem.
- TSM Receiver: The FVIN is the first number in the listed version of the TSM Receiver Subsystem.
Canada, Innovation, Science and Economic Development (ISED) CAN ICES-3 (B)
This device contains license-exempt transmitters that comply with Innovation, Science and Economic Development Canada's license-exempt RSS(s).
Operation is subject to the following two conditions: 1. This device may not cause interference. 2. This device must accept any interference, including interference that may cause undesired operation of the device.
Radio Frequency (RF) Exposure Statement
This equipment complies with FCC/IC RSS-102 radiation exposure limits set forth for an uncontrolled environment. This transmitter must not be co-located or operating in conjunction with any other antenna or transmitter.
6507R - 4-channel with Traxxas Link Wireless Module

6507R Transmitter contains FCC ID: XVE-TRX1018, IC: 8668A-TRX1018 Wireless Module

6509R - 2-channel, Traxxas Link Enabled
6533 - TQi TSM Receiver
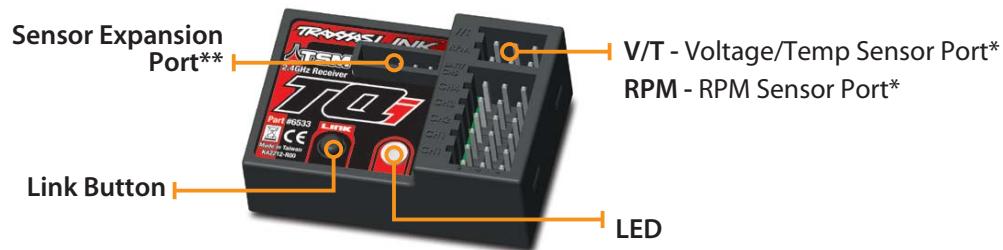
Accessory sensor ports for use with standard voltage/temperature and RPM telemetry sensors.
*Accessory sensor expansion port for use with the Telemetry Expander Module (see Traxxas.com for more information).
Traxxas Link Wireless Module and Traxxas Link App A Traxxas TQi transmitter with the Traxxas Link™ Wireless Module installed is required to set up Traxxas Stability Management (TSM) for your specific vehicle model using the Traxxas Link App. The Traxxas Link Wireless Module (part #6511) is included with the #6507R TQi transmitter (available separately for easy installation in the #6509R TQi transmitter). The Traxxas Link App is available in the Apple App Store™ or on Google Play™. If you do not have the Traxxas Link Wireless module installed, then you will not be able to use the Traxxas Link App to access the specific software for your model. TSM will function, but it will not be optimized for your model and you may experience some unexpected behavior from the vehicle. If you do see undesirable effects, turn the multi-function knob counterclockwise to reduce TSM's assistance until you are satisfied with the performance or turn TSM completely off (see page 8 for additional information).
TQi Radio System Basic Adjustments
Steering Trim
The electronic steering trim located on the face of the transmitter adjusts the neutral (center) point of the steering channel.
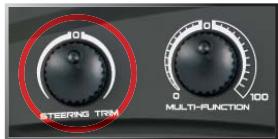
Note: Traxxas Stability Management (TSM) must be completely turned off while adjusting steering trim. See page 8 for TSM adjustments.
Multi-Function Knob
The Multi-Function knob can be programmed to control a variety of functions. From the factory, the Multi-Function knob controls Traxxas Stability
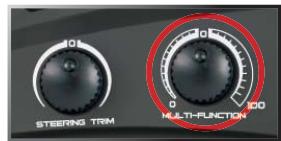
Management (TSM). For more detail on TSM, refer to page 8.
Receiver Installation
For best performance, it is recommended that the receiver be installed in the same orientation as the original receiver (with the label facing upward). Refer to the vehicle owner's manual for additional information, wiring diagrams, and detailed instructions on maintaining a watertight seal.
Use double-sided adhesive foam tape to install the receiver into the receiver box. Once installed, plug the wires into the receiver.
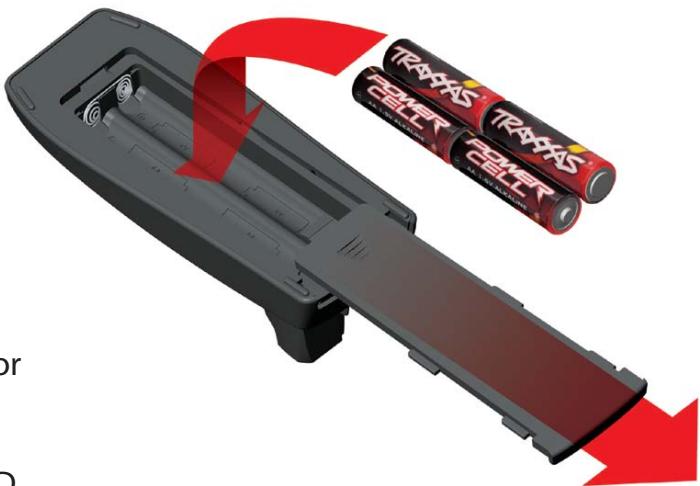
Installing Transmitter Batteries
Your TQi transmitter uses 4 AA batteries. The battery compartment is located in the base of the transmitter.
- Remove the battery compartment door by pressing the tab and sliding the door open.
- Install the batteries in the correct orientation as indicated in the battery compartment.
- Reinstall the battery door and snap it closed.
- Turn on the transmitter and check the status LED for a solid green light.
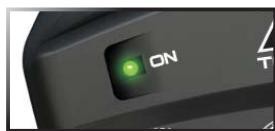
If the status LED flashes red, the transmitter batteries may be weak, discharged or possibly installed incorrectly. Replace with new or freshly charged batteries. The power indicator light does
not indicate the charge level of the battery pack installed in the model. Refer to the Troubleshooting section on page 14 for more information on the transmitter status LED codes.

Use the Right Batteries
Your transmitter uses AA batteries. Use new alkaline batteries. Do not use rechargeable AA cells to power the TQi transmitter, as they will not provide sufficient voltage for optimum transmitter performance.
CAUTION: Discontinue running your model at the first sign of weak batteries (flashing red light on the transmitter) to avoid losing control. Risk of explosion if the battery is replaced by an incorrect type. Replace only with the same or equivalent type recommended by the manufacturer. Dispose of used batteries according to the instructions. Disposal of the battery into fire or a hot oven, or mechanically crushing or cutting of the battery, can result in an explosion. Extremely high temperatures and/or extremely low air pressure can result in an explosion or the leakage of flammable liquid or gas.
Selecting Your Model Profile
The Traxxas Link App includes model profiles and customized Traxxas Stability Management (TSM) settings for each Traxxas model. Download the Traxxas Link App to your Apple® iPhone®, iPad®, iPod touch®, or Android™ device and select your model from the Home screen (see page 12 for additional information).
If you do not have the Traxxas Link Wireless Module installed, then you will not be able to use the Traxxas Link App to access the specific profile for your model and the servo direction will need to be set manually. Follow the instructions on page 16 to change these setting(s) to suit your model.
Using the Traxxas TQi Radio System with non-Traxxas Models
The TQi radio system can be used with all popular servos in any hobby-grade RC vehicle. Follow the instructions on page 16 to change the servo setting(s) to suit your model.
Before installing the TQi radio system in your model, make certain the steering trim knob is centered. After you have installed and bound the radio system, confirm the steering servo and throttle servo (if installed) operate properly: turning the steering wheel right makes the front wheels turn right (and vice-versa), and pulling the trigger to the grip opens the throttle of your nitro engine. If either control operates "backwards," follow the menu tree on page 16 or use the Traxxas Link App to reverse the servo's operation.
After confirming correct servo operation, turn off TSM (see page 8) and use the TQi's steering trim knob to center your model's front wheels so it drives straight with the steering wheel at its neutral position; then, return the multi-function knob to the desired TSM setting.
If there is not enough adjustment to achieve this with the steering trim knob, reset the steering trim to its center position, then remove and reinstall the servo's steering horn to center the steering system as close as possible. The steering trim knob can now be used to make the final adjustments.
Repeat this process for the throttle servo. To access throttle trim, follow the steps in the menu tree on page 16.
If your model is equipped with an electronic speed control, it will have to be calibrated to the TQi radio system. Follow the instructions included with your vehicle or your speed control to calibrate it properly.
Range-Testing the Radio System
Before each running session with your model, you should range-test your radio system to ensure that it operates properly.
- Turn on the radio system and check its operation as described in the previous section.
- Have a friend hold the model. Make sure hands and clothing are clear of the wheels and other moving parts on the model.
- Walk away from the model with the transmitter until you reach the farthest distance you plan to operate the model.
- Operate the controls on the transmitter once again to be sure that the model responds correctly.
- Do not attempt to operate the model if there is any problem with the radio system or any external interference with your radio signal at your location.
Higher Speeds Require Greater Distance
The faster you drive your model, the more quickly it will near the limit of radio range. At 60mph, a model can cover 88 feet every second! It's a thrill, but use caution to keep your model in range. If you want to see your model achieve its maximum speed, it is best to position yourself in the middle of the model's running area, not the far end, so you drive the model towards and past your position. In addition to maximizing the radio's range, this technique will keep your model closer to you, making it easier to see and control.
No matter how fast or far you drive your model, always leave adequate space between you, the model, and others. Never drive directly toward yourself or others.
TQi Binding Instructions
For proper operation, the transmitter and receiver must be electronically 'bound.' This has been done for you at the factory. Should you ever need to re-bind the system or bind to an additional transmitter or receiver, follow these instructions. Note: the receiver must be connected to a 4.8-6.0v (nominal) power source for binding and the transmitter and receiver must be within 5 feet of each other.
- Press and hold the transmitter's SET button as you switch the transmitter on. The transmitter's LED will flash red slowly. Release the SET button.
- Press and hold the receiver's LINK button as you switch the model on. Release the LINK button.
- When the transmitter's and receiver's LEDs turn solid green, the system is bound and ready for use. Confirm that the steering and throttle operate properly before driving your model.
TRAXXAS STABILITY MANAGEMENT (TSM)

Your radio system is equipped Traxxas Stability Management or TSM. TSM allows you to experience all the speed and acceleration that was engineered into your Traxxas model
by helping you to maintain control of the vehicle in low-traction situations. TSM helps provide straight ahead full-throttle acceleration on slippery surfaces, without fishtailing, spinouts, or loss of control. TSM also dramatically improves braking control. High speed cornering and control is also made possible as TSM makes corrections for you, without intruding on your fun, or creating unexpected side effects.
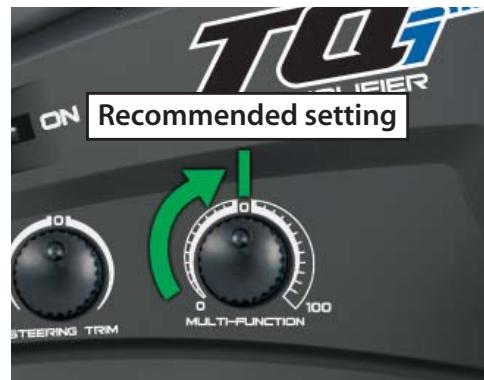
The Multi-Function knob on the TQi transmitter has been programmed to control TSM. The recommended (default) setting for TSM is to rotate the knob to the 12:00 position (the zero mark on the dial).
Turn the knob clockwise to increase assistance; turn the knob counterclockwise to decrease assistance. Turn the knob counterclockwise to its stop to turn TSM completely off. Note: TSM is deactivated automatically when driving or braking in reverse.
When driving on surfaces with some traction, decrease the TSM setting to allow the vehicle to feel more
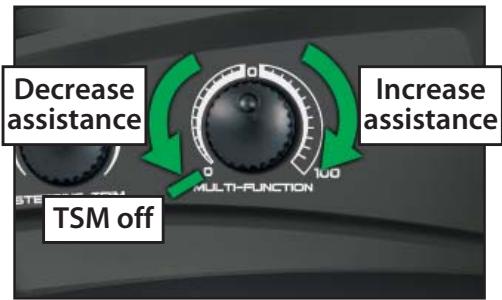
"loose" for power sliding, drifting, and so on. On surfaces with very little traction (loose dirt, smooth concrete, ice/snow), increase TSM to maximize acceleration and control.
Drive with TSM on and off to test how it is making your control of the vehicle easier and more precise. For more information, visit Traxxas. com/tsm.
Note: TSM must be completely turned off while adjusting steering trim.
Available Tuning Adjustments
All the features described below may also be accessed using the menu and set buttons on the transmitter and observing signals from the LED. An explanation of the menu structure follows on page 16. The following items can be adjusted most easily using your mobile device with the Traxxas Link Wireless Module and the Traxxas Link App (see page 12).
Your Traxxas transmitter has a programmable Multi-Function knob that can be set to control various advanced transmitter functions (set to Traxxas Stability Management (TSM) by default, see page 8). Experiment with the settings and features to see if they can improve your driving experience.
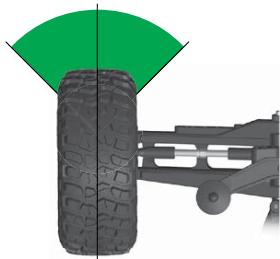
Steering Sensitivity (Exponential)
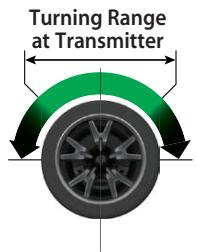
The Multi-Function knob on the TQi transmitter can be set to control Steering Sensitivity (also known as exponential). The standard setting for Steering Sensitivity is "normal (zero exponential)," with the dial full left in its range of travel. This setting provides linear servo response: the steering servo's movement will correspond exactly with the input from the transmitter's steering wheel. Turning the knob clockwise from center will result in "negative exponential" and decrease steering sensitivity by making the servo less responsive near neutral, with increasing sensitivity as the servo nears the limits of its travel range. The farther you turn the knob, the more pronounced the change in steering servo movement will be. The term "exponential" comes from this effect; the servo's travel changes exponentially relative to the input from the steering wheel. The exponential effect is indicated as a percentage—the greater the percentage, the greater the effect. The illustrations below show how this works.
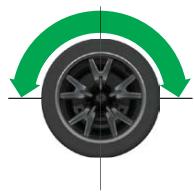
Normal Steering Sensitivity (0% exponential):
In this illustration, the steering servo's travel (and with it, the steering motion of the model's front wheels) corresponds precisely with the steering wheel. The ranges are exaggerated for illustrative purposes.
Decreased Steering Sensitivity (Negative Exponential):
By turning the Multi-Function knob clockwise, the steering sensitivity of the model will be decreased. Note that a relatively large amount of steering wheel travel results in a smaller amount of servo travel. The farther you turn the knob, the more pronounced the effect becomes. Decreased steering sensitivity may be helpful when driving on low-traction
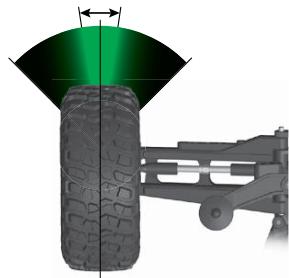
Effective Turning Range on Model
surfaces, when driving at high speed, or on tracks that favor sweeping turns where gentle steering inputs are required. The ranges are exaggerated for illustrative purposes.
Throttle Sensitivity (Throttle Exponential)
The Multi-Function knob can be set to control Throttle Sensitivity. Throttle Sensitivity works the same way as Steering Sensitivity, but applies the effect to the throttle channel. Only forward throttle is affected; brake/reverse travel remains linear regardless of the Throttle Sensitivity setting.
Steering Percentage (Dual Rate)
The Multi-Function knob can be set to control the amount (percentage) of servo travel applied to steering. Turning the Multi-Function knob fully clockwise will deliver maximum steering throw; turning the knob counterclockwise reduces steering throw (note: turning the dial counterclockwise to its stop will eliminate all servo travel). Be aware that the steering End Point settings define the servo's maximum steering throw. If you set Steering Percentage to 100% (by turning the Multi-Function knob fully clockwise), the servo will travel all the way to its selected end point, but not past it. Many racers set Steering Percentage so they have only as much steering throw as they need for the track's tightest turn, thus making the model easier to drive throughout the rest of the course. Reducing steering throw can also be useful in making a model easier to control on high-traction surfaces, and limiting steering output for oval racing where large amounts of steering travel are not required.
Braking Percentage
The Multi-Function knob may also be set to control the amount of brake travel applied by the servo in a nitro-powered model. Electric models do not have a servo-operated brake, but the Braking Percentage function still operates the same way in electric models. Turning the Multi-Function knob full clockwise will deliver maximum brake throw; turning the knob counterclockwise reduces brake throw (Note: Turning the dial counterclockwise to its stop will eliminate all brake action).
Throttle Trim
Setting the Multi-Function knob to serve as throttle trim will allow you to adjust the throttle's neutral position to prevent unwanted brake drag or throttle application when the transmitter trigger is at neutral.
Note: Your transmitter is equipped with a Throttle Trim Seek mode to prevent accidental runaways. See below for more information.

Throttle Trim Seek Mode
When the Multi-Function knob is set to throttle trim, the transmitter remembers the throttle trim setting. If the throttle trim knob is moved from the original setting while the transmitter is off, or while the transmitter was used to control another model, the transmitter ignores the actual position of the trim knob. This prevents the model from accidentally running away. The LED on the face of the transmitter will rapidly blink green and the throttle trim knob (Multi-Function knob) will not adjust the trim until it is moved back to its original position saved in memory. To restore throttle trim control, simply turn the Multi-Function knob either direction until the LED stops blinking.
Steering and Throttle End Points
The TQi transmitter allows you to choose the limit of the servo's travel range (or its "end point") independently for left and right travel (on the steering channel) and throttle/brake travel (on the throttle channel). This allows you to fine-tune the servo settings to prevent binding caused by the servo moving steering or throttle linkages (in the case of a nitro model) farther than their mechanical limits. The end point adjustment settings you select will represent what you wish to be the servo's maximum travel; the Steering Percentage or Braking Percentage functions will not override the End Point settings.
Steering and Throttle Sub-Trim
The Sub-Trim function is used to precisely set the neutral point of the steering or throttle servo in the event that simply setting the trim knob to "zero" does not completely center the servo. When selected, Sub-Trim allows finer adjustment to the servo output shaft's position for precise setting of the neutral point. Always set the Steering Trim knob to zero before making final adjustment (if required) using Sub-Trim. If Throttle Trim has been previously adjusted, the Throttle Trim will need to be reprogrammed to "zero" before making final adjustment using Sub-Trim.
Setting Lock
Once you've adjusted all of these settings the way you like them, you may want to disable the Multi-Function knob so none of your settings can be changed. This is especially handy if you operate multiple vehicles with a single transmitter via Traxxas Link™ Model Memory.
Multiple Settings and the Multi-Function Knob
It is important to note that settings made with the Multi-Function knob are "overlaid" on top of each other. For example, if you assign the Multi-Function to adjust Steering Percentage and set it for 50% , then reassign the knob to control Steering Sensitivity, the transmitter will "remember" the Steering Percentage setting. Adjustments you make to Steering Sensitivity will be applied to the 50% steering throw setting you selected previously. Likewise, setting the Multi-Function knob to "disabled" will prevent the knob from making further adjustments, but the last setting of the Multi-Function knob will still apply.

Failsafe
Your Traxxas radio system is equipped with a built-in failsafe function that returns the throttle to its last saved neutral position in the event of signal loss. The LED on the transmitter and the receiver will rapidly flash red to indicate the failsafe has been activated.
Traxxas Link Wireless Module
The #6507R TQi transmitter is equipped with the Traxxas Link Wireless Module (part #6511, available separately for easy installation in the #6509R TQi transmitter). This innovative accessory transforms your iPhone®, iPad®, iPod touch®, or Android™ device into a powerful tuning tool that equips your TQi with an intuitive, high-definition, full-color graphical user interface.
Traxxas Link
The powerful Traxxas Link App (available in the Apple App Store or on Google Play™) gives you complete control over the operation and tuning of your Traxxas model with stunning visuals and absolute precision. Install Traxxas Link telemetry sensors on the model, and Traxxas Link displays real-time data such as speed, RPM, temperature, and battery voltage.
Intuitive iPhone, iPad, iPod touch, and Android interface
Traxxas Link makes it easy to learn, understand, and access powerful tuning options. Control Drive Effects settings such as TSM assistance percentage; steering and throttle sensitivity; steering percentage; braking strength; and throttle trim by simply touching and dragging the sliders on the screen.
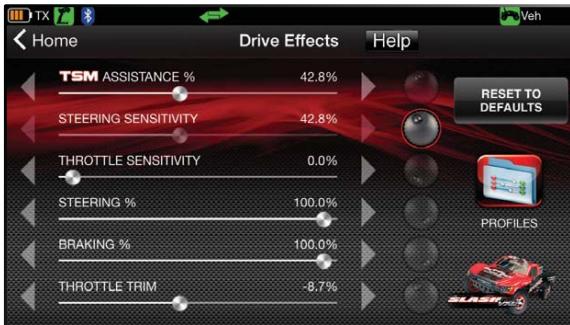
Tap and slide to adjust TSM, Steering Sensitivity, Throttle Trim, Braking Percent, and more!
Real-Time Telemetry
With the installed telemetry sensors, the Traxxas Link dashboard comes to life showing you speed, battery voltage, RPM, and temperature. Set threshold warnings and log maximums, minimums, or averages. Use the recording function to document your dashboard
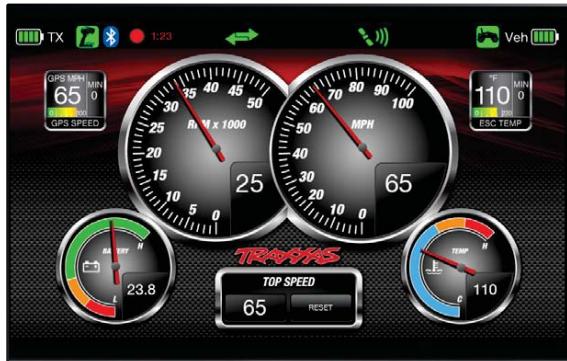
The customizable Traxxas Link dashboard delivers real-time RPM, speed, temperature, and voltage data.
view, with sound, so that you can keep your eyes on your driving and not miss a single apex.
Manage up to 30 Models with Traxxas Link
The TQi radio system automatically keeps track of what vehicles it has bound to and what settings were used for each--up to 30 models total! Traxxas Link provides a visual interface to name the models, customize their settings, attach profiles, and lock them into memory. Simply choose a model and any previously bound transmitter, power them up, and start having fun.
Pairing the TQi transmitter with the Traxxas Link Wireless Module and the Traxxas Link App® for the first time:
- Turn the transmitter switch on.
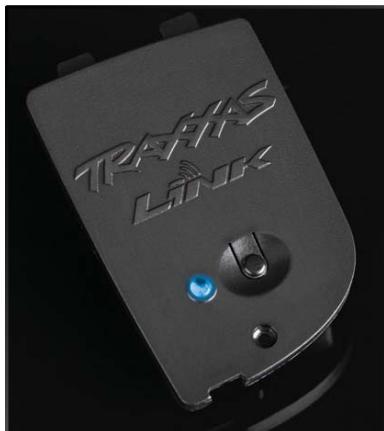
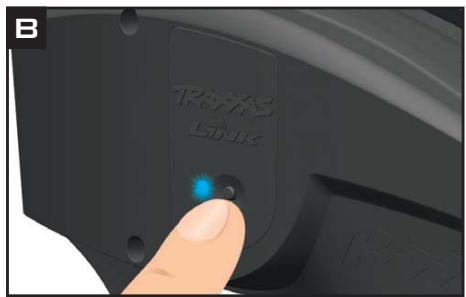
- Open the Traxxas Link App on your mobile device. Touch the Garage button, and then touch the Wireless Module button (A).
- Press the button on the Traxxas Link Wireless Module. The blue LED on the module will blink (B).
- Within 10 seconds, touch the "Press here to search for Traxxas Link Wireless Module" button on your mobile device (C).
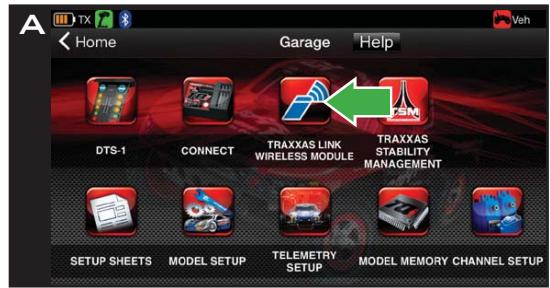
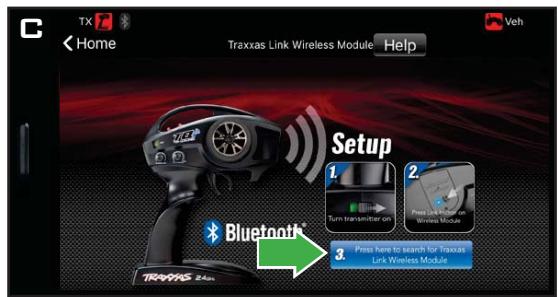
- The Bluetooth® icon in the status bar will turn blue, and the blue LED on the module will glow solid blue (D).
- The Traxxas Link Wireless Module
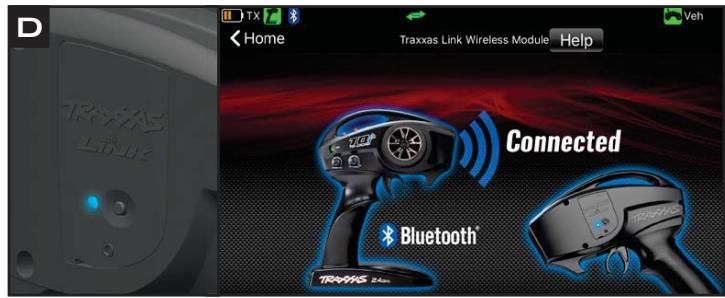
and the Traxxas Link App are now paired, and will automatically connect when the transmitter is turned on and the app is running.
TRAXXAS LINK MODULE LED CODES
| LED Color / Pattern | Name | Notes | |
| ● | Blue LED off | Connecting mode | Traxxas Link App is not running on a paired device. |
| ● | Slow blue (0.5 sec on / 0.5 sec off) | Pairing mode | See above for information on pairing the module with Traxxas Link App. |
| ● | Solid blue | Connected | See page 4 for information on how to use your transmitter controls. |
TRANSMITTER LED CODES
| LED Color / Pattern | Name | Notes | |
| ○ | Solid green | Normal Driving Mode | |
| ○ | Slow red (0.5 sec on / 0.5 sec off) | Binding | See page 8 for more information on binding. |
| ○ | Flashing fast green (0.1 sec on / 0.15 sec off) | Throttle Trim Seek Mode | Turn the Multi-Function knob right or left until the LED stops flashing. See page 10 for more information. |
| ○ | Flashing medium red (0.25 sec on / 0.25 sec off) | Low Battery Alarm | Put new batteries in the transmitter. See page 6 for more information. |
| ○ | Flashing fast red (0.125 sec on / 0.125 sec off) | Link Failure / Error | Transmitter and receiver are no longer bound. Turn the system off and then back on to resume normal operation. Find source of the link failure (i.e., out of range, low batteries, damaged antenna). |
| Programming Patterns | |||
| or x8 | Counts out number (green or red), then pauses | Current menu position | See Menu Tree for more information. |
| Fast green 8 times | Menu setting accepted (on SET) | ||
| x8 | Fast red 8 times | Menu SET invalid | User error such as trying to delete a locked model. |
RECEIVER LED CODES
| LED Color / Pattern | Name | Notes | |
| ● | Solid green | Normal Driving Mode | |
| ● | Slow red (0.5 sec on / 0.5 sec off) | Binding | See page 8 for more information on binding. |
| ● | Flashing fast red (0.125 sec on / 0.125 sec off) | Fail-Safe / Low-Voltage Detect | Consistent Low-Voltage in the receiver triggers Fail-Safe so there is enough power to center the throttle servo before it completely loses power. |
Traxxas Link Model Memory
Traxxas Link Model Memory is an exclusive, patent-pending feature of the TQi transmitter. Each time the transmitter is bound to a new receiver, it saves that receiver in its memory along with all the settings assigned to that receiver. When the transmitter and any bound receiver are switched on, the transmitter automatically recalls the settings for that receiver. There is no need to manually select your vehicle from a list of model memory entries.
Model Lock
The Traxxas Link Model Memory feature can store up to 30 models (receivers) in its memory. If you bind a thirty-first receiver, Traxxas Link Model Memory will delete the "oldest" receiver from its memory (in other words, the model you used the longest time ago will be deleted). Activating Model Lock will lock the receiver in memory so it cannot be deleted.
You may also bind multiple TQi transmitters to the same model making it possible to pick up any transmitter and any previously bound model in your collection and simply turn them on and drive. With Traxxas Link Model Memory, there is no need to remember which transmitter goes with which model, and there is never a need to select any model from a list of model memory entries. The transmitter and receiver do it all for you automatically.
To activate Model Lock:
- Switch on the transmitter and receiver you wish to lock.
- Press and hold MENU. Release when the status LED blinks green.
- Press MENU three times. The status LED will blink green four times repeatedly.
- Press SET. The status LED will blink green in single-flash intervals.
- Press SET once. The status LED will blink red once repeatedly.
- Press MENU once, the LED will blink red twice repeatedly.
- Press SET, the LED will blink rapidly green. The memory is now locked. Press MENU and SET to return to driving mode.
Note: To unlock a memory, press SET twice at step 5. The LED will blink rapidly green to indicate the model is unlocked. To unlock all models, press MENU twice at step 6 and then press SET.
To delete a model:
At some point, you may wish to delete a model you no longer drive from the memory.
- Switch on the transmitter and receiver you wish to delete.
- Press and hold MENU. Release when the status LED blinks green.
- Press MENU three times. The status LED will blink green four times repeatedly.
- Press SET once. The status LED will blink green once repeatedly.
- Press MENU once. The status LED will blink green twice repeatedly.
- Press SET. The memory is now selected to be deleted.
- Press SET to delete the model. Press and hold MENU to return to driving mode.
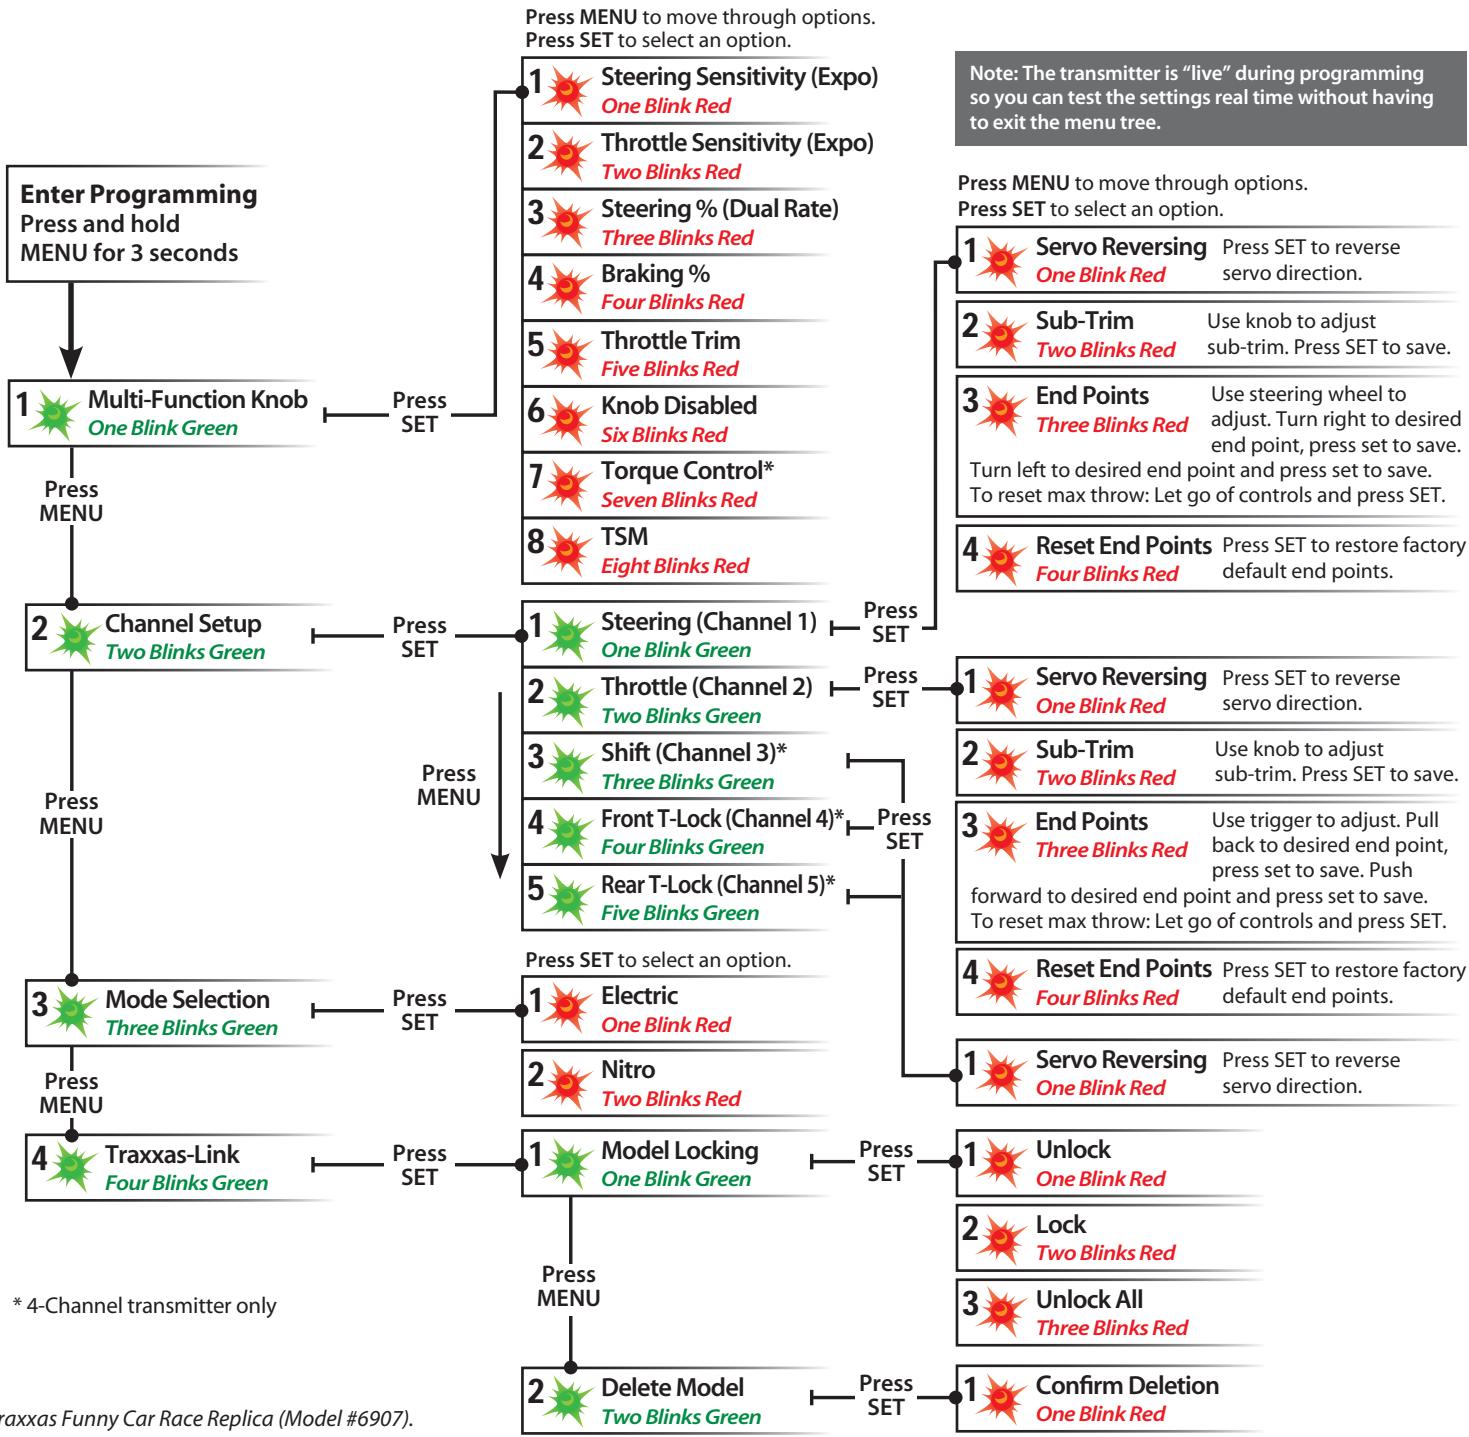
MENUTREE
The menu tree below shows how to navigate through the TQi transmitter's various settings and functions. Press and hold MENU to enter the menu tree, and use the following commands to navigate through the menu and select options.
MENU: When you enter a menu, you always start at the top. Press MENU to move down the menu tree. When you reach the bottom of the tree, pressing MENU again will return you to the top.
SET: Press SET to move across the menu tree and select options. When an option is committed to the transmitter's memory, the status LED will rapidly blink green.
BACK: Press both MENU and SET to go back one level in the menu tree.
EXIT: Press and hold MENU to exit programming. Your selected options will be saved.
ECHO: Press and hold SET to activate the "echo" function. Echo will "play back" your current position on the Menu Tree, should you lose your place. For example: If your current position is Steering Channel End Points, holding SET will cause the LED to blink green twice, green once, and then red three times. Echo will not alter your adjustments or change your position in the programming sequence.
Below is an example of how to access a function in the menu tree. In the example, the user is setting the Multi-Function knob to be a Steering % (Dual-Rate) control.
To set the Multi-Function knob to control STEERING % (DUAL-RATE):
- Switch the transmitter on.
- Press and hold MENU until the green LED lights. It will blink in single intervals.
- Press SET. The red LED will blink in single intervals to indicate Steering Sensitivity (Expo) has been selected.
- Press MENU twice. The red LED will blink three times repeatedly to indicate Steering % (Dual-Rate) has been selected.
- Press SET to select. The green LED will blink 8 times fast to indicate successful selection.
- Press and hold MENU to return to driving mode.
Restoring Factory Defaults:
When programming your transmitter, you may feel the need to start over with a clean slate. See Selecting Your Model Profile on page 6 for instructions.
| Set Multi-Function knob for STEERING SENSITIVITY (Expo) | Press/hold MENU green LED blinks | Press SET red LED blinks | x8 Press SET to confirm green LED blinks (x8) | Press/hold MENU returns to driving mode | |||||
| Set Multi-Function knob for THROTTLE SENSITIVITY (Expo) | Press/hold MENU green LED blinks | Press SET red LED blinks | x2 Press MENU to confirm red LED blinks (x2) | x8 Press SET to select green LED blinks (x8) | Press/hold MENU returns to driving mode | ||||
| Set Multi-Function knob for STEERING DUAL RATE (%) | Press/hold MENU green LED blinks | Press SET red LED blinks | x3 Press MENU twice red LED blinks (x3) | x8 Press SET to select green LED blinks (x8) | Press/hold MENU returns to driving mode | ||||
| Set Multi-Function knob for BRAKING PERCENTAGE (%) | Press/hold MENU green LED blinks | Press SET red LED blinks | x4 Press MENU 3 times red LED blinks (x4) | x8 Press SET to select green LED blinks (x8) | Press/hold MENU returns to driving mode | ||||
| Set Multi-Function knob for THROTTLE TRIM | Press/hold MENU green LED blinks | Press SET red LED blinks | x5 Press MENU 4 times red LED blinks (x5) | x8 Press SET to select green LED blinks (x8) | Press/hold MENU returns to driving mode | Adjust the Multi-Function knob until the LED turns solid green. | |||
| To DISABLE (Lock) the Multi-Function knob | Press/hold MENU green LED blinks | Press SET red LED blinks | x6 Press MENU 5 times red LED blinks (x6) | x8 Press SET to lock green LED blinks (x8) | Press/hold MENU returns to driving mode | ||||
| To REVERSE the direction of STEERING servo | Press/hold MENU green LED blinks | Press SET green LED blinks | x2 Press SET green LED blinks | Press SET to reverse servo direction | x8 Press SET to reverse servo direction | Press/hold MENU returns to driving mode | |||
| To set the SUB-TRIM of the STEERING servo | Press/hold MENU green LED blinks | Press SET green LED blinks (x2) | x2 Press SET green LED blinks | Press SET to red LED blinks (x2) | x2 Press SET to red LED blinks (x2) | Use Multi-Function knob to set neutral | x8 Press SET to save position | Press/hold MENU returns to driving mode | |
| To set the END POINTS of the STEERING servo | Press/hold MENU green LED blinks | Press SET green LED blinks (x2) | x2 Press SET green LED blinks | Press SET to red LED blinks (x2) | x3 Press SET to red LED blinks (x3) | Turn steering wheel to desired max left and right travel | x8 Press SET to save each position | Turn steering wheel to test settings | IF END POINTS ARE OK: Press/hold MENU returns to driving mode |
| To reset the END POINTS of STEERING servo to defaults | Press/hold MENU green LED blinks | Press SET green LED blinks (x2) | x2 Press SET green LED blinks | Press SET to red LED blinks (x2) | x4 Press SET to red LED blinks (x4) | x8 Press SET to red LED blinks (x4) | Press/hold MENU returns to driving mode | ||
| To REVERSE the direction of THROTTLE servo | Press/hold MENU green LED blinks | Press SET green LED blinks (x2) | x2 Press SET green LED blinks | Press SET to red LED blinks (x2) | Press SET to red LED blinks (x2) | Press SET to red LED blinks (x2) | Press/hold MENU returns to driving mode | ||
| To set the SUB-TRIM of the THROTTLE servo | Press/hold MENU green LED blinks | Press SET green LED blinks (x2) | x2 Press SET green LED blinks | Press SET to red LED blinks (x2) | x2 Press SET to red LED blinks (x2) | Use Multi-Function knob to set neutral | x8 Press SET to save position | Press/hold MENU returns to driving mode | |
| To set the END POINTS of the THROTTLE servo | Press/hold MENU green LED blinks | Press SET green LED blinks (x2) | x2 Press SET green LED blinks | Press SET to red LED blinks (x2) | x3 Press SET to red LED blinks (x3) | Use throttle trigger to set desired max throttle or brake | Press SET to save Use trigger to test | IF END POINTS ARE OK: Press/hold MENU returns to driving mode | IF END POINTS ARE OK: Press/hold MENU and repeat steps 7-9 |
| To reset the END POINTS of THROTTLE servo to defaults | Press/hold MENU green LED blinks | Press SET green LED blinks (x2) | x2 Press SET green LED blinks | Press SET to red LED blinks (x2) | x2 Press SET to red LED blinks (x2) | Press SET to red LED blinks (x2) | Press SET to red LED blinks (x2) | Press/hold MENU returns to driving mode | |
| To REVERSE the direction of SHIFT servo | Press/hold MENU green LED blinks | Press SET green LED blinks (x2) | x2 Press SET green LED blinks | Press SET to red LED blinks (x2) | x3 Press SET to red LED blinks (x3) | Press SET to reverse servo direction | Press/hold MENU returns to driving mode |
6528B, 6529B, 6530B, 6529A --TQi 2.4GHz High Output Radio system

NOTES:
6528B-01MLBT, 6529B-01MLBT, 6530B-01MLBT-TQi 2.4GHz High Output Radio system

6507R Transmitter contains FCC ID: XVE-TRX1018, IC: 8668A-TRX1018 Wireless Module
FCC SAR statement --Control
This equipment complies with FCC radiation exposure limits set forth for an uncontrolled environment. End user must follow the specific operating instructions for satisfying RF exposure compliance. This transmitter must not be co-located or operating in conjunction with any other antenna or transmitter.
The portable device is designed to meet the requirements for exposure to radio waves established by the Federal Communications Commission (USA). These requirements set a SAR limit of 1.6 W/kg averaged over one gram of tissue. The highest SAR value reported under this standard during product certification for use when properly worn on the Head.
IC SAR statement -Control
This equipment complies with ISED radiation exposure limits set forth for an uncontrolled environment. End user must follow the specific operating instructions for satisfying RF exposure compliance. This transmitter must not be co-located or operating in conjunction with any other antenna or transmitter. The portable device is designed to meet the requirements for exposure to radio waves established by the ISED. These requirements set a SAR limit of 1.6 W/kg averaged over one gram of tissue. The highest SAR value reported under this standard during product certification for use when properly worn on the Head.
MODELS/MODELES6507R,6509R
OWNER'S MANUAL MANUEL DU PROPRIÉTAIRE
TRAAS
6250 TRAXXAS WAY, MCKINNEY, TEXAS 75070
1-888-TRAXXAS
iPhone (4S and later)
iPod touch (5th generation and later)
iPad (3rd generation and later)
iPad mini
Android (4.4 and later)
Apple, the Apple logo, iPhone, iPad, and iPod touch are trademarks of Apple Inc., registered in the U.S. and other countries.
App Store is a service mark of Apple Inc. Android and Google Play are trademarks of Google Inc.