
TLK 25 - Communication device MOTOROLA - Free user manual and instructions
Find the device manual for free TLK 25 MOTOROLA in PDF.
| Product Type | Two-way communication device (walkie-talkie) |
| Brand | Motorola Solutions |
| Model | TLK 25 (TLK 25Wi-Fi) |
| Dimensions | Approximately 130 x 60 x 35 mm |
| Weight | Approximately 250 g (with battery) |
| Power Supply | Rechargeable lithium-ion battery 7.4 V, typical capacity 2000 mAh |
| Connectivity | Built-in Wi-Fi (2.4 and 5 GHz bands), Bluetooth possible (not specified) |
| Frequencies | Wi-Fi bands 2.4 / 5 GHz (for Wi-Fi model) |
| Main Features | Two-way voice communication, talkback, channel selection, emergency call, compatibility with management applications |
| Regulatory Compliance | FCC Part 15 (Class B), ISDE Canada (CNR), European Directive (if applicable) |
| RF Exposure | Compliant with national and international limits for the general population |
| Indoor/Outdoor Use | 5 GHz band reserved for indoor use; 2.4 GHz band allowed indoors and outdoors |
| Maintenance and Cleaning | Clean with a soft, dry cloth, avoid solvents. Do not immerse in water. |
| Spare Parts and Repairability | Antenna, battery, belt clip available from Motorola Solutions or authorized dealers |
| Included Accessories (estimated) | Battery, charger, belt clip, antenna |
| General Information | User manual available for free download on notice-facile.com; requires acceptance of RF conditions |
Frequently Asked Questions - TLK 25 MOTOROLA
User questions about TLK 25 MOTOROLA
0 question about this device. Answer the ones you know or ask your own.
Ask a new question about this device
Download the instructions for your Communication device in PDF format for free! Find your manual TLK 25 - MOTOROLA and take your electronic device back in hand. On this page are published all the documents necessary for the use of your device. TLK 25 by MOTOROLA.
USER MANUAL TLK 25 MOTOROLA
TLK 25 Series Device User Guide
Contents
Legal and Support. 5
Intellectual Property and Regulatory Notices 5
Legal and Compliance Statements. 6
Supplier's Declaration of Conformity 6
ISED WLAN Statement. 7
Safety and General Information. 7
Notice to Users (FCC and Innovation, Science and Economic Development Canada (ISED)).... 8
Chapter 1: Read Me First. 9
1.1 Software Version.. 9
Chapter 2: Device Care 11
2.1 Cleaning and Disinfecting Your Device 11
Cleaning Your Device 11
Disinfecting Your Device 12
Chapter 3: Device Overview 13
3.1 LED Indicators 14
3.2 Battery Capacity 15
Chapter 4: Getting Started. 17
4.1 Charging the Device 17
4.2 Turning the Device On or Off 18
Turning the Device On. 18
Turning the Device Off. 18
4.3 Adjusting the Volume 18
4.4 Wired Earpiece Overview 19
4.5 Attaching or Removing the Ear Tip 20
Attaching the Ear Tip. 20
Removing the Ear Tip. 20
4.6 Attaching or Detaching the Wired Earpiece 21
Attaching the Wired Earpiece 21
Detaching the Wired Earpiece 21
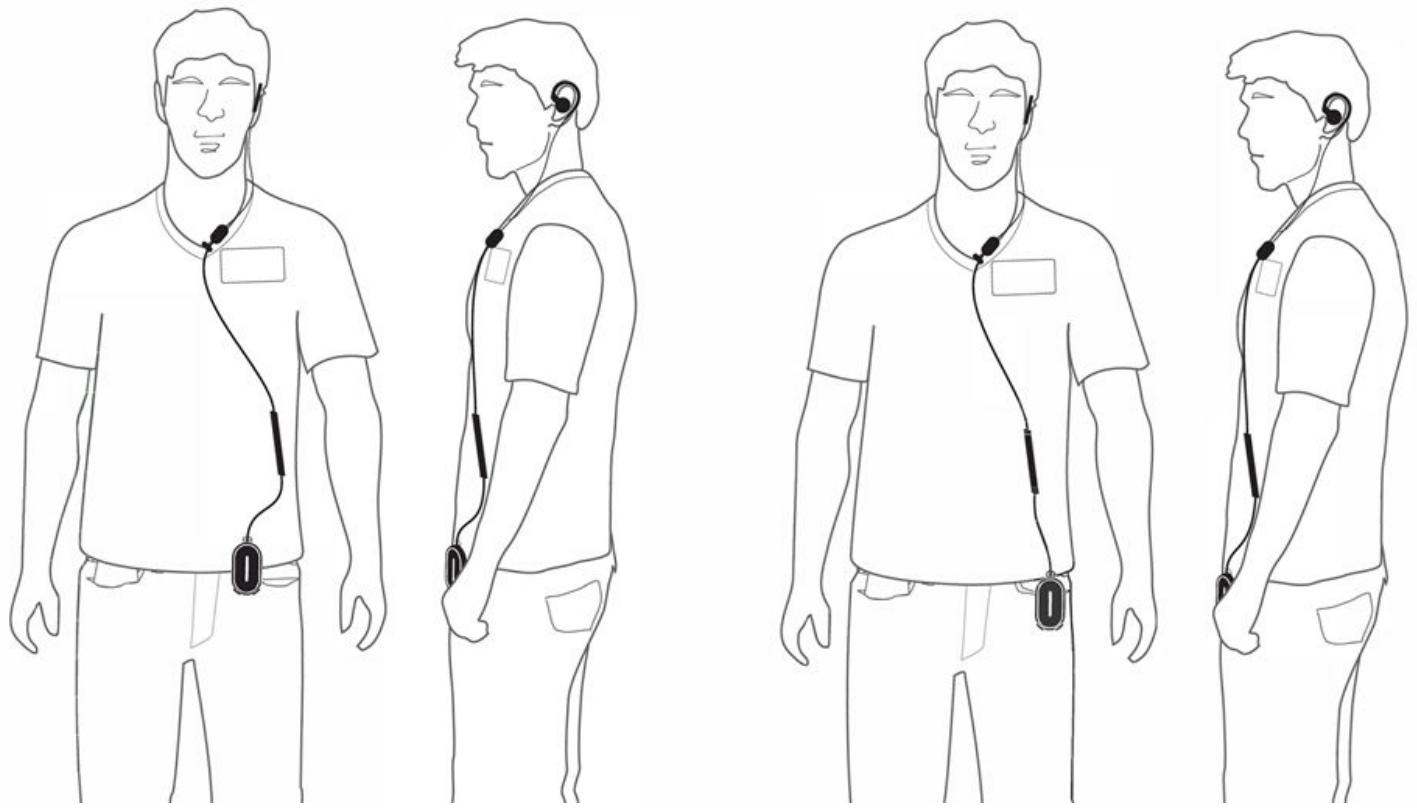
4.7 Wearing Your Device 22
4.7.1 Attaching the Badge Clip 22
4.7.2 Attaching the Device to the Holster 23
4.8 Activating the Preconfigured Wi-Fi Access Point (PWAP) 24
Chapter 5: Basic Device Operation. 25
5.1 Navigating the Status and Menu List 25
5.2 Initiating Voice Assistant 26
5.2.1 Voice Assistant Commands 26
5.3 Locking and Unlocking PTT 28
Locking PTT 28
Unlocking PTT 28
5.4Turning the Mute Mode On or Off 29
Turning the Mute Mode On. 29
Turning the Mute Mode Off. 29
Chapter 6: Type of Calls. 30
6.1 Making Calls 30
6.2 Receiving Calls 31
Chapter 7: Supervisory Override 32
Chapter 8: Area-Based Talkgroup. 33
8.1 Entering And Exiting Area-Based Talkgroup 33
Chapter 9: Instant Personal Alert. 34
9.1 Initiating IPA 34
9.2 Receiving IPA 34
9.3 Browsing, Responding and Clearing IPA List 35
Chapter 10: Ambient Listening 37
Chapter 11: Do Not Disturb. 38
11.1 Turning DND On or Off 38
Chapter 12: Connectivity 39
12.1 Bluetooth 39
12.1.1 Turning the Bluetooth On or Off 39
Turning the Bluetooth On. 39
12.1.2 Bluetooth Pairing 40
12.1.3 Bluetooth Connection Failure 41
12.1.4 Checking Bluetooth Status 41
12.1.5 Clearing Bluetooth Pairing 41
12.2 Wi-Fi 42
12.2.1Turning the Wi-Fi On or Off 42
12.2.2 Wi-Fi Status 42
Chapter 13: Emergency Operations. 45
13.1 Declaring Emergency 45
13.2 Transmitting Emergency Call 45
13.3 Canceling Emergency 46
13.4 Receiving Emergency Alerts 46
13.5 Receiving and Responding to Emergency Calls 46
Chapter 14: Scan 48
14.1 Turning Scan On or Off 48
Chapter 15: Device Stun 49
Chapter 16: User Disabled or Suspended 50
Chapter 17: Device Kill 51
Chapter 18: Firmware Over the Air (FOTA) 52
Chapter 19: Authorized Accessories List. 53
Legal and Support
Intellectual Property and Regulatory Notices
Copyrights
The Motorola Solutions products described in this document may include copyrighted Motorola Solutions computer programs. Laws in the United States and other countries preserve for Motorola Solutions certain exclusive rights for copyrighted computer programs. Accordingly, any copyrighted Motorola Solutions computer programs contained in the Motorola Solutions products described in this document may not be copied or reproduced in any manner without the express written permission of Motorola Solutions.
No part of this document may be reproduced, transmitted, stored in a retrieval system, or translated into any language or computer language, in any form or by any means, without the prior written permission of Motorola Solutions, Inc.
Trademarks
MOTOROLA, MOTO, MOTOROLA SOLUTIONS, and the Stylized M Logo are trademarks or registered trademarks of Motorola Trademark Holdings, LLC and are used under license. All other trademarks are the property of their respective owners.
License Rights
The purchase of Motorola Solutions products shall not be deemed to grant either directly or by implication, estoppel or otherwise, any license under the copyrights, patents or patent applications of Motorola Solutions, except for the normal nonexclusive, royalty-free license to use that arises by operation of law in the sale of a product.
Open Source Content
This product may contain Open Source software used under license. Refer to the product installation media for full Open Source Legal Notices and Attribution content.
European Union (EU) and United Kingdom (UK) Waste of Electrical and Electronic Equipment (WEEE) Directive

The European Union's WEEE directive and the UK's WEEE regulation require that products sold into EU countries and the UK must have the crossed-out wheeie bin label on the product (or the package in some cases). As defined by the WEEE directive, this crossed-out wheeie bin label means that customers and end users in EU and UK countries should not dispose of electronic and electrical equipment or accessories in household waste.
Customers or end users in EU and UK countries should contact their local equipment supplier representative or service center for information about the waste collection system in their country.
Disclaimer
Please note that certain features, facilities, and capabilities described in this document may not be applicable to or licensed for use on a specific system, or may be dependent upon the characteristics of a specific mobile subscriber unit or configuration of certain parameters. Please refer to your Motorola Solutions contact for further information.
© 2024 Motorola Solutions, Inc. All Rights Reserved
Legal and Compliance Statements
Supplier's Declaration of Conformity
Supplier's Declaration of Conformity
Per FCC CFR 47 Part 2 Section 2.1077(a)

Responsible Party
Name: Motorola Solutions, Inc.
Address: 2000 Progress Pkwy, Schaumburg, IL. 60196
Phone Number: 1-800-927-2744
Hereby declares that the product:
Model Name: TLK 25 Wi-Fi, TLK 25
conforms to the following regulations:
FCC Part 15, subpart B, section 15.107(a), 15.107(d), and section 15.109(a)
Class B Digital Device
As a personal computer peripheral, this device complies with Part 15 of the FCC Rules. Operation is subject to the following two conditions:
- This device may not cause harmful interference, and
- This device must accept any interference received, including interference that may cause undesired operation.

NOTE:
This equipment has been tested and found to comply with the limits for a Class B digital device, pursuant to part 15 of the FCC Rules. These limits are designed to provide reasonable protection against harmful interference in a residential installation. This equipment generates, uses and can radiate radio frequency energy and, if not installed and used in accordance with the instructions, may cause harmful interference to radio communications. However, there is no guarantee that interference will not occur in a particular installation.
If this equipment does cause harmful interference to radio or television reception, which can be determined by turning the equipment off and on, the user is encouraged to try to correct the interference by one or more of the following measures:
- Reorient or relocate the receiving antenna.
- Increase the separation between the equipment and receiver.
- Connect the equipment into an outlet on a circuit different from that to which the receiver is connected.
- Consult the dealer or an experienced radio or TV technician for help.
For country code selection usage (WLAN devices)

NOTE: The country code selection is for non-US model only and is not available to all US models. Per FCC regulation, all Wi-Fi products marketed in the US must be fixed to US operation channels only.
ISED WLAN Statement

CAUTION:
- The device for operation in the band 5150-5250 MHz is only for indoor use to reduce the potential for harmful interference to co-channel mobile satellite systems.
- The maximum antenna gain permitted for devices in the bands 5250-5350 MHz and 5470-5725 MHz shall be such that the equipment still complies with the e.i.r.p. limit.
- The maximum antenna gain permitted for devices in the band 5752-5850 MHz shall be such that the equipment still complies with e.i.r.p. limits specified for point-to-point and non-point-to-point operation as appropriate.
- The worst case tilt angle(s) necessary to remain compliant with the e.i.r.p. elevation mask requirement set forth in Section 6.2.2 (3) shall be clearly indicated.
- User should also be advised that high-power radars are allocated as primary users (i.e. priority users) of the bands 5250-5350 MHz and 5650-5850 MHz and that these radars could cause interference and/or damage to LE-LAN devices.
Safety and General Information

CAUTION: Before using this radio, read this section which contains important operating instructions. For more information on product details, brochures, user manuals, and approved accessories, refer to http://www.motorolasolutions.com.
Compliance with RF Exposure Standards
National and international regulations require manufacturers to comply with the RF energy exposure limits for portable two-way radios before they can be marketed. Your Motorola Solutions two-way radio is designed, manufactured, and tested to comply with all applicable national and international regulations for human exposure to radio frequency electromagnetic energy.
RF Energy Exposure Awareness and Control Information and Operational Instructions for General Population and Uncontrolled Environment Use
For more information on what RF energy exposure is, refer to the following websites:
- https://www.fcc.gov/
- http://www.who.int/peh-emf/project/en/
- http://www.ic.gc.ca/eic/site/smt-gst.nsf/eng/sf11467.html
- http://www.ic.gc.ca/eic/site/smt-gst.nsf/eng/sf01904.html
For additional information, refer to https://www.motorolasolutions.com/en_us/about/company-overview/corporate-responsibility/governance-and-policies.html.
Notice to Users (FCC and Innovation, Science and Economic Development Canada (ISED))
This device complies with Part 15 of the FCC rules and Innovation, Science and Economic Development Canada's license-exempt RSS's per the following conditions:
- This device may not cause harmful interference.
- This device must accept any interference received, including interference that may cause undesired operation.
- Changes or modifications made to this device, not expressly approved by Motorola Solutions, could void the authority of the user to operate this equipment.
Chapter 1
Read Me First
This user guide covers the basic operations of the device models offered in your region.
Notations Used in This Manual
Throughout the text in this publication, you notice the use of Warning, Caution, and Notice. These notations are used to emphasize that safety hazards exist, and the care that must be taken or observed.

WARNING: An operational procedure, practice, or condition, and so on, which may result in injury or death if not carefully observed.

CAUTION: An operational procedure, practice, or condition, and so on, which may result in damage to the equipment if not carefully observed.

NOTE: An operational procedure, practice, or condition, and so on, which is essential to emphasize.
Special Notations
The following special notations are used throughout the text to highlight certain information or items:
Table 1: Special Notations
| Example | Description |
| Menu key or PTT button | Bold words indicate a name of a key, button, or soft menu item. |
| <required ID> | The courier, bold, italic, and angle brackets indicate user input. |
| Setup → Tone → All Tones | Bold words with the arrow in between indicate the navigation structure in the menu items. |
Feature and Service Availability
Your dealer or administrator may have customized your device for your specific needs.

NOTE:
- Not all features in the manual are available in your device. Contact your dealer or administrator for more information.
You can consult your dealer or system administrator about the following:
What are the functions of each button?
- Which optional accessories may suit your needs?
What are the best device usage practices for effective communication?
- What maintenance procedures promote longer device life?
1.1
Software Version
All the features described in the following sections are supported by the software version:
MN010359A01-AB
Chapter 1: Read Me First
R01.00.01_AP_R01.00.05 or later.
Contact your dealer or administrator for more information.
Chapter 2
Device Care
This section describes the basic handling precaution of the device.
Table 2: IP Specification
| IP Specification | Description |
| IP67 | Allows your device to withstand adverse field conditions such as being submersed in water between 15 cm and 1 m for 30 minutes or dust tight for 2–8 hours. |
- If your device has been submersed in water, shake your device and wired earpiece well to remove any water that may be trapped inside the speaker and microphone port. Trapped water could cause decreased audio performance.
- Never poke the vent (hole) located on the device back casing on top of the battery compartment. This vent allows for pressure equalization in the device. Doing so may create a leak path into your device, and your device's submersibility may be lost.
- Never obstruct or cover the vent, even with a label.
- Ensure that no oily substances come in contact with the vent.
- Your device is designed to be submersible to a maximum depth of 1m (3.28 ft) and a maximum submersion time of 30 minutes. Exceeding either maximum limit or use may result in damage to your device.
- When cleaning your device, do not use a high-pressure jet spray on device as this will exceed the 1 m depth pressure and may cause water to leak into your device.
2.1
Cleaning and Disinfecting Your Device
Cleaning Your Device
Prerequisites: Ensure that you have the following items:
- Gloves or other PPE as applicable
- Detergent
Water - Dishcloths
- Stiff, non-metallic, and short bristled brush
- Soft, absorbent, and lint-free cloths
Procedure:
- Mix a 0.5% detergent-water solution.
-
Apply the detergent-water solution with a dish cloth and wipe down and clean your device.
-
Using a stiff, non-metallic, and short bristled brush, remove any loose dirt from your device.
- Using a soft, absorbent, and lint-free cloths, wipe away the solution and dry your device.
- Ensure that there are no solutions left in or near any connectors, cracks, or crevices.
Disinfecting Your Device
Prerequisites: Ensure that you have the following items:
- Gloves or other PPE as applicable
Over-the-counter isopropyl alcohol (rubbing alcohol) with at least 70% alcohol concentration - Dishcloths
- Soft, absorbent, and lint-free cloths
Procedure:
Apply the rubbing alcohol to a dish cloth and wipe down your device.

NOTE:
Never apply alcohol directly to your device.
The effects of certain chemicals and their vapors can have detrimental effects on plastics and the metal platings.
Do not use bleach, solvents, or cleaning sprays to cleanse or disinfect your device.
For more information on recommended cleaning and disinfecting guidelines, refer to https:// youtu.be/cYjxoUNCXZo.
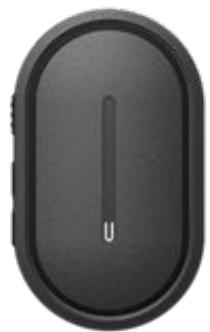
Chapter 3
Device Overview
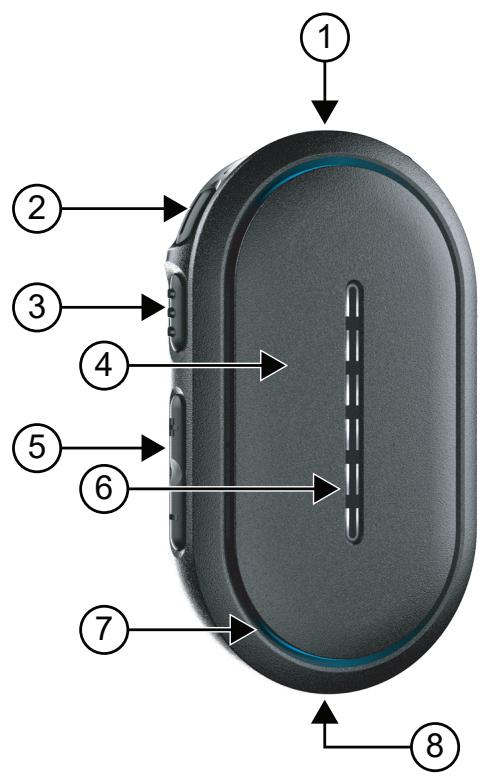
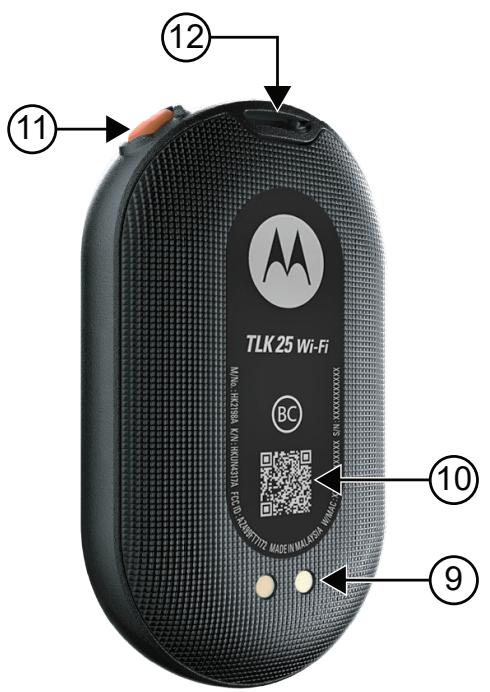
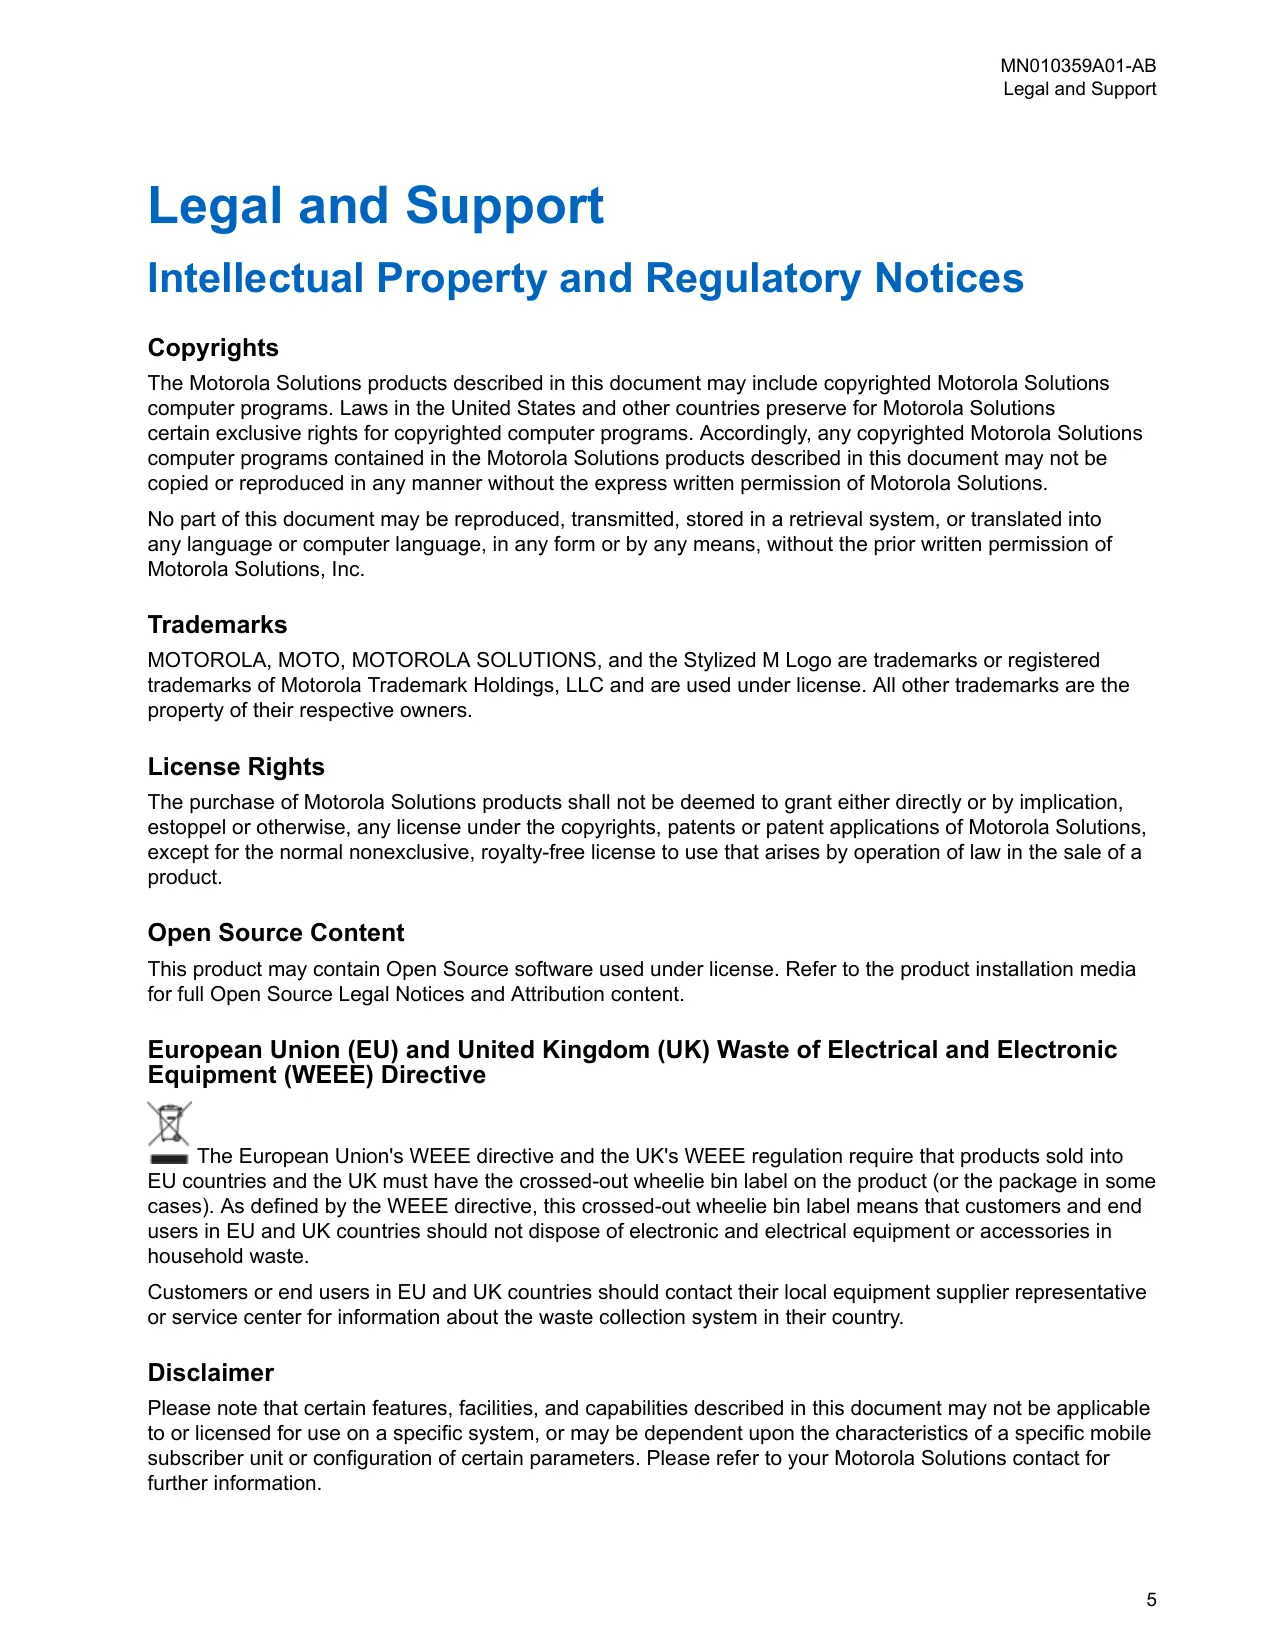
Table 3: Device Overview
| Label | Name | Description |
| 1 | 3.5 mm Audio Connector Jack | Allows you to connect audio accessories to your device. |
| 2 | Power Button | Allows you to turn your device on or off and access the menu features. |
| 3 | Voice Assistant Button | Allows you to access the voice assistant feature. |
| 4 | Push-to-Talk (PTT) Button | Allows you to execute voice operations (for example, Group Call and Private Call). |
| 5 | Volume (+/-) Button | Allows you to adjust the volume. |
| 6 | LED Bar Indicator | Provides you the battery status. |
| 7 | Crescent LED Indicator | Provides you the operating status. |
| 8 | USB-C Port | Allows you to charge and program your device. |
| 9 | Charging Contacts | Charging point for the battery. |
| 10 | QR Code | Scanning the QR code takes you to the TLK 25 web page. |
| 11 | Emergency Button | Allows you to turn on and off the emergency operations. |
| 12 | Lanyard Slot | Allows you to attach badge clip to your device. |
3.1
LED Indicators
The LED Indicators show the basic operational status of your device.

NOTE: Specific feature-related LED indications are listed in the respective feature content.
Table 4: LED Indications
| Crescent LED | Middle Bar LED | Status | |
| Blinking Green | Top ✓ | Six-bar LED | The device is ready for use. The Voice Assistant is ready. |
| Bottom ✓ | |||
| Slow Blinking Green | Top ✓ | N/A | The device PTT is unlocked. |
| Bottom ✓ | |||
| Double Blinking Green | Top ✓ | N/A | The device is receiving a Group Call or Private Call. |
| Bottom X | |||
| Solid Green | Top ✓ | N/A | The device is transmitting a Group Call or Private Call. User Voice Command is detected. |
| Bottom X | |||
| Rapid Blinking Green | Top ✓ | N/A | User Voice Command is recognized. User Voice Command fulfillment failed. |
| Bottom ✓ | |||
| Solid Amber | Top ✓ | N/A | The device is transmitting an Emergency Call. |
| Bottom ✓ | |||
| Blinking Red | Top ✓ | Six-bar LED | The device is powering off. |
| Bottom ✓ | |||
| Double Blinking Red | Top ✓ | N/A | The device PTT is locked. The device cannot connect to any network. The Voice Assistant is facing an error. |
| Bottom ✓ | |||
| Slow Blinking Blue | Top ✓ | N/A | To show that the device is on and active. |
| Bottom X | |||
| Double Blinking Aqua | Top ✓ | N/A | The device is searching for nearby Blue-tooth devices. |
| Bottom ✓ | |||
| Blinking Aqua | Top | N/A | The Bluetooth device is connected. |
| Bottom | |||
| Blinking Red and Purple | Top | N/A | No wired or Bluetooth accessories is con- nected. |
| Bottom | |||
3.2
Battery Capacity
The following table provides the battery capacity information of your device. LED Indications appear when you press Power button.
Table 5: Battery Capacity
| Device Appearance | LED Indication | Voice Announcement | Description |
| Six-bar LED momenta-ry pulse | “Battery is at 100 per-cent.” | Battery full Charging complete | |
| Five-bar LED momen-tary pulse | “Battery is at 71 percent.” | 71%–99% capacity | |
| Four-bar LED momen-tary pulse | “Battery is at 51 percent.” | 51%–70% capacity | |
| Three-bar LED momentary pulse | “Battery is at 31 percent.” | 31%–50% capacity | |
| Two-bar LED momentary pulse Slow blinking red | “Battery is at 11 percent.” | 11%–30% capacity | |
| One-bar LED momentary pulse Rapid blinking red | “Battery is at less than 10 percent, please charge.” | 0%–10% capacity |
Chapter 4
Getting Started
This chapter provides instructions on how to prepare your device for use.
4.1
Charging the Device
Procedure:
Perform one of the following actions:
| Option | Action |
| Using Multi-Unit charger (MUC) | Insert the device into the slot of the charger. |
| Using the USB-C charger | Plug the charging cable to the USB power source. |
Result:
For ongoing charging, your device shows the following indications:
The bar LED blinks rapidly for three minutes.
- The top and bottom crescent red LED illuminates.
If there is an error during charging, your device shows the following indications:
-
For MUC charging, the top and bottom red crescent LED blinks.
-
For USB charging, the bottom red crescent LED blinks.
4.2
Turning the Device On or Off
Turning the Device On
Procedure:
Press and hold the Power button.
Result:
If your device turns on successfully, your device shows the following indications:
The device vibrates.
- The two-bar LED illuminates and scrolls.
If your device fails to turn on, your device shows the following indications:
The device vibrates.
- The top and bottom red crescent LED illuminates.

NOTE:
- You can hear the voice announcements1 during the device power up. You can repeat the voice announcement again to know the current state by pressing the PTT button or the Emergency button.
- Contact your dealer or administrator for more information regarding power up issue.
Turning the Device Off
Procedure:
Press and hold the Power button.
Result:
If your device turns off, your device shows the following indications:
The device vibrates.
- The top and bottom red crescent LED illuminates.
- The bar-LED turns off after countdown.
4.3
Adjusting the Volume
This settings allows you to adjust the device volume.
Procedure:
Perform one of the following actions:
- To increase the volume, press the Volume Up button.
To decrease the volume, press the Volume Down button.

NOTE: The LED bar appears when you adjust the volume.
4.4
Wired Earpiece Overview
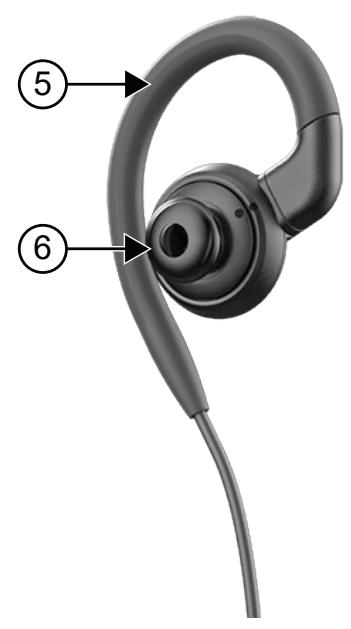
Table 6: Wired Earpiece Overview
| Label | Name | Description |
| 1 | Microphone | Allows your voice to be sent when PTT or voice operations are activated. |
| 2 | Voice Assistant Button | Allows you to access the voice assistant feature. |
| 3 | Push-to-Talk (PTT) Button | Allows you to execute voice operations (for example, Group Call and Private Call). |
| 4 | Mute/Unmute Slider | Allows you to toggle mute/unmute the incoming audio on the device. |
| 5 | Earhook | Allows you to hang the earpiece on your ear. |
| 6 | Removable Ear Tip | Allows you to fit the earpiece to your ear. |
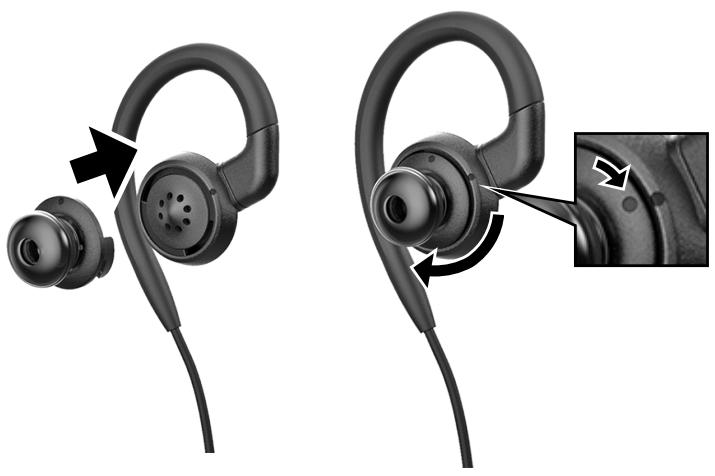
4.5
Attaching or Removing the Ear Tip
Attaching the Ear Tip
Procedure:
Attach the ear tip to the earhook and twist clockwise until you hear a click.
Removing the Ear Tip
Procedure:
Twist the ear tip anticlockwise until you hear a click and detach the ear tip.
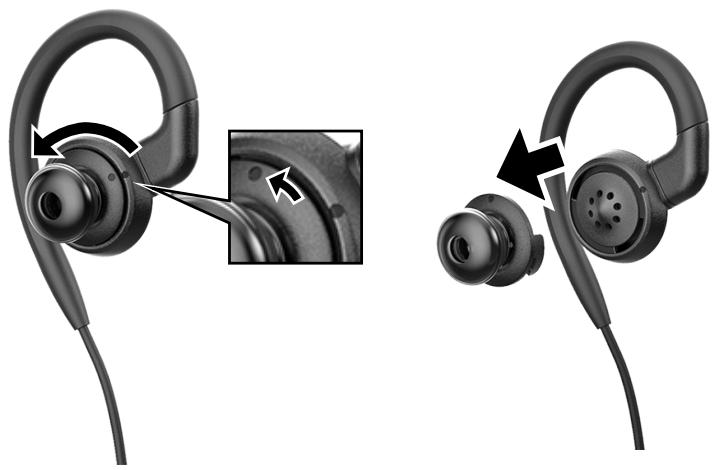
4.6
Attaching or Detaching the Wired Earpiece
Attaching the Wired Earpiece
Procedure:
Insert a wired earpiece to the audio connector jack.
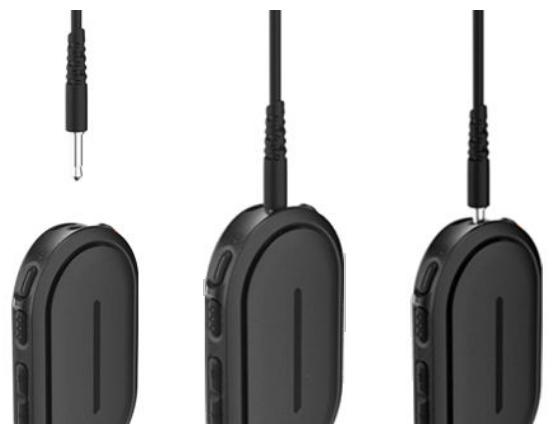
Detaching the Wired Earpiece
Procedure:
Remove the wired earpiece from the audio connector jack.

Result: If your device is not connected to a Bluetooth accessory and you are not charging your device, the device shows the following indications:
The device vibrates.
- The top and bottom red crescent LED blinks alternately with the purple crescent LED.
4.7
Wearing Your Device
The device is designed to be worn on the body. A set of accessories offer comfortable and secure wearing.
4.7.1
Attaching the Badge Clip
Procedure:
- Slide the badge clip from downwards of the lanyard slot.
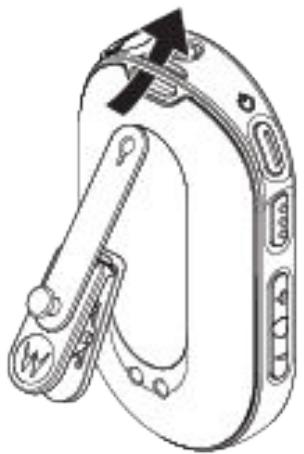
- Buckle up the badge clip strap.

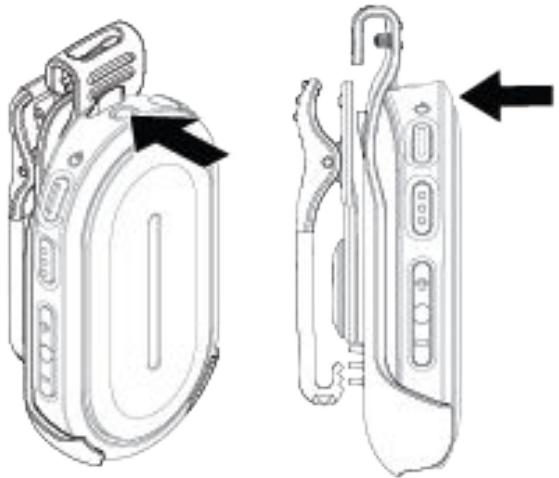
4.7.2
Attaching the Device to the Holster
Procedure:
- Slide the bottom of the device into the holster until it snaps into place.
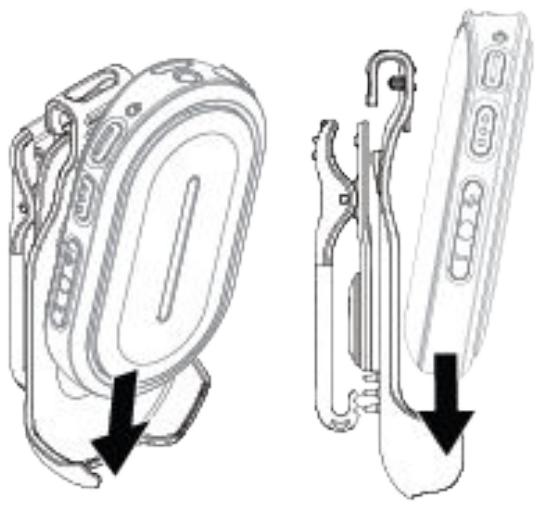
- Secure the device by pressing the top of the device until you hear a "click" sound.
4.8
Activating the Preconfigured Wi-Fi Access Point (PWAP)
This feature provides a temporary Wi-Fi connection for the device to download the configurations from the portal. Instead of the manual configuration through the Maintenance Mode Web Server, you can use the preconfigured Wi-Fi access point for initial Wi-Fi connection.
Prerequisites: Turn on your phone or router Wi-Fi hotspot and change the Wi-Fi name and password to reflect the following configured TLK 25 Wi-Fi access point (AP):
Wi-Fi Name/SSID: WaveRadio
- Password: RadioManagement
Procedure:
- Turn on your device and wait until your device starts searching for connections. The three-bar LED illuminates and scrolls.
- To connect to the PWAP, press the Power button and Volume Up button simultaneously. Your device searches for the available network.
Result: If connection to the configured Wi-Fi AP is successful, your device shows the following indications:
The voice announcement sounds.
The four-bar LED illuminates.
Chapter 5
Basic Device Operation
This section explains the basic operations that you can perform on your device.
5.1
Navigating the Status and Menu List
This section shows you the operations available and instructions to navigate the Status and Menu List.
When and where to use: To identify the device Menu features.
Table 7: Status and Menu List Features
| Menu Feature | Description |
| Instant Personal Alert (IPA) List | Listen to all Instant Personal Alerts until cleared. |
| Battery Level Status | Listen to device battery level. |
| Talkgroup List | Change the Talkgroup. |
| Contact List | Select a contact. |
| Do Not Disturb (DND) | Turn the Do Not Disturb feature on or off. |
| PTT Lock | Turn the PTT Lock feature on or off. |
| Bluetooth | Turn the Bluetooth on or off. |
Procedure:
- To enter Status and Menu Mode, press the Power button.
- To navigate through the Status and Menu List, press the Power button again within the 5 second timeout period.
The device sounds the current selected value or item through Voice Announcement as the user scrolls through the list. A tone sounds when the user reaches the end of the list.
- To toggle the Menu feature, press the Volume Up or Volume Down button.
The device sounds the current selected value or item through Voice Announcement as the user toggles the options.
-
To exit the Status and Menu List, do one of the following actions:
-
Wait for the 5 second timer to expire and for the device to sound a positive tone.
- Press a button that overrides the Status and Menu Mode, such as the PTT or the Voice Assistant button.
5.2
Initiating Voice Assistant
Voice Assistant allows you to manage your device and perform information lookups using voice commands.

NOTE: This feature can only be used with a wired or Bluetooth accessory.
Prerequisites: Ensure an accessory is connected.
Procedure:
- Press the Voice Assistant button.
A positive tone sounds.
- The top and bottom crescent green crescent LED blinks.
- Speak your command into the accessory microphone.
When your command is detected, the top and bottom crescent green LED illuminates.
5.2.1
Voice Assistant Commands
The following commands are examples you can use to operate the device.
There are no specific commands. You may speak your intended commands in approximate terms.

NOTE:
- Acceptable voice commands can be configured in the WAVE PTX Portal.
- To end the current voice assistant session, say "Cancel" or "Nevermind".
| Features | Command Examples |
| Private Call | •“Call Tom” |
| •“Contact Tom” | |
| Group Call | •“Switch to Maintenance” |
| •“Call Maintenance” | |
| Lock and Unlock PTT button | •“Lock PTT” |
| •“Unlock PTT” | |
| DND | •“Set status to DND” |
| •“Set status to Available” | |
| Battery Status | •“Battery level” |
| •“Check battery status” | |
| Volume | •“Increase volume” |
| •“Decrease volume” | |
| •“What is my volume” | |
| Time | ·“What is the time” |
| ·“Current time” | |
| Bluetooth | ·“Turn on Bluetooth” |
| ·“Turn off Bluetooth” | |
| ·“Bluetooth status” | |
| ·“Unpair Bluetooth” | |
| ·“Disconnect Bluetooth” | |
| ·“Remove Bluetooth” | |
| Connectivity | ·“Wi-Fi status” |
| ·“Turn On Wi-Fi” | |
| ·“Turn Off Wi-Fi” | |
| ·“Connection” | |
| ·“Wi-Fi strength” | |
| Device Status | ·“What is my device status?” |
| Device Information | ·“What is my device ID?” |
| Instant Personal Alert (IPA) | ·“Send IPA to Tom” |
| ·“Get IPAs” | |
| ·“Clear IPAs” | |
| Instant Personal Alert (IPA) List | ·“Yes” |
| ·“No” | |
| ·“Next” | |
| ·“Back” | |
| Firmware Over The Air (FOTA) | ·“Any update?” |
| Contact Presence | ·“Is Tom online?” |
| ·“What is Tom's status?” | |
| Scan | ·“Turn On Scan” |
| ·“Turn Off Scan” | |
| ·“Scan status” | |
| GPS | ·“Turn On GPS” |
| ·“Turn Off GPS” | |
| ·“Is GPS On?” | |
| ·“Check GPS” | |
| Network Connection | ·“What's my Network Status?” |
| ·“Check Network” | |
| Help | “Help” |
| “Command List” | |
| Emergency | “Who declared Emergency?” |
5.3
Locking and Unlocking PTT
The default setting for PTT Lock feature is "Unlock". When you power cycle your device, the PTT Lock settings is set to the default setting.
A voice announcement sounds to prompt the user if the PTT is locked for a certain amount of time. This feature is configurable through the WAVE PTX Portal.
Locking PTT
Procedure:
Perform one of the following actions:
| Option | Actions |
| Locking PTT through the Menu | From the menu, select PTT Lock. |
| Locking PTT through the Voice Assistant | a. Press the Voice Assistant button. b. After you hear a tone, speak your command into the accessory microphone. |
Result: If the PTT feature is locked successfully, your device shows the following indications:
A voice announcement sounds.
- The top and bottom red crescent LED blinks twice.

NOTE: Locking the device PTT does not lock the PTT of a connected wired earpiece or Bluetooth accessory.
Unlocking PTT
Procedure:
Perform one of the following actions:
| Option | Actions |
| Unlocking PTT through the Menu | From the menu, select PTT Lock. |
| Unlocking PTT through the Voice Assistant | a. Press the Voice Assistant button. b. After you hear a tone, speak your command into the accessory microphone. |
Result: If the PTT feature is unlocked successfully, your device shows the following indications:
A voice announcement sounds.
- The top and bottom green crescent LED illuminates.
5.4
Turning the Mute Mode On or Off
You must mute the voice call audio only through a Motorola Solutions accessory that has a Mute toggle function.
Turning the Mute Mode On
Procedure:
Slide the accessory button upwards.

Result:
The device vibrates.
A voice announcement sounds.
The LED bar displays one-bar LED.
Turning the Mute Mode Off
Procedure:
Slide the accessory button downwards.

Chapter 6
Type of Calls
There are several ways that you can make a call with your device depending on the types of calls available on your device.
Table 8: Types of Calls
| Call Type | Description |
| Group Call | A Group Call is a point-to-multipoint call operation. Your device must be configured as a member of the group for you to communicate with each other. |
| Private Call | Private Call is a call from an individual device to another individual device. |
| Broadcast Call | A Broadcast Call is a one-way voice call from any user to an entire talkgroup.The Broadcast Call feature allows only the call initiating user to transmit to the talkgroup, while the recipients of the call cannot respond. |
| NOTE: Broadcast call has priority over Group call and Pri-vate call. |
6.1
Making Calls
Procedure:
Perform one of the following actions based on type of calls:
| Options | Actions |
| Making group calls through the Menu | a. Press the Power button to enter Talkgroup List. b. Press the Volume Up and Volume Down buttons to navigate to the selected Talkgroup. c. To call, press and hold the PTT button. d. Wait for the Talk Permit Tone to end, and speak into the accessory microphone. The top crescent green LED illuminates during transmission. e. To stop transmitting, release the PTT button. |
| Making group calls through the Voice Assistant | a. Press the Voice Assistant button. b. After you hear a tone, speak your command into the accessory microphone while men-tioning the targeted talkgroup. c. To call, press and hold the PTT button. d. Wait for the Talk Permit Tone to end, and speak into the accessory microphone. The top crescent green LED illuminates dur-ing transmission. e. To stop transmitting, release the PTT button. |
| Making private calls through the Menu | a. Press the Power button to enter Contact List. b. Press the Volume Up and Volume Down buttons to navigate to the selected Contact. c. To call, press and hold the PTT button. d. Wait for the Talk Permit Tone to end, and speak into the accessory microphone. e. To stop transmitting, release the PTT button. |
| Making private calls through the Voice Assistant | a. Press the Voice Assistant button. b. After you hear a tone, speak your command into the accessory microphone while men-tioning the targeted talkgroup. c. To call, press and hold the PTT button. d. Wait for the Talk Permit Tone to end, and speak into the accessory microphone. e. To stop transmitting, release the PTT button. |
If errors arise when you initiate a call, your device shows the following indications:
A tone sounds.
- The top and bottom crescent red LED blinks twice.
6.2
Receiving Calls
When you receive calls, your device shows the following indications:
- For private call only, the device vibrates.
A tone sounds. - The top crescent green LED blinks twice continuously.
The call ends if you press the Voice Assistant button or Menu button.
Chapter 7
Supervisory Override
Supervisory Override allows a supervisor to interrupt an ongoing talkgroup call and immediately start a supervisory call. A supervisor is configured on the WAVE PTX Portal by selecting and configuring a user as a supervisor within a talkgroup.
When Supervisory Override is initiated, the top crescent green LED blinks twice continuously on the receiving device until the supervisory call ends.
Any talkgroup call in progress may be interrupted by a supervisor. When the call is taken over by the supervisor, the receiving and transmitting devices unmutes automatically to the supervisory call with receiving call LED notification.
If a designated supervisor presses the PTT button while receiving a talkgroup call, the talkgroup call is overridden by a supervisory call.
When you are receiving a talkgroup call and a supervisory call is initiated, your device unmutes to the supervisory call and continues receiving the talkgroup call from the supervisor.
When you are transmitting in a talkgroup call and a supervisory call is initiated, your device unmutes to the supervisory call and displays the receiving call LED notification.
Chapter 8
Area-Based Talkgroup
When you enter a geographic area, you are able to hear the notifications for the talkgroup area in that geofence.
8.1
Entering And Exiting Area-Based Talkgroup
Entering Area-Based Talkgroup
When you are in the Area Talkgroup, your device sounds a tone.
After you are added to the Area Talkgroup, your device is able to receive calls from the Area Talkgroup even if Talkgroup Scanning is turned off.
When you are not in an active call, an area-based group call is received if there is any.
If there is an ongoing call, you begin to receive the call upon entering the area.
Exiting Area-Based Talkgroup
When you exit the Area Talkgroup, your device sounds a tone.

NOTE: If you are in a call when you exit the Area Talkgroup, the call continues without dropping. When the call ends, your device then exits the Area Talkgroup and returns to the default talkgroup.
Chapter 9
Instant Personal Alert
Instant Personal Alert (IPA) is a notification that you can send to a contact that is busy or unable to reply to a group or private call.
9.1
Initiating IPA
Procedure:
- Press the Voice Assistant button.
- After you hear a tone, speak your command into the accessory microphone.
| Options | Actions |
| The searched contact is the only available one | IPA can be sent directly. |
| There are multiple potential matching contacts | Scroll through the contact list by speaking your command into the accessory microphone. |
| The searched contact is busy | Choose through Voice Assistant whether to send or not send IPA. |
| The searched contact is offline or unavailable | IPA cannot be sent. |
- To send IPA, press and hold the PTT button.
The top crescent green LED illuminates.
Result:
If your IPA is sent, your device shows the following indications:
A tone sounds.
The voice announcement sounds.
If your IPA is not sent, your device shows the following indications:
A tone sounds.
The voice announcement sounds.

NOTE: An IPA can only be sent to contacts in your Contact List.
9.2
Receiving IPA
When you receive an IPA during idle mode, your device shows the following indications:
A tone sounds.
The voice announcement sounds.
- The top crescent white LED blinks twice.
When you receive an IPA during a call, your device shows the following indications after the call:
A tone sounds.
The voice announcement sounds.
- The top crescent white LED blinks twice.
There are no visible or audible indicators while the call is in progress.
When you receive an IPA when your device is in Do Not Disturb mode, your device shows the following indications:
A tone sounds.
The voice announcement sounds.
- The top crescent white LED blinks twice.

NOTE:
- If you receive multiple IPAs from the same contact, there is only one entry in the IPA list with the latest IPA at the beginning.
- The IPA List can store up to nine alerts.
- An IPA can be received from contacts outside your Contact List.
9.3
Browsing, Responding and Clearing IPA List
Procedure:
Perform one of the following actions:
| Options | Actions |
| Browsing IPA List | a. Press the Power button to enter the IPA List. b. Press the Volume Up and Volume Down buttons to scroll through the IPAs. The voice announcement sounds the IPA sender's alias and time the IPA was received. |
| Responding to IPA | a. Press the Power button to enter the IPA List. b. Press the Volume Up and Volume Down buttons to scroll to the selected IPA. c. To call, press and hold the PTT button. d. Wait for the Talk Permit Tone to end, and speak into the accessory microphone. e. To end the call to the IPA sender, release the PTT button. |
| Clearing IPA List through Voice Assistant | a. Press the Power button to enter the IPA List. b. Press the Voice Assistant button. c. After you hear a tone, speak your command into the accessory microphone. The voice announcement sounds the clearance of the IPA list. NOTE: Alternatively, you can power cycle your device to clear all IPAs. |
Chapter 10
Ambient Listening
Ambient listening allows an authorized user to listen to the ambient audio of specific users' device during idle mode.
When ambient listening is initiated or restored, your device shows the following indications:
- The top crescent green LED illuminates.
The voice announcement sounds.
Ambient listening stops when a call is initiated or received and is restored after the call ends.

NOTE: Ambient Listening during Emergency Mode is available, subject to the Wave PTX Server.
Chapter 11
Do Not Disturb
Do Not Disturb (DND) allows you to change the status of the device from available to unavailable.
When DND is enabled, you are not able to receive any calls, except broadcast calls.
11.1
Turning DND On or Off
Procedure:
Perform one of the following actions:
| Options | Actions |
| Turning DND On or Off through Voice Assistant | a. Press the Voice Assistant button. b. After you hear a tone, speak your command into the accessory microphone. The voice announcement sounds the device DND status. |
| Turning DND On or Off through Menu | a. Press the Power button to enter the DND menu feature. b. Press the Volume Up or Volume Down but-tons to toggle DND on or off. |
Result:
If DND turns on, your device shows the following indications:
- The top and bottom crescent yellow and green LED blinks twice continuously.
The voice announcement sounds.
If DND turns off, your device shows the following indications:
- The top and bottom crescent green LED blinks twice.
The voice announcement sounds.
If DND fails to turn on or off, your device shows the following indications:
A tone sounds.
The voice announcement sounds.
Chapter 12
Connectivity
You can connect your device to other devices, accessories, or network through different types of connectivity.
12.1
Bluetooth
This feature allows you to use your device with a Bluetooth-enabled accessory through a Bluetooth connection. Your device supports both Motorola Solutions and Commercially available Off-The-Shelf (COTS) Bluetooth-enabled accessory.
Bluetooth operates within a range of 10 m (32 ft) line of sight. This is an unobstructed path between your device and your Bluetooth-enabled accessory. For a high degree of reliability, Motorola Solutions recommends to not separate the device and the accessory.
At the fringe areas of reception, both voice and tone quality start to sound "garbled" or "broken". To correct this problem, position your device and Bluetooth-enabled accessory closer to each other (within the 10 m defined range) to reestablish clear audio reception. The Bluetooth function of your device has a maximum power of 2.5 mW (4 dBm) at the 10 m range.

NOTE:
- Use the latest Bluetooth accessories (v5.0 and above) for enhanced connection security.
Always adopt Bluetooth security best practices when using Bluetooth devices.
12.1.1
Turning the Bluetooth On or Off
Turning the Bluetooth On
Procedure:
Perform one of the following actions:
| Option | Actions |
| Turning the Bluetooth On through the Menu | a. From the menu, select Bluetooth. b. Press the Volume Up or Volume Down but- ton to toggle Bluetooth On. |
| Turning the Bluetooth On through the Voice As- sistant | a. Press the Voice Assistant button. b. After you hear a tone, speak your command into the accessory microphone. |
Result: If the Bluetooth is turned on, the voice announcement sounds.
Turning the Bluetooth Off
Procedure:
Perform one of the following actions:
| Option | Actions |
| Turning the Bluetooth Off through the Menu | a. From the menu, select Bluetooth. b. Press the Volume Up or Volume Down but- ton to toggle Bluetooth Off. |
| Turning the Bluetooth Off through the Voice As- sistant | a. Press the Voice Assistant button. b. After you hear a tone, speak your command into the accessory microphone. |
Result: If the Bluetooth is turned off, the voice announcement sounds.
12.1.2
Bluetooth Pairing
Bluetooth pairing happens automatically when you:
- Turn on your device.
- Turn on the Bluetooth feature.
- Press the Volume Up button and Volume Down button simultaneously.

NOTE:
o Pressing the volume buttons simultaneously will clear all previously paired Bluetooth accessories and makes your device search for both provisioned and unprovisioned Bluetooth accessories that are discoverable.
- Your device can save multiple provisioned Bluetooth accessory but can only save one unprovisioned Bluetooth accessory.
If your device is searching for other Bluetooth device, your device shows the following indications:
The voice announcement sounds.
- The top and bottom crescent aqua LED blinks.
If the Bluetooth device is connected to your device, your device shows the following indications:
- The top and bottom crescent aqua LED illuminates for 2 seconds.
- A delayed voice announcement sounds.

NOTE:
- If both wired earpiece and Bluetooth earpiece are connected to the device at the same time, the wired earpiece overrides the audio output.
- To ensure proper pairing behavior, make sure your Bluetooth accessory is discoverable within 12 seconds of enabling Bluetooth on your device.
- After 12 seconds of searching, your device will connect to the closest detected accessory.
12.1.3
Bluetooth Connection Failure
When the Bluetooth accessory is out of the Bluetooth connection range or removed, the device is disconnected and experience signal interference.
Your device shows the following indication while reconnecting to the same Bluetooth accessory within an allocated time:
A tone sounds.
- The top and bottom aqua crescent LED blinks twice.
After timeout, your device starts searching for a wired earpiece.
If your device is not connected to a wired earpiece and you are not charging your device, the device shows the following indications:
The device vibrates.
- The top and bottom red crescent LED blinks alternately with the purple crescent LED.
12.1.4
Checking Bluetooth Status
Procedure:
- Press the Voice Assistant button.
- After you hear a tone, speak your command into the accessory microphone.
Result:
You can hear three different corresponding voice announcement sounds depending on the status:
- When your device is connected to a Bluetooth accessory.
- When the Bluetooth connection is on but not connected to any Bluetooth accessory.
- When the Bluetooth connection is off. You can speak your command into the accessory microphone to turn it on.
12.1.5
Clearing Bluetooth Pairing
You can clear all the Bluetooth pairing list saved in the device.
Procedure:
- Press the Voice Assistant button.
- After you hear a tone, speak your command into the accessory microphone.
Result:
If the Bluetooth pairing is cleared, your device shows the following indications:
The device vibrates.
The voice announcement sounds.
- The top and bottom crescent aqua LED blinks.
- The bar LED illuminates and scrolls outward from the middle.
If any action is restricted, the voice announcement sounds.
12.2
Wi-Fi
Wi-Fi® is a registered trademark of Wi-Fi Alliance®. You can set up and connect Wi-Fi network to update your device firmware, codeplug, and Voice Announcement.

NOTE: Configure your Wi-Fi system according to the latest industry security recommendations or use Enterprise Wi-Fi.
12.2.1
Turning the Wi-Fi On or Off
Procedure:
- Press the Voice Assistant button.
- After you hear a tone, speak your command into the accessory microphone.
Result: If the Wi-Fi is turned on or off, the voice announcement sounds.
12.2.2
Wi-Fi Status
Initiating the voice command for Wi-Fi status allows you to get the Wi-Fi status for your device as shows in the following table.
Table 9: Wi-Fi Status and Indications
| Wi-Fi Status | Indications |
| Your device is connected to the Wi-Fi network. | The voice announcement sounds. The LED bar shows the Wi-Fi signal strength. |
| Your device Wi-Fi is turned on but there are no Wi-Fi signals. | The voice announcement sounds. The top and bottom crescent red LEDs blink twice. One-bar LED blinks. |
| Your device Wi-Fi is turned on, connected to the Wi-Fi router, but there is no internet connection. | The voice announcement sounds. The top and bottom crescent red LEDs blink twice. The LED bar shows the Wi-Fi signal strength. |
| Your device Wi-Fi is turned off. | The voice announcement sounds and prompts you to turn on the device Wi-Fi. NOTE: If the turning on Wi-Fi Permission feature is restricted, the voice announcement does not prompt you to turn on the device Wi-Fi. |
Table 10: Wi-Fi Signal Strength and Indications
| Device Appearance | LED Indications | Voice Announcement |
| Six-bar LED momentary pulse | “Excellent” | |
| Five-bar LED momentary pulse | “Very good” | |
| Four-bar LED momentary pulse | “Good” | |
| Two-bar LED momentary pulse | “Fair” |
Device Appearance
LED Indications
Voice Announcement
One-bar LED momentary pulse
"Poor"
Chapter 13
Emergency Operations
Emergency Alerts are used to indicate critical situations. You can initiate an Emergency Alert at any time even when there is no activity on the current Talkgroup.
During the Emergency mode, any call launched is declared as Emergency Call.
13.1
Declaring Emergency
Procedure:
To declare emergency locally, press and hold the Emergency button.
Result: Your device shows the following indications:
The device vibrates.
- The Emergency Alert tone sounds.
The voice announcement sounds.
- The bar LED shows six bars after countdown ends.
- The top and bottom crescent amber LED blinks twice.
You can release the Emergency button during the countdown to stop the process.

NOTE: You can also declare an Emergency remotely by an authorized user or a dispatcher, but there is no countdown on the device LED bar if done remotely.
If Emergency is declared successfully, your device shows the following indications:
- The Emergency Alert tone sounds.
The voice announcement sounds. - The top and bottom crescent amber LED illuminates.

NOTE: When the device is in Emergency mode, you are only allowed to control the volume, make an emergency call and exit the emergency mode.
If Emergency fails to declare, your device shows the following indications:
The Emergency Declare Fail tone sounds.
The voice announcement sounds.
- Returns to the previously selected talkgroup.
13.2
Transmitting Emergency Call
Procedure:
When device is declaring emergency, press and hold the PTT button.
Result:
-
The device enters open-mic mode and actively transmits.
-
The top crescent amber LED illuminates.
13.3
Canceling Emergency
Procedure:
To cancel emergency locally, press and hold the Emergency button.
Result: Your device shows the following indications:
The device vibrates.
The voice announcement sounds.
- The bar LED shows six bars after countdown ends.
You can release the Emergency button during the countdown to stop the process.

NOTE: You can also cancel an Emergency remotely by an authorized user or a dispatcher, but there is no countdown on the device LED bar if done remotely.
If Emergency is canceled successfully, your device shows the following indications:
The voice announcement sounds.
- Returns to the previously selected talkgroup.
If Emergency cancellation fails, your device shows the following indications:
A tone sounds.
- The top and bottom crescent amber LED illuminates.
13.4
Receiving Emergency Alerts
When you receive a Declared-Emergency Alert, your device shows the following indications:
- The Emergency Alert tone sounds.
- The top and bottom crescent amber LED blinks until the Emergency Alert is cleared.
- The voice announcement sounds the Declared-Emergency Alert and the initiator's alias.

NOTE: The Emergency Alert tone can be configured or disabled through the WAVE PTX Portal.
When you receive a Cancelled-Emergency Alert, your device shows the following indications:
The Emergency Alert tone sounds.
- The top and bottom crescent amber LED blinks until the Emergency Alert is cleared.
- The voice announcement sounds the Cancelled-Emergency Alert and the initiator's alias.

NOTE: The Emergency Alert has higher priority than making or receiving calls.
13.5
Receiving and Responding to Emergency Calls
When you receive an Emergency Call, your device shows the following indications:
-
For Private Call, the device vibrates.
-
For Group and Private Call, the Emergency Call tone sounds.
- For Group and Private Call, the top crescent amber LED blinks twice throughout the call.

NOTE: The Emergency Call has higher priority than Group and Private Call.
Procedure:
- To respond to the Emergency Call, press and hold the PTT button.
- Wait for the Talk Permit Tone to end, and speak into the accessory microphone.
- To listen, release the PTT button.
Chapter 14
Scan
Scan allows your device to monitor multiple Talkgroups in the programmed scan list to look for an active Talkgroup.
When in the scan mode, the system preempts an ongoing low-priority talkgroup call. Your device unmutes to the high-priority talkgroup call. You respond to the active talkgroup when you press the PTT button during the programmed period (hang time) of an ongoing call from your scan list.
Pressing the PTT button when the device is not in a call causes the device to start a call on the last selected talkgroup.
14.1
Turning Scan On or Off
Procedure:
- Press the Voice Assistant button.
- Speak your command into the accessory microphone.
Result:
If the scan feature is on, your device shows the following indications:
The voice announcement sounds.
- The top and bottom crescent yellow LED blinks twice.
If the scan feature is off, the voice announcement sounds.
If the scan feature fails, your device shows the following indications:
The voice announcement sounds.
- The top and bottom crescent red LED blinks twice.

NOTE: If no Talkgroup is assigned to your device, the scan feature automatically turns on.
Chapter 15
Device Stun
Device Stun indicates that your device is disabled.
When Device Stun is initiated, the voice announcement sounds. When you press any button, the same voice announcement is sounds.
When your device is in Device Stun mode, all the buttons, except for Power, Volume Up, and Volume Down buttons, are disabled. All voice announcement and LED indications are also disabled. Only the volume LED bar shows momentarily.
If you press any buttons when the device is in Stun Mode, the voice announcement indicates that the device is in Stun Mode.
When Device Stun is initiated while your device is in charging mode, the device continues charging but the battery capacity LED bar indicator is not shown. But you can still see the charging LED during the following situations:
- The battery level increases.
- You unplug and replug the charging the USB cable.
When your device is in Stun mode, the following activities occur:
- Scan feature is disabled.
- DND feature is disabled.
- Instant Personal Alert List is cleared.
Emergency Alert List is cleared.
Chapter 16
User Disabled or Suspended
User Disabled or Suspended indicates that your account is disabled or suspended. When your account is disabled or suspended, you are not able to log in to the PTT server.
Your account can be disabled through the WAVE PTX Portal or by an authorized user.
If your account is disabled or suspended, your device shows the following indications:
A tone sounds.
The voice announcement sounds.
- The top and bottom crescent red LED blinks.
The Power, Volume Up, and Volume Down buttons continue to work normally.
If you press the PTT button, your device attempts to log in to the PTT server. If your device is able to connect to the PTT server, you encounter the normal login screen, else, your device sounds the voice announcement.
Chapter 17
Device Kill
Device Kill indicates that your device is permanently disabled.
When your device receives a Kill command when in normal operation mode, your device turns off.
While in Kill mode, User Interface (UI) is not available on your device and you are not able to turn on your device. Your device can only be reactivated by Motorola Solutions.
Contact your dealer for more information.
Chapter 18
Firmware Over the Air (FOTA)
Firmware Over The Air (FOTA) feature allows your device to be updated with latest firmware over the internet.
When the firmware updates are ready for your device, the device shows the following indications:
- A voice announcement sounds that prompts you to restart the device for the firmware installation.
- The two white crescent LED blink twice.

NOTE: If your device battery power is low, the device does install the firmware updates.
Your device continues to show the firmware updates indications until you have restarted the device for every three hours for eight times. You can also use the voice assistant feature to check the firmware updates for your device.
If you have not restart your device after the eighth firmware updates indications, the device shows the following indications:
- A voice announcement sounds that prompts you to press any button to cancel the auto restart for the firmware installation.
- 10 seconds auto restart countdown. The countdown is indicated by the LED bar.

NOTE: If your device battery power is low, the device does not auto restart. Instead, your device continues to show you the firmware updates indications.
Chapter 19
Authorized Accessories List
Motorola Solutions provides a list of accessories to improve the productivity of your device.
Table 11: Cable
| Part Number | Description |
| PMKN4294_ | USB-C to USB-A Cable |
Table 12: Carry Solution
| Part Number | Description |
| PMLN8537_ | TLK 25 Holster Belt Clip |
| PMLN8538_ | TLK 25 Badge Clip |
Table 13: Charger
| Part Number | Description | Power Supply |
| PMPN4659_ | TLK 25 Multi-Unit Charger (MUC) | - |
| PMPN4660_ | TLK 25 Multi-Unit Charger (MUC) for NA | PS000580A01 |
| PMPN4662_ | TLK 25 Multi-Unit Charger (MUC) for EU | PS000580A02 |
| PMPN4663_ | TLK 25 Multi-Unit Charger (MUC) for UK | PS000580A03 |
Table 14: Power Supply
| Part Number | Description |
| PS000150A31 | USB-A, 1.5 A Power Supply Wall Charger, USA/Japan |
| PS000150A32 | USB-A, 1.5 A Power Supply Wall Charger, EURO |
| PS000150A33 | USB-A, 1.5 A Power Supply Wall Charger, UK/HK |
Table 15: Wired-Audio Accessory
| Part Number | Description |
| PMLN8536_ | TLK 25 Earpiece with Cable Clip and Flag Label |
| PMLN8613_ | TLK 25 Short Cord Earpiece with Cable Clip and Flag Label |
- https://www.fcc.gov/
- http://www.who.int/peh-emf/project/en/
- http://www.ic.gc.ca/eic/site/smt-gst.nsf/eng/sf11467.html
- http://www.ic.gc.ca/eic/site/smt-gst.nsf/eng/sf01904.html
Pour obtenir plus d'information, reportez-vous à la section https://www.motorolasolutions.com/en_us/about/company-overview/corporate-responsibility/governance-and-policies.html.