
SU-GX70 - Audio Amplifier TECHNICS - Free user manual and instructions
Find the device manual for free SU-GX70 TECHNICS in PDF.
| Product Type | Network Audio Amplifier |
| Brand | Technics |
| Model | SU-GX70 |
| Dimensions (W x H x D) | 430 x 98 x 318 mm |
| Weight | 7.3 kg |
| Power Supply | 220-240 V AC, 50/60 Hz |
| Power Consumption | 55 W (standby: 0.3 W) |
| Output Power | 2 x 60 W (4 Ω) |
| Compatible Impedance | 4 - 8 Ω |
| Audio Inputs | HDMI ARC, Optical, Coaxial, Phono (MM), RCA Line, USB-A |
| Network Connectivity | Wi-Fi, Bluetooth, Ethernet |
| Streaming Services | AirPlay 2, Chromecast, Spotify Connect, Tidal, Qobuz |
| Supported Audio Formats | MP3, AAC, WMA, FLAC, WAV, DSD |
| Headphone Output | Yes, 6.35 mm jack |
| Speaker Output | Screw terminals |
| Maintenance and Cleaning | Use a soft, dry cloth. Do not use solvents. |
| Safety | Do not expose to moisture or heat sources. |
| Spare Parts and Repairability | Contact an authorized Technics after-sales service. |
| Supplied Accessories | Remote control, power cable, Wi-Fi/Bluetooth antenna |
Frequently Asked Questions - SU-GX70 TECHNICS
User questions about SU-GX70 TECHNICS
0 question about this device. Answer the ones you know or ask your own.
Ask a new question about this device
Download the instructions for your Audio Amplifier in PDF format for free! Find your manual SU-GX70 - TECHNICS and take your electronic device back in hand. On this page are published all the documents necessary for the use of your device. SU-GX70 by TECHNICS.
USER MANUAL SU-GX70 TECHNICS
Music is borderless and timeless, touching people's hearts across cultures and generations.
Each day the discovery of a truly emotive experience from an unencumbered sound awaits.
Let us take you on your journey to rediscover music.
Delivering the Ultimate Emotive Musical Experience to All
At Technics we understand that the listening experience is not purely about technology but the magical and emotional relationship between people and music.
We want people to experience music as it was originally intended and enable them to feel the emotional impact that enthuses and delights them.
Through delivering this experience we want to support the development and enjoyment of the world's many musical cultures. This is our philosophy.
With a combination of our love of music and the vast high-end audio experience of the Technics team, we stand committed to building a brand that provides the ultimate emotive musical experience by music lovers, for music lovers.
Thank you for purchasing this product.
Please read these instructions carefully before using this product, and save this manual for future use.
-
About descriptions in these operating instructions
-
Pages to be referred to are indicated as " oo".
- The illustrations shown may differ from your unit.
-
Unless otherwise indicated, operations are described using the remote control.
-
Illustrations and figures in this manual are of the silver main body.
-
A more detailed operating instruction is available in "Operating Instructions" (PDF format). To read it, download it from the website.
www.technics.com/support/downloads/oi/SU-GX70.html
- You will need Adobe Reader to browse or print "Operating Instructions" (PDF format).
You can download and install a version of Adobe Reader that you can use with your OS from the following website.
https://get.adobe.com-reader/

If you have any questions, visit:
U.S.A.: http://shop.panasonic.com/support
Canada: www.panasonic.ca/english/support
Register online at http://shop.panasonic.com/support (U.S. customers only)
Table of contents
IMPORTANT SAFETY INSTRUCTIONS 05
Installation 07
Control reference guide 08
Connections 11
Basic
Network settings 14
Playback 18
Licenses 20
Specifications 21
Accessories
AC power supply cord (1)
K2CG3YY00219
FM indoor antenna (1)
RSAX0002
Remote control (1)
N2QAYA000239
Batteries for remote control (2)

(ONLY FOR CANADA)
The enclosed Canadian French label sheet corresponds to the English display on the unit.
- Product numbers provided in these operating instructions are correct as of February 2023.
These may be subject to change. - Do not use AC mains lead with other equipment.
IMPORTANT SAFETY INSTRUCTIONS
Read these operating instructions carefully before using the unit. Follow the safety instructions on the unit and the applicable safety instructions listed below. Keep these operating instructions handy for future reference.
1 Read these instructions.
2 Keep these instructions.
3 Heed all warnings.
4 Follow all instructions.
5 Do not use this apparatus near water.
6 Clean only with dry cloth.
7 Do not block any ventilation openings. Install in accordance with the manufacturer's instructions.
8 Do not install near any heat sources such as radiators, heat registers, stoves, or other apparatus (including amplifiers) that produce heat.
9 Do not defeat the safety purpose of the polarized or grounding-type plug. A polarized plug has two blades with one wider than the other. A grounding-type plug has two blades and a third grounding prong. The wide blade or the third prong are provided for your safety. If the provided plug does not fit into your outlet, consult an electrician for replacement of the obsolete outlet.
10 Protect the power cord from being walked on or pinched particularly at plugs, convenience receptacles, and the point where they exit from the apparatus.
11 Only use attachments/accessories specified by the manufacturer.
12 Use only with the cart, stand, tripod, bracket, or table specified by the manufacturer, or sold with the apparatus. When a cart is used, use caution when moving the cart/ apparatus combination to avoid injury from tip-over.
13 Unplug this apparatus during lightning storms or when unused for long periods of time.
14 Refer all servicing to qualified service personnel. Servicing is required when the apparatus has been damaged in any way, such as power-supply cord or plug is damaged, liquid has been spilled or objects have fallen into the apparatus, the apparatus has been exposed to rain or moisture, does not operate normally, or has been dropped.
Warning
Unit
- To reduce the risk of fire, electric shock or product damage,
- Do not expose this unit to rain, moisture, dripping or splashing.
- Do not place objects filled with liquids, such as vases, on this unit.
- Use only the recommended accessories.
- Do not remove covers.
- Do not repair this unit by yourself. Refer servicing to qualified service personnel.
- Do not let metal objects fall inside this unit.
- Do not place heavy items on this unit.
AC power supply cord
- The power plug is the disconnecting device. Install this unit so that the power plug can be unplugged from the socket outlet immediately.
-
Ensure the earth pin on the power plug is securely connected to prevent electrical shock.
-
An apparatus with CLASS I construction shall be connected to a power socket outlet with a protective earthing connection.
Caution
Unit
- Do not place sources of naked flames, such as lighted candles, on this unit.
- This unit may receive radio interference caused by mobile telephones during use. If such interference occurs, please increase separation between this unit and the mobile telephone.
Placement
- Place this unit on an even surface.
-
To reduce the risk of fire, electric shock or product damage,
-
Do not install or place this unit in a bookcase, built-in cabinet or in another confined space. Ensure this unit is well ventilated.
- Do not obstruct this unit's ventilation openings with newspapers, tablecloths, curtains, and similar items.
-
Do not expose this unit to direct sunlight, high temperatures, high humidity, and excessive vibration.
-
Do not lift or carry this unit by holding the knobs or antenna. Doing so may cause this unit to fall, resulting in personal injury or malfunction of this unit.
Battery
- Danger of explosion if battery is incorrectly replaced. Replace only with the type recommended by the manufacturer.
-
Mishandling of batteries can cause electrolyte leakage and may cause a fire.
-
Remove the battery if you do not intend to use the remote control for a long period of time. Store in a cool, dark place.
- Do not heat or expose to flame.
- Do not leave the battery(ies) in a car exposed to direct sunlight for a long period of time with doors and windows closed.
- Do not take apart or short circuit.
- Do not recharge alkaline or manganese batteries.
- Do not use batteries if the covering has been peeled off.
-
Do not mix old and new batteries or different types at the same time.
-
When disposing of the batteries, please contact your local authorities or dealer and ask for the correct method of disposal.
IMPORTANT SAFETY INSTRUCTIONS

CAUTION
RISK OF ELECTRIC SHOCK DO NOT OPEN

CAUTION:
TO REDUCE THE RISK OF ELECTRIC SHOCK,DO NOT REMOVE SCREWS. NO USER- SERVICEABLE PARTS INSIDE.
REFER SERVICING TO QUALIFIED SERVICE PERSONNEL.

The lightning flash with arrowhead symbol, within an equilateral triangle, is intended to alert the user to the presence of uninsulated "dangerous voltage" within the product's enclosure that may be of sufficient magnitude to constitute a risk of electric shock to persons.

The exclamation point within an equilateral triangle is intended to alert the user to the presence of important operating and maintenance (servicing) instructions in the literature accompanying the appliance.
Conforms to UL STD 62368-1.
Certified to CAN/CSA STD C22.2 No.62368-1.
THIS FOLLOWING APPLIES IN THE U.S.A. AND CANADA.
This device complies with part 15 of FCC Rules and Innovation, Science and Economic Development Canada's licence-exempt RSS(s). Operation is subject to the following two conditions: (1) this device may not cause harmful interference, and (2) this device must accept any interference received, including interference that may cause undesired operation.
FCC ID: ACJ-SU-GX70
IC: 216A-SUGX70
This transmitter must not be co-located or operated in conjunction with any other antenna or transmitter. This equipment complies with FCC/ISED radiation exposure limits set forth for an uncontrolled environment and meets the FCC radio frequency (RF) Exposure Guidelines and RSS-102 of the ISED radio frequency (RF) Exposure rules. This equipment should be installed and operated keeping the radiator at least 20cm (7^7 / 8^ ) or more away from person's body.
For indoor use only
THE FOLLOWING APPLIES ONLY IN CANADA.
CANICES-003(B)/NMB-003(B)
THE FOLLOWING APPLIES ONLY IN THE U.S.A. FCC Note:
This equipment has been tested and found to comply with the limits for a Class B digital device, pursuant to Part 15 of the FCC Rules.
These limits are designed to provide reasonable protection against harmful interference in a residential installation. This equipment generates, uses and can radiate radio frequency energy and, if not installed and used in accordance with the instructions, may cause harmful interference to radio communications.
However, there is no guarantee that interference will not occur in a particular installation. If this equipment does cause harmful interference to radio or television reception, which can be determined by turning the equipment off and on, the user is encouraged to try to correct the interference by one or more of the following measures:
- Reorient or relocate the receiving antenna.
- Increase the separation between the equipment and receiver.
- Connect the equipment into an outlet on a circuit different from that to which the receiver is connected.
- Consult the dealer or an experienced radio/TV technician for help.
FCC Caution: To assure continued compliance, follow the attached installation instructions and use only shielded interface cables when connecting to peripheral devices.
Any unauthorized changes or modifications to this equipment would void the user's authority to operate this device.
Supplier's Declaration of Conformity Trade Name:Technics
Model No.: SU-GX70
Responsible Party:
Panasonic Corporation of North America Two Riverfront Plaza, Newark, NJ 07102-5490 Support Contact:
http://shop.panasonic.com/support

Information on Disposal in other Countries outside the European Union
This symbol is only valid in the European Union.
If you wish to discard this product, please contact your local authorities or dealer and ask for the correct method of disposal.
Avoid the use in the following conditions
- High or low extreme temperatures during use, storage or transportation.
- Replacement of a battery with an incorrect type.
- Disposal of a battery into fire or a hot oven, or mechanically crushing or cutting of a battery, that can result in an explosion.
- Extremely high temperature and/or extremely low air pressure that can result in an explosion or the leakage of flammable liquid or gas.
Installation
- Turn this unit off, fold the antenna and disconnect all the equipment before moving this unit. Be sure to raise this unit when moving, and do not drag this unit.
- Confirm the installation location can sustain the weight of this unit. ( 21)
- For the dimensions of this unit ( 21)
- Refer to the following figure for the dimensions of this unit's legs.
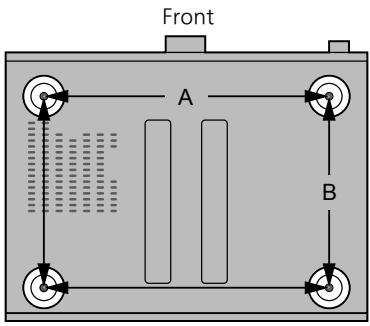
A:xxx.mm
B:xxx mm
Unit care
Pull out the AC mains lead from the socket before maintenance. Clean this unit with a soft cloth.
- When dirt is heavy, wring a wet cloth tightly to wipe the dirt, and then wipe it with a soft cloth.
- Do not use solvents including benzine, thinner, alcohol, kitchen detergent, chemical wiper, etc. Doing so may cause the exterior case to be deformed or the coating to come off.
Using "Technics Audio Center"
If you install the dedicated app "Technics Audio Center" (free of charge) on your tablet/ smartphone, you can stream music files from the device on your network to this unit and configure the settings of sound quality, etc. For details, visit:
www.technics.com/support/
- This application is subject to change or be discontinued with notice.
Firmware updates
Occasionally, Panasonic may release updated firmware for this unit that may add or improve the way a feature operates. These updates are available free of charge.
- For the update information, refer to the following website. www.technics.com/support/firmware/
To restore all the settings to the factory defaults
① Press [SETUP].
② Press [▲], [▼] repeatedly to select "Initialization" and then press [OK].
③ Press [▲], [▼] to select "Yes" and then press [OK].
- A confirmation screen appears. Select "Yes" in the following steps to restore all the settings to defaults.
(4) Press [], [] to select "Yes" and then press [OK] again.
To dispose of or transfer this unit
- Before disposing of or transferring this unit, be sure to erase all the recorded information by restoring the settings to factory default (above).
- Before you dispose of or transfer this unit to a third party, be sure to log out of your music streaming services accounts to prevent unauthorised use of your accounts.
Network services
The services provided by their respective service providers may be changed or discontinued without notice. Panasonic bears no responsibility for change or discontinuance of their services.
Not all music streaming services are available in all countries/regions. Registration/ subscription may be required, or fees may be charged to use music streaming services. Services are subject to change or be discontinued. For details, visit an individual music streaming service's website.
This unit (front)
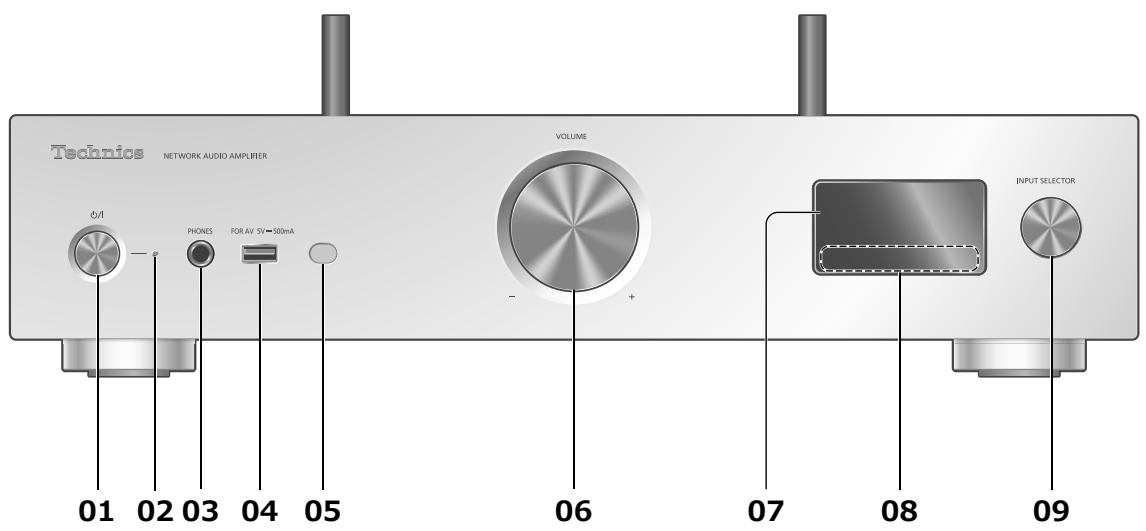
01 [O/I] Standby/on button
- Press to switch the unit from on to standby mode or vice versa. In standby mode, the unit is still consuming a small amount of power.
02 Power indicator
- Blue: The unit is on.
-
Off: The unit is off.
-
Red: The unit is in standby mode.
03 Headphones jack
- When a plug is connected, the speakers and PRE OUT terminals do not output sound.
- Excessive sound pressure from earphones and headphones can cause hearing loss.
- Listening at full volume for long periods may damage the user's ears.
04 USB-A terminal (USB-A)
(For AV) (5 V = 500 mA)
- You can connect a USB device to the unit and play back music stored on the USB device.
- You can connect the USB flash memory with new firmware and update the firmware for this unit. For details, refer to the following website.
www.technics.com/support/firmware/
05 Remote control signal sensor
- Reception distance:
Within approx. 7 m directly in front - Reception angle:
Approx. 30^ left and right
06 Volume knob
-- dB (min), -99.0 dB to 0 dB (max)
07 Display
- Input source, playback status, etc. are displayed.
08 Touch switches
·[↓←], [▶→], [■], [▶/II]:
Playback operation buttons
Each time you press the switch, a beep sound will be heard.
09 Input selector knob
- Turn this knob clockwise or anticlockwise to switch the input source.
This unit (rear)
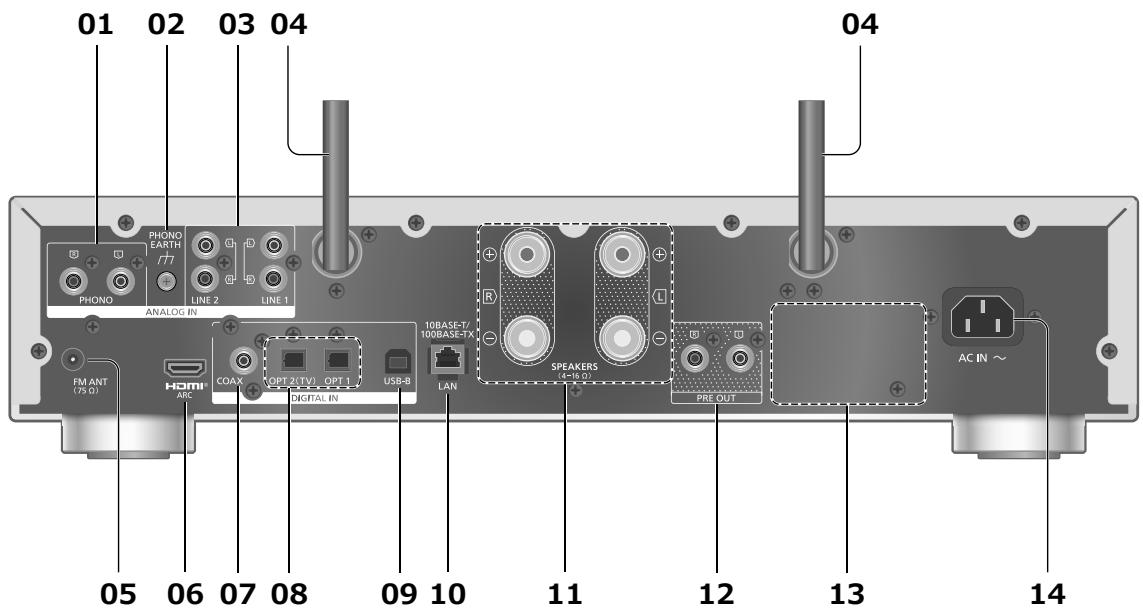
01 Analogue audio input terminals (PHONO)
You can connect the turntable with PHONO cable (not supplied) to this unit and play back music.
- Please use the cable less than 3m .
02 PHONO EARTH terminal
- For connecting the ground wire of a turntable.
03 Analogue audio input terminals (LINE1/LINE2)
You can connect the an analogue audio output device with analogue audio cable (not supplied) to this unit and play back music.
04 Wireless LAN antenna
$$ (\Rightarrow 1 5) $$
05 FM ANT terminal
$$ (\Rightarrow 1 1, 1 8) $$
06 HDMI terminal
You can connect the HDMI equipment with ARC function with HDMI cable (not supplied) to this unit and play back music. ( 11)
- Please use Premium High Speed HDMI cable.
07 Coaxial digital input terminals (COAX)
You can connect a digital audio output device such as D/A converter, etc. with coaxial digital cable (not supplied) and play back music.
08 Optical digital input terminal (OPT1/OPT2)
You can connect a digital audio output device, etc. with optical digital audio cable (not supplied) and play back music.
- When connecting the HDMI equipment without ARC function, connect the equipment with optical digital audio cable (not supplied) to the optical digital input terminal (OPT2) of this unit. ( 11)
09 USB-B terminal (USB-B)
You can connect the PC, etc. or another device with USB 2.0 cable (not supplied) to this unit and play back music.
10 LAN terminal
$$ (\Rightarrow 1 5) $$
11 Speaker output terminals
$$ (\Rightarrow 1 3) $$
12 Analogue audio output terminals (PRE OUT)
You can connect the power amplifier, subwoofer, etc. with analogue audio cable (not supplied) to output the analogue audio signals.
Sound is not output from PRE OUT terminals when "PRE OUT" is set to "Off". (The factory default is "Off".)
13 Product identification marking
- The model number is indicated.
14 AC IN terminal ()
$$ (\Rightarrow 1 3) $$
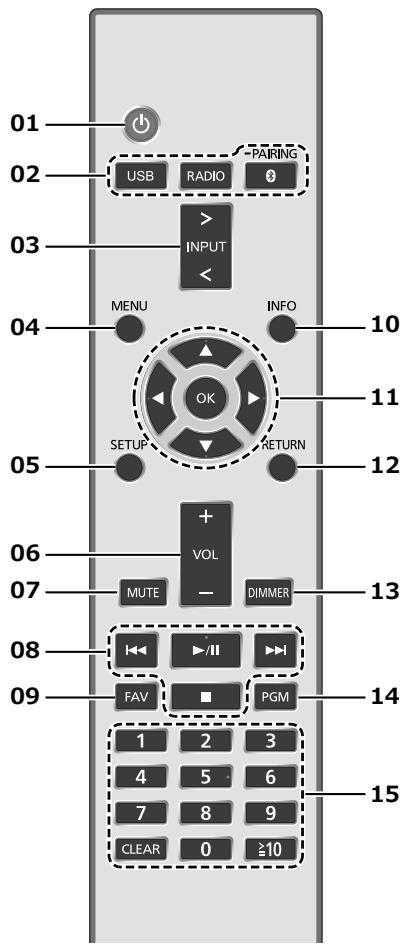
Remote control
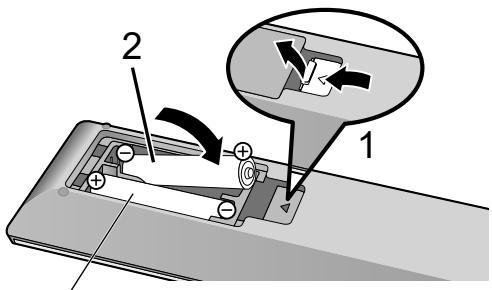
Using the remote control
R03/LR03, AAA (Alkaline or manganese batteries)
Note
- Insert the battery so the terminals ( and ) match those in the remote control.
- Point it at the remote control signal sensor on this unit. ( 08)
- Keep the batteries out of reach of children to prevent swallowing.
01 []: Standby/on switch
- Press to switch the unit from on to standby mode or vice versa. In standby mode, the unit is still consuming a small amount of power.
02 [USB]/[RADIO]/[8-PAIRING]: Select the device to be operated ( 18,19)
03 [>INPUT<]: Switch the input source
04 [MENU]: Enter menu
05 [SETUP]: Enter setup menu
06 [+VOL-] : Adjust the volume
- -- dB (min), -99.0 dB to 0 dB (max)
07 [MUTE]: Mute the sound
- Press [MUTE] again to cancel. "MUTE" is also cancelled when you adjust the volume or when you turn the unit to standby.
08Playback operation buttons
09 [FAV]: Select the favourite radio station or playlist (FM / USB-A / DMP / Internet Radio / Spotify / TIDAL / Deezer / Qobuz, etc.)
- You can register up to 9 favourite stations. To register, press and hold [FAV] while the favourite station or playlist is played back, select the number to register and then press [OK].
10 [INFO]: View content information
- Press this button to display the track, artist, and album names, file type, sampling frequency, MQA® content type and other information. (The information varies depending on the input source.)
11 [▲], [▼], [▲], [▶]/[OK]: Selection/OK
12 [RETURN]: Return to the previous display
13 [DIMMER]: Adjust the brightness of the display, etc.
- When the display is turned off, it will light up for a few seconds only when you operate this unit. Before the display turns off, "Display Off" will be displayed for a few seconds.
- Press repeatedly to switch the brightness.
- You can turn off the power indicator in addition to adjusting the brightness of this unit as 4 steps by pressing [DIMMER] when "DIMMER Steps" is set to "5 (including Blackout)" from the setup menu.
14 [PGM]: Memorise the preset radio channel
15 Numeric buttons, etc.
- To select a 2-digit number Example:
$$ 1 6: [ \geq 1 0 ] > [ 1 ] > [ 6 ] $$
To select a 4-digit number Example:
$$ 1 2 3 4: [ \geq 1 0 ] > [ \geq 1 0 ] > [ \geq 1 0 ] > [ 1 ] > [ 2 ] > [ 3 ] > [ 4 ] $$
- [CLEAR]: Clear the entered value.
FM antenna connection
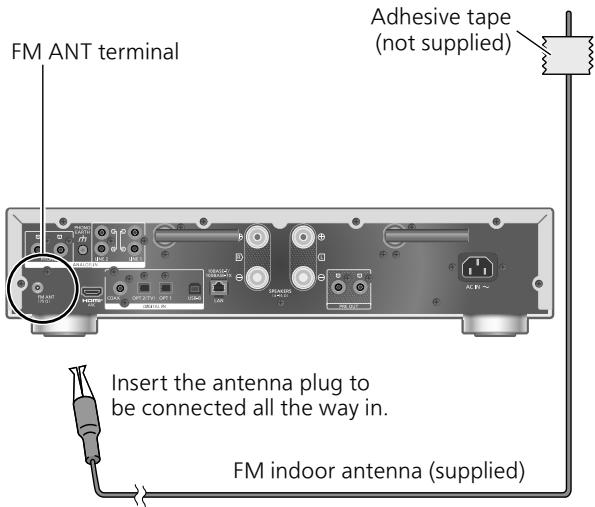
- Tape the antenna to a wall or column at the position with the least amount of interference.
Connecting HDMI equipment with ARC function
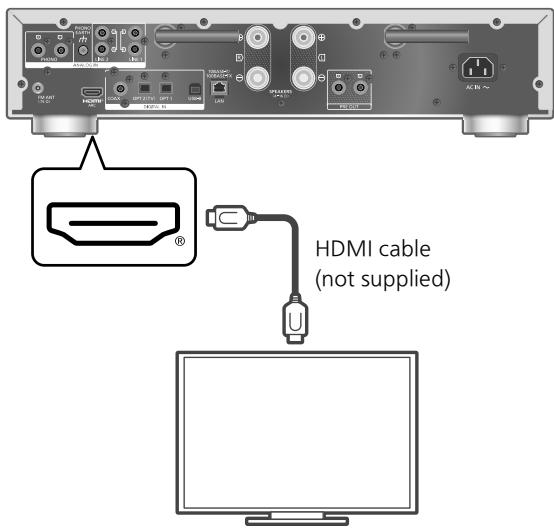
TV, etc.
- Use Premium High Speed HDMI cables when connecting to peripheral devices.
- Connect this unit to the HDMI input terminal which has ARC function.
- Set the audio output from TV speakers to Off.
- Linear PCM signal is only available for ARC function.
- Do not input the signals other than linear PCM signal, otherwise it may cause noise or damage the connected speakers.
- For the equipment does not support ARC function, connect the equipment with HDMI cable (not supplied) and optical digital audio cable (not supplied) to the optical digital input terminal (OPT2) of this unit.
- To use this unit exclusively as the amplification, set "Pure Amplification" to "On (Custom)" and disable the network functions for the higher quality sound. ( 12)
Analogue audio output device connection
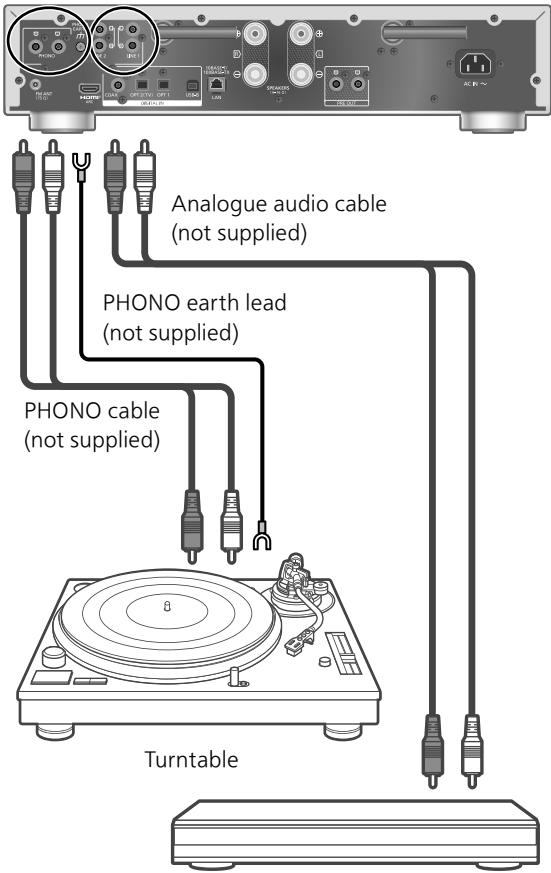
analogue audio output device
- When connecting a turntable with a built-in PHONO equalizer, turn the equalizer of turntable off or connect the PHONO cable to the analogue audio input terminals (LINE1/ LINE2) of this unit.
- When connecting a turntable with a PHONO earth lead, connect the PHONO earth lead to the PHONO EARTH terminal of this unit.
Pure Amplification
By disabling the network functions, etc. this unit operates exclusively as the amplification for the higher quality sound.
- The features such as network, HDMI, etc, are disabled when "Pure Amplification" is set to "On".
① Press [SETUP].
② Press [ ] , [▼] repeatedly to select "Pure Amplification" and then press [OK].
③ Press [▲], [▼] to select "On" and then press [OK].
Note
- This unit is not displayed as the output speakers on "Technics Audio Center" app, etc. after setting.
- Playback of the online music streaming services, music files from network devices, etc. cannot be available while "Pure Amplification" is enabled.
- The display is turned off by dimmer function after setting "Pure Amplification" to "On". Press [DIMMER] repeatedly to switch the brightness. ( 10)
Speaker connection
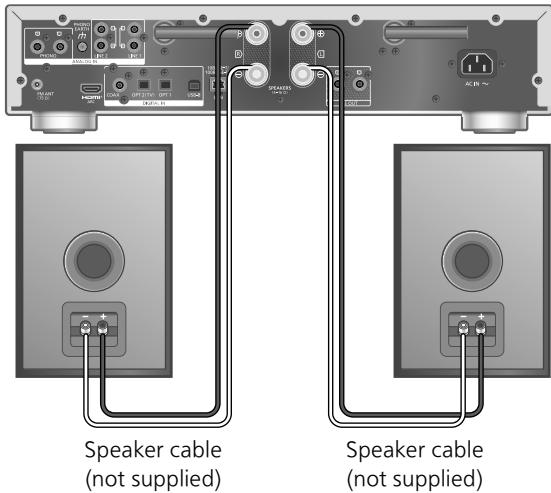
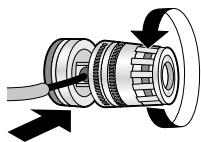
1 Turn the knobs to loosen them, and insert the core wires into the holes.
2 Tighten the knobs.

Note
- When the connections are completed, pull the speaker cables lightly to check that they are connected firmly.
- Be careful not to cross (short-circuit) or reverse the polarity of the speaker wires as doing so may damage the amplifier.
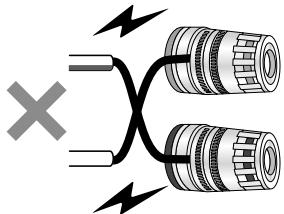
DO NOT
- Wire the polarity (+/-) of the terminals correctly. Not doing so may adversely affect stereo effects or cause malfunction.
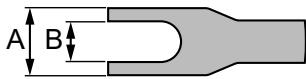
- For details, refer to the operating instructions of the speakers.
- Though the spade plug (A: 16 mm or less, B: 8 mm or more) can be connected, some plug may not be connected depending on the shape of plug.
AC mains lead connection
Connect only after all other connections are completed.
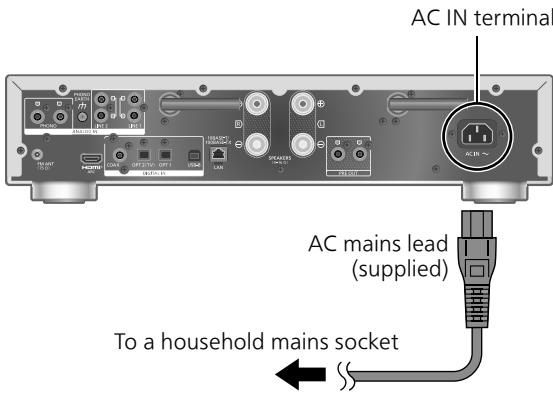
- Use only the supplied AC mains lead.
- Do not connect the AC mains lead until all other connections are complete.
- Insert the plugs of the cables to be connected all the way in.
- Do not bend cables at sharp angles.
- Wireless LAN (Wi-Fi®) setting may start when this unit is turned on. If you stop the Wi-Fi setting, select "No" in "Wi-Fi Setup" screen. Select "Yes" to keep the Wi-Fi setting. ( 15)
Note
- This unit consumes a small amount of AC power ( 21) even when the unit is in standby mode. Remove the plug from the main electrical outlet if you will not be using the unit for an extended period of time. Place the unit so the plug can be easily removed.
- It is recommended that "MQA Decoding" is set to "Off" when the connected digital output device provides MQA full decoding.
You can stream online music services or music files from your smartphone/tablet to this unit. To use these features, this system must join the same internet-connected network as the compatible device.
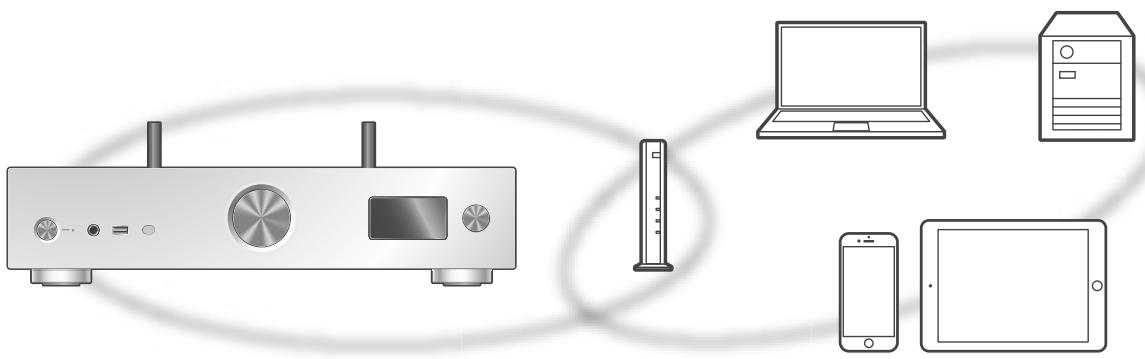
This unit can be connected to a router using a LAN cable or built-in Wi-Fi.
For a stable connection to the network, a wired LAN connection is recommended.
Note
- If you try to change the network settings immediately after turning on this unit, it may take some time until the network setup screen is displayed.
-
If "Firmware update is available" is displayed after the network connection is set up, the firmware for this unit is available.
-
For the update information, refer to the following website. www.technics.com/support/firmware/
-
In order to fully enjoy all the features the SU-GX70 has to offer, it has been designed to work with the Google Home app which integrates with your Google account.
- To use this unit exclusively as the amplification, set "Pure Amplification" to "On (Custom)" and disable the some functions other than network for the higher quality sound. ( 12)
Preparation
If you install the Google Home app or Apple Home app on your smartphone/tablet, you can set up a connection using the application.
- When using Chromecast-enabled apps to play music on this unit, set up a connection using the Google Home app and a Google Assistant-enabled device.
-
When using AirPlay to play music on this unit, add the product to Home in the Apple Home app. Adding this unit to the network via Apple Home app will also allow the user to stream audio using Siri.
-
Make sure that the Wi-Fi function and Bluetooth® function are activated on your smartphones/tablet.
(Using Google Home app)
1 Install the Google Home app on your smartphone/tablet.
- To download the Google Home app, visit: https://www.google.com/cast/setup/

(Using Apple Home app)
1 Install Apple Home app on your smartphone/tablet.
To download Apple Home app, visit: https://www.apple.com/ios/home/

2 Connect your smartphone/tablet to the same network as this unit before setting.
- Make sure that the network is connected to the Internet.
Wired LAN connection
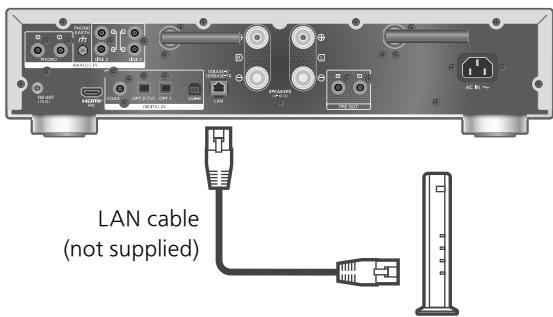
Broadband router, etc.
1 Disconnect the AC mains lead.
2 Connect this unit to a broadband router, etc. using a LAN cable.
3 Connect the AC mains lead to this unit. ( 13)
4 Press [O] to turn this unit on.
- When the connection is established, " 12 " is displayed.
5 Press [>INPUT<] to select "Chromecast built-in".
(Using Google Home app)
6 Open the Google Home app and follow the on-screen instructions to set up a connection. ( 17)
(Using Apple Home app)
6 Open Apple Home app and follow the on-screen instructions to set up a connection. (⇒ 17)
Note
- While the AC mains lead is disconnected, the LAN cable must be connected or disconnected.
- Use category 7 or above straight LAN cables (STP) when connecting to peripheral devices.
- Inserting any cable other than a LAN cable in the LAN port can damage the unit.
- When a LAN cable is connected, the Wi-Fi function may be disabled.
Wireless LAN connection
Preparation
① Disconnect the AC mains lead.
② Disconnect the LAN cable.
③ Place this unit as close to the wireless router as possible.
(4) Point up the antenna on the rear of this unit as shown in the figure.
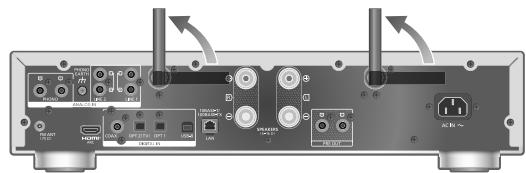
⑤ Connect the AC mains lead to this unit. ( 13)
Note
- The setting will be cancelled after the set time limit. In that case, try the setting again.
- To cancel this setting in the middle, press [■] or turn the unit to standby mode.
- When the connection is established, " 17 displayed. (⇒ 17)
Network setting for the first time using app
1 Press [O] to turn this unit on.
"Wi-Fi Setup" is displayed.
2 Press [] , [] to select "Yes" and then press [OK].
- "Setting" is displayed.
(Using Google Home app)
3 Open the Google Home app and follow the on-screen instructions to set up a connection. ( 17)
(Using Apple Home app)
3 Open Apple Home app and follow the on-screen instructions to set up a connection. ( 17)
Note
- This unit will be displayed as "Technics-SUGX70-*" if the device name is not set. ("*" stands for characters unique to each set.)
- You can check your network information (SSID, MAC address and IP address) from the Google Home app or "Technics Audio Center" app.
- Some items on the Google Home app are irrelevant to this unit.
- When this unit is switched to standby mode and turned on before the Wi-Fi setting is complete, "Wi-Fi Setup" is displayed. Complete the Wi-Fi setting or set "Wi-Fi Menu" to "Off" to turn off the display.
Setting the network from the setup menu (When not using apps with this unit)
- To stream music files with this unit using Chromecast-enabled apps ( 17) , set up the network setting using Google Home app. ( 16)
Using the WPS button "WPS"
If your wireless router supports WPS, you can set up a connection by pressing the WPS button.
- A compatible wireless router may have the WPS identifier mark.
- Complete the settings within 2 minutes while "WPS" is displayed.
- When "Wi-Fi Setup" is displayed when turning on this unit, press [■] to cancel the network setting and start the setting again.
1 Press [SETUP].
2 Press [] , [] repeatedly to select "Network" and then press [OK].
- When "Wi-Fi Menu" screen is displayed, press [OK].
3 Press [] , [] to select "On" and then press [OK]. (The wireless LAN function is enabled.)
4 Press [] , [] to select "WPS Push" and then press [OK].
- "WPS" blinks. Complete step 5 within 2 minutes.
5 After "WPS" is displayed, press the WPS button on the wireless router.
Example:
"Linking" blinks.
- When the connection is established, "Success" is displayed.
- "Fail" may be displayed if the connection was not complete. Try this method again from the setup menu. If "Fail" is still displayed, try other methods.
6 Press [OK] to exit the setting.
Using the WPS PIN code "WPS PIN"
If your wireless router supports WPS, you can set up a connection by entering the WPS PIN code.
- For details on how to enter the PIN code, refer to the operating instructions of the wireless router.
- Complete the settings within 2 minutes while "WPS PIN" and the PIN code are displayed.
- When "Wi-Fi Setup" is displayed when turning on this unit, press [■] to cancel the network setting and start the setting again.
1 Press [SETUP].
2 Press [] , [] repeatedly to select "Network" and then press [OK].
- When "Wi-Fi Menu" screen is displayed, press [OK].
3 Press [] , [] to select "On" and then press [OK]. (The wireless LAN function is enabled.)
4 Press [▲], [▼] to select "WPS PIN" and then press [OK].
- The PIN code is displayed. Complete step 5 within 2 minutes.
5 Enter the PIN code into the wireless router from PC, etc.
"Linking" blinks.
- When the connection is established, "Success" is displayed.
- "Fail" may be displayed if the connection was not complete. Try this method again from the setup menu. If "Fail" is still displayed, try other methods.
6 Press [OK] to exit the setting.
Note
Depending on a router, other connected devices may temporarily lose their connection.
- For details, refer to the operating instructions of the wireless router.
Setting the network from the setup menu (When using app with this unit)
1 Press [>INPUT<] to select "Chromecast built-in".
2 Press [SETUP].
3 Press [] , [] repeatedly to select "Network" and then press [OK].
- When "Wi-Fi Menu" screen is displayed, press [OK].
4 Press [] , [] to select "On" and then press [OK]. (The wireless LAN function is enabled.)
5 Press [▲], [▼] to select "Wi-Fi Setup" and then press [OK].
"Setting" is displayed.
(Using Google Home app)
6 Open the Google Home app and follow the on-screen instructions to set up a connection.
(Using Apple Home app)
6 Open Apple Home app and follow the on-screen instructions to set up a connection.
Using the Google Home app or Apple Home app "Wi-Fi Setup"
1 Open the Google Home app or Apple Home app and follow the on-screen instructions to set up a connection.
-
When the connection is established, "Success" is displayed.
-
"Fail" may be displayed if the connection was not complete. Try this method again from the setup menu. If "Fail" is still displayed, try other methods.
2 Press [OK] to exit the setting.
Note
- This unit will be displayed as "Technics-SUGX70-*" if the device name is not set. ("***" stands for characters unique to each set.)
- You can check your network information (SSID, MAC address and IP address) from the Google Home app or "Technics Audio Center" app.
- Some items on the Google Home app are irrelevant to this unit.
Streaming music over the network
This unit is compatible with Chromecast-enabled apps. For detailed information of Chromecast-enabled apps, visit:
g.co/cast/apps
You can also stream music files from the device on your network to this unit by using the
"Technics Audio Center" app. Download and install the app from the website below.
www.technics.com/support/
And, you can also stream music over AirPlay.
Preparation
- Complete the network settings. ( 14) (Make sure that the network is connected to the Internet.)
- Install the supported application on your device.
- Connect the device to the network currently used at home.
1 Open a Chromecast-enabled app, AirPlay-enabled app or "Technics Audio Center" app on your device (smartphone, tablet, etc.), and select this unit as the output speaker.
2 Play back the music.
Note
- You cannot use Chromecast app with this unit when the network setting is set up by "WPS PIN" for "WPS Push". To stream music files with this unit using Chromecast-enabled apps ( 17) , set up the network setting using Google Home app. ( 16)
Not all music streaming services are available in all countries/regions. Registration/ subscription may be required, or fees may be charged to use music streaming services. Services are subject to change or be discontinued. For details, visit an individual music streaming service's website.
Important notice:
Before you dispose of or transfer this unit to a third party, be sure to log out of your music streaming services accounts to prevent unauthorised use of your accounts.
Playing back music files on the media server
You can share music files stored in the media server (PC, Network Attached Storage, etc.) connected to your home network, and enjoy the contents with this unit.
1. Press [>INPUT<] repeatedly to select "DMP".
- You can also select the input source by turning the input selector knob on the unit.
- The server selection screen will be displayed.
2 Press [] , [] to select a media server on the network, and then press [OK].
- The folder/content selection screen will be displayed. Repeat this step to make further selections.
- Folders/content may be displayed in different order from the order on the server, depending on its specifications.
3 Press [] , [] to select an item and then press [OK].
Note
- The connected server and its contents may not be displayed properly depending on its condition. (e.g. soon after adding the contents to the server, etc.)
- Please try again later. For details, refer to the operating instructions of the device.
- The content may not be played back properly depending on the network condition.
Listening to FM Radio
Storing FM stations
You can preset up to 30 channels.
- A station previously stored is overwritten when another station is selected for the same channel by presetting.
1 Press [RADIO] repeatedly to select "FM".
2 Press [MENU].
3 Press [] , [] repeatedly to select "Auto Preset" and then press [OK].
4 Press [] , [] to select an item and then press [OK].
Lowest:
To begin the auto preset with the lowest frequency (FM 87.50).
Current:
To begin the auto preset with the current frequency.
- The tuner starts to preset all the stations it can receive into the channels in ascending order.
The factory default is "Lowest".
To listen to preset FM channel
① Press [MENU].
(2) Press [] , [] repeatedly to select "Tuning Mode" and then press [OK].
(3) Press [], [] to select "Preset" and then press [OK].
④ Press [I▶], [▶▶] or numeric buttons to select the channel.
Using Bluetooth®
Registering the Bluetooth® device
- Turn on the Bluetooth® feature of the device and place the device near this unit.
- If a Bluetooth® device is already connected, disconnect it.
1 Press [8-PAIRING].
- When "Pairing" is indicated on the display, proceed to step 5.
- By pressing and holding [8-PAIRING] this unit starts waiting for registering. Proceed to step 5.
2 Press [MENU].
3 Press [] , [] repeatedly to select "Pairing" and then press [OK].
4 Press [] , [] to select "Yes" and then press [OK].
- "Pairing" is displayed, and this unit waits for registering.
5 Select "Technics-SU-GX70-****" from the Bluetooth® device's menu.
- The name of the connected device is indicated on the display.
- The MAC address "**" ("*" stands for a character that is unique to each set.) may be displayed before "Technics-SU-GX70-*" is displayed.
- If the device name is set on the Google Home app or Apple Home app, the set name is displayed.
Note
- You can also enter pairing mode by pressing and holding [3- PAIRING] when the input source is "Bluetooth".
- If prompted for the passkey, input "0000".
- While "Standby Mode" is set to "On", this unit automatically turns on when a Bluetooth® connection is established to this unit from a paired Bluetooth® device.
■ Listening to music stored on a Bluetooth® device
1 Press [8-PAIRING].
- "Ready" or "Pairing" is indicated on the display.
2 Select "Technics-SU-GX70-****" from the Bluetooth® device's menu.
- The name of the connected device is indicated on the display.
- If the device name is set on the Google Home app or Apple Home app, the set name is displayed.
3 Start playback on the Bluetooth® device.
Note
- Set "Auto Reconnect" to "On" to connect the last connected Bluetooth® device automatically when "Bluetooth" is selected as an input source.
- This unit can only be connected to one device at a time.
- Disconnecting a Bluetooth® device
1 Press [MENU].
2 Press [] , [] repeatedly to select "Disconnect?" and then press [OK].
3 Press [] , [] to select "Yes" and then press [OK].
Note
- The Bluetooth® device will be disconnected if a different audio source is selected.

CERTIFIED

The Wi-Fi CERTIFIED™ Logo is a certification mark of Wi-Fi Alliance®.
The Wi-Fi Protected Setup™ Logo is a certification mark of Wi-Fi Alliance®.

Works with Apple AirPlay
Use of the Works with Apple badge means that an accessory has been designed to work specifically with the technology identified in the badge and has been certified by the developer to meet Apple performance standards.
Apple and AirPlay are trademarks of Apple Inc., registered in the U.S. and other countries.
This product is compatible with AirPlay 2. iOS 11.4 or later is required.

Chromecast built-in
Google, Google Home, and Chromecast built-in are trademarks of Google LLC.
Google Assistant is not available in certain languages and countries.
Windows is a trademark or a registered trademark of Microsoft Corporation in the United States and other countries.
Windows Media and the Windows logo are trademarks or registered trademarks of Microsoft Corporation in the United States and/or other countries. This product is protected by certain intellectual property rights of Microsoft Corporation and third parties. Use or distribution of such technology outside of this product is prohibited without a license from Microsoft or an authorized Microsoft subsidiary and third parties.
Mac and OS X are trademarks of Apple Inc., registered in the U.S. and other countries.
The Bluetooth® word mark and logos are registered trademarks owned by Bluetooth SIG, Inc. and any use of such marks by Panasonic Holdings Corporation is under license. Other trademarks and trade names are those of their respective owners.
"DSD" is a registered trademark.
FLAC Decoder
Copyright (C) 2000, 2001, 2002, 2003, 2004, 2005, 2006, 2007, 2008, 2009 Josh Coalson. Redistribution and use in source and binary forms, with or without modification, are permitted provided that the following conditions are met:
- Redistributions of source code must retain the above copyright notice, this list of conditions and the following disclaimer.
- Redistributions in binary form must reproduce the above copyright notice, this list of conditions and the following disclaimer in the documentation and/or other materials provided with the distribution.
- Neither the name of the Xiph.org Foundation nor the names of its contributors may be used to endorse or promote products derived from this software without specific prior written permission.
THIS SOFTWARE IS PROVIDED BY THE COPYRIGHT HOLDERS AND COLNTRIBUTORS "AS IS" AND ANY EXPRESS OR IMPLIED WARRANTY, INCLUDING, BUT NOT LIMITED TO, THE IMPLIED WARRANTY OF MERCHANTABILITY AND FITNESS FOR A PARTICULAR PURPOSE ARE DISCLAIMED. IN NO EVENT SHALL THE FOUNDATION OR COLNTRIBUTORS BE LIABLE FOR ANY DIRECT, INDIRECT, INCIDENTAL, SPECIAL, EXEMPLARY, OR CONSEQUENTIAL DAMAGES (INCLUDING, BUT NOT LIMITED TO, PROCUREMENT OF SUBSTITUTE GOODS OR SERVICES; LOSS OF USE, DATA, OR PROFITS; OR BUSINESS INTERruption) HOWEVER CAUSED AND ON ANY THEORY OF LIABILITY, WHETHER IN CONTRACT, STRICT LIABILITY, OR TORT (INCLUDING NEGLIGENCE OR OTHERWISE) ARISING IN ANY WAY OUT OF THE USE OF THIS SOFTWARE, EVEN IF ADVISED OF THE POSSIBILITY OF SUCH DAMAGE.
The Spotify Software is subject to third party licenses found here: https://www.spotify.com/connect/third-party-licenses.

MQA
MQA and the Sound Wave Devices are registered trade marks of MQA Limited. © 2016
HOMI
HIGH-DEFINITION MULTIMEDIA INTERFACE
The terms HDMI, HDMI High-Definition Multimedia Interface, HDMI trade dress, Premium HDMI, Premium High Speed HDMI Cable, Premium High Speed HDMI Cable with Ethernet, Premium HDMI Cable Certification Label, Premium HDMI Cable Logo and the HDMI Logos are trademarks or registered trademarks of HDMI Licensing Administrator, Inc.
GENERAL
| Power supply | AC 120 V, 60 Hz |
| Power consumption | 63 W |
| Power consumption in standby mode etwork standby On) | 2.0 W |
| Power consumption in standby mode Network standby Off) | 0.5 W |
| Dimensions (W×H×D) | 430 mm × 98 mm × 368 mm |
| Mass | Approx. 6.5 kg |
| Operating temperature range | 0 °C to 40 °C |
| Operating humidity range | 35 % to 80 % RH (no condensation) |
AMPLIFIER SECTION
| Output power | 40 W + 40 W (1 kHz, T.H.D. 1.0 %, 8 Ω, 20 kHz LPF) 80 W + 80 W (1 kHz, T.H.D. 1.0 %, 4 Ω, 20 kHz LPF) |
| Load Impedance | 4 Ω - 16 Ω |
| Frequency Response | |
| PHONO (MM) | 20 Hz - 20 kHz (RIAA DEVIATION ±1 dB, 4 Ω) |
| LINE | 20 Hz - 40 kHz (-3 dB, 4 Ω) |
| DIGITAL | 20 Hz - 80 kHz (-3 dB, 4 Ω) |
| Input sensitivity/Input impedance | |
| LINE | 200 mV / 23 kΩ |
| PHONO (MM) | 2.0 mV / 47 kΩ |
TUNER SECTION
Frequency Modulation (FM)
| Preset memory | 30 stations |
| Frequency range | 87.9 MHz to 107.9 MHz (200 kHz step) |
| 87.5 MHz to 108.0 MHz (100 kHz step) | |
| Antenna terminals | 75 Ω (unbalanced) |
Bluetooth® SECTION
| Bluetooth® system specification | Bluetooth® Ver.5.1 |
| Wireless equipment classification | Class 1 (4 mW) |
| Supported profiles | A2DP, AVRCP |
| Supported codec | AAC, SBC |
| Frequency band | 2.4 GHz band FH-SS |
| Operating distance | Approx. 10 m Line of sight*1 |
*1: Prospective communication distance
Measurement environment:
Temperature 25^ /Height 1.0m
Measure in "Mode1"
Wi-Fi SECTION
| Standard | IEEE802.11a / b / g / n / ac / ax |
| Frequency Band | 2.4 GHz band 5 GHz band |
| Security | WPA2™ |
- The WLAN feature of this product shall exclusively be used inside buildings.
TERMINALS SECTION
| Headphones Jack | Stereo, φ6.3 mm 5 mW, 32 Ω (VOL MAX) |
| USB-A (Front) | Type A Connector |
| Support Memory Capacity | 2 TB (max) |
| Maximum number of folders (albums) | 800 |
| Maximum number of files (songs) | 8000 |
| File system | FAT16, FAT32, NTFS |
| USB port power | DC OUT 5 V 0.5 A MAX |
| USB-B (Rear) | Type B Connector |
| Ethernet interface | LAN (100BASE-TX/10BASE-T) |
| Analogue Input | LINE IN ×2 (Pin Jack) PHONO (MM) (Pin Jack) |
| Analogue Output | PRE OUT (Pin Jack) |
| Digital Input | OPT IN ×2 (Optical terminal) COAX IN (Pin Jack) |
| Format support | LPCM |
| HDMI Output (ARC) | Type A Connector |
| Format support | LPCM |
■ FORMAT SECTION USB-A
| USB Standard | USB 2.0 High-speed USB Mass Storage class |
| USB-B | |
| USB Standard | USB 2.0 High-speed USB Audio Class 2.0, Asynchronous mode |
| DSD control mode | ASIO Native mode, DoP mode |
Format
This unit supports the following formats.
- This unit does not support the playback of copy-protected music files.
- Playback of all files in formats supported by this unit is not guaranteed.
- Playback of a file in a format not supported by this unit may cause choppy audio or noise. In such cases, check to see if this unit supports the file format.
- This unit does not support VBR (Variable Bit Rate) playback.
- Some of the connected devices or servers may be capable of converting files in formats not supported by this unit and output them. For details, refer to the operating instructions for your devices or servers.
- File information (sampling frequency, etc.) shown by this unit and playback software may differ from each other.
- Depending on PC, application, etc., the content may not be played back even though the sampling frequency is supported. Check the PC, application, etc., to play back properly.
| Extension | Sampling frequency | Bit rate/ Number of quantisation bits | USB-A | USB-B | LAN (DMR)*2 | |
| MP3 | .mp3 | 32/44.1/48 kHz | 16 to 320 kbps | ✓ | ✓ | |
| AAC | .m4a/.aac | 32/44.1/48/88.2/96 kHz | 16 to 320 kbps | ✓ | ✓ | |
| WAV | .wav | 32/44.1/48/88.2/96/ 176.4/192/352.8/384 kHz | 16/24/32 bit | ✓ | ✓ | |
| FLAC | .flac | 32/44.1/48/88.2/96/ 176.4/192/352.8/384 kHz | 16/24 bit | ✓ | ✓ | |
| AIFF | .aiff | 32/44.1/48/88.2/96/ 176.4/192/352.8/384 kHz | 16/24/32 bit | ✓ | ✓ | |
| ALAC | .m4a | 32/44.1/48/88.2/96/ 176.4/192/352.8/384 kHz | 16/24 bit | ✓ | ✓ | |
| DSD | .dff/.dsf | 2.8/5.6/11.2 MHz | ✓ | ✓ | ✓ | |
| PCM | 32/44.1/48/88.2/96/ 176.4/192/352.8/384 kHz | 16/24/32 bit | ✓ |
*2: Whether or not each music file can be played back over your network is determined by the network server even if the format of the file is listed above. For example, if you are using Windows Media Player 11, not all music files on the PC are playable. You can play back only those added to the library of Windows Media Player 11.
Note
- Specifications are subject to change without notice.
- Mass and dimensions are approximate.
Limited Warranty (ONLY FOR U.S.A.)
Technics Products - Limited Warranty
Limited Warranty Coverage (For USA Only)
If your product does not work properly because of a defect in materials or workmanship, Panasonic Corporation of North America (referred to as "the warrantor") will, for the length of the period indicated on the chart below, which starts with the date of original purchase ("warranty period"), at its option either (a) repair your product with new or refurbished parts, (b) replace it with a new or a refurbished equivalent value product, or (c) refund your purchase price. The decision to repair, replace or refund will be made by the warrantor.
| Product or Part Name | Part | Labor |
| Technics Network Audio Amplifier | 3 (three) years | 3 (three) years |
During the "Labor" warranty period there will be no charge for labor. During the "Parts" warranty period, there will be no charge for parts. This Limited Warranty excludes both parts and labor for non-rechargeable batteries, antennas, and cosmetic parts (cabinet). This warranty only applies to products purchased and serviced in the United States. This warranty is extended only to the original purchaser of a new product which was not sold "as is".
Mail-In Service--Online Repair Request
Online Repair Request
To submit a new repair request and for quick repair status visit our Web Site at
http://shop.panasonic.com/support
When shipping the unit, carefully pack, include all supplied accessories listed in the Owner's Manual, and send it prepaid, adequately insured and packed well in a carton box. When shipping Lithium Ion batteries please visit our Web Site at
http://shop.panasonic.com/support as Panasonic is committed to providing the most up to date information. Include a letter detailing the complaint, a return address and provide a daytime phone number where you can be reached. A valid registered receipt is required under the Limited Warranty.
IF REPAIR IS NEEDED DURING THE WARRANTY PERIOD, THE PURCHASER WILL BE REQUIRED TO FURNISH A SALES RECEIPT/PROOF OF PURCHASE INDICATING DATE OF PURCHASE, AMOUNT PAID AND PLACE OF PURCHASE. CUSTOMER WILL BE CHARGED FOR THE REPAIR OF ANY UNIT RECEIVED WITHOUT SUCH PROOF OF PURCHASE.
Limited Warranty Limits and Exclusions
This warranty ONLY COVERS failures due to defects in materials or workmanship, and DOES NOT COVER normal wear and tear or cosmetic damage. The warranty ALSO DOES NOT COVER damages which occurred in shipment, or failures which are caused by products not supplied by the warrantor, or failures which result from accidents, misuse, abuse, neglect, mishandling, misapplication, alteration, faulty installation, set-up adjustments, misadjustment of consumer controls, improper maintenance, power line surge, lightning damage, modification, introduction of sand, humidity or liquids, commercial use such as hotel, office, restaurant, or other business or rental use of the product, or service by anyone other than a Factory Service Center or other Authorized Servicer, or damage that is attributable to acts of God.
The model number and serial number of this product can be found on either the back or the bottom of the unit.
Please note them in the space provided below and keep for future reference.
MODEL NUMBER SU-GX70
SERIAL NUMBER
THERE ARE NO EXPRESS WARRANTY EXCEPT AS LISTED UNDER "LIMITED WARRANTY COVERAGE".
THE WARRANTYOR IS NOT LIABLE FOR INCIDENTAL OR CONSEQUENTIAL DAMAGES RESULTING FROM THE USE OF THIS PRODUCT, OR ARISING OUT OF ANY BREACH OF THIS WARRANTY.
(As examples, this excludes damages for lost time, travel to and from the servicer, loss of or damage to media or images, data or other memory or recorded content. The items listed are not exclusive, but for illustration only.)
ALL EXPRESS AND IMPLIED WARRANTY, INCLUDING THE WARRANTY OF MERCHANTABILITY, ARE LIMITED TO THE PERIOD OF THE LIMITED WARRANTY.
Some states do not allow the exclusion or limitation of incidental or consequential damages, or limitations on how long an implied warranty lasts, so the exclusions may not apply to you.
This warranty gives you specific legal rights and you may also have other rights which vary from state to state. If a problem with this product develops during or after the warranty period, you may contact your dealer or Service Center. If the problem is not handled to your satisfaction, then write to:
Panasonic Corporation of North America
Consumer Affairs Department
Two Riverfront Plaza
Newark NJ 07102-5490
PARTS AND SERVICE, WHICH ARE NOT COVERED BY THIS LIMITED WARRANTY, ARE YOUR RESPONSIBILITY.
Product registration is not mandatory. Failure to complete the form does not affect the consumer's warranty rights.

for all your Technics gear Go to
http://shop.panasonic.com/support
Get everything you need to get the most out of your Technics products
Accessories & Parts for your Camera, Phone, A/V products, TV, Computers & Networking, Personal Care, Home Appliances, Headphones, Batteries, Backup Chargers & more…
Customer Services Directory
For Product Information, Operating Assistance, Parts, Owner's Manuals, Dealer and Service info go to http://shop.panasonic.com/support
For the hearing or speech impaired TTY: 1-877-833-8855
As of March, 2023
User memo:
| DATE OF PURCHASE | |
| DEALER NAME | |
| DEALER ADDRESS | |
| TELEPHONE NUMBER |
Panasonic Canada Inc.
5770 Ambler Drive, Mississauga, Ontario L4W 2T3
TECHNICS PRODUCT - LIMITED WARRANTY
Panasonic Canada Inc. warrants this product to be free from defects in material and workmanship under normal use and for a period as stated below from the date of original purchase agrees to, at its option either (a) repair your product with new or refurbished parts, (b) replace it with a new or a refurbished equivalent value product, or (c) refund your purchase price. The decision to repair, replace or refund will be made by Panasonic Canada Inc.
Technics Network Audio Amplifier
3 (three) years parts and labour
This warranty is given only to the original purchaser, or the person for whom it was purchased as a gift, of a Technics brand product mentioned above sold by an authorized Panasonic dealer in Canada and purchased and used in Canada, which product was not sold "as is", and which product was delivered to you in new condition in the original packaging.
IN ORDER TO BE ELIGIBLE TO RECEIVE WARRANTY SERVICE HEREUNDER, A PURCHASE RECEIPT OR OTHER PROOF OF DATE OF ORIGINAL PURCHASE, SHOWING AMOUNT PAID AND PLACE OF PURCHASE IS REQUIRED
LIMITATIONS AND EXCLUSIONS
This warranty ONLY COVERS failures due to defects in materials or workmanship, and DOES NOT COVER normal wear and tear or cosmetic damage. The warranty ALSO DOES NOT COVER damages which occurred in shipment, or failures which are caused by products not supplied by Panasonic Canada Inc., or failures which result from accidents, misuse, abuse, neglect, mishandling, misapplication, alteration, faulty installation, set-up adjustments, misadjustment of consumer controls, improper maintenance, power line surge, lightning damage, modification, introduction of sand, humidity or liquids, commercial use such as hotel, office, restaurant, or other business or rental use of the product, or service by anyone other than an Authorized Servicer, or damage that is attributable to acts of God.
Dry cell batteries are also excluded from coverage under this warranty.
THIS EXPRESS, LIMITED WARRANTY IS IN LIEU OF ALL OTHER WARRANTYES, EXPRESS OR IMPLIED, INCLUDING ANY IMPLIED WARRANTY OF MERCHANTABILITY AND FITNESS FOR A PARTICULAR PURPOSE. IN NO EVENT WILL PANASONIC CANADA INC. BE LIABLE FOR ANY SPECIAL, INDIRECT OR CONSEQUENTIAL DAMAGES RESULTING FROM THE USE OF THIS PRODUCT OR ARISING OUT OF ANY BREACH OF ANY EXPRESS OR IMPLIED WARRANTY. (As examples, this warranty excludes damages for lost time, travel to and from the Authorized Servicer, loss of or damage to media or images, data or other memory or recorded content. This list of items is not exhaustive, but for illustration only.)
In certain instances, some jurisdictions do not allow the exclusion or limitation of incidental or consequential damages, or the exclusion of implied warranties, so the above limitations and exclusions may not be applicable. This warranty gives you specific legal rights and you may have other rights which vary depending on your province or territory.
WARRANTY SERVICE
For product operation, repairs and information assistance, please visit our Support page on:
www.panasonic.ca/english/support
IF YOU SHIP THE PRODUCT TO A SERVICENTRE
Carefully pack and send prepaid, adequately insured and preferably in the original carton.
Include details of the defect claimed, and proof of date of original purchase.
Panasonic Corporation of North America
Two Riverfront Plaza, Newark, NJ 07102-5490
http://www.panasonic.com
Panasonic Canada Inc.
5770 Ambler Drive,
Mississauga, Ontario,
L4W 2T3
www.panasonic.com


- Delivering the Ultimate Emotive Musical Experience to All
- Accessories
- IMPORTANT SAFETY INSTRUCTIONS
- Warning
- Unit
- AC power supply cord
- Caution
- Placement
- Battery
- CAUTION:
- THIS FOLLOWING APPLIES IN THE U.S.A. AND CANADA.
- THE FOLLOWING APPLIES ONLY IN CANADA.
- THE FOLLOWING APPLIES ONLY IN THE U.S.A. FCC Note:
- Information on Disposal in other Countries outside the European Union
- Avoid the use in the following conditions
- Installation
- Unit care
- Using "Technics Audio Center"
- Firmware updates
- To restore all the settings to the factory defaults
- To dispose of or transfer this unit
- Network services
- This unit (front)
- [O/I] Standby/on button
- Power indicator
- Headphones jack
- USB-A terminal (USB-A)
- (For AV) (5 V = 500 mA)
- Remote control signal sensor
- Volume knob
- Display
- Touch switches
- Input selector knob
- This unit (rear)
- Analogue audio input terminals (PHONO)
- PHONO EARTH terminal
- Analogue audio input terminals (LINE1/LINE2)
- Wireless LAN antenna
- FM ANT terminal
- HDMI terminal
- Coaxial digital input terminals (COAX)
- Optical digital input terminal (OPT1/OPT2)
- USB-B terminal (USB-B)
- LAN terminal
- Speaker output terminals
- Analogue audio output terminals (PRE OUT)
- Product identification marking
- AC IN terminal ()
- Remote control
- Note
- FM antenna connection
- Connecting HDMI equipment with ARC function
- Analogue audio output device connection
- Pure Amplification
- Speaker connection
- AC mains lead connection
- Preparation
- Install the Google Home app on your smartphone/tablet.
- (Using Apple Home app)
- Install Apple Home app on your smartphone/tablet.
- Connect your smartphone/tablet to the same network as this unit before setting.
- Wired LAN connection
- Wireless LAN connection
- Network setting for the first time using app
- Streaming music over the network
- Important notice:
- Playing back music files on the media server
- Press [>INPUT<] repeatedly to select "DMP".
- Press [] , [] to select a media server on the network, and then press [OK].
- Press [] , [] to select an item and then press [OK].
- Listening to FM Radio
- Storing FM stations
- Lowest:
- Current:
- To listen to preset FM channel
- Using Bluetooth®
- Registering the Bluetooth® device
- Press [8-PAIRING].
- Press [MENU].
- Press [] , [] repeatedly to select "Pairing" and then press [OK].
- Press [] , [] to select "Yes" and then press [OK].
- Select "Technics-SU-GX70-****" from the Bluetooth® device's menu.
- ■ Listening to music stored on a Bluetooth® device
- Select "Technics-SU-GX70-****" from the Bluetooth® device's menu.
- Start playback on the Bluetooth® device.
- - Disconnecting a Bluetooth® device
- Press [MENU].
- Press [] , [] repeatedly to select "Disconnect?" and then press [OK].
- Press [] , [] to select "Yes" and then press [OK].
- CERTIFIED
- Works with Apple AirPlay
- Chromecast built-in
- FLAC Decoder
- MQA
- HOMI
- TUNER SECTION
- Format
- Limited Warranty (ONLY FOR U.S.A.)
- Technics Products - Limited Warranty
- Limited Warranty Coverage (For USA Only)
- Online Repair Request
- Limited Warranty Limits and Exclusions
- PARTS AND SERVICE, WHICH ARE NOT COVERED BY THIS LIMITED WARRANTY, ARE YOUR RESPONSIBILITY.
- Customer Services Directory
- Panasonic Canada Inc.
- TECHNICS PRODUCT - LIMITED WARRANTY
- IN ORDER TO BE ELIGIBLE TO RECEIVE WARRANTY SERVICE HEREUNDER, A PURCHASE RECEIPT OR OTHER PROOF OF DATE OF ORIGINAL PURCHASE, SHOWING AMOUNT PAID AND PLACE OF PURCHASE IS REQUIRED
- LIMITATIONS AND EXCLUSIONS
- WARRANTY SERVICE
- IF YOU SHIP THE PRODUCT TO A SERVICENTRE
Brand : TECHNICS
Model : SU-GX70
Category : Audio Amplifier