
ADURO 15 LUX - Wood stove ADURO - Free user manual and instructions
Find the device manual for free ADURO 15 LUX ADURO in PDF.



| Product type | Wood stove |
| Brand | ADURO |
| Model | ADURO 15 LUX |
| Nominal power | 6,5 kW |
| Flue diameter | Ø15 cm (top/rear) |
| Dimensions (H x W x D) | 84 x 77,9 x 36,6 cm |
| Weight | 94 kg |
| Material | Steel |
| Fuel | Wood and wood briquettes |
| Maximum log length | 50 cm |
| Efficiency | 78 % |
| Energy efficiency index | 104,1 |
| Energy efficiency class | A |
| Heating area (optimum insulation) | 150 m² |
| Heating area (average insulation) | 100 m² |
| Heating area (poor insulation) | 60 m² |
| Convection system | Yes |
| Air supply | Primary, secondary, and tertiary |
| Aduro-tronic system | Yes (automatic regulation) |
| Ash pan | Yes |
| Warranty | 5 years (with free registration) |
| Standards | EN13240, NS3058, Nordic Ecolabel |
| Glass cleaning | Automatic system using secondary air |
Frequently Asked Questions - ADURO 15 LUX ADURO
User questions about ADURO 15 LUX ADURO
0 question about this device. Answer the ones you know or ask your own.
Ask a new question about this device
Download the instructions for your Wood stove in PDF format for free! Find your manual ADURO 15 LUX - ADURO and take your electronic device back in hand. On this page are published all the documents necessary for the use of your device. ADURO 15 LUX by ADURO.
USER MANUAL ADURO 15 LUX ADURO
* with insulated pipe
* with insulated pipe
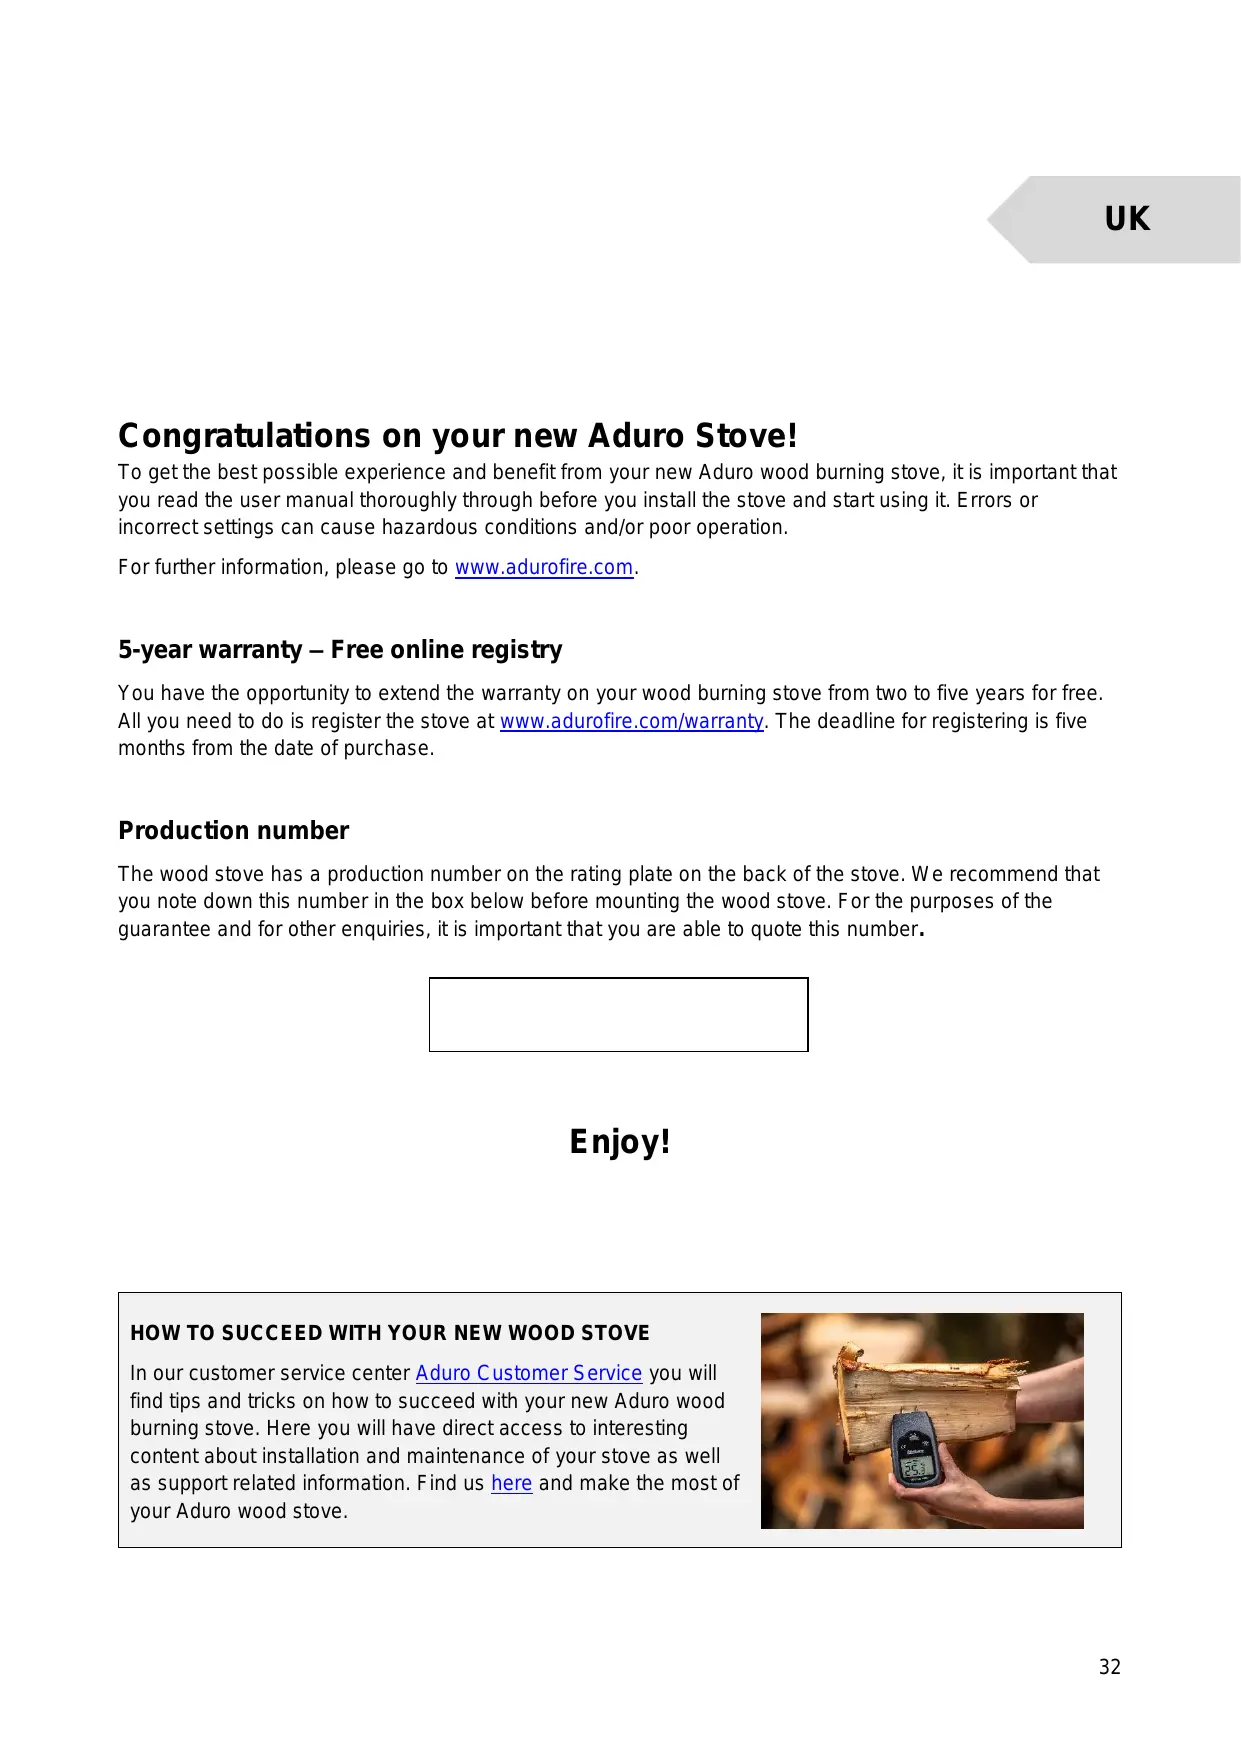
Congratulations on your new Aduro Stove!
To get the best possible experience and benefit from your new Aduro wood burning stove, it is important that you read the user manual thoroughly through before you install the stove and start using it. Errors or incorrect settings can cause hazardous conditions and/or poor operation.
For further information, please go to www.adurofire.com.
5-year warranty – Free online registry
You have the opportunity to extend the warranty on your wood burning stove from two to five years for free. All you need to do is register the stove at www.adurofire.com/warranty. The deadline for registering is five months from the date of purchase.
Production number
The wood stove has a production number on the rating plate on the back of the stove. We recommend that you note down this number in the box below before mounting the wood stove. For the purposes of the guarantee and for other enquiries, it is important that you are able to quote this number.
Enjoy!
HOW TO SUCEED WITH YOUR NEW WOOD STOVE
In our customer service center Aduro Customer Service you will find tips and tricks on how to succeed with your new Aduro wood burning stove. Here you will have direct access to interesting content about installation and maintenance of your stove as well as support related information. Find us here and make the most of your Aduro wood stove.
1. General
1.1 Compliance
Aduro 15 Lux complies with the EN13240 European standard as well as the NS3058 Norwegian standard and is thereby approved for installation and use in Europe. At the same time, the manufacturing process is subject to external quality control. Aduro 15 Lux also carries the Nordic Ecolabel, which guarantees that the wood burning stove complies with the most stringent environmental requirements and has been manufactured in an environmentally correct manner. DoP (Declaration of Performance) can be downloaded at www.adurofire.com/download.
1.2 Technical data
| Aduro 15 Lux | Data |
| Nominal power | 6,5 kW |
| Flue outlet, diameter | Ø150 mm top/rear |
| Measurements (HxBxD) | 84 x 77,9 x 36,6 cm |
| Height exhaust branch above floor | 82 cm |
| Distance from floor to centre of rear outlet | 68,7 cm |
| Distance from centre of exhaust branch to rear edge of stove | 18,5 cm |
| Weight | 94 kg |
| Material | Sheet iron |
| Fuel | Wood and wood briquettes |
| Max wood length | 50 cm |
| Convection stove | ✓ |
| Primary, secondary, and tertiary air supply | ✓ |
| Air-wash system | ✓ |
| Ashpan | ✓ |
| Energy efficiency | 78 % |
| Energy efficiency index | 104,1 |
| Energy efficiency class | A |
| Chimney draft | 12 Pa |
| Maximum combustion amount per hour (wood) | Approx. 3,1 kg |
| Heat rating in buildings with - Optimum insulation - Average insulation - Inadequate insulation | 150 m² 100 m² 60 m² |
1.3 Transportation
When taking your wood burning stove home, please ensure that it travels in an upright position. If you wish to lay it flat, it is important that you remove all loose parts from the combustion chamber (cast iron grate and loose fireproof tiles) and remove the ashpan. Please use wood from the packaging for the first use. The plastic packaging should be discarded.
2. Installation of the stove
You are welcome to install your wood burning stove yourself – but we strongly recommend that you consult your chimney sweep before you begin the installation. It is important to ensure that all local rules and regulations, including ones relating to national and European standards, are complied with when installing this device. Your dealer can also provide you with installation advice. Remember, it is your responsibility that rules in force are complied with.

You may not begin to use the stove until it has been inspected and approved by your local chimney sweep.
2.1 Position of the stove / distance requirements
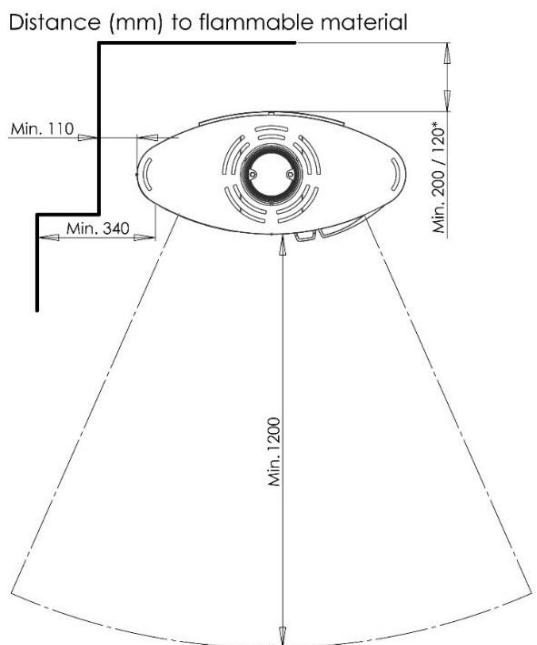
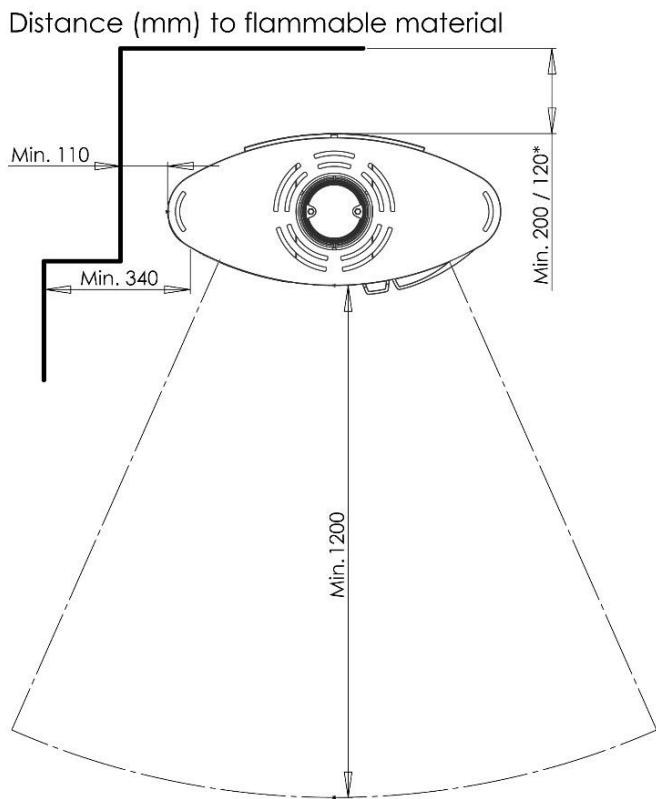
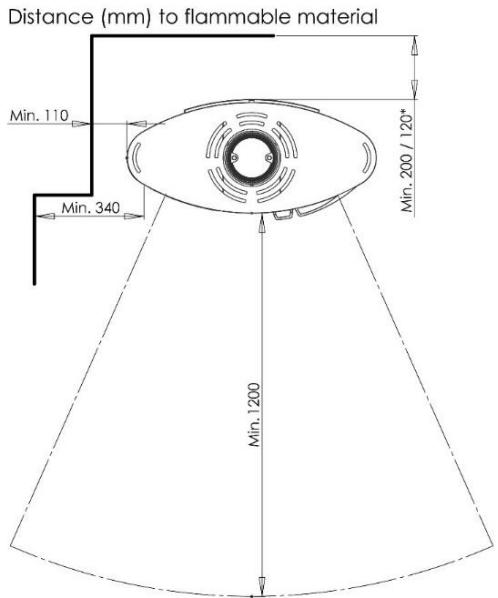
The wood burning stove must be installed in a suitable and physically possible position. You need to be sure that the position complies with local regulations. Distance requirements will only apply if the wood burning stove is to be placed close to flammable materials:
| Distance to flammable material (see also illustration below) | ||||
| Behind the stove | Behind stove with insulated flue pipe | To the sides | Above the stove | Distance to furniture |
| 20 cm | 12 cm | 34/11 cm | 75 cm | 120 cm |
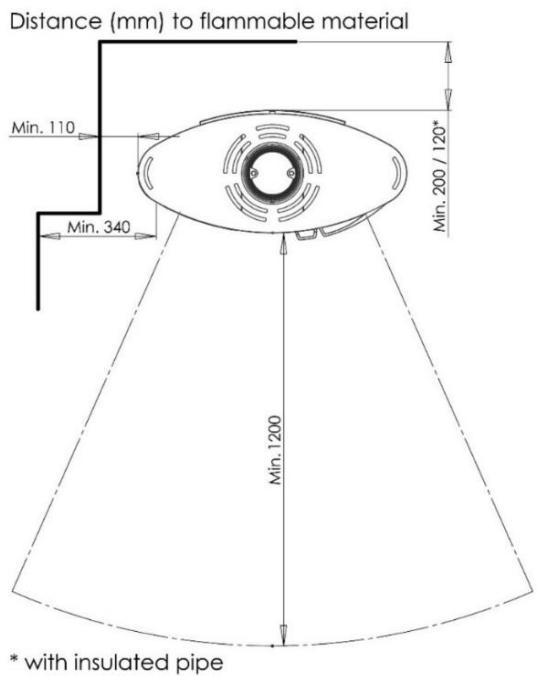
If the stove is positioned against a brick wall or other non-flammable material, there are no minimum distance requirements. To facilitate cleaning and for the best use of the convection air, we recommend that you leave a distance of approximately 5-10 cm to the wall.
If the wood burning stove is to be placed close to flammable material such as a wooden floor or carpet, it must be placed on a non-flammable base. The floor plate should extend for at least 30 cm in front of the wood burning stove and 15 cm on each side measured from the opening of the combustion chamber.

The wood burning stove must be installed on a floor with the adequate load-bearing capacity. If the existing construction does not meet this requirement, appropriate adaptation measures must be taken (e.g. a load-distributing plate).
2.2 Pipe connection
Aduro 15 Lux leaves the factory with the flue outlet mounted on the top. If you require the flue outlet on the back, "brake" the two cover plates on top of the back of the stove. Exchange the exhaust connector (from the top outlet) with the cover plate from the rear outlet. Mount the cover plate from the rear outlet to the top outlet. The top outlet is finished with the plate that lies in the ashpan. A flue pipe with an internal diameter of 150mm should be used for Aduro stoves.
Please ensure that building regulations are complied with, including CE marking of the exhaust connector. Additionally, distance requirements to flammable material for the exhaust connector must be respected.
2.3 Connection to a brick chimney
If the stove is being connected to a brick chimney, the rear outlet or a curved flue pipe via the top outlet should be used. After measuring, a hole is made in the chimney in which the pipe sleeve is placed and stove mortar is used to seal it in place. The stove is placed in position and the flue pipe is put in place. A thin gasket is placed between the flue pipe and the pipe sleeve to seal the joints. The flue pipe should protrude into the pipe sleeve, but must not block the opening in the chimney (see the illustration below):
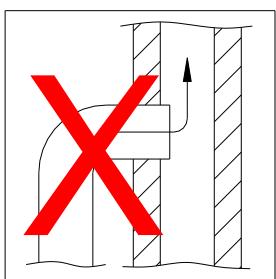
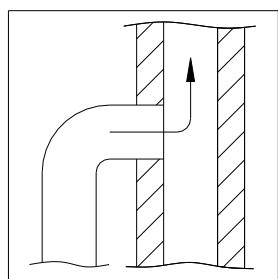
The stove can be connected to a chimney to which other heat sources are connected.
2.4 Supply of combustion air
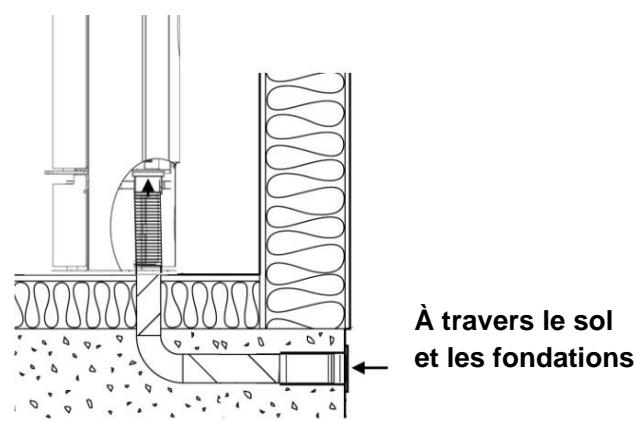
All wood burning stoves need constant supply of air to ensure a clean and efficient combustion. This is often a problem in modern energy-efficient houses that are very tight. Therefore, the Aduro 15 Lux is equipped with external supply of combustion air, where the air to the combustion is supplied from the outside and directly into the wood burning stove. Air from the outside can be provided through a channel, which is connected to the connecting pipe under the combustion chamber. The amount of air needed for combustion is 25m3 / h .
The connecting pipe has an external diameter of 78 mm , to which you need a pipe with a diameter of 80 mm . If the pipe work is further than 1 m , the pipe diameter must be increased to 100 mm and a correspondingly
larger wall valve must be chosen. In warm rooms the channel should be insulated with 30 mm mineral wool covered with a damp-proof course (plastic). It is important that the lead-in between the pipe and the wall (or floor) is sealed with jointing compound. You can eventually use the complete Aduro fresh air kit.
The pipe with external supply of combustion air can be taken out at the bottom of the back side of the stove or under the stove (see illustration below):
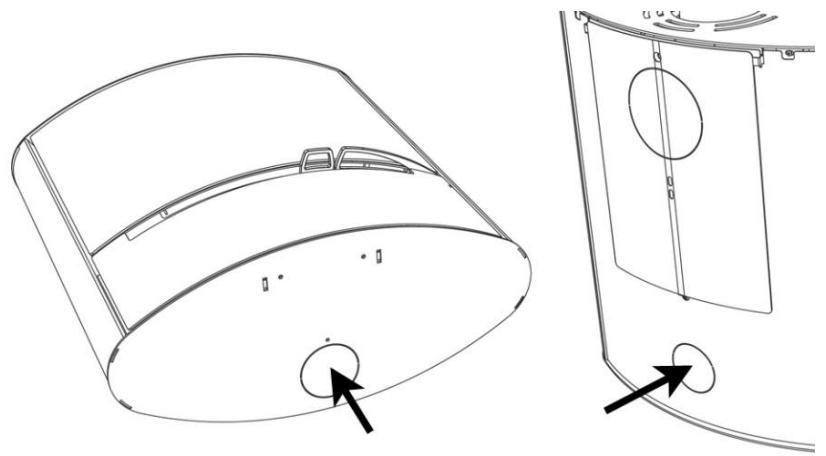
If you want to use the wood burning stove without connecting the supply of combustion air, "brake" off the cover plate in the rear cover at the bottom of the back of the stove.
2.5 Ways of installation
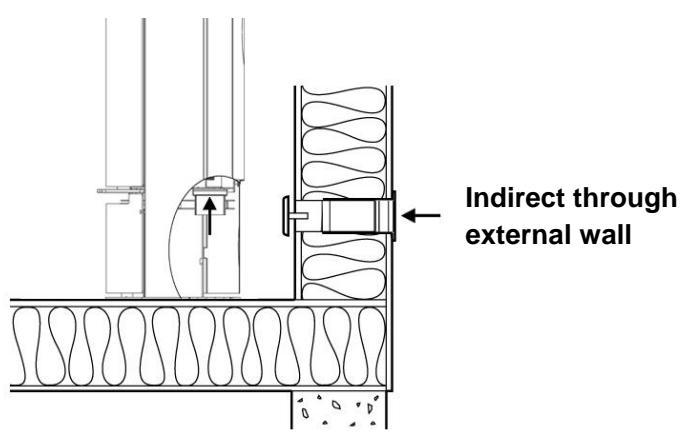

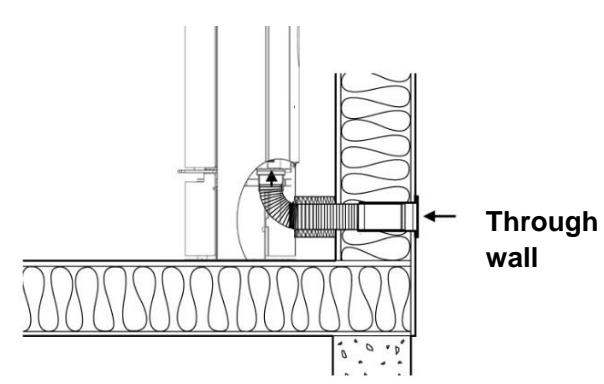
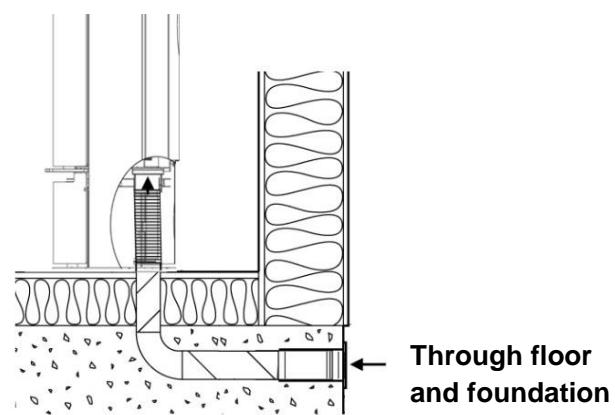
Do not install the stove in the following ways:
Through a damp crawl space:
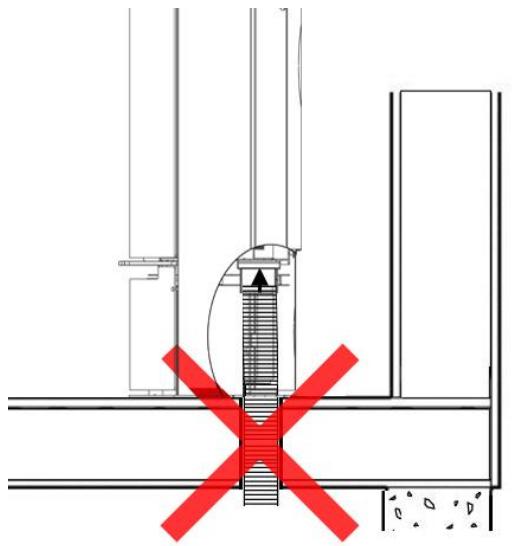
If the air is drawn from a damp crawl space, you won't achieve an optimum air intake.
With air intake upwards:
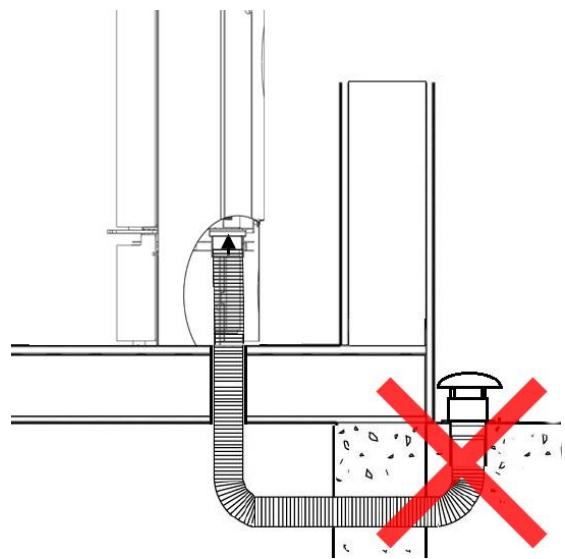
If the air intake is turned upwards, there will be too much resistance for the air intake.
2.6 Safety wire
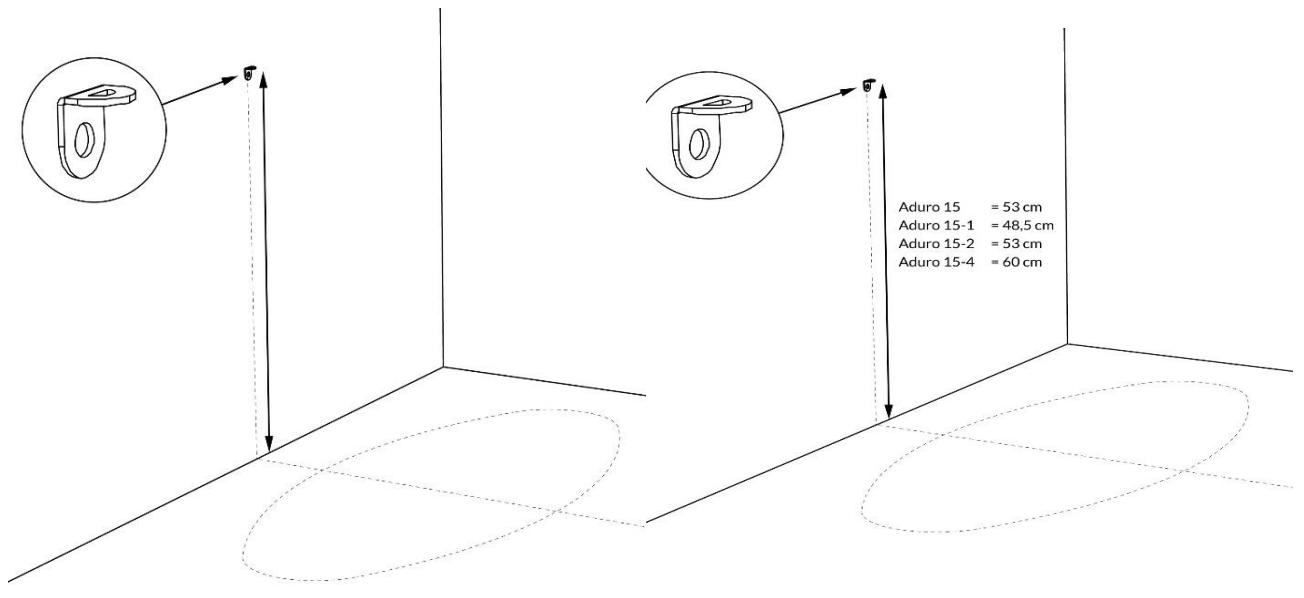
The stove comes with a safety wire. Please follow the mounting instructions below:
- Mount the bracket on the wall central to the stove:
a. For Aduro 15: Approx. 53 cm above the floor hearth.
b. For Aduro 15 Lux: Approx. 53 cm above the floor hearth.
c. For Aduro 15.1: Approx. 48.5 cm above the floor hearth.
d. For Aduro 15.2: Approx. 53 cm above the floor hearth.
e. For Aduro 15.4: Approx. 60 cm above the floor hearth.
f. For Aduro 15SK / 15SK Limestone: Approx. 53 cm above the floor hearth.
g. For Aduro 18: Approx. 69.4 cm above the floor hearth.
h. For Aduro 20: Approx. 53 cm above the floor hearth.
-
Slide the safety wire through the two oblong holes in the backplate of the stove as well as through the eye in the wall bracket. The safety wire ends must be secured in the rectangular wire lock
-
The length of the wire is adjusted and the wire lock tightened. Excess wire is cut off. In case the wire should be real tightened, the stove can temporarily be pushed slightly against the wall, while tightening the wire.
3. Lighting the stove
Important safety information
- The wood burning stove will become warm during use and therefore it should be treated with all necessary caution.
- Never keep easily combustible fluids such as petrol in the vicinity of the wood burning stove.
- Never use easily combustible fluids to light the fire in the wood burning stove.
- When lighting a fire, it is important to get the fire burning fast. If the fire does not start quickly and wood only smoulders, it can cause strong smoke formation and in worst case cause an explosive ignition of the flue gasses, which can damage the stove.
- Never empty the ashpan when the wood burning stove is warm. Embers may still be found in the ashpan for up to 24 hours after the fire has gone out. Please wait to empty the ashpan until you are sure that there are no embers in the ash.
- The door should be kept closed while the wood burning stove is in use. While lighting the fire, the door can stand ajar for the first few minutes.
- In the event of a chimney fire: Close all the dampers on the wood burning stove and call the firefighting service.
3.1 Damper
The stove is equipped with a damper under the door, which regulates the combustion air: primary, secondary, and tertiary air supply. The primary air is used at the beginning to get the fire going, the secondary air keeps the fire burning evenly, and the tertiary air ensures that flue gasses are burned. You must always add secondary and tertiary air, while firing the stove.
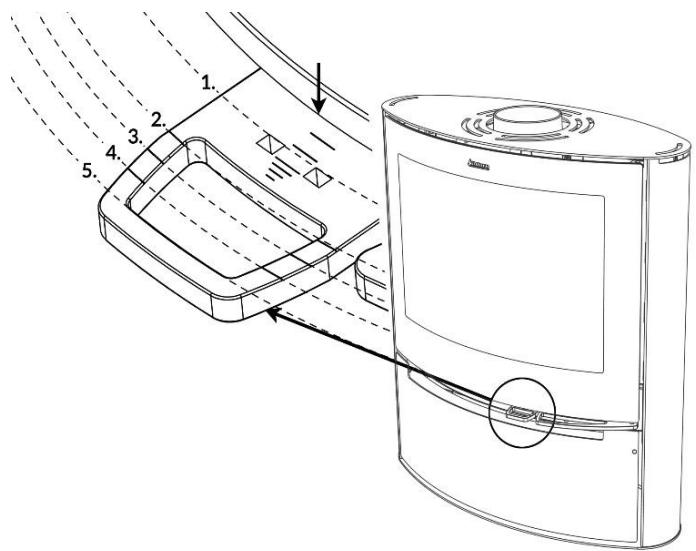
The damper allows you to adjust the stove according to the chimney draft and the heat output you require. The longer the damper is pulled out, the more air is added and the more powerful the combustion. The illustration below shows the stove seen from the front with the dampers indicated. Use edge of door to read position of inlet air:
1: Fully open primary, secondary, and tertiary air inlet. This position can be maintained with the Aduro key, which must be placed in the two holes.
2: Closed primary air inlet, fully open secondary and tertiary air inlet.
3: Closed primary air inlet, half way closed secondary air inlet, and fully open tertiary air inlet.
4: Closed primary and secondary air inlet, fully open tertiary air inlet.
5: Regulator pushed all the way in. All air inlet closed.
3.1.1 Secondary air supply
In normal circumstances, the wood burning stove should be working with this damper open between 60% and 100% . You should never close the air intake so far that the flames are extinguished. There should always be visible flames in order to achieve clean and efficient combustion. A too low supply of air can lead to bad combustion, high emissions and a bad efficiency. The air-wash system that minimizes soot collecting on the glass panes is also adjusted by this damper.
If you want to fire the stove with the lowest effect possible – around 3kW – you must close the secondary damper almost completely 45 minutes after the wood has been put in. At this point there are only few flames and the stove can burn clean by using the tertiary air from behind in the stove.
3.1.2 Primary damper
When you add a new log, the primary damper should be opened until the fire is burning properly. In order to utilize the fuel to the fullest extent, the embers should have burnt for so long that it is necessary to open the primary damper for approx. 2 minutes to get the new log to burn.
In order to reduce the risk of ash falling from the stove when the door is opened to add more fuel, it is a good idea to open the primary damper for approx. 1 minute before the door is opened. This increases the draft through the stove and reduces the risk that ash will drop on the floor.

If you overload the wood burning stove and burn more than approx. 3,1 kg wood/hour, there is a risk that the lacquered surface of the stove will become discoloured and eventually fall off. The stove can be resurfaced, but this is not covered by the manufacturer's guarantee. In the same way, any other damage to the stove caused by overloading will not be covered by the guarantee.
3.2 Aduro-tronic
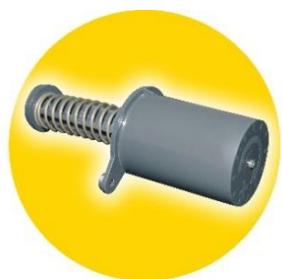
The patent-APplied control Aduro-tronic is a manually operated mechanical start-up device, which works without the use of electricity and automatically regulates the combustion. All you have to do is put dry wood in the stove and activate the control system. Aduro-tronic does the rest, leaving you to enjoy the flames, the benefits of
3.2.1 How to operate Aduro-tronic
When lighting
When lighting a fire in the stove for the first time, the maximum amount of primary air will be needed to light the fire. For that reason, the primary damper can be kept "forcibly open". This is done by pulling the primary damper forward as far as possible and then fixing it with the Aduro Key (see illustration). When the stove is warm and a layer of embers has been created on the bottom of the combustion chamber, the Aduro-tronic can be set to the automatic position, i.e. the Aduro Key can be removed. Alternatively, you can leave the door ajar the first minutes during lighting the fire (without the key).
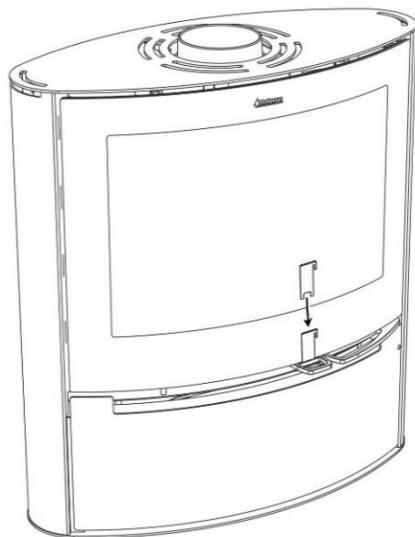
When stoking
Each time fresh wood is put in the stove, a precise amount of primary
air will be allowed in for the first few minutes. What's more important is that the primary air is not allowed in for too long. This is to ensure optimum combustion. The Aduro-tronic control will ensure intake of primary air at the right tempo. The automatic is activated by pulling the primary damper out each time fresh wood is put in the stove. The automatic closes then the primary air gradually.
Regulation of the Aduro-tronic control
The control is pre-set to close the primary air intake within 6 minutes. This setting has been used during testing at the Danish Technological Institute using a standard chimney and 'standard' sized logs (approx. 30 cm long, 10x10 cm thick) with maximum moisture content of 18% . In practice, such circumstances can differ, which is why the Aduro-tronic control can be adjusted to your circumstances. If you want a slower intake of primary air (e.g. for a slower flue draft, larger sized wood or for longer intervals between stoking), adjust the screw on the front of the control level using a small allen key to slow closure rate. If the screw is turned to the right, closing time is increased and if turned to the left, closing time is reduced.
3.3 How should I use my wood burning stove?
The wood burning stove is intended for intermittent combustion. This means that each stoking should burn down to embers before new logs are added.
To obtain the best possible combustion, you should regulate the effect/heat output with the fuel. Burning small logs provides more powerful combustion than burning large logs as the surface area is greater and more gas is released. The amount of wood in the combustion chamber is another factor that affects combustion. The optimum combustion is achieved by placing two logs in the stove. If you want an enhanced effect, you can add more logs. The ideal heat output is reached by burning approx. 1,5 kg per hour.
If you experience problems lighting the fire or the fire dies after a short time, it can be due to the following reasons:
-
The fire wood is not dry enough. The fire wood should have a moisture content of max. 18% .
There is a negative pressure in the house. -
The smoke outlet from the outside may be blocked from sooth. This can occur after chimney sweeping. Control the smoke outlet.
- The used amount of wood may have been too small. Therefore, the embers were too weak and cold to light the next load of wood.

Use of dry wood of the right size is important to achieve optimum combustion.
3.4 The first time a fire is lit
The wood burning stove is packed in recycling packaging. The wood from the packaging can be sawed into smaller pieces and used the first few times a fire is lit. The plastic packaging must be disposed according to national rules regarding disposal of waste.
During transportation, it may happen that the baffle plate in steel falls out of place. Therefore, before using the stove, please make sure that the baffle plate is properly placed (on the hooks or fastened to the bolts depending on the model) for optimum combustion and preventing soot on the glass.
The first few times the wood burning stove is used, there may be some smoke and unpleasant odours from the wood burning stove, which is fairly normal. This is caused by the heat-resistant paint hardening. Make sure there is sufficient ventilation during this stage. It is also important not to let the fire burn too fiercely the first 2-3 times, so that the wood burning stove has time to expand slowly.
You should also be aware that the stove may make some clicking sounds as it heats up and cools down – like pouring boiling water into a sink. These are caused by the great differences in temperature to which the materials are being exposed.

During the first firing, which should be carried out using approximately 1kg of wood, the stoking door must be left slightly open and must not be closed until the stove is cold. This is to prevent the sealing rope sticking to the stove.
3.5 Lighting a fire in the wood burning stove
The fire lighting method is very important for starting combustion quickly and efficiently.
- Pull the damper under the door forward to open primary, secondary, and tertiary air supply.
- Place a log of wood crosswise in the combustion chamber and put 2 firelighters close to the log. Light the firelighters and quickly put a new log close to the firelighters and several small logs at an angle above it. Air must be able to reach the firelighters, but the logs should be touching to "warm" each other.
- Keep the door approx. 1 cm ajar, until the glass is too hot to touch. Then close the door. When there are distinct, visible flames and the fire has taken hold, close the primary air intake/damper (see section 3.1.2).

The control handles will get warm when the wood burning stove is in use. Please use the glove provided when you operate the wood burning stove.
3.6 Recommended fuels
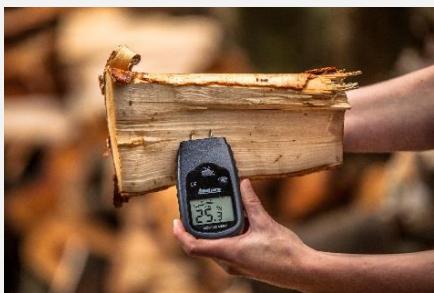
Wood and wood briquettes. We recommend the use of split hardwood that has been stored outdoors under cover for at least 1 year. Wood that has been stored indoors has a tendency to become too dry and will burn too quickly. We recommend that you fell the wood during the winter when a lot of the moisture in the wood will have been drawn down into the roots. In order to achieve optimum combustion, the wood's moisture level should not exceed 18% , which roughly corresponds to storing the wood under cover outdoors for one year. The moisture level of the wood can be measured using a moisture meter or by applying dishwashing liquid to one end of the log and blowing air in the other end. If the wood is dry enough, soap bubbles will appear. The wood should be chopped into logs with a diameter of approx. 10cm and a log length of max. 50cm . Firing with wet fuel will reduce the energy efficiency and increase the particle emission.
Burning varnished wood, impregnated wood, chipboard, paper, and other waste is strictly forbidden. Burning these materials will damage the environment, the wood burning stove, and your own health. Fossil fuels must not be used.
4. The chimney
The optimum combustion is achieved at a constant chimney draft of 10-14 Pascal (Pa) measured in the flue pipe above the stove (when having a smoke exhauster). However, with natural draft (chimney without smoke exhauster) the draft in the chimney will be between 18-25 Pa when conditions are optimum. There are many factors that affect the chimney draft, including the outside temperature, wind strength, and surrounding buildings. There are no requirements with respect to specific chimney heights, but a chimney must be tall enough to provide a good draft. If the recommended chimney draft is not achieved, there may be problems with smoke out of the door by firing.
| Data for chimney calculation | Wood |
| Flue temperature at [20°C] | 395 |
| Chimney draft at testing power [mbar]/[Pa] | 0,12 / 12 |
| Flue gas mass flow [g/s] | 5,4 |
4.1 Inadequate draft in the chimney
If you experience poor draft in the stove after the installation, please make sure that there is nothing in the chimney to restrict the smoke and that no nearby buildings or trees affect the winds around the chimney.
If the chimney is too short, leaks, or is inadequately insulated, there may be problems with the chimney draft (let the chimney sweep assess this). The draft should be sufficient during the ignition phase when the stove/chimney is cold to provide a clean combustion and prevent smoke leakage. Therefore, we recommend a chimney draft around 5 Pa in the ignition phase.
Once the ignition is a success and the smoke temperature is rising, it is important that the chimney draft reaches a stable area around 18-25 Pa in operation (1 hour after ignition) when the chimney/stove is hot. The draft in the area of 18-25 Pa when the stove is hot is essential in order to achieve an optimum and clean
combustion. Therefore, we recommend that you measure your chimney draft when the chimney is cold and when it is hot after 1 hour in operation.
In practice, the chimney draft will differ – especially in cold condition. Therefore, the best indication of the chimney draft is to measure the draft when it is hot. If the chimney sweep judges the draft to be sufficient, but you still have problems lighting a fire, try extending the fire lighting phase by using more thin pieces of kindling and 1-2 firelighters, so that the chimney gets thoroughly warm. The chimney will not draw at optimum effect until it is warm. When a layer of embers has been formed, add 2-3 dry logs.
If it is impossible to establish a sufficiently natural chimney draft, the chimney can be fitted with a smoke exhauster, e.g. Aduro DraftOptimizer.
4.2 Chimney and Smoke
If you experience smoke coming out of the stove or the start section of the smoke pipe, it could be due to certain weather conditions. On stormy or cold winter days or if the chimney has not been used in a while, a cold plug can be created in the chimney, meaning the natural draft will be at its minimum.
If the chimney is cold and cold plugs are created, you may experience smoke leaks during the ignition and startup phase. In this situation there can be more smoke than usually in the combustion chamber and some of it might leak out of the stove. Therefore, if you have a cold chimney that has not been used for a while, we recommend that you use some wood sticks to heat the chimney and eliminate the cold plug.
5. Maintenance and cleaning of the stove

All maintenance and cleaning of the stove should be carried out when it is cold.
Combustion chamber
The fireproof tiles in the combustion chamber eventually wear out and should be replaced when the cracks are more than 0.5cm . The durability of the tiles depends on how often and how intensively the stove is used. You can change the tiles yourself. They are available as a ready-to-use set. For further information, go to www.aduroshop.com.
Glass
Wet wood, unsatisfactory chimney draft, and wrong use of the stove can leave soot stains on the glass pane. They can easily be removed using a damp cloth that you dip in cold ash and rub on the sooty glass. Special cleaning agents are also available to remove soot from glass, e.g. the Aduro Easy Clean pad. The pad neither scratch nor damage the glass and is for multiple usage. Water or other cleaning agents are not necessary.
It is common maintenance to tighten the glass fittings shortly after the stove has been installed as well as to check if the gaskets are properly placed.
Gaskets
With time, gaskets around glass and door will wear. We recommend that you inspect them regularly. If leakages appear, they must be replaced.
Ashes
Empty the ashpan before it gets completely full. Always leave a layer of ashes in the stove because it insulates and makes it easier to light a fire.
Cleaning the stove
The stove's surface is treated with a heat-resistant Senotherm® paint, which will stay at its best just by being vacuumed with a small, soft mouthpiece or dusted with a soft, dry cloth. Do not use spirit or other solvents, as they will remove the paint.

Do not clean the stove with water. If the stove is exposed to moisture, the stove may develop rust.
The inside of the stove and the flue pipe can be cleaned through the door or alternatively through the cleaning aperture in the flue pipe/chimney. The upper fireproof tile (the exhaust deflector) can be removed. To allow free access to the top of the stove and the flue pipe, remove the exhaust deflector in steel. The flue pipe can be removed from the stove and cleaned. Cleaning of the inside of the stove and the flue pipe should be undertaken at least once a year, or more frequently if necessary, depending on how often the stove is used. This work can also be carried out by the chimney sweep or your local Aduro GO partner.
Repairing the surface
Aduro stoves are painted with a heat-resistant paint that can withstand temperatures up to 500 degrees. If the surface of the stove gets scratched or worn, it can easily be renewed using this type of paint. Everybody can repair the surface and obtain a perfect result. The paint is available in black metallic from your local dealer or at www.aduroshop.com.
Spare parts and unauthorized alterations
You may only use original spare parts for your stove. All forms of unauthorized alterations to the stove are strictly forbidden, as the stove will no longer comply with the approved specifications. At www.aduroshop.com you can buy original spare parts for your stove.
6. Accessories
For Aduro stoves we offer a wide product range of accessories to fulfil the experience: Companion sets, firewood baskets and buckets, fireplace grid, briquette buckets, floor hearths in glass and steel, flue pipes, Aduro Easy Firelighter, and Aduro Easy Clean pad. For further information, go to www.adurofire.com/accessories.
7. Right of complaint
In accordance with the Danish Sale of Goods Act, you have a two-year right of complaint from the date of purchase of the wood burning stove. The dated receipt will be sufficient proof. The right of complaint does not cover damages caused by faulty installation and use of the stove. The right of complaint also does not cover loose and wearing parts (glass, gaskets, firebricks, handles, slides, painted surfaces, cast iron grate etc.) as they are subject to wear during normal use. These parts can be bought as spare parts in our webshop www.aduroshop.com.
In addition, the right of complaint does not cover:
- Damages resulting from incorrect installation and use of the stove, e.g. overheating and wrong or missing maintenance of the stove.
- Damages caused by (condensation) water in and around the chimney, too much or too little draft in the chimney and missing maintenance/cleaning.
- Mounting or demounting relating to repairs.
- Transportation costs relating to repairs.
- Damages to the stove caused by external influences or damages caused by the stove on other objects.
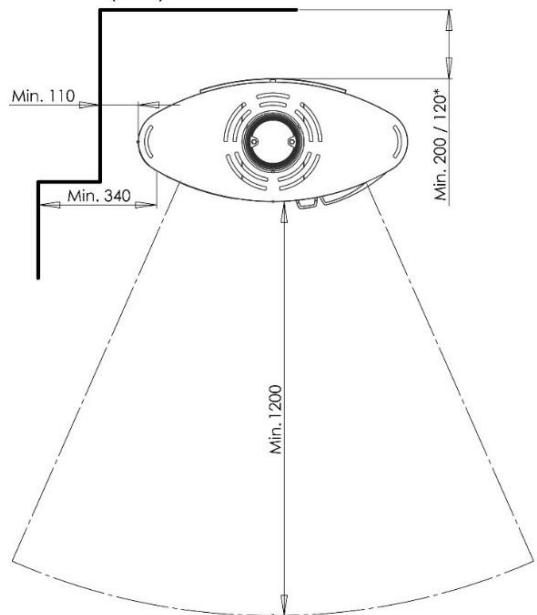
Distance (mm) to flammable material
* with insulated pipe
2.5 Possibilities d-installation

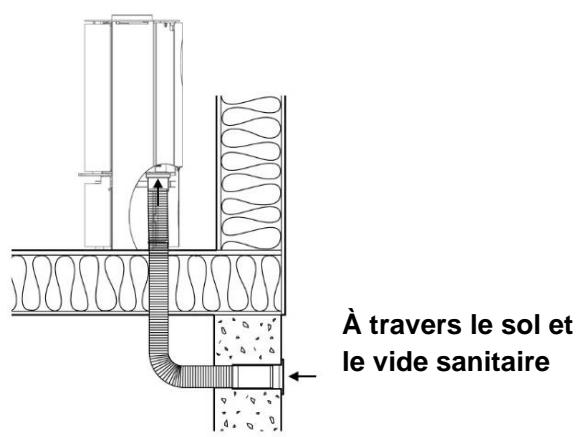
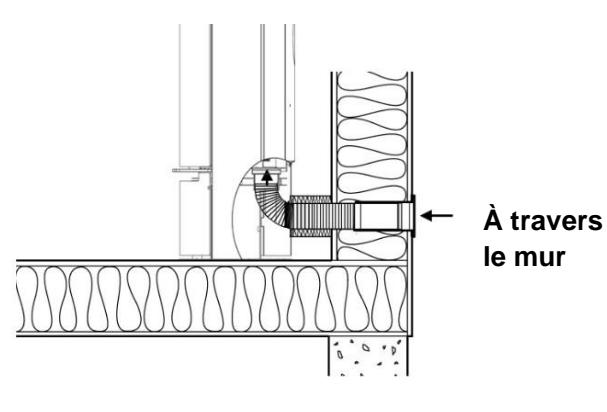
* with insulated pipe

- CONGRATULATIONS ON YOUR NEW ADURO STOVE
- 5-YEAR WARRANTY – FREE ONLINE REGISTRY
- PRODUCTION NUMBER
- ENJOY
- HOW TO SUCEED WITH YOUR NEW WOOD STOVE
- GENERAL
- 1.1 COMPLIANCE
- 1.2 TECHNICAL DATA
- 1.3 TRANSPORTATION
- INSTALLATION OF THE STOVE
- 2.1 POSITION OF THE STOVE / DISTANCE REQUIREMENTS
- 2.2 PIPE CONNECTION
- 2.3 CONNECTION TO A BRICK CHIMNEY
- 2.4 SUPPLY OF COMBUSTION AIR
- 2.5 WAYS OF INSTALLATION
- 2.6 SAFETY WIRE
- LIGHTING THE STOVE
- IMPORTANT SAFETY INFORMATION
- 3.1 DAMPER
- 3.1.1 SECONDARY AIR SUPPLY
- 3.1.2 PRIMARY DAMPER
- 3.2 ADURO-TRONIC
- 3.2.1 HOW TO OPERATE ADURO-TRONIC
- WHEN LIGHTING
- WHEN STOKING
- REGULATION OF THE ADURO-TRONIC CONTROL
- 3.3 HOW SHOULD I USE MY WOOD BURNING STOVE
- USE OF DRY WOOD OF THE RIGHT SIZE IS IMPORTANT TO ACHIEVE OPTIMUM COMBUSTION
- 3.4 THE FIRST TIME A FIRE IS LIT
- DURING THE FIRST FIRING, WHICH SHOULD BE CARRIED OUT USING APPROXIMATELY 1KG OF WOOD, THE STOKING DOOR MUST BE LEFT SLIGHTLY OPEN AND MUST NOT BE CLOSED UNTIL THE STOVE IS COLD. THIS IS TO PREVENT THE SEALING ROPE STICKING TO THE STOVE
- 3.5 LIGHTING A FIRE IN THE WOOD BURNING STOVE
- THE CONTROL HANDLES WILL GET WARM WHEN THE WOOD BURNING STOVE IS IN USE. PLEASE USE THE GLOVE PROVIDED WHEN YOU OPERATE THE WOOD BURNING STOVE
- 3.6 RECOMMENDED FUELS
- THE CHIMNEY
- 4.1 INADEQUATE DRAFT IN THE CHIMNEY
- 4.2 CHIMNEY AND SMOKE
- MAINTENANCE AND CLEANING OF THE STOVE
- COMBUSTION CHAMBER
- GLASS
- GASKETS
- ASHES
- CLEANING THE STOVE
- DO NOT CLEAN THE STOVE WITH WATER. IF THE STOVE IS EXPOSED TO MOISTURE, THE STOVE MAY DEVELOP RUST
- REPAIRING THE SURFACE
- SPARE PARTS AND UNAUTHORIZED ALTERATIONS
- ACCESSORIES
- RIGHT OF COMPLAINT
- 2.5 POSSIBILITIES D-INSTALLATION
Brand : ADURO
Model : ADURO 15 LUX
Category : Wood stove