
B3 - Wood stove ADURO - Free user manual and instructions
Find the device manual for free B3 ADURO in PDF.


| Product Type | Space Heater |
| Dimensions (H x W x D) | 25 x 20 x 30 cm |
| Weight | 2.5 kg |
| Power Consumption | 1500 W |
| Heating Method | Convection |
| Thermostat | Adjustable, with digital display |
| Safety Features | Overheat protection, tip-over switch |
| Maintenance & Cleaning | Wipe with a dry, soft cloth; do not use water |
| Spare Parts & Repairability | Contact customer service for spare parts |
| Energy Efficiency Class | A |
Frequently Asked Questions - B3 ADURO
User questions about B3 ADURO
0 question about this device. Answer the ones you know or ask your own.
Ask a new question about this device
Download the instructions for your Wood stove in PDF format for free! Find your manual B3 - ADURO and take your electronic device back in hand. On this page are published all the documents necessary for the use of your device. B3 by ADURO.
USER MANUAL B3 ADURO
natural_image
Interior of a modern dining room with wooden flooring, black chairs, and a portable fire extinguisher (no visible text or symbols)Aduro Bio Stoves
Aduro B1, Aduro B2 & Aduro B3
EN 16647:2015
aduro.dk / adurofire.com
Congratulations on your new Aduro Bio stove!
To get the best possible experience and benefit from your new Aduro Bio stove, it is important that you read the user manual thoroughly before you install the stove and start using it. Errors or incorrect settings can cause hazardous conditions and/or poor operation. Please keep the user manual in a safe place for future reference.
For further information, please go to www.adurofire.com.
Production number
The bio stove has a production number on the rating plate under the stove. For the purposes of the guarantee and for other enquiries, it is important that you are able to quote this number.
1. General
1.1 Compliance
All Aduro Bio stoves comply with the European Standard EN16647:2015 and is thereby approved for installation and use in Europe. At the same time, the manufacturing process is subject to external quality control.
1.2 Warnings and safety precautions
Remember that safety is first priority, and therefore the stove must be used with care and respect. Do not use the stove before the following warnings have been read:
- Examine local legislation before using the stove.
- Never change the construction of the bioethanol burner.
- Always place the bio stove in a well-ventilated, draft-free room. The room should have a minimum of 80 m 3 .
- Bioethanol is a hazardous material with hazard level UN1987, level 3.
- Bioethanol is extremely flammable and must be handled with care.
- Never place anything on top of the stove.
- Never move the stove while in use.
- Never leave the stove unattended and keep children and pets at a safe distance.
- Outer surfaces and materials near the burner become hot when the stove is in use.
- Only use bioethanol intended for bio stoves. We recommend using bioethanol with 93-96.5%.
• Bioethanol should be stored in a safe location, away from fire and out of reach of children and pets. - Any stove featuring naked flames or using flammable liquids has a potential risk of burns or injury.
- Never overfill the burner with bioethanol. The bioethanol must be completely absorbed in the ceramic material in the burner and must never exceed the arrows which indicate the maximum fuel level. Lighting an overfilled burner is unsafe.
- Avoid physical contact with the bioethanol.

Never pour fuel into a hot or burning stove.

Do not position the stove near combustible materials.
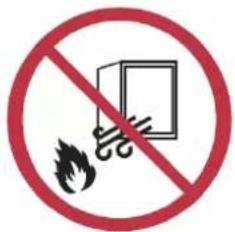
Only use in draft-free surroundings.

No smoking

Keep pets and children at a safe distance.

Never move the stove while in operation.
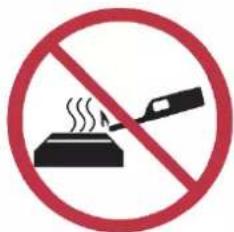
Never (re)ignite a hot stove (

Never overfill the stove.
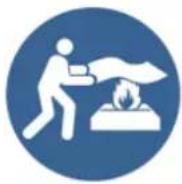
A fire blanket is recommended.

A fire extinguisher is recommended.

Only use fuel according to the user manual.

For decorative and domestic use only.

Only use in a ventilated room.
Aduro A/S declines all responsibility for any direct or indirect damages to persons, animals, or objects due to non-compliance with the provisions in this user guide, especially warnings regarding installation, use, and maintenance of the stove.
The responsibility for improper use of the product is entirely borne by the user and relieves the manufacturer from any civil and criminal liability. Tampering or unauthorized replacement with non-original spare parts could be hazardous for the operator's safety and relieves the company from any civil and criminal liability.
1.3 Technical data
| Aduro Bio stoves | |
| Capacity, burner | 1.2 L (we recommend 1 L) |
| Weight, stove | 22 kg |
| Burn time | 3-4 hours |
| Heat efficiency | 1.8 – 3 kW/h |
| Burner function | Manual |
| Material, stove | Black powder-coated steel and 4 mm tempered glass |
| Material, burner | Brushed stainless steel |
| Fuel | Bioethanol (93-96.5 %) |
| Outer dimensions (∅ x H x D)* | 48 x 47.65 x 35.05 cm |
*See illustrations on adurofire.com
2. Installation of the stove
You can install the stove yourself. Aduro Bio stoves are easy to mount, and no chimney is required. You can use the stove both indoors and outdoors. However, be aware that the stove is not rust protected and must therefore be moved inside when the stove is cold. If stored outdoors, corrosion on the stove will occur.
2.1 Position of the stove and distance requirements
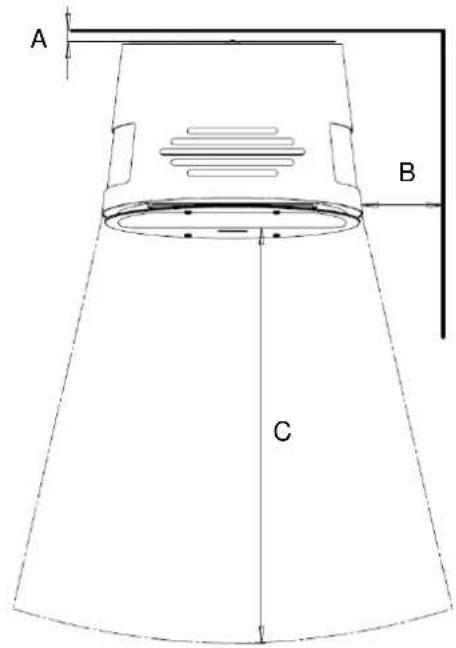
If the stove is placed near combustible material, specific distance requirements apply. See table and illustrations below:
| Distance to combustible material | Mounted on foot/legs | Mounted on wall bracket |
| Behind the stove (A) | 2 cm | - |
| To the sides (B) | 15 cm | 15 cm |
| In front of the stove (C) | 75 cm | 75 cm |
| Above the stove (D) | 20 cm | 20 cm |

natural_image
Simple circular diagram with a rectangle and labeled point D, no text or symbols presentIf the stove is being wall-mounted, it can only be mounted on a non-flammable wall. If the stove is placed on the metal foot, it should be placed on a non-flammable material. If the stove is positioned against a brick wall or other non-flammable material, there are no minimum distance requirements.
The stove must be installed on a floor/wall/material with an adequate load-bearing capacity. Make sure that the bio stove is installed in level, both horizontally and vertically. Do not place the stove in a room with a constant high humidity level. The room must be well-ventilated and should have a minimum of 80 m3 .
2.2 Mounting options
The Aduro Bio stoves can be mounted on wooden legs, a metal foot, or hung on the wall. Find instructions for mounting the stoves at the back of this user manual.
2.3 Wall-mounted stove
If the stove is to be mounted on the wall, it must be installed on a non-flammable wall. The wall bracket must be properly mounted to the wall before mounting the stove (find instructions for mounting the bracket at the back of this user manual). You may consult your normal supplier of building materials about suitable attachment materials for the stove/wall before the mounting. ONLY USE FIXING MATERIALS WHICH CANNOT MELT.

The lower edge of the stove must be minimum 15 cm above the floor.
2.4 Connect to a central air heating system (Only Aduro B3)
With the Aduro B3 you can distribute the hot air from the stove into the central air ventilation system of the house since the stove is equipped with an outlet pipe.
The pipe must be mounted onto the wall behind the stove. Find instructions for mounting the pipe at the back of this user manual.
The distance from the top of the pipe to the air intake must not be less than 250 mm. We recommend a distance between minimum 250 mm and 400 mm.
Please notice: The distance from the top of the pipe to combustible material should be minimum 250 mm:


natural_image
Modern portable stove with black chamber and wooden legs, emitting heat or steam from a vertical tube (no text or symbols visible)3. Firing in the bio stove
Important safety information
- Never ignite the stove if it is filled past the "MAX" fuel sign.
- The stove gets hot during use and therefore it should be treated with all necessary caution.
- Do not keep bioethanol and other easily combustible fluids near the stove.
• The room must be well-ventilated, draft-free, and should have a minimum volume of 80 m3. - Do not place anything on top of the stove while it is in use.
- Do not cover up ventilation grids in the front and in the back of the stove.
- Do not place ceramic decoration logs, stones, or other things inside the stove. The flames must not touch decorative material.
- Never leave the stove unattended when in use.
- Keep children and pets at a safe distance.
- Use of several stoves is only allowed if the power output is equal or lower than 4.5 kW/h. An additional ventilation of the room is then required.
- The stove is not suitable for continuous operation.
3.1 Filling and refilling
When filling and refilling the bio stove, you should always use the Aduro funnel. The funnel can only be placed on top of the metallic plate with the temperature indicator. See illustration 1 below on how to correctly place the funnel.
Due to the patent pending safety feature Aduro Bio-Safe, which is a bimetallic spring, you cannot place the funnel correctly and thus refill bioethanol, when the stove is too hot (the spring is in the red area and blocks the funnel). When the spring is in the blue area (the temperature is below 40 degrees), it is possible to refill. See illustration 2 below. You should always close the burner opening for 10 seconds and open it again before you refill.

The stove has a fuel capacity of 1,20 L. However, we recommend using 1 L fuel. When filling and refilling the stove, you must always be able to see the MAX fuel sign over the fuel level.

Never overfill the burner. The fuel must be completely absorbed in the ceramic material. It creates a dangerous situation if you light the stove with too much fuel.
3.1.1 Overfilling the burner
In case of accidental overfilling of the burner, do not ignite the stove. Please follow one of the following guides:
Option 1: The burner is overfilled (over the MAX sign), but not completely over the edge of the burner:
- Spilt bioethanol can be removed with an absorbing cloth until the fibre in the burner can absorb all fluid again.
- Wipe off all excess fuel that may have dripped on the outside of the burner and allow any residual fuel to evaporate.
- Leave for 1 hour.
Option 2: The burner is overfilled (over the MAX sign), and the bioethanol flows outside the burner:
- Remove the burner from the stove.
- Empty the excess fuel into a suitable container.
- Wipe off all excess fuel that may have dripped on the outside of the burner during emptying and allow any residual fuel to evaporate.
- Leave the burner for 1 hour.
- Seal and move the container with the overspilled bioethanol to a safe distance from the stove.
- Put the burner back in place.
3.2 Igniting the stove
Before igniting the stove, always make sure that no bioethanol fuel has spilled into the outer tray of the burner (look through the hole in the front of the stove or through the holes next to the burner) and remove any spillage.
If you have spilled some fuel on the burner/surface, you can remove it with paper or a dry cloth. You can also take the burner out of the stove and remove the overfilled liquid. See section 3.1.1.
Make sure that the burner is cold and the latch for the burning area is open all the way. If reigniting the stove, please make sure that the temperature is below 40 degrees.
Use the Aduro handle to avoid injury. See image below regarding usage.
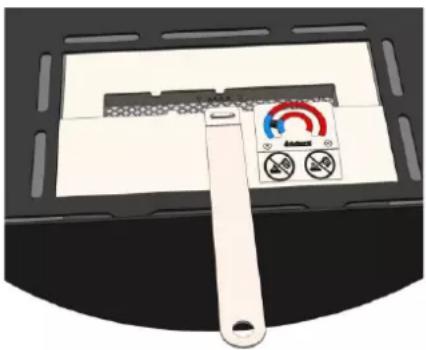
Always use a long lighter to ignite the stove so that your hands are not directly over the burning area. Ignite the fibres in the burner.

Always stay at least 1 meter from the stove when it is in use.
To turn off the stove, close the latch all the way and make sure the flame goes out. See picture below. Do not open the latch within the first 3 minutes after closing it. This will give time to ensure that the flame inside the burner is complete extinguished. Always make sure that the stove is turned off and the latch is closed before leaving the room.

The flame size is not adjustable. You will reach the full flame picture within 10-15 minutes after igniting.
Applies to Aduro B1 and B3:
Aduro B1 and B3 have a glass door covering the front which will get warm during use. Please open and close the door as illustrated below:
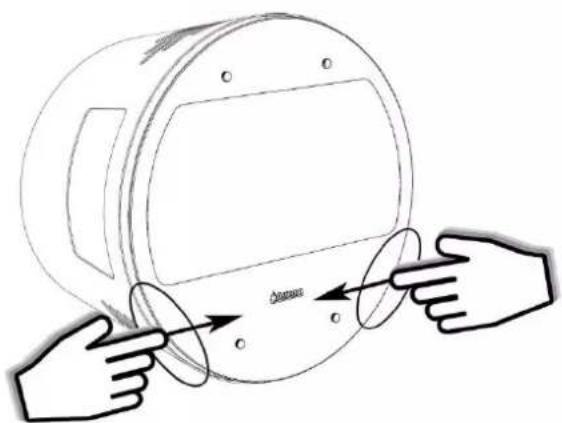
3.3 Emergency extinguish instructions
In case of fire, place a fire blanket over the burner, and leave it there for at least 30 seconds before removing it again. If you do not have access to a fire blanket, you can use a regular towel soaked in water.
3.4 Recommended fuels
Only use bioethanol marked UN:1170 which is recommended for bioethanol burners. We recommend using bioethanol fuel with 93-96.5 %.
Bioethanol is a hazardous material with hazard level UN1987, level 3. It is extremely flammable and must be handled with care. Bioethanol should be stored in a safe location, away from fire and out of reach of children and pets.
4. Cleaning and maintenance

All cleaning and maintenance of the stove should be carried out when the stove is cold.
Aduro Bio stoves do not require a lot of cleaning or maintenance. However, there are a couple of things that should be checked regularly.
The burner
Regularly check the burner for any signs of misshaping or leakage. Ensure that the burner contains no fuel before cleaning. Do not clean the burner box with water or put in a dishwasher.
Over time, the burner may start to discolour. This is a natural reaction to the high heat that is produced. It can be removed by using an approved stainless-steel cleaner. Just rub the cream in the direction of the "grain" of the steel. You can also use the Aduro Easy Clean pad.
Always make sure that the burner is dry after cleaning before igniting the stove.
The bimetallic spring
Regularly check that the bimetallic spring functions and that the arrow/temperature indicator is always in the red area when the stove is so warm that you cannot hold your hand in the area around the flame opening (temperature >40 degrees C).
The stove's surface
Regularly check the stove for any signs of misshaping or leakage.
Temporary discoloration may occur on the stove's surface. This is harmless residue from the burning of the bioethanol fuel and can be removed by using a non-scratch scourer with washing-up liquid.
Always make sure that the burner is dry after cleaning before igniting the stove.

Never use chemicals, steel wool, or abrasive cleaning products, as these can scratch the surface.
Glass
Use a glass cleaner to clean the glass.
Spare parts and unauthorized alterations
You may only use original spare parts for your bio stove. All forms of unauthorized alterations to the stove are strictly forbidden, as the stove will no longer comply with the approved specifications. At www.aduroshop.com you can buy original spare parts for your stove.
5. Right of complaint
The right to complain applies in accordance with the sales act in the country where the stove was purchased. The dated receipt will be sufficient proof.
The right of complaint does not cover:
- Damages resulting from incorrect installation and use of the stove, overheating, and wrong or missing maintenance of the stove etc.
- Consumable service parts (front glass, side glass, sliders, funnel, gasket) which are subject to normal wear and tear. You can buy these parts in our online shop www.aduroshop.com.
- Damages to the stove caused by external influences, or damages caused by the stove on other objects.
Read more at www.adurofire.com/warranty
6. Disposal of your Aduro Bio stove
When disposing your stove, metal, burner, and glass must be sorted separately. Dispose hereafter the materials according to the regulations at your nearest recycling depot.
Tillykke med din nye Aduro Biopejs!
Ingen rygning

natural_image
Modern portable stove with open lid and wooden legs, emitting flame (no text or symbols visible)natural_image
Illustration of hands interacting with a circular device, showing directional arrows indicating motion (no text or symbols)3.3 Nødslukning
Mounting the stove on wooden legs
-
Assemble the legs by mounting each leg to the frame. Screw in the screws from the inside of the leg and tighten the nuts onto the screws from the outside.
-
Place the stove onto the legs and secure it by screwing in the screw.

Mounting the stove on metal foot
-
Place the stove on the foot.
-
Screw the screw in place to secure the stove.

Wall-mounting the stove
- Mount the wall bracket on the wall:
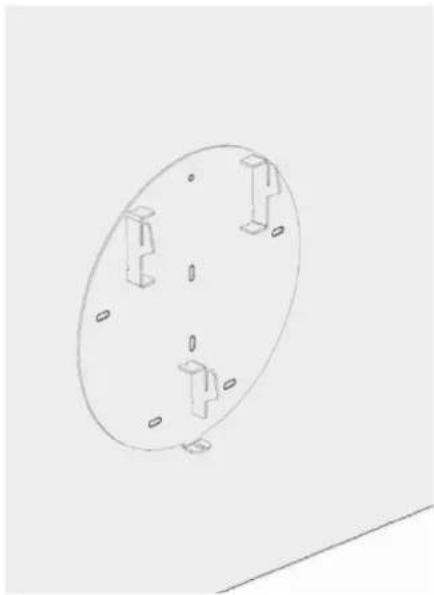
natural_image
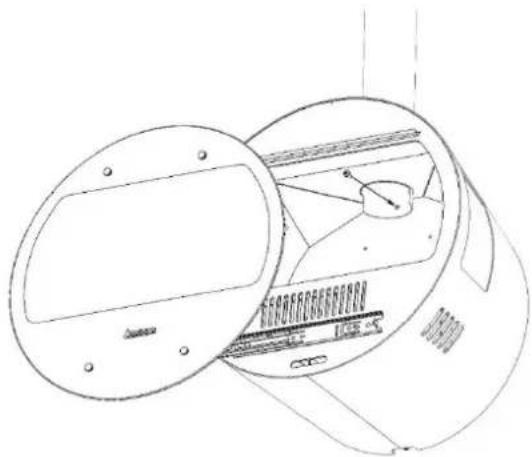
Simple line drawing of a circular object with three small 3D blocks and four ovals, no text or symbols present.- Dismount the stove's backplate:

natural_image
Technical line drawing of a cylindrical device with internal components and labeled parts (no text or symbols present)- Attach the stove to the wall bracket:

natural_image
Technical line drawing of a cylindrical device with internal components and mounting holes (no text or symbols)- Secure the stove to the wall bracket with the screw under the bottom:

natural_image
Technical line drawing of a cylindrical device with an inset showing a mechanical component (no text or symbols)Mounting the flue pipe on Aduro B3
- Dismount the baffle plate and the screw for the pipe:

natural_image
Technical line drawing of a mechanical device with no visible text or symbols- Insert the pipe into the hole on top of the stove:

natural_image
Technical line drawing of a mechanical device with internal components and mounting holes (no text or symbols)- Mount the screw for the pipe:
natural_image
Technical line drawing of a mechanical component with circular housing and internal components (no text or symbols)- Remount the baffle plate:

natural_image
Technical line drawing of a mechanical device with internal components and mounting holes (no text or symbols)- Mount the pipe bracket on the wall using the fitting screw:

natural_image
Technical line drawing of a mechanical component with screw and pin (no text or symbols)- Depending on whether the stove is placed on legs or mounted on the wall, the pipe bracket should either face upwards or downwards:

natural_image
Technical line drawing of a cylindrical mechanical component with a small protrusion and mounting hole (no text or symbols)Position 1: Stove mounted on wall bracket

Position 2: Stove mounted on legs
- Slide pipe top on to the bracket:
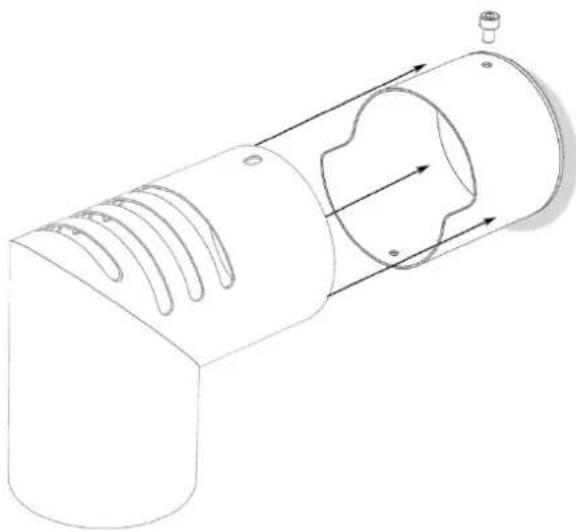
natural_image
Technical line drawing of a cylindrical mechanical component with internal channels and mounting features (no text or symbols)- Fasten the pipe to the bracket by screwing the screw in place:

natural_image
Technical line drawing of a cylindrical mechanical component with internal grooves and a mounting hole (no text or symbols)
- Aduro Bio Stoves
- Congratulations on your new Aduro Bio stove!
- Production number
- General
- Compliance
- Warnings and safety precautions
- Technical data
- Installation of the stove
- Position of the stove and distance requirements
- Mounting options
- Wall-mounted stove
- Connect to a central air heating system (Only Aduro B3)
- Firing in the bio stove
- Important safety information
- Filling and refilling
- Overfilling the burner
- Option 1: The burner is overfilled (over the MAX sign), but not completely over the edge of the burner:
- Option 2: The burner is overfilled (over the MAX sign), and the bioethanol flows outside the burner:
- Igniting the stove
- Applies to Aduro B1 and B3:
- Emergency extinguish instructions
- Recommended fuels
- Cleaning and maintenance
- The burner
- The bimetallic spring
- The stove's surface
- Glass
- Spare parts and unauthorized alterations
- Right of complaint
- Disposal of your Aduro Bio stove
- Tillykke med din nye Aduro Biopejs!
- Nødslukning
- Mounting the stove on wooden legs
- Mounting the stove on metal foot
- Wall-mounting the stove
- Mounting the flue pipe on Aduro B3
Brand : ADURO
Model : B3
Category : Wood stove