USER MANUAL VC 60 4MC X 701T VALBERG
This product has a 2-year warranty as of the date of purchase*, covering any fault resulting from a manufacturing or material defect. This warranty does not cover defects or damage resulting from incorrect installation, improper use or abnormal wear of the appliance.
*upon presentation of the sales receipt.
CONDITION DE GARANTIE
FR
Thank you for choosing this VALBERG product. Selected, tested and recommended by ELECTRO DEPOT, VALBERG brand products are easy to use, reliable and known for their impeccable quality. With this appliance, you can be sure of complete satisfaction every time you use it.
Welcome to ELECTRO DEPOT.
Visit our website: www.electrodepot.fr

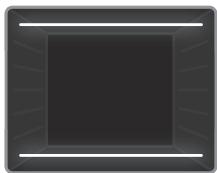
Preview of the appliance
Features of the product

Using the appliance
Installation and preparation for use Using the appliance

Useful information
Cleaning and maintenance Troubleshooting and transport
Features of the Product
IMPORTANT
Product specifications vary and your appliance may look different from those that appear in the figures below.
List of components
1 Hob
Control panel
3 Oven door handle
Oven door
5 Adjustable feet
Control panel
6 Function control
Oven temperature control
8 Hob control
Installation and preparation for use
WARNING
This appliance must be fitted by an authorised professional or qualified technician in accordance with the instructions in this manual and the applicable installation standards.
- Improper installation shall invalidate the warranty and may result in damage or injury for which the manufacturer cannot be held responsible.
- Before fitting, make sure that the local power supply conditions (voltage and current frequency and/or type and pressure of the gas) and the settings of the appliance are compatible. The setting conditions for this appliance are shown on the label.
- The laws, regulations, decrees and standards applicable in the country of installation must be applied (safety regulations, recycling in accordance with regulations, etc.).
- If the product contains guides for the removable racks (wire racks) and the user manual includes recipes like yoghurt, the wire racks must be removed and the oven must operate using the set cooking mode. Information on removing the wire rack is included in the CLEANING AND MAINTENANCE section.
Instructions for the installer
General instructions
- After removing the packaging from the appliance and its accessories, check the appliance for damage. If the appliance appears to be damaged, do not use it and immediately contact an authorised professional or qualified technician.
- Check that there are no combustible or flammable objects or materials, e.g. curtains, oil, cloth, etc., in the immediate vicinity.
- The worktop and furniture units surrounding the appliance must be able to withstand temperatures of over 100^ .
- This appliance must not be fitted directly above a dishwasher, refrigerator, freezer, washing machine or tumble dryer.
- The appliance can be fitted next to a furniture unit, provided that the height of the unit does not exceed the height of the hob in the installation area.
Cooker installation
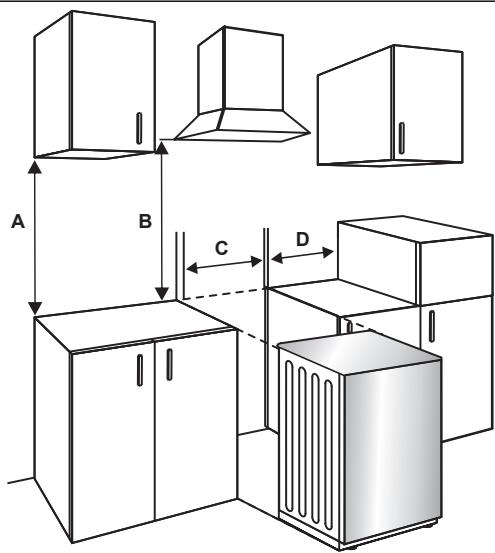
- If the kitchen units are higher than the hob, there must be a gap of at least 10cm between the units and the sides of the appliance so that air can flow freely in between.
- If an extractor fan or cupboard is to be fitted above the appliance, the safety distance between the hob and the cupboard or extractor fan must match the gap shown on the diagram below.
A (mm) Unit 420
B (mm) Extractor fan 650/700
C (mm) Product width
D (mm) 50
Electrical connection and safety
WARNING
This appliance must be connected to the power supply by an authorised professional or qualified technician in accordance with the instructions in this manual and the applicable installation standards.
WARNING
The appliance must be earthed.

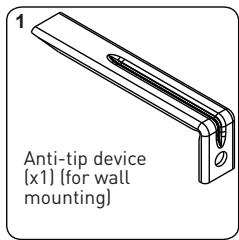
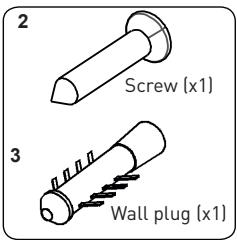
Anti-tip kit
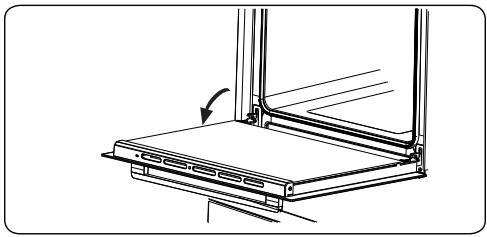
The documentation bag contains an anti-tip kit. Fasten the anti-tip device (1) to the wall using the screw (2) and the wall plug (3), in accordance with the dimensions in the illustration and table below. Adjust the height of the anti-tip device so that it is aligned with the groove on the cooker, then tighten the screw (2). Push the appliance towards the wall, making sure that the anti-tip device fits into the groove at the back of the appliance.
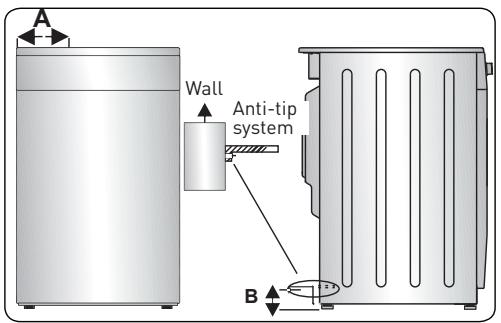
| Product dimensions
(width X depth X height) (cm) | A (mm) | B (mm) |
| 60 x 60 x 90 (double cavity oven) | 297.5 | 52 |
| 50 x 60 x 90 (double cavity oven) | 247.5 | 52 |
| 90 x 60 x 85 | 430 | 107 |
| 60 x 60 x 90 | 309.5 | 112 |
| 60 x 60 x 85 | 309.5 | 64 |
| 50 x 60 x 90 | 247.5 | 112 |
| 50 x 60 x 85 | 247.5 | 64 |
| 50 x 50 x 90 | 247.5 | 112 |
| 50 x 50 x 85 | 247.5 | 64 |
Adjusting the feet
The product rests on adjustable feet. For safe operation, it is important to check that the appliance is stable. Check that the appliance is level before you start cooking. To raise the appliance, turn the feet anti-clockwise. To lower the appliance, turn the feet clockwise. The height of the appliance can be increased by up to 30mm by adjusting the feet. The appliance is very heavy and we recommend that it should be handled by at least two people. Never pull the appliance.
Using the appliance
Hob controls
Heating element
The heating element is controlled by a 6-position button.
The heating element is controlled by the corresponding controller, which must be set to the required setting. Beside each controller is a symbol that indicates which element is controlled by the controller. The on/off indicator light on the control panel indicates whether one of the heating elements is in use.

| Button position | Function |
| 0 | Off position |
| 1 | Keep warm position |
| 2-3 | Low heat position |
| 4-5-6 | Cook, sear and boil position |
IMPORTANT
The direction of rotation of the button varies depending on the product's characteristics.
Double and oval cooking zone (if available)
The double and oval cooking zone is composed of two cooking zones. To activate the outer part of a double/oval element, turn the button to the position. The two exterior zones light up. To deactivate the outer part of a double/oval element, turn the button to the Off position. The two exterior zones switch off.
Residual heat indicator (if available)
After using the hob, some of the heat will remain stored up in the ceramic surface. This is the residual heat. If the residual heat level is above +60^ , the residual heat indicator of the cooking zone concerned will light up.
If the power supply to the hob is cut off while the residual heat indicator light is on, the warning light will flash when the power is restored. The display flashes until the residual heat has dropped or one of the cooking zones is activated.
Tips and advice
IMPORTANT
When the heating elements are set to the highest levels, the hot zones may switch on and off. This is because of a safety system that prevents the glass from overheating. This is normal at high temperatures, will not damage the hob and only extend cooking times very slightly.
WARNING
- Never use the hob without any cookware on the cooking zone.
- Only use flat-bottomed pans with a thick base.
- Check that the bottom of the cookware is completely dry before placing it on the hob.
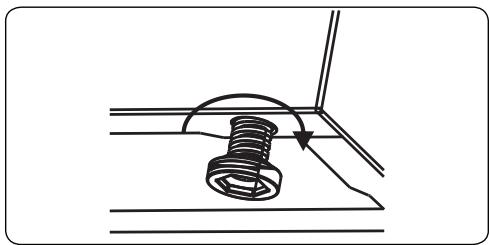
- When the cooking zone is on, it is important to check that the cookware is centred on the zone.
- To save energy, do not use cookware with a different diameter from that of the cooking zone used.
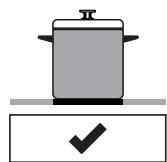
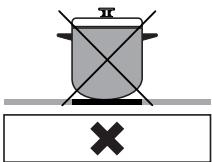
Pan with rounded bottom
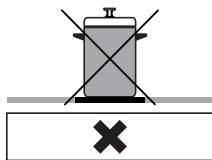
Pan is too small
Pan is incorrectly positioned
WARNING
- Do not use cookware with a rough base, as it may damage the ceramic surface.
- If possible, always use a lid with the cookware.
- During use, the temperature of the accessible surfaces may be high. Keep children and pets away from the hob during use and until it has cooled down completely after use.
- If there is a crack on the hob, turn it off immediately and get it replaced by an authorised technician.
Oven controls
Function control
Turn the button to the symbol of the function you want. For the details of the different functions, refer to "Oven functions".
Oven temperature control
Once the cooking function is selected, turn this button to adjust the temperature. The oven temperature light turns on whenever the thermostat is working to heat the oven or maintain it at the required temperature setting.
Oven functions
- The functions of the oven may vary depending on the model of your product.
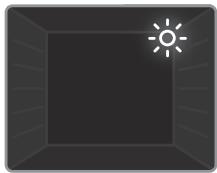
- Oven light: Only the oven light comes on. It remains on throughout the cooking process.
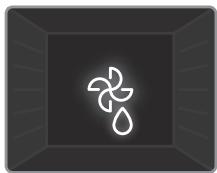
- Defrost function: The oven warning lights come on and the fan starts. To use the Defrost function, place the frozen food in the oven on a tray/rack inserted on the third level from the bottom. Put a drip pan under the defrosting food to catch the water from the melting ice. This function does not cook food, it simply defrosts food more quickly.
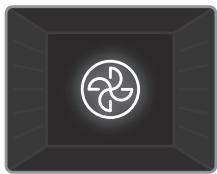
- Turbo function: The thermostat light and the oven warning lights come on, the ring heater starts to heat up and the fan starts. The Turbo function distributes the heat evenly throughout the oven and ensures that food is cooked evenly on all levels. Preferably preheat the oven for about 10 minutes.
- Natural convection function: The temperature light and oven indicator lights will come on and the top and bottom heating elements will start to heat up. The Static heat function emits heat that cooks the food evenly. It is ideal for pastries, cakes, pasta bakes, lasagne and pizza. It is recommended to preheat the oven for 10 minutes and to use only one level at a time in this mode.

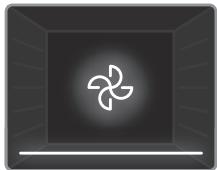
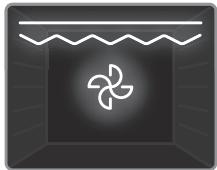
- Fan function: The temperature light and the oven warning lights come on, the top and bottom heating elements start to heat up and the fan starts to turn. This function is suitable for baking pastries. The cooking is done by the upper and lower heating elements of the oven and by the fan which circulates the air, giving the food a slightly "grilled" appearance. Preferably preheat the oven for about 10 minutes.
- Pizza function: The temperature light and the oven warning lights come on, the circular and bottom heating elements start to heat up and the fan starts to turn. The Pizza function is suitable for evenly cooking food like pizza with a short cooking time. The fan distributes the heat evenly throughout the oven, while the bottom element cooks the food.
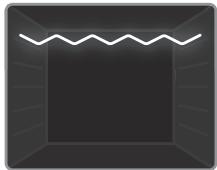
- Grill function: The temperature light and oven indicator light come on and the grill element starts to heat up. This function is used to grill and toast food placed on the upper levels of the oven. Lightly oil the wire rack with a brush to prevent food from sticking, then put the food in the centre of the rack. Always place a drip pan under the grill to catch oil or grease. Preferably preheat the oven for about 10 minutes.
WARNING
When using the grill, the oven door must be closed and the oven temperature set to 190^ .
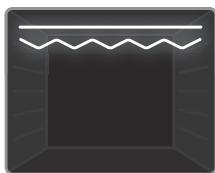
- Express Grill function: The temperature light and oven warning lights come on and the grill and top elements start to heat up. This function is recommended for grilling a larger quantity of food more quickly (e.g., : meat). Using the top level. Lightly oil the wire rack with a brush to prevent food from sticking, then put the food in the centre of the rack. Always place a drip pan under the grill to catch oil or grease. Preferably preheat the oven for about 10 minutes.
WARNING
When using the grill, the oven door must be closed and the oven temperature set to 190^ .
- Ventilated double grill function: The temperature light and oven warning lights come on, the grill and upper heating elements start to heat up and the fan starts to turn. This function is recommended for grilling thicker food faster and over a larger area. The upper heating elements and the grill work simultaneously with the fan to ensure even cooking. Use the top level. Lightly oil the wire rack with a brush to prevent food from sticking, then put the food in the centre of the rack. Always place a drip pan under the grill to catch oil or grease. It is recommended to preheat the oven for about 10 minutes.
WARNING
When using the grill, the oven door must be closed and the oven temperature set to 190^ .
Hob
| Function | Dishes | | | |
| Static | Puff pastry | 2-3-4 | 170-190 | 35-45 |
| Cake | 2-3-4 | 170-190 | 30-40 |
| Cookies | 2-3-4 | 170-190 | 30-40 |
| Beef stew | 2 | 175-200 | 40-50 |
| Fan | Chicken | 2-3-4 | 200 | 45-60 |
| Puff pastry | 2-3-4 | 170-190 | 25-35 |
| Cake | 2-3-4 | 150-170 | 25-35 |
| Cookies | 2-3-4 | 150-170 | 25-35 |
| Beef stew | 2 | 175-200 | 40-50 |
| Turbo | Chicken | 2-3-4 | 200 | 45-60 |
| Puff pastry | 2-3-4 | 170-190 | 35-45 |
| Cake | 2-3-4 | 150-170 | 30-40 |
| Cookies | 2-3-4 | 150-170 | 25-35 |
| Beef stew | 2 | 175-200 | 40-50 |
| Grill | Grilled meatballs | 5 | 200 | 10-15 |
| Chicken | * | 190 | 50-60 |
| Chops | 4-5 | 200 | 15-25 |
| Steak | 5 | 200 | 15-25 |
*If available, use the roasting spit.
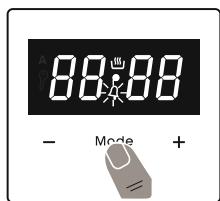
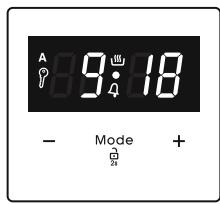
Using the touchscreen digital timer

Description of the functions
A Automatic cooking
Manual cooking
Locking
Minute beep
Mode Mode function
-
Reducing the timer
-
Increasing the timer
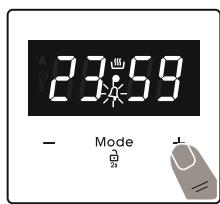
23 59 Timer display
Setting the clock
The time must be set before you start using the oven.
After switching on the oven, the "A" symbol and "00:00" or "12:00" flash on the screen.
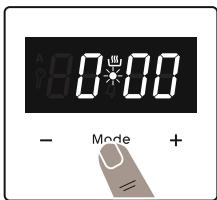
- Press "MODE" for 2 seconds to deactivate the child lock and the dot in the middle of the screen will start flashing.
- Set the time while the dot flashes using the "+" and "-"
- After a few seconds, the dot stops flashing and stays highlighted.
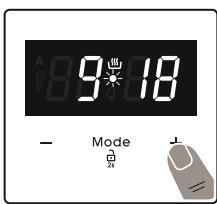
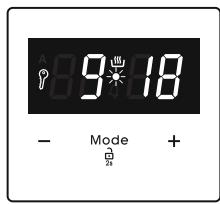
Child lock
The child lock is activated automatically after the timer has not been used for 7 seconds. The "?" symbol appears and remains highlighted. To unlock the timer, press the "MODE" button for 2 seconds. The required operation can be completed.
Setting the time delay of the audible alarm
The audible alarm can be set to go off after "00:00" to "23:59" minutes. The audible alarm is for warning purposes only. This function does not activate the oven.
- Press the "MODE" button. The "A" starts flashing and the display shows "000".
- Select the time you want using the "+" and "-" buttons while "4" is flashing.
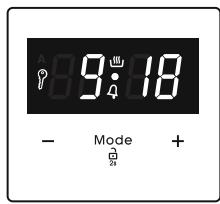
- The " " symbol will remain highlighted, the time will be recorded and the warning time will be programmed.
When the timer reaches zero, a beep sounds and the "A" symbol flashes. Press any key to stop the beep. Press "MODE" for 2 seconds, and the "A" symbol disappears and the clock is displayed.
Setting the semi-automatic cooking timer
This function is for cooking your food for a specific period of time. The time setting can be between 0 and 10 hours. Prepare the food to be cooked and put it in the oven.
- Select the required cooking function and temperature using the control buttons.
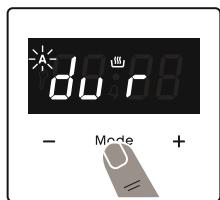
- Press the "MODE" button until you see the "dur" symbol. The "A" symbol flashes.

- Use the "+" and "-" buttons to select the time you want.
- The current time reappears on the screen, and the "A" and "ü" symbols stay highlighted.
When the timer reaches zero, the oven stops and a beep sounds. The "A" symbol flashes. Place both control buttons on "0" and press any button on the timer to stop the beep. Press "MODE" for 2 seconds, and the "A" symbol disappears and the timer returns to manual operation.
Setting the sound signal
To adjust the volume of the beep, when the timer displays the current time, press the "+" and "-" buttons, and the dot in the middle of the screen will start flashing. Press "MODE" to display the current beep sound. Then, each time you press the "-" button, a different beep sound is emitted. There are three different beep sounds. Select the beep sound you want and do not press any other buttons. After a short time, the selected beep is saved.
Accessories
The easyfix metal oven rack
Clean the accessories thoroughly with lukewarm water, detergent and a soft, clean cloth the first time you use them.
- Insert the accessory in the correct position inside the oven.
- Leave a gap of at least 1cm between the fan cover and the accessories.
- Be sure to remove cooking utensils and accessories from the oven. Hot food or accessories can cause burns.
- Accessories can become deformed when heated. Once cooled, they will return to their original shape, appearance and performance.
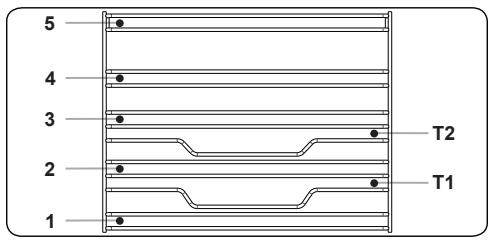
- The metal trays and oven racks can be positioned at any level from 1 to 5.
- The telescopic rails can be positioned at levels T1, T2, 3, 4, 5.
- Level 3 is recommended for when cooking with only one level.
- Level T2 is recommended for cooking with only one level on telescopic rails.
- The rotisserie rack should be positioned at level 3.
- Level T2 is used for positioning the rotisserie rack with telescopic rails.
***Accessories may vary depending on the model purchased.
Deep tray
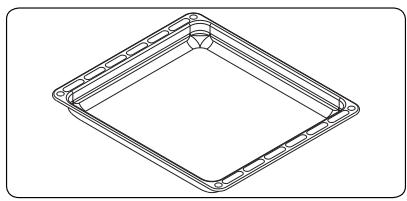
The deep tray is used to cook stews.
To position the tray properly in the cavity, place it on any rail and push it to the back.
Drawer
The appliance has a drawer for storing accessories (drip pans, plates, grills and small pots/ pans).
WARNING
The interior surface of the drawer may become hot when the oven is on. Do not store any food or plastic, or flammable objects in the drawer.
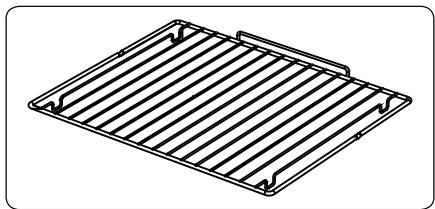
Wire rack
The wire mesh is used for grilling or preparing food in other containers.
WARNING
Correctly place the oven rack in the oven cavity by pushing it all the way in.
Cleaning and maintenance
Cleaning
WARNING
Turn off the appliance and allow it to cool before cleaning.
General instructions
- Check that the cleaning products are suitable and recommended by their manufacturer before using them on the appliance.
- Use particle-free cream or liquid cleaners. Do not use caustic (corrosive) creams, abrasive cleaning powders, rough steel wool or hard tools, as they may damage the cooker's surfaces.
WARNING
Do not use cleaners that contain particles, as they could scratch the glass, or the enamelled and/or painted parts of the appliance.
- If some liquid spills over, immediately wipe it up to avoid damaging the parts.
WARNING
Do not use a steam cleaner to clean any part of this appliance.
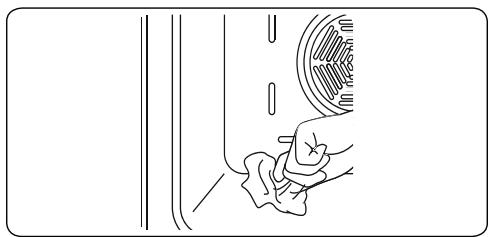
Cleaning the inside of the oven
- Preferably clean the inside of the enamelled oven when it is hot.
- Wipe the oven with a soft cloth soaked in soapy water after each use. Then, wipe the oven again with a damp cloth and dry it.
- You may need to occasionally use a liquid cleaning product to completely clean the oven.
Catalytic cleaning
- The oven has catalytic panels fitted inside the cavity. These are the light coloured matte panels on the sides and/or the matte panel at the back of the oven. They work by collecting any grease and oil residues during cooking.
- The liner self-cleans by absorbing the grease and oil, and burning them to ashes, which can then be easily removed from the bottom of the oven with a damp cloth. The liner must be porous to remain effective. The liner may discolour with age.
- If a large amount of grease has been spilled on the liner, it may make it less effective. To overcome this problem, set the oven to maximum heat for about 20 to 30 minutes. Once the oven has cooled down, wipe the bottom of the oven.
- It is not advisable to clean the catalytic liners manually. Using a pad of steel wool filled with soap or any other abrasive product will damage the product. Furthermore, we do not recommend using spray cleaners on the liners. The walls of a catalytic coating can become ineffective when covered with too much grease. Excess grease can be removed with a soft cloth or sponge moistened with warm water, and the cleaning can be done as described above.
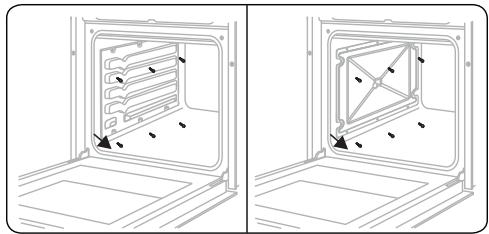
Removing the catalytic coating
To remove the catalytic coating, remove the screws that secure each catalytic panel to the oven.
Cleaning the ceramic glass
Ceramic glass can bear the weight of heavy utensils but may break when struck by a sharp object.
WARNING
Ceramic hobs: If the surface is cracked, turn off the appliance to avoid the risk of an electric shock and contact the maintenance department.
- Use a cream or liquid cleaner to clean the ceramic glass. Then, rinse and dry the glass thoroughly with a dry cloth.
WARNING
Do not use steel cleaning products as these may damage the glass.
- If substances with a low melting point are used in the base or on the coatings, they can damage the ceramic hob. If any plastic, aluminium foil, sugar or sweet food items fall onto the ceramic hob while it is hot, remove it as quickly and as safely as possible. If these substances melt, they can damage the ceramic hob. When cooking very sweet dishes, like jam, cover the hob with a suitable protective product beforehand if possible.
- Dust on the surface should be wiped off with a damp cloth.
- Any change in the colour of the ceramic glass will not affect the structure or durability of the ceramic and is not the result of a change in the material.
A change in the colour of the ceramic glass can be caused by a number of factors:
- Spilled food that was not wiped off the surface.
- Using incorrect dishes on the hob will wear out the surface.
- Using unsuitable cleaning products.
Cleaning the glass parts
- Regularly clean the enamelled parts of the appliance.
- Use a window cleaning product to clean the inside and outside of the glass parts. Then, rinse and dry the glass thoroughly with a dry cloth.
Cleaning the enamelled parts
- Clean the enamelled parts of your appliance regularly.
- Wipe the enamelled parts with a soft cloth dipped in soapy water. Then, wipe them again with a damp cloth and dry them.
WARNING
- Do not clean the enamelled parts that are still hot after cooking.
- Do not leave any vinegar, coffee, milk, salt, water, lemon or tomato juice on the enamel for too long.
Cleaning the stainless steel parts (if applicable)
- Regularly clean the stainless steel parts of the appliance.
- Wipe the stainless steel parts with a soft cloth dipped in water only. Then, dry the glass thoroughly with a dry cloth.
WARNING
- Do not clean the stainless steel parts while they are still hot after cooking.
- Do not leave any vinegar, coffee, milk, salt, water, lemon or tomato juice on the stainless steel for too long.
Cleaning the painted surfaces (if applicable)
- Stains from tomatoes, tomato paste, ketchup, lemon, oil derivatives, milk, sugary foods, sugary drinks and coffee should be wiped off immediately with a cloth dipped in warm water. If these stains are not wiped away and dried from the surfaces they are on, do NOT scrub them with hard objects (sharp objects, steel and plastic scrubbers, dish sponge which will damage the surface) or cleaning products containing high levels of alcohol, stain removers, grease removers or abrasive surface chemicals. Otherwise, corrosion may occur on the powder-coated surfaces, and stains may appear. The manufacturer will not be held responsible for any damage caused by the use of inappropriate products or cleaning methods.
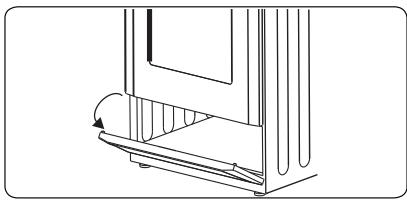
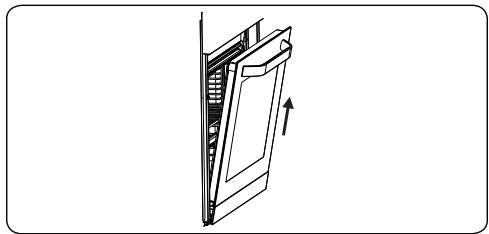
Removing the oven door
Before cleaning the glass of the oven door, the internal glass must be removed as follows:
- Open the oven door.
- Fully open the saddle support (a) (with a screwdriver) until it stops.
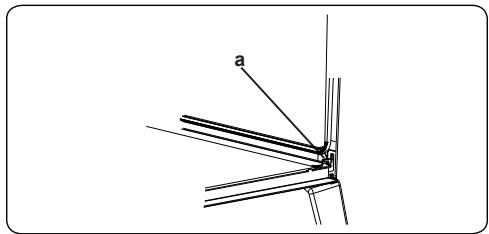
- Close the door until it is almost fully closed and remove it by pulling it towards you.
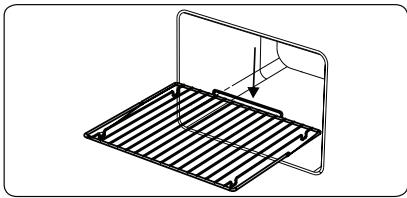
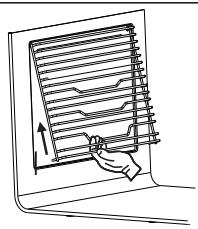
To remove the metal tray;
Pull out the metal tray as shown in the figure. Once it is free from the attachments, a , lift it up.
Maintenance
WARNING
This appliance should be maintained by an authorised person or qualified technician.
Replacing the oven light
WARNING
Turn off the appliance and let it cool down before cleaning.
- Remove the glass cover, then remove the bulb.
- Insert the new bulb (resistant to 300^ ) to replace the one you removed (230 V, 15 - 25 Watt, Type E14).
- Replace the glass cover. The oven is now ready to operate.
- This product contains a light source with an energy efficiency rating of G .
- The light source cannot be replaced by the end user. After-sales servicing is required.
- The included light source cannot be used for other applications.
Light source replaceable by a professional
WARNING
The light is made exclusively for use in household cooking appliances. It is not suitable for lighting up a room.
Troubleshooting and transport
Troubleshooting
WARNING
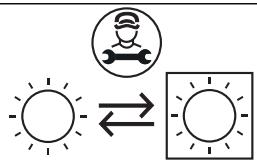
If the problem persists with the appliance after following these basic repairs, contact an authorised professional or qualified technician.
| Problem | Possible cause | Solution |
| The hob or cooking zones cannot be switched on. | There is no power. | Check the fuse for the appliance in the fuse box.
Check that the power supply is not cut by trying to turn on other electronic appliances. |
| The oven does not switch on. | The power supply is cut. | Check that the power supply is connected. Also check that the other kitchen appliances are working. |
| No heat is generated or the oven does not preheat. | The oven temperature setting is incorrect.
The oven door is open. | Check that the oven temperature control is set correctly. |
| Uneven cooking in the oven. | The trays/racks are incorrectly positioned. | Check that the recommended temperatures and levels are being followed.
Do not open the door frequently unless the food being cooked needs to be turned. Opening the door too often causes the temperature in the oven to drop, which can affect the cooking results. |
| The oven light is not working. | The bulb does not work.
The power supply is cut or disconnected. | Replace the bulb according to the instructions.
Check the power supply is connected to the mains socket. |
| The timer buttons do not go in properly. | Some foreign objects have become stuck in the timer buttons. Touch model: the control panel is damp. The child lock function is activated. | • Remove the foreign objects, then try again. Remove any sign of moisture, then try again.
• Check that the child lock function is not activated. |
| The oven fan (if there is one) is noisy. | The oven trays/racks vibrate. | • Check that the oven is level.
• Check that no trays/racks or dishes are vibrating or touching the rear panel of the oven. |
Transport
- If the appliance has to be moved, pack it in its original packaging and cardboard box. Follow the transport guidelines indicated on the packaging. Fasten moving parts to the appliance using adhesive tape to prevent any damage during transport.
- If the original packaging is not available, prepare a cardboard box to protect the appliance from external hazards (especially the external surfaces).
Merci!


