
CO 68 C X 373P - Built-in oven HIGH ONE - Free user manual and instructions
Find the device manual for free CO 68 C X 373P HIGH ONE in PDF.
| Product type | Built-in oven |
| Brand | HIGH ONE |
| Model | CO 68 C X 373P |
| Dimensions (W x H x D) | 595 x 595 x 550 mm (estimated) |
| Weight | Approximately 35 kg (estimated) |
| Power supply | 230 V ~ 50 Hz, single-phase |
| Maximum power | Approximately 2.5 kW (estimated) |
| Cooking functions | Natural convection, Bottom heat, Top heat, Grill, ECO |
| Timer | Mechanical, adjustable from 5 to 120 minutes |
| Interior lighting | Halogen bulb 25 W (G9) |
| Self-cleaning | Catalytic liners |
| Number of cooking levels | 5 (estimated) |
| Usable capacity | Approximately 65 liters (estimated) |
| Interior material | Catalytic enamel |
| Included accessories | Drip tray, grid |
| Warranty | 2 years |
| Installation | Built-in, requires cabinet cutout |
| Grill power | See manual (not specified) |
Frequently Asked Questions - CO 68 C X 373P HIGH ONE
User questions about CO 68 C X 373P HIGH ONE
0 question about this device. Answer the ones you know or ask your own.
Ask a new question about this device
Download the instructions for your Built-in oven in PDF format for free! Find your manual CO 68 C X 373P - HIGH ONE and take your electronic device back in hand. On this page are published all the documents necessary for the use of your device. CO 68 C X 373P by HIGH ONE.
USER MANUAL CO 68 C X 373P HIGH ONE
This product is guaranteed for a period of 2 years from the date of purchase* against any failure resulting from a manufacturing or material defect. This warranty does not cover defects or damage resulting from incorrect installation, improper use or abnormal wear of the product.
*as shown on the sales receipt.
FR
CONDITION DE GARANTIE
Thank you for choosing this HIGHONE product.
Chosen, tested and recommended by ELECTRO DEPOT,
HIGHONE brand products are easy to use, reliable
and of the highest quality.
With every use of this appliance, you can be sure of
complete satisfaction.
Welcome to ELECTRO DEPOT.
Visit our website: www.electrodepot.fr

Description of the appliance

Installation Use Using oven - Practical tips

Cleaning and maintenance Emergencies
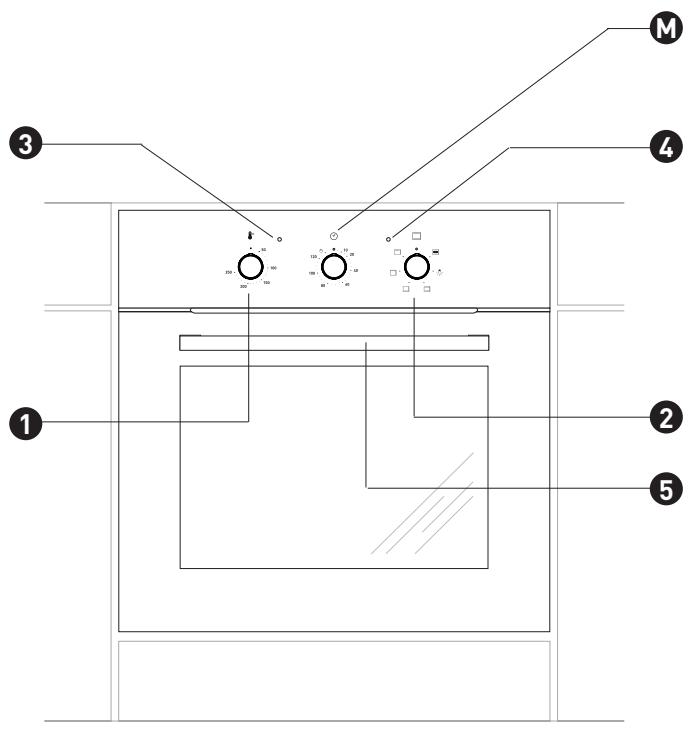
Appliance description
Mechanical timer
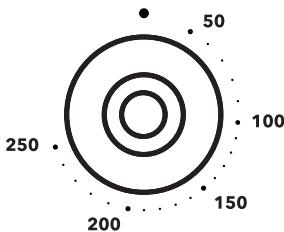
1 Temperature control knob
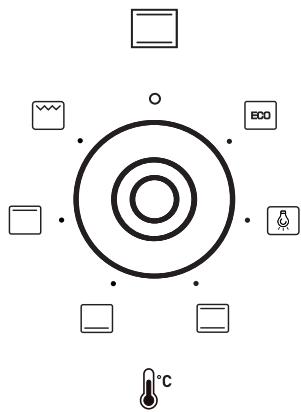
Oven programme knob
3 Temperature indicator light
Oven indicator light
5 Oven door handle
Installation
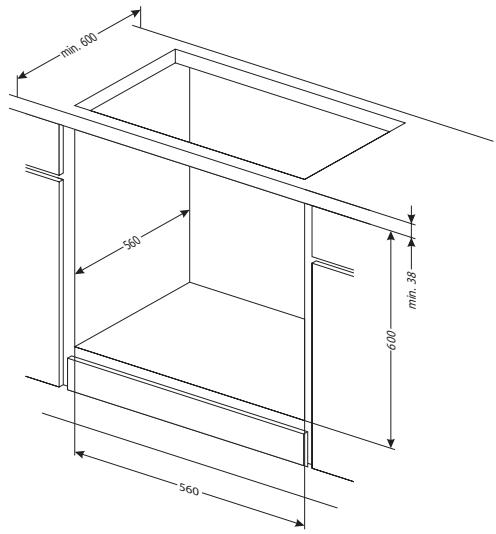
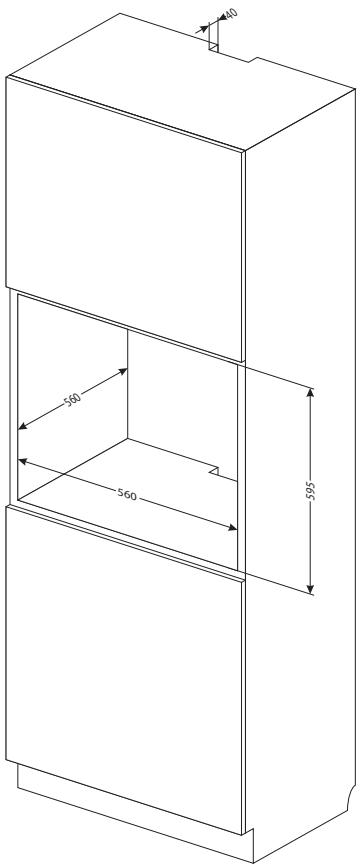
Oven Installation
- The oven must be positioned in a dry, airy space with good ventilation.
When installing the oven, easy access to all control elements should be ensured.
The finish and adhesives used to make the units for housing the oven, must be capable of withstanding a temperature of 100^ . If these conditions are not met, the surface of the units may become warped and the finish or coating – may peel off.
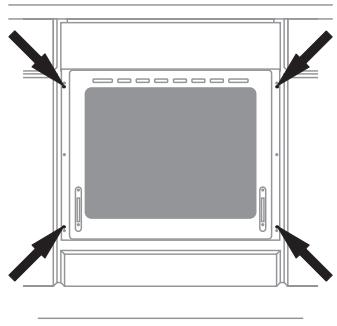
- Prepare an aperture in the housing unit as per the dimensions shown on the picture,
- Fully insert the oven into the recess and secure using four screws (as shown in drawing) to prevent it from slipping.
Power supply connection
The oven must be powered by a single-phase AC system (230 V 1 N~50 Hz) and fitted with a 3 × 1.5 mm^2 power cord, roughly 1.5 m long with a grounded outlet.
- The electrical socket must be fitted with an earth wire and must not be positioned above the oven.
Once the oven is installed, ensure the electrical socket is easily accessible.
- Before plugging in, check that:
the circuit breaker and electrical system can handle the load from the oven,
- the electrical circuits are equipped with an effective grounding system, that meets current standards and regulations,
the socket is easily accessible.
COMMENT
To avoid any risk, if the fixed power cord is faulty, it must be replaced or repaired by the manufacturer or an approved professional.
Use
Before using the oven for the first time
- remove all packaging components, clean the oven to eliminate all traces of products used to protect the oven,
- remove all oven accessories and clean using hot water and cleaning product,
- heat the oven to 250^ , using the natural convection setting, for roughly 30 minutes, remove all residue and wash thoroughly.
- carefully clean the inside of the oven.
Clean the inside of the oven using warm water and a small amount of cleaning product only.
Mechanical timer
The timer is used to set the cooking time on your electric oven. The timer can be set from 5 to 120 minutes. Once the specified time has elapsed, the timer will beep and the oven automatically turns off. Programming - turn the knob clockwise and set the cooking time.
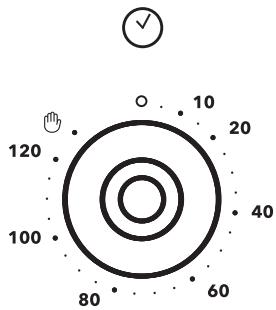
If the knob is turned to the "0" position, the oven will not turn on.
If you want to use the oven without the timer, the knob must be turned to the position.
COMMENT
When setting the timer for 5 to 10 minutes, you must first turn the knob 90 degrees and then select the required length of time.
Oven functions and use
The oven is heated by top, bottom, fan-assisted and/or grill heating elements.
The oven is controlled by the cooking mode and temperature control buttons. For the oven to work properly, the selection must be set according to the food that is to be cooked. The symbols around the button correspond to the specific functions of the oven.
To turn off the oven, you need to turn both knobs to the /0 position.
COMMENT
The oven will only start heating up (resistance etc.) when you have selected one of the oven functions and the temperature.
Possible positions of oven control knob
| ECO cooking mode This function allows you to heat dishes so as to maximize energy efficiency. Cooking times may be slightly longer. In this position, the oven light stays off. |
| Oven light When you turn the knob to this position, the light comes on inside the oven. |
| Turning on top and bottom heating When you turn the knob to this position, the oven is heated using conventional natural convection. |
| Turning on bottom heating When you turn the knob to this position, the oven heats up using just the bottom element. |
| Turning on top heating When you turn the knob to this position, you can heat the oven using just the top element. |
| Turning on the grill When you turn the knob to this position, the grill turns on, allowing you to grill food. |
Indicator lights
When the oven is turned on, two lights - a red light and an orange light - come on. The orange light indicates that the oven is on. The red light turns off when the oven has reached the selected temperature. If the recipe states that the dish must be placed in a pre-heated oven, wait until the red light switches off for the first time. During cooking, the light will regularly switch on and off (keeping the oven temperature constant). The orange light also turns on when you select the "Oven light" function.
Using the grill
Food is grilled using infra red radiation emitted by the grill's incandescent element.
To switch on the grill, you need to:
- turn the knob to the grill position
- heat up the oven for roughly 5 minutes (with the door closed),
- insert the oven tray with your dish at the appropriate level. If using the spit, place an oven tray below the spit to collect the fat,
close the oven door.
When using the grill and super-grill feature, we recommend that you set the temperature to 250^ and then adjust to 190^ .
WARNING
Keep the door closed when using the grill.
When using the grill, the external parts of the oven can become extremely hot.
Keep children away.
Using oven - Practical tips
Baking
- when baking your pastries/cakes, we recommend using the oven tray supplied with the device or the baking sheet placed on the rack,
- you can also use commercially available moulds and trays. You need to place them on the rack. We recommend using black baking trays for your pastries, which conduct heat better and reduce cooking time,
- before removing your pastries/cakes from the oven, you need to check that they are cooked using a wooden skewer (if the mixture is cooked, the skewer will come out clean and dry),
- you do not need to pre-heat the oven. If you're not using the fan-assisted function, preheat the oven before putting the cake in the oven,
- the guidelines provided on the cooking chart below are approximate and can be altered depending on the experience and culinary preferences of each user.
- if the instructions in your recipe book differ from those presented here, please follow the directions provided in this instruction manual.
Cooking and roasting meat
- the oven is designed for cooking cuts of meat weighing in excess of 1kg . We recommend cooking smaller portions on the hob,
- we recommend using heat-resistant containers. Container handles must also be able to withstand high temperatures,
- if using a rack or a turn-spit, we recommend placing an oven tray, with a small quantity of water, underneath,
- meat should normally be turned at least once halfway through cooking. The joint should also be basted with its juices or using hot salted water. Do not spray the joint with cold water.
ECO cooking mode
- when using the ECO mode, the appliance automatically activates the optimum settings for energy saving during cooking.
- the cooking time will not be reduced if you use a higher temperature setting and there is no need to preheat the oven before cooking.
- ensure you do not adjust the temperature or open the door while cooking.
Recommended settings when using the ECO cooking mode
| Type of cake or dish | Oven Function | Temperature | Level | Time [mins.] |
| °C | [°] | [L] | ||
| 180 - 200 | 2 - 3 | 25 - 401) | ||
| 180 - 200 | 2 - 3 | 25 - 401) | ||
| 190 - 210 | 2 - 3 | 25 - 1002) | ||
| 200 - 220 | 2 | 90 - 1202) | ||
| 200 - 220 | 2 | 90 - 1602) | ||
| 180 - 200 | 2 | 80 - 1002) |
1)Recommended for cooking times of less than 40 minutes.
2]Recommended for cuts of meat weighing more than 1kg
| Type of cake/pastry or dish | Oven Function | Temperature | Level | Time [mins.] |
| °C | [°] | |||
| 160 - 200 | 2 - 3 | 30 - 50 | ||
| 160 - 1701) | 3 | 25 - 402) | ||
| 220 - 2401) | 2 | 15 - 25 | ||
| 210 - 220 | 2 | 45 - 60 | ||
| 230 - 250 | 4 | 14 - 18 | ||
| 225 - 250 | 2 | 120 - 150 | ||
| 160 - 230 | 2 | 90 - 120 |


160-180
2
45-60


190-210
2
40-50
Unless otherwise stated, times given are for a non-preheated oven. Reduce the cooking time by roughly 5-10 minutes for a preheated oven.
1) Preheat empty oven
[2] The cooking times given are for products in small moulds or containers
NOTE
The settings indicated in the chart are provided as guidance only and can be changed based on your own experience and preferences.
Cleaning and maintenance
To extend the life of your oven, you must look after it properly, in accordance with the manufacturer's recommendations.
Before cleaning, disconnect the oven from the power source and check that all the knobs are in the ‘•’/‘0’ position. You can only start cleaning when the oven is cool.
Oven
- The oven must be cleaned after each use. When cleaning, switch on the light to give you a better view of the area you're going to clean.
- Clean the inside of the oven using warm water and a small amount of washing up liquid only.
- After cleaning the inside of the oven, wipe it thoroughly so it's completely dry.
- The enamel items of equipment must be washed in hot water with washing up liquid.
- Do not use liquids containing organic acids (e.g. citric acid) as these can cause permanent stains or discolour the ceramic enamel.
COMMENT
You must not use scourers, scouring creams or abrasive detergents to clean or maintain the oven.
To clean the outside, just use hot water and a small amount of washing up liquid. Do not use scouring creams.
- The oven is equipped with a set of panels covered with a special, self-cleaning enamel.
This enamel automatically eliminates any dirt, grease or food residue, unless this is baked on or burnt. Catalytic cleaning can take a long time; to avoid this lengthy process any food residue or grease should be wiped off as soon as possible before it becomes dried or burnt. To use the self-cleaning feature, turn the temperature to 250^ and leave on for 1 hour. The length of time can be reduced if there is not too much dirt or residue.
During the cleaning process, surfaces can get hotter than normal. Keep children away.
Important!
Catalytic cleaning uses a large amount of energy so we recommend that you check the level of dirt before proceeding. If the user notices that the catalytic enamel plates are becoming less efficient, he can contact the after-sales service and change them. If you choose a traditional cleaning method, remember that self-cleaning enamel is not abrasion-resistant so you need to avoid using hard cloths or abrasive cleaning products.
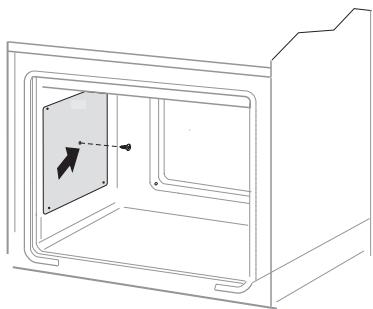
Removing the catalytic panels
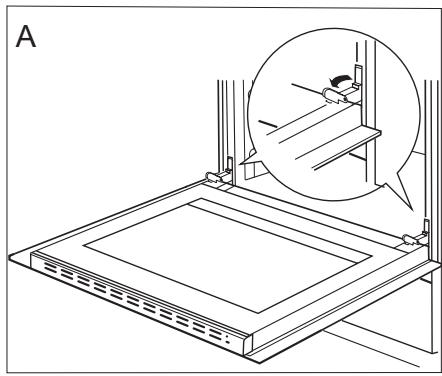
How to take off the door
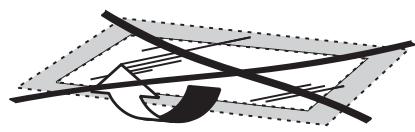
To make it easier to clean the oven cavity, the door can be removed. To do this, open the door and lift up the hinge guard (fig A). Then gently close the door, lift it and remove it by pulling it towards you.
To reinstall the door after cleaning, perform the same actions but in the reverse order. When reinstalling the door, make sure that the hook is properly positioned in the hinge slot. Once the door is attached, lower the hinge guard and fix securely.
Incorrect positioning of the guards could cause damage to the hinges when closing the door.
Removing the hinge guards
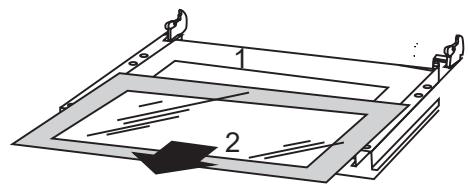
How to remove the inner glass
- Detach the upper panel of the door using a flat screwdriver, lifting it gently at the sides (fig B).
- Remove the upper panel of the door (fig.B, C).
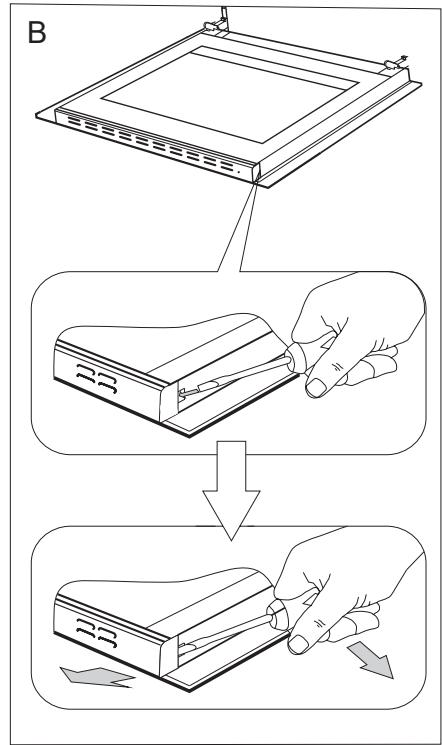
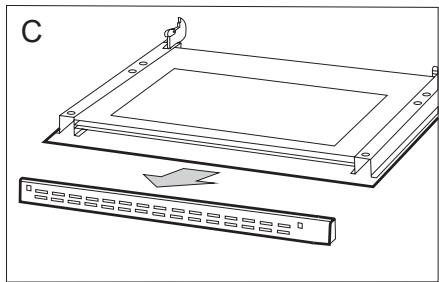
- Detach the inner glass from its mount (the lower part of the door). Remove the inner glass (fig. D.)
- Wash the glass using warm water and a little cleaning product.
To reinstall the glass, follow the same procedure but in the reverse order.
The smooth part should be at the top.
WARNING
You must refrain from pushing both sides of the upper door panel simultaneously.
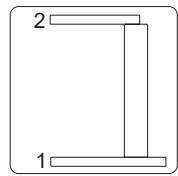
To position the upper panel of the door correctly, you first need to place the left-hand side of the panel on the door and push the right hand side down until you hear a "click." Then you need to push down on the left-hand side until you hear another click.
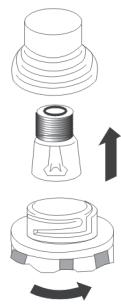
Replacing the halogen bulb of the oven light
D1
WARNING
Make sure that the appliance has been unplugged from the power supply before replacing the lamp to avoid any risk of electric shocks.
- Turn the oven knobs to the ‘ ’/‘0’ position and disconnect unit from power supply.
- Unscrew, wash the cover and dry it throughout.
-
Remove the halogen bulb using a cloth or paper. If necessary, replace the halogen bulb with a new one:
-
voltage 230 V
- power consumption 25 W
-G9 - Precisely position the halogen bulb in the recessed compartment.
- Attach the cover.
Regular checks
In addition to routine oven maintenance and cleaning, you need to:
- Regularly check the oven's mechanical and electronic features. You need to arrange to have the oven serviced when the warranty expires and at least every two years,
- repair any defects found,
- arrange for mechanical inspection and servicing.
COMMENT
Repairs and adjustments must be carried out by an approved professional or by our after-sales team.
Emergencies
In the event of an emergency, you must:
- turn the oven knobs to the 0 position
- disconnect unit from power supply
- contact the after-sales department
Minor issues can often be resolved by the consumer using the table below. Before contacting the customer service or after-sales service, check this table:
| Problem | Cause | Solution |
| The appliance isn’t working. | Power cut. | Check the fuse on the house’s switchboard, plug it back in or replace it. |
| The oven light is not working. | The bulb is unscrewed or faulty. | Screw in the bulb or replace it (see the Cleaning and Maintenance section). |
The product complies with the EN 60335-1 and EN 60335-2-6 standards in force in the European Union.
The energy labelling data for electric ovens is given in accordance with the EN 60350-1/IEC 60350-1 standard. This data is defined for standard loads with active functions: lower and upper heating elements (conventional mode) and fan-assisted heating (if these functions are available).
Manufacturer's declaration:
The manufacturer declares that this product complies with the essential requirements of the following European directives:
2014/35/EC «low voltage» directive
2014/30/EC electromagnetic compatibility directive
- 2009/125/EC «eco-design» directive, therefore, the product is marked and has obtained a declaration of conformity which is available to the market conduct authorities.
Merci!

- FR
- CONDITION DE GARANTIE
- Appliance description
- Installation
- Oven Installation
- Power supply connection
- COMMENT
- Use
- Before using the oven for the first time
- Clean the inside of the oven using warm water and a small amount of cleaning product only.
- Mechanical timer
- Oven functions and use
- Possible positions of oven control knob
- Indicator lights
- Using the grill
- WARNING
- Using oven - Practical tips
- Baking
- Cooking and roasting meat
- ECO cooking mode
- NOTE
- Cleaning and maintenance
- Oven
- During the cleaning process, surfaces can get hotter than normal. Keep children away.
- Important!
- How to take off the door
- How to remove the inner glass
- Replacing the halogen bulb of the oven light
- Regular checks
- Emergencies
- Manufacturer's declaration:
- Merci!
Brand : HIGH ONE
Model : CO 68 C X 373P
Category : Built-in oven