
TV QLED 65 - TV POLAROID - Free user manual and instructions
Find the device manual for free TV QLED 65 POLAROID in PDF.
| Product Type | QLED 4K UHD TV |
| Brand | Polaroid |
| Model | TBSAND65QLED (65 QLED TV) |
| Screen Size | 65 inches (163.81 cm) |
| Resolution | 3840 x 2160 pixels (4K UHD) |
| Aspect Ratio | 16:9 |
| Contrast Ratio | 4000:1 |
| Tuner | DVB-T, DVB-C, DVB-T2 |
| Power Supply | 100-240 V ~ 50/60 Hz, 3 A |
| Power Consumption (on) | 150 W (standby ≤ 0.5 W) |
| Dimensions (with stand) | 1447 x 300 x 926.3 mm |
| Net Weight | Approximately 18.1 kg |
| Speakers | 2 x 10 W |
| Connectivity | Wi-Fi (2.4/5 GHz), Bluetooth 4.0 |
| Inputs | 4 x HDMI, 3 x USB, 1 x ANT, 1 x CI, 1 x RJ45, 1 x AV |
| Outputs | 1 x Headphone, 1 x Optical (SPDIF) |
| Smart TV | Android TV with Google Assistant and Chromecast built-in |
| Supported Media Formats | Video: FLV, MKV, MPEG, MOV, AVI, H.264; Audio: MP3, WAV, M4A, AMR; Photo: JPG, BMP, PNG, JPEG; Text: TXT |
| Included Accessories | Stand (2 pieces), remote control, user guide |
| Maintenance | Clean with a soft dry cloth. Do not use chemicals. |
| Safety | Do not expose to water or humidity. Unplug before cleaning. Do not open the casing. |
| Warranty | 2 years (parts and labor) |
Frequently Asked Questions - TV QLED 65 POLAROID
User questions about TV QLED 65 POLAROID
0 question about this device. Answer the ones you know or ask your own.
Ask a new question about this device
Download the instructions for your TV in PDF format for free! Find your manual TV QLED 65 - POLAROID and take your electronic device back in hand. On this page are published all the documents necessary for the use of your device. TV QLED 65 by POLAROID.
USER MANUAL TV QLED 65 POLAROID
RISQUE D'ÉLECTROCUTION NE PAS OUVRIR
ATTENTION: POUR ÉVITER TOUT RISQUE D'ÉLECTROCUTION, NE RETIREZ PAS LE COUVERCLE (NI LE PANNEAU ARRIÈRE).
AUCUNE PIECE N'EST REMPLAACIBLE PAR L'UTILISATEUR. CONTACTEZ UN PERSONNEL QUALIFIÉ EN CAS DE PANNE.

MODE VENTE AU DÉTAIL
EXCLUSIONS DE GARANTIE
EXCLUSIONS DE GARANTIE LIÉES À L'ORIGINE DU DOMMAGE
You've asked des questions?
Imported by Market Maker Brand Licensing – 79/81 Ancienne Route
Nationale 7-69570 Dardilly, France
PLR IP Holdings, LLC, its licensees and affiliates, fully supports all electronic waste initiatives. As responsible stewards of the environment, and to avoid violating established laws, you should properly dispose of this product in compliance with all applicable regulations, directives or other governments in the area where you reside. Please check with local authorities or the retailer where you purchased this product to determine a location where you can appropriately dispose of the product. You may also go to www.polaroid.com and reference Social Responsibility http://www.polaroid.com/social-responsibility to learn more about the specific laws in your area and to locate a collection facility near your home.
If your electronic device has internal memory on which personal or other confidential data may be stored, you may want to perform a data sanitization process before you dispose of your device to assure another party cannot access your personal data. Data sanitization varies by the type of product and its software, and you may want to research the best sanitization process for your device before disposal. You may also check with your local recycling facility to determine their data sanitization procedures during the recycling process.
IMPORTANT INSTRUCTIONS
SAFETY PRECAUTIONS

The warning sign showing a lightning bolt in a triangle indicates that this product contains "dangerous electrical voltages".
CAUTION
RISK OF ELECTRIC SHOCK DO NOT OPEN
CAUTION: TO AVOID THE RISK OF ELECTROCUTION, DO NOT REMOVE THE COVER (OR THE BACK OF THE DEVICE). NO PARTS ARE REPLACEABLE BY THE USER. PLEASE CONTACT QUALIFIED PERSONNEL IN CASE OF FAILURE.

The warning sign showing an exclamation point in a triangle indicates that this point of the manual requires special attention.

CAUTION: - TO REDUCE THE RISK OF FIRE, ELECTRIC SHOCK OR SERIOUS INJURY:
Read these safety instructions before using your device and store them for possible future reference.
- This device must only be connected to a mains network whose characteristics are identical to those shown on the device identification plate.
- The mains plug must always be easily accessible. It serves as a mains disconnecting switch of the device.
- To disconnect the device from the mains, the plug must be disconnected. Hold the mains cable by its plug. Do not pull on the mains cable to disconnect the plug.
- The mains cables must be routed so that they are not trampled upon or pinched by objects placed on or against them.
- If the mains cable of the device is damaged, it must be replaced by the manufacturer, its after-sales service or a similarly qualified person to avoid any danger.
The device must not be exposed to dripping or splashing water, moisture or liquids. - Do not place the device near water, for example in a bathroom or near a sink.
- No objects filled with liquids such as vases should be placed on or above the device.
- Never touch the mains cable with wet hands, this could cause a short circuit or electric shock.
- To avoid the risk of fire, do not place sources of open flames, such as lighted candles, or heat sources such as radiators, on or near the device.
- The device is intended for use only in a temperate climate.
-
If smoke, an unusual odour or strange noise is emitted by the device: unplug the mains cable from the electrical outlet and consult the after-sales service or repair centre. Never attempt to make repairs yourself, this could be potentially dangerous.
-
Do not attempt to open or disassemble the device. This would expose you to dangerous voltages.
- The slots and openings of the device are intended for ventilation and to ensure its operation. To prevent overheating, these openings must not be obstructed or covered in any way, such as by newspapers, tablecloths or curtains.
- Always leave a minimum distance of ± 0 cm around the device for sufficient ventilation .
- Never push any object to the device through one of its openings, as it may come into contact with electrical components, which can cause an electric shock or fire.
- In case of thunderstorm or lightning, immediately unplug the mains cable from the electrical outlet when the device will not be used for a long period of time.
- Unplug the device from the electrical outlet before cleaning. Do not use liquid or aerosol cleaners. Use a dry, soft cloth for cleaning.
- If the product does not bear the logo, it's a Class I device. It must then be connected to a mains socket with a protective earth connection.

CAUTION -:TO AVOID RISK OF INJURY OR DAMAGE TO THE PRODUCT OR OTHER EQUIPMENT:
- This product is intended for household and personal use only. Do not use this product for commercial, industrial or other purpose.
- Do not subject the product to strong shocks, extreme temperatures or direct sunlight for prolonged periods.
- Keep the product away from magnetic objects, motors and transformers.
- Do not use the product outdoors, regardless of weather conditions.
Install the device only on a stand (forniture, wall...) that can support it's weight safely. -
WARNING: never place a TV on an unstable location. This can fall, causing injuries or even the death of a person. Many injuries, especially in the case of children, can be avoided by taking simple precautions such as:
-
The use of furniture or stands recommended by the TV manufacturer.
- The exclusive use of furniture that can support the weight of the TV safely.
- Make sure that the device does not protrude from the dege of the furniture on which it is placed.
- Never place the device on a tall piece of furniture (e.g. cabinets or bookcases) without attaching both the furniture and the device to a suitable stand.
- Do not place the device on a trolley or on a stand that is not stable. Do not install the device on any fabric or other materials placed between its base and the supporting furniture. The device could fall and be damaged or seriously injure a person.
- Do not use or wath the TV while driving. This is dangerous and illegal in some countries.
- Explain to children the dangers they face when climbing on the furniture to reach the device or its controls.
-
If you keep this device and change the location, you should apply the same considerations.
-
CAUTION: to avoid accidents, this device must be securely attached to the floor or wall according to the installation instructions.

CAUTION: TO AVOID EYE HAZARDS:
- It is best to have soft indirect lighting to watch TV. Avoid completely dark environments and any reflection on the screen, as these can cause eyestrain.

USE AND HANDLING OF BATTERIES
- CAUTION: danger of explosion if the batteries are not inserted correctly or if they are replaced by a non-similar or incompatible model.
- Replace the batteries only with batteries of the same type or equivalent type.
- Batteries must not be exposed to excessive heat such as that from the sun, fire or similar origin.
- Never throw batteries into fire and never expose them to heat sources.
- Do not mix different types of batteries, or new and used batteries.
- The batteries must be inserted according to the polarities indicated on the battery and in the battery case of the remote control.
Used batteries must be removed from the remote control. - The batteries must be disposed of safely at the assigned specific collection points to preserve the environment. Follow the disposal instructions indicated on the batteries and at the collection points.
- Keep batteries out of the reach of children and animals. Only adults are capable of handling the batteries.
For installation, handling, cleaning and disposal of the device, refer to the following chapters of the user manual.
ACCESSORIES
User Manual 1
Remote Control 1
Stand 2
All the pictures in this manual are just for your reference, appearance and display should subject to the final product.
TABLE OF CONTENTS
GETTING STARTED
IMPORTANT INSTRUCTIONS 1-3
ACCESSIONS 3
FEATURES. 5
GENERAL PARTS 6-7
REMOTE CONTROL. 8-9
REMOTE CONTROL PREPARATION. 10
BASIC CONNECTION 11-13
OPERATIONS
BASIC
OPERATIONS 14-33
FOR REFERENCE
MAINTENANCE 34
WALL MOUNTING 34
STAND INSTALLATION 35
SPECIFICATIONS 36
TROUBLESHOOTING 39
WARRANTY CONDITIONS 40
FEATURES
65" LED Display
This unit has a built-in LED display window to provide clear vision and low radiation.
Support Auto TV Scanning
Support Digital Broadcasting Reception
Support TV Guide Function
Support TELETEXT (Europe) Function
Support USB Multimedia Playback
Support Multi-languages On Screen Display
Support Full Function Remote Control
Support HDMI, ANT,RJ 45,USB, AV and CI Input
Support EARPHONE and OPTICAL
With Detachable Stand Holder
With External Antenna Jack
With Built-in Speakers
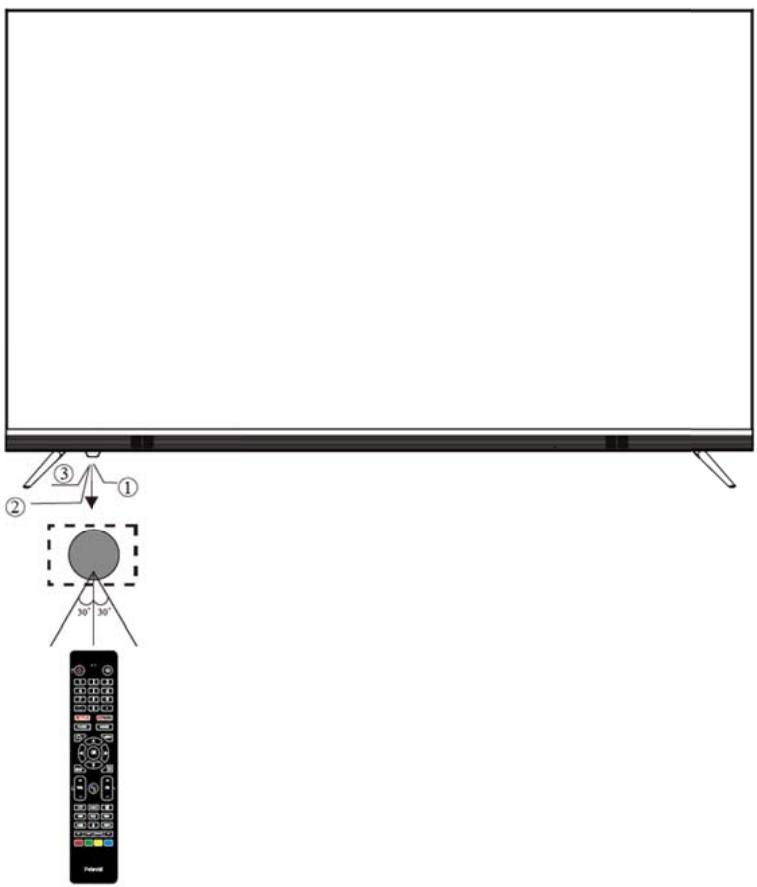
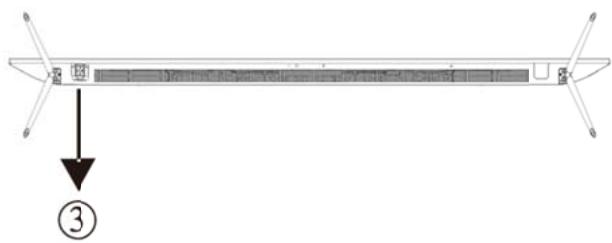
GENERAL PARTS
MAIN UNIT Front View
Bottom view
1: Remote control sensor.
2: Indicator-LED: RED STANDBY.
3: " = " VOL- and move left
"VOL+ and move right
"∧" CH- and move down
"CH+ and move up
- short press to confirm enter the menu.
- long press to power off.
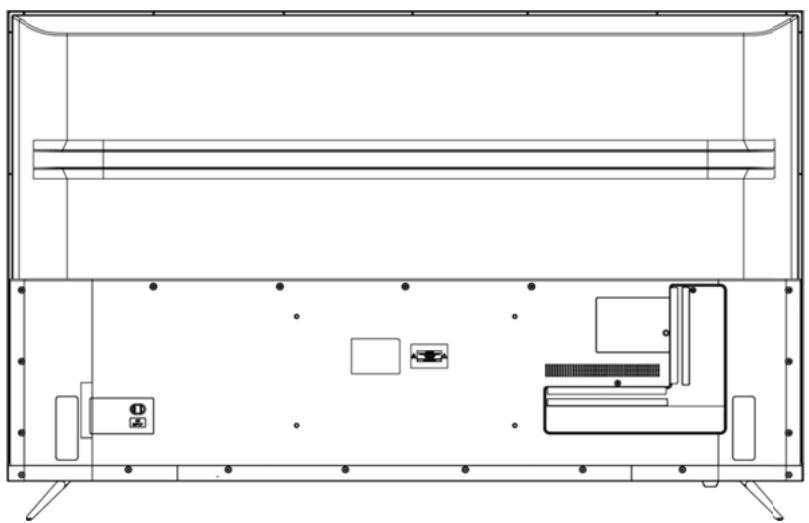
GENERAL PARTS
Back View
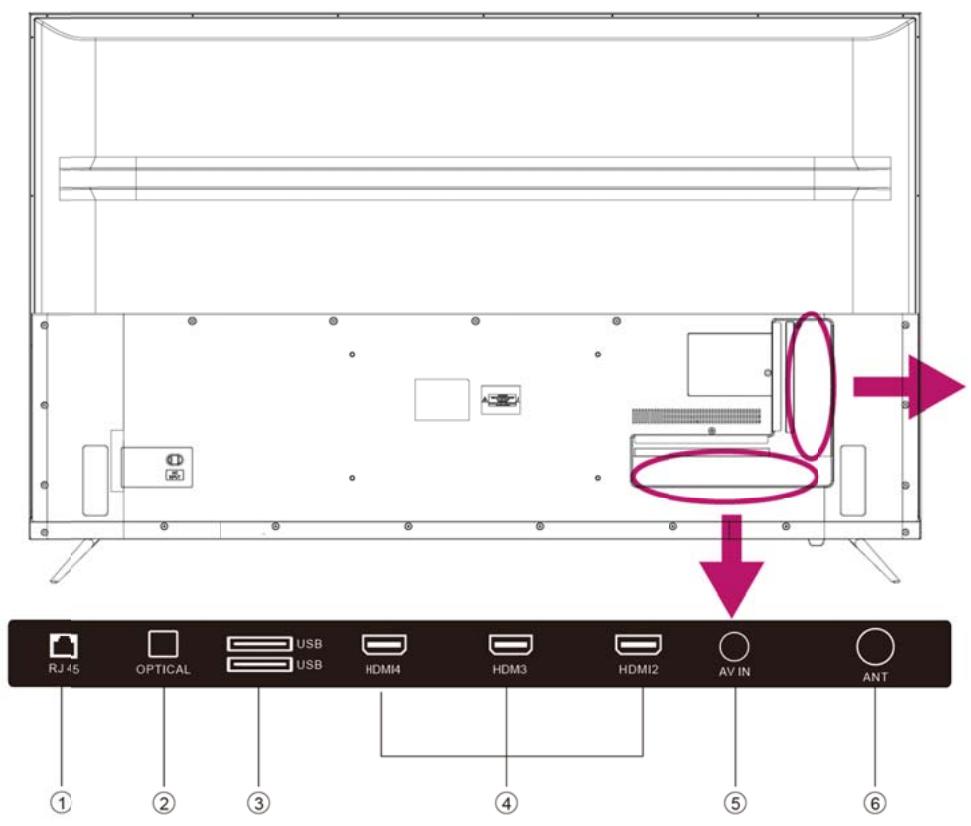
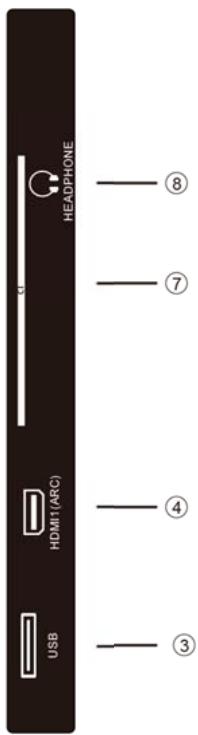
1.RJ 45
2.OPTICAL
3.USB INPUT
4.HDMI
5.AV IN.
6.ANT
7.CI slot.
8. Headphone output.
REMOTE CONTROL
1: Power: To set the TV to Standby or Power On modes.
2: Select among the different input signal sources.
3: NUMBER KEY : For direct access to channels.
4: Jumps to last channel viewed.
5: Input the character "dot".
6: NETFLIX: NETFLIX : Press to open NETFLIX
7: YouTube: press to open YouTube
8: P.MODE: Press to switch the picture mode.
9: S.MODE: Press to switch the sound mode.
10: : press to open the home page.
11: MENU: Press to open or close the on-screen menu.
12: OK: Confirm selection.
13: press to open the app list.
14: BACK: Return to the previous menu.
15: VOL+/:- To adjust the sound level.
16: CH+/CH:: To access the next or previous channel.
17: i+: Press to display the channel information.
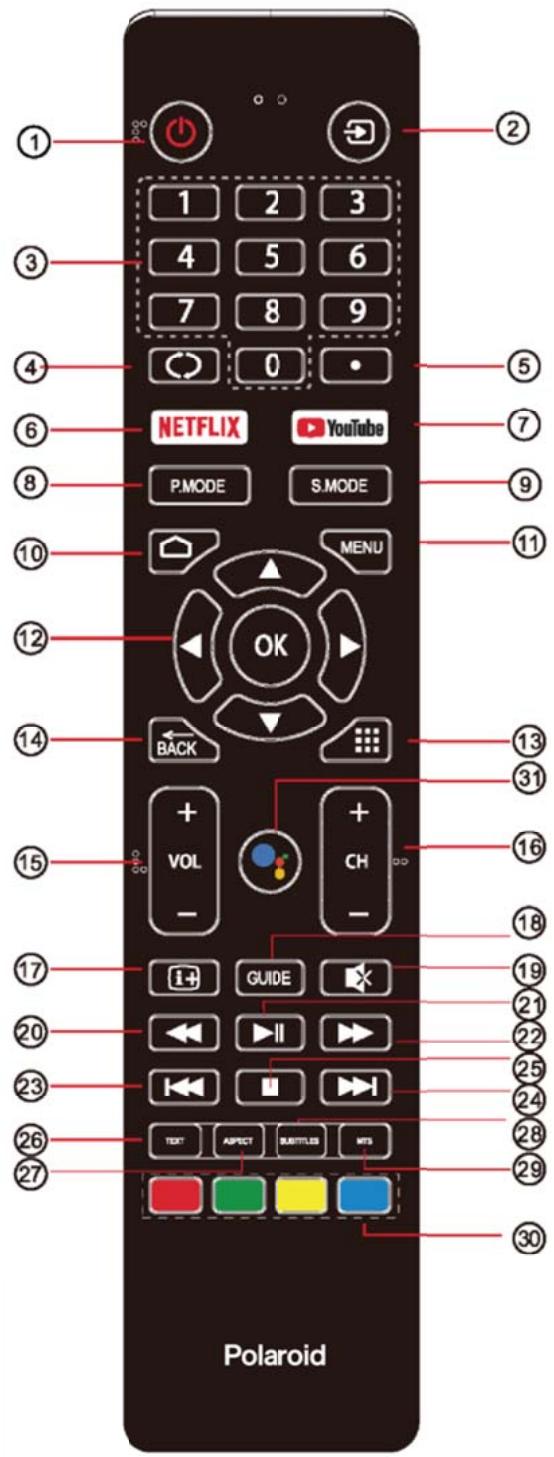
REMOTE CONTROL
18: GUIDE: Press to display electronic programme guide in TV mode.
19: MUTE : To disable or enable the speaker sound output.
20: (Reverse): Reverse playback rapidly.
21: Play/Pause): Start playback or Pause playback.
22: (Forward): Advance playback rapidly.
23: (Prev) To skip to the beginning of the previous chapter/track/photo.
24: (Next): Skip to the beginning of the next chapter/track/photo.
25: (Stop): Press to stop multimedia playback.
26: TEXT : Press to select the teletext mode.
27: ASPECT : Press to change the picture aspect ratio.
28: SUBTITLES : To turn on subtitles in DTV mode.
29: MTS : Press to select Mono, Nicam, Stereo for ATV channel. Audio language for DTV Channel.
30: Coloured Buttons : Press to Implement the relevant operations according to the prompt at the button of the menu in the text.
31: Google Assistant : Press to open the google assistant or start a voice search.
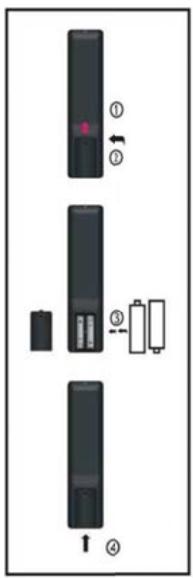
REMARQUE:
Install the batteries as the following pictures. Be sure + and - terminals are positioned as indicated in the battery compartment (Fig1).
SERVICE LIFE OF BATTERIES
- The batteries normally last for one year although this depends on how often the remote control is used.
- If the remote control fails to work even when it is operated near the player, replace the batteries.
- Use two size AAA dry batteries.
NOTE:
- Do not drop, step on or otherwise impact the remote control. This may damage the parts or lead to malfunction.
- If the remote control is not going to be used for a long time, remove the batteries.
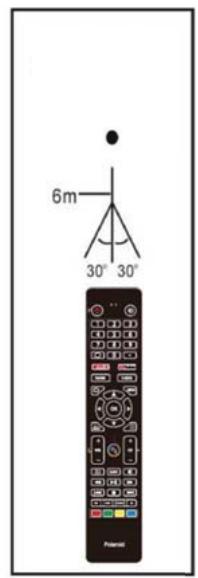
Point the remote control from no more than about 6 ~m from the remote control sensor and within about 60^ of the front of the player (Fig2).
NOTES:
- The operating distance may vary according to the brightness of the room.
- Do not point bright light at remote control sensor.
- Do not place objects between the remote control and the remote control sensor.
- Do not use this remote control while simultaneously operating the remote control of any other equipments.
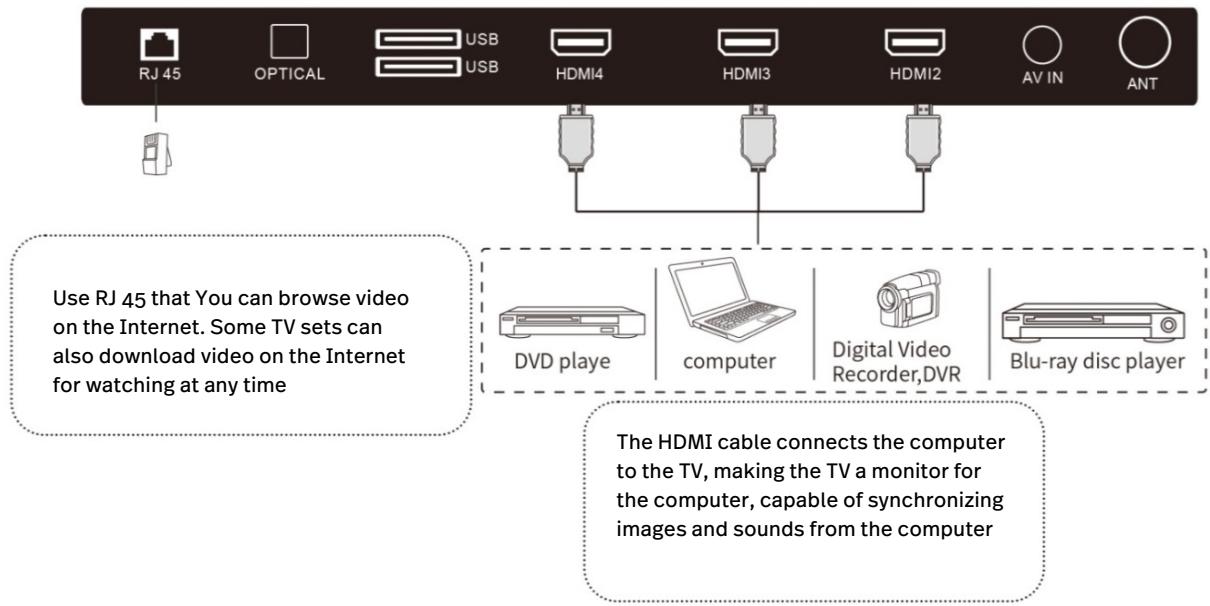
BASIC CONNECTION
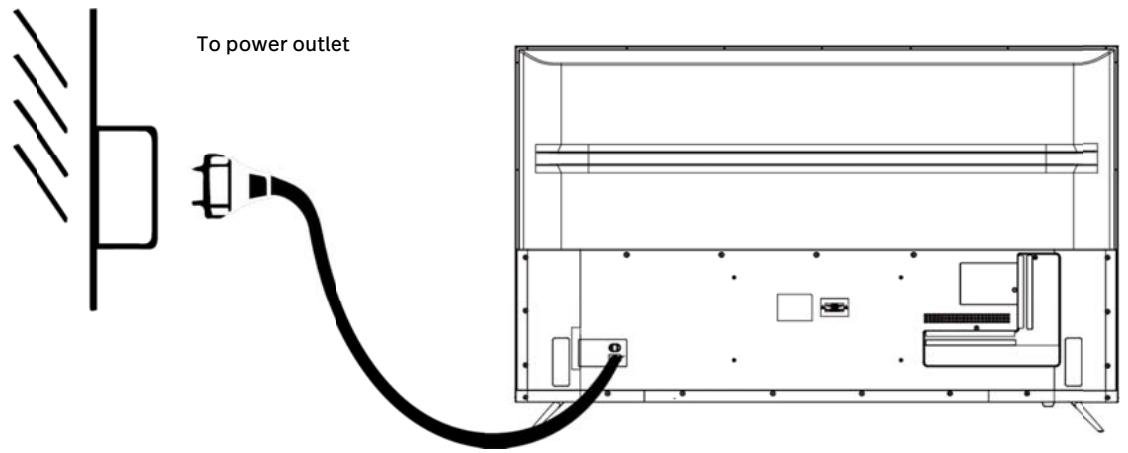
- Ensure all the cables are disconnected from the main unit before connecting to AC power source.
- Read through the instructions before connecting other equipments.
CONNECTING TO AC POWER SOURCE
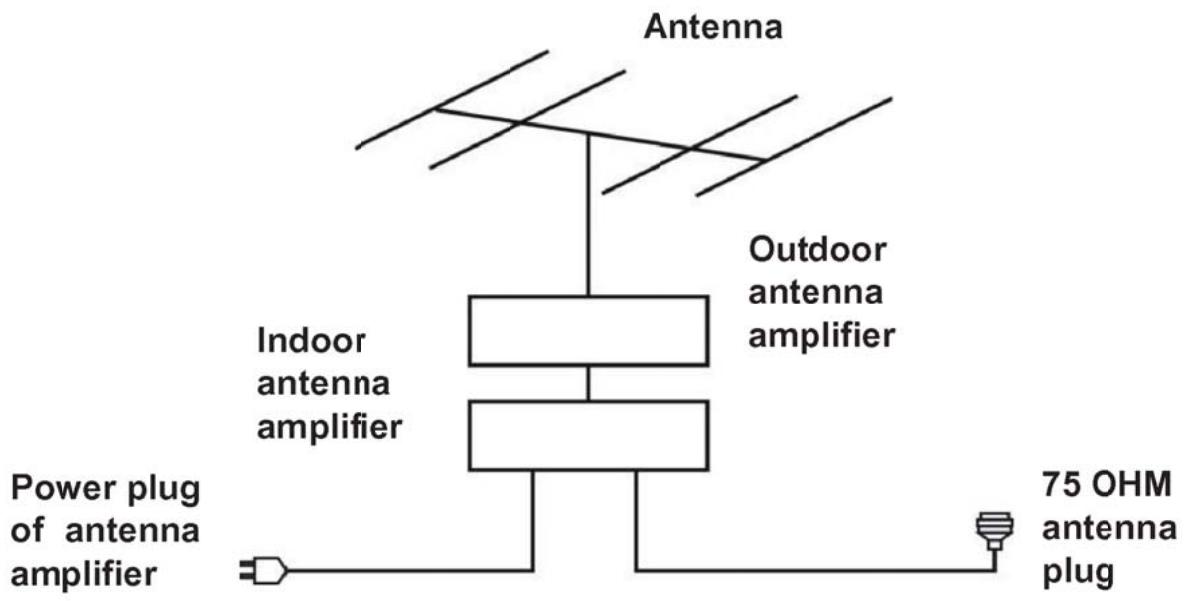
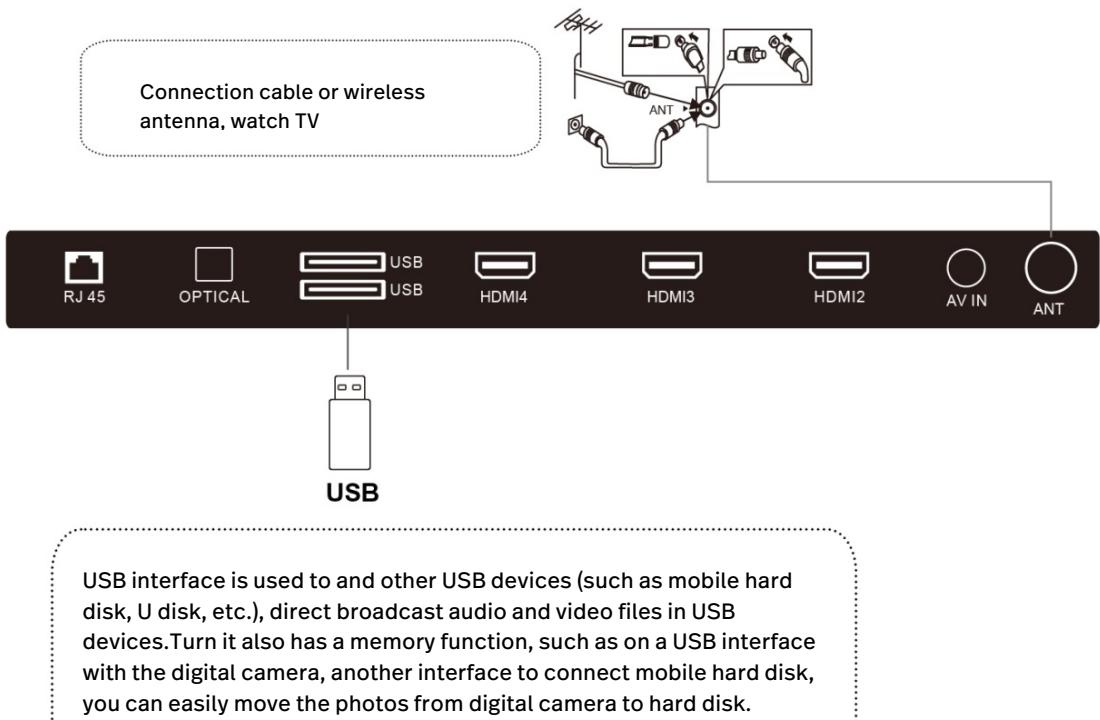
CONNECT EXTERNAL ANTENNA TO UNIT
Install external antenna into antenna jack for best picture.
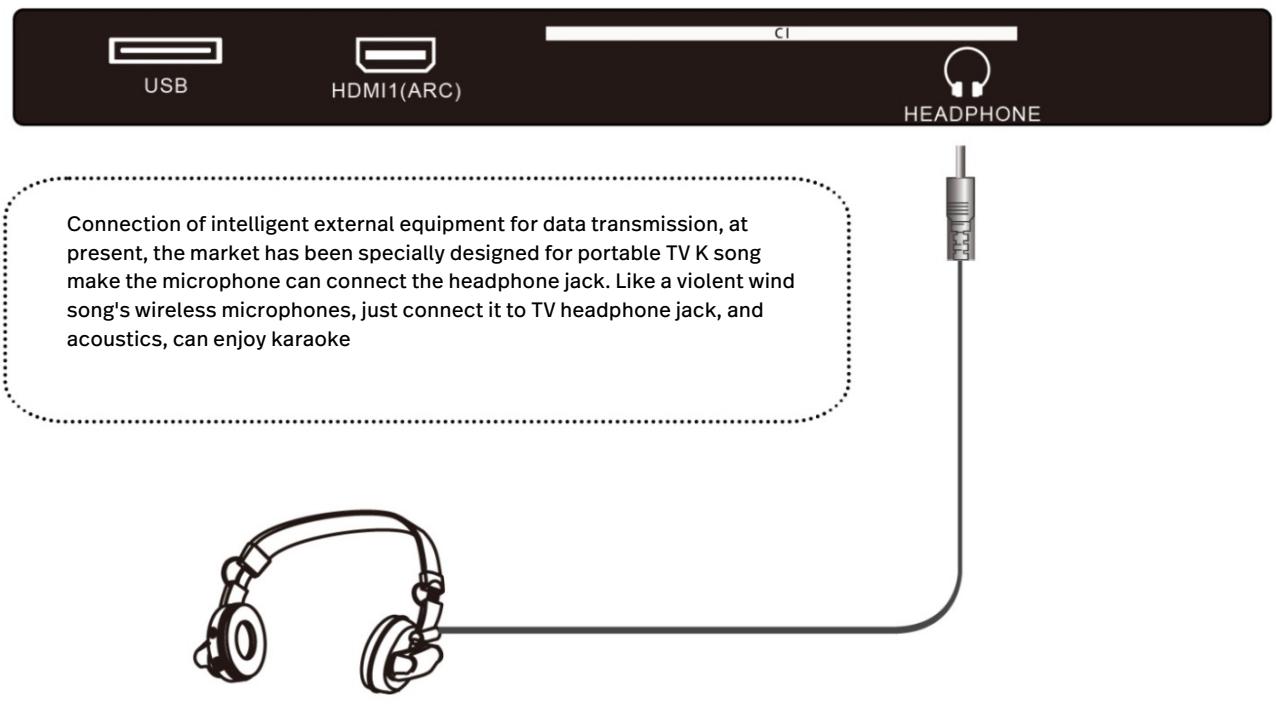
HEADPHONE
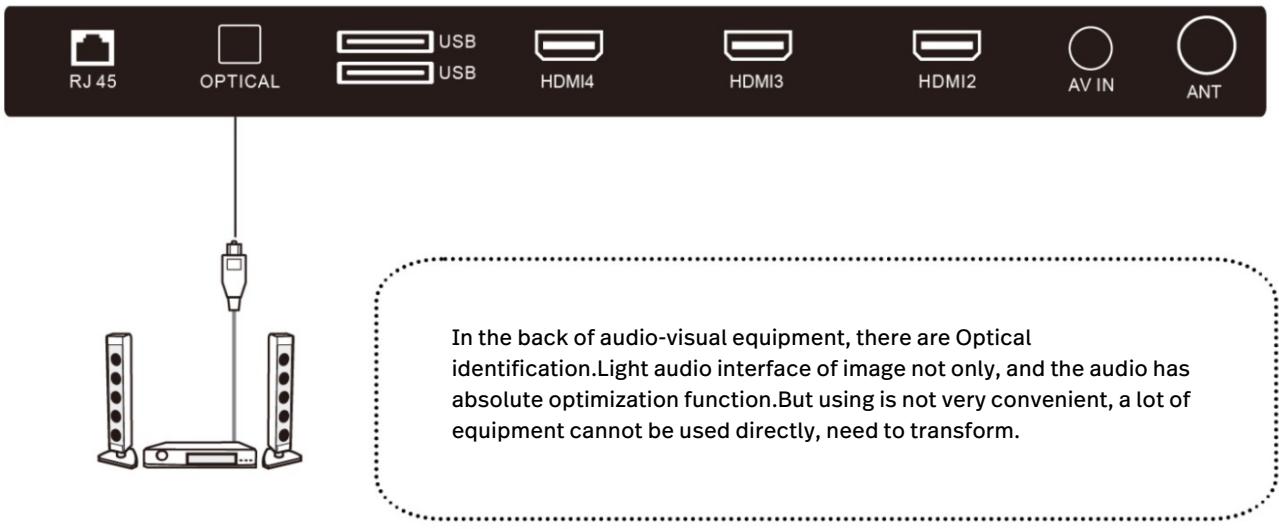
OPTICAL
USB and ANT
MAKE SURE ALL THE EQUIPMENTS AND POWER PLUG ARE CONNECTED PROPERLY AND THE UNIT IS SET IN CORRECT MODE BEFORE KINDS OF OPERATIONS.
BASIC OPERATION
- Press POWER button on the unit or remote control to power ON the unit; press it again to power OFF (standby mode) the unit (indicator will glow red).
- Press SOURCE button on the remote control to switch the unit to Composite or HDMI mode.
SELECT DESIRED PROGRAM
- Press CH+ button to play next channel.
- Press CH- button to play previous channel.
- Press number buttons on remote control directly to select desired program
VOLUME CONTROL
- Press VOL+ or VOL- to adjust the level of current volume. Available range: 0-100
MUTE CONTROL
- Press MUTE button to mute the sound, press it again to turn on the sound.
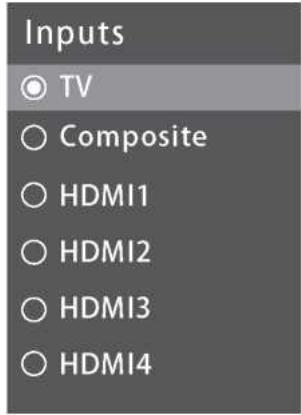
SOURCE SETTING
- Press SOURCE button on the remote control to display the sources list.
- Press UP or DOWN navigation button to select desired input source, and then press OK button to confirm selection.
Available options: TV, Composite, HDMI.
BASIC OPERATION
INITIAL SETUP
The first you turn your TV, the setup wizard will guide you through setting up basic settings. Please according to the text tip to first time setup
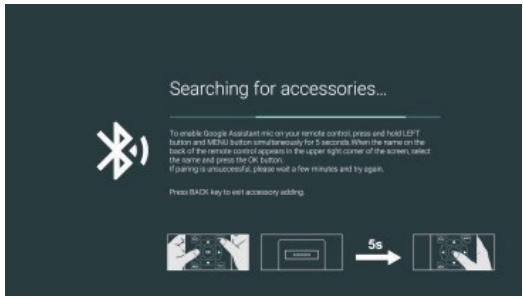
This function is used for the remote control pair code. After the code is successful, you can use the Bluetooth remote control to operate the TV.
If you don't need to use the Bluetooth remote control, you can press the BACK button to skip this step.
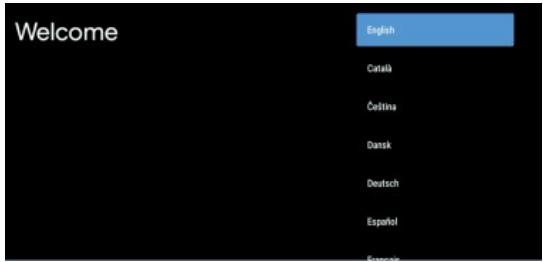
Press to select the system language and press OK to confirm the language.
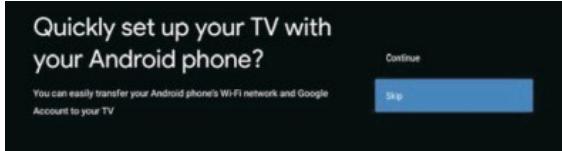
Connect your Android phone to your TV,select Continue to continue the connection,and choose Skip to skip this step.
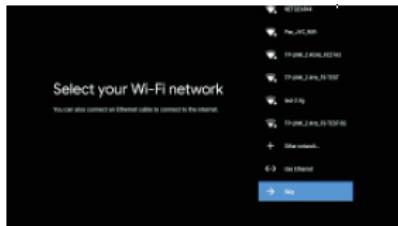
Press to select the WIFI to connect. Press OK and enter the password to confirm the connection is successful.
You can also try use Ethernet and skip select network.
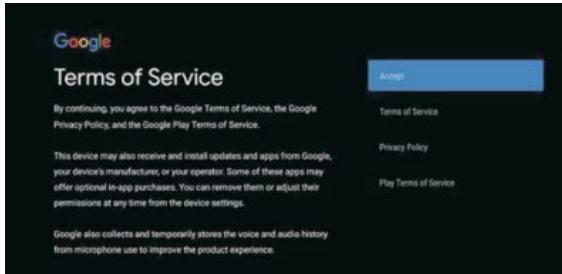
By accepting the Google Terms of Service to improve the product experience,select "accept" to accept this condition.
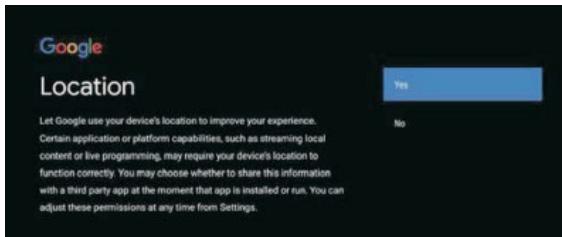
Agree to Google to get the location information of your device to get more features,choose "YES" to accept.

By agreeing to automatically send diagnostic information to Google to improve discriminative power, choose "YES" to accept.
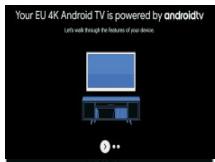

- Your device is powered by Android TV and press button to select the browsing feature.
- You can get mroe apps from Google Play and press button to go to the next screen.
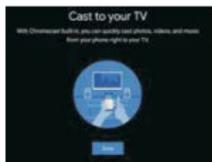
- Transfer photos and other content to the TV via the built-in chromecast, press OK to complete the browsing.

Press to select the country of your device and press OK to confirm.
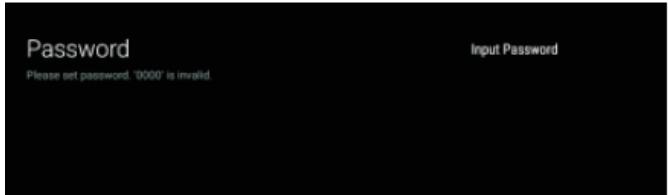
Used to set your device's password to ensure security and privacy.

Press OK to pop up the soft keyboard and use the remote control to enter the 4 digit password automatically jump to the next interface.

Confirm the password again and keep it consistent. Use the remote control to enter the password and complete the password confirmation.
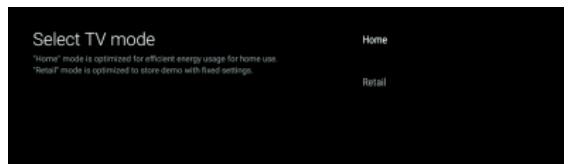
For selecting the mode, press to select Home mode and press OK to confirm.

Confirm the selected mode again. Select "YES" to confirm the selected mode and select "No" to return to the previous step.
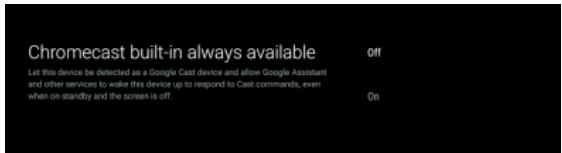
Let this device be detected as a Google Cast device and allow Google Assistant and other services to wake this device up to respond to Cast commands, even when on standby and the screen is off.
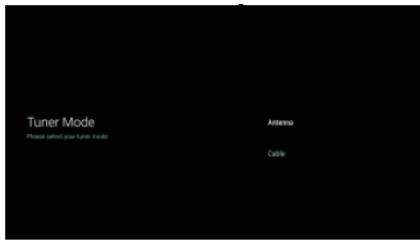
To select the tuner mode for searching. Press to select and press OK to confirm

Press to select whether to search. Select "Scan" to search and select "Skip Scan" to skip search.
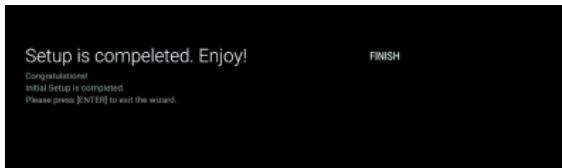
Press OK to complete the setup.
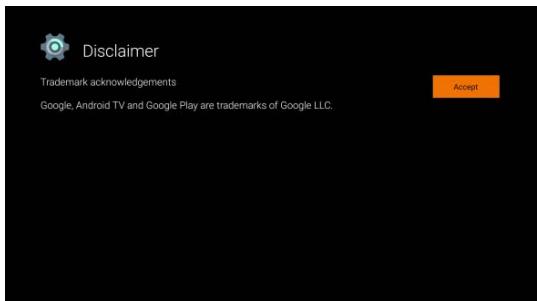
Press OK button to agree to (Disclaimer). After setting is complete, you can watch TV.
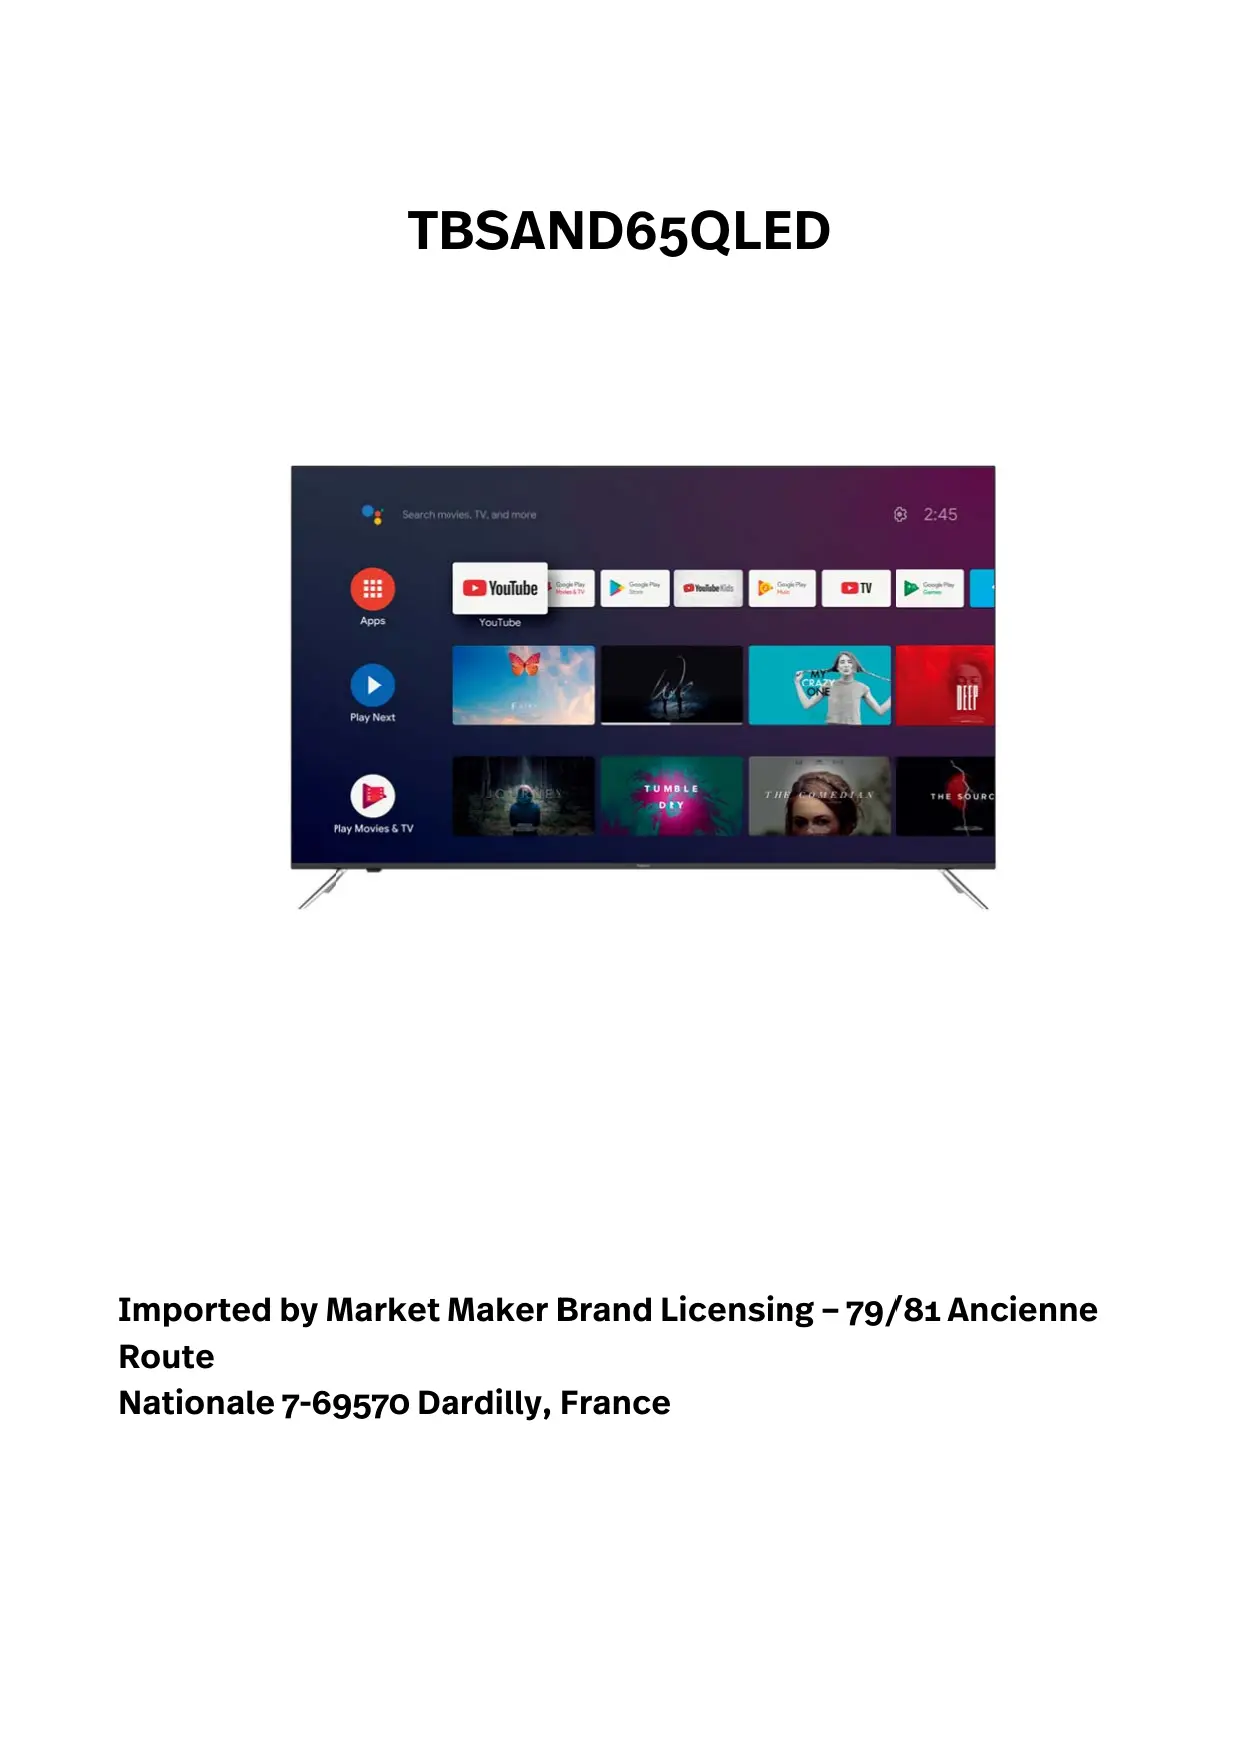
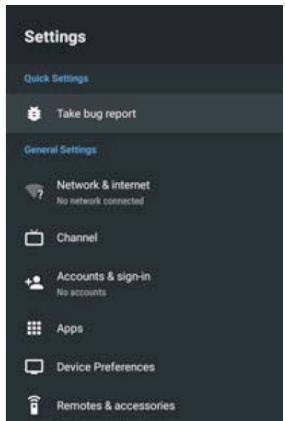
HOME SCREEN
Press the HOME button to go to the home page
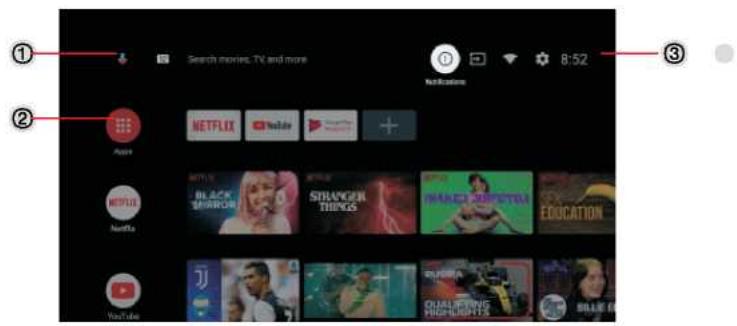
① open the google assistant start a voice search or use keyboard search.
(2) Among the applications installed on the TV, the icons for the favourite applications are shown inside here.(Favourite applications can be added/deleted/ changed its order by users.)
- Apps: Click to jump to Apps screen where all the installed applications are listed.
Notificaties: Display the notifications
Inputs:Icon to select an input source.
Network & Internet: Icon to Setup Network, Such as wifi.
Settings: Various settings can be configured here.
For details on the settings, see the next explanation.
INPUT SOURCE
- In the HOME interface, press to select the "Inputs" icon, press OK to open the input source list, then press up to highlight an input and press OK to switch.
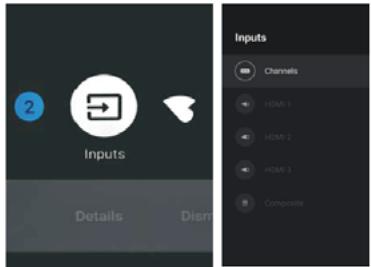
- Under Live TV, press the "SOURCE" button to display the list of input sources. you can select the desired source.
NAVIGATING THE ON-SCREEN MENU
- There are two says to enter. First, in Live TV, press the menu button to display TV options. Press select the settings menu and press OK to confirm. Second, in the HOME interface, press the key to select the icon of the circular settings menu, press OK to confirm.
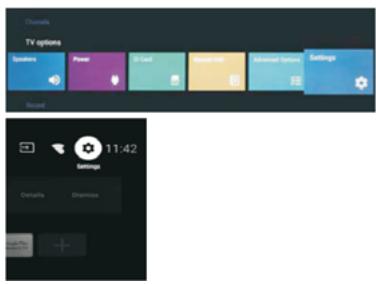
- Press button to select what you want set.
- Press OK to enter setting.
Press BACK to return to the previous menu if the main menu is displayed, pressing BACK will close the on-screen menu.
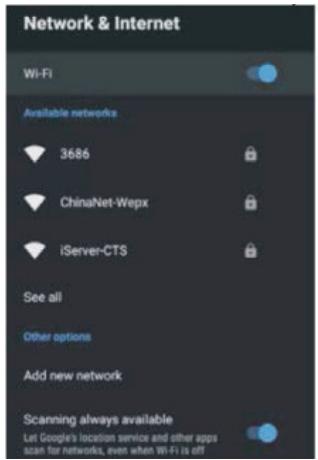
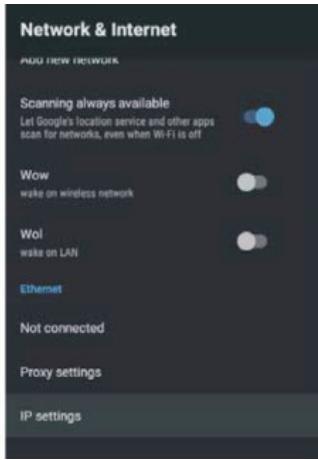
Netwerk & Internet
- Press button to select what you want set.
- Press OK button to adjust.
- After finishing your adjustment, press OK button to save and return to the previous menu.
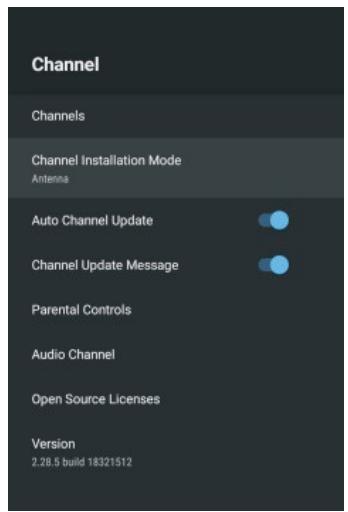
CHANNEL
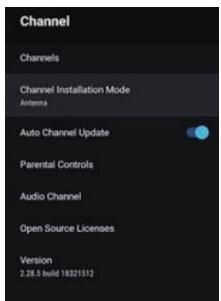
Channels: Display the scan sub menu based on different Channel installation modes.
Channel installation mode: :Select on screen display channel sources, you can select the signal
type. Antenna: Set the signal type to antenna. When set to Antenna, theTV can receive analog and digital (DVB-T/DVB-T2) broadcasting signals.
Cable: :Set the signal type to cable. When set to Cable, theTV can receive analog and QAM broadcasting signals.
Auto Channel Update
Parental controls: Press button to select the option then press OK button to enter the sub-menu.
Audio Channel: press button to select the option then press OK button to enter the sub-menu.
Open source licenses: press button to select the option then press OK button to enter the sub-. menu.
Antenna
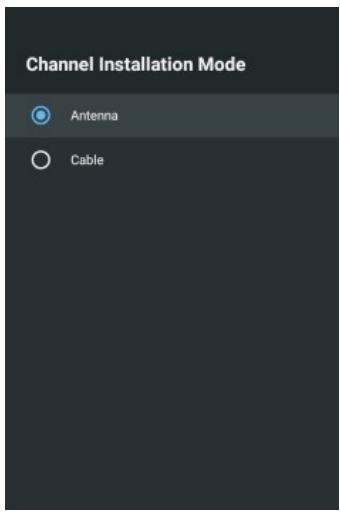
- Menu->Settings->Channel->Channel Installation Mode enter, choose Antenna or cable.
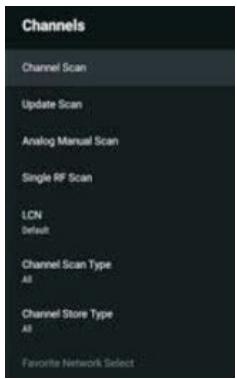
- Enter Menu->Settings -> Channel -> Channels.
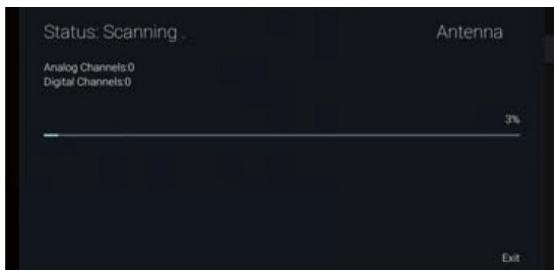
- Channel Scan directly enters the ATV + DTV automatic search platform interface of Antenna. Update scan: Re-automatically search for frequency points outside the station.
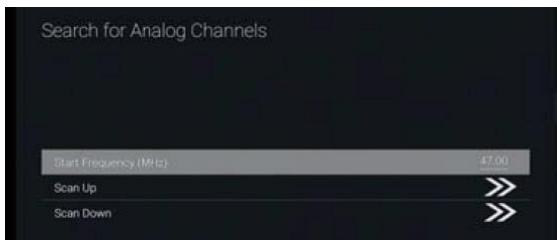
Analog Manual Scan: Manual ATV search station. After input the frequency point, you can select up or down search station..
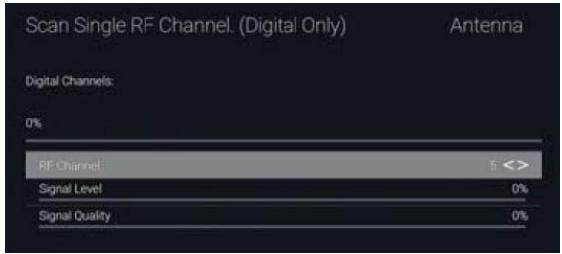
Single RF-scan: DTV manual search, left and right after selecting RF Channel, directly OK search.
Cable

- Menu->Settings->Channel->Channel Installation Mode, select cable
- Enter Menu-> Settings -> Channel -> Channels.
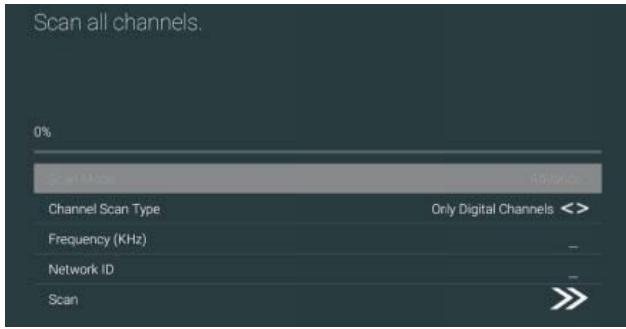
- Enter Channel Scan, where Numericable are the local operators, and the default Scan Mode is Advance; Others have Advance, Quick and Full Scan modes.
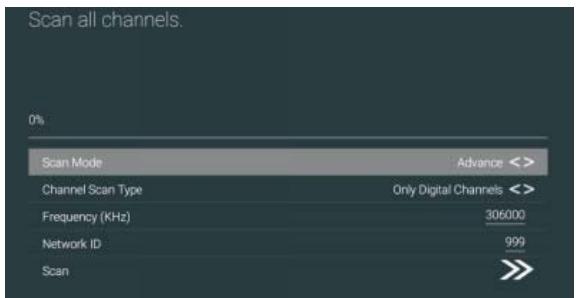
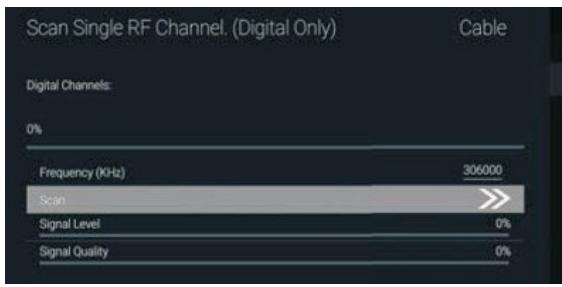
Single RF-scan: manual search station.
ACCOUNTS & SIGN IN
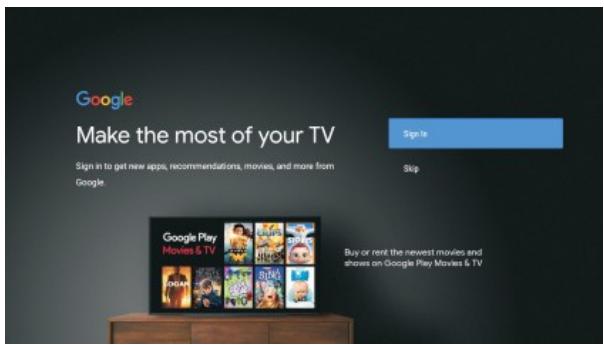
Press UP/DOWN button to select Sign in or Skip
APPS
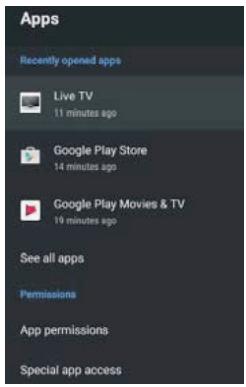
In this menu, you can set the APP permissions, and read the app lists.
- Press button to select what you want set.
- Press OK button to adjust.
3.After finishing your adjustment, press BACK button to return to the previous menu.
DEVICE PREFERENCES
About
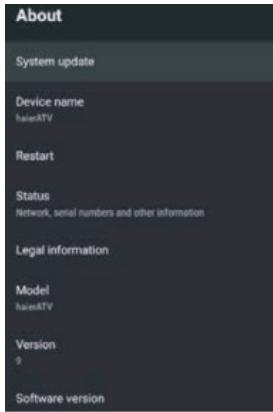
In this menu, you can read the information and settings of TV.
- Press button to select what you want set.
- Press OK button to adjust.
- After finishing your adjustment, press BACK button to return to the previous menu.
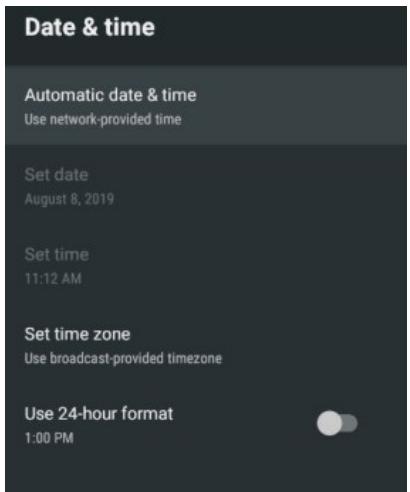
Date & time
Automatic date&time-Press button to select the option then press OK button to enter the submenu. (Optional:Use network-provided time,Off)
Set date: press button to select the option then press OK button to enter the sub-menu.
Set time: press button to select the option then press OK button to enter the sub-menu.
Set time zone: press button to select the option then press OK button to enter the sub-menu.
Use 24-hour format: press button to select the option then press OK button to choose ON/OFF.
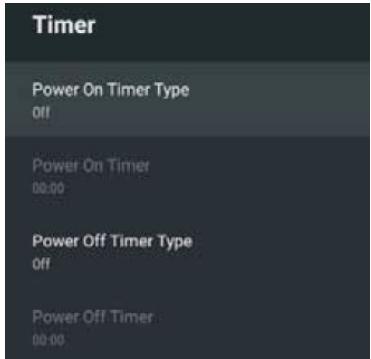
TIMER:
Power On Timer Type: Press ▲ button to select the option then press OK button to choose ON/OFF/ONCE.
Power On Timer: Press button to select the option then press OK button to enter the sub-menu.
Power Off Timer Type: Press button to select the option then press OK button to choose ON/OFF/ONCE.
Power Off Timer: Press button to select the option then press OK button to enter the sub-menu. LANGUAGE:
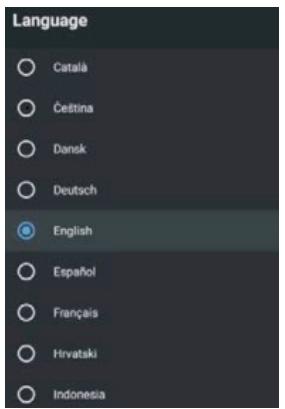
Language: Press button to select the option then press OK button to enter the select language.
KEYBOARD
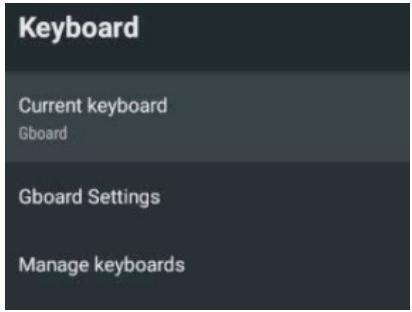
Current keyboard: Press button to select the option then press OK button to enter the sub-menu.
Gboard Settings: Press button to select the option then press OK button to enter the sub-menu.
Mange Keyboards: Press button to select the option then press OK button to enter the submenu.
INPUT

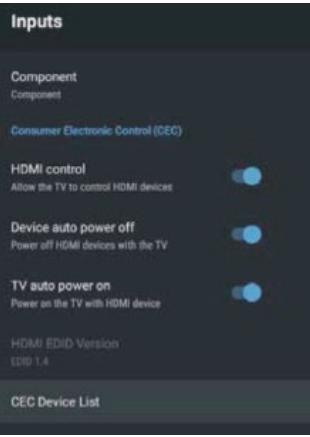
Input: Press button to select the option then press OK button to enter the sub-menu.
HDMI Control: Press button to select the option then press OK button to select ON/OFF.
Device auto power off :Press▼▲ button to select the option then press OK button to choose ON/OFF.
TV auto power on: Press ▲ button to select the option then press OK button to select ON/OFF.
HDMI EDID-version: show EDID version
CEC Device List: Press button to select the option then press OK button to enter the sub-menu.
Power
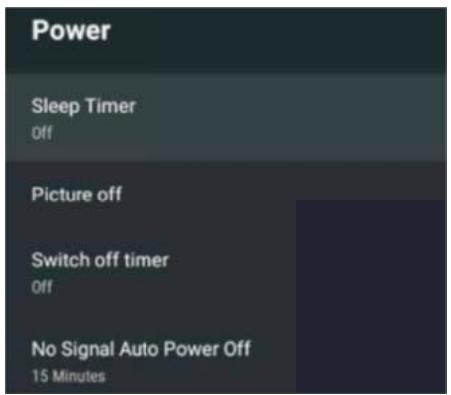
Sleep Timer: Press button to select the option then press OK button to enter the sub-menu. (Optional: off, 10 minutes, 20 minutes, 30 minutes, 40 minutes, 50 minutes, 60 minutes, 90 minutes, 120 minutes).
Picture off: Press button to select the option then press OK button to turn off the TV.
Switch off Timer: Press button to select the option then press OK button to enter the sub-menu.
(Optional: off, 30 minutes, 60 minutes, 90 minutes, 120 minutes, 150 minutes, 180 minutes, 210 minutes, 240 minutes).
No signal Auto Power Off: Press button to select the option then press OK button to enter the sub-menu.
(Optional: off, 5 minutes, 10 minutes, 15 minutes, 30 minutes, 60 minutes).
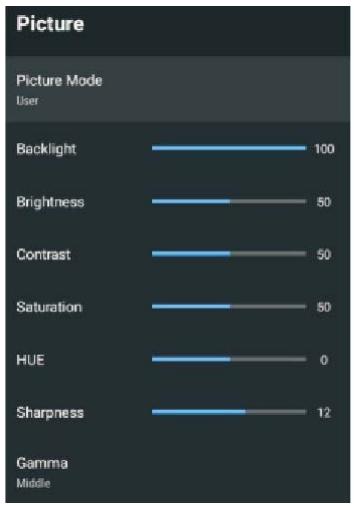
Picture
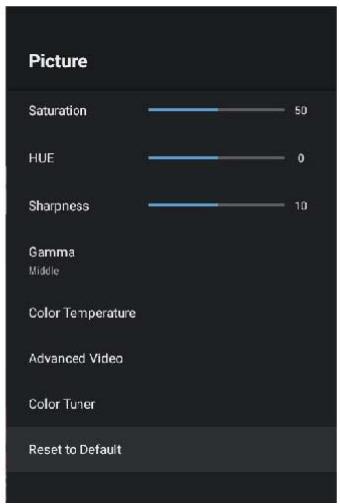
Picture Mode: Press button to select the option then press OK button to enter the sub-menu.
(Optional: user, Standard, Vivid, Sport, Movie, Energy, saving).
Backlight/Brightness/Contrast/Saturation/HUE/Sharpness: Press ▲ button to select the option. press to decrease the parameter. Press increase the parameter
Gamma: Press button to select the option then press OK button to enter the sub-menu.
(Optional: Dark, middle, Bright).
Color Temperature: Press button to select the option then press OK button to enter the submenu.
Advanced Video: Press button to select the option then press OK button to enter the sub-menu.
Reset to Default: :Reset all settings to the factory defaults.
SOUND
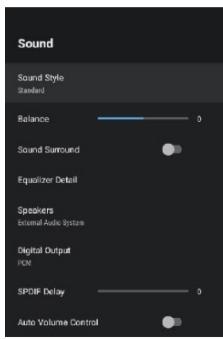
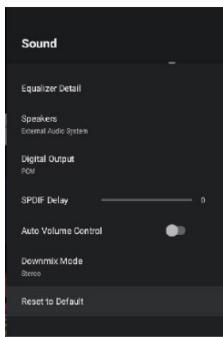
Sound Style: Press button to select the option then press OK button to enter the sub-menu. (Optional: user, Standard, Vivid, Sport, Movie, Music, News).
Balance: press to decrease the parameter. Press increase the parameter
Sound Surround: Press ▲ button to select the option then press OK button to select ON/OFF. Equalizer Detail: Press ▲ button to select the option then press OK button to enter the sub-menu. Speakers: Press ▲ button to select the option then press OK button to enter the sub-menu. (Optional: TV Speaker, External Audio System).
Digital Output: Press button to select the option then press OK button to enter the sub-menu. (Optional: Auto, Bypass, PCM, Dolby Digital Plus, Dolby Digital).
SPDIF Delay: Press button to select the option. press to decrease the parameter. Press increase the parameter
Auto Volume Control: Press button to select the option then press OK button to select ON/OFF. Downmix-modes: Press button to select the option then press OK button to enter the sub-menu. (
Optional: Stereo, Surround)
Reset to Default: Reset all settings to the factory defaults.
storage
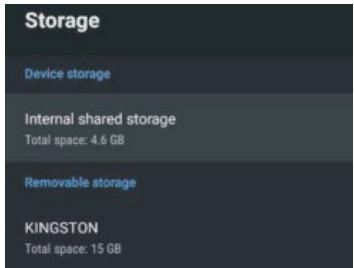
Internal shared storage: Press ▲ button to select the option then press OK button to enter the sub-menu.
Removeable Storage: Press button to select the option then press OK button to enter the submenu.(Note:Show external devices if available)
HOME SCREEN
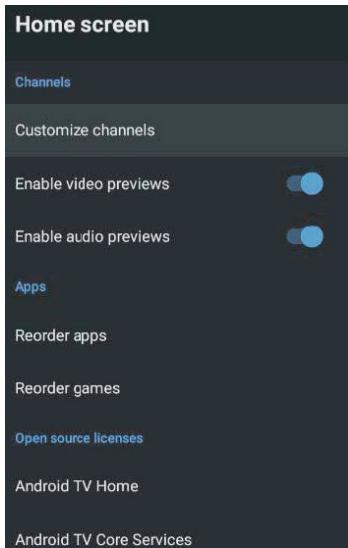
In this menu, you can set channels, apps, open source licenses.
- Press button to select what you want set.
- Press OK button to adjust.
- After finishing your adjustment, Press BACK button return to the previous menu.
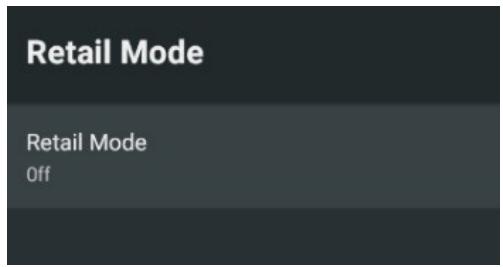
Retail Mode
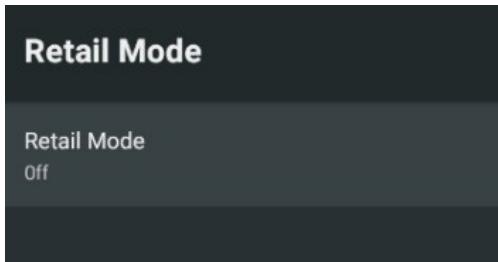
Retail-mode: Press button to select the option then press OK button to select ON/OFF.

In this menu, you can set searchable apps, safe search filter, block offensive words, open source licenses.
- Press button to select what you want set.
- Press OK button to adjust.
- After finishing your adjustment, Press BACK button return to the previous menu.
CHROMECASE BUILT-IN
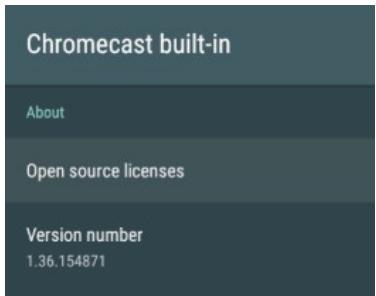
In this menu, you can read the information and settings of Chromecast.
- Press button to select what you want set.
- Press OK button to adjust.
- After finishing your adjustment, Press BACK button return to the previous menu.
SCREENSAVER
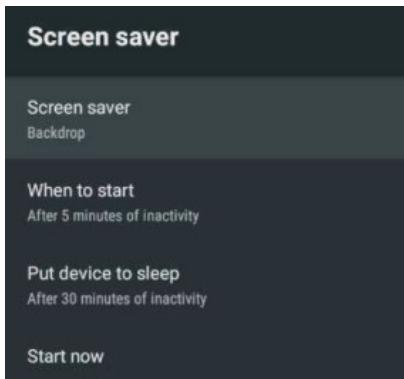
Screen saver: Press button to select the option then press OK button to enter the sub-menu. (Optional: Tum screen off, Backdrop, Colors).
When to Start: Press button to select the option then press OK button to enter the sub-menu. (Optional: 5 minutes, 15 minutes, 30 minutes, 1 hour, 2 hours).
Put device to sleep: Press button to select the option then press OK button to enter the submenu. (Optional:30 minutes, 1 hour, 3 hours, 6 hours, 12 hours, Never).
Start Now: Press button to select the option then press OK button to enter screen saver.
LOCATION
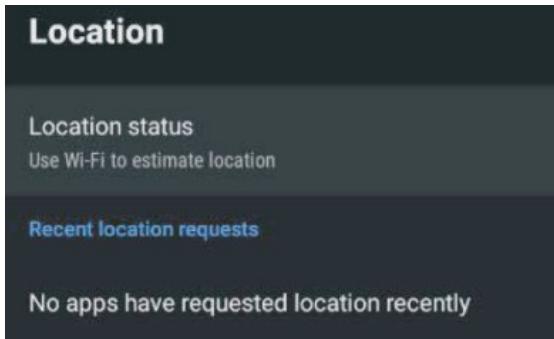
Location status: Press button to select the option then press OK button to enter the sub-menu. (Optional: Use Wi-Fi to estimate location, off)
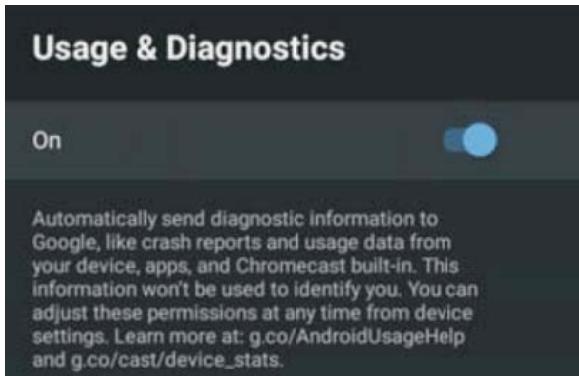
Usage & diagnostics: Press button to select the option then press OK button to choose ON/OFF.
Accessibility
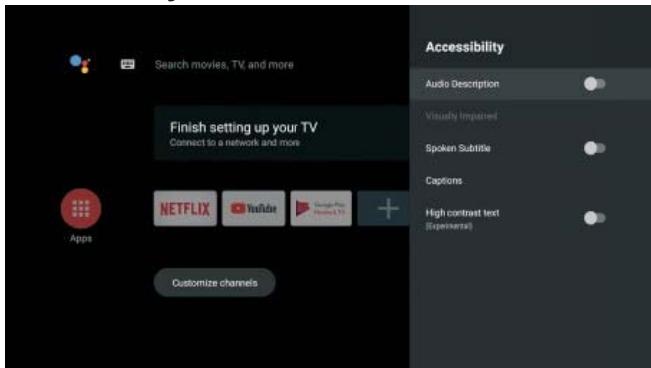
Audio Description: Press button to select the option then press OK button to choose ON/OFF..
Visually Impaired: Press button to select the option then press OK button to enter the sub-menu.
Spoken Subtitle: Press button to select the option then press OK button to choose ON/OFF..
Captions: Press button to select the option then press OK button to enter the sub-menu.Tekst met hoog
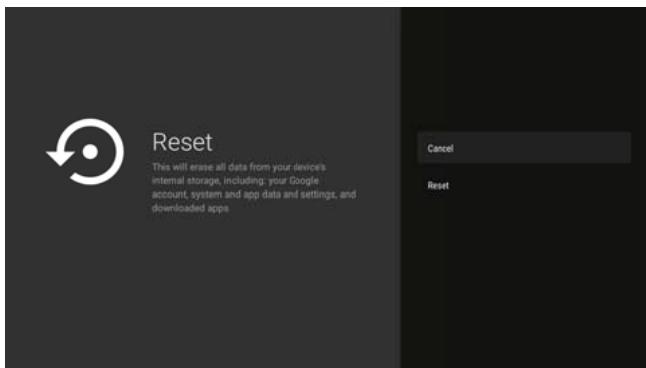
High contrast text: Press button to select the option then press OK button to choose ON/OFF.. RESET
Press OK button to enter the sub-menu
Reset-Erase everything.
REMOTE & ACCESSORIES
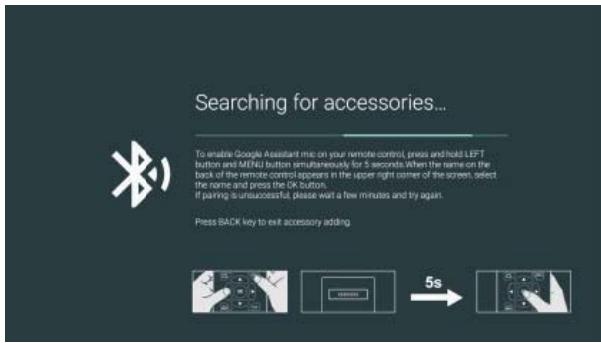
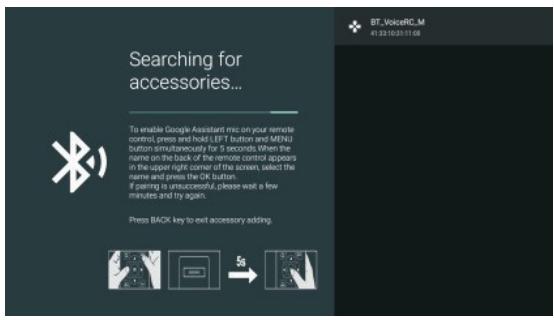
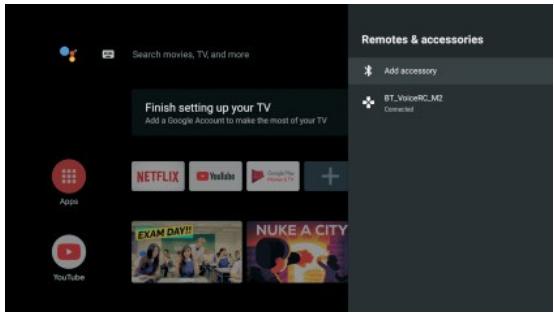
In this menu, you can pair Bluetooth devices.
- Press the "MENU" and "LEFT" buttons at the bottom of the remote control for 5 seconds.
- When the LED starts to flash, release it. The remote controller will send the pairing signal to the TV and display the information of the remote control on the right side of the screen.
- Press the OK button to display the pairing. If the paired is displayed, the connection is successful.
- If the couldn't pair appears, the connection fails. Wait for 30 seconds and then press the "MENU" and "LEFT" buttons at the bottom of the remote control for 5 seconds to repeat the previous steps.
- Press BACK button return to the previous menu.
MULTIMEDIA PLAYER
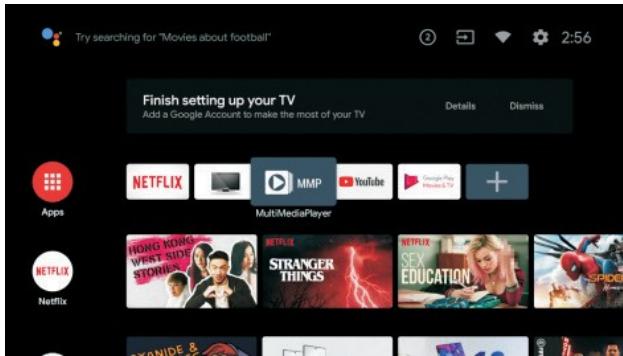
In the HOME interface, select the MMP APP to display Video, Photo, Audio, Text. After inserting the USB flash drive, you can view the corresponding files in the USB flash drive.

NOTE:
The menu may be different depending on when you purchased the TV.
MAINTENANCE
- Be sure to press POWER button to set the player to the standby mode and disconnect the power plug before maintaining the player.
- Wipe the player with a dry, soft cloth.
- If the surface is extremely dirty, wipe clean with a cloth which has been dipped in a weak soap-water solution and wrung out thoroughly, and then wipe again with a dry cloth. Never use alcohol, benzene, thinner, cleaning fluid or other chemicals. And do not use compressed air to remove dust.
- Do never insert any object nor liquid into ventilation areas. It may damage the product, create short-circuit or electric shock danger
WALL MOUNTING
- Contact a professional for assistance when wall mounting your TV. We are not responsible for any damage to the product or injury to yourself, if you mount the TV on your own.
- Do not wall mount the TV while TV is turned on. It may cause personal injury due to electric shock.
- Use standard M4*5mm screws (4 pieces) to mount this TV.
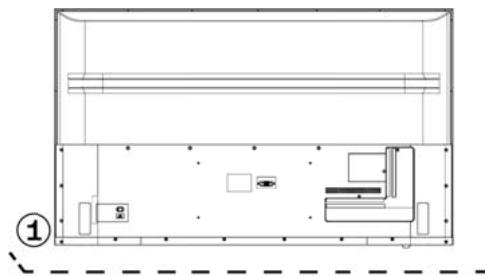
STAND INSTALLATION
Your TV is packaged with the Stand and the Cabinet separated. Before enjoying this TV, please carry out the Stand Installation according to the instructions below.
Step 1
Place the TV faced down on a soft cloth or cushion to prevent the panel from being damaged.
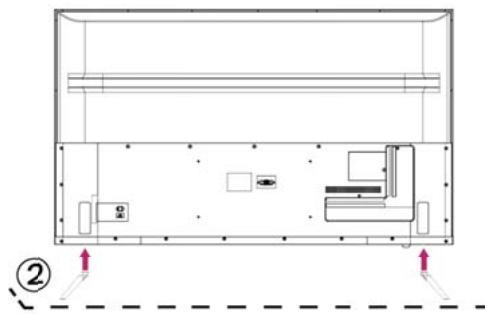
Step 2
Align the Stand with TV bottom and then force the end of stand until the TV is fully seated on the stand.
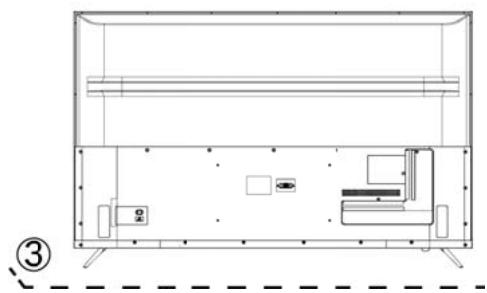
Step 3
Tighten the included screws with a screw driver.
NOTES:
1) Unplug the power plug first when installing or removing the TV Stand.
2) To avoid any damage to this TV, contact one or more partner for assistance when installing or removing the TV stand
SPECIFICATIONS
| REFERENTIE | TBSAND65QLED.133 |
| MODEL N° | TBSAND65QLED |
| Model titel | LED screen 65 inches |
| Resolution | 3840x2160 pixels |
| Color number | 1billion |
| Contrast | 4000:1 |
| Ratio | 16:9 |
| Tuner | DVB-T, DVB-C, DVB-T2 |
| TV rated voltage | 100-240V-50/60HZ 3A |
| Consumption | 220W |
| Dimensions | 1447x300x926.3mm |
| Weight | (ca.) 18.1 kg |
| Base | 2 pieces, removable |
| Operating temperature | 5-35°C |
| Remote control rated voltage | DC1.5Vx2(Battery is not included) |
| Loudspeakers | 2x10W |
| Inputs | HDMIx4, RF, CI, USBx3, RJ45,AV IN |
| Outputs | HEADPHONEx1,OPTICAL |
| Functions via USB | Y |
| Compatible multimedia formats via USB | Film: FLV, MKV, MPEG, MOV, AVI, H.264 |
| Music: MP3, WAV, M4A, AMR | |
| Photos: JPG, BMP, PNG, JPEG | |
| Text: TXT | |
| VGA supported formats | N |
| Frequency range | BT: 2402MHz-2480MHz wifi: 2400MHz-2483.5MHz/5150MHz- 5350MHz/5470MHz-5825MHz |
| Max RF power output | 100mW |
4K
UHD
Specification are subject to change without notice.
ACCESSIONS:
Stand 2 pieces
Remote control 1
User manual 1
All the pictures in this manual are just for your reference, appearance and display should subject to the final product.
The terms HDMI and HDMI High-Definition Multimedia Interface, and the HDMI Logo are trademarks or registered trademarks of HDMI Licensing Administrator, Inc. in the United States and other countries.
| Spec sheet about energy | |
| Brand | Polaroid |
| Reference | TBSAND65QLED |
| Energy efficiency grade | A |
| Screen size | 163.81 cm; 64.5 inch |
| Eletrical consumption in on mode (W) | 150W |
| Annual electric consumption for 4 hours/day, 365 days/year | 219kWh/jaar |
| Eletrical consumption in sleep mode (W) | <0,5W |
| Eletrical consumption in off mode (W) | N/A |
| Screen resolution (pixels) | 3840x2160 |
Specifications are subject to change without notice
4K

The terms HDMI and HDMI High-Definition Multimedia Interface, and the HDMI logo are trademarks or registered trademarks of HDMI.

ENERG
eheprna -Evpeyela


Polaroid
TBSAND65QLED
A++
A++
A+
A
B
C
D

ENERGIA·EHEPTNRA
ENEPTEIA · ENERGIJA
ENERGY·ENERGIE ENERGI
150
Watt
219
kWh/annum
163.81
cm

64.5
inch
2010/1062-2020
GENERAL TROUBLESHOOTING
Check the following points before assuming malfunctions of this unit:
| Symptom[COMMON] | Remedy |
| No power. | Insert the power plug securely into the power outlet |
| No picture. | Ensure that the equipment is connected properly |
| • No sound. • Distorted sound | • Ensure that the equipment is connected properly. • Ensure that the input setting for the TV and stereo system are correct. • Adjust the master volume to a suitable volume by pressing VOL+/VOL- button. |
| No operations can be performed with the remote control unit. | • Check the batteries are installed with the correct polarities. • The batteries are exhausted: replace them with new ones. • Point remote control at the remote control sensor and operate it again. • Operate the remote control unit at a distance of no more than 6m from the remote control sensor. • Remove the obstacles between the remote control and remote control sensor. |
| No key operation (by the main unit and/or the remote control unit) is effective | Disconnect the power plug and then reconnect it. (The player may not be operating properly due to lightning, static electricity or some other factors.) |
| Symptom[TV] | Remedy |
| No or poor picture. | • Adjust antenna or use an external antenna. • Relocate the unit near a window (if inside a building). • Move units away from this product that causes interference. • Do Auto Tuning again. • Try another channel. |
| No sound or poor sound. | • Check the audio settings • Press MUTE button on remote control to cancel mute function. • Unplug the headphone. |
| Noise or other interface. | Electronic equipment near the unit is causing interface. Relocate the unit or move the equipment. |
Warranty conditions
OPERATING MANAGEMENT:
Your product is guaranteed 2 years.
To request support, contact the customer service at 0811 482 202
You will then be asked the defective part and the original invoice stating the product regulation. We may ask you for photos of your appliance.
FAILURE TO PACKING:
If it appeared, after unpacking the product or device, a vice preventing the use of the product in its expected configuration, contact the customer service within 72 hours worked.
DISCLAIMER OF WARRANTY
DISCLAIMER OF WARRANTY RELATED TO THE ORIGIN OF DAMAGES
The guarantee does not apply in case of accidental physical damage, it does not cover such damage and failures that resulted:
- improper installation (of a bad installation) or a misuse or poor maintenance of the product.
- improper use of the material or not complying with the instructions in the user manual.
lightning, flood, fire, power surge, shock, poor ventilation, a fall, discoloration due to the action of light, burning, humidity, excessive heating without humidifier, or irregular ground or insects.
- repairs made and / or working on the hardware and / or opening of it by an unauthorized person by the manufacturer.
- maintenance, repair or replacement of parts due to normal usury or failure to maintain.
modification of the construction and original features of the guaranteed product. - corrosion, oxidation, a bad connection nor an external power supply problem.
EXCLUSION OF WARRANTY RELATING TO THE NATURE OF DAMAGES (INDIRECTS DAMAGES)
The guarantee covers only the right to repair or replace the guaranteed product. Consequently, the indirect damage resulting from the failure or damage not covered by
warranty, including:
- Commissioning costs, adjusting, cleaning;
- Damage of any kind resulting from the unavailability of the product guaranteed during the period between deterioration and failure and repair or the replacement of the product guaranteed.
OTHER EXCLUSIONS
- Damage and faults under specific exclusions in the warranty manufacture guaranteed product, as mentioned in the product instructions for use;
The aesthetic damage; - The products guarantee that the customer is not able to return or those who returned without their accessories.
PIXEL POLICY
- In accordance with the ISO 13406-2 norm, a product is considered defective when the number of dead or lit pixels is over 3.
SUPPORT
Please refer you to the board below to find easily your after sales number:
| LAND | TELEFOONNUMMER | WEB | |
| FR (alleen voor grootstedelijk Frankrijk) | (+33) 0811 482 202 | sav@market-maker.com | www.mms-support.net |
| BEL NL | +352.26.11.00.90 | support_BE@market-maker.fr | |
| DE | +49359127224626 | Service@letmerepair.com | |
| IT | 199 309 314 | helpdesk@stitaly.it | |
| ES | +34952179479 | support_ES@market-maker.fr | |
| PT | (+34) 952 179 557 | info@letmerepair.PO | |
| CH | 0900 77 88 99 | info@dsv.ch |
PLR IP Holdings, LLC, its licensees and affiliates, fully support all electronic waste initiatives. As responsible stewards of the environment, and to avoid violating established laws, you should properly dispose of this product in compliance with all applicable regulations, directives or otherGovernances in the area where you reside. Please check with local authorities or the retailer where you purchased this product to determine a location where you can appropriately dispose of the product.
THE DISPOSAL OF ELECTRICAL AND ELECTRONIC EQUIPMENT WASTE PRODUCTS ON THE PART OF FINAL USERS IN THE EUROPEAN UNION This symbol on the product or on the container indicates that this product cannot be eliminated with the general waste. The user is responsible for eliminating this kind of waste by throwing them away at a "recycling point" specifically for electrical and electronic waste. Selective collection and electrical equipment recycling contribute to preserve natural resources and warrant waste recycling to protect environment and health. In order to receive further information about electrical and electronic waste collecting and recycling, contact your Local Council, the service of household waste or the establishment where the product was acquired.


To avoid possible hearing damage, do not listen at high audio volume for long periods of time.
Product features, specifications and appearances are subject to change without notice.
Declaration of conformity EU:
Market Maker Brand Licensing, hereby declares that this equipment, conforms to the essential requirements and other relevant provisions of Directive 2014/53/UE. The declaration of Conformity can be viewed at the following address:
http://www.mms-support.net/OTA/ECD_MMBL_TBSAND65QLED
Have questions? We’ve got Answers.
Visit us at polaroid.com/support or give us a call at 0811 482 202
Instantly recognizable. Instantly
reassuring. The Polaroid Classic Border and Polaroid Color Spectrum logos let you know you’ve purchased a product
that exemplifies the best qualities of our
brand and that contributes to our rich heritage of quality and innovation.
© 2020. All Rights Reserved. Polaroid, Polaroid Color Spectrum and Polaroid Classic Border Logo are trademarks of PLR IP Holdings, LLC, used under license. PLR IP Holdings, LLC does not manufacture this product or provide any Manufacturer's Warranty or support.
TBSAND65QLED 65''-UHD-LED-TV/ACCESS 65 SERIES 12000
Benutzerhandbuch
TBSAND65QLED

Use Wi-Fi to estimate location
Recent location requests
No apps have requested location recently
Automatically send diagnostic information to Google, like crash reports and usage data from your device, apps, and Chromecast built-in. This information won't be used to identify you. You can adjust these permissions at any time from device settings. Learn more at: g.co/AndroidUsageHelp and g.co/cast/device.stats.
VIDA U T I L D E L A S P I L A S
(OPTIONES: 5 minutes, 15 minutes, 30 minutes, 1 hour, 2 hours).
Market Maker Brand Licensing declares that this equipment is the most popular and has been widely used in the market. Market Maker Brand Licensing provides a comprehensive range of products including equipment for various industries, from machinery to software, from hardware to software, from software to hardware, and so on.
http://www.mms-support.net/OTA/ECD_MMBL_TBSAND65QLED.pdf
